Free Crochet Mrs. Claus Hat Pattern
By Jan Bay
This free crochet Mrs. Claus hat pattern makes a full gathered red cap with a fitted lower band and snowy white crocheted ruffle framing the face. The softly puffed crown gives it the unmistakable old-fashioned Mrs. Claus look without turning it into another pointed Santa hat, making it a fun Christmas accessory for photos, parties and matching Santa-and-Mrs.-Claus outfits.
Explore More Christmas Crochet Patterns
Free Crochet Santa Hat Pattern
Adult Crochet Santa Hat Pattern
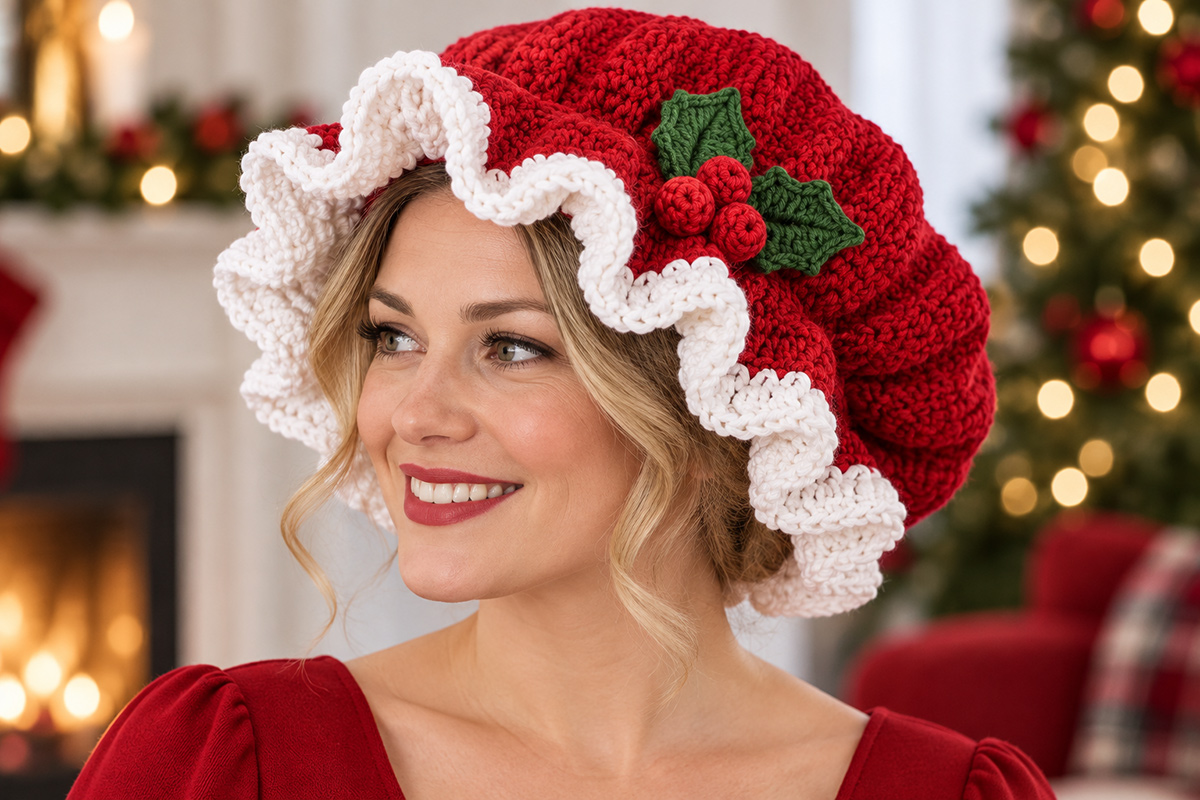
Worsted Weight Yarn for the Mrs. Claus Hat
Jump to the Pattern
Finished Size and Fit
This crochet Mrs. Claus hat is made as one adult size with a full gathered crown rather than a close-fitting beanie shape. The finished lower band is designed for an adult head measuring about 21 to 23 inches around, while the red crown is intentionally much larger so it can puff softly behind the head.
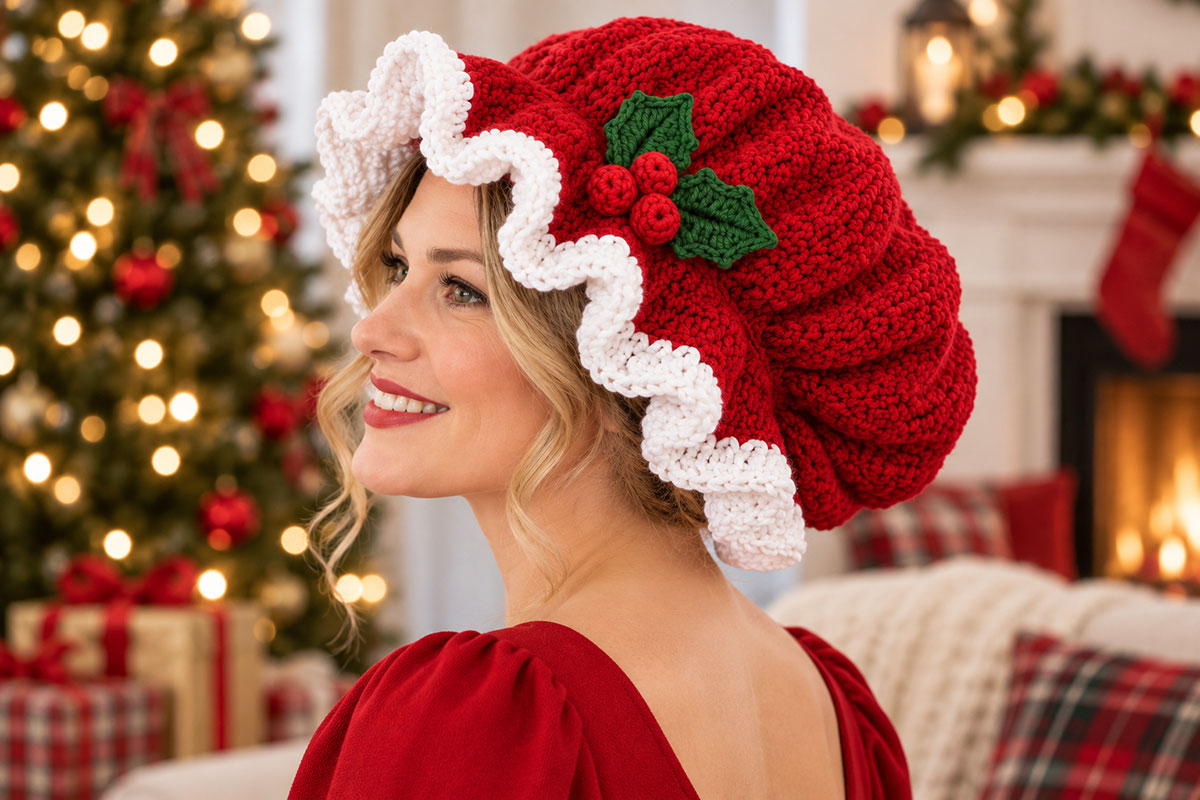
That extra crown room matters. If you reduce it until the red section fits closely, you'll lose the old-fashioned Mrs. Claus bonnet shape shown in the finished example.
The Craft Yarn Council head circumference chart lists an adult woman's head circumference at approximately 21 to 23 inches. Measure around the forehead and the fullest part of the back of the head before you begin if you're unsure about the fit.
Expected finished measurements at gauge:
- Fitted lower band: 72 hdc; check the actual fit on your work because the stated dc gauge does not establish the exact hdc-band circumference
- Red crown circumference before gathering: about 29 1/2 inches
- Red crown depth from top center through Round 18: about 10 1/4 to 10 1/2 inches, calculated from the stated gauge
- The three-round hdc band adds additional depth below the crown
- White ruffle depth: expected to be about 2 to 2 1/2 inches
Don't judge the fit by the red crown alone. It is supposed to look too roomy before the lower shaping pulls it in.
Materials for the crochet mrs claus hat pattern
- Medium weight #4 yarn, approximately 275 to 325 yards red
- Medium weight #4 yarn, approximately 125 to 150 yards white
- Small amount of dark green medium weight yarn for two holly leaves
- Small amount of red medium weight yarn for three berries
- 5.0 mm crochet hook, or size needed to obtain gauge
- Yarn needle
- Stitch marker
- Scissors
- Optional small amount of washable fiberfill for the berries
I would keep the red and white yarns fairly similar in weight and firmness. A very soft white yarn beside a firm red yarn can make the ruffle droop while the crown holds its shape, and that's not the look we're after here.
Gauge
13 dc = 4 inches
7 dc rounds = 4 inches
Check the stitch gauge before committing to the full crown. The pattern deliberately grows to 96 stitches before gathering back down, so a fairly small gauge difference can add several inches to the crown circumference.
The finished hat hasn't been physically test-made from these instructions, so the dimensions given here are calculated from the stated gauge. Check your actual work as you go and adjust hook size if your gauge is noticeably different.
Abbreviations
- ch = chain
- dc = double crochet
- FPdc = front post double crochet
- hdc = half double crochet
- sc = single crochet
- sl st = slip stitch
- st(s) = stitch(es)
- tr = treble crochet
- dc2tog = double crochet 2 together
- sc2tog = single crochet 2 together
- MR = magic ring
Beginning chains do not count as stitches unless a round specifically says otherwise. Join each crown round with a slip stitch to the first actual stitch of that round.
Construction Notes
The hat is worked from the center of the red crown downward. You'll first make a flat circle, then stop increasing and add depth. The lower rounds reduce the crown from 96 stitches to 72 stitches so all that extra fabric gathers into the fitted band.
After the red band is finished, the white ruffle is crocheted directly onto its lower edge. The two holly leaves and three berries are made separately and sewn near one temple at the end.
The finished crown is supposed to be fuller at the back than at the forehead. Once the hat is on, gently push the extra red fabric toward the back of the head instead of spreading it evenly around the entire band.
Round marker: Even though these are joined rounds, move a stitch marker into the first stitch of each round. It makes the increase and decrease counts much easier to check.
Raised-stitch section: The front post stitches appear only through the deep crown section. They add the subtle vertical texture visible in the finished example without changing the total stitch count.
Crochet the Red Gathered Crown
With red yarn, make an MR.
Round 1: Ch 2, work 12 dc into MR. Pull ring closed. Join with sl st to first dc. 12 sts
Round 2: Ch 2, work 2 dc in each st around. Join. 24 sts
Round 3: Ch 2, *dc in next st, 2 dc in next st; repeat from * around. Join. 36 sts
Round 4: Ch 2, *dc in next 2 sts, 2 dc in next st; repeat from * around. Join. 48 sts
Round 5: Ch 2, *dc in next 3 sts, 2 dc in next st; repeat from * around. Join. 60 sts
Round 6: Ch 2, *dc in next 4 sts, 2 dc in next st; repeat from * around. Join. 72 sts
Round 7: Ch 2, *dc in next 5 sts, 2 dc in next st; repeat from * around. Join. 84 sts
Round 8: Ch 2, *dc in next 6 sts, 2 dc in next st; repeat from * around. Join. 96 sts
Lay the crown flat and check it now. It should measure approximately 9 to 9 1/2 inches across at the widest point. A slight cup is fine. A strongly ruffled circle means your stitch gauge is too loose for the stated round gauge.
Round 9: Ch 2, dc in each st around. Join. 96 sts
Round 10: Ch 2, *FPdc around next st, dc in next 3 sts; repeat from * around. Join. 96 sts
Round 11: Ch 2, *FPdc around each FPdc from the previous round, dc in each of the next 3 sts; repeat from * around. Join. 96 sts
Rounds 12-15: Repeat Round 11. 96 sts after every round
The crown should now have enough depth to fold softly toward the back of the head. Don't decrease early just because it looks large. The generous size is what gives the finished bonnet its gathered shape.
Round 16: Ch 2, dc in each st around. Join. 96 sts
Round 17: Ch 2, *dc in next 6 sts, dc2tog over next 2 sts; repeat from * around. Join. 84 sts
Round 18: Ch 2, *dc in next 5 sts, dc2tog over next 2 sts; repeat from * around. Join. 72 sts
Stop here and count. You need exactly 72 stitches before beginning the fitted band.
Crochet the Fitted Brim
Round 19: Ch 1, hdc in each st around. Join with sl st to first hdc. 72 sts
Round 20: Ch 1, hdc in each st around. Join. 72 sts
Round 21: Ch 1, hdc in each st around. Join. 72 sts
Before fastening off, check the band around the intended head. It should sit snugly without pinching and should not slide when the crown settles toward the back. If it is loose, redo Rounds 19-21 with a smaller hook. If it is too tight, use a larger hook for those three rounds. Keep the 72-stitch count so the crown shaping and ruffle count remain unchanged.
If you changed hook size for the fitted band, return to the 5.0 mm hook, or the hook size you used to obtain the stated gauge, before beginning the white ruffle.
Fasten off red and weave in the end securely.
Try the hat on before adding the white ruffle if possible. The red band should sit securely around the head while the crown remains visibly loose and full behind it. If the band is much too loose, changing the ruffle won't fix the fit. Correct the band first.
Add the White Crochet Ruffle
Join white yarn with a slip stitch in any stitch of Round 21.
Ruffle Round 1: Ch 2, work 2 dc in each hdc around. Join with sl st to first dc. 144 sts
This is the round that creates the fullness. It should already begin to wave away from the band instead of lying flat.
Ruffle Round 2: Ch 2, dc in each st around. Join. 144 sts
Ruffle Round 3: Ch 1, *sc in next st, skip next st, 5 dc in next st, skip next st; repeat from * around. Join with sl st to first sc. 36 scallops
Fasten off and weave in the white yarn end.
Don't block this ruffle flat. The deep waves are part of the design. You can arrange them gently with your fingers so they frame the face and continue around the back of the bonnet.
Crochet the Holly Accent
Make two leaves with dark green yarn.
Leaf: Ch 9.
Beginning in second ch from hook, sc in next ch. In next ch work (hdc, ch 2, sl st in second ch from hook, hdc). Dc in next ch. In next ch work (tr, ch 2, sl st in second ch from hook, tr). Dc in next ch. In next ch work (hdc, ch 2, sl st in second ch from hook, hdc). Sc in next ch.
In the last ch work sc, ch 3, sl st in the first of those 3 ch, sc. This forms the pointed end of the leaf.
Continue along the unused loops on the opposite side of the foundation chain. Sc in next ch. In next ch work (hdc, ch 2, sl st in second ch from hook, hdc). Dc in next ch. In next ch work (tr, ch 2, sl st in second ch from hook, tr). Dc in next ch. In next ch work (hdc, ch 2, sl st in second ch from hook, hdc). Sc in the final unused loop.
Join with sl st to the first sc. Fasten off, leaving a long tail for sewing.
Make the second leaf the same way.
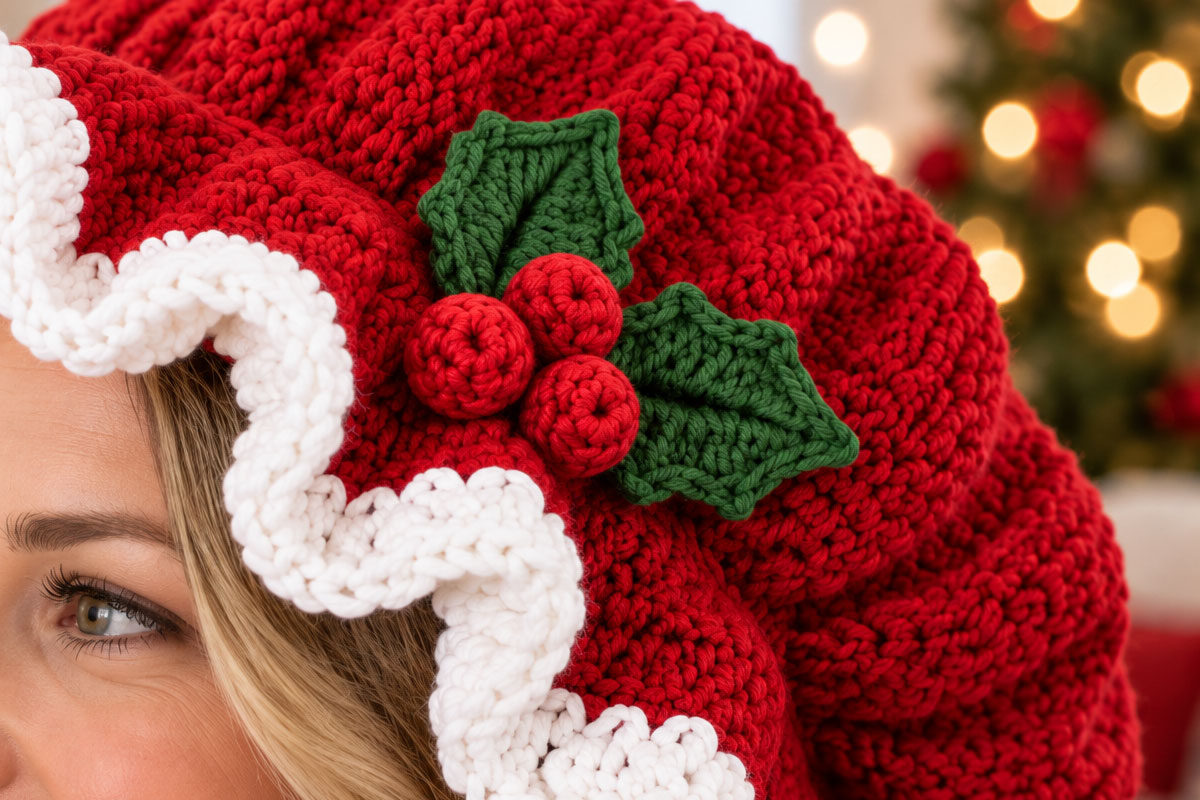
If you want a larger holly decoration for another Christmas project, my crochet holly leaf pattern with berries uses a fuller three-leaf motif. For this hat, I kept the cluster smaller so it wouldn't overpower the white ruffle.
The leaves should finish at roughly 2 1/4 to 2 1/2 inches long. If yours are much larger, use a smaller hook for the holly pieces rather than changing the main hat gauge.
Berry, make 3: With red yarn, make an MR.
Work the berry in continuous rounds without joining. Place a stitch marker in the first stitch and move it up at the beginning of each round.
Berry Round 1: Work 6 sc into MR. 6 sts
Berry Round 2: Work 2 sc in each st around. 12 sts
Berry Round 3: Sc in each st around. 12 sts
Add a tiny pinch of washable fiberfill if you want a rounder berry.
Berry Round 4: Sc2tog around. 6 sts
Fasten off, leaving a long sewing tail. Thread the tail through the remaining six stitches and pull the opening closed.
Arrange the two leaves so they angle away from one another near one temple. Place the three berries where the leaf bases meet. Sew each piece down separately and securely. I wouldn't sew the entire leaf flat. A little lift at the tips looks more like the finished example.
Finishing the Mrs. Claus Hat
Weave in every remaining yarn end on the inside of the hat. Give the crown a gentle shake and move most of the red fullness toward the back.
Arrange the white ruffle so the scallops frame the forehead and sides without covering the eyes. The ruffle should stay full around the back rather than being tucked under the crown.
Check the holly cluster one last time. The leaves and berries need to be attached firmly enough that normal handling won't loosen them.
If you wash the finished hat, follow the care directions for the yarn you used and reshape the crown and ruffle while damp. Avoid pressing the ruffle flat.
Adjusting the Fit
If your head measurement is near the lower end of the 21 to 23-inch range and the 72-stitch band feels loose, use a slightly smaller hook for Rounds 19 through 21. That keeps the full crown intact while tightening only the part that controls fit.
If you need more room, use a slightly larger hook for those same three band rounds. I would adjust the band before changing the 96-stitch crown because reducing the crown changes the feature that makes this hat look like the finished example.
If you deliberately want a smaller or larger adult version, keep the crown-to-band difference generous. The bonnet needs substantial excess fabric above the band. A fitted crown turns it into a different hat.
The white ruffle can also be toned down without changing the red crown. For a slightly less dramatic edge, work 3 dc instead of 5 dc in each scallop on Ruffle Round 3. For the finished example shown on this page, use the full 5-dc scallop.
Make a Matching Santa and Mrs. Claus Hat Set
The gathered crown is what keeps this Mrs. Claus hat from looking like a regular Santa hat with a ruffle added to it. If you're making a pair, use the free adult crochet Santa hat pattern for the pointed version and keep this one full, rounded and softly gathered.
I like the contrast between the two shapes. They obviously belong together, but each hat still looks like its own design.
Mrs. Claus Hat Pattern Questions
Can I make the crown less full?
Yes, but I wouldn't reduce it very much if you want the hat to look like the finished example. The 96-stitch crown gathered down to a 72-stitch band is what gives the back of the hat its soft, puffed shape. A much smaller crown starts looking like a fitted beanie.
Can I leave off the holly?
Yes. The holly cluster is decorative and doesn't affect the construction of the hat. If you prefer a plainer Mrs. Claus bonnet, finish the ruffle and stop there.
Can I make the ruffle smaller?
Yes. Work 3 dc instead of 5 dc in each scallop on the final ruffle round. The finished example uses the fuller 5-dc scallop, so keep that version if you want to match the hat shown on this page.
Why is the crown so much larger than the fitted band?
That's intentional. The extra circumference gathers above the band and gives the hat its rounded Mrs. Claus silhouette. The band controls the fit. The crown controls the shape.
Can I use a different yarn weight?
You can, but changing yarn weight changes the stitch size, crown circumference and ruffle depth. If you substitute yarn, work from the stated gauge rather than relying on the hook size alone.
Does the beginning chain count as a stitch?
No. The beginning chains in this pattern do not count as stitches unless a round specifically says otherwise.
More Christmas Crochet Projects
If you're keeping the Christmas yarn out, the crochet Santa lovey pattern is a completely different project built around the same red-and-white holiday palette.
You can also use the free mini crochet Santa hat pattern for smaller decorations and gift projects rather than scaling this adult bonnet down.
When you click on links to various merchants on this site and make a purchase, this may result in this site earning a commission. This does not affect the price you pay.

UBGI Gold Standard 2026
Reviewed under the site's
editorial checklist.
Photos, decorating ideas, party setups and reader submissions are shared for inspiration unless a page is specifically presented as a pattern, tutorial, reference guide or step-by-step project. Follow the instructions, measurements, safety guidance and manufacturer directions provided for the particular project or product.
About Jan | Contact | Baby Nursery Ideas (Blog) | Site Map | Privacy Policy | Disclosure Policy | Disclaimer | Affiliate Disclosure | Earnings Disclosure | Facebook | Pinterest
I am a participant in the Amazon Services LLC Associates Program, an affiliate advertising program designed to provide a means for us to earn fees by linking to Amazon. As an Amazon Associate I earn from qualifying purchases.
Copyright © 2006-2026. All Rights Reserved.