Free Crochet Santa Hat Pattern for Baby
By Jan Bay
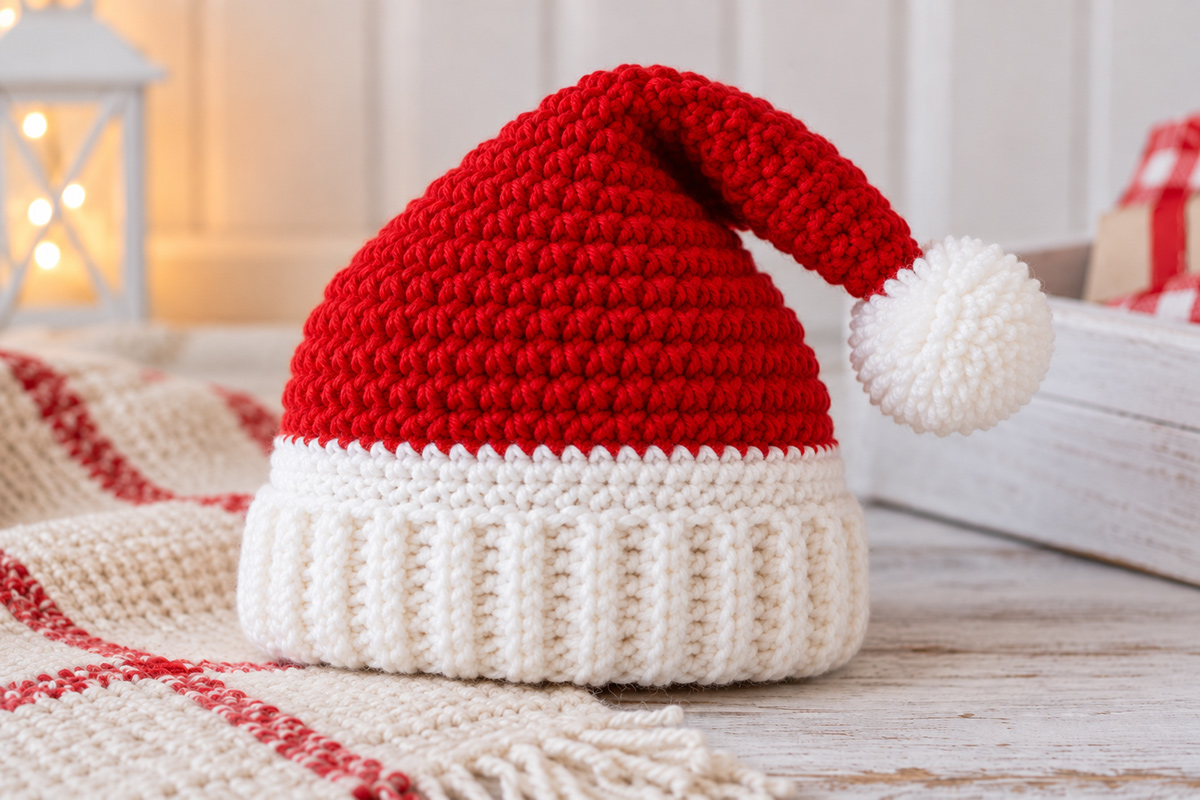
This free crochet Santa hat pattern makes a classic red and white Christmas hat sized especially for babies, with instructions for newborn, 0–3 months, 3–6 months and 6–12 months. The design combines a moderately deep ribbed white cuff, a narrow smooth white transition band and a shaped red crown that stays fairly straight above the brim before tapering into a gentle bend and compact white pom-pom.
Explore More Free Christmas Crochet Patterns
See Worsted-Weight Yarn for This Project.
Jump to:
About This Free Crochet Santa Hat Pattern
I kept this Santa hat classic where it matters and changed the details that make the fit and shape better for a baby. You still get the red crown, white cuff and pom-pom everybody expects, but the lower part of the crown doesn't start narrowing the second it leaves the brim.
Instead, there's a short straight section above the white band before the shaping begins. That gives the hat a proper fitted base around the head and saves the bend for the upper crown. I prefer that to an extra-long point hanging halfway down a baby's back.
The white cuff has two parts. The deeper lower section is worked in vertical ribbing, then a narrow smooth band sits between the ribbing and the red crown. That little change is worth keeping. It gives the brim more definition without making it bulky or fussy.
You'll make the hat in four sizes: newborn, 0–3 months, 3–6 months and 6–12 months. Measure the baby's head if you can rather than relying only on the age label. Babies don't all arrive at the same size, and hats are one place where an inch matters.
This pattern has been mathematically checked against the stated gauge, stitch counts and finished measurements, but it has not been physically test-crocheted. Check your gauge and measurements as you work, especially before beginning the crown shaping.
The Craft Yarn Council head circumference chart gives a broad 14–16 inch range for babies. I've broken this pattern into smaller size steps so you aren't trying to make one hat cover that whole span.
If you'd rather make another Christmas project after the hat, the Christmas crochet patterns collection has the rest of the seasonal projects together.
Materials
You'll need:
#4 medium worsted-weight yarn in Christmas red and white.
Approximately 65 (75, 85, 95) yards red for newborn (0–3 months, 3–6 months, 6–12 months).
Approximately 45 (50, 55, 60) yards white for newborn (0–3 months, 3–6 months, 6–12 months), including the pom-pom.
5.0 mm H-8 crochet hook, or the hook size you need to obtain gauge.
Yarn needle.
Scissors.
Stitch marker.
2½-inch pom-pom maker if you use one. You can also make the pom-pom without a commercial maker.
The yarn amounts above are calculated estimates rather than physically measured usage, so I'd leave yourself a little extra, especially with the white yarn. Pom-poms can eat yarn surprisingly quickly.
Sizes and Finished Measurements
The pattern is written for newborn (0–3 months, 3–6 months, 6–12 months). When four numbers appear together, use the number that corresponds to your size.
Suggested head circumference:
Newborn: about 13½–14½ inches
0–3 months: about 14½–15½ inches
3–6 months: about 15½–16½ inches
6–12 months: about 16½–17½ inches
Finished hat circumference before stretching:
Newborn: about 12½ inches
0–3 months: about 13¾ inches
3–6 months: about 14⅞ inches
6–12 months: about 16 inches
Approximate red crown length from the top of the white band to the tip:
Newborn: 6¼ inches
0–3 months: 7 inches
3–6 months: 7¾ inches
6–12 months: 8⅜ inches
The ribbed part of the white cuff is about 2¼ inches deep. The smooth white band adds about another ¾ inch.
Those finished measurements give the hat roughly ½ to 2 inches of negative ease across the four size ranges, with the amount depending on the baby's actual head measurement. That lets the ribbing stretch gently around the head instead of sitting there like a bucket. If the baby's measurement falls near the upper edge of one size and you prefer a less snug fit, move up a size.
Gauge and Abbreviations
Gauge: 14 hdc and 11 rounds = 4 inches in half double crochet.
For the ribbing, approximately 14 BLO single crochet rows should measure 4 inches along the length of the strip. Eight single crochet stitches should measure close to 2¼ inches across the depth of the cuff.
Don't skip the gauge check on this one. Four stitches at this gauge amount to a little over an inch around the hat, so being several stitches' worth off can move you into another size.
US crochet terms:
ch = chain
sc = single crochet
hdc = half double crochet
sl st = slip stitch
BLO = back loop only
hdc2tog = half double crochet two stitches together
st/sts = stitch/stitches
rnd/rnds = round/rounds
Chains at the beginning of rounds do not count as stitches unless the instructions say otherwise.
Crochet the White Ribbed Brim
The ribbing is made sideways as a flat strip. You'll seam the short ends together, then crochet around one long edge. That gives us the vertical ribs shown on the finished hat without trying to imitate them with decorative post stitches.
With white yarn, ch 9.
Row 1: Sc in the second ch from the hook and in each ch across. Turn. (8 sc)
Row 2: Ch 1. Working in the BLO, sc in each of the 8 sts across. Turn. (8 sc)
Repeat Row 2 until you have completed 44 (48, 52, 56) rows.
Before you seam the strip, lay it flat without stretching it. It should measure approximately 12½ (13¾, 14⅞, 16) inches along the long edge. A small difference is fine. A difference of an inch isn't.
Fasten off, leaving about a 10-inch tail. Bring the foundation edge and final row together with the ribbing running vertically. Thread the tail onto a yarn needle and whipstitch the short ends together securely to form a ring. Keep the seam flexible and don't cinch it tighter than the rest of the ribbing.
Turn the ring so the seam is on the inside.
Set-up round: With white yarn and the right side facing, join yarn at the ribbing seam. Ch 1. Work 1 sc into the end of each ribbing row around the upper edge. Join with a sl st to the first sc. You should have 44 (48, 52, 56) sc.
If you don't have that count, fix it here. Don't add or subtract a random stitch in the crown later to make the numbers work.
Smooth white band, Rnd 1: Ch 1. Sc in each st around. Join with a sl st to the first sc. 44 (48, 52, 56) sc.
Rnd 2: Repeat Rnd 1.
Rnd 3: Repeat Rnd 1.
Fasten off white and weave in the end securely. You're finished crocheting with white until the pom-pom, which will be made separately.
Crochet Santa Hat Pattern: Red Crown Shaping
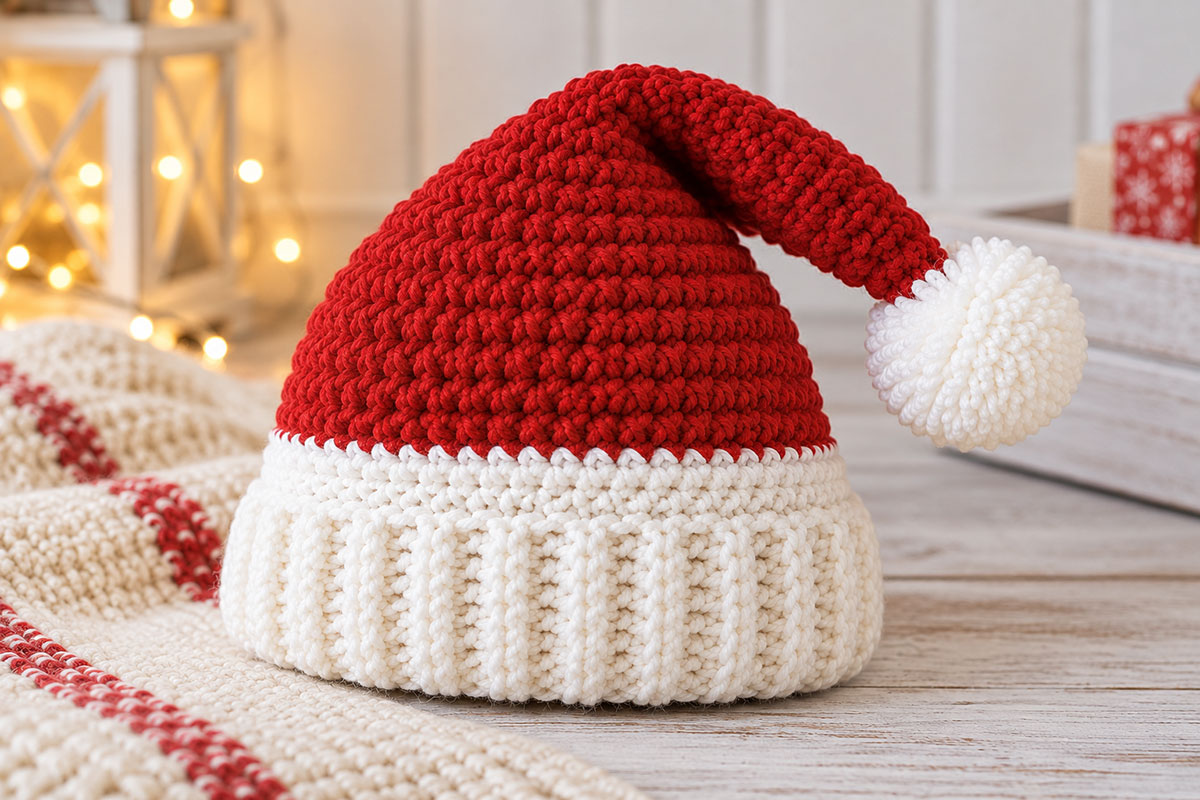
Join red yarn in the first sc of the last white round directly above the ribbing seam. The lower red section is worked without decreases first. That's intentional. It gives the hat the straighter fitted area above the brim that you can see in the finished example before the Santa-hat taper takes over.
Ch 1 at the beginning of each round. The beginning chain does not count as a stitch. Work the first hdc into the same stitch where the red yarn was joined. Join each round with a sl st to the first hdc. Do not turn the rounds. Do not work into the joining sl st or the ch 1 when counting stitches.
Before beginning the first decrease round: The straight red section should measure approximately 1⅞ (2¼, 2½, 2⅞) inches from the top edge of the white band for newborn (0–3 months, 3–6 months, 6–12 months). These are approximate measurements based on the stated round gauge, so use the correct round count as your primary guide.
Newborn Crown
Rnds 1–5: Hdc in each st around. (44 hdc)
Rnd 6: *Hdc in next 9 sts, hdc2tog.* Repeat from * to * 4 times. (40)
Rnd 7: *Hdc in next 8 sts, hdc2tog.* Repeat 4 times. (36)
Rnd 8: *Hdc in next 7 sts, hdc2tog.* Repeat 4 times. (32)
Rnd 9: *Hdc in next 6 sts, hdc2tog.* Repeat 4 times. (28)
Rnd 10: *Hdc in next 5 sts, hdc2tog.* Repeat 4 times. (24)
Rnd 11: *Hdc in next 4 sts, hdc2tog.* Repeat 4 times. (20)
Rnd 12: *Hdc in next 3 sts, hdc2tog.* Repeat 4 times. (16)
Rnds 13–14: Hdc in each st around. (16)
Rnd 15: *Hdc in next 2 sts, hdc2tog.* Repeat 4 times. (12)
Rnd 16: *Hdc in next st, hdc2tog.* Repeat 4 times. (8)
Rnd 17: Hdc2tog 4 times. (4)
0–3 Month Crown
Rnds 1–6: Hdc in each st around. (48 hdc)
Rnd 7: *Hdc in next 10 sts, hdc2tog.* Repeat 4 times. (44)
Rnd 8: *Hdc in next 9 sts, hdc2tog.* Repeat 4 times. (40)
Rnd 9: *Hdc in next 8 sts, hdc2tog.* Repeat 4 times. (36)
Rnd 10: *Hdc in next 7 sts, hdc2tog.* Repeat 4 times. (32)
Rnd 11: *Hdc in next 6 sts, hdc2tog.* Repeat 4 times. (28)
Rnd 12: *Hdc in next 5 sts, hdc2tog.* Repeat 4 times. (24)
Rnd 13: *Hdc in next 4 sts, hdc2tog.* Repeat 4 times. (20)
Rnd 14: *Hdc in next 3 sts, hdc2tog.* Repeat 4 times. (16)
Rnds 15–16: Hdc in each st around. (16)
Rnd 17: *Hdc in next 2 sts, hdc2tog.* Repeat 4 times. (12)
Rnd 18: *Hdc in next st, hdc2tog.* Repeat 4 times. (8)
Rnd 19: Hdc2tog 4 times. (4)
3–6 Month Crown
Rnds 1–7: Hdc in each st around. (52 hdc)
Rnd 8: *Hdc in next 11 sts, hdc2tog.* Repeat 4 times. (48)
Rnd 9: *Hdc in next 10 sts, hdc2tog.* Repeat 4 times. (44)
Rnd 10: *Hdc in next 9 sts, hdc2tog.* Repeat 4 times. (40)
Rnd 11: *Hdc in next 8 sts, hdc2tog.* Repeat 4 times. (36)
Rnd 12: *Hdc in next 7 sts, hdc2tog.* Repeat 4 times. (32)
Rnd 13: *Hdc in next 6 sts, hdc2tog.* Repeat 4 times. (28)
Rnd 14: *Hdc in next 5 sts, hdc2tog.* Repeat 4 times. (24)
Rnd 15: *Hdc in next 4 sts, hdc2tog.* Repeat 4 times. (20)
Rnd 16: *Hdc in next 3 sts, hdc2tog.* Repeat 4 times. (16)
Rnds 17–18: Hdc in each st around. (16)
Rnd 19: *Hdc in next 2 sts, hdc2tog.* Repeat 4 times. (12)
Rnd 20: *Hdc in next st, hdc2tog.* Repeat 4 times. (8)
Rnd 21: Hdc2tog 4 times. (4)
6–12 Month Crown
Rnds 1–8: Hdc in each st around. (56 hdc)
Rnd 9: *Hdc in next 12 sts, hdc2tog.* Repeat 4 times. (52)
Rnd 10: *Hdc in next 11 sts, hdc2tog.* Repeat 4 times. (48)
Rnd 11: *Hdc in next 10 sts, hdc2tog.* Repeat 4 times. (44)
Rnd 12: *Hdc in next 9 sts, hdc2tog.* Repeat 4 times. (40)
Rnd 13: *Hdc in next 8 sts, hdc2tog.* Repeat 4 times. (36)
Rnd 14: *Hdc in next 7 sts, hdc2tog.* Repeat 4 times. (32)
Rnd 15: *Hdc in next 6 sts, hdc2tog.* Repeat 4 times. (28)
Rnd 16: *Hdc in next 5 sts, hdc2tog.* Repeat 4 times. (24)
Rnd 17: *Hdc in next 4 sts, hdc2tog.* Repeat 4 times. (20)
Rnd 18: *Hdc in next 3 sts, hdc2tog.* Repeat 4 times. (16)
Rnds 19–20: Hdc in each st around. (16)
Rnd 21: *Hdc in next 2 sts, hdc2tog.* Repeat 4 times. (12)
Rnd 22: *Hdc in next st, hdc2tog.* Repeat 4 times. (8)
Rnd 23: Hdc2tog 4 times. (4)
Cut the red yarn, leaving an 8-inch tail. Thread the tail through the remaining 4 stitches, pull the opening closed and secure it on the inside.
Those two even rounds at 16 stitches aren't a mistake. They give the upper crown a short narrow section that can make the gentle bend shown in the finished hat without turning the design into a long-tail Santa hat.
Make and Attach the White Pom-Pom
Make a dense white yarn pom-pom about 2¼ to 2½ inches across after trimming. Keep it compact. An oversized pom-pom would pull this little crown down too far and change the shape we've been building.
Leave two long, separate tying strands through the center of the pom-pom.
Thread one strand through one side of the closed crown tip and the second strand through the opposite side. Tie the strands together firmly on the inside of the hat. Thread each tail through several nearby stitches in different directions before weaving it in.
Give the pom-pom a firm tug before calling it finished. If the center tie moves, redo it.
Finishing the Santa Hat
Weave in the remaining red and white yarn tails on the wrong side. Don't cut them flush with the fabric. Run each tail through several stitches, change direction and work it back through the fabric before trimming.
Smooth the ribbing with your fingers and line up the ribbing seam with the joining line at the back of the crown.
The white cuff should sit straight, with the ribbed section below and the narrow smooth band completely visible above it. Don't fold the smooth band under the ribbing. It's part of the design.
Shape the upper red crown gently to one side with your hand. You don't need to force a sharp bend. The narrow upper section and the weight of the small pom-pom are enough to give it the relaxed Santa-hat curve shown in the finished example.
If the crown is standing straight up when the hat is lying flat, check your gauge and make sure you worked the two even 16-stitch rounds before the final decreases.
Baby Hat Safety
This is a wearable Christmas hat, not sleepwear. Use it for supervised wear and remove it before naps or nighttime sleep.
The NIH Safe to Sleep guidance advises keeping a baby's head and face uncovered during sleep and notes that indoor hats can contribute to overheating.
Check the pom-pom before each use. If it loosens, sheds badly or the center tie can be pulled away from the crown, stop using the hat until it has been repaired.
I'd also skip beads, bells, buttons or any other loose trim on this baby version. The red, white and pom-pom are plenty.
Getting the Fit Right
If you can measure the baby's head, do that before choosing the size. Wrap the tape around the fullest part of the head, usually above the eyebrows and ears and around the back of the head. Keep the tape level and don't pull it tight.
Compare that measurement with the suggested head circumference rather than the finished hat circumference. The hat itself is supposed to be smaller because the ribbing and crochet fabric stretch.
If your gauge is too loose, the cuff can become floppy and the crown will grow wider and longer. If your gauge is too tight, the brim won't have enough give. Change hook size until the gauge is right instead of changing the stitch count.
If you'd like another baby-sized Christmas hat rather than a second Santa version, the crochet elf baby hat pattern gives you a completely different silhouette while staying in the same Christmas group.
When you click on links to various merchants on this site and make a purchase, this may result in this site earning a commission. This does not affect the price you pay.

UBGI Gold Standard 2026
Reviewed under the site's
editorial checklist.
Photos, decorating ideas, party setups and reader submissions are shared for inspiration unless a page is specifically presented as a pattern, tutorial, reference guide or step-by-step project. Follow the instructions, measurements, safety guidance and manufacturer directions provided for the particular project or product.
About Jan | Contact | Baby Nursery Ideas (Blog) | Site Map | Privacy Policy | Disclosure Policy | Disclaimer | Affiliate Disclosure | Earnings Disclosure | Facebook | Pinterest
I am a participant in the Amazon Services LLC Associates Program, an affiliate advertising program designed to provide a means for us to earn fees by linking to Amazon. As an Amazon Associate I earn from qualifying purchases.
Copyright © 2006-2026. All Rights Reserved.