Free Adult Crochet Santa Hat Pattern
By Jan Bay
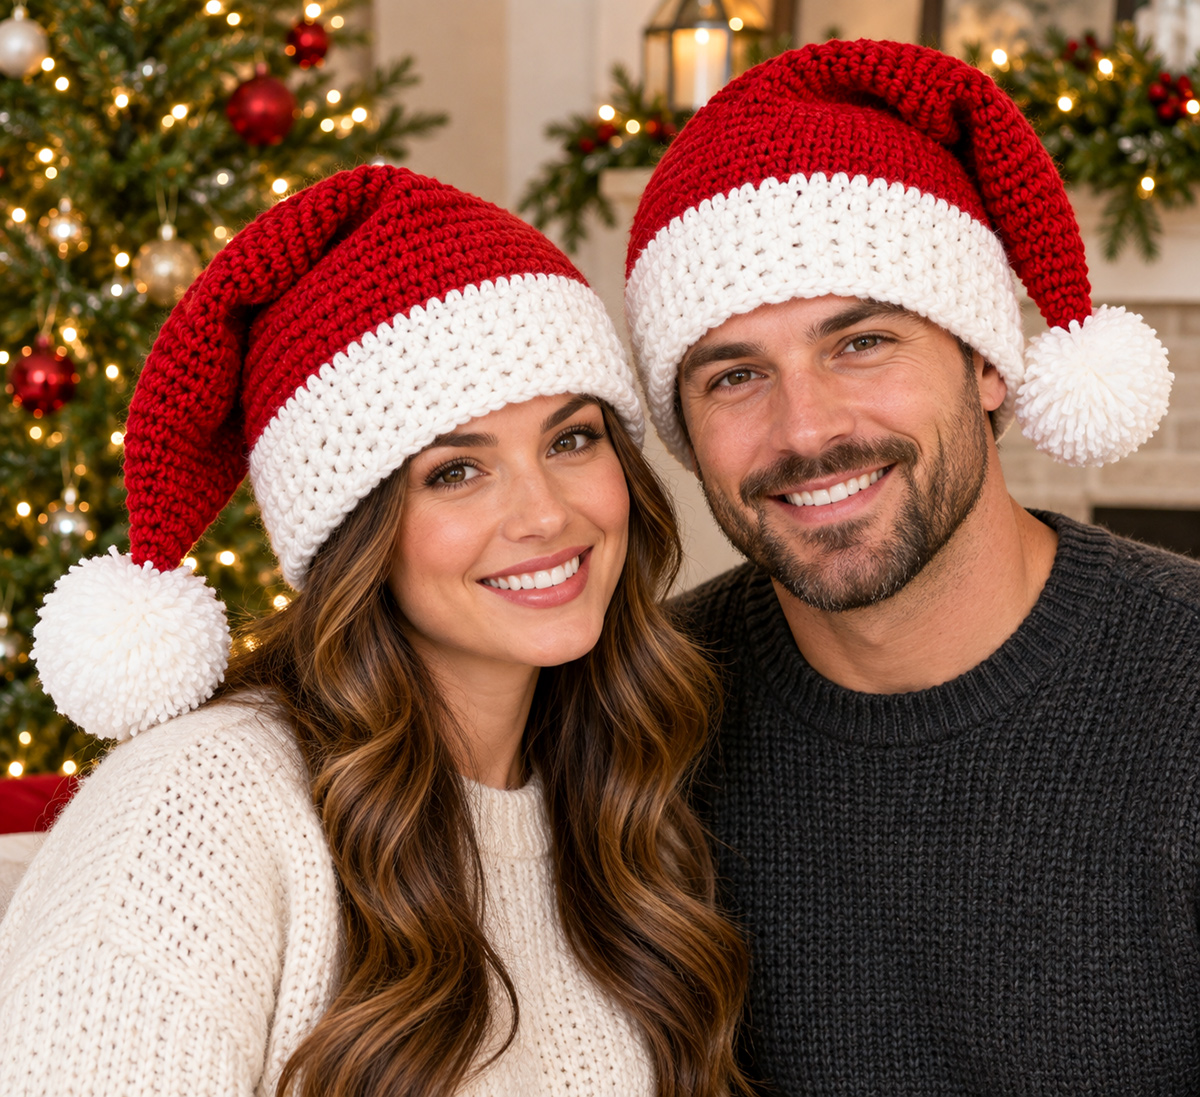
This free adult crochet Santa hat pattern creates a classic Christmas hat for Mom or Dad that is made for an adult, with a white brim, a gradually tapered red crown and just enough side drape to create that familiar hat worn by the Jolly Old Elf. This is not just any old long floppy stocking cap. It can be an important part of the family's holiday photo. The two coordinated adult sizes make it easy to get a comfortable fit while keeping the proportions of the brim, crown and pom-pom balanced.
Explore More Santa and Christmas Crochet Patterns
Free Crochet Santa Hat Pattern for Babies
Free Mini Crochet Santa Hat Pattern
Free Crochet Santa Lovey Pattern
Worsted Weight Yarn for the Adult Santa Hat
Jump to a Section
Adult Crochet Santa Hat Pattern Finished Sizes
I kept this adult Santa hat to two sizes because that's really all we need here. The Small/Medium works for many average adult heads, while the Large adds enough circumference and a little extra crown depth without changing the character of the hat.
Adult Small/Medium: approximately 20 1/2 inches around, with about 2 1/2 inches of white brim and a 12-inch red crown above it.
Adult Large: approximately 22 1/4 inches around, with about 2 1/2 inches of white brim and a 12 3/4-inch red crown above it.
The hat is designed with a little negative ease so it sits securely instead of balancing loosely on top of the head. If you're between sizes, measure around the head where the lower edge of the hat will actually sit before deciding which count to use.
Don't add several inches to the crown just because you want it to droop. The controlled bend is part of this design. A very long crown changes it into a stocking cap, and that's a different Santa hat altogether.
Materials for the Adult Santa Hat
You'll need a smooth #4 medium or worsted-weight yarn. I would skip very stiff cotton for this one because the crown needs enough body to hold its taper while still bending naturally near the top.
The Craft Yarn Council yarn weight standards place worsted, Afghan and Aran yarns in the #4 Medium category. Match the gauge below rather than choosing yarn by the label alone.
- Approximately 150 (175) yards of true Christmas red #4 medium yarn
- Approximately 80 (90) yards of white #4 medium yarn, including the pom-pom
- 5.5 mm (I-9) crochet hook, or size needed to obtain gauge
- Yarn needle
- Scissors
- Stitch markers
- Pom-pom maker approximately 4 inches in diameter, optional
- Flexible measuring tape
The numbers in parentheses throughout the pattern are for Adult Large. If only one number appears, use it for both sizes.
Gauge
14 hdc = 4 inches
10 rounds = 4 inches
Measure the gauge in half double crochet worked in the round. The stitch gauge matters most around the head. If 14 stitches measure more than 4 inches, the hat will finish too large. If they measure less, it will finish too small.
Check the round gauge too because it controls the crown length and therefore the amount of side drape. I wouldn't ignore that measurement on this particular hat.
Abbreviations
- ch = chain
- hdc = half double crochet
- hdc2tog = half double crochet 2 together
- rnd = round
- sl st = slip stitch
- st/sts = stitch/stitches
This pattern uses U.S. crochet terminology.
Pattern Notes Before You Start
The hat is worked from the bottom edge upward in joined rounds. The white brim comes first, then you'll change to red and crochet the crown without breaking the basic construction.
Chain 1 at the beginning of a round does not count as a stitch. Join each round with a slip stitch to the first hdc unless the instructions say otherwise.
Keep the joining seam at the center back. After Red Round 4, divide the crown into three equal sections. For Small/Medium, each section contains 24 stitches. For Large, each section contains 26 stitches. Place a removable marker in the last stitch of each section.
On a decrease round, work hdc across each marked section until 2 stitches remain in that section, then hdc2tog over those final 2 stitches. Move that section marker into the hdc2tog just made. Repeat the same method in all three sections. Each decrease round removes exactly 3 stitches.
On the straight rounds between the first four decrease rounds, work hdc in every stitch. As you reach each marked stitch, remove the marker from the previous round and place it in the hdc just worked so all three section markers stay in the current round. After joining the straight round, move each marker one stitch forward in the direction of work. That small shift staggers the next three decreases while keeping the crown divided into three equal sections.
Once the upper-crown shaping begins and every round becomes a decrease round, use the same three-section method and move all three markers one stitch forward after completing each round. This gives you the gradual taper without asking you to guess where the decreases belong.
Make the color change at the center-back join. On White Round 6, work the final hdc completely in white, then complete the joining slip stitch with red yarn as instructed below. This leaves the entire white brim in white and positions the red yarn to begin the crown.
Crochet the White Brim
With white yarn, ch 72 (78) loosely so the foundation edge can stretch comfortably with the finished brim. Take a second to make sure the chain isn't twisted, then sl st into the first ch to form a ring.
Rnd 1: Ch 1. Hdc in each ch around. Join with sl st to first hdc. 72 (78) sts.
Rnds 2–5: Ch 1. Hdc in each st around. Join with sl st to first hdc. 72 (78) sts.
Rnd 6: Ch 1. Hdc in each st around. To join, insert the hook into the first hdc and complete the slip stitch with red yarn. 72 (78) sts.
After Round 6, the brim should measure approximately 2 3/8 to 2 1/2 inches deep at gauge.
Try the band around the head now if you can. This is the best checkpoint in the whole pattern for catching a sizing problem before you've crocheted the crown.
Cut the white yarn, leaving a tail long enough to weave in securely. Continue with red for the crown.

Crochet the Red Crown
The red crown starts with four straight rounds before the taper begins. That bit of full-width crown above the brim is deliberate. It keeps the finished hat from looking like a cone perched directly on top of the white band.
Red Rnds 1–4: Ch 1. Hdc in each st around. Join. 72 (78) sts.
Now begin the gradual lower-crown shaping. Each decrease round removes exactly three stitches by working one hdc2tog in each of the three marked sections. Follow the marker method established in the Pattern Notes so the shaping stays evenly distributed and the decrease positions remain staggered.
Red Rnd 5: In each of the 3 marked sections, hdc in each st until 2 sts remain, then hdc2tog over the final 2 sts. Move the section marker into the hdc2tog just made. Repeat for all 3 sections. Join. 69 (75) sts.
Red Rnd 6: Hdc in each st around. Join. 69 (75) sts. Move each of the 3 section markers one stitch forward in the direction of work.
Red Rnd 7: Repeat the 3-section decrease method from Round 5. Join. 66 (72) sts.
Red Rnd 8: Hdc in each st around. Join. 66 (72) sts. Move each section marker one stitch forward.
Red Rnd 9: Repeat the 3-section decrease method. Join. 63 (69) sts.
Red Rnd 10: Hdc in each st around. Join. 63 (69) sts. Move each section marker one stitch forward.
Red Rnd 11: Repeat the 3-section decrease method. Join. 60 (66) sts.
Red Rnd 12: Hdc in each st around. Join. 60 (66) sts. Move each section marker one stitch forward.
At this point the lower crown has started narrowing, but it should still look broad and wearable rather than sharply pointed.
Shape the Upper Crown
From here to the tip, every round is a decrease round. Use the same 3-section method established above: hdc across each marked section until 2 stitches remain, hdc2tog over those final 2 stitches, then move the section marker into the decrease. After joining the round, move all three markers one stitch forward before beginning the next round.
Adult Small/Medium
- Rnd 13: 57 sts
- Rnd 14: 54 sts
- Rnd 15: 51 sts
- Rnd 16: 48 sts
- Rnd 17: 45 sts
- Rnd 18: 42 sts
- Rnd 19: 39 sts
- Rnd 20: 36 sts
- Rnd 21: 33 sts
- Rnd 22: 30 sts
- Rnd 23: 27 sts
- Rnd 24: 24 sts
- Rnd 25: 21 sts
- Rnd 26: 18 sts
- Rnd 27: 15 sts
- Rnd 28: 12 sts
- Rnd 29: 9 sts
- Rnd 30: 6 sts
Adult Large
- Rnd 13: 63 sts
- Rnd 14: 60 sts
- Rnd 15: 57 sts
- Rnd 16: 54 sts
- Rnd 17: 51 sts
- Rnd 18: 48 sts
- Rnd 19: 45 sts
- Rnd 20: 42 sts
- Rnd 21: 39 sts
- Rnd 22: 36 sts
- Rnd 23: 33 sts
- Rnd 24: 30 sts
- Rnd 25: 27 sts
- Rnd 26: 24 sts
- Rnd 27: 21 sts
- Rnd 28: 18 sts
- Rnd 29: 15 sts
- Rnd 30: 12 sts
- Rnd 31: 9 sts
- Rnd 32: 6 sts
For every round in those lists, work exactly one hdc2tog in each of the 3 marked sections using the method above. Each round therefore removes exactly 3 stitches. The stitch count shown is the count you should have after completing that round.
Before closing the tip, lay the hat flat and measure from the top edge of the white brim to the final round. You're looking for approximately 12 inches on the Small/Medium and 12 3/4 inches on the Large.
If your stitch counts are right but that measurement is far off, check your round gauge before adding or removing rounds. Extra straight rounds at the tip will change the shape we designed.
Make and Attach the Pom-Pom
Fasten off the red yarn after the final 6-stitch round, leaving a tail about 10 inches long.
Thread the tail onto a yarn needle. Run it through the front loop of each of the remaining 6 stitches, pull the opening closed firmly and take the needle through the closed tip once more to secure it. Weave the tail into the inside of the crown.
Make one dense white pom-pom approximately 4 inches in diameter. Trim it into a neat round shape, but don't keep trimming until it turns into a tiny ball. The pom-pom needs enough size to balance the adult crown.
Use two strong pom-pom tying tails to attach it through opposite sides of the closed crown tip. Tie securely on the inside of the hat, then weave those tails in separately.
A yarn pom-pom keeps the red-and-white crochet look consistent with the finished example. Faux fur would change the character of this particular hat.
Finishing the Adult Santa Hat
Remove all three section markers. Weave in the white and red yarn tails on the wrong side, staying within yarn of the same color whenever possible.
Lay the hat flat with the joining seam at the back. Smooth the crown without stretching it. The taper should narrow gradually from the lower crown to the tip, not pinch suddenly halfway up.
Check the finished measurements once more:
- Small/Medium circumference: approximately 20 1/2 inches
- Large circumference: approximately 22 1/4 inches
- White brim depth: approximately 2 3/8 to 2 1/2 inches
- Red crown above brim: approximately 12 inches for Small/Medium or 12 3/4 inches for Large
- Pom-pom: approximately 4 inches across
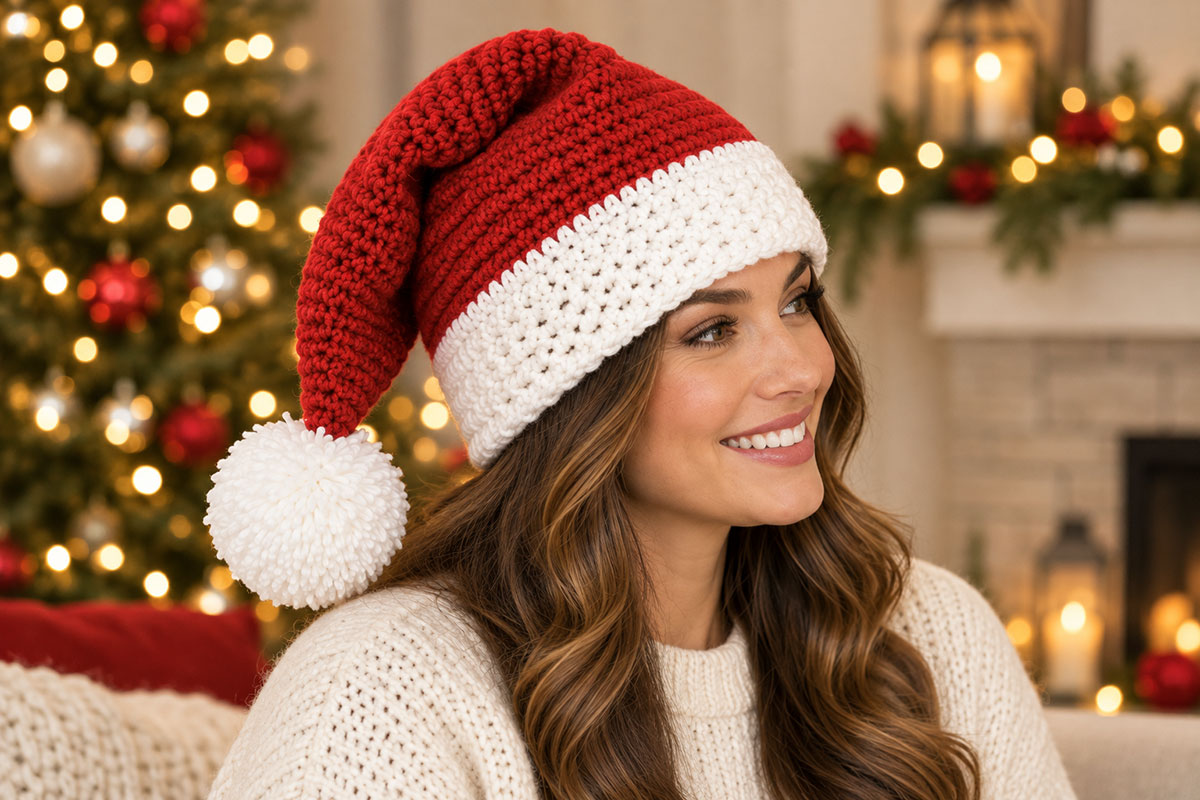
Place the hat on the head with the back seam centered. Let the upper crown settle toward one side instead of pulling the tip straight down. That gives you the softer bend shown in the finished example without adding a long floppy tail.
If you'd rather have the crown fall a little farther back, rotate the bend slightly after the hat is on. You don't need another construction or another set of stitch counts for that.
The adult version is intentionally a little more controlled than a children's Santa hat. The deeper white brim gives it enough visual weight at the bottom, while the red crown has room to bend without dropping all the way to the shoulder.
That's the look I would keep.
How the Adult Santa Hat Should Fit
This hat is meant to fit close enough around the head to stay put, but it shouldn't feel tight across the forehead. The white brim does most of the fitting work, while the red crown keeps its fuller shape above it.
If you're choosing between the two sizes, use the actual head measurement rather than guessing from whether the hat is for Mom or Dad. Adult head sizes overlap quite a bit, so the measurement tells you more than the label does.
The Small/Medium is designed for a head measuring about 21 to 22 1/2 inches around. The Large is better for about 22 1/2 to 24 inches.
If the brim fits well but the crown looks too long or too short, don't change the starting stitch count. That would change the fit around the head. Check your round gauge instead.
The finished crown should bend to one side on its own without needing to be folded sharply. If it sticks straight up, your yarn may be too stiff or your round gauge may be too short.
Why This Adult Santa Hat Isn't Just the Baby Pattern Made Bigger
The free crochet Santa hat pattern for babies belongs to the same red-and-white Santa hat family, but the proportions here are different on purpose.
An adult hat can carry a deeper white brim and a longer crown without looking oversized. It also needs a more controlled taper. Simply multiplying the baby stitch counts would make the adult version wider, but it wouldn't automatically give it the right balance.
For this one, the lower crown stays broad a little longer before the shaping becomes more noticeable. The pom-pom is larger too, but not so large that it pulls the tip down into an exaggerated flop.
That distinction matters. A Santa hat for an adult should still look like something you'd willingly wear in a Christmas photo, not like a children's hat that happened to be enlarged.
Choosing Yarn for the Right Drape
You can substitute another #4 medium yarn if you can match the gauge, but pay attention to how the yarn behaves as well as the number on the label.
A very stiff yarn can make the crown stand too upright. A yarn with too little body can make the whole upper hat collapse instead of forming the gradual bend shown in the finished example.
I'd look for a smooth worsted-weight acrylic, wool blend or similar yarn with enough softness to drape and enough structure to keep the stitches visible. You don't need anything exotic.
Use the same yarn weight for the red crown and white brim unless you deliberately swatch another combination first. A much thicker white yarn can tighten the lower edge and change the fit before you even reach the crown.
Color matters less to the construction, of course, but a clear Christmas red and clean white give this particular design the classic Santa look it was built around.
Blocking and Caring for the Finished Hat
This hat doesn't need aggressive blocking. In fact, I wouldn't stretch the crown flat because that can take away the soft bend we're trying to keep.
If the stitches need tidying, shape the hat gently to its finished measurements and use the care method appropriate for the yarn you've chosen. Let the crown rest in its natural tapered shape rather than pinning it into a hard triangle.
After washing, reshape the white brim so it lies evenly around the head and smooth the red crown with your hands. Let the upper part fall slightly to one side while it dries.
If you've used an acrylic yarn, follow the yarn manufacturer's care directions and avoid excessive heat. If you've used wool or a wool blend, treat it according to the fiber label so you don't accidentally felt or shrink the hat.
The pom-pom may need a little fluffing after storage or washing. A quick trim of any stray strands is usually enough.
More Santa and Christmas Crochet Projects
If you're making a coordinated Christmas set, the adult hat pairs naturally with the baby crochet Santa hat without requiring everyone in the family to wear an identical scaled copy.
For a small project that uses the same Santa-hat idea in a decorative way, the free mini crochet Santa hat pattern is the quicker option.
You can also move beyond hats with the crochet Santa lovey pattern, or browse the broader Christmas crochet patterns collection for more seasonal projects.
Keep the adult hat simple, though. The beard, long-tail hat and Mrs. Claus versions deserve their own designs rather than being piled onto this one.
Adult Crochet Santa Hat Pattern FAQ
Can I make the crown longer for more slouch?
You can, but adding several rounds changes the design into a longer stocking-style Santa hat. If you want the finished hat to match the example shown here, keep the crown at approximately 12 inches for Small/Medium or 12 3/4 inches for Large above the white brim.
Can I make the white brim deeper?
Yes, but every extra round adds depth below the red crown. One extra round is a small change. Adding several rounds will make the brim dominate the hat and may change where the crown begins on the head.
What if my head measurement falls exactly between the two sizes?
Compare your actual gauge first. If you're matching gauge and prefer a closer fit, choose Small/Medium. If you don't like snug hats or have thick hair that adds bulk underneath, the Large may be more comfortable.
Can I use bulky yarn instead?
Not with these stitch counts. A bulky yarn would make the hat much larger and would also change the crown drape. You would need to re-engineer the counts and shaping rather than simply changing yarn and hook size.
Can I use faux fur for the pom-pom?
You can attach one if you prefer it, but the pattern is designed around a white yarn pom-pom. A faux-fur pom-pom gives the hat a different finished look and usually adds more weight at the tip.
Why are the decrease positions staggered?
Moving the decreases slightly from one shaping round to the next helps keep the crown smooth. Stacking all three decrease columns in exactly the same places can create visible ridges running toward the tip.
A Classic Santa Hat for the Grown-Ups
This version still reads immediately as a Santa hat without going too far in either direction. It isn't a short red beanie with a white edge, and it isn't a long floppy stocking cap.
The deeper brim, gradual taper and moderate side drape give it adult proportions while keeping the construction straightforward enough to make again for another member of the family.
Once your gauge is right, follow the two size counts and leave the proportions alone. That's what keeps the finished hat looking like the one you came here to make.
When you click on links to various merchants on this site and make a purchase, this may result in this site earning a commission. This does not affect the price you pay.

UBGI Gold Standard 2026
Reviewed under the site's
editorial checklist.
Photos, decorating ideas, party setups and reader submissions are shared for inspiration unless a page is specifically presented as a pattern, tutorial, reference guide or step-by-step project. Follow the instructions, measurements, safety guidance and manufacturer directions provided for the particular project or product.
About Jan | Contact | Baby Nursery Ideas (Blog) | Site Map | Privacy Policy | Disclosure Policy | Disclaimer | Affiliate Disclosure | Earnings Disclosure | Facebook | Pinterest
I am a participant in the Amazon Services LLC Associates Program, an affiliate advertising program designed to provide a means for us to earn fees by linking to Amazon. As an Amazon Associate I earn from qualifying purchases.
Copyright © 2006-2026. All Rights Reserved.