Free Crochet Halloween Garland Pattern with Bats, Ghosts and Pumpkins
By Jan Bay
This free crochet Halloween garland pattern brings together two black bats, two orange pumpkins, two smiling ghosts holding little pumpkins, and a sleepy crescent moon. Strung along a black crocheted cord, these seven handmade decorations make a sweet addition to baby's first Halloween celebration. Hang the finished garland across a fireplace mantel, party backdrop, or wall safely out of little hands' reach. I'll show you how to arrange and hang the pieces, with links to the individual crochet patterns for every motif.
More Free Halloween Crochet Patterns
Free Halloween Crochet Patterns
Halloween Crochet Appliqué Collection
Free Crochet Bat Appliqué Pattern
Free Crochet Ghost Appliqué Pattern
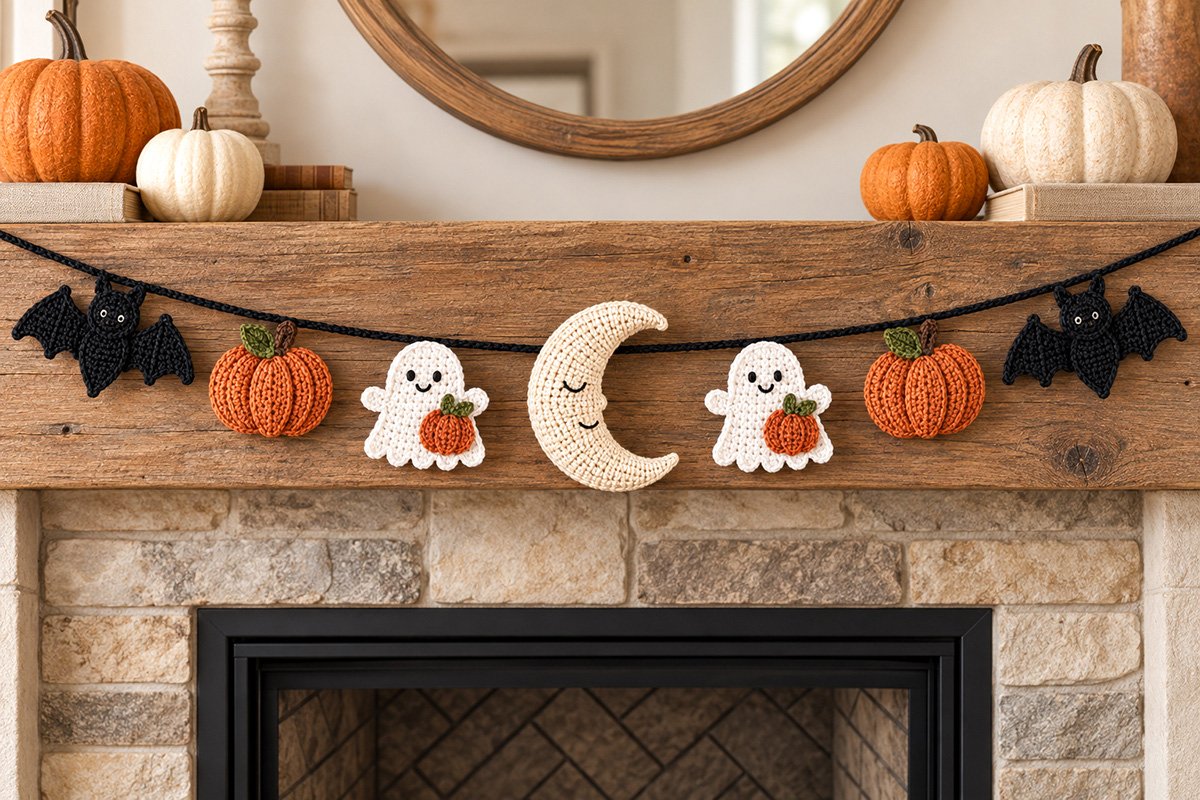
Display safety: This photograph is a styled decorating illustration. Never hang a crochet garland above an operating fireplace or near burning candles. Use a completely cool, unused mantel or a separate wall display.
See Supplies for This Project Here.
Jump to the Free Crochet Halloween Garland Instructions
Materials for the Crochet Halloween Garland Pattern
You won't need to buy seven different kinds of yarn for this project. Most of the garland uses ordinary worsted weight yarn, and the little crescent moon uses lighter DK cotton so it keeps its softly rounded shape without becoming too heavy.
I'd choose smooth cotton or cotton-blend yarn for the flat pieces. You want the bats' wing points and the ghosts' wavy hems to stay visible after everything is hanging.
- Black worsted weight yarn, #4: Have approximately 100 yards available for the two bats and connecting cord.
- White worsted weight yarn, #4: Approximately 80 to 90 yards for both ghosts.
- Orange worsted weight yarn, #4: Have approximately 180 to 200 yards available for the two stuffed ribbed pumpkins and the small pumpkins held by the ghosts. Actual use will vary with gauge and shaping.
- Olive-green and brown worsted weight yarn: Small amounts for the pumpkin leaves and stems.
- Ivory DK weight cotton yarn, #3: Approximately 35 to 40 grams for the stuffed crescent moon.
- Black embroidery floss: For the ghost smiles and moon's sleepy eyes.
- Pale gray or ivory embroidery floss: For small visible eyes on the black bats.
- Crochet hooks: 4.0 mm for the bats, ghosts and black cord; 3.5 mm for the mini pumpkins; 3.0 mm for the moon.
- Polyester fiberfill: Enough to lightly stuff the crescent moon and both ribbed pumpkins. The bats and ghosts remain flat and unstuffed.
- Strong, low-stretch cotton thread or cord: At least 12 inches for the moon's separate support loop, plus approximately 82 inches of thin black cotton cord to reinforce the back of the crocheted garland strand.
- Other supplies: Yarn needle, embroidery needle, a 4 to 5-inch long yarn or doll needle for shaping the pumpkin ribs, scissors, stitch markers, measuring tape, blocking pins and a blocking surface.
- For display: Two firmly installed hanging hooks suitable for your wall or mantel area.
These yarn quantities include a little working allowance, but they aren't measurements taken from a crocheted sample of the complete garland. If you're using leftovers, measure what you have before starting the black cord.
Finished Size and Gauge
The planned black connecting cord measures approximately 72 inches before its ends are folded into hanging loops. Folding about 2 inches at each end leaves approximately 68 inches between the two folded ends. The seven motifs are spaced 9 inches apart, measured from center to center along the straight cord before it is hung. The outside bats will sit approximately 7 inches inward from the folded ends.
The bats use wider garland-specific wings and are intended to finish noticeably wider than the ghosts. Measure the first completed bat before making the second, since this enlarged wing variation has not been physically test-crocheted. The ghosts should measure around 5 to 5 1/2 inches across, including their arms. The moon should finish about 6 to 6 1/2 inches tall. The two separate stuffed pumpkins are expected to measure approximately 4 1/2 to 5 inches wide and about 3 1/2 inches tall before their stems are added. These are expected measurements, not dimensions verified from a finished garland.
For the two stuffed pumpkins, the working gauge is approximately 18 single crochets and 20 rounds over 4 inches using worsted weight cotton yarn and a 3.5 mm hook. The fabric should be firm enough that the stuffing cannot show between stitches. Check your gauge before crocheting both pumpkins. A different gauge will change their finished proportions.
Use standard U.S. crochet terms throughout: ch = chain, sc = single crochet, hdc = half double crochet, dc = double crochet, sl st = slip stitch, sc2tog = single crochet two together, and hdc2tog = half double crochet two together. A turning chain does not count as a stitch.
Skill level: Intermediate for the complete project. The individual flat motifs are simpler, but the stuffed moon, pumpkin shaping and final hanging adjustments require some care.
Free Crochet Patterns for All Seven Halloween Garland Motifs
Here's the nice part about this garland. You can use several crochet patterns that are already complete, then put them together in a different way. There's no need to rewrite the bat, ghost or crescent moon instructions.
Make Two Black Crochet Bats
Use my free crochet bat applique pattern for the two black bat heads, tapered bodies, pointed ears and final assembly. For this garland, we'll make the wings a little wider so the bats have the spread-wing silhouette shown in the finished display.
Work with black worsted weight yarn and a 4.0 mm hook. Make four matching garland wings in all, two for each bat. The beginning ch 1 does not count as a stitch.
Wider Bat Wings for the Halloween Garland
Row 1: Ch 2. Sc in the second ch from the hook. Turn. (1 sc)
Row 2: Ch 1, 2 sc in the only stitch. Turn. (2 sc)
Row 3: Ch 1, sc in the first stitch, 2 sc in the last stitch. Turn. (3 sc)
Row 4: Ch 1, 2 sc in the first stitch, sc in the remaining 2 stitches. Turn. (4 sc)
Row 5: Ch 1, sc in the next 3 stitches, 2 sc in the last stitch. Turn. (5 sc)
Row 6: Ch 1, 2 sc in the first stitch, sc in the remaining 4 stitches. Turn. (6 sc)
Row 7: Ch 1, sc in the next 5 stitches, 2 sc in the last stitch. Turn. (7 sc)
Row 8: Ch 1, 2 sc in the first stitch, sc in the remaining 6 stitches. Turn. (8 sc)
Rows 9 and 10: Ch 1, sc in each stitch across. Turn after each row. (8 sc)
Row 11: Ch 1, sc in the next 6 stitches, sc2tog. Turn. (7 sc)
Row 12: Ch 1, sc2tog, sc in the remaining 5 stitches. Turn. (6 sc)
Row 13: Ch 1, sc in the next 4 stitches, sc2tog. Turn. (5 sc)
Row 14: Ch 1, sc2tog, sc in the remaining 3 stitches. Turn. (4 sc)
Row 15: Ch 1, sc in the next 2 stitches, sc2tog. Turn. (3 sc)
Row 16: Ch 1, sc2tog, sc in the remaining stitch. Turn. (2 sc)
Row 17: Ch 1, sc2tog. (1 sc) Fasten off.
Shape the Wider Wing Edge
With the narrow Row 1 end at the top and Row 17 at the bottom, join black yarn at the Row 1 tip along the shaped outer edge. Work 1 sc into each of the first 7 row-end spaces.
Ch 4, sl st in the second ch from the hook, sc in the next ch and hdc in the final ch. Sl st back into the same outer-edge space to form one pointed projection.
Continue with 1 sc in each of the remaining 10 row-end spaces, ending at the narrow Row 17 tip. Fasten off and weave in the ends without pulling the edge inward.
Make four identical wings. For each bat, flip one wing from side to side to create a mirrored pair, keeping both narrow upper tips pointing upward. Sew the relatively straight inner edges behind the original bat head and body as described in the linked bat applique pattern. Keep the pointed outer edges free.
Embroider tiny ivory or pale-gray eyes on the black heads instead of using beads or plastic eyes. Block the completed bats lightly if necessary, keeping both wing tips and lower points distinct.
Compare the first completed bat with a finished ghost before making the second bat. The bat should have a noticeably wider silhouette, with the little round head remaining smaller than the overall spread of the wings. Match the second bat to the first.
Make Two White Ghosts Holding Pumpkins
My free crochet ghost applique pattern makes the exact style of little ghost used here, complete with short arms, five rounded waves along the bottom and a small orange pumpkin.
Make two matching ghosts, using white yarn and a 4.0 mm hook. Embroider their smiling faces with black floss. Follow the original instructions for making and attaching each ghost's little pumpkin, including the olive-green stem and leaf.
Keep the pumpkins on the lower right side of both ghosts, just as shown in the example. I wouldn't reverse one of them. The repeated detail helps the two ghosts look like a pair.
Make One Sleepy Crescent Moon
For the centerpiece, use the crescent moon instructions in my crochet moon and stars baby mobile pattern.
Work the stuffed moon with ivory DK cotton and a 3.0 mm hook. Follow the original joined-round instructions and make the two little embroidered closed eyes before you finish stuffing. Keep the upper and lower horns gently tapered.
You'll need the separate moon support loop from that pattern, but skip the braided cord, dangling star and other mobile decorations. The completed moon will hang by itself at the center of our Halloween garland.
Make Two Rounded Ribbed Crochet Pumpkins
Those two little orange pumpkins need to be rounded, with deep ribs running down their sides. I'd make them as stuffed pieces rather than flat appliques. That gives them the fuller shape shown between the bats and ghosts in our Halloween garland.
Use the pumpkin-head instructions from my free crochet pumpkin rattle pattern. We're borrowing only the stuffed pumpkin construction, not making rattles. You won't need wooden rings, rattle inserts or embroidered pumpkin faces.
Make two complete orange pumpkin heads with worsted weight cotton yarn and a 3.5 mm hook. Follow the original instructions from Round 1 through Round 27, including the increases, decreases, stuffing, closing and final rib shaping.
The head reaches 64 stitches at its widest point. Round 14 has eight evenly spaced rib markers, and the final decrease round leaves six stitches to close. Follow the linked pattern for the complete round-by-round instructions.
When stuffing, leave a little give in the fabric. Each pumpkin should hold its rounded shape while still allowing the orange shaping yarn to form eight clearly visible vertical grooves.
For this garland, omit the rattle insert entirely. Use only polyester fiberfill. Complete all eight shaping grooves, remove their temporary markers, and secure the shaping yarn before attaching the stem.
Make the Short Brown Pumpkin Stems
Make one stem for each pumpkin with brown worsted weight yarn and a 3.5 mm hook.
Round 1: Work 8 sc into a magic ring. Pull the ring closed securely. (8 sc)
Rounds 2 through 4: Sc in each stitch around, working continuously without joining. Move the working marker to the first stitch of each new round. (8 sc per round)
Fasten off, leaving a 12-inch sewing tail. Remove the working marker. Leave the lower opening unclosed. The stem should be a short little tube, not a long pointed stalk.
Make Two Olive-Green Pumpkin Leaves
With olive-green worsted weight yarn and a 3.5 mm hook, ch 6.
Work a sl st in the second chain from the hook, sc in the next chain, hdc in the next chain and dc in the following chain.
In the final foundation chain, work sc, ch 2, sl st in the second chain from the hook, then another sc into that same final foundation chain.
Continue along the unused loops on the opposite side of the foundation chain. Work dc in the next loop, hdc in the next loop, sc in the next loop and sl st in the final loop.
Fasten off, leaving a 12-inch tail for attachment. The small chain point forms the leaf tip. Make the second leaf the same way.
Finish Both Ribbed Pumpkins
Place the open lower edge of a brown stem over the gathered top center of the first pumpkin. Using the sewing tail, sew through all eight stitches around the stem's lower edge and into the orange pumpkin beneath it. Return to the starting point, secure the yarn and bury the end inside the pumpkin.
Place one olive leaf beside the stem, pointing toward the upper left. Sew the leaf's base firmly into the pumpkin with several small stitches. Leave the pointed outer portion free so it rests naturally against the rounded orange body.
Repeat with the second pumpkin. Set them beside one another and compare their shapes. Both should have eight recognizable ribs, short brown stems and one small olive leaf.
Before attaching the pumpkins to the garland, check that neither stem or leaf shifts when gently pulled and that no fiberfill shows between the stitches. The pumpkins are decorations, not toys.
Crochet the Black Halloween Garland Cord
For the connecting cord, I'd use the same smooth black worsted weight yarn as the bats. The photograph has one continuous black strand, so there's no need for a striped cord, a decorative border or a second hanging row.
We're aiming for a finished cord approximately 72 inches long before folding its ends into hanging loops. You can shorten or lengthen it to fit your display, but keep the motif spacing proportional.
Make a Short Cord Gauge Sample
With black yarn and a 4.0 mm hook, ch 21.
Work a sl st into the back bump of the second chain from the hook and into the back bump of every remaining chain. You should finish with exactly 20 slip stitches.
Lay the sample flat without stretching it and measure its finished length. This tells you approximately how many slip stitches you'll need per inch. If your 20 slip stitches measure 4 inches, your cord gauge is 5 stitches per inch.
At that gauge, a 72-inch cord requires 360 slip stitches, so you would begin with ch 361. If your sample measures differently, divide 20 by the measured length in inches, multiply that result by 72, round up to the next whole stitch, and add one for the foundation chain.
Make the Full-Length Cord
Step 1: Crochet the calculated number of foundation chains, keeping the tension relaxed and even.
Step 2: Starting in the second chain from the hook, work one slip stitch into the back bump of each chain across. Do not skip stitches or add extra chains between them.
Step 3: Fasten off and weave the working yarn through several stitches on the back. Measure the finished cord again. Adjust its length if necessary before continuing. While the cord is still straight and before folding either end into a hanging loop, measure from the original left end and place removable stitch markers at 9, 18, 27, 36, 45, 54 and 63 inches. These mark the centers of the seven motifs. Leave the markers in place while completing both hanging loops.
Step 4: At one end, fold approximately 2 inches of cord back on itself to form a small hanging loop. Adjust the opening to fit your selected hook, then stitch the doubled section firmly together with black yarn.
Step 5: Repeat at the opposite end, making the second loop the same size. Weave the ends securely into the doubled cord.
That's the connecting strand finished. Before attaching any decorations, lift it by both loops and check that it hangs without twisting.
Since the moon and both pumpkins are stuffed, reinforce the black crocheted cord before attaching the motifs. Cut approximately 82 inches of thin, strong, low-stretch black cotton cord. Lay it along the back of the crocheted strand and secure it with small black yarn stitches every 3 to 4 inches. Anchor the reinforcing cord firmly into the stitched bases of both hanging loops, keeping it straight without pulling the crochet out of shape. Trim and secure the excess ends. The reinforcement should stay hidden behind the visible black strand.
Arrange and Space the Crochet Halloween Garland Motifs
Don't start sewing the decorations onto the cord just yet. Lay everything out first. It's much easier to move a pumpkin an inch or two on the table than to remove stitches after you've hung the garland.
Put the black cord across a table with its hanging loops pointing toward the ends. Then arrange your seven pieces from left to right in this order:
Black bat, orange pumpkin, white ghost, ivory crescent moon, white ghost, orange pumpkin, black bat.
That puts the moon in the middle, with the ghosts framing it. The orange pumpkins sit between the ghosts and bats, so the colors repeat evenly from both ends.

Mark the Seven Attachment Positions
Lay the completed cord flat with its two hanging loops at the ends. You should already have seven removable stitch markers placed before the ends were folded. Check that the markers follow the positions below, measured from the original left end of the straight cord. Don't start measuring again from the folded hanging loop, or the spacing will shift.
- 9 inches: First black bat
- 18 inches: First orange pumpkin
- 27 inches: First white ghost
- 36 inches: Crescent moon
- 45 inches: Second white ghost
- 54 inches: Second orange pumpkin
- 63 inches: Second black bat
These are center positions along the cord, not measurements across the hanging display. Once the cord curves downward, the straight-line distance between neighboring decorations will be smaller.
Center each motif beneath its marker. The bats' wings should spread outward, the pumpkins' stems should point upward, and the ghosts should face forward with their little pumpkins visible.
The moon should hang with its open crescent facing right, its upper horn above the lower horn and its embroidered eyes facing forward. Because the moon is taller than the other motifs, its lower tip will naturally hang farther down.
Give the finished arrangement a good look before attaching anything. You should be able to recognize all seven decorations without one covering another.
If you're using the garland across a smaller mantel, you can move the motifs a little closer together or make a shorter cord. I would keep the symmetrical order rather than squeezing everything toward one end.
Attach the Halloween Motifs to the Garland
Now we're ready to put everything together. I prefer sewing the motifs to the cord instead of tying each one on with a long dangling strand. Short, concealed attachment stitches keep the decorations close to the black cord and help them stay facing forward.
Use a yarn needle and matching yarn for each motif. Work through actual crochet stitches rather than splitting loose yarn fibers, and secure your sewing ends on the back.
Attach the Crescent Moon First
Start with the crescent moon because it marks the center of the garland. Check the balance again after both stuffed pumpkins and the remaining motifs are attached.
Locate the support loop you made using the original moon pattern. Place that loop around the black cord at the 36-inch marker, keeping the moon's front facing you.
With matching strong cotton thread, stitch the support loop securely around the cord, catching two neighboring cord stitches. Bring the thread ends to the back, tie them securely and weave them into the attachment area.
Temporarily lift the garland by its two end loops. Check that the moon hangs upright. If it twists, add a second small concealed securing stitch between the back of its upper outer curve and an adjacent portion of the cord. Keep the second attachment close to the support loop so it stabilizes the moon without pulling its horns out of shape.
The moon should stay gently curved, with its stuffing evenly distributed and both tapered tips clearly visible. Don't sew through the crescent opening or pull a support stitch tightly across the front.
Attach Both Ghosts
Place the first ghost beneath the 27-inch marker and the second beneath the 45-inch marker.
Thread a yarn needle with white yarn. For each ghost, pass the attachment yarn beneath several stitches at the upper back of the rounded head, then around the black garland cord. Repeat through a neighboring head stitch and cord stitch to give the attachment two secure points.
Tie off the yarn at the back and weave in the ends. Check that the white head stays centered above the body and that the little orange pumpkin remains on the lower right.
The ghosts' arms and five bottom waves should hang freely without folding behind the body. Don't pull the head tightly against the cord. You want the rounded top of the ghost to remain visible.
Attach Both Ribbed Pumpkins
Position the pumpkins beneath the 18-inch and 54-inch markers.
With orange yarn, mark two attachment points on the upper back of each stuffed pumpkin, approximately four stitches apart, with one on either side of the stem. At the first point, pass the needle beneath two neighboring orange single crochet stitches on the pumpkin's surface, then around both the black crocheted strand and its hidden reinforcing cord. Repeat this path once to secure the connection. Make the second attachment in the same way at the other marked point. Keep both points at approximately the same height so the pumpkin hangs upright. Leave the sewing tails unsecured until you have checked the pumpkin's position. Do not sew through the stem or leaf, and do not pull the attachment points together.
The two attachment points should support the pumpkin body rather than relying on the stem or leaf to hold its weight.
Before securing the ends, check that the raised pumpkin ribs face forward. The stems should stand upright, with the olive leaves angled toward the upper left. Adjust the attachment stitches if needed, then tighten them without compressing the pumpkin. Fasten off securely and weave the sewing tails into the back of the crochet.
Attach the Two Black Bats
Finally, attach a bat beneath the 9-inch marker and another beneath the 63-inch marker.
Use black yarn to secure the upper back of the head to the cord. Add a second small attachment through the upper body or inner wing-root area, spreading the supporting stitches across the bat's center without stitching across the outer wings.
Lift each bat gently and check that its head stays upright. The ears should point upward, the lower body point downward and the two wings outward.
Leave the outer wing edges free so their scalloped points remain visible. If a wing has curled, lightly reshape it before hanging the complete garland.
Check the Complete Assembly
Lift the garland by both end loops and let all seven motifs settle. You may need to adjust an attachment slightly if one decoration turns sideways.
Check the back of every motif for loose sewing ends. Gently tug the cord near each attachment point to check that nothing shifts or pulls free.
Once the two bats sit at similar heights, the pumpkins face forward and the ghosts hang evenly beside the centered moon, you're finished with the sewing. Remove all seven stitch markers, any temporary pins and every scrap of holding yarn. Check each attachment once more, weave in any remaining sewing tails and make sure nothing sharp or loose remains in the finished garland.
That's plenty. The shapes and colors do all the decorating without adding bows, beads or extra dangling pieces.
Hanging, Finishing and Safety Tips for Your Halloween Garland
The garland is ready to hang, but I'd give it one final check on a flat surface first. Smooth the ghost hems, straighten the pumpkin stems and spread the bats' wings so none of the pointed edges are folded underneath.
If your flat motifs have curled, lightly dampen and block those pieces as appropriate for the yarn. Let everything dry completely before hanging. Don't soak the stuffed moon. Gently reshape it by hand instead.
Hanging Across a Fireplace Mantel
A mantel is a pretty place to show off this garland because you can see the little faces and the crescent moon at eye level. Choose two firmly installed hooks that are suitable for the mounting surface, then place one hanging loop over each hook.
Let the cord form a shallow curve. Check that the moon stays centered and that the outside bats hang at approximately matching heights. You may need to change the hook spacing slightly to get the arrangement you want.
Only use this garland over a fireplace when the fireplace is completely cool and not in use. Never operate the fireplace while the garland is hanging above it. Keep yarn decorations at least 3 feet from burning candles and other heat sources. If you can't maintain that clearance, choose a separate wall or party backdrop instead. The styled photograph is a design illustration, not an example of safe clearance from an active fire.
Using the Garland for Baby's First Halloween
I like the friendly ghosts and sleepy moon for a baby's first Halloween party because they look festive without being too scary. You could hang the garland high on a party backdrop or across a wall where it becomes part of the decorations.
But this is a decoration, not a baby toy. Keep the cord and every crocheted motif completely out of reach of babies and young children. Don't attach the garland to a crib, bassinet, play yard, changing table or another place where a child could grab it.
The U.S. Consumer Product Safety Commission's safe sleep guidance calls for a bare infant sleep space with nothing but a fitted sheet. This garland belongs on a separate wall or party display, never in or over an infant's sleeping space.
Can You Make the Garland Longer?
Yes. If you have a wider wall or party display, you can crochet a longer connecting cord and increase the spacing between the motifs. Keep the two bats at the outside ends and the moon in the center, then adjust the pumpkins and ghosts evenly on both sides.
For a shorter version, I'd start with fewer motifs rather than crowding all seven together. A bat, ghost and pumpkin can make a small three-piece Halloween wall decoration, while the original seven-motif arrangement is the better choice when you have enough room.
Keeping Your Handmade Garland for Next Halloween
After Halloween, remove the garland from its hooks and lay it flat. Gently straighten any folded wing tips and make sure the moon is completely dry before storing it.
I'd place it in a clean box with tissue between the decorations instead of folding the cord tightly around the motifs. That helps the bats' pointed wings and the pumpkins' raised ribs keep their shape until you're ready to hang everything again.
If you're making more Halloween decorations, my free crochet Halloween applique patterns include other little designs that work on blankets, treat bags, wall decorations and seasonal projects. You can use the same motifs in several ways without making a completely different collection each time.
Pattern note: The stitch counts, shaping and assembly have been mathematically reviewed. Finished dimensions are estimates, and the example photographs illustrate the intended design. The complete garland has not been physically test-crocheted, so the finished measurements and appearance have not been confirmed against a handmade sample.
When you click on links to various merchants on this site and make a purchase, this may result in this site earning a commission. This does not affect the price you pay.

UBGI Gold Standard 2026
Reviewed under the site's
editorial checklist.
Photos, decorating ideas, party setups and reader submissions are shared for inspiration unless a page is specifically presented as a pattern, tutorial, reference guide or step-by-step project. Follow the instructions, measurements, safety guidance and manufacturer directions provided for the particular project or product.
About Jan | Contact | Baby Nursery Ideas (Blog) | Site Map | Privacy Policy | Disclosure Policy | Disclaimer | Affiliate Disclosure | Earnings Disclosure | Facebook | Pinterest
I am a participant in the Amazon Services LLC Associates Program, an affiliate advertising program designed to provide a means for us to earn fees by linking to Amazon. As an Amazon Associate I earn from qualifying purchases.
Copyright © 2006-2026. All Rights Reserved.