Crochet Moon and Stars Baby Mobile Pattern (Free Celestial Nursery Mobile)
My crochet moon and stars baby mobile pattern will create handmade nursery decor that adds a peaceful finishing touch while becoming a keepsake your family can treasure for years.
I designed this free pattern with a crescent moon, fluffy clouds and gentle stars that work together as a balanced hanging mobile. The crocheted motifs can also be used for wall hangings, garlands and other nursery décor projects.
By Jan Bay
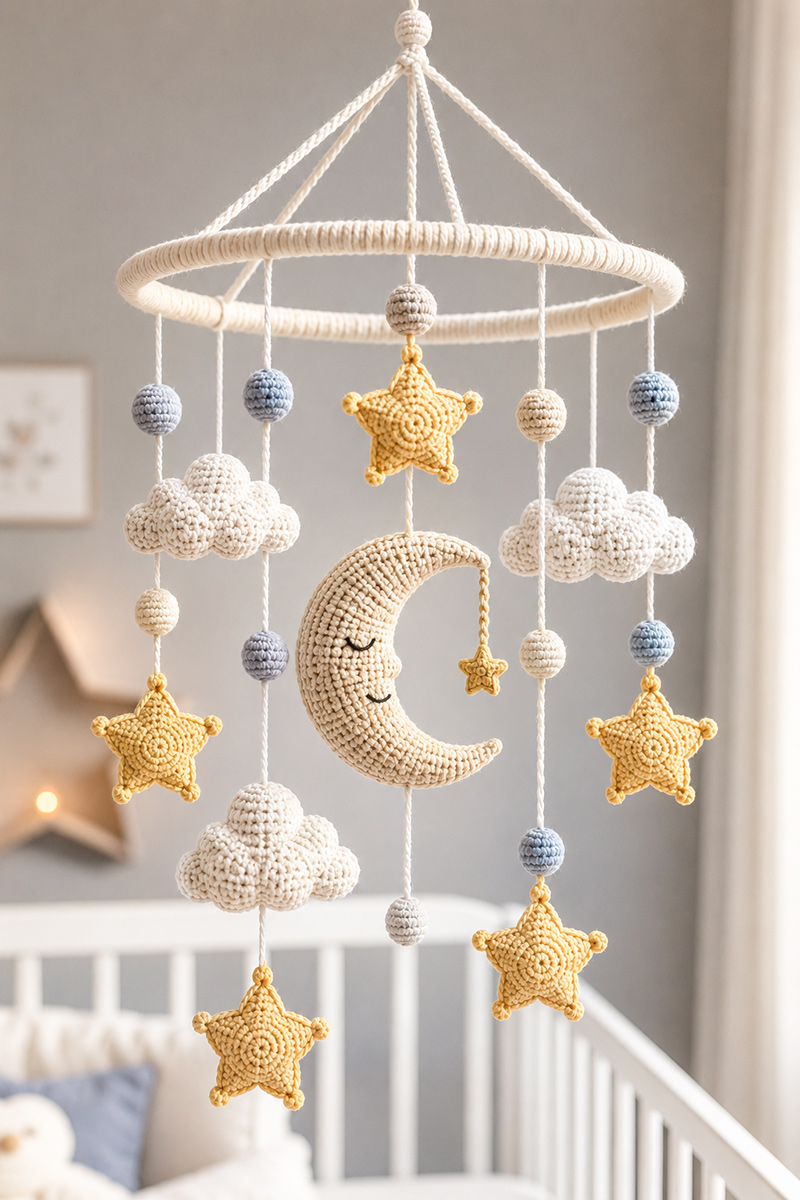
This crochet moon and stars baby mobile pattern is made by crocheting individual motifs, lightly stuffing each shape, attaching them to separate hanging strands, and balancing everything from a wooden ring. The finished mobile shown on this page includes one crescent moon, six five point stars, three clouds and decorative crochet beads arranged to rotate freely above the crib while remaining well out of a baby's reach.
Quick Answer
This crochet moon and stars baby mobile pattern requires crocheting the moon, stars, clouds and covered beads separately before attaching them to a wooden ring. This version also includes a decorative braided cord with a tiny dangling star attached to the moon. The separate support loop, measured strands and balanced ring layout support the moon and control the finished arrangement.
It doesn't take dozens of pieces to make a nursery look finished. Sometimes one handmade project becomes the detail everyone notices first. A moon and stars mobile catches changing daylight, adds handcrafted texture overhead and finishes the room without filling every shelf or wall.
If this mobile will become the handmade focal point of a larger celestial room, my space themed nursery ideas show how to coordinate it with planets, wall decor, bedding and a controlled color palette.
The moon is only the beginning. Once it is finished, every star, cloud and hanging strand falls naturally into place.
Project Specifications for the Crochet Moon and Stars Baby Mobile
This crochet moon and stars baby mobile pattern is designed as one complete nursery project rather than a collection of separate ornaments. Every piece is proportioned to work together so the finished mobile hangs evenly, rotates naturally and keeps its shape over time.
Finished Project at a Glance
- Ring diameter: 12 inches
- Finished drop below the wooden ring: about 23 inches
- Hanging point to lowest motif: approximately 38 to 40 inches, depending on the finished top loop and suspension height
- Crescent moon: approximately 6 to 6½ inches high by about 5 inches wide
- Stars: about 3½ inches across
- Clouds: approximately 4 to 4¼ inches wide
- Covered beads: about 1 inch in diameter
- Approximate finished weight: varies with yarn and stuffing
- Skill level: Intermediate
- Estimated project time: approximately 10 to 14 hours
Hook
3.0 mm crochet hook
Recommended Yarn
DK weight 100% cotton
Sample Color Plan
Use ivory for the crescent moon and warm white for the clouds. Divide the mustard and navy yarn among the six full-size stars and nine bead covers as desired. Each moon, star, cloud puff and bead cover is completed in one color, so no color changes are required within a motif.
Approximate Yarn Requirements
- Ivory: approximately 70 grams
- Warm white: approximately 45 grams
- Mustard: approximately 40 grams
- Navy: approximately 20 grams
Other Materials
- Approximately 3 ounces polyester fiberfill
- Tapestry needle
- Stitch markers
- Small locking clips or clothespins for temporarily balancing the hanging strands
- Sharp embroidery scissors
- Sewing pins
- Wooden chopstick or stuffing tool
- Flexible measuring tape
- 12 inch wooden mobile ring
- At least 15 yards of strong, low-stretch cotton crochet thread or smooth cotton cord that passes through the holes in the wooden beads
- Small amount of black embroidery floss or smooth black cotton yarn for the moon's closed eyes
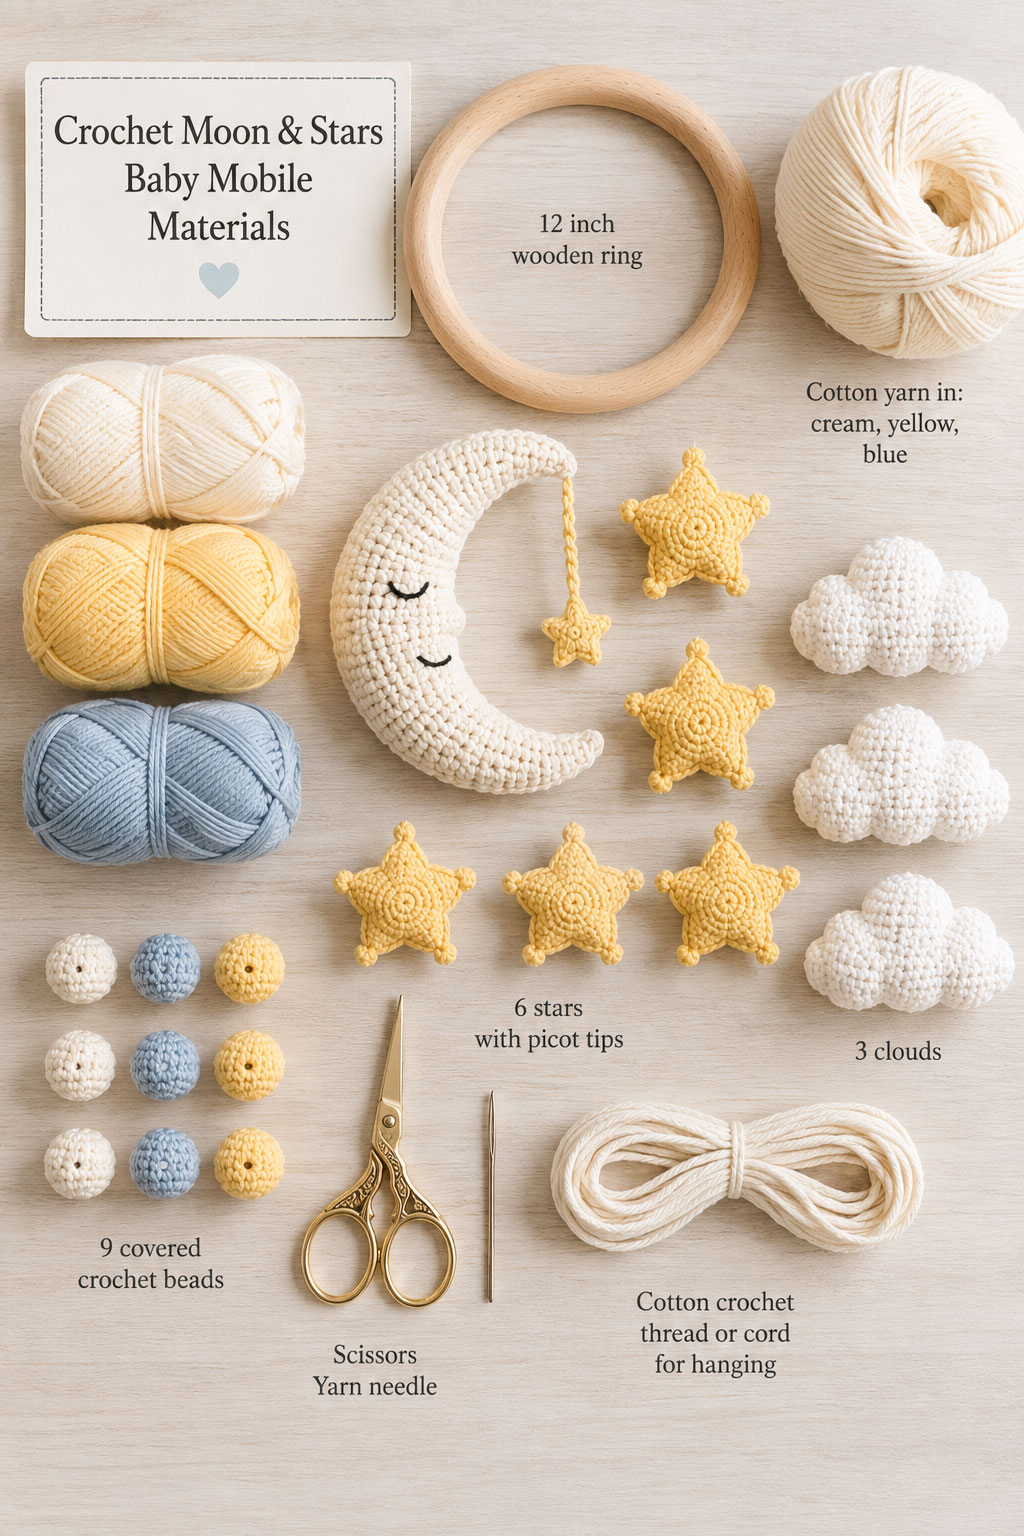
The finished arrangement places the crescent moon slightly above the visual center of the ring. Six stars and three clouds hang at different lengths around it, allowing every piece to rotate independently rather than forming one flat circle. Looking up from beneath the mobile, the design appears balanced from every angle without looking rigid.
Individual crochet tension varies from one crocheter to another. Small differences in finished measurements are normal, but noticeable size differences can affect the spacing and balance of the completed mobile. Measure the first moon, star, cloud puff and bead cover before making the remaining matching pieces.
Construction Overview
This project is assembled one piece at a time. The moon is made first because it establishes the proportions for everything that hangs around it. Once the moon is finished, the stars, clouds and covered beads are worked separately before the entire mobile is assembled.
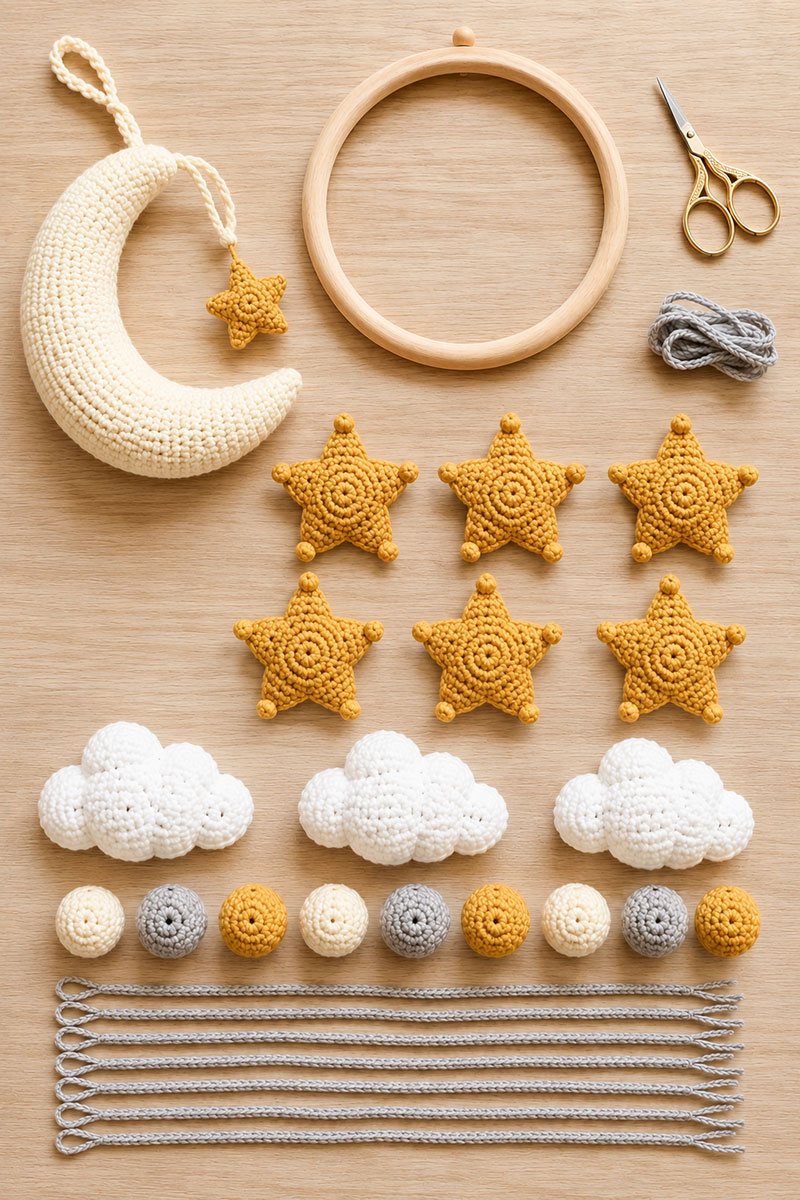
Work the project in the following order. Each finished piece becomes the size reference for the next one.
- Crochet the crescent moon and add the embroidered eyes before the opening becomes too small to reach through. Finish, stuff and shape the moon before adding its separate support loop.
- Add the decorative braided cord and tiny dangling star to the upper horn of the moon.
- Crochet twelve matching star panels and join them into six finished stars.
- Crochet fifteen cloud puffs and sew them into three five-puff clouds.
- Make nine covered crochet beads, leaving the bead holes accessible at both ends.
- Add a secure hanging loop to each star and cloud during assembly.
- Prepare the four-point ring suspension harness, center moon cord and nine outer hanging strands from strong cotton thread or cord.
- Wrap the wooden ring with matching yarn if desired, or leave the natural wood exposed.
- Lay every finished component on a flat surface and compare the matching pieces before assembly.
- Attach and balance every component before securing the final knots.
Leave enough yarn for sewing each motif, but do not use ordinary finishing tails as the main hanging strands. Add a small secured support loop to the completed moon, every star and every cloud. Attach those loops to separate lengths of strong cotton thread or cord during final assembly.
Add fiberfill to the moon gradually as the decrease rounds narrow the opening. When joining each pair of star panels, add fiberfill to the points and center before the seam becomes too small to reach through. Gradual stuffing produces smoother curves and more consistent shaping around the moon horns and star points.
For the moon, full-size stars, cloud puffs and tiny dangling star, pull each magic ring firmly closed and weave its starting tail through several wrong-side stitches before the inside becomes inaccessible. Do not close the starting magic ring on the bead covers because those openings must remain aligned with the holes through the wooden beads.
Blocking is optional when using cotton yarn, although lightly shaping matching panels before joining helps produce cleaner finished edges. Allow every piece to dry completely before beginning assembly.
Use strong, low-stretch cotton crochet thread or smooth cotton cord for every load-bearing strand. The material must pass through the holes in the covered wooden beads. Do not use crocheted chains for the suspension harness or beaded hanging strands because the chains may be too thick for the bead holes and may stretch unevenly.
Different strand lengths are intentional. The finished motif positions vary by approximately three to four inches so the shapes remain visible at separate levels while the moon stays near the visual center of the arrangement.
I believe the easiest way to balance a mobile is to tape each strand temporarily to the ring before tying permanent knots. A few minutes spent adjusting the layout now can save taking the entire mobile apart later.
Before joining any pieces permanently, lay them around the wooden ring without tying the strands. It's much easier to adjust spacing on a tabletop than after the mobile is hanging.
Before hanging the completed mobile in the nursery, suspend it from a temporary hook and allow every strand to settle naturally. Make small adjustments until the ring hangs level and the moon remains slightly above the visual center of the arrangement.
The foundation of the mobile is complete. The next step is crocheting the crescent moon, since every remaining piece is sized around it.
Crochet Crescent Moon Pattern With Braided Star Detail
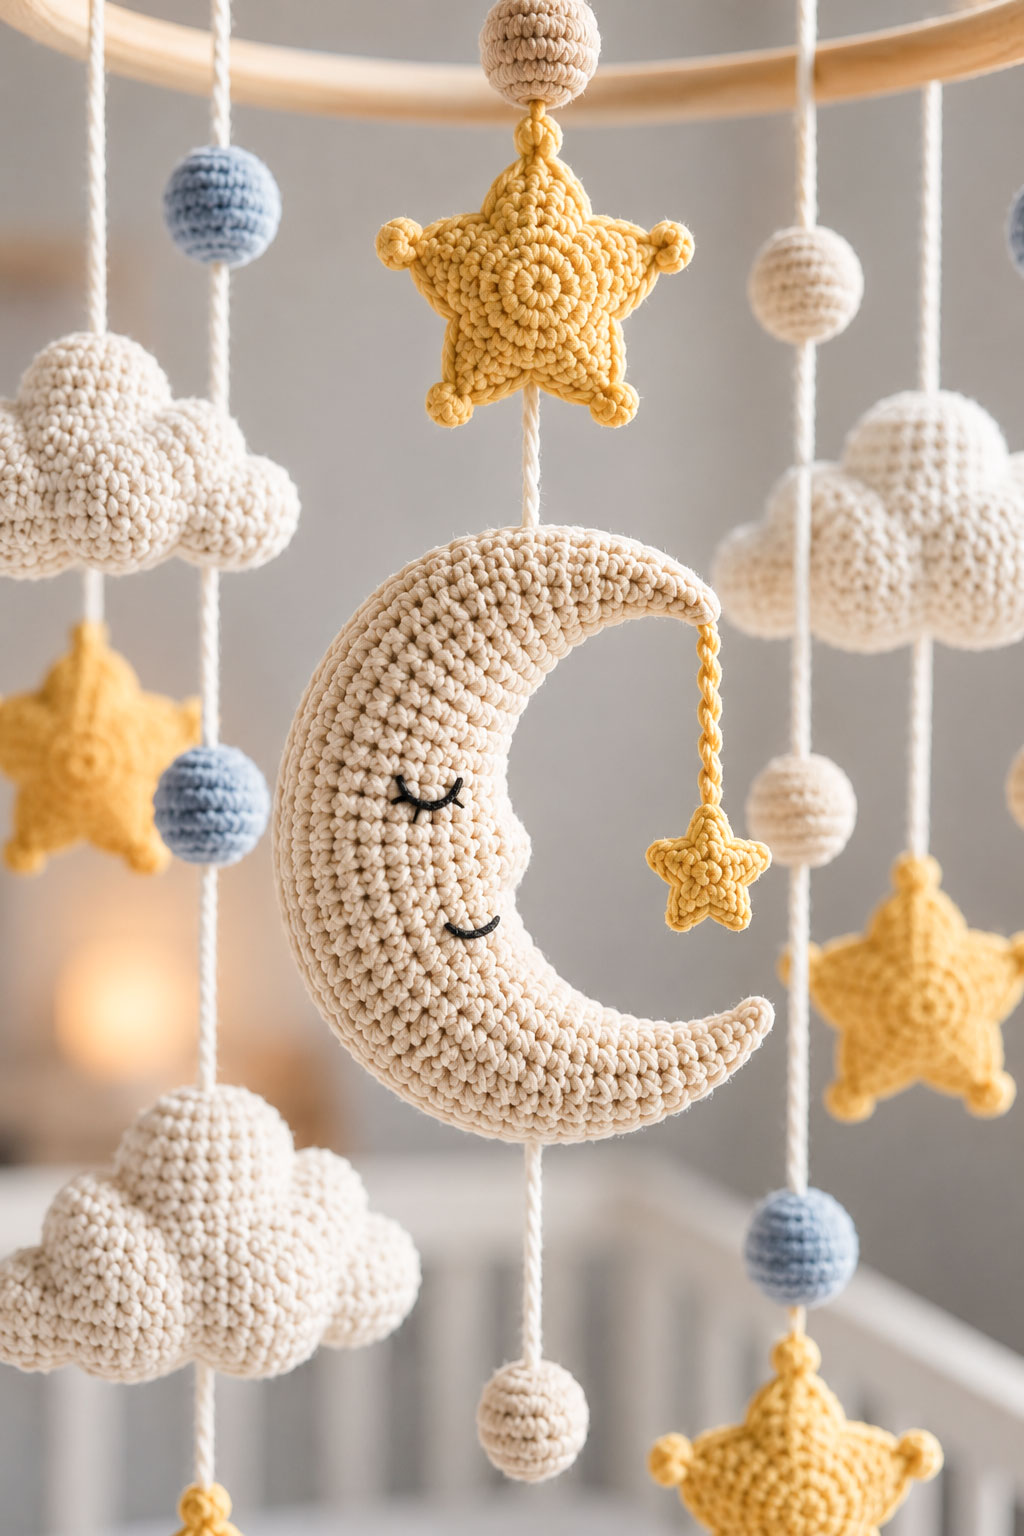
The crescent moon is the largest piece in this mobile and sets the size for the stars, clouds and hanging strands that follow. This version has a shorter center section than a pillow-style moon, so it stays lighter and better suited for a nursery mobile.
Finished Size
Measure your finished sample after stuffing. This moon is expected to finish around 6 to 6½ inches tall, but size will vary with yarn, hook size and tension.
Abbreviations Used
Mc = magic circle, ch = chain, sc = single crochet, inc = 2 sc in same stitch, dec = single crochet decrease, sl st = slip stitch, st/sts = stitch/stitches.
Yarn Used for Moon
Approximately 35 to 40 grams of the same DK weight cotton yarn used for the remaining mobile pieces.
Moon Notes
Use firm, even stitches so the fiberfill does not show through. The moon should hold its shape, but it should not be packed tight. A mobile piece needs to stay light enough to hang cleanly from the ring.
Important Moon Construction Notes
- Work every round in the same direction. Do not turn after joining.
- The chain 1 and the slip stitch used to join each round do not count as stitches.
- Work the first single crochet of each new round into the same stitch where the previous round was joined.
- Keep the joined seam and all paired increases and decreases aligned along the same side of the moon.
- The repeated increases and decreases beside the join create the fuller outer curve. Shape the moon with the joined seam along the outer curve and the opposite side forming the inside curve.
- Treat the starting tip as the upper horn and the final tip as the lower horn.
Crescent Moon Pattern
Mc, ch 1.
Round 1: 4 sc in center ring, sl st to first sc to join, ch 1. (4 sts)
Rounds 2 to 3: 1 sc in each st around, sl st to first sc to join, ch 1. (4 sts)
Round 4: Inc in 1st st, 1 sc in each of the next 2 sts, inc in last st, sl st to first sc to join, ch 1. (6 sts)
Rounds 5 to 7: 1 sc in each st around, sl st to first sc to join, ch 1. (6 sts)
Round 8: Inc in 1st st, 1 sc in each of the next 4 sts, inc in last st, sl st to first sc to join, ch 1. (8 sts)
Round 9: 1 sc in each st around, sl st to first sc to join, ch 1. (8 sts)
Round 10: Inc in 1st st, 1 sc in each of the next 6 sts, inc in last st, sl st to first sc to join, ch 1. (10 sts)
Round 11: 1 sc in each st around, sl st to first sc to join, ch 1. (10 sts)
Round 12: Inc in 1st st, 1 sc in each of the next 8 sts, inc in last st, sl st to first sc to join, ch 1. (12 sts)
Round 13: 1 sc in each st around, sl st to first sc to join, ch 1. (12 sts)
Round 14: Inc in 1st st, 1 sc in each of the next 10 sts, inc in last st, sl st to first sc to join, ch 1. (14 sts)
Round 15: 1 sc in each st around, sl st to first sc to join, ch 1. (14 sts)
Round 16: Inc in 1st st, 1 sc in each of the next 12 sts, inc in last st, sl st to first sc to join, ch 1. (16 sts)
Round 17: 1 sc in each st around, sl st to first sc to join, ch 1. (16 sts)
Round 18: Inc in 1st st, 1 sc in each of the next 14 sts, inc in last st, sl st to first sc to join, ch 1. (18 sts)
Rounds 19 to 26: 1 sc in each st around, sl st to first sc to join, ch 1. (18 sts)
Do not add more stuffing yet. Add the embroidered face while the inside of the moon remains accessible. After the embroidery ends are secured, begin adding small pieces of fiberfill and continue stuffing a little at a time every few rounds. This helps the crescent keep an even profile and prevents lumps from collecting near the center.
Add the Embroidered Face
Place the partially completed moon flat with the joined seam running along the outer curve. Keep the starting tip at the top and the open working end at the bottom. Choose one broad side as the front.
- Use black embroidery floss to make two small curved closed eyes on the front of the moon.
- Place the upper eye near Rounds 20 to 21 and the lower eye near Rounds 23 to 24. Each eye should span approximately three to four stitches.
- Keep both eyes on the rounded front surface rather than placing them directly over the joined seam.
- Secure every embroidery end inside the moon. Do not use buttons, safety eyes or glued facial pieces.
- Begin adding small pieces of fiberfill after the embroidery has been secured.
- Continue stuffing and crocheting the remaining rounds.
Round 27: Dec, 1 sc in each of the next 14 sts, dec, sl st to first sc to join, ch 1. (16 sts)
Round 28: 1 sc in each st around, sl st to first sc to join, ch 1. (16 sts)
Round 29: Dec, 1 sc in each of the next 12 sts, dec, sl st to first sc to join, ch 1. (14 sts)
Round 30: 1 sc in each st around, sl st to first sc to join, ch 1. (14 sts)
Round 31: Dec, 1 sc in each of the next 10 sts, dec, sl st to first sc to join, ch 1. (12 sts)
Round 32: 1 sc in each st around, sl st to first sc to join, ch 1. (12 sts)
Round 33: Dec, 1 sc in each of the next 8 sts, dec, sl st to first sc to join, ch 1. (10 sts)
Round 34: 1 sc in each st around, sl st to first sc to join, ch 1. (10 sts)
Round 35: Dec, 1 sc in each of the next 6 sts, dec, sl st to first sc to join, ch 1. (8 sts)
Round 36: 1 sc in each st around, sl st to first sc to join, ch 1. (8 sts)
Round 37: Dec, 1 sc in each of the next 4 sts, dec, sl st to first sc to join, ch 1. (6 sts)
Round 38: 1 sc in each st around, sl st to first sc to join, ch 1. (6 sts)
Round 39: Dec, 1 sc in each of the next 2 sts, dec, sl st to first sc to join, ch 1. (4 sts)
Rounds 40 to 41: 1 sc in each st around, sl st to first sc to join, ch 1. (4 sts)
Fasten off, leaving a 12 inch tail. Thread the tail through the remaining four stitches and pull snug to close the opening. Pass the tail through the moon and bring it out through a different stitch several inches away. Pull gently, trim the tail close to the surface and allow the cut end to disappear inside the stuffing. Add the separate moon support loop after the moon has been fully shaped.
Roll the moon lightly between your hands to distribute the stuffing. The center should stay rounded while both points remain narrow enough to look clean once the mobile is hanging.
Add the Moon Support Loop After Shaping
- Place the completed moon flat with the joined seam along the outer curve, the starting tip forming the upper horn, the final tip forming the lower horn and the crescent opening toward the right.
- Place a locking stitch marker on the upper outer curve at approximately Rounds 10 to 12.
- Pass a temporary scrap of cord through the marked area and lift the completed moon. Move the marker one or two stitches at a time until the upper horn remains above the lower horn and the front of the moon faces forward without twisting.
- Remove the temporary scrap of cord.
- Cut a 12 inch length of strong cotton thread or cord and fold it in half.
- Thread one cut end onto a tapestry needle. At the marked position, pass that end beneath at least three nearby crochet stitches and bring it out on the back of the moon approximately ½ inch below the marker.
- Thread the second cut end onto the needle. Pass it beneath three adjacent crochet stitches and bring it out beside the first end on the back of the moon.
- Adjust the folded section until approximately a 1 inch support loop remains above the moon.
- Tie the two ends together on the back with two firm overhand knots.
- Weave the two ends in opposite directions through several nearby stitches without pulling the moon out of shape.
- Trim the remaining ends and pull firmly on the completed support loop to confirm that it does not shift or loosen.
Braided Cord and Tiny Dangling Star
The small star hanging from the upper tip gives the moon a finished nursery-mobile look and makes the piece feel less like a plain crescent. It also adds movement without adding much weight.
Braided Cord
- Cut three strands of yarn, each approximately 18 inches long.
- Thread all three strands through the upper tip of the moon, about ½ inch below the point.
- Fold the strands in half so you have six strands hanging from the moon.
- Divide the six strands into three groups of two strands. Braid the three paired groups together for approximately 3 inches.
- Tie a small knot at the end of the braid.
- Trim the ends neatly after the star is attached.
Tiny Star
Mc, ch 1.
Round 1: 5 sc in center ring, sl st to first sc to join. (5 sts)
Star Points: Ch 3, sl st in 2nd ch from hook, sc in next ch, sl st into next stitch on the ring. Repeat 4 more times to make 5 points.
Fasten off, leaving a long tail. Use the tail to sew the tiny star securely to the knot at the end of the braid. Weave in any loose ends.
The braid and tiny star are decorative only. They do not support the weight of the moon. Suspend the moon from the separate loop installed along the top outer curve, and allow the braided star to hang freely from the upper horn.
Crochet Puffy Star Pattern with Tiny Picot Points
The stars surround the crescent moon and help carry the celestial theme throughout the mobile. Each finished star is made from two matching panels that are joined and lightly stuffed. A tiny picot at the tip of every point adds just enough detail to catch the light without distracting from the overall design.
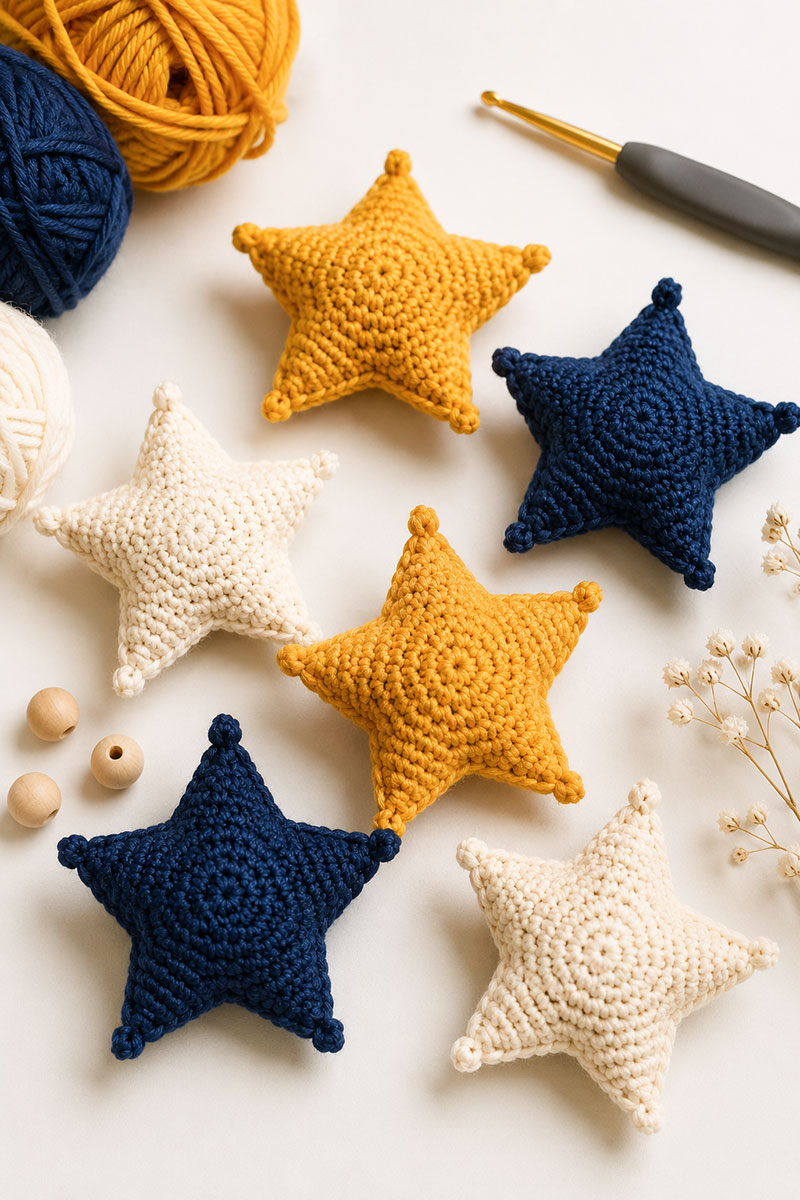
Finished Size
Approximately 3 to 3½ inches across after joining and light stuffing.
Gauge
The finished star should measure about 3¼ inches across. If your finished star is noticeably larger, use a smaller hook. If it is smaller, move up one hook size.
Make
Make twelve matching panels to create six finished stars.
Yarn
Approximately 35 to 40 grams of DK weight cotton yarn for all six stars.
Hook
3.0 mm crochet hook.
Abbreviations
Mc = magic circle, ch = chain, sc = single crochet, inc = 2 sc in the same stitch, dec = single crochet decrease, sl st = slip stitch, st/sts = stitch/stitches.
Star Panel Pattern
Work the center in continuous rounds. Do not join unless instructed. Place a stitch marker in the first stitch of each round.
Mc.
Round 1: Work 5 sc into the magic circle. (5 sts)
Round 2: Inc in each stitch around. (10 sts)
Round 3: *(1 sc, inc)* repeat around. (15 sts)
Round 4: *(2 sc, inc)* repeat around. (20 sts)
Round 5: *(3 sc, inc)* repeat around. (25 sts)
Round 6: *(4 sc, inc)* repeat around. (30 sts)
Divide the final round into five sections of 6 stitches. Each section becomes one point.
The chain 1 at the end of Point Rows 1 through 3 is a turning chain and does not count as a stitch.
Point 1
Row 1: Beginning in the marked first stitch of Round 6, sc in that stitch and in each of the next 5 stitches, ch 1, turn. (6 sts)
Row 2: Dec, sc in the next 2 stitches, dec, ch 1, turn. (4 sts)
Row 3: Dec twice, ch 1, turn. (2 sts)
Row 4: Dec. (1 st)
Ch 3 and sl st into the first chain to form a small picot at the point tip. Fasten off.
Points 2 to 5
Insert the hook into the first unworked stitch of Round 6 and pull up a loop of yarn. Ch 1, which does not count as a stitch. Sc in the same stitch and in each of the next 5 stitches, ch 1, turn. (6 sts)
Complete Rows 2 to 4 and the tip picot exactly as written for Point 1, then fasten off. Repeat from the first unworked stitch for each remaining point. Each point uses exactly 6 stitches from Round 6, so all five points use 5 × 6 = 30 stitches with no stitches left over.
Tuck the point tails toward the wrong side of the panel. They will be enclosed when the panels are joined.
Make a second matching panel and fasten off all five points normally. Cut a separate 48 inch length of matching yarn for joining the two panels.
Joining the Star
- Place the two panels together with the right sides facing outward. Match all five valleys, points and picots.
- Choose one point as the top of the star.
- Thread the separate 48 inch joining yarn onto the tapestry needle. Begin at the valley beside the selected top point and use small whip stitches through corresponding edge loops.
- When you reach each point tip, pass the needle through both picot loops twice so the two panel picots sit together as one small tip detail.
- Add a small amount of fiberfill to each point as the seam reaches it.
- Keep the valleys lightly filled so the five points remain clearly separated.
- Add only enough fiberfill to the center to prevent it from collapsing.
- Before closing the selected top point, cut a 6 inch length of strong cotton thread or cord and fold it in half.
- Place the folded thread inside the point with approximately a 1 inch loop extending beyond the seam.
- Knot the two cut ends together inside the star and stitch through the knot before closing the point.
- Before closing the final section of the seam, lay the star on a flat surface and compare all five points. If one point appears slightly longer than the others, gently reshape it.
- Complete the final whip stitches, secure the joining yarn and hide the remaining end inside the star.
Roll the finished star lightly between your fingers to distribute the fiberfill. Pinch each valley gently so the points stand apart and the tiny picots remain visible.
Measure the finished star at its widest point from one outer tip to the farthest opposite outer edge. It should measure approximately 3 to 3½ inches across. Make and finish one complete sample star before joining the remaining panels.
I believe it is easier to crochet all twelve panels first, then join and stuff them as a group. Working assembly style usually produces stars that match each other more closely.
Hang the stars at different heights around the moon instead of placing them all at the same level. The varied lengths create natural movement while allowing the crescent moon to remain the focal point of the finished mobile.
Small flying accents can enhance a celestial mobile, and these bird nursery mobile ideas show how lightweight birds and wing shapes can add gentle movement without competing with the moon and stars.
Crochet Cloud Pattern for the Baby Mobile
These clouds are built from five lightly stuffed crochet puffs sewn together into one cloud shape. This construction gives the cloud rounded edges, keeps the weight low and allows it to hang naturally beneath the mobile without twisting.

Finished Size
Approximately 4 to 4¼ inches wide and about 2½ inches tall after assembly. Finished size may vary slightly depending on yarn, hook size and individual tension.
Make
Three finished clouds.
Gauge
Each finished puff should measure approximately 1¼ to 1½ inches across before assembly. Complete and measure one puff before making the remaining fourteen.
Yarn
Approximately 30 grams of DK weight cotton yarn.
Hook
3.0 mm crochet hook.
Abbreviations
Mc = magic circle, sc = single crochet, inc = 2 sc in the same stitch, dec = invisible decrease, st/sts = stitch/stitches.
Cloud Puff
Work each puff in continuous rounds. Do not join or turn. Place a stitch marker in the first stitch of each round and move it up as you work.
Make five puffs for each cloud, for a total of fifteen puffs.
Round 1: Using warm white yarn, make a magic circle. Work 6 sc into the ring. (6 sts)
Round 2: Inc in each stitch around. (12 sts)
Round 3: *(1 sc, inc)* repeat around. (18 sts)
Rounds 4 to 5: Sc in each stitch around. (18 sts)
Round 6: *(1 sc, dec)* repeat around. (12 sts)
Add enough fiberfill for the puff to hold its rounded shape. It should compress easily between your fingers instead of feeling firm.
Round 7: Work 6 invisible decreases. Pull the opening closed and fasten off, leaving a 12 inch yarn tail for sewing. (6 sts)
Measure the first completed puff before making the remaining fourteen. It should measure approximately 1¼ to 1½ inches across.
Assemble Each Cloud
Arrange the five finished puffs in the following layout before sewing.
      ○     ○

   ○     ○     ○
Before sewing, rotate the puffs until you find the arrangement that produces the smoothest outline. Minor adjustments now make the finished cloud look much more balanced.
- Arrange three puffs side by side to form the lower row.
- Position the remaining two puffs above them so each upper puff rests over a join between two lower puffs.
- Sew the lower left puff to the lower middle puff where their sides touch.
- Sew the lower middle puff to the lower right puff where their sides touch.
- Attach the upper left puff to both the lower left and lower middle puffs.
- Attach the upper right puff to both the lower middle and lower right puffs.
- Sew the two upper puffs together where their sides touch.
- Do not pull one securing stitch through all five puffs. Reinforce only the individual places where two neighboring puffs touch.
- Cut a 6 inch length of strong cotton thread or cord and fold it in half.
- Place the folded center between the two upper puffs with approximately a 1 inch loop extending above the cloud.
- Pass one loose end through several stitches in the inner side of the upper left puff and into the lower middle puff.
- Pass the other loose end through several stitches in the inner side of the upper right puff and into the lower middle puff.
- Knot the two ends together against the lower middle puff and hide the knot inside the seam.
- Weave in all remaining sewing tails.
Gently squeeze each puff individually after assembly to redistribute the fiberfill. This keeps every bump rounded while preventing flat spots where the puffs are sewn together.
Lay all three finished clouds beside one another before attaching them to the mobile. Small variations give the project character, but the overall size should remain consistent so one cloud does not appear noticeably larger than the others.
Set each cloud on a flat surface after shaping. If one puff sits noticeably higher than the others, massage the stuffing gently until the outline becomes more even.
I believe it's easiest to crochet all fifteen puffs first, then assemble the three clouds together. Crocheting all fifteen puffs before beginning assembly usually produces clouds that match one another more closely.
One cloud looks especially nice hanging just below the crescent moon, while the remaining two balance opposite sides of the mobile. Staggering the hanging heights by an inch or two creates movement without making the arrangement appear crowded.
Before tying permanent knots on the mobile ring, clip each cloud temporarily into place with small sewing clips or clothespins. This makes it much easier to adjust spacing before the final assembly.
Covered Crochet Beads
The covered beads separate the moon, stars and clouds while adding another layer of texture to the finished mobile. They also help each hanging strand drape naturally by spreading the visual weight from top to bottom instead of concentrating it near the ends.
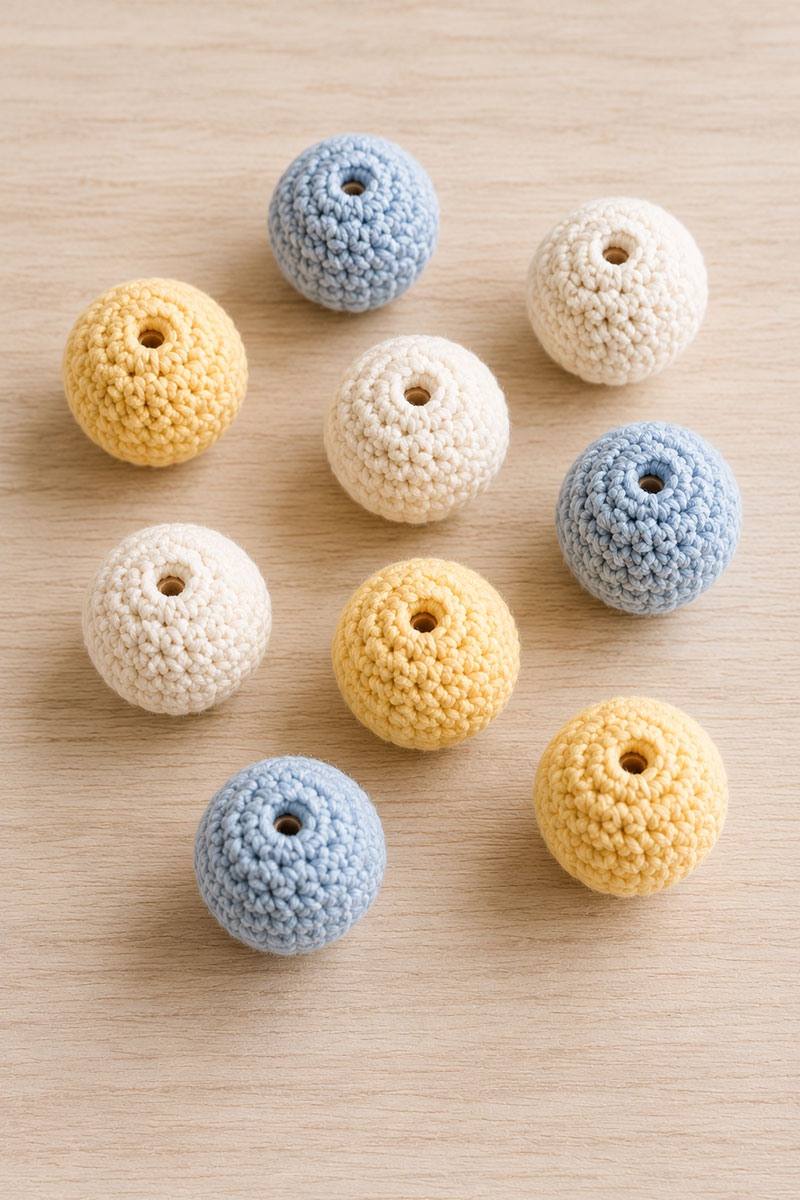
Finished Size
Designed to fit standard 1 inch unfinished wooden beads.
Natural wooden beads can vary slightly from one manufacturer to another. Crochet one bead cover first and test the fit before making the remaining eight.
Make
Nine covered beads.
Gauge
The completed cover should fit snugly over the bead without stretching the stitches enough to expose the wood underneath.
Supplies
- Nine unfinished 1 inch wooden beads
- DK weight cotton yarn
- 3.0 mm crochet hook
- Tapestry needle
Abbreviations
Mc = magic circle, sc = single crochet, inc = 2 sc in one stitch, dec = invisible decrease, st = stitch.
Crochet Bead Cover
Work the bead cover in continuous rounds. Do not join or turn. The chain 1 after the magic circle does not count as a stitch. Place a stitch marker in the first single crochet of each round and move it up as you work.
Crochet all nine bead covers before beginning the final assembly. Working them as one group usually produces more consistent sizing.
Mc, ch 1.
Both ends of the crochet cover must remain open and aligned with the hole through the wooden bead. Do not pull either opening completely closed.
Round 1: Work 6 sc into the magic circle. Pull the ring only until its center opening is approximately the same size as the hole in the wooden bead. (6 sts)
Leave the magic-ring tail accessible. Do not weave it in or pull the opening completely closed.
Round 2: Work 2 sc in each stitch around. (12 sts)
Round 3: *(1 sc, inc)* repeat around. (18 sts)
Rounds 4 and 5: Sc in each stitch around. (18 sts)
Slip one unfinished wooden bead inside the crochet cover. Position the center opening from Round 1 directly over one end of the hole through the wooden bead. Hold that alignment while completing the remaining rounds.
The cover should fit closely around the bead without forcing the stitches open. If the bead slides in too easily, remake the cover using slightly tighter tension before continuing.
Round 6: *(1 sc, dec)* repeat around. (12 sts)
Round 7: Work one invisible decrease in each stitch pair around for a total of 6 decreases. Fasten off, leaving a 6 inch tail.
Align the remaining opening with the hole through the wooden bead. Thread the finishing tail through the front loops of the six remaining stitches and draw them inward only until the crochet opening matches the bead hole.
Pass the finishing tail beneath one decrease stitch twice and knot it against that stitch. Weave the tail through several nearby crochet stitches without crossing or blocking the bead hole.
Return to the starting magic-ring tail. Adjust the starting opening until it matches the hole at the opposite end of the wooden bead. Pass the starting tail around the base of one Round 1 stitch twice, knot it securely and weave it through several neighboring stitches without crossing or blocking the hole.
I like covering the beads in the same colors used for the stars and clouds so the colors repeat naturally throughout the mobile without allowing any single strand to stand out more than the others.
Keep the beginning and ending openings aligned with the hole through the bead. During assembly, use a tapestry needle to pass the cotton hanging thread through the first crochet opening, through the wooden bead and out through the opposite crochet opening.
Tips for Consistent Beads
- Lay all nine finished bead covers in a row before assembling the mobile. Matching sizes help the completed project look balanced.
- Check that every cover fits snugly before weaving in the yarn tails.
- If one cover appears noticeably larger or smaller than the others, remake it now rather than trying to tighten it with additional stitches.
- Roll each covered bead lightly between your palms after securing both crochet openings around the bead holes. This distributes the stitches evenly around the wooden bead.
- Weave every yarn tail through several stitches before trimming to help prevent the opening from loosening over time.
Before attaching any bead permanently, line all nine beads up on a flat surface and compare them side by side. If one appears noticeably larger or smaller than the others, remake it while the yarn and hook are still nearby.
I believe it is easier to finish every bead before beginning the final assembly. Having all nine completed makes balancing the mobile much simpler because you can experiment with spacing before tying permanent knots.
Place one covered bead on each of the six star strands and one on each of the three cloud strands. This uses all nine beads. The center moon cord remains unbeaded.
How to Assemble the Crochet Moon and Stars Baby Mobile Pattern
Assembly is where the project comes together. Before tying a single permanent knot, arrange every finished piece on a large table. Taking a few extra minutes now makes balancing the completed mobile much easier than trying to adjust everything after it is hanging.
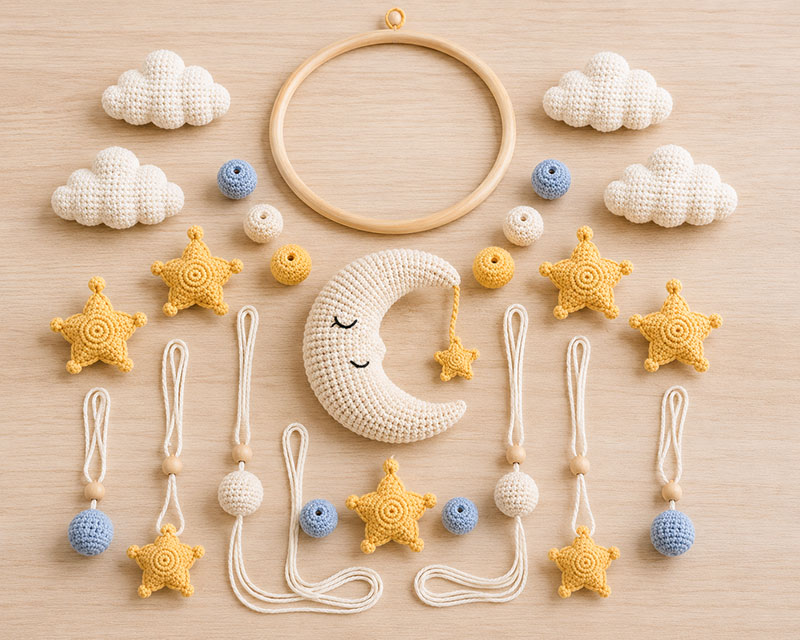
Finished Components
- 1 crescent moon
- 6 stuffed stars
- 3 clouds
- 9 covered crochet beads
- 1 twelve inch wooden ring
- Strong, low-stretch cotton crochet thread or smooth cotton cord for the four-point suspension harness, center moon cord and nine outer strands
Before attaching any hanging cords, pull firmly on the support loop of the moon, every star and every cloud. The loops should not shift, stretch out of position or loosen their surrounding stitches. Repair any weak attachment before continuing with the mobile assembly.
Recommended Hanging Lengths
Measure each motif position vertically from the underside of the wooden ring to the top attachment loop of the finished motif after its bead and knots are in place.
- Center moon: approximately 8 inches from the ring to the moon's top attachment loop
- Two upper star strands: approximately 11 inches
- Two middle star strands: approximately 15 inches
- Two lower star strands: approximately 19 inches
- Three cloud strands: approximately 9 inches, 12 inches and 15 inches
- Top suspension: four equal 30 inch cords adjusted to place the central gathering knot approximately 8 to 10 inches above the ring
Cord Cutting Lengths
These are cutting lengths rather than finished hanging measurements. The extra cord allows room for the ring attachments, motif knots, bead stoppers and final balancing.
- Moon support loop: one 12 inch length
- Star support loops: six 6 inch lengths
- Cloud support loops: three 6 inch lengths
- Four top suspension cords: 30 inches each
- Separate top hanging-loop cord: 18 inches
- Center moon cord: 30 inches
- Two cords for the 11 inch star positions: 22 inches each
- Two cords for the 15 inch star positions: 26 inches each
- Two cords for the 19 inch star positions: 30 inches each
- Cloud cord for the 9 inch position: 20 inches
- Cloud cord for the 12 inch position: 23 inches
- Cloud cord for the 15 inch position: 26 inches
Measure every strand before attaching it. Even a difference of half an inch becomes noticeable once the mobile begins turning.
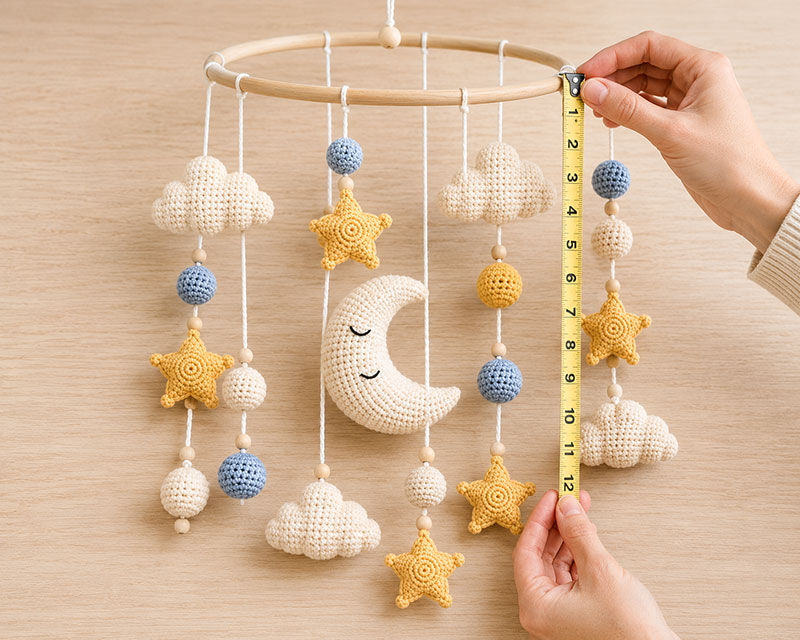
Suggested Layout
                 Star

       Cloud               Star

   Star          Moon           Star

      Cloud                 Star

           Star       Cloud
The layout does not have to match this exactly, but keeping the visual weight evenly distributed around the ring helps the mobile rotate smoothly instead of leaning to one side.
Assembly Order
- Wrap the wooden ring with matching yarn if desired, or leave the natural wood exposed.
- Mark four equally spaced suspension points around the ring. Each point should sit one quarter of the way around the ring from the next point.
- Use the four 30 inch suspension cords. At each marked point, wrap one end of a cord around the ring twice. Tie the short end to the long standing section with two firm overhand knots. Leave approximately a 2 inch tail for final reinforcement.
- Bring the four long cord ends together above the exact center of the ring.
- Temporarily suspend the empty ring. Adjust the four cords until the ring remains level and the gathering point sits approximately 8 to 10 inches above the ring.
- Tie all four long ends together at the gathering point using two firm overhand knots placed directly on top of one another.
- Confirm that the empty ring remains level. Trim each of the four cord ends extending beyond the gathering knot to approximately 2 inches.
- Using a tapestry needle, pass each short tail down through the gathering-knot area twice. Trim each secured tail to approximately 1 inch.
- Fold the separate 18 inch top hanging-loop cord in half. Pass the folded center beneath the gathering knot and pull the two cut ends through the folded loop.
- Bring the two cut ends of the hanging-loop cord together and tie them with two firm overhand knots. Pull firmly on the completed loop before attaching the mobile to a permanent support.
- Tie one end of the 30 inch center moon cord to the underside of the central gathering knot using two firm overhand knots.
- Pass the center moon cord straight down through the open center of the wooden ring.
- Tie the lower end of the center cord to the built-in loop on the moon.
- Adjust the center cord until the moon's top attachment loop hangs approximately 8 inches below the wooden ring. Secure the cord with two firm overhand knots.
- Mark nine outer motif positions around the ring. Space them as evenly as possible.
- Place one cloud at every third position. Use the six remaining positions for the six full-size stars.
- Match each cut outer cord with its planned star or cloud position.
- Thread one covered bead onto each outer cord and slide the bead temporarily toward the upper end.
- Tie the lower end of each cord to the built-in loop on its star or cloud using two firm overhand knots. Leave approximately a 2 inch tail.
- Measure approximately 3 inches above the motif's attachment loop. At that point, tie three overhand knots directly on top of one another to make a bulky lower bead stopper.
- Slide the covered bead down onto the stopper knot. Confirm that the knot cannot pass through the wooden bead hole. Add another knot directly over the stopper if the bead can pass over it.
- Tie three overhand knots directly above the bead so it cannot slide upward or downward along the cord.
- Use locking clips or clothespins to hold the upper ends of the nine outer cords temporarily at the marked ring positions. Do not tie the final upper knots yet.
- Suspend the mobile and measure from the underside of the ring to the top loop of every motif. Adjust the clipped cords until the motifs match the recommended finished positions.
- Check the ring from several directions. If one side drops, move one temporarily clipped motif slightly around the ring or swap a heavier motif with a lighter motif on the opposite side.
- If the empty ring itself does not remain level, adjust the four top suspension cords before continuing. Do not change a motif's vertical strand length merely to correct ring tilt.
- When the ring remains level and the motifs are visually balanced, secure each outer cord to the ring. Wrap the cord around the ring twice and tie the short end to the standing cord with two firm overhand knots.
- Pass every short cord tail back through its knot area twice with a tapestry needle before trimming it.
- Suspend the mobile again and confirm the final drop, ring level, bead positions and spacing before installation.
Use strong cotton thread or cord for every load-bearing strand. Do not use crocheted chains for the top suspension harness or for strands that must pass through the covered wooden beads.

Keep only the upper ring attachments temporary during balancing by holding them with locking clips or clothespins. The lower motif knots and bead stopper knots should already be firmly secured before the mobile is suspended.
Instead of placing every star at the same height, arrange the star attachment loops approximately 11 inches, 15 inches and 19 inches below the ring. These separate levels help the shapes remain visible without placing the moon at the bottom of the arrangement.
The decorative braid should hang freely from the upper horn without carrying any of the moon's weight. The separate loop along the moon's top outer curve connects to the center suspension cord and helps the crescent hang upright while still allowing it to rotate naturally with the mobile.
Before tying the final upper ring knots, suspend the mobile temporarily from a secure hook and allow it to rotate freely for several minutes. If the empty ring tilts, adjust the four top suspension cords. If the ring begins tilting only after the motifs are added, move one temporarily clipped motif slightly around the ring or swap a heavier motif with a lighter motif on the opposite side. Changing only the vertical length of a motif strand will change its height but will not correct uneven weight around the ring.

When everything hangs evenly, secure each knot by tying it firmly and wrapping the tail through the knot area with a yarn needle. Trim loose ends only after the mobile has been checked from every angle.
Take one final look from directly underneath. The moon should remain the focal point, the stars should appear evenly spaced around it, and the clouds should create a balanced frame without hiding any of the hanging pieces. Those last few adjustments often make the difference between a mobile that simply hangs and one that looks professionally finished.
Displaying Your Crochet Mobile Safely
The final step is making sure your finished mobile hangs securely and remains a decorative item rather than a toy. Once everything is balanced, take a few extra minutes to inspect every attachment point before placing it in the nursery.
The crocheting may be finished, but a few careful adjustments before hanging the mobile often make the biggest difference. Taking time to balance the strands and inspect every connection helps the completed project hang naturally from the very first day.

Because this full-length version measures approximately 38 to 40 inches from its hanging point to the lowest motif, suspend it from a securely installed ceiling hook or a manufacturer-rated wall bracket positioned so every cord, bead and crocheted piece remains completely out of the baby's reach. Do not use a crib-mounted mobile arm for this full-length version. Confirm that the support and every connection remain firmly attached before displaying the completed mobile.
I believe it is worth checking the balance one final time after the mobile has been installed. Gravity sometimes changes the way the strands settle compared with when the project is lying on a table.
Final Assembly Checklist Before Hanging
- The four top suspension cords are attached at equally spaced points around the wooden ring.
- The four suspension cords meet above the exact center of the ring.
- The wooden ring remains level when suspended.
- The center moon cord descends through the open center of the ring without pulling the ring toward one side.
- The crescent moon hangs from its separate support loop near the visual center of the arrangement.
- The decorative braid and tiny star hang freely from the upper horn and do not support the moon's weight.
- The six stars are arranged at three different finished levels around the ring.
- The three clouds are spaced around the ring without hiding the moon or stars.
- One covered bead is threaded onto each star and cloud strand.
- Both crochet openings on every covered bead remain aligned with the hole through the wooden bead.
- Every knot is tied securely and reinforced by passing the tail back through the knot area.
- The mobile rotates freely without one side consistently dropping lower than the other.

Safe Nursery Placement
- Keep the mobile completely out of your baby's reach at all times.
- Hang it high enough that no hanging strand or crocheted piece can be pulled into the crib.
- Inspect the hanging loop, knots and attachment points regularly.
- Remove the mobile when your baby first begins pushing up on hands and knees or reaches 5 months of age, whichever comes first. Remove it sooner if any cord, bead or crocheted piece can be reached.
- Keep the mobile away from ceiling fans, heating vents and open windows that may cause continuous spinning.
Many nurseries have an air vent that creates a slow turning motion throughout the day. If the mobile spins continuously, move it to a location with less airflow. Slow movement allows each piece to be seen clearly, while constant spinning can gradually twist the hanging strands.
Dust the finished mobile occasionally with a clean microfiber cloth or a hair dryer set to the coolest, lowest airflow setting. If the crocheted moon, a star or a cloud becomes soiled, remove it from the mobile, hand wash it separately and allow it to dry completely before reinstalling it. Wipe the covered wooden beads and wooden ring with a barely damp cloth and dry them immediately. Do not soak the wooden pieces.
When the mobile is not being displayed, store it inside a large storage box. Wrap each hanging strand loosely around a piece of clean cardboard or an empty paper towel tube to help prevent tangles during storage.
For current nursery and infant sleep safety information, review the U.S. Consumer Product Safety Commission safe sleep guidance and the American Academy of Pediatrics nursery safety checklist.
Frequently Asked Questions
Can I use acrylic yarn instead of cotton?
Yes. Cotton helps the shapes hold crisp edges, while acrylic produces a lighter mobile. Either fiber works well provided the same yarn weight and similar crochet tension are used throughout the project.
How many stars should I make?
This design uses six stars because they balance well around one crescent moon on a 12 inch ring. If you increase the ring size, you can add additional stars while maintaining even spacing.
Can I make the mobile larger?
Yes. Increase every component proportionally rather than enlarging only the moon. Keeping all of the pieces in scale preserves the balanced appearance of the finished design.
Can I wash the finished mobile?
The crocheted moon, stars and clouds can be hand washed after they are removed from the mobile. Wipe the covered wooden beads and wooden ring with a barely damp cloth and dry them immediately rather than soaking them. Allow every part to dry completely before reassembling the mobile.
How do I know if the mobile is balanced correctly?
Suspend it temporarily before tying the final knots. The wooden ring should remain level, the moon should stay near the visual center and the mobile should rotate naturally without one side consistently dropping lower than the other.
Is it safe to hang a crochet mobile above a crib?
A crochet mobile is decorative nursery decor rather than a toy. Keep every cord, bead and crocheted piece completely out of the baby's reach. Remove the mobile when the baby first begins pushing up on hands and knees or reaches 5 months of age, whichever comes first. Remove it sooner if the baby can reach toward any part of it.
After the final adjustments are complete, step back and look at the mobile from several places in the room. The crescent moon should naturally become the focal point, the stars should appear evenly distributed, and the clouds should frame the arrangement without competing for attention. Those final few minutes of careful adjustment often make the difference between a handmade project and one that looks professionally crafted.
A nursery changes quickly during the first few years, but handmade projects often stay with a family much longer. Careful finishing, balanced assembly and secure construction help this mobile remain a keepsake long after the crib has been packed away.
When you click on links to various merchants on this site and make a purchase, this may result in this site earning a commission. This does not affect the price you pay.

UBGI Gold Standard 2026
Reviewed under the site's
editorial checklist.
Photos, decorating ideas, party setups and reader submissions are shared for inspiration unless a page is specifically presented as a pattern, tutorial, reference guide or step-by-step project. Follow the instructions, measurements, safety guidance and manufacturer directions provided for the particular project or product.
About Jan | Contact | Baby Nursery Ideas (Blog) | Site Map | Privacy Policy | Disclosure Policy | Disclaimer | Affiliate Disclosure | Earnings Disclosure | Facebook | Pinterest
I am a participant in the Amazon Services LLC Associates Program, an affiliate advertising program designed to provide a means for us to earn fees by linking to Amazon. As an Amazon Associate I earn from qualifying purchases.
Copyright © 2006-2026. All Rights Reserved.