Free Crochet Ghost Applique Pattern to Decorate Halloween Projects
By Jan Bay
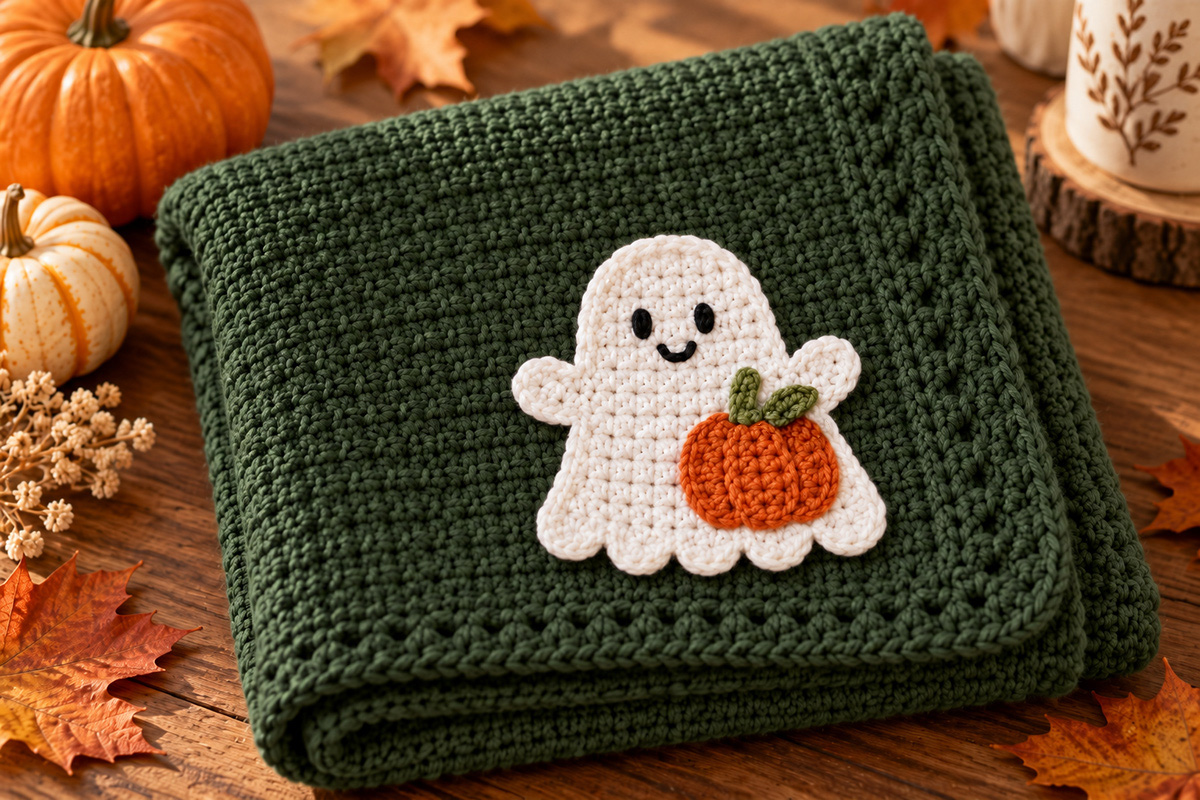
This free crochet ghost applique pattern makes a small flat ghost with a rounded head, gently flared body, little arms, a pumpkin and a wavy lower edge. The finished ghost can be sewn onto Halloween blankets, clothing, banners, wall hangings, pillows and other handmade projects, and the simple embroidered face keeps the design friendly rather than spooky.
Jump to:
Ghost Applique Size
At the gauge below, the finished ghost should be about 5 inches tall and about 5 to 5 1/2 inches across from one arm tip to the other. The lower white body is about 4 1/2 inches across before the arms are attached, and the little pumpkin is about 2 1/4 inches wide.
The measurements are calculated from the stitch counts and gauge rather than taken from a physically test-made sample. A small difference won't matter much if you're putting the ghost on a blanket or wall hanging, but I'd check your gauge if you need it to fit a particular spot on a shirt or other small project.
The important proportions are the rounded head, body that gets a little wider toward the bottom, short arms, five separate waves along the hem and a pumpkin that covers part of the lower right side without hiding the ghost shape. I added the pumpkin so this little spook wouldn't look quite like all the others. It gives him a little more personality and style.
Materials
Skill level: Confident beginner. You'll need to know how to work in rows and joined rounds, increase, crochet around both sides of a foundation chain and sew flat pieces together.
Terminology: This pattern uses standard U.S. crochet terms.
Pieces: This pattern uses 7 crocheted pieces in all: 1 lower body, 1 head, 2 arms, 1 pumpkin, 1 stem and 1 leaf.
White yarn: About 35 to 40 yards of #4 medium worsted weight yarn for the ghost.
Orange yarn: About 8 to 10 yards of #4 medium worsted weight yarn for the pumpkin.
Olive green yarn: About 3 to 4 yards of #4 medium worsted weight yarn for the pumpkin stem and one leaf.
Black embroidery floss: A small amount for the eyes and smile.
Hook: 4 mm G-6 crochet hook.
Other supplies: Yarn needle, embroidery needle, scissors and blocking pins if you want to block the finished applique before attaching it to another project.
I prefer a smooth cotton or cotton-blend yarn for a flat applique because the edges stay easy to see and the little pumpkin doesn't get fuzzy. A smooth acrylic yarn can work too. I wouldn't use chenille or another very plush yarn here. It would hide too much of the shaping.
Gauge: About 18 sc and 20 rows = 4 inches.
Gauge isn't critical for a blanket or wall hanging. It matters more if you're putting the applique on clothing and need the finished size to stay close to 5 inches. At that size, it's just right for the corner of a crocheted baby blanket, the center of a throw pillow, or the front of a baby's bodysuit or t-shirt.
Abbreviations: ch = chain, MR = magic ring, sc = single crochet, hdc = half double crochet, dc = double crochet, sl st = slip stitch, inc = 2 sc in the same stitch.
A beginning ch 1 does not count as a stitch, whether you're turning a row or beginning a joined round. When working the head and pumpkin in joined rounds, join with a sl st to the first actual stitch of the round unless the instructions say otherwise.
Crochet Ghost Applique Pattern: Make the Body
The white ghost is built from two flat pieces that overlap: a round head and a slightly flared lower body. Sewing the lower part of the head over the upper body hides the straight top edge and gives us the rounded silhouette in the example without having to stuff anything.
Lower Body
With white yarn, ch 15.
Row 1: Sc in the second ch from the hook and in each ch across. Turn. (14 sc)
Row 2: Ch 1. Work 2 sc in the first st, sc in the next 12 sts, 2 sc in the last st. Turn. (16 sc)
Rows 3 through 5: Ch 1. Sc in each st across. Turn. (16 sc)
Row 6: Ch 1. Work 2 sc in the first st, sc in the next 14 sts, 2 sc in the last st. Turn. (18 sc)
Rows 7 through 9: Ch 1. Sc in each st across. Turn. (18 sc)
Row 10: Ch 1. Work 2 sc in the first st, sc in the next 16 sts, 2 sc in the last st. Turn. (20 sc)
Rows 11 and 12: Ch 1. Sc in each st across. Turn. (20 sc)
Fasten off. Don't add an edging around the sides. The finished ghost in the example has a clean flat outline, and a full border would make that edge heavier than I want.
Head
With white yarn, make a MR.
Round 1: Work 6 sc in the ring. Join. (6 sc)
Round 2: Ch 1. Work 2 sc in each st around. Join. (12 sc)
Round 3: Ch 1. Repeat (sc in next st, 2 sc in next st) around. Join. (18 sc)
Round 4: Ch 1. Repeat (sc in next 2 sts, 2 sc in next st) around. Join. (24 sc)
Round 5: Ch 1. Repeat (sc in next 3 sts, 2 sc in next st) around. Join. (30 sc)
Round 6: Ch 1. Repeat (sc in next 4 sts, 2 sc in next st) around. Join. (36 sc)
Round 7: Ch 1. Repeat (sc in next 5 sts, 2 sc in next st) around. Join. (42 sc)
Round 8: Ch 1. Repeat (sc in next 6 sts, 2 sc in next st) around. Join. (48 sc)
Fasten off, leaving about an 18-inch tail for assembly.
Lay the lower body flat with the 20-stitch edge at the bottom. Center the round head over the top of the body. Let the bottom of the head overlap approximately the upper 1 1/4 inches of the body, and make sure the round head completely covers the 14-stitch top edge. That overlap is important. If you simply butt the two pieces together, the ghost will look like a circle sitting on top of a rectangle.
Use the long white tail to attach the head. Start where the lower left edge of the head first overlaps the body and sew along the lower curved edge of the head through both layers until you reach the matching point on the lower right side. Work mainly from the back and catch small amounts of the stitches so the joining line doesn't become a thick ridge across the front. Secure the tail on the back.
Make the Ghost Arms
The two arms are separate flat pieces. They have a narrow end that disappears behind the body and a rounded outer end, which is easier to control than trying to build the arms into the side rows.
Make two.
With white yarn, ch 6.
Working from the second ch from the hook, sl st in the next ch, sc in the next ch and hdc in each of the next 2 ch.
Work 5 hdc in the last ch to turn around the rounded end.
Now work along the unused loops on the opposite side of the foundation chain. Hdc in each of the next 2 loops, sc in the next loop and sl st in the final loop.
Join to the first sl st and fasten off, leaving a 10 to 12-inch sewing tail.
Each arm should look like a small flat paddle rather than a circle.
Place one arm behind each upper side of the ghost body. The narrow end should be hidden behind the white body and the rounded tip should point slightly upward, as it does in the example image.
I would position the arm roots roughly beside Body Rows 3 through 6. Leave about 3/4 inch of each rounded arm showing beyond the body edge. This keeps the arms short and gives the ghost the proportions shown in the example. Flip the second arm over before attaching it so the pair looks balanced rather than both leaning in the same direction.
Using the sewing tail, stitch around the narrow hidden end of each arm where it overlaps the back of the body, then secure the tail on the back. Leave the rounded outer 3/4 inch of each arm projecting beyond the body and keep that visible portion completely flat.
Make the Five Bottom Waves
The five waves are worked directly into the 20 stitches along the bottom of the ghost. That gives us exactly five separate rounded sections without adding a border around the rest of the applique.
With the front of the ghost facing you, join white yarn at either lower corner, in the side edge immediately before the first of the 20 stitches along the bottom. Do not work into a bottom stitch when you join.
Ch 1.
Repeat the following sequence 5 times:
Skip the next st, work 5 hdc in the next st, skip the next st, sl st in the next st.
You will use all 20 stitches and finish with exactly 5 waves.
Fasten off and weave in the end on the back.
Don't add another edging over these shells. The five separate curves are supposed to be easy to count and are one of the details that keeps the ghost from looking like a plain white oval.
Embroider the Ghost Face
Use black embroidery floss for the face. I wouldn't substitute buttons or plastic eyes here. The little stitched ovals match the flat construction much better.
Set the ghost upright and mark the center of the head before you start stitching.
Place the centers of the eyes about 3/4 inch apart and approximately 1 1/4 inches below the top of the head. Each finished eye should be a small vertical oval about 1/4 inch wide and 3/8 inch high.
Fill each oval with 4 or 5 short satin stitches. Keep the stitches beside one another instead of making one long loose strand across the surface.
Center the smile below the eyes. Make a shallow U about 1/2 inch wide, with the lowest part of the smile roughly 3/8 inch below the bottom of the eyes.
Use 3 or 4 short backstitches to form the curve. Secure the floss on the back and bury or trim the ends neatly.
The expression should stay small. If the eyes and mouth get much larger, they start competing with the pumpkin and the ghost loses the simple look we're trying to reproduce.
Crochet the Pumpkin Applique
The pumpkin is flat too. It is an oval worked around a short foundation chain, then the rib lines are added on the surface. There is no stuffing and no second pumpkin layer.
Pumpkin
With orange yarn, ch 7.
Round 1: Sc in the second ch from the hook and in each of the next 4 ch. Work 3 sc in the last ch. Turn the foundation chain so you can work along its unused loops. Sc in each of the next 4 loops and work 2 sc in the final loop. Join. (14 sc)
Round 2: Ch 1. Work 2 sc in the first st, sc in the next 4 sts, 2 sc in each of the next 3 sts, sc in the next 4 sts and 2 sc in each of the final 2 sts. Join. (20 sc)
Round 3: Ch 1. Sc in the first st, 2 sc in the next st, sc in the next 4 sts, repeat (sc in next st, 2 sc in next st) 3 times, sc in the next 4 sts, then repeat (sc in next st, 2 sc in next st) 2 times. Join. (26 sc)
Fasten off, leaving a long tail for sewing.
Lay the pumpkin flat. With orange yarn, add three shallow vertical rib lines from the upper edge toward the lower edge. Make one line through the center and one on each side of it. Surface slip stitches work well, but ordinary short backstitches with the same orange yarn are fine too.
Keep those rib stitches loose enough that they don't pull the oval into a cup.
Stem
With olive green yarn, ch 4.
Sc in the second ch from the hook and in each of the remaining 2 ch. (3 sc)
Fasten off, leaving a tail for sewing.
One Small Leaf
With olive green yarn, ch 5.
Sc in the second ch from the hook, hdc in the next ch and dc in the next ch.
In the last ch work 2 dc, ch 2, sl st in the second ch from the hook, then work 2 more dc in that same foundation ch. The little ch-2 point forms the tip of the leaf.
Working along the unused loops on the opposite side of the foundation chain, dc in the next loop, hdc in the next loop and sc in the final loop.
Sl st to the first sc to join, then fasten off, leaving a sewing tail.
Sew the stem behind the top center of the orange pumpkin so about 1/2 inch shows above it. Place the single leaf at the right side of the stem and angle its point outward. Sew both pieces down securely while keeping them flat.
If you want a separate three-dimensional pumpkin project later, the free crochet pumpkin pattern is a different construction. For this ghost, I'd keep the pumpkin flat.
Attach the Pumpkin
Put the finished pumpkin over the lower right side of the ghost before you sew anything permanently. The placement matters more than it might seem.
Move the pumpkin slightly to the right of the ghost's center line. Its lower edge should sit about 1/4 inch above the deepest part of the bottom waves. Leave all five waves recognizable rather than dropping the pumpkin so low that it hides the hem.
The pumpkin should cover part of the lower body, but it shouldn't reach the right arm or extend beyond the white outer edge.
Once the placement looks right, use the long orange tail to sew around the outer edge of the pumpkin. Keep the stitches small and work mainly from the back so you don't add a heavy outline around the orange piece.
Tack the stem and leaf securely too. The finished design should still lie flat when you lift the ghost from the table.
Finish the Ghost Applique
Weave in every remaining yarn end on the back. Check the arm roots, pumpkin, stem and leaf and add another small stitch anywhere a corner wants to lift.
If the ghost needs flattening, lightly wet block it on a towel. Shape the rounded head, keep the body centered, spread the two arms evenly and pin each of the five bottom waves so the curves stay separate. Let it dry completely, then remove every blocking pin before attaching the applique to anything else.
Don't iron the applique flat. Heat can change some yarn fibers, and we don't need pressure to get the shape we want.
If you're sewing it to a crocheted blanket, you can use white yarn and small whipstitches around the outer ghost edge. On a knit shirt or woven fabric, I would use matching sewing thread instead. It adds less bulk and lets you make smaller stitches.
Sew the arms and every lower wave down, not just the center body. Tack the pumpkin, stem and leaf to the background fabric as well if the finished item will be handled often. I wouldn't rely on glue for a baby or child's item.
If you're putting the applique on a baby blanket, remember that a decorative blanket isn't appropriate as loose bedding in an infant sleep space. The U.S. Consumer Product Safety Commission recommends a bare crib, bassinet or play yard with only a fitted sheet. You can read the CPSC safe sleep guidance before deciding how a baby blanket will be used.
Ways to Use the Ghost Applique
A white ghost shows up much better when you give it some contrast. I especially like this one against deep forest green because the white outline stays crisp and the orange pumpkin still has plenty of color around it. Charcoal, muted rust and medium brown would work too. I would skip cream or white for the background because too much of the ghost disappears.
Baby blanket: Sew one ghost near a lower corner rather than putting it in the center of the blanket. You still get the Halloween detail, but most of the blanket stays simple. For an infant, use the blanket only in ways consistent with safe sleep guidance rather than as loose crib bedding.
Halloween shirt or sweatshirt: Put the ghost on the front of a solid-colored shirt where the whole shape can lie flat. Deep green, black, charcoal or rust will give you much more contrast than ivory.
Nursery wall hanging: A single ghost can be the center of a small fabric or crochet wall hanging. You don't need to surround it with ten more decorations. The pumpkin already gives the motif enough color.
Halloween banner: Make several ghosts and alternate them with plain orange or green crochet pieces. If every ghost gets its own pumpkin, the banner can get busy fast, so I'd use the pumpkin version as the focal motif and keep some of the other pieces simpler.
Pillow, tote or trick-or-treat bag: These are good places to use the applique when you want a larger dark background behind it. Sew the whole perimeter down so the five waves and little arms don't catch during use.
If you're putting together several handmade Halloween projects, you'll find more ideas in the Halloween crochet patterns collection. And if you want more small flat motifs to sew onto blankets and clothing, the crochet animal applique patterns use the same basic idea of making the motif separately and attaching it afterward.
When you click on links to various merchants on this site and make a purchase, this may result in this site earning a commission. This does not affect the price you pay.

UBGI Gold Standard 2026
Reviewed under the site's
editorial checklist.
Photos, decorating ideas, party setups and reader submissions are shared for inspiration unless a page is specifically presented as a pattern, tutorial, reference guide or step-by-step project. Follow the instructions, measurements, safety guidance and manufacturer directions provided for the particular project or product.
About Jan | Contact | Baby Nursery Ideas (Blog) | Site Map | Privacy Policy | Disclosure Policy | Disclaimer | Affiliate Disclosure | Earnings Disclosure | Facebook | Pinterest
I am a participant in the Amazon Services LLC Associates Program, an affiliate advertising program designed to provide a means for us to earn fees by linking to Amazon. As an Amazon Associate I earn from qualifying purchases.
Copyright © 2006-2026. All Rights Reserved.