Free Crochet Christmas Baby Mobile Pattern
By Jan Bay
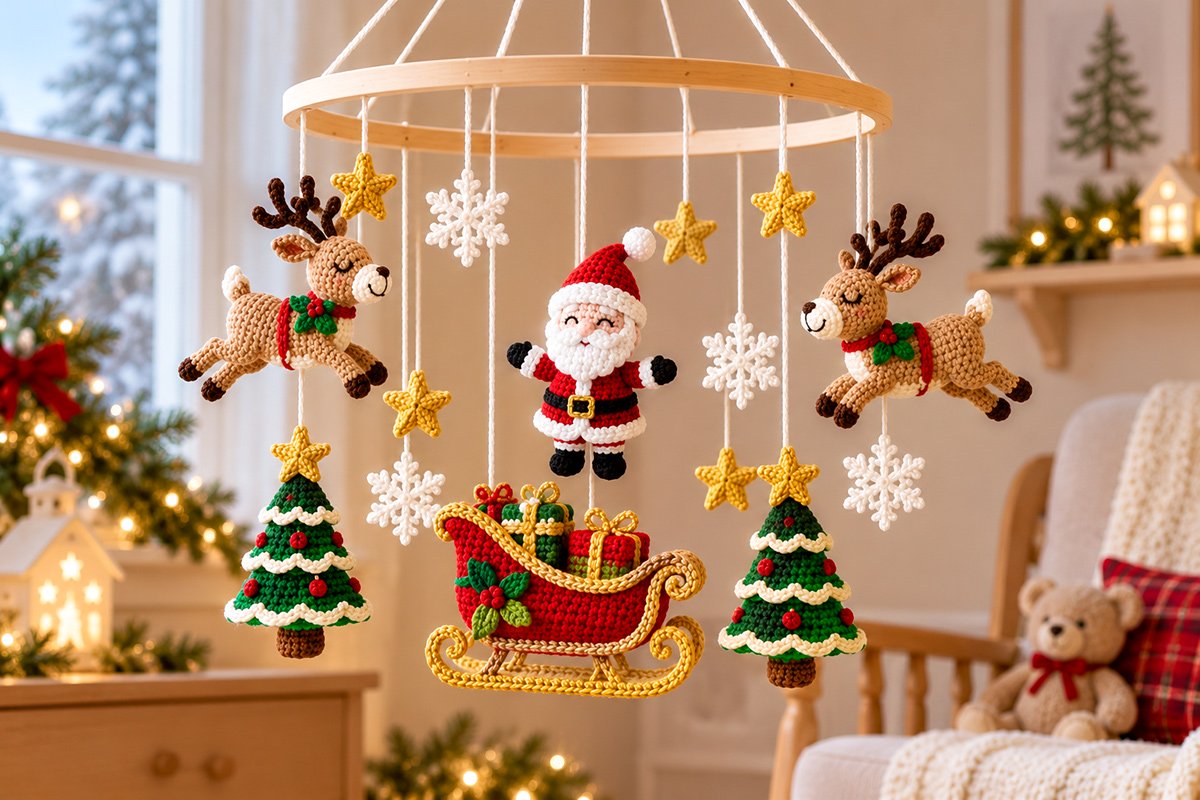
This free crochet Christmas baby mobile pattern brings Santa, two flying reindeer, a sleigh filled with tiny presents, and a pair of Christmas trees together on a simple wooden hanging hoop. Little crocheted snowflakes and gold stars hang between the larger ornaments, adding even more Christmas cheer to the display. You can follow my instructions just as they're written, mix and match the ornaments to create your own version, or use them to make a matching Christmas garland. There are even more crochet ornament patterns on this site, so you can go wild creating your own combinations! Just remember that any mobile or garland you make is intended for decorative display completely outside a baby's reach and away from sleeping and changing areas.
Explore More Free Christmas Crochet Patterns
Free Crochet Flying Reindeer Ornament Pattern
Free Crochet Santa Ornament Pattern
Free Crochet Santa Sleigh Ornament Pattern
Crochet Christmas Tree Ornament Pattern
See Supplies for This Project Here.
Jump to the Christmas Mobile Instructions
Putting Our Christmas Mobile Together
We've already got the Christmas characters, so there's no need to start inventing a whole new collection of ornaments. The fun part is bringing them together into one decoration that looks like it belongs together.
I'd give the red sleigh the most attention. Those curled gold runners and three tiny presents make it a natural centerpiece. Santa can hang a little higher, with our two flying reindeer on opposite sides of the wooden hoop.
Then come the Christmas trees. Their evergreen branches, ivory trim and little cranberry berries bring some color into the lower part of the arrangement without competing with the sleigh.
Three small white snowflakes and three separate gold stars are plenty to fill the remaining spaces. The two Christmas trees already have stars at their tops, so we don't need to make the mobile look like a sky full of them.
Keep the wooden hoop plain. I wouldn't wrap it in yarn, add a big Christmas decoration to the top or cover it with bows. The ornaments are pretty enough without all that extra fuss.
One important thing before we begin: the photograph is our finished design reference, but your actual mobile needs to balance with the ornaments you've made. That's why we'll measure and weigh the finished pieces before permanently fastening the hanging cords.
Construction note: The measurements in this assembly pattern are starting targets based on the finished design, not measurements from a physically tested mobile. Your ornaments may vary in size and weight, so check the finished dimensions, hanging lengths, knots and balance before installing the decoration. If the assembled frame cannot be balanced securely, don't hang it for display.
Materials and Supplies for the Christmas Baby Mobile
You'll need one sturdy wooden hoop, the finished Christmas ornaments and enough hanging cord to suspend everything separately. I'd use the same ivory color for the hanging cords throughout the mobile. It keeps them from drawing attention away from the crochet.
Wooden Frame and Assembly Supplies
- One rigid, natural wooden hoop, approximately 20 inches in diameter, suitable for suspended craft displays
- Approximately 20 yards of strong, low-stretch braided polyester hanging cord, about 1 to 1.5 mm thick, with a documented load rating appropriate for the completed project
- A secure, closed metal suspension ring or other load-rated connector for gathering the upper support cords
- Appropriately rated ceiling mounting hardware, selected for the actual ceiling construction
- Small amount of matching yarn or strong sewing thread for reinforcing ornament loops and securing cord ends
- Yarn needle and sewing needle
- Sharp scissors
- Flexible measuring tape or ruler
- Small digital scale for weighing the completed ornaments
- Removable markers or painter's tape for identifying the six main ornament positions and four upper suspension positions; these are not load-bearing attachments
Choose the hoop before cutting any hanging cords. A flexible embroidery hoop or decorative ring that twists under a small load isn't what we want here. Look for a solid ring with smooth edges, no cracks and no loose joints. The frame, cord and hardware all need to be suitable for the actual finished weight.
Don't rely on glue to hold suspension cords or support the ornaments. We need proper knots, secure loop attachments and mounting hardware designed to carry the load.
Crochet Yarn and Hooks
The individual ornament pages give you their complete yarn quantities, hook sizes and stitch instructions. We'll use those same supplies instead of changing the approved ornament designs.
For the extra decorations, have a little antique-gold DK yarn available for three miniature stars. You'll also need fine ivory cotton crochet thread for three small snowflakes. Begin with size 20 cotton thread and a suitable steel crochet hook, approximately 1 to 1.25 mm, if you're reducing the size of the existing snowflake design.
Make one sample snowflake first. We're aiming for roughly 2 1/2 to 3 inches across, and that size has to be checked against your actual thread and tension. The existing full-sized snowflake ornament pattern is expected to measure about 5 to 6 inches with its original materials. That's too large for the little snowflakes in this particular mobile.
You'll also need a blocking mat and rustproof pins if you're blocking the snowflakes. Remove every pin before attaching the finished decorations.
Make the Six Christmas Crochet Ornaments
Here are the ornament patterns we're using. Follow the instructions on each page rather than trying to make smaller or simpler versions for the mobile. Their distinctive little details are what make this Christmas collection special.
One Santa Sleigh Filled with Presents
Start with my free crochet Santa sleigh ornament pattern. Make the complete cranberry sleigh with both finished sides, curled antique-gold runners, all three wrapped presents and the green crocheted holly with red berries.
Keep its original reinforced red hanging loop. The loop is sewn through the joined sleigh body, rather than relying on the presents or gold decorative pieces to support the weight.
The expected finished width is about 7 to 7 1/2 inches. It should become the lowest and most prominent ornament in the finished mobile.
Two Matching Flying Reindeer
Make two reindeer using my free crochet reindeer ornament pattern. Each one has a tan flying body, cream muzzle and chest, dark branching antlers, four dark hooves, embroidered sleepy eyes and a red crocheted harness.
Don't forget the two green holly leaves and three red crocheted berries on each reindeer's harness. Those details should match on both ornaments.
Each finished reindeer is expected to measure about 6 to 7 1/2 inches from nose to extended hoof. Keep their original reinforced hanging loops attached to the upper bodies. The loops are designed to hold the animals in a slightly raised flying position.
I would make the two reindeer as close to the same size as possible. They're going to hang opposite one another, and matching their yarn and tension will make balancing the mobile a little easier.
One Crochet Santa Claus
Use my crochet Santa ornament pattern for the traditional red-and-white Santa with his fluffy beard, red hat, black boots and mittens, and gold belt buckle.
Leave off the optional miniature baby bootie from that pattern. We want Santa hanging independently above the sleigh, just as he appears in the finished mobile photograph.
Two Christmas Trees
Make two matching trees with the classic version of my free crochet Christmas tree ornament pattern.
Each tree has three evergreen tiers, ivory snowy edging, cranberry berry clusters, a brown trunk and a little gold star at the top. We don't need the optional baby booties on these trees either.
At approximately 4 to 4 1/2 inches tall, the trees are smaller than the sleigh and reindeer. That's just what we want. They'll fill the lower spaces without hiding the larger Christmas characters.
Three Little Snowflakes and Three Gold Stars
For the snowflakes, use my crochet snowflake ornament pattern, working a smaller sample in fine cotton thread as described above. Keep the same six-point design. Don't shorten individual branches at random because that would change the finished shape.
For the three separate gold stars, use my free crochet star pattern, starting with antique-gold DK yarn and a 3 mm hook for a smaller version. The pattern begins with 10 single crochet stitches in a magic ring and forms five shaped points in the second round. Make one star first and measure it. We're aiming for approximately 1 1/2 to 2 inches across, but the exact size depends on your yarn and tension. Adjust the hook or yarn thickness if needed, then use the same combination for all three stars.
Those little stars are separate hanging decorations. They aren't extra tree toppers.
Before moving on, put everything on a table and count your finished pieces. You should have six main ornaments, three separate snowflakes and three separate gold stars. That gives us twelve independently suspended decorations, with the two tree-topper stars already attached to their Christmas trees.
Check all the sewing while the ornaments are still on the table. Every holly berry, present, antler, hoof, tree decoration and hanging loop needs to be firmly attached. It's much easier to fix a loose piece now than after everything is hanging.
Prepare the Wooden Hoop for Hanging
Now we're ready for the wooden hoop. Before tying anything permanently, we'll mark where the ornaments belong. I wouldn't guess at the positions while holding the hoop in the air. It's much easier to plan everything with the frame lying flat on a table.
Step 1. Mark the Six Main Ornament Positions
Lay the 20-inch hoop flat and imagine you're looking down at a clock face. Use removable markers to identify these six positions:
- 12 o'clock: Santa Claus
- 2 o'clock: First flying reindeer
- 4 o'clock: First Christmas tree
- 6 o'clock: Santa's sleigh
- 8 o'clock: Second Christmas tree
- 10 o'clock: Second flying reindeer
There should be approximately 60 degrees between neighboring ornament positions. Around a 20-inch circular hoop, that gives each main ornament approximately 10 1/2 inches of space along the rim before accounting for its width.
These are starting positions rather than permanent knots. We can make small adjustments after the ornaments have been weighed and the mobile is suspended.
Step 2. Make the Four Upper Suspension Cords
Cut four lengths of the braided hanging cord, each approximately 30 inches long. These will hold the wooden hoop from above.
Mark four upper support positions at 12, 3, 6 and 9 o'clock. At the 12 and 6 o'clock positions, keep the upper support attachment separate from the Santa and sleigh attachment points. A little space between their knots will prevent them from rubbing together.
At each upper support position, wrap the cord twice around the solid wooden hoop. Secure the wrap with two snug half-hitches around the standing part of the cord, then reinforce the finished attachment by tightly whipping the short tail to the standing cord with strong thread. Leave enough tail beyond the whipping to check that nothing slips. These are structural attachments, so don't replace them with bows or glue.
Repeat for the other three supports. Pull each cord upward individually to check that its wrap stays in place and doesn't slide around the wooden ring.
Gather the four loose ends above the hoop. For this 20-inch frame, a suspension point approximately 12 inches above the plane of the hoop is a useful starting target.
With a 10-inch hoop radius and a suspension point 12 inches above its center, each cord has a straight-line distance of approximately 15.6 inches between the rim and the upper gathering point. That measurement is calculated geometry, not a final knot-to-knot length. Leave the extra cord available while you adjust and balance the assembled mobile.
Bring the four cords together at the closed suspension ring while the wooden hoop rests on a padded surface. Attach each upper support cord independently to the ring using a secure knot compatible with the cord and connector. Follow the cord manufacturer's fastening instructions and leave enough length for later balancing adjustments. Check that all four connections are fully secured before lifting the hoop. Never use temporary clips or unfinished knots to support the hanging mobile.
Lift the empty hoop by its upper support and check that it hangs approximately level. Make sure all four cords are carrying tension. If one is loose, adjust its length before continuing.
Step 3. Prepare the Ornament Hanging Cords
Cut six pieces of the same braided polyester cord, approximately 24 inches long each. These are deliberately longer than the finished hanging lengths. You'll shorten them once the ornaments are in position.
Don't cut all six to their final lengths yet. Santa's ornament, the reindeer and the sleigh have different hanging loops, and those original loops already contribute to the distance between the hoop and the finished decoration.
Attach each prepared cord to its marked hoop position using the same securely wrapped, knotted and reinforced method used for the upper supports. The loose lower end will eventually connect to the existing loop on its ornament.
For the smaller decorations, prepare six additional lengths of hanging cord, approximately 20 inches each. These are for the three snowflakes and three gold stars.
Wait until the larger ornaments are suspended before attaching these smaller cords permanently. That way, you'll know which open spaces are actually worth filling.
Step 4. Weigh the Finished Ornaments
Before attaching the main ornaments, weigh each one with its own crocheted hanging loop included. A small digital kitchen scale that reads in grams is useful here.
Write down the weight of the sleigh, Santa, both reindeer and both Christmas trees. You don't need to make them weigh exactly the same, but you do need to know what you're hanging.
Pay special attention to the sleigh. It has two finished sides, three presents and fairly elaborate gold runners, so we shouldn't assume it weighs the same as one of the little Christmas trees.
Compare the two reindeer with each other and then compare the two trees. If one matching ornament is noticeably heavier, make a note of it. We'll account for those differences during balancing rather than adding unnecessary decorations to disguise the problem.
Crochet Christmas Baby Mobile Pattern: Assembly
Here's where the arrangement begins to look like our finished photograph. Start with the large ornaments and leave the snowflakes and little stars until last.
Work over a table or another protected surface so the ornaments are supported whenever you're adjusting their cords. Don't let the weight of the mobile pull against an unfinished attachment.
Step 1. Attach Santa at the Back of the Hoop
Find the 12 o'clock mark. This is Santa's position at the back of the circular arrangement.
Connect the prepared hanging cord securely to Santa's original reinforced loop at the top of his hat. Pass the connector cord through the existing loop, make a secure attachment knot and fasten its free tail so the knot cannot work loose. Don't hang Santa from his pom-pom, beard or arms.
Begin with the top of Santa's hat approximately 4 to 5 inches below the underside of the wooden hoop. Measure that distance with Santa actually hanging, because his original loop and the connector cord both contribute to the finished drop.
His boots should hang below his coat, with the face and buckle visible from the front. Adjust the attachment if Santa twists sideways.
Step 2. Attach the Two Flying Reindeer
Position one reindeer at 10 o'clock and the other at 2 o'clock.
Both should face inward toward the general center of the mobile. From the front, the reindeer on the left faces right, and the reindeer on the right faces left.
Use the reinforced ivory hanging loops already made with the reindeer patterns. Do not attach the mobile cord to the antlers, red harness or holly decorations.
Begin with the highest antler tips approximately 3 to 4 inches below the wooden hoop, adjusting for the height of each existing hanging loop.
Hang the first reindeer and check his position. The body should be nearly horizontal, the head slightly raised and all four dark hooves visible. Then attach the second reindeer at a similar height.
If one reindeer faces the wrong way, adjust the connector at the hanging loop rather than twisting the antlers or trying to bend the crocheted body into a different position.
Let both animals hang freely. Their antlers shouldn't touch the wooden hoop, the support cords or any nearby ornament.
Step 3. Hang the Christmas Trees
Attach one tree at 8 o'clock and the other at 4 o'clock. These positions place the trees below and between the reindeer and the sleigh.
Use the evergreen hanging loops on the backs of the trees. Keep both gold star toppers facing forward and the little brown trunks pointing down.
Start with the top of each tree approximately 7 to 8 inches beneath the hoop.
That puts the trees a little lower than the reindeer while leaving enough room for their scalloped ivory branches to show. Try to get both trees hanging at roughly the same height before securing their final cord lengths.
Don't hang the trees directly beneath the reindeer's hooves. They need their own space. A small gap between neighboring ornaments will look much better than having the tree toppers disappear behind an animal's legs.
Step 4. Hang the Santa Sleigh
Now for the big red sleigh. Attach it at the 6 o'clock position, opposite Santa on the wooden hoop.
Use the reinforced red hanging loop already attached to the main sleigh body. Pass the mobile's connector cord through that loop and secure it. The sleigh must never be supported by one of its gift bows, curved runner tips or holly decorations.
Start with the highest part of the sleigh approximately 11 to 12 inches below the underside of the hoop. Its gold runners will extend farther down.
Lift the sleigh gently by the suspension cord and let it settle. Check that the presents remain upright and that the long gold runner stays reasonably level.
If one end dips, check the existing sleigh hanging loop before changing anything on the main mobile. That loop was designed to be positioned over the sleigh's balance point, and it needs to work correctly on its own.
When you look at the mobile from the front, the sleigh should appear below Santa and between the two Christmas trees. It doesn't have to hang directly beneath Santa's cord. In fact, having Santa toward the back of the hoop and the sleigh toward the front helps give the arrangement the depth shown in our finished example.
Now stand back and look at all six ornaments. The reindeer should look as though they're flying, Santa should be easy to recognize, and the sleigh should be visible without a Christmas tree hiding either end.
Step 5. Add the Three Snowflakes
Once the main ornaments are hanging in approximately the right places, bring in the little ivory snowflakes.
Place one between the left reindeer and left tree, a second in the open area between Santa and the right reindeer, and the third between the right reindeer and right tree.
You'll probably want slightly different cord lengths here. Try the snowflakes at approximately 5 to 8 inches below the hoop, measured to the upper tip of each snowflake.
Attach each snowflake through a reinforced point or its securely sewn hanging loop. Keep its six branches spread out so you can still recognize the snowflake shape from a little distance.
The exact positions may need a small adjustment once everything is hanging. That's fine. Just keep the three snowflakes separate and don't let their branches snag the larger ornaments.
Step 6. Add the Three Separate Gold Stars
Finish the smaller decorations with three antique-gold crocheted stars.
Hang one between Santa and the left reindeer, one between Santa and the right reindeer, and the third in an open space above the sleigh.
Use different drops, roughly 4 to 8 inches beneath the hoop, to keep them from forming one straight row.
Attach the cord through a securely reinforced top point of each little star. The gold stars should hang flat enough that their five-point shapes are visible.
Remember that both Christmas trees already have a star topper. The three separate stars are only filling the open spaces.
Take one more look from the front and from both sides. If two small decorations appear to overlap from one viewpoint, you can move one of their hanging positions slightly around the wooden hoop.
Don't keep adding more ornaments just because there's an empty space. A little breathing room is part of this design.
Balance and Finish Your Christmas Mobile
Before you trim any cords or hang the mobile in its final location, we need to see whether the wooden hoop stays level with all the ornaments attached.
The reindeer and Christmas trees are arranged in matching pairs, which gives us a useful starting point. But Santa and the sleigh don't necessarily weigh the same, and the smaller decorations contribute a little weight, too.
Don't assume a mobile is balanced just because it looks symmetrical in a photograph.
Step 1. Check the Mobile on a Temporary Support
Move the assembled mobile to a secure temporary support in an area away from children. The support must be capable of carrying the full weight of the frame and decorations.
Hang the mobile from its upper suspension ring. Keep a protected surface beneath it while making adjustments.
Let the ornaments settle naturally. Don't hold one side of the hoop or pull on the hanging cords to make the frame appear level.
Measure the height of the wooden hoop above the floor at the 12, 3, 6 and 9 o'clock positions. Those four measurements should be approximately equal when the ring is level.
Also check that every upper suspension cord is taut. If one has gone slack, it isn't sharing the load as intended.
Step 2. Correct a Tilting Hoop
If the hoop dips toward the sleigh, the combined weight distribution is pulling the frame toward that side. If it dips toward a reindeer or Christmas tree, check the weights and positions on that side.
Begin by checking that the corresponding ornaments are attached at the intended marks and that the paired ornaments haven't shifted around the hoop.
Next, adjust the gathering point of the four upper support cords. The upper suspension point needs to sit vertically above the combined center of gravity of the frame and everything attached to it. That point may be a little off the geometric center of the wooden hoop.
If the hoop tilts, lower the entire mobile onto a padded support before changing the upper suspension. Adjust the upper gathering point slightly toward the heavier side and retie the necessary support cords securely. Lift the mobile only after every connection is fastened. Let it settle, then check the four rim heights again. Repeat with small adjustments until the hoop hangs level and all four upper supports remain tensioned.
Don't correct a substantial weight imbalance by simply pulling one corner upward with an overly tight cord while leaving another support loose. All four upper cords need to carry tension in the final arrangement.
If the mobile still won't balance, check the individual ornament loops, paired weights and attachment positions. A heavier ornament may need a different position around the rim. Make sure you can restore a level frame without forcing the knots, bending the hoop or leaving one support slack.
If you cannot get the assembled mobile to hang level with all supports properly tensioned, don't install it for display. The suspension needs to be corrected first.
Step 3. Check the Ornament Spacing
Once the wooden hoop is level, look at the ornaments themselves.
Santa should hang independently, without touching the sleigh. Both reindeer should hold their flying positions, and the Christmas tree toppers should remain visible beneath them.
Gently move the suspended hoop through a small, slow rotation. Watch what happens as the decorations change position.
The ornaments should have room to hang without the antlers, runner curls, tree branches or snowflake tips catching against one another. Aim for at least an inch or two of separation between neighboring decorations as a practical starting point, allowing more wherever long antlers or runners could swing into another piece.
If two decorations touch, raise one, lower the other or move their attachment positions slightly around the hoop. Repeat the check afterward.
We aren't trying to make the mobile spin constantly. We just want it to remain attractive and untangled if it moves gently in the room.
Step 4. Finish the Suspension Knots
Once the mobile balances correctly, check every permanent suspension knot again. At each ornament connector, the hanging cord must pass through the original reinforced crochet loop and be secured with a knot appropriate for the cord material. Follow the cord manufacturer's fastening instructions, secure the tails against loosening and check each connection individually. Support the hoop whenever a knot needs adjustment. Never loosen a connection while it is carrying the mobile's weight.
Make sure every attachment bears on the ornament's reinforced hanging loop rather than on an individual loose crochet stitch. Reinforce any original loop that shifts or stretches before returning that ornament to the mobile.
After all four permanent upper connections are secure, remove the temporary position markers. Check the hoop's level again because tightening the knots can slightly change the cord lengths. If another adjustment is needed, support the hoop before loosening any cord.
Secure and neatly finish the remaining cord tails. Don't leave long loose ends near the ornaments.
Finally, check all four upper supports, the six main ornament attachments and the six smaller decoration attachments individually. There should be no loose knots, sliding rim wraps, frayed cords or decorations pulling away from their reinforced loops. Count all twelve hanging decorations and inspect their sewn details. Remove every temporary marker, clip, blocking pin and loose thread. Check that no small decorative piece or hanging cord can detach during normal display.
Step 5. Check the Finished Mobile Before Display
Leave the completed mobile hanging from its secure temporary support in an area away from children for at least 24 hours, checking periodically for slipping knots, cord stretching, hoop movement and changes in ornament positions.
That's a useful stability check, but it isn't a substitute for proper hardware ratings, correct knots or a load-bearing installation.
Only after the assembly remains secure should you trim any unnecessary cord tails and install the mobile in its chosen decorative location.
When you step back, you should see the red sleigh in the lower middle, Santa above it, reindeer flying on either side and the two little Christmas trees finishing the lower edges. The snowflakes and gold stars should add Christmas sparkle without hiding the bigger ornaments.
That's the whole idea. A collection of handmade Christmas decorations, all working together instead of competing for attention.
Make a Matching Christmas Crochet Garland
Here's another way to use the same ornaments. Instead of hanging them around a circular wooden frame, arrange them along one sturdy cord for a Christmas garland.
I especially like this option if you're making the ornaments as keepsakes. You can display them together at Christmas, then put them back on the tree individually another year.
The garland doesn't need a second collection of patterns. Use the same reindeer, Santa, sleigh and Christmas trees we've already made.
Garland Materials and Finished Length
For the complete six-ornament arrangement, plan a wall display approximately 7 feet wide. Cut a 120-inch length of strong braided polyester cord, leaving enough material for a gently hanging central section and secure attachments at both ends.
Allow approximately 96 inches of that cord for the decorated section, with about 12 inches remaining at each end for mounting. With the supports approximately 84 inches apart, this gives the garland a fairly deep curve, especially once the ornaments are attached. If you'd prefer a shallower curve, shorten the decorated section before fastening the ornaments permanently, then mark the six ornament positions evenly along the shorter length. Don't trim the extra cord until you're happy with the finished spacing and sag.
Use proper wall-mounting hardware suitable for the surface and the completed garland's weight. Avoid temporary adhesive hooks, pins or other attachments that might release under the load.
Arrange the Christmas Ornaments
Lay the garland cord on a table and arrange the six main ornaments in this order, from left to right:
- Christmas tree
- Flying reindeer
- Santa Claus
- Santa sleigh
- Second flying reindeer
- Second Christmas tree
Use approximately 15 inches between the attachment centers along the decorated cord. On the 96-inch working section, the six ornament positions begin approximately 10, 25, 40, 55, 70 and 85 inches from one end.
That spacing leaves room for the wider sleigh and reindeer without forcing the Christmas trees against them.
Place one small snowflake or gold star between neighboring ornaments where there is enough clearance. I wouldn't automatically add every little decoration from the mobile. Five small accents, alternating snowflakes and gold stars, are plenty for this arrangement.
Attach the Garland Ornaments
Lay the garland cord on a table and mark the ornament positions before hanging it. Secure both ends of the main cord to properly rated supports, then check its height and gentle curve without attaching the decorations. Lower the cord onto the table before fastening each ornament through its reinforced hanging loop. Once all connections are secure, hang the garland and check the spacing again. If something needs moving, support the decorations and take the weight off the cord before adjusting its knots.
Attach each ornament to the garland through its existing reinforced hanging loop, using a short connector where needed. Keep the attachment knots secure and prevent them from sliding along the support cord.
Let the original ornament loops establish much of the hanging length. If a connector is needed, keep it short enough that the ornament remains distinct from the decorations beside it.
Attach the larger ornaments first. Add the stars and snowflakes afterward, then adjust their drops so the small decorations don't overlap the reindeer antlers or the sleigh's curled runners.
Check the support cord after all the decorations are attached. The combined weight will change its sag, so you may need to adjust the length between the mounting points.
Once you're happy with the arrangement, complete the permanent attachment knots and secure the cord ends. Inspect every hanging loop, mounting point and decorative detail before leaving the garland on display.
Use the finished garland as a seasonal wall decoration or on another secure display support completely outside children's reach. It must not hang across a crib, bassinet, play area or changing space.
That's a nice bonus from making the original ornaments. One collection gives you a Christmas tree ornament set, a matching mobile and a garland without learning a whole new group of crochet patterns.
Christmas Crochet Baby Mobile Safety
This crochet Christmas mobile is decorative nursery artwork, not a toy. The hanging cords, small crocheted decorations and wooden frame must always remain completely outside a baby's reach.
Do not hang this mobile above a crib, bassinet, changing table or other surface where a baby might sleep, play or be lifted close enough to grab it. Choose a separate decorative location where the entire assembly, including its lowest hanging ornament, is inaccessible to children.
Mount the mobile using hardware appropriate for the ceiling structure and the total measured weight of the finished assembly. A properly installed structural ceiling anchor is different from a small adhesive hook or a decorative fastener. Follow the hardware manufacturer's installation and load instructions, and don't attach the mobile to a light fixture, curtain rod or other support not designed for hanging loads.
All crocheted decorations must remain permanently attached to their ornaments. Check the holly berries, tree stars, sleigh presents, reindeer antlers and hanging loops carefully. Don't add plastic eyes, detachable beads, bells, buttons or loose charms.
The American Academy of Pediatrics' nursery safety guidance explains that crib mobiles should be removed by five months of age or when a baby begins pushing up on hands and knees, whichever comes first.
Our Christmas decoration should be installed away from the infant sleep space from the beginning. That way, it isn't being treated as an overhead crib toy.
Inspect the hanging hardware, cords, knots and ornaments regularly. Take the decoration down immediately if any attachment loosens, a cord becomes damaged or the location is no longer outside a child's reach.
A Handmade Christmas Decoration to Keep
What I like about this Christmas mobile is that every ornament has a life of its own. The little Santa looks right at home on a Christmas tree. The reindeer can become part of a holiday garland, and that red sleigh with its three tiny presents is pretty enough to hang all by itself.
Put them together on the simple wooden hoop, though, and you've got a Christmas decoration with a little more personality than a collection of matching ornaments.
When Christmas is over, remove the mobile from its hanging support. Store the ornaments so the antlers, snowflake branches and gold runners aren't pressed against one another. Keep the hanging cords untangled and check them again before the next holiday season.
If you decide to make more handmade decorations, my free Christmas crochet patterns collection has plenty of other projects to choose from. And for year-round nursery designs, you can return to my crochet baby mobile patterns collection.
You don't need to change these little Christmas characters to use them in a completely different project. That's part of the pleasure of making the ornaments separately in the first place.
When you click on links to various merchants on this site and make a purchase, this may result in this site earning a commission. This does not affect the price you pay.

UBGI Gold Standard 2026
Reviewed under the site's
editorial checklist.
Photos, decorating ideas, party setups and reader submissions are shared for inspiration unless a page is specifically presented as a pattern, tutorial, reference guide or step-by-step project. Follow the instructions, measurements, safety guidance and manufacturer directions provided for the particular project or product.
About Jan | Contact | Baby Nursery Ideas (Blog) | Site Map | Privacy Policy | Disclosure Policy | Disclaimer | Affiliate Disclosure | Earnings Disclosure | Facebook | Pinterest
I am a participant in the Amazon Services LLC Associates Program, an affiliate advertising program designed to provide a means for us to earn fees by linking to Amazon. As an Amazon Associate I earn from qualifying purchases.
Copyright © 2006-2026. All Rights Reserved.