Free Crochet Santa Sleigh Ornament Pattern
By Jan Bay
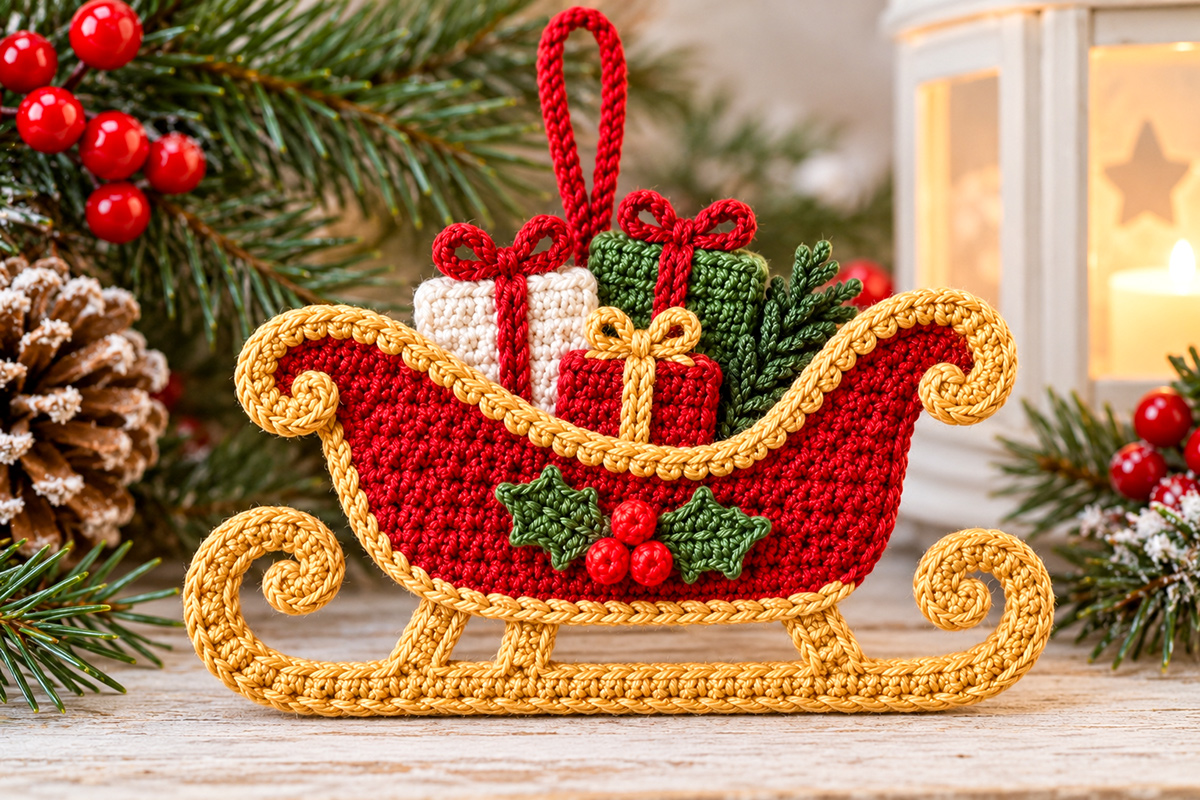
This free crochet Santa sleigh ornament pattern brings a little old-fashioned Christmas charm to your handmade decorations. The cranberry-red sleigh has gracefully curved golden runners, tiny wrapped Christmas presents and a miniature holly decoration on the front. Both sides are finished, making it a lovely choice for a Christmas tree, holiday garland or decorative nursery Christmas mobile. It's one little sleigh with several ways to enjoy it.
More Free Christmas Crochet Patterns
Free Christmas Crochet Patterns
Baby's First Christmas Ornaments
See Supplies for This Project Here.
Jump to a Section
Materials and Finished Size for the Santa Sleigh Ornament
You'll need small amounts of Christmas-colored cotton yarn for this sleigh. I would choose smooth sport-weight cotton rather than fluffy acrylic. The gold curves, tiny packages and holly leaves have quite a bit of detail, and a smooth yarn will let those stitches show.
The sleigh is made in two matching red panels, so both sides will be finished. The packages have neat backs, too. That little extra work is worthwhile if you're hanging the ornament somewhere it can turn around.
Expected finished size: Approximately 7 to 7 1/2 inches wide, including the curled runners, and about 4 3/4 to 5 inches tall, excluding the hanging loop. These dimensions are calculated from the target gauge and have not been confirmed with a finished sample.
Skill level: Intermediate. You'll be making shaped flat pieces, small decorative motifs, crocheted cords and several sewn joins.
Yarn: Sport-weight cotton or a smooth cotton blend.
- Cranberry red: have at least 75 yards available for both sleigh panels, the small red gift, ribbons, berries, hanging loop and joining stitches.
- Antique gold: have at least 50 yards available for the runner assembly, supports, curled ends, decorative edging and gift ribbons.
- Ivory: approximately 10 yards for one wrapped gift.
- Evergreen: approximately 10 yards for one wrapped gift and ribbon details.
- Dark holly green: approximately 5 yards for the miniature leaves.
These are planning allowances, not yardage measured from a completed sample. Leftover yarn from other Christmas projects may be plenty, provided the colors and yarn thickness work together.
Other supplies:
- 2.75 mm crochet hook, or the size needed for gauge
- Yarn needle for assembly
- Small embroidery needle
- Scissors
- Removable stitch markers
- Rustproof pins and a blocking surface
- Measuring tape
Target gauge: 26 single crochet stitches and 28 rows measure 4 inches in a firm, flat swatch.
At that gauge, the widest part of each red body panel measures approximately 6 1/2 inches. The narrow lower foundation measures approximately 4 inches. The highest parts of the red body measure about 2 7/8 inches from its lower edge, while the dipped center opening sits approximately 1 3/8 to 1 1/2 inches above that edge. The separate gold runner assembly extends beyond the red body.
If your 42-stitch panel is much wider than 6 1/2 inches, change your hook before making the second panel. You want the two pieces to match, and you also need room for the gifts to sit neatly between the raised ends.
Don't stuff the sleigh. The two layers of crochet are enough for the body, and stuffing would give it a rounded appearance that doesn't match the flatter ornament pictured above.
I'd also skip wire, beads, bells and little plastic decorations. The curves and Christmas details should come from the crochet itself.
Stitches, Abbreviations and Pattern Notes
We're using US crochet terms for this pattern. Most of the work is single crochet, with a few slip stitches and taller stitches for the little holly leaves.
- ch = chain
- sc = single crochet
- hdc = half double crochet
- sl st = slip stitch
- st or sts = stitch or stitches
- sc2tog = single crochet two stitches together
- inc = work two single crochet stitches in one stitch
- RS = right side
- WS = wrong side
Before you begin:
- Chain 1 at the beginning of a turned row does not count as a stitch.
- Turn your work after each completed row unless the instructions tell you otherwise.
- The stitch count in parentheses is the number of stitches remaining at the end of that row.
- Use a stitch marker to identify the first and last stitches when making the raised sleigh ends.
- Make the two red panels with the same hook, yarn and tension.
- All the little gift pieces are worked flat. No stuffing is used.
- Keep sewing tails long enough to attach the pieces securely.
A note about the sleigh shape: We're starting at the bottom and working upward. The red body widens gradually, then the two ends continue separately. That leaves the lowered opening between them where the Christmas presents belong.
The gold runners are made separately, then attached underneath the finished sleigh. Don't try to crochet the runners directly into the red panel. Keeping them separate makes the curves easier to shape and lets you finish both sides neatly.
There are several small pieces, but each has a job. The gifts make the sleigh look ready for Christmas, the little holly decorates both faces, and the gold runners give the whole ornament its unmistakable silhouette.
Pattern status: The stitch counts and expected measurements have been calculated from the construction below. This pattern has not been physically test-crocheted, so the finished dimensions and the stiffness of the curved runners have not been verified with a completed sample.
Free Crochet Santa Sleigh Ornament Pattern: Crochet the Sleigh Panels
Begin with the cranberry-red sleigh body. You'll make two identical pieces, one for the front and one for the back.
Keep your increases at the beginning and end of the specified rows. The bottom starts narrower, and the sides gradually widen as you work toward the upper edge. After that, we'll form the two raised ends separately.
Main Sleigh Body
Make 2 in cranberry red.
Foundation: Ch 27.
Row 1: Sc in the second ch from the hook and in each remaining ch. (26 sc)
Row 2: Ch 1, turn. Work 2 sc in the first st, sc across to the last st, and work 2 sc in the last st. (28 sc)
Row 3: Ch 1, turn. Work 2 sc in the first st, sc across to the last st, and work 2 sc in the last st. (30 sc)
Row 4: Ch 1, turn. Work 2 sc in the first st, sc across to the last st, and work 2 sc in the last st. (32 sc)
Row 5: Ch 1, turn. Work 2 sc in the first st, sc across to the last st, and work 2 sc in the last st. (34 sc)
Row 6: Ch 1, turn. Work 2 sc in the first st, sc across to the last st, and work 2 sc in the last st. (36 sc)
Row 7: Ch 1, turn. Work 2 sc in the first st, sc across to the last st, and work 2 sc in the last st. (38 sc)
Row 8: Ch 1, turn. Work 2 sc in the first st, sc across to the last st, and work 2 sc in the last st. (40 sc)
Row 9: Ch 1, turn. Work 2 sc in the first st, sc across to the last st, and work 2 sc in the last st. (42 sc)
Row 10: Ch 1, turn. Sc in each st across. (42 sc)
Fasten off after Row 10.
Size checkpoint: At the target gauge, the lower foundation should measure approximately 4 inches. The upper edge should measure approximately 6 1/2 inches across, with 42 stitches. You should have 10 completed rows.
The eight increase rows have added 16 stitches to the original 26. The lower body widens gradually toward the raised sleigh ends, creating the more tapered shape shown in the finished photograph.
Shape the Raised Sleigh Ends
Now comes the shaping that makes this look like Santa's sleigh instead of a plain red rectangle.
Lay the panel flat. With the lower foundation edge horizontal, mark the first 11 stitches at one end of Row 10 and the last 11 stitches at the other end. The middle 20 stitches remain unworked while you make the raised ends.
The two raised ends are made separately. Each begins with 11 stitches and narrows along its inner edge until five stitches remain. The outer edge stays straight enough for the gold curling decoration that will be added later.
First Raised End
Attach cranberry yarn at the outermost stitch of the first marked 11-stitch section. Work toward the center of the sleigh.
Row 11: Sc in the 11 marked sts. (11 sc)
Row 12: Ch 1, turn. Sc2tog over the first 2 sts, then sc in each remaining st. (10 sc)
Row 13: Ch 1, turn. Sc in each st across. (10 sc)
Row 14: Ch 1, turn. Sc2tog over the first 2 sts, then sc in each remaining st. (9 sc)
Row 15: Ch 1, turn. Sc in each st across. (9 sc)
Row 16: Ch 1, turn. Sc2tog over the first 2 sts, then sc in each remaining st. (8 sc)
Row 17: Ch 1, turn. Sc across to the last 2 sts, then sc2tog. (7 sc)
Row 18: Ch 1, turn. Sc2tog over the first 2 sts, then sc in each remaining st. (6 sc)
Row 19: Ch 1, turn. Sc across to the last 2 sts, then sc2tog. (5 sc)
Row 20: Ch 1, turn. Sc in each st across. (5 sc)
Fasten off, leaving a tail to weave in later.
Second Raised End
Work the opposite side as a mirror image.
Attach cranberry yarn at the outermost stitch of the other marked 11-stitch section of Row 10. Turn the panel over if needed so you can work from that outside edge toward the center.
Repeat Rows 11 through 20 exactly as written for the first raised end, keeping every decrease along the inner edge of the sleigh.
The second end must also finish with five stitches.
Finished shaping check:
- 42 stitches across the original upper body row
- 11 stitches used to begin the first raised end
- 20 center stitches left unworked
- 11 stitches used to begin the second raised end
- Five stitches remaining at the top of each raised end
- 20 rows total at the highest parts of the sleigh
42 stitches divided into 11, 20 and 11 gives us the correct center opening. Each raised end then decreases six times, leaving five stitches.
Repeat the entire body and raised-end construction for the second red panel.
Lay both panels together and compare the outside edges, inner slopes and raised ends. They should line up without stretching. Lightly block them to matching measurements if necessary.
Don't join the panels yet. We still need to place the wrapped gifts and finish the decorations on both faces.
Make the Curved Gold Sleigh Runners
The gold runners give this ornament much of its Christmas character. I wouldn't replace them with straight strips. Those curled ends are worth making, even if they take a little extra attention when you assemble everything.
We'll make one long lower runner with three supporting posts. Both faces will be finished in gold, including the curled decorations at the ends.
The runner pieces are made separately from the sleigh body so you can shape them before attaching them.
Lower Gold Runner
Make 2 in antique gold.
Ch 46.
Row 1: Sc in the second ch from the hook and in each remaining ch. (45 sc)
Rows 2 and 3: Ch 1, turn. Sc in each st across. (45 sc per row)
Fasten off, leaving a long sewing tail.
Each strip should measure approximately 6 7/8 to 7 inches long at the target gauge.
Place the two strips together with their wrong sides touching. Sew along their long edges with gold yarn, keeping the ends aligned. The joined strip forms the bottom of the sleigh runner assembly.
Keep it flat and straight. A twisted runner will make the whole ornament hang crooked.
Gold Runner Support Posts
Make 6 in antique gold.
Ch 3.
Row 1: Sc in the second ch from the hook and in the remaining ch. (2 sc)
Rows 2 through 5: Ch 1, turn. Sc in each st across. (2 sc per row)
Fasten off, leaving a sewing tail.
Pair the six narrow rectangles to make three double-layer supports. Place each pair with wrong sides touching and sew securely around its edges, keeping the stitches relaxed.
Each completed support contains two matching five-row rectangles and measures approximately 5/16 inch wide and 5/8 to 3/4 inch tall at the target gauge.
These narrower supports preserve the three-post arrangement while producing a slimmer appearance closer to the finished photograph.
Each support will be approximately 5/8 to 3/4 inch tall. These supports connect the underside of the red sleigh to the long gold runner.
Don't attach them to the red body yet. It's easier to position the supports once all the other pieces are ready.
Curled Runner Ends
Make 4 gold cords, two for each finished curl.
Ch 33.
Row 1: Sc in the second ch from the hook and in each remaining ch. (32 sc)
Fasten off, leaving a long sewing tail.
At the target stitch gauge, each cord has approximately 4 7/8 to 5 inches of calculated length. This provides additional yarn length for the outer curve, inward spiral and attachment.
Pair the four cords to make two double-layer runner curls.
Place the two matching cords of the first pair together, with their wrong sides touching. Sew along both long edges, keeping the stitches aligned. Repeat with the second pair.
Lay the first doubled cord flat. Allow approximately five stitches at one end for the upright section that will connect to the lower runner.
Shape the remaining length into a broad upward curve approximately 3/4 inch across. Bring the free end inward, then continue turning it into a smaller spiral inside the outer curve.
Pin the outer loop and inner spiral into position. Use small gold stitches through both crochet layers wherever the spiral touches the adjacent cord. Secure the innermost tip so it cannot unwind.
Repeat with the second doubled cord, reversing the curve so the two completed ends mirror one another and both spiral tips turn inward toward the sleigh.
Sew the upright lower section of each curl to the corresponding end of the long gold runner. Work through both layers of the runner and both layers of the curl, securing the full attachment area rather than only the bottom tip.
Lay the complete runner assembly flat. Check that both curled ends rise to approximately the same height, point inward and lie in the same plane as the long runner.
The curves must hold their shape without wire. Their stiffness and final appearance still require verification on a crocheted sample.
Small Gold Curls for the Upper Sleigh Ends
Make 4 in antique gold, one for each raised end on each face.
Ch 10.
Sl st in the second ch from the hook and in each remaining ch. (9 sl sts)
Fasten off, leaving a sewing tail.
Shape each small cord into a gentle inward curl. Pin and sew the tip against the adjacent cord so the shape stays together without wire.
These smaller curls will go at the tips of the red sleigh's raised ends. Place one on each end of each face, following the gold upper edging.
Keep the upper curls a little smaller than the lower runner curls. You'll get a much nicer sleigh silhouette when the two sets of curls aren't competing for attention.
Crochet the Christmas Gifts and Miniature Holly
Now we'll make the three little Christmas presents that peek out of the sleigh. There's an ivory package with a red ribbon, an evergreen package with a red ribbon and a smaller red package with a gold ribbon.
I would keep those three colors. They show up nicely against the red sleigh, and you don't need to add more presents just because there's a little room left.
The ivory and green packages will be finished on both sides and tucked behind the lowered upper edge. The smaller red package is made from two matching decorated pieces joined together, then attached across the front and back of the sleigh.
Ivory Christmas Present
Make 2 in ivory.
Ch 10.
Row 1: Sc in the second ch from the hook and in each remaining ch. (9 sc)
Rows 2 through 17: Ch 1, turn. Sc in each st across. (9 sc per row)
Fasten off, leaving a sewing tail on one piece.
The expected size of each ivory rectangle is approximately 1 3/8 inches wide and 2 3/8 to 2 1/2 inches tall.
Evergreen Christmas Present
Make 2 in evergreen.
Ch 11.
Row 1: Sc in the second ch from the hook and in each remaining ch. (10 sc)
Rows 2 through 18: Ch 1, turn. Sc in each st across. (10 sc per row)
Fasten off, leaving a sewing tail on one piece.
The expected finished size is approximately 1 1/2 inches wide and 2 1/2 to 2 5/8 inches tall.
This package is a little taller than the ivory one. That height difference helps the gifts look like separate packages instead of one solid block.
Small Red Christmas Present
Make 2 in cranberry red.
Ch 9.
Row 1: Sc in the second ch from the hook and in each remaining ch. (8 sc)
Rows 2 through 11: Ch 1, turn. Sc in each st across. (8 sc per row)
Fasten off, leaving a long sewing tail on each piece.
Each red package should measure approximately 1 1/4 inches wide and 1 1/2 to 1 5/8 inches tall.
These two red rectangles will be sewn together along their upper and side edges, leaving the bottom open. During assembly, the lower three rows of each face will be attached to the corresponding sleigh panel. The remaining eight rows will stand above the sleigh's lowered center edge.
Add the Gift Ribbons
Each present needs a vertical ribbon, a short ribbon across the upper part of the package and a little bow at the top.
Use cranberry red for the ivory and evergreen gift ribbons, and antique gold for the small red gift ribbons.
Use your crochet hook and the chosen ribbon color to work a raised line of surface slip stitches down the center of each gift face. Begin at the upper edge. Bring a loop of ribbon yarn through the fabric from the wrong side, then insert the hook into the next row below, draw up another loop and slip it through the loop already on the hook.
Continue down the center, working approximately one surface slip stitch per row. The ivory gift has 17 rows, the evergreen gift has 18 and the small red gift has 11. Keep the slip stitches relaxed so the fabric doesn't pucker.
Work a second line of surface slip stitches horizontally across each gift, approximately two rows below its upper edge. Follow the stitches of that row, using nine positions for the ivory gift, ten for the evergreen gift and eight for the red gift. Secure all ribbon tails on the wrong side before joining the gift panels.
The ribbons should sit slightly above the crocheted fabric, giving the presents a raised wrapped-package appearance without adding loose cords or separate hanging decorations.
Repeat for both faces of the ivory and green packages and for each separate red package.
Crochet the Tiny Gift Bows
Make 6 bows, using the matching ribbon colors.
With the chosen ribbon yarn, ch 6. Sl st into the first ch to form a small loop.
Ch 6 again, then sl st into the same base point to form the second loop.
Fasten off, leaving enough yarn to wrap around the middle of the two loops and sew the bow down.
Wrap the tail twice around the center to give the bow its knot. Attach the bow at the top of the corresponding package with several secure stitches.
Make two red bows for the ivory package, two red bows for the evergreen package and two gold bows for the small red package.
Keep the loops small and stitch them down against the package. Long floppy bow loops wouldn't suit an ornament this size.
Finish the Larger Gift Packages
Place the two ivory gift panels together with their decorated sides facing outward. Match all four edges.
Using ivory yarn, sew across the top edge and down both sides through Rows 4 through 17 only. Leave the side edges of Rows 1 through 3 unsewn, along with the entire lower foundation edge.
This creates two separate three-row flaps at the bottom of the ivory gift. One flap will attach to the inside of the front sleigh panel and the other to the inside of the back panel.
Repeat for the evergreen gift, using evergreen yarn. Sew its top edge and side edges through Rows 4 through 18, leaving Rows 1 through 3 separate and the lower foundation edge open.
Do not sew the bottom flaps together. They must remain separate so they can lie flat against their respective red sleigh panels during assembly.
Neither gift needs stuffing. The joined upper portions give the packages their finished double-sided appearance.
Set both gifts aside with their lower three-row flaps open. These flaps will be concealed between the red sleigh panels during assembly.
Miniature Evergreen Gift Sprigs
The taller green present has a little evergreen sprig peeking out beside it. Make one for each visible face of the package. These are small flat crochet decorations, not stuffed pieces.
Make 2 in dark evergreen yarn.
Ch 9.
First side: Sl st in the second ch from the hook. Sc in the next foundation ch.
Ch 3. Sl st in the second ch from the hook and the next ch. Sc in the next foundation ch.
Sc in the next foundation ch.
Ch 4. Sl st in the second ch from the hook and in the next 2 ch. Sc in the next foundation ch.
Sc in the next foundation ch.
Ch 3. Sl st in the second ch from the hook and the next ch. Sc in the next foundation ch.
Sl st in the last foundation ch. You have worked into all eight foundation chains, with three short branches along this side.
Second side: Continue around the foundation chain, working into the eight unused opposite loops.
Sl st in the first opposite loop.
Ch 3. Sl st in the second ch from the hook and the next ch. Sc in the next opposite loop.
Sc in the next opposite loop.
Ch 4. Sl st in the second ch from the hook and in the next 2 ch. Sc in the next opposite loop.
Sc in the next opposite loop.
Ch 3. Sl st in the second ch from the hook and the next ch. Sc in the next opposite loop.
Sc in the next opposite loop, then sl st in the final opposite loop at the tip.
Fasten off, leaving a long sewing tail.
Each sprig has a central stem and three little branches on each side. Shape the branches outward with your fingers.
Sew one sprig against each outward-facing side of the completed evergreen gift, near its upper right edge. Let the branches extend slightly beyond the gift, with the lower stem securely stitched through both gift layers.
Keep the sprigs small enough that they don't cover the red bow or extend beyond the raised red sleigh end.
Miniature Crochet Holly Leaves
The holly decoration on the sleigh is deliberately smaller than a regular crochet appliqué. We're making two pointed leaves for each face, with three tiny red berries arranged between them.
Make 4 miniature leaves in dark holly green.
Each leaf begins with a short foundation chain. The pointed edges are made with tiny chain picots.
Ch 8.
First side: Sl st in the second ch from the hook. Sc in the next ch.
In the next ch, work (hdc, ch 2, sl st in the second ch from the hook, hdc).
Sc in the next foundation ch.
In the next foundation ch, work (hdc, ch 2, sl st in the second ch from the hook, hdc).
Sc in the next foundation ch and sl st in the last foundation ch.
You've now worked along all seven foundation chains and formed two small side points.
Second side: Continue around the foundation chain, working into its seven unused opposite loops, beginning at the base of the leaf.
Sl st in the first opposite loop. Sc in the next.
In the next loop, work (hdc, ch 2, sl st in the second ch from the hook, hdc).
Sc in the next opposite loop.
In the next loop, work (hdc, ch 2, sl st in the second ch from the hook, hdc).
Sc in the next opposite loop, then sl st in the final opposite loop at the leaf tip.
Fasten off, leaving a long tail for sewing.
Gently shape the two pointed sides with your fingers. The leaf should look narrow and slightly jagged, not like a round flower petal.
Make three more the same way.
Miniature Crochet Holly Berries
We're keeping the berries very small, but they'll be crocheted rather than embroidered. That gives them the slightly raised texture shown in the finished sleigh without using stuffing or hard decorations.
Make 6 in cranberry red, three for each face.
Begin with a magic ring.
Round 1: Work 6 sc into the ring. Pull the ring closed. (6 sc)
Round 2: Sc in each st around. (6 sc)
Sl st into the next st, then fasten off, leaving a long sewing tail.
Each berry contains 12 single crochet stitches across two rounds. The second round gives it a little depth without stuffing.
Flatten the base gently and tuck the starting tail inside the small crochet shape. The berries should be shallow rounded accents rather than loose hanging balls.
You'll sew three berries directly between the holly leaves on each face, using close stitches around their lower edges. Keep all three together in a small triangular arrangement.
For a larger Christmas project, you can use my free crochet holly leaf pattern with berries. The finished leaves on that page are considerably larger, so the miniature version here is a better match for this little ornament.
Check Your Crochet Components Before Final Assembly
The complete Santa sleigh ornament requires 43 individual crocheted components. At this point, you should have made 42 of them. The hanging loop, which is the final component, is crocheted later in Assembly Step 7.
Some components have already been sewn together or decorated. Use the following list to account for every component, rather than expecting all the pieces to remain separate:
- 2 cranberry-red sleigh body panels
- 2 long gold runner strips
- 6 gold support rectangles, joined into 3 supports
- 4 long gold curl strips, joined into 2 runner curls
- 4 small gold upper curls
- 2 ivory gift panels
- 2 evergreen gift panels
- 2 red gift panels
- 6 small gift bows
- 2 miniature evergreen sprigs
- 4 miniature holly leaves
- 6 miniature crocheted holly berries
- 1 crocheted hanging loop
The ribbons and gold surface edging are worked directly onto their pieces and aren't counted separately. Nothing needs stuffing.
Assemble and Finish the Crochet Santa Sleigh Ornament
All the pieces are ready, so now we can put the sleigh together. I'd lay everything out before sewing. You want the taller gifts behind, the smaller red package in front and the two holly leaves centered below them.
Take a moment to check the arrangement from both sides. Once the red panels are joined, moving the presents will be much more difficult.
Step 1: Position the Ivory and Green Presents
Lay the front red sleigh panel flat with its right side facing upward, the lower foundation edge at the bottom and the two raised sleigh ends at the top.
Count the 42 stitches of Row 10 from left to right as you face the front of the sleigh. The 20-stitch center opening occupies positions 12 through 31.
Mark positions 13 through 21 for the ivory gift and positions 21 through 30 for the evergreen gift. Use removable markers so these positions remain identifiable when the panel is turned over.
Now turn the front panel over so its right side faces down and its wrong side faces upward. Keep the marked stitch positions unchanged.
Position the ivory gift behind its marked stitches 13 through 21 and the evergreen gift behind stitches 21 through 30. Let the evergreen gift sit behind the ivory gift where they overlap at stitch 21.
Check the placement by temporarily turning the panel right-side up. The ivory gift must appear on the left and the evergreen gift on the right when viewing the finished front of the sleigh.
Return the panel to its wrong-side-up position before continuing with the attachment instructions below.
This arrangement leaves stitches 12 and 31 clear at the ends of the center opening, providing space between the presents and the raised sleigh ends.
Let the lower three rows of both gifts extend down behind the red sleigh panel. The ivory gift will have 14 rows visible above the opening, while the evergreen gift will have 15 rows visible.
Pin both gifts into position. Sew the lower three rows of each gift's front-facing panel to the wrong side of the front red sleigh panel, working along the lower edge and lower side portions.
Catch the inside strands of the red crochet where possible so the attachment stitches remain inconspicuous on the finished front.
Now place the second red sleigh panel behind the first, with the two wrong sides facing one another. Align their lower edges, raised ends and center openings.
The larger gifts should sit between the two red panels at their lower ends, while their upper portions remain visible above the opening.
Temporarily pin the red panels together near their outer corners. Lift the back panel enough to reach its inside surface, keeping the gift positions unchanged.
Sew the lower three rows of each gift's back-facing panel to the wrong side of the back red sleigh panel. Use the corresponding positions so the front and back gift attachments line up.
Do not sew through both gift faces and both red panels in one seam. Each gift face should attach to its corresponding red panel, with the finished package extending above the opening.
Return the two red panels to their aligned position. Check that both gifts stand upright. Viewed from the front, the ivory gift sits toward the left and the evergreen gift toward the right. When the sleigh is turned over, their positions naturally appear reversed. Do not twist or reposition the gifts to make both views identical.
Keep the upper gift portions free of the red sleigh panels. The lower attachments will be hidden when the sleigh body is joined.
Step 2: Position the Small Red Christmas Present
The smaller red present sits in front of the ivory and evergreen packages. Eight of its 11 rows will rise above the lowered center opening, with the remaining three rows attached to the red sleigh body.
Place the two red gift rectangles together with their decorated sides facing outward. Match their edges and sew across the top and down both sides through Rows 4 through 11 only.
Leave the side edges of Rows 1 through 3 unsewn and the lower foundation edge open. The two separate three-row flaps will attach to the outside of the front and back red sleigh panels, as described below.
Keep the two red sleigh body panels aligned with their wrong sides facing inward. They should still be temporarily pinned together, not permanently joined.
Turn the temporarily pinned sleigh assembly over so the right side of the front red panel faces upward. Keep the two panels aligned.
From the front of the sleigh, position the red gift across stitches 19 through 26 of the lowered center opening, counting from left to right as you face the front. This places it slightly to the right of center, overlapping the space in front of the ivory and evergreen gifts.
Allow the upper eight rows of the gift to project above the red sleigh edge. Lay the lower three rows of the front gift face against the right side of the front red sleigh panel.
Pin the front gift face in position. Sew its lower edge and the sides of its lower three rows to the front red panel with small cranberry stitches.
Turn the aligned sleigh panels over. Position the second face of the same gift against the right side of the back red panel, directly opposite the first face.
Sew the lower three rows of this second gift face to the back red panel, matching the front attachment. Keep the upper eight rows of the two gift faces joined together and free of the sleigh body.
Use two or three small securing stitches to attach the upper back of the red gift to the adjacent ivory or evergreen package. Keep these stitches hidden behind the gift.
Check the sleigh from both sides before removing the temporary alignment pins. The red gift should stand in front of the taller packages, with matching front and back faces and no twisted lower attachment.
Step 3: Add the Miniature Holly
Place two holly leaves on the front red panel, below the small present. Angle one toward the lower left and the other toward the lower right.
Let the leaf bases meet near the center. Sew down the bases and several points along each leaf so the edges won't curl away from the sleigh.
Sew three miniature crocheted berries between the leaves in a small triangular cluster. Secure each berry around its entire lower edge so it cannot dangle or pull away from the sleigh.
Repeat the same arrangement on the back sleigh panel.
I'd keep the holly centered and fairly low on the sleigh. It should decorate the body without covering the little red Christmas present.
Step 4: Join the Two Red Sleigh Panels
Place the two red panels together with their wrong sides facing inward and right sides facing outward. Match the lower corners, raised ends and lowered center edges.
Check that both larger gifts have their lower portions attached between the red panels. The small red gift should extend above the center opening, with its lower three rows sewn to the outside of each sleigh panel.
Pin the red panels around their outer edges, keeping all three gifts upright.
With cranberry yarn, join the red panels using single crochet through both layers. Begin along the lower outside edge and continue around the outer sides and raised ends.
Work one joining stitch in each available stitch along the straight edges. Along row ends and the shaped ends, distribute the stitches evenly without pulling the edge inward.
When you reach the lowered center opening, move the projecting portions of the gifts gently upward and away from the joining path.
Work into the corresponding red stitches of Row 10 on both sleigh panels, passing the hook behind the gift fabric rather than through the gifts themselves.
Where the small red present crosses the center opening, lift its upper portion enough to reach the paired red edge stitches beneath it. Keep the attached lower three rows undisturbed.
If a section is too narrow for the hook without catching the gift fabric, close only that concealed section with small cranberry sewing stitches through the two red panel edges. Resume the single crochet joining stitches as soon as the red edge is accessible.
Continue around the remaining perimeter. Join the last crochet stitch to the first with a slip stitch and fasten off.
Check both faces of the joined sleigh. The red body should lie flat, the larger gifts should remain secure between the layers, and the small red present should stand in front without being caught in the center seam.
Remove the temporary alignment pins only after confirming that the two body panels and all three gifts remain correctly positioned.
Step 5: Add the Gold Sleigh Edging
Use two strands of antique-gold sport-weight yarn held together for the decorative outline. Work the surface slip stitches with relaxed tension so the edging sits as a raised gold cord rather than a thin embroidered line. If necessary, use a slightly larger hook for this edging only, without changing the underlying red body stitch counts.
Work the gold edging as a raised line of surface slip stitches following the joined red sleigh perimeter. The edging must continue across the lowered center opening on both faces, including the section in front of the small red Christmas present.
The calculated placement guide for each face is:
- 26 positions along the lower foundation edge
- 10 row-end positions along each lower outer side
- 10 row-end positions along the outside of each raised end
- 5 stitches across the top of each raised end
- 10 row-end positions along each inner sloping edge
- 20 positions across the lowered center opening
These sections total 116 calculated positions per face. Use each corner position once. Treat the count as a placement guide, because the shaped row ends and double-strand gold surface stitches must still lie flat without pulling the red fabric inward.
Begin near the upper tip of one raised end and work along the perimeter. Keep the surface slip stitches relaxed and check the fabric after each curve.
Across the lowered center opening, follow the red body edge until you reach the small red present.
Where the present covers the red edge, continue the gold surface stitches across the lower portion of the gift face, following the same level as the surrounding upper sleigh edge. Work through the gift fabric in this short section so the gold line remains visible in front of the present.
Return to the red sleigh fabric at the opposite edge of the gift and continue following the upper body outline.
Repeat the same path on the back face. The gold edging should cross the small red present at the same height on both sides.
Check that the upper gold line appears continuous and that neither side of the sleigh has gathered, twisted or become shorter than the other.
Keep the surface stitches even and don't pull them so tightly that the red body puckers. The gold should follow the shape already made by the red panels.
Attach the four small gold curls to the raised ends, one at each tip on each face. Sew them securely into the gold edging, with the little curled tips pointing inward.
Those upper curls are small details, but they finish the traditional sleigh outline nicely.
Step 6: Attach the Gold Runner Assembly
Lay the assembled long gold runner beneath the red sleigh. Center it so the curled ends extend beyond both sides by approximately the same amount.
Position the three double-layer support posts between the lower edge of the red body and the gold runner.
Count the 45 stitches along the runner from left to right. Position the first narrow support over stitches 10 and 11, the second over stitches 17 and 18, and the third over stitches 33 and 34.
These positions give the three supports their planned spacing. The outside posts sit beneath the sleigh body, while the additional post provides the third attachment visible in the finished example.
Pin all three supports between the lower red sleigh body and the gold runner, keeping their existing stitch positions along the runner.
Viewed from the front, angle the left and middle supports slightly toward the right at their upper attachments. Angle the right support slightly toward the left. This reproduces the gently slanted supports shown in the finished ornament.
Keep the diagonal angles shallow. The supports must fit comfortably between the red body and gold runner without stretching, pulling the lower edge downward or twisting the assembly.
Check that the three supports maintain their positions when the sleigh is viewed from both sides before sewing them permanently.
Sew each lower support edge firmly through both layers of the gold runner. Then sew each upper support edge through both red sleigh panels, catching the full width of the support.
Make several small securing stitches at each junction, then weave the tails into the joined fabric. Keep the stitches close enough that no support can pivot freely.
Hold the sleigh upright and check that all three supports remain attached, with the bottom runner approximately level.
Look at the sleigh from the front and back. The gold runner should appear continuous, with its curved ends rising gracefully on either side.
Check the runner shape: Hold the assembled sleigh upright by its upper center. If the runner bends downward or a curl opens, reinforce its sewn contact points and check the tension of the gold fabric. If it still won't hold the intended silhouette, the runner construction needs to be adjusted before the pattern can be considered physically verified.
Step 7: Crochet and Attach the Hanging Loop
Leaving a starting yarn tail at least 10 inches long, ch 20 with cranberry-red yarn.
Sl st into the first ch to close the chain into a loop.
Cut the working yarn, leaving a second tail at least 10 inches long, then fasten off.
Use both tails to attach the loop through the main sleigh structure as directed below.
Position the hanging loop behind the gifts, close to the upper center of the sleigh.
Bring both attachment tails down behind the packages to the upper central portion of the joined red sleigh body.
Temporarily secure the tails with two small stitches through both red body panels. Do not weave in or trim the tails yet.
Gently lift the ornament by its hanging loop, supporting the underside with your other hand until the temporary stitches are carrying the weight.
Check that the gold runner hangs approximately level and the three presents remain upright.
If the sleigh tilts, lower it onto a flat surface, remove the temporary attachment stitches and move the loop slightly toward the heavier side. Repeat the hanging check before securing it permanently.
Once the sleigh hangs level, reinforce the attachment with several additional stitches through both red body panels. The main sleigh structure must carry the weight rather than the gift packages alone.
Weave both remaining yarn tails securely through the internal crochet layers. Trim them only after the loop has passed the hanging check and its final attachment is complete.
Step 8: Final Finishing
Check every seam and decorative attachment, including all three gifts, the evergreen sprigs, holly leaves, six berries, gold curls, three runner supports and hanging loop.
Remove every temporary pin and removable stitch marker. Check both sides and the space between the joined panels so none are left inside the ornament.
Give each attached decoration a gentle tug. If any piece moves or lifts away from its stitching, reinforce it before hanging the ornament.
Weave in any remaining yarn ends. Trim only after each end has been secured through several stitches.
Lightly block the finished ornament if the red body needs straightening. Shape the raised ends with your fingers and keep the runner flat while it dries.
Don't stretch the runner or force the curls wider than their stitched shape. The ornament should keep its compact appearance.
Now check both sides one last time. The red sleigh, three presents, miniature holly and gold runner details should all be visible whichever way the ornament turns.
That's your finished Santa sleigh.
Three Ways to Use Your Finished Christmas Sleigh
On the Christmas tree: Hang the sleigh from a sturdy branch with enough space beneath it for the gold runners. I would leave the hanging loop red rather than changing it to gold, since it blends nicely with the rest of the ornament.
On a Christmas garland: Make several sleighs or alternate them with smaller Christmas motifs. A crochet Santa ornament would be a natural companion. Keep the decorations spaced apart so the sleigh's curved runners don't get hidden behind another piece.
As part of a nursery Christmas display: The finished front and back make the sleigh useful as a decorative hanging motif. For other coordinating ideas, see my crochet baby mobile patterns. The ornament itself is not a complete mobile pattern, and it isn't a toy for a baby to hold.
I wouldn't add tiny bells or dangling decorations to the presents. The gold curls, wrapped gifts and holly already give this little sleigh enough detail.
Important Safety Notes for Nursery Decorations
This crochet sleigh is a decorative Christmas ornament, not a baby toy. It should never be placed inside a crib, bassinet or other infant sleep space.
If the ornament is used on a nursery mobile, every part of the mobile, including its hanging cords and decorations, must remain completely out of the baby's reach. A mobile must be removed by five months of age or when the baby begins pushing up on hands and knees, whichever comes first. Remove it earlier if the baby can reach any part.
The American Academy of Pediatrics explains these precautions in its baby room safety checklist.
Don't attach extra yarn ties or improvised hanging cords to a crib or play yard. If you're making a nursery display, use a mounting arrangement specifically designed for that purpose and follow its safety instructions.
Because the sleigh has small sewn decorations and curled runner ends, keep it out of children's reach even when it isn't part of a mobile.
A Little Christmas Keepsake Worth Bringing Out Again
One of the nice things about making a sleigh ornament is that it doesn't have to stay on the Christmas tree. You can include it in a handmade garland, use it in a seasonal wall display or pack it away with the other special decorations you bring out every December.
I'd keep the first one in the traditional cranberry, evergreen and antique-gold colors. If you make more, a different combination of gift ribbons is plenty of variety without changing the sleigh pattern itself.
You can also pair the finished sleigh with the other projects in my free Christmas crochet patterns collection or use it alongside the keepsake ideas on my baby Christmas ornaments page.
Keep the little gold curls, the three wrapped gifts and the holly just as they are. Those are the details that give this ornament its character, and it really doesn't need anything else.
When you click on links to various merchants on this site and make a purchase, this may result in this site earning a commission. This does not affect the price you pay.

UBGI Gold Standard 2026
Reviewed under the site's
editorial checklist.
Photos, decorating ideas, party setups and reader submissions are shared for inspiration unless a page is specifically presented as a pattern, tutorial, reference guide or step-by-step project. Follow the instructions, measurements, safety guidance and manufacturer directions provided for the particular project or product.
About Jan | Contact | Baby Nursery Ideas (Blog) | Site Map | Privacy Policy | Disclosure Policy | Disclaimer | Affiliate Disclosure | Earnings Disclosure | Facebook | Pinterest
I am a participant in the Amazon Services LLC Associates Program, an affiliate advertising program designed to provide a means for us to earn fees by linking to Amazon. As an Amazon Associate I earn from qualifying purchases.
Copyright © 2006-2026. All Rights Reserved.