Free Crochet Christmas Tree Ornament Pattern with Optional Baby Booties
By Jan Bay
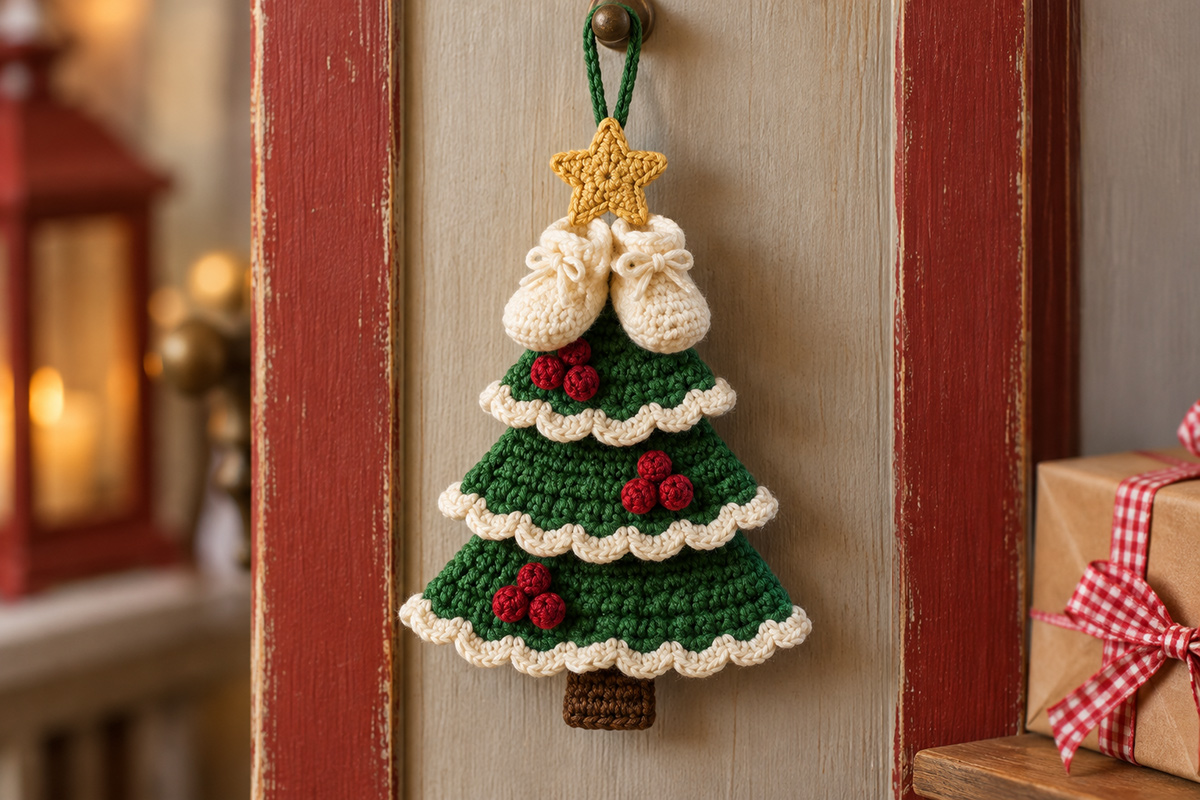
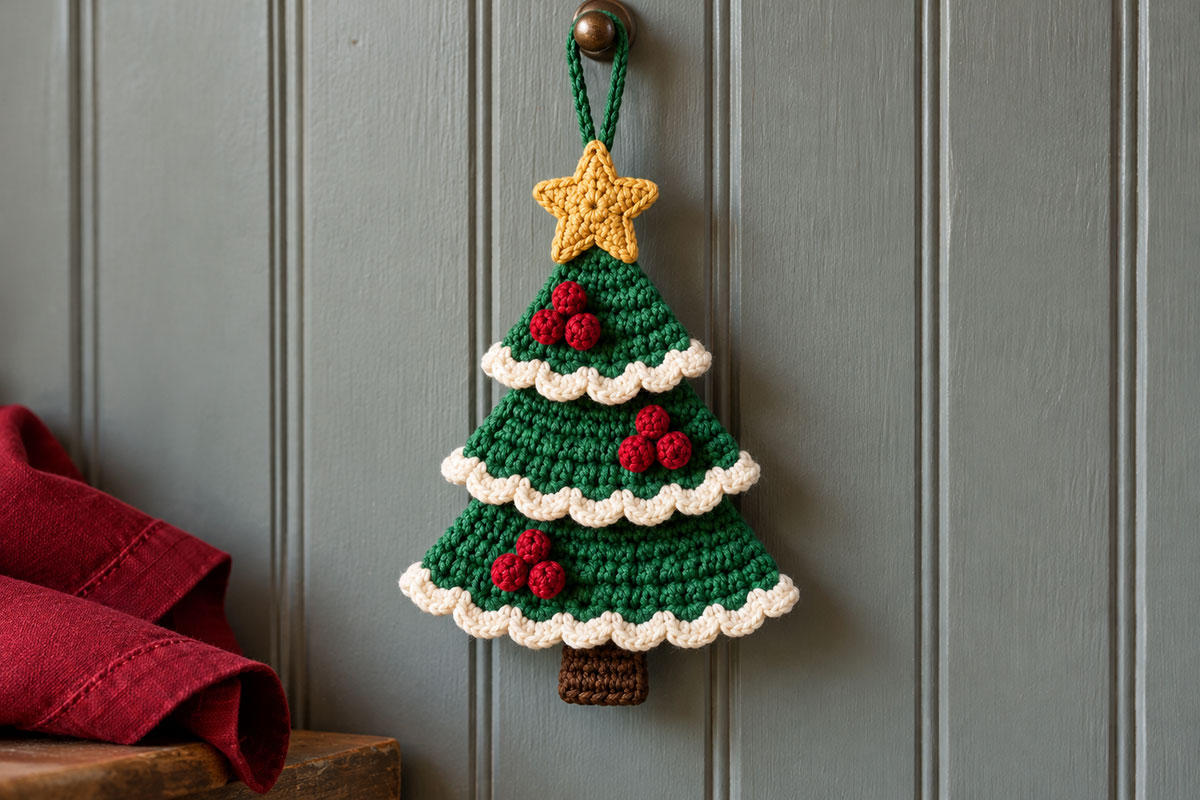
This free crochet Christmas tree ornament pattern makes a little three-tier evergreen tree with snowy ivory branches, cranberry red holly berry clusters and a gold star tree topper. Make the classic tree ornament on its own, or add two tiny ivory baby booties hanging directly beneath the star for a special Baby's First Christmas keepsake. Both versions use the same tree pattern, so you can choose your favorite without learning a second construction method.
Explore More Free Crochet Christmas Patterns
Free Christmas Crochet Patterns
Free Crochet Angel Ornament Pattern
See Supplies for This Project Here.
Materials and Finished Size
We're going to make this little Christmas tree in three separate pieces, so you won't have to wrestle with complicated shaping. Each evergreen section is a little wider than the one above it, and the ivory edging gives the branches their snowy look.
The regular ornament needs just the tree, its gold star, berries, trunk and hanging loop. If you want the Baby's First Christmas version, you'll make two miniature ivory booties and attach them just below the star. That's the only extra construction.
Yarn and Crochet Supplies
- DK or light-worsted weight yarn, category 3, in deep evergreen
- Small amounts of ivory yarn for the snowy edging and optional baby booties
- Cranberry yarn for nine small crocheted berries
- Antique-gold yarn for the five-point star
- Brown yarn for the little tree trunk
- 3.25 mm crochet hook
- Yarn needle with an eye large enough for the yarn
- Sharp scissors
- Stitch markers, optional
- Measuring tape
I'd choose a smooth yarn with reasonably firm stitch definition. Fuzzy yarn can hide the little increase stitches and make the finished tree look less tidy. You don't need metallic thread, beads or miniature Christmas decorations. The star, snowy edges and berries give it plenty of Christmas color already.
Finished Size and Gauge
The expected finished tree measures approximately 4 to 4½ inches tall, from the top of the gold star to the bottom of the brown trunk. That measurement doesn't include the evergreen hanging loop.
The widest green triangle should measure approximately 3¼ inches across its final row before adding the ivory edging, based on the proposed gauge. The finished snowy trim may extend a little beyond that width. These are calculated estimates rather than measurements from a completed crochet sample.
Gauge target: Approximately 22 single crochet stitches and 24 rows over 4 inches in a firm, flat swatch.
Exact gauge isn't critical for an ornament, but the three green sections need to be made with the same yarn, hook and tension. Changing those halfway through can leave you with mismatched layers that don't overlap neatly.
Skill level: Confident beginner. The main tree uses single crochet and simple increases. The textured ivory edging, star and miniature booties take a little more attention.
Construction: Three flat green panels joined together, followed by separate crocheted decorations. No stuffing or wire is needed.
Decide whether you want the baby booties before sewing on the gold star. The tree itself is made exactly the same way for both versions. If you're adding the booties, leave the star unattached until their hanging cords are secured. That way, you won't have to undo any stitching later.
Crochet Abbreviations
All instructions use standard U.S. crochet terms.
- ch: Chain
- sc: Single crochet
- hdc: Half double crochet
- sl st: Slip stitch
- st or sts: Stitch or stitches
- inc: Work 2 single crochet stitches into the same stitch
- MR: Magic ring
- Reverse sc: Reverse single crochet, also called crab stitch
The beginning chain 1 on each turned row doesn't count as a stitch. Always work the first single crochet into the first actual stitch of the preceding row.
For the tree triangles, turn your work after every row. Increase on the odd-numbered rows beginning with Row 3, and work the even-numbered rows without increasing.
Count your stitches at the end of every increase row. If you miss an increase near one edge, the triangle can lean to one side, and that becomes much more noticeable when the three tiers are stacked.
Free Crochet Christmas Tree Ornament Pattern: Three Evergreen Tiers
Start with the evergreen yarn. You'll make three separate triangles using the same basic rows. The top triangle is the shortest, the middle triangle is a little larger, and the bottom triangle gives the tree its broad Christmas tree shape.
All three begin the same way. The only difference is the row where you stop.
First Triangle: Small Top Tier
Row 1: Ch 3. Work 1 sc in the second chain from the hook and 1 sc in the final chain. (2 sc)
Row 2: Ch 1, turn. Work 1 sc in each stitch across. (2 sc)
Row 3: Ch 1, turn. Work 2 sc in each stitch. (4 sc)
Row 4: Ch 1, turn. Work 1 sc in each stitch across. (4 sc)
Row 5: Ch 1, turn. Work 2 sc in the first stitch, 1 sc in each of the next 2 stitches, and 2 sc in the last stitch. (6 sc)
Row 6: Ch 1, turn. Work 1 sc in each stitch across. (6 sc)
Row 7: Ch 1, turn. Work 2 sc in the first stitch, 1 sc in each of the next 4 stitches, and 2 sc in the last stitch. (8 sc)
Row 8: Ch 1, turn. Work 1 sc in each stitch across. (8 sc)
Row 9: Ch 1, turn. Work 2 sc in the first stitch, 1 sc in each of the next 6 stitches, and 2 sc in the last stitch. (10 sc)
Fasten off. Leave the triangle untrimmed until you've made the other two green sections.
Second Triangle: Middle Tier
Begin again with evergreen yarn and repeat Rows 1 through 9 of the first triangle. You should have 10 sc at the end of Row 9.
Row 10: Ch 1, turn. Work 1 sc in each stitch across. (10 sc)
Row 11: Ch 1, turn. Work 2 sc in the first stitch, 1 sc in each of the next 8 stitches, and 2 sc in the last stitch. (12 sc)
Row 12: Ch 1, turn. Work 1 sc in each stitch across. (12 sc)
Row 13: Ch 1, turn. Work 2 sc in the first stitch, 1 sc in each of the next 10 stitches, and 2 sc in the last stitch. (14 sc)
Fasten off. The middle triangle now has 13 rows and finishes with 14 single crochet stitches across its bottom edge.
Third Triangle: Wide Bottom Tier
Make one more evergreen triangle, working Rows 1 through 13 exactly as written above.
Row 14: Ch 1, turn. Work 1 sc in each stitch across. (14 sc)
Row 15: Ch 1, turn. Work 2 sc in the first stitch, 1 sc in each of the next 12 stitches, and 2 sc in the last stitch. (16 sc)
Row 16: Ch 1, turn. Work 1 sc in each stitch across. (16 sc)
Row 17: Ch 1, turn. Work 2 sc in the first stitch, 1 sc in each of the next 14 stitches, and 2 sc in the last stitch. (18 sc)
Fasten off.
Check the Three Tree Sections
You should now have three evergreen triangles:
- Small top triangle: 9 rows, finishing with 10 sc
- Middle triangle: 13 rows, finishing with 14 sc
- Large bottom triangle: 17 rows, finishing with 18 sc
Lay them beside one another with their points facing up. Each triangle should widen evenly toward its bottom edge, with no obvious slant to the left or right.
Don't sew the pieces together yet. The snowy ivory trim goes on first, while you can still turn each little triangle around comfortably.
Add the Ivory Snowy Edging
The ivory edging is what gives this little tree its snowy Christmas look. I wouldn't make it into a big, floppy ruffle. We want a slightly raised, softly scalloped edge that sits just below the evergreen stitches without taking over the whole branch.
Work the same edging on all three triangles. Only the stitch counts change.
First Row: Gently Ruffled Ivory Trim
Place the small triangle with its chosen front side facing you and its point at the top.
Join ivory yarn with a slip stitch at the right-hand corner of the triangle's straight bottom edge.
Ch 1. Working into the 10 single crochet stitches of the final green row, repeat the following sequence five times:
Work 1 sc in the next stitch, then 2 sc in the following stitch.
You'll have 15 ivory sc across the small triangle.
Repeat this edging on the middle and lower triangles:
- Small triangle: Repeat the two-stitch sequence 5 times. (15 ivory sc)
- Middle triangle: Repeat 7 times. (21 ivory sc)
- Large triangle: Repeat 9 times. (27 ivory sc)
Those extra stitches give the trim a little fullness. Don't try to stretch the green fabric to match the ivory border. Let the ivory stitches sit naturally along the edge.
Second Row: Textured Snowy Finish
Keep the ivory yarn attached after completing the first edging row.
Ch 1, but don't turn the work.
Begin by working 1 reverse single crochet into the last ivory stitch of the preceding row, directly beneath your working loop. Insert the hook through both top loops of that stitch, pull up a loop, yarn over and pull through both loops on your hook.
Now move to the next ivory stitch to the right and work another reverse single crochet. Continue working backward across the row, making 1 reverse single crochet in each remaining ivory stitch.
For a right-handed crocheter, you'll work from left to right. This stitch is also called crab stitch.
Count your stitches before fastening off. You should have 15 reverse single crochet stitches on the small triangle, 21 on the middle triangle and 27 on the large triangle.
Fasten off and weave the ivory yarn tails into the back of the green fabric.
The finished edging should have a rounded, slightly raised appearance. If it curls into a tight little roll, your finishing stitches may be too tight. Loosen your tension before changing the stitch counts.
Lay all three pieces flat again. You should see three matching snowy branch edges, with the widest one at the bottom.
Assemble and Decorate the Crochet Christmas Tree
Now we can put those three little pieces together. The important thing is keeping the tips centered and leaving enough evergreen showing below each ivory edge.
Don't line up the three points at the top. That would leave you with three triangles sitting on top of one another instead of the stepped Christmas tree in the finished photograph.
Arrange the Three Evergreen Layers
Step 1: Lay the largest triangle on your work surface with its point facing upward and the right side showing.
Step 2: Place the middle triangle over the large triangle, keeping their vertical centerlines aligned.
Position the middle triangle so its ivory lower edge sits immediately below Row 11 of the large triangle, counting rows from the large triangle's upper point. Rows 12 through 17 of the large triangle should remain visible beneath the middle tier.
Step 3: Place the smallest triangle over the middle triangle. Align the centerlines again.
Position the small triangle so its ivory lower edge sits immediately below Row 7 of the middle triangle, counting from the middle triangle's upper point. Rows 8 through 13 of the middle triangle should remain visible below the small tier.
You should now see three separate ivory branch edges, with the tree becoming progressively wider toward the bottom.
The upper triangle will extend above the other two points. That's intentional. Its point becomes the top of the finished tree, directly beneath the gold star.
Sew the Three Sections Together
Thread your yarn needle with evergreen yarn.
Begin by securing the middle triangle to the lower triangle. Make several small stitches through the overlapping green fabric, working from the back wherever possible.
Place stitches near the center and toward both sides of the overlapping area. Keep the ivory edging free so it can sit slightly forward.
Next, attach the top triangle to the middle triangle in the same way.
Check the front before finishing the last few stitches. All three ivory edges should be visible, and the green sections should sit symmetrically around the centerline.
Weave the yarn tails securely into the back.
If one branch looks crooked, fix the overlap before adding the decorations. A berry won't straighten a crooked tree.
Crochet the Little Brown Trunk
With brown yarn, ch 5.
Row 1: Work 1 sc in the second chain from the hook and in each remaining chain. (4 sc)
Row 2: Ch 1, turn. Work 1 sc in each of the 4 stitches across. (4 sc)
Rows 3 through 6: At the beginning of each row, ch 1 and turn. Work 1 sc in each of the 4 stitches across. (4 sc in each row)
You should now have a brown rectangle measuring 4 stitches wide and 6 rows tall.
Fasten off, leaving a sewing tail approximately 8 inches long.
Place the trunk behind the center of the lower triangle. Tuck its uppermost row behind the bottom green row and keep the remaining five brown rows extending downward. The ivory edging will cover part of that extension, leaving an expected visible trunk length of approximately ½ inch at the proposed gauge.
Sew the overlapped section to the back of the tree with several firm stitches. Weave in the tail.
Keep the trunk centered. It doesn't need to be wide, because the lower evergreen branches are the feature here.
Crochet Nine Small Cranberry Berries
The finished tree has three berry clusters, each made from three little raised berries. We're using crocheted berries rather than beads, so they'll have the same soft yarn texture as the tree.
Make nine berries in cranberry yarn.
Berry Round 1: Make a magic ring. Work 4 sc into the ring. Pull the ring closed. (4 sc)
Berry Round 2: Work 1 sc into each of the four stitches. (4 sc)
Fasten off, leaving a sewing tail. Thread the tail through the front loops of the four final stitches and pull gently to close the top into a small rounded berry.
Use your fingers to shape the berry. Don't add stuffing. It's small enough to hold its rounded shape without it.
Make eight more berries the same way.
Position the Three Berry Clusters
Arrange the berries in groups of three, making a small triangle with each group.
Upper tier: Place one cluster slightly left of center, on the exposed green area above the first ivory branch edge. Keep it below the position reserved for the optional booties.
Middle tier: Place one cluster right of center, a little above the second ivory edge.
Lower tier: Place the final cluster left of center, above the widest ivory branch edge.
Sew each berry separately to the green fabric, passing the sewing tail through several stitches. Secure the tails on the back.
Keep the three groups spaced apart rather than trying to fill every green area with decorations.
That's enough berries. Adding more would start hiding the branch shape and snowy trim.
Crochet the Gold Star and Hanging Loop
The little gold star finishes the top of the tree. Keep it fairly small so it doesn't look heavier than the upper evergreen section.
If you're adding the baby booties, leave the star unattached until you've secured their hanging cords. The star will cover those attachment stitches when everything is in place.
Crochet the Five-Point Gold Star
Use antique-gold yarn.
Round 1: Make a magic ring. Work 5 sc into the ring. Pull the ring closed and join with a slip stitch to the first sc. (5 sc)
Round 2: We're making five little points, one between each pair of neighboring stitches around the center.
Ch 3. Work a slip stitch in the second chain from the hook and 1 sc in the next chain. Slip stitch into the next stitch of Round 1.
Repeat this same point sequence four more times, working one point for each of the five center stitches. After the fifth point, your final slip stitch returns to the first center stitch.
Fasten off, leaving an approximately 10-inch sewing tail.
Gently shape the points with your fingers. The star should have five clearly separated points and a compact center.
Make the Evergreen Hanging Loop
With evergreen yarn, leave a 6-inch starting tail and ch 18.
Work a slip stitch into the second chain from the hook and each remaining chain. (17 sl sts)
Fasten off, leaving a second 6-inch tail.
Fold the crocheted cord into a loop. Bring both ends together at the uppermost point of the tree.
Use the two yarn tails to sew the loop securely to the back of the top green triangle. Pass the needle through several green stitches rather than catching only one loop of yarn.
Weave the ends back through the upper tree fabric.
Finish the Classic Christmas Tree Ornament
If you're making the ordinary tree ornament without baby booties, sew the gold star onto the front of the upper tree point now.
Center the star directly beneath the hanging loop and make several small stitches through its center and the green tree fabric.
Leave the five points visible and spread evenly. The upper point should face straight up toward the hanging loop.
Secure the sewing tail on the back.
And there's your finished Christmas tree ornament. You can stop here if you don't want to make the baby booties.
Add Two Tiny Baby Booties for Baby's First Christmas
Now for the Baby's First Christmas version! Instead of hanging the booties from the bottom of the tree, we're going to place them right beneath the gold star. They'll rest against the upper evergreen branches, with their little toes turned slightly outward.
It's a sweet way to turn an ordinary Christmas ornament into a keepsake without changing the tree pattern itself.
I'd keep both booties ivory, including their cuffs and bows. That keeps the colors simple and lets the gold star and cranberry berries show up nicely.
Crochet the Two Miniature Ivory Booties
Use the miniature bootie instructions from my free crochet wreath ornament pattern. That page contains the small bootie construction, so you don't need to learn a different bootie pattern for this project.
Make two matching booties, following Rounds 1 through 8 of the miniature bootie instructions in the wreath ornament pattern.
Those booties begin with continuous rounds. Place a marker in the first stitch of Round 1 and move it to the first stitch of each new round as you work. Keep the beginning of each round identified so the four decreases in Round 5 remain centered across the toe.
After completing Round 6, follow the original instructions for the ankle and cuff, but use ivory instead of cranberry when joining yarn at the back of the opening for Round 7. Keep the original four increases in Round 8, finishing with 18 stitches around the cuff.
For this Christmas tree version, make the following color changes:
- Use ivory yarn for the soles and lower bootie sections.
- Continue in ivory for the ankle and cuffs, instead of changing to cranberry.
- Keep the little cuff shape shown in the bootie pattern.
- Make two matching ivory bows for the fronts.
The finished miniature booties should each measure approximately 1 to 1¼ inches long when worked at the intended gauge. Check the actual size before attaching them because they need to sit beneath the gold star without covering the first snowy branch edge.
These are miniature decorative booties, not booties intended to fit a baby.
Make the Ivory Bows
Cut an approximately 8-inch length of ivory yarn for each bootie.
Thread the yarn through a yarn needle. Pass it beneath two neighboring stitches at the front of the cuff, bringing the two ends to the outside.
Tie a small bow with loops approximately ¼ to ⅜ inch long.
Make a couple of tiny securing stitches through the knot so the bow stays in place. Weave the remaining ends into the inside of the cuff.
Repeat on the second bootie.
Don't make the bows too large. They're meant to be little finishing details, not floppy ribbons that hide the crocheted toes.
Crochet Two Short Hanging Cords
With ivory yarn, leave a 6-inch starting tail and ch 4.
Work a slip stitch in the second chain from the hook and in each of the next two chains. (3 sl sts)
Fasten off, leaving another 6-inch tail.
Make a second cord exactly the same way.
These short cords keep the booties close to the star. Longer cords would let them drop too far down the tree and change the appearance of the finished ornament.
Attach the Booties Directly Beneath the Gold Star
If you're making the bootie version, the green hanging loop should already be secured to the back of the top triangle, but the gold star should still be unattached.
Step 1: Sew one end of each ivory cord securely into the upper back edge of a bootie cuff.
Step 2: Place both booties against the front of the upper tree section, directly beneath the position reserved for the gold star.
The booties should sit side by side, with their openings near the star and their rounded toes pointing slightly outward.
Step 3: Bring the upper ends of both cords together at the center of the tree's top point. Pass the yarn tails through the green panel near Rows 2 through 4.
Step 4: Temporarily hold the upper cord tails against the back of the green tree panel with a removable stitch marker or a loose holding stitch. Don't fasten them permanently yet.
Step 5: Hang the ornament temporarily from its evergreen loop and check the position of both booties. They should hang side by side directly beneath the star position, with their toes pointing slightly outward.
Adjust the exposed length of either cord by gently drawing more of its yarn tail through to the back of the tree. Keep the booties close beneath the star so the first ivory snowy edging remains visible below them.
Step 6: When both booties hang evenly, remove the temporary marker or holding stitch. Sew the upper cord tails securely through several green stitches on the back of the top triangle. Work each tail back through the fabric in another direction before weaving in the remaining length.
Step 7: Place the gold star over the front of the attachment area and sew it securely to the green tree panel. Keep all five points visible and hide the cord attachment stitches beneath the center of the star.
The bootie cords are anchored to the green tree itself. The star covers their attachment point but doesn't carry their weight.
You don't need to add a name or year directly to the crocheted tree. A small gift tag or keepsake label can carry the baby's name and Christmas year without crowding the design.
That's the finished Baby's First Christmas version, with the same three evergreen tiers and gold star as the classic ornament, plus those two little ivory booties at the top.
Finishing and Safety Notes
Check the Finished Christmas Tree Ornament
Before hanging your ornament, remove any stitch markers used during construction. Turn the ornament over and check the back. All three evergreen tiers should be securely joined, with no long loose yarn tails showing.
Check the brown trunk, gold star, berry clusters and hanging loop. If you added the baby booties, gently check each cord and cuff attachment too.
Lay the ornament flat and look at the overall shape. The star should line up with the center of the tree, the snowy branches should widen toward the bottom, and the trunk should sit directly below the middle of the widest tier.
If the lower edges need a little shaping, gently arrange them with your fingers. You can lightly dampen the green and ivory sections and let them dry flat if your yarn's care instructions permit it. Avoid stretching the triangles or flattening the raised berries.
Don't press a hot iron directly onto the crocheted pieces. Synthetic yarns can be damaged by heat, and heavy pressing can flatten the texture.
Hanging and Storing Your Ornament
Hang the finished ornament from its evergreen loop on a sturdy tree branch or ornament display hook.
I'd put the Baby's First Christmas version where you can see those tiny booties clearly, rather than hiding it deep inside the Christmas tree.
When Christmas is over, lay the ornament flat in a small keepsake box with a piece of tissue paper around it. Avoid placing heavy ornaments on top of the crocheted star or booties.
If you're making it as a gift, you can include a little card with the baby's name, Christmas year and the date the ornament was given.
Baby Ornament Safety
Even though this project has a Baby's First Christmas option, it's a Christmas decoration and keepsake, not a baby toy.
Keep it out of children's reach and away from cribs, bassinets and other infant sleeping areas. The hanging loop and bootie cords should never be within a baby's reach.
Don't substitute beads, bells, plastic eyes or loose charms for the crocheted decorations. The berries, bows, star and booties all need to be securely attached.
The U.S. Consumer Product Safety Commission's holiday safety guidance has additional information about holiday decorations and small-part hazards.
A Note About the Pattern
This pattern's stitch counts and proposed construction have been reviewed mathematically. It has not yet been physically sample-tested, so the finished measurements, edging fullness and precise proportions may vary with your yarn and crochet tension.
More Handmade Christmas Ornaments
If you'd like to make a few coordinating ornaments, my crochet wreath ornament pattern is another way to use the little baby booties. You can also make the crochet snowflake ornament when you want something lighter and more delicate.
For more holiday projects, browse my free Christmas crochet patterns or the baby Christmas ornament ideas collection.
Whether you make the classic tree or add the two ivory booties, you'll have a handmade ornament that can come out with the Christmas decorations again next year.
When you click on links to various merchants on this site and make a purchase, this may result in this site earning a commission. This does not affect the price you pay.

UBGI Gold Standard 2026
Reviewed under the site's
editorial checklist.
Photos, decorating ideas, party setups and reader submissions are shared for inspiration unless a page is specifically presented as a pattern, tutorial, reference guide or step-by-step project. Follow the instructions, measurements, safety guidance and manufacturer directions provided for the particular project or product.
About Jan | Contact | Baby Nursery Ideas (Blog) | Site Map | Privacy Policy | Disclosure Policy | Disclaimer | Affiliate Disclosure | Earnings Disclosure | Facebook | Pinterest
I am a participant in the Amazon Services LLC Associates Program, an affiliate advertising program designed to provide a means for us to earn fees by linking to Amazon. As an Amazon Associate I earn from qualifying purchases.
Copyright © 2006-2026. All Rights Reserved.