Free Crochet Snowflake Ornament Pattern
By Jan Bay
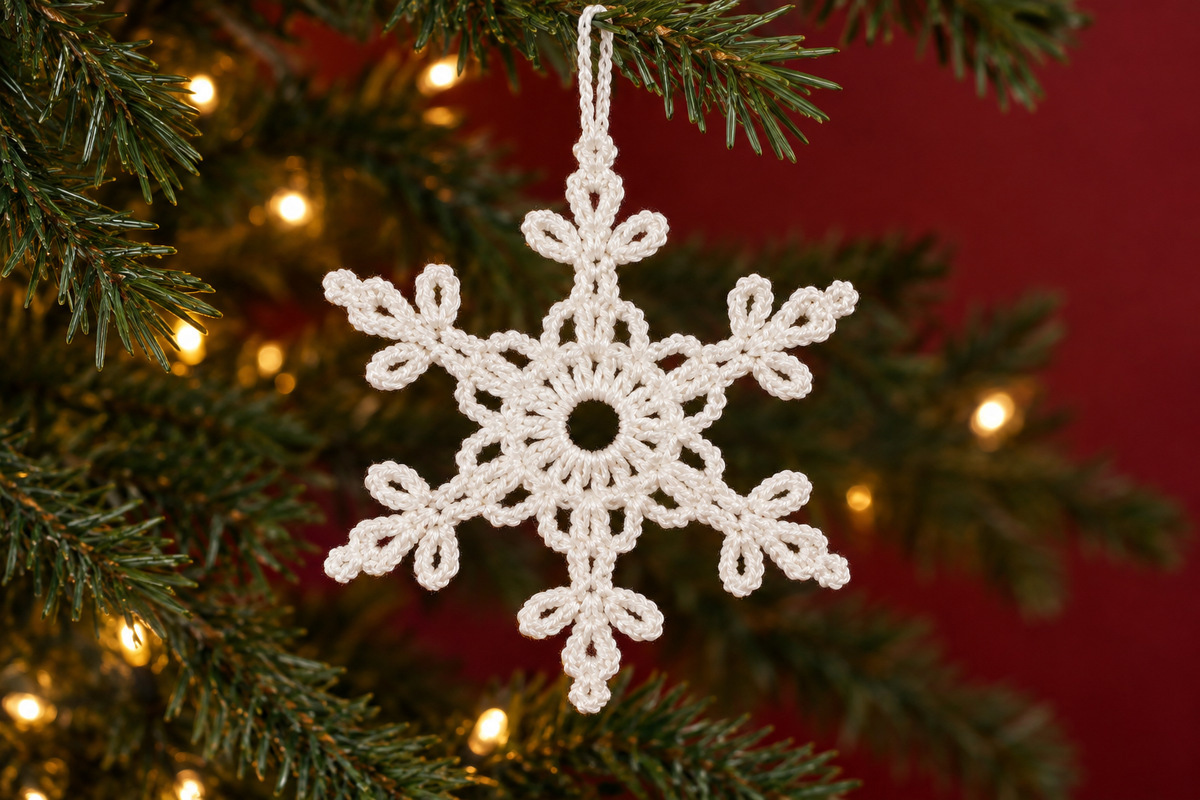
This free crochet snowflake ornament pattern creates a pretty six-point snowflake with an open center, delicate branching tips and a simple hanging loop. Make one for the Christmas tree, crochet a matching set for a garland or tie a finished snowflake to a wrapped gift. It's a lovely way to add something handmade to your Christmas decorations.
More Free Christmas Crochet Patterns and Ornament Ideas
Free Christmas Crochet Patterns
Free Christmas Crochet Snowflake Applique Pattern
Baby Christmas Ornaments and Keepsake Ideas
Free Crochet Santa Ornament Pattern
See Supplies for This Project Here.
On This Page
Materials for This Crochet Snowflake Ornament Pattern
I'd choose ivory cotton crochet thread for this snowflake. Cotton gives the little branches a clean, defined look, and it takes blocking well. You don't need glitter thread or any extra decorations. The open stitches are pretty enough on their own.
- Size 3 cotton crochet thread in ivory or soft white, approximately 25 to 35 yards (estimated allowance)
- 2.25 mm crochet hook, or a size that produces firm, even stitches
- Yarn needle for weaving in ends
- Small scissors
- Two removable stitch markers, helpful for locating the arm and connecting-arch attachment points
- Blocking mat or another pin-friendly surface
- Rustproof blocking pins
- Clean towel
- Optional water-based fabric stiffener suitable for cotton
Keep a little extra thread handy if you're making several ornaments. The actual amount will depend on your tension, especially around the raised edges and decorative loops.
Finished Size and Pattern Notes
The planned finished snowflake measures approximately 5 to 6 inches across from one outer tip to the opposite tip, excluding its hanging loop. That's an estimated size for the thread and hook listed above. Your finished measurement may be different.
Skill level: Intermediate. You'll need to be comfortable working in the round, crocheting into both sides of a foundation chain and making small chain loops.
Terminology: US crochet terms.
Construction: The ornament begins with a round center. Six matching arms extend outward from the center, with three decorative loops at the tip of every arm. Six open chain arches connect the inner portions of the arms. A separate hanging loop finishes the ornament.
Special stitch placement: Each arm begins with a chain of 20. Number those chains from the center outward, with chain 1 nearest the center and chain 20 at the outer tip. You'll work along one side of that chain, return to the center, and then work along the other side. The decorative loops attach at specific chains so they line up evenly.
The central loop at the end of each arm is slightly longer than its two side loops. Keep all six arms alike. One arm with shorter branches will stand out when the snowflake is hanging.
Gauge: The exact gauge cannot be established from the example image. For your first ornament, use the specified thread and hook and check the shape before making a matching set. Firm, even stitches are more useful here than trying to force the work to an unverified measurement.
Crochet Stitch Abbreviations
- ch: Chain
- sl st: Slip stitch
- sc: Single crochet
- dc: Double crochet
- tr: Treble crochet
- st: Stitch
- sp: Space
- rnd: Round
- RS: Right side
- rep: Repeat
All instructions use US terminology. If you're more familiar with UK crochet terms, the Craft Yarn Council's crochet abbreviation guide is helpful for checking the differences before you begin.
Working into a chain loop: Insert your hook through the middle of the loop and work the specified single crochet stitches around the chain strands. Don't work separately into each chain stitch unless the instructions specifically tell you to.
Free Crochet Snowflake Ornament Pattern
Start with the little center ring and work outward. The six arms are made separately, so you can compare each one with the first before moving on. Keep the two shorter loops on opposite sides of each arm and the longer loop pointing straight outward.
Make the Center Ring
Foundation: With ivory cotton thread, ch 10. Join with a sl st in the first ch to form a ring. Be careful not to twist the chain.
Rnd 1: Ch 3 (counts as first dc). Work 23 dc into the center ring. Join with a sl st in the top of the beginning ch-3. (24 dc)
Rnd 2: Ch 1 (does not count as a stitch). Sc in the same stitch as the Rnd 1 join (the top of the beginning ch-3), tr in the next dc, ch 2, tr in the next dc, sc in the next dc. *Sc in the next dc, tr in the next dc, ch 2, tr in the next dc, sc in the next dc.* Repeat from * to * four more times. Join with a sl st in the first sc. (12 sc, 12 tr and six ch-2 spaces)
Fasten off and weave in the ends on the back of the center.
You should now have a round center with six equally spaced chain-2 openings. Those openings are the attachment points for the snowflake arms. Make sure you have all six before continuing.
Make the First Snowflake Arm
Each arm has one long, narrow stem, two smaller side loops and one longer loop at the end. You'll make all three decorative loops from the same foundation chain.
Step 1: Foundation stem
Join ivory thread with a sl st in any ch-2 space from Rnd 2. Ch 20, keeping the chains even and not too tight.
Count the foundation chains from the center outward. Chain 1 is nearest the center, and chain 20 is the last chain made. You'll attach the side loops at chain 17. Place a removable marker there if it helps.
Step 2: Long Center Tip and Small Picot
With the hook at chain 20, ch 9. Sl st back into foundation chain 20 to close the oval loop.
Work 5 sc around the ch-9 loop, placing them along one side of the loop until you reach the outermost end, opposite foundation chain 20.
Ch 4 and sl st into the first of those four chains to form a small picot at the outer tip.
Continue around the remaining portion of the ch-9 loop, working 5 more sc back toward its base. Sl st into foundation chain 20 again. (10 sc and one ch-4 picot)
Keep the oval opening visible below the smaller picot. Both should point outward in line with the main stem.
Step 3: First side loop
Working back toward the center along one side of the original 20-chain foundation, sl st in foundation chains 19, 18 and 17.
At chain 17, ch 7 and sl st back into the same foundation chain to form a loop.
Work 8 sc around the ch-7 loop. Sl st into foundation chain 17 again.
Keep this loop pointing diagonally away from the stem rather than straight toward the outer tip.
Step 4: First edge of the stem
Continue toward the center, working 1 sc into one available loop of each foundation chain from chain 16 through chain 1. (16 sc)
Sl st into the same Rnd 2 ch-2 space where the arm began.
Step 5: Second edge of the stem
Without cutting the thread, pivot the work so you can reach the unworked loops along the opposite side of the original foundation chain.
Work 1 sc in each free loop of foundation chains 1 through 16, moving outward from the center. (16 sc)
Work a sl st into the opposite side of foundation chain 17.
Step 6: Second side loop
Ch 7 and sl st into foundation chain 17 to form the second side loop.
Work 8 sc around this ch-7 loop. Sl st into foundation chain 17 again.
This loop should sit opposite the first side loop so the two look like matching branches.
Step 7: Finish the arm
Sl st into foundation chains 18, 19 and 20, working along the remaining unworked loops toward the outer tip.
Fasten off, leaving a tail long enough to weave neatly along the back of the stem.
First arm stitch check: The original 20-chain foundation carries 16 sc along each lower edge. The long outer loop has 10 sc, and each of the two side loops has 8 sc. That's 58 sc across the completed arm and its three decorative loops, not counting the slip stitches used to form and anchor them.
Make the Remaining Five Arms
Repeat Steps 1 through 7 in each of the five unused ch-2 spaces around the center.
Keep the same foundation length, loop counts and stitch placement for every arm. All six center loops should point away from the middle of the snowflake, with the shorter side loops spreading out on either side.
When the sixth arm is complete, lay the ornament flat and arrange the arms like spokes on a wheel. There should be six evenly spaced arms and 18 decorative loops in total.
Don't pull the arms tightly while checking their positions. The connecting arches and blocking will help hold everything in place.
Connect the Arms with Openwork Arches
Make six separate connecting arches, one between each pair of neighboring arms. Attach each arch to the facing edges of the two arms so the openings stay balanced around the center.
Step 1: Mark the attachment points. With the right side facing, choose two neighboring arms. On the first arm, count outward from the center along the crocheted edge facing the second arm. Mark the sixth sc. On the second arm, count outward along the edge facing the first arm and mark its sixth sc.
Step 2: Make the connecting chain. Join ivory thread with a sl st in the first marked stitch. Ch 10 loosely, keeping the chain flat. Sl st into the marked stitch on the neighboring arm.
Step 3: Edge the arch. Ch 1 and turn. Work 1 sc into each of the 10 chain stitches, returning along the connecting chain toward the first arm. (10 sc)
Sl st into the original attachment stitch on the first arm. Fasten off and weave in both ends securely.
Step 4: Repeat around the snowflake. Remove the markers and use them again to locate the matching sixth-sc attachment points between the next two neighboring arms. Repeat Steps 1 through 3 until all six spaces have a connecting arch.
Completed arch count: Six separate ch-10 arches, each edged with 10 sc. That's 60 connecting chain stitches and 60 edging single crochet stitches altogether, plus the turning chains and attachment slip stitches.
Lay the snowflake flat and check that each arch curves gently between its two arms. The arches shouldn't cross or pull the main stems sideways. If one is noticeably tight or loose, correct its chain length before blocking and make the same adjustment consistently wherever needed.
Check the Finished Snowflake Shape
Before blocking, lay the ornament on a flat surface and check the whole shape against the example image.
- One open circular center
- Six evenly spaced arms
- One elongated outer loop on every arm
- Two matching side loops on every arm
- Six openwork arches between adjacent arms
- No loose or unattached decorative branches
The ornament may look a little uneven before blocking, especially at the narrow loops. That's expected with an openwork shape like this. However, missing loops, incorrect stitch counts or arms of different lengths need correcting before the ornament is blocked.
Blocking and Shaping the Snowflake
Blocking makes a big difference with this ornament. Those narrow branches and little open loops need some shaping before they'll sit as neatly as they do in the finished example.
First, check the care instructions for your cotton thread. If it can be wet blocked, gently dampen the snowflake with cool water. Press out the extra moisture between clean towels. Don't wring or twist it.
Lay the snowflake on a blocking mat with the right side facing upward.
- Arrange the six main arms at equal angles around the center.
- Pin the outer tip of each arm so all six are the same distance from the center.
- Spread the two shorter side loops on each arm into matching diagonal positions.
- Shape the longer center loop so it points outward along the arm.
- Open the six connecting arches and arrange them evenly.
- Check that the center remains circular rather than being pulled into a hexagon.
Use the example image as your guide for the proportions. The side loops should look like little branches, not rounded petals gathered into a flower.
If you'd like a firmer ornament, apply a small amount of fabric stiffener suitable for cotton, following the product instructions. You want enough body for the snowflake to keep its shape while hanging, without filling or closing the little open spaces.
Let the ornament dry completely before removing the pins. Don't use an iron directly on the raised crochet stitches.
Hanging Loop and Finishing
Once the snowflake has dried, choose one arm to be the top. It should point straight upward, with the matching arm directly below it.
Step 1: Choose the upper arm and locate the small ch-4 picot at its outer tip. Join ivory thread with a sl st through the uppermost chain of that picot, catching both loops of the chain stitch for a secure attachment.
Step 2: Ch 30. Bring the chain back to the same attachment stitch and join with a sl st to form the first hanging loop.
Step 3: Ch 30 again and join into the same attachment stitch with a sl st. This forms a second matching chain loop that can lie alongside the first, giving the hanger the doubled appearance in the example image.
Step 4: Fasten off securely. Use a yarn needle to weave the ends through several stitches on the back of the upper tip. Trim the remaining thread.
Hold the ornament by its hanger and check that it hangs with one arm pointing straight down. If it leans, check that the hanging strands are evenly positioned before securing the final ends.
Check the finished ornament one last time. All six arches, 18 decorative loops and six small terminal picots should be securely attached. Make sure every loose end is woven in and that no blocking pins or removable stitch markers remain.
That's your finished snowflake! You can hang it on a Christmas tree, use it as a decoration on a wrapped gift or make several for a matching holiday display. If you're planning a garland, give the ornaments a little space so their delicate branches don't become tangled.
Because this is a decorative Christmas ornament rather than a baby toy, keep it and its hanging loop out of reach of babies and young children.
Pattern note: The stitch counts and proposed construction have been reviewed mathematically against the approved design, but the pattern has not been physically test-crocheted. The finished size is estimated, and a sample is still needed to confirm the precise shape, proportions and measurements.
When you click on links to various merchants on this site and make a purchase, this may result in this site earning a commission. This does not affect the price you pay.

UBGI Gold Standard 2026
Reviewed under the site's
editorial checklist.
Photos, decorating ideas, party setups and reader submissions are shared for inspiration unless a page is specifically presented as a pattern, tutorial, reference guide or step-by-step project. Follow the instructions, measurements, safety guidance and manufacturer directions provided for the particular project or product.
About Jan | Contact | Baby Nursery Ideas (Blog) | Site Map | Privacy Policy | Disclosure Policy | Disclaimer | Affiliate Disclosure | Earnings Disclosure | Facebook | Pinterest
I am a participant in the Amazon Services LLC Associates Program, an affiliate advertising program designed to provide a means for us to earn fees by linking to Amazon. As an Amazon Associate I earn from qualifying purchases.
Copyright © 2006-2026. All Rights Reserved.