Free Crochet Bunny Baby Mobile Pattern
By Jan Bay
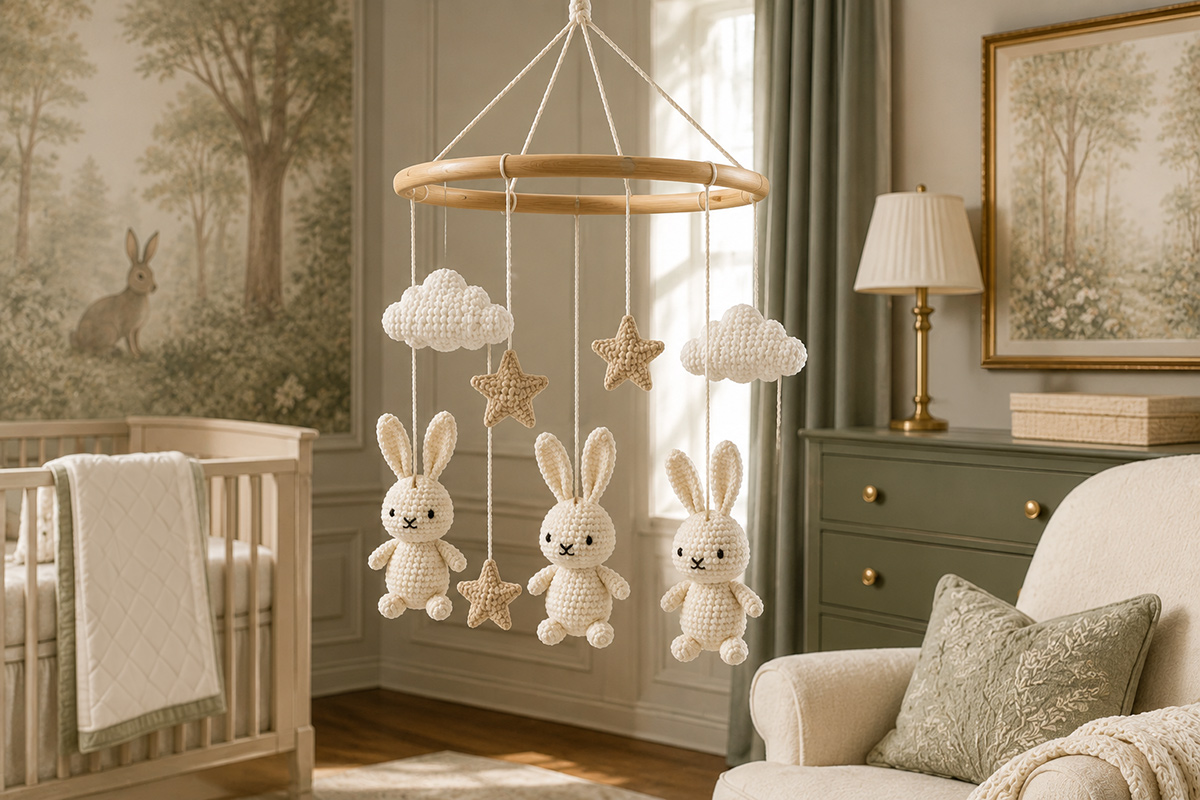
This free crochet bunny baby mobile pattern combines lightweight crocheted rabbits with simple clouds and stars for a soft nursery display. The handmade bunny pieces are lightly stuffed with embroidered faces so they stay easy to balance on the mobile while still having enough shape to stand out from across the room.
Explore More Free Crochet Baby Patterns
Baby Mobile Frames and Hanging Supplies
Jump to:
Supplies for the Crochet Bunny Baby Mobile
This mobile is designed around small, lightweight crochet pieces rather than full-size amigurumi. Keeping the bunnies compact makes them easier to balance and keeps the finished mobile from looking crowded once the clouds and stars are added.
I would use smooth worsted-weight cotton or a cotton blend for this project. It gives the little bunny faces a clean shape and makes the ears easier to position. You can use acrylic yarn if that is what you have, but avoid very fuzzy yarn because it hides the embroidery and makes the small pieces harder to shape evenly.
- Worsted-weight yarn in white, cream, soft gray, blush or another bunny color
- Small amount of pale pink yarn for inner-ear details, optional
- Small amounts of white yarn for the clouds
- Small amounts of coordinating yarn for the stars
- Black embroidery floss for the eyes, nose and mouth
- 3.5 mm crochet hook
- Polyester fiberfill
- Yarn needle
- Embroidery needle
- Stitch marker
- Scissors
- Wooden mobile ring or lightweight wooden hoop approximately 8 to 10 inches across
- Strong cotton cord or other suitable hanging cord, at least 25 feet
- Purpose-built mobile arm or mounting hardware suitable for the installation location and the complete mobile weight
- Measuring tape or ruler
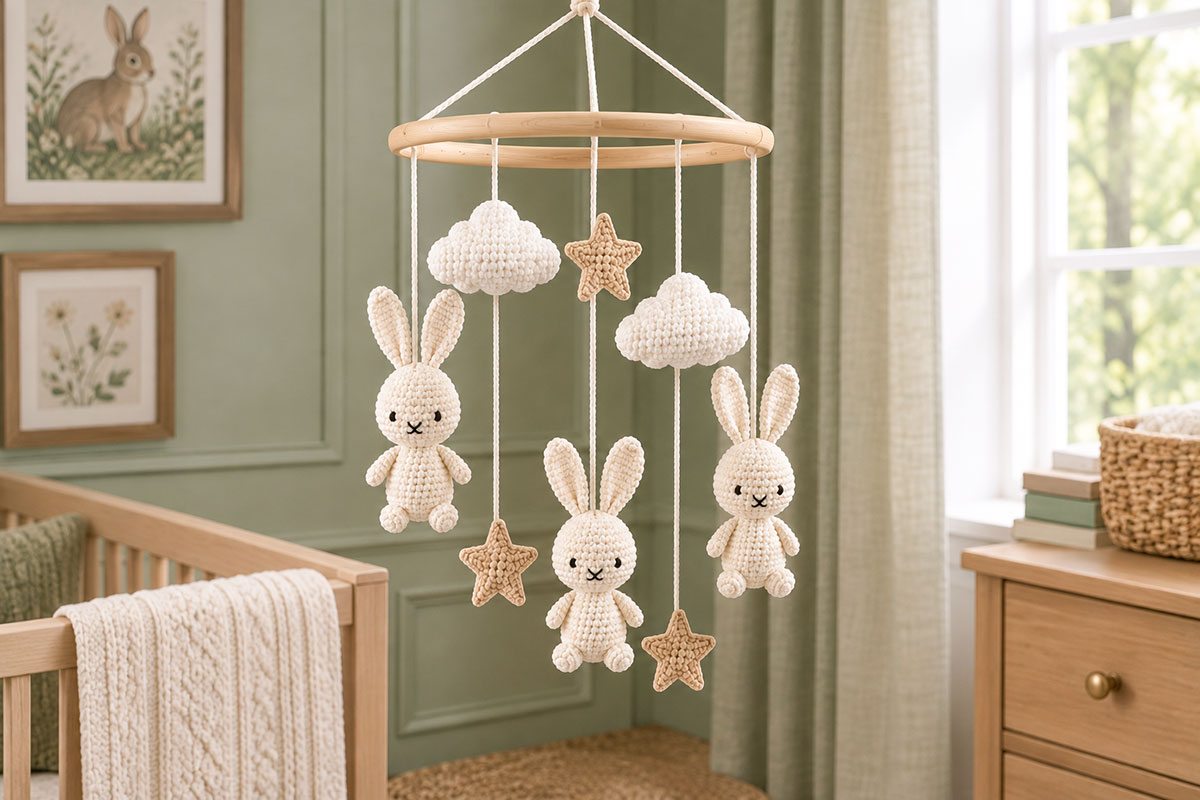
Finished design: three small crochet bunnies, two clouds and three stars suspended at staggered heights from one wooden ring.
Expected bunny size: approximately 4 1/2 to 5 inches from the top of the ears to the bottom of the body. The finished size will vary with yarn, hook size, tension and stuffing.
Gauge: Exact gauge is not critical. Crochet tightly enough that the stuffing does not show through the stitches.
Crochet piece count before assembly: 34 pieces total: 3 heads, 3 bodies, 6 ears, 6 arms, 6 legs, 3 tails, 4 cloud panels and 3 stars. After the bunnies and clouds are assembled, the mobile has 8 hanging elements: 3 bunnies, 2 clouds and 3 stars.
Abbreviations:
- ch = chain
- sc = single crochet
- dc = double crochet
- inc = work 2 sc in the same stitch
- dec = invisible single crochet decrease over the next 2 stitches
- sl st = slip stitch
- st or sts = stitch or stitches
- MR = magic ring
For each dec, insert the hook through the front loop of each of the next 2 stitches, yarn over and pull through both front loops, then yarn over and pull through the 2 loops on the hook.
The bunny pieces are worked in continuous rounds unless a different method is stated. Place a stitch marker in the first stitch of each round and move it up as you work.
If you already enjoy small animal projects, the crochet bunny appliqué pattern gives you another way to use the same nursery theme on blankets, banners and other handmade pieces.
Free Crochet Bunny Baby Mobile Pattern: Bunny Pieces
Make three bunnies for the mobile. They can all match, or you can change the yarn color while keeping the construction identical. Using the same pattern for all three helps the mobile stay visually balanced, while different colors give the finished arrangement a little more movement.
Bunny Head
Make 3.
Round 1: Work 6 sc in a MR. (6 sts)
Round 2: Inc in each st around. (12 sts)
Round 3: (Sc in next st, inc in next st) 6 times. (18 sts)
Round 4: (Sc in next 2 sts, inc in next st) 6 times. (24 sts)
Rounds 5 through 8: Sc in each st around. (24 sts)
Round 9: (Sc in next 2 sts, dec) 6 times. (18 sts)
Round 10: (Sc in next st, dec) 6 times. (12 sts)
Pause here and add the embroidered face before the opening becomes smaller.
Use black embroidery floss to make two small satin-stitch eyes between Rounds 6 and 7, about 4 stitches apart. Keep the eyes simple and even. Embroider a small nose one round below the eyes, then add a short vertical stitch and two tiny angled stitches for the mouth.
Do not use plastic safety eyes on a nursery mobile. Embroidery keeps the face lightweight and avoids adding small removable pieces.
Add a small amount of fiberfill. Shape the head as you stuff rather than packing it firmly. A lightly stuffed head weighs less and hangs more neatly from the mobile.
Round 11: Dec around. (6 sts)
Fasten off, leaving a 12-inch tail for sewing. Do not close the remaining 6-stitch opening. The open stitches will be matched one-to-one with the 6 stitches at the top of the body during assembly.
Bunny Body
Make 3.
Round 1: Work 6 sc in a MR. (6 sts)
Round 2: Inc in each st around. (12 sts)
Round 3: (Sc in next st, inc in next st) 6 times. (18 sts)
Rounds 4 through 6: Sc in each st around. (18 sts)
Round 7: (Sc in next st, dec) 6 times. (12 sts)
Rounds 8 and 9: Sc in each st around. (12 sts)
Add a small amount of fiberfill. Keep the body soft enough to compress slightly between your fingers.
Round 10: Dec around. (6 sts)
Fasten off. Do not close the remaining 6-stitch opening. Keep the stuffing inside the body and leave these 6 stitches available for joining to the head.
Bunny Ears
Make 6.
The ears are intentionally unstuffed. Flat ears weigh less and keep the little rabbits from becoming top-heavy.
Round 1: Work 5 sc in a MR. (5 sts)
Round 2: Inc in each st around. (10 sts)
Rounds 3 through 6: Sc in each st around. (10 sts)
Round 7: (Sc in next 3 sts, dec) twice. (8 sts)
Rounds 8 and 9: Sc in each st around. (8 sts)
Do not stuff. Flatten the ear so the beginning of the round sits along one side rather than directly at the front. Work 4 sc through both layers of the flattened opening to close the base.
Fasten off, leaving a long sewing tail. The 4 closing stitches form the sewing edge for attaching the ear to the head.
If you want pink inner ears, use pale pink yarn and embroider one narrow line down the center of each ear. Keep the detail flat instead of adding a separate crocheted piece. The ears stay lighter, and the finished rabbit keeps a simple nursery look.
Bunny Arms
Make 6.
Round 1: Work 6 sc in a MR. (6 sts)
Rounds 2 through 5: Sc in each st around. (6 sts)
Do not stuff.
Flatten the top of the arm and work 3 sc through both layers to close it.
Fasten off, leaving a long tail for sewing.
Bunny Legs
Make 6.
Round 1: Work 6 sc in a MR. (6 sts)
Round 2: (Sc in next st, inc in next st) 3 times. (9 sts)
Rounds 3 and 4: Sc in each st around. (9 sts)
Round 5: (Sc in next st, dec) 3 times. (6 sts)
Rounds 6 and 7: Sc in each st around. (6 sts)
Add only a pinch of stuffing to the lower part of the leg. Leave the upper portion unstuffed so it can lie neatly against the body.
Flatten the top and work 3 sc through both layers.
Fasten off, leaving a long sewing tail.
Small Bunny Tail
Make 3.
Round 1: Work 6 sc in a MR. (6 sts)
Round 2: Inc in each st around. (12 sts)
Round 3: Sc in each st around. (12 sts)
Add a very small amount of stuffing.
Round 4: Dec around. (6 sts)
Fasten off, leaving a long sewing tail. Do not draw the remaining 6 stitches closed. Use this 6-stitch opening as the tail base when you sew the tail to the body.
Assemble Each Bunny
Before sewing, lay all the pieces for one bunny on a flat surface. Check that the two ears match in length and that the arms and legs form even pairs. Small differences become more noticeable when three rabbits hang beside one another.
- Place the body upright with its 6-stitch opening at the top. Position the head above it with the embroidered face pointing forward.
- Match the 6 open stitches of the head to the 6 open stitches of the body. Use the head sewing tail to whipstitch the openings together one stitch to one stitch all the way around. Secure and bury the tail inside the join.
- With the bunny facing you, place the two ear bases across Rounds 2 and 3 of the head. Leave about 3 stitches between the inner edges of the ears and angle the tips slightly outward.
- Sew through all 4 closing stitches at the base of each ear. Pass through the head fabric directly beneath the ear base, then return across the full 4-stitch edge before securing the yarn.
- Place one arm on each side of the body with its 3-stitch closing edge spanning Rounds 6 and 7. Sew through all 3 closing stitches of each arm.
- Place the legs on the lower front of the body with their 3-stitch closing edges spanning Rounds 3 and 4. Leave about 4 body stitches between the inner edges of the legs so they hang slightly forward instead of directly beneath the body.
- Sew through all 3 closing stitches at the top of each leg and secure the yarn inside the body.
- Center the open 6-stitch tail base on the back of the body across Rounds 3 and 4, directly opposite the space between the legs.
- Sew the 6 tail stitches to the body one at a time around the complete tail opening. Secure and bury the yarn tail inside the body.
- Check the head, ears, arms, legs and tail from the front, side and back. Reinforce any attachment that shifts before adding the hanging cord.
- Weave in every remaining yarn end before the bunny is attached to the mobile.
Turn the bunny around and look at it from the side as well as the front. A mobile is viewed from many angles, so the back should be tidy and the head should sit directly above the body instead of tipping forward.
Repeat the same assembly process for the other two rabbits.
You can make all three bunnies alike, but I prefer a small color change between them. For example, make one cream, one soft gray and one pale blush bunny while keeping the embroidered faces identical. The repetition ties the set together without making the mobile look too uniform.
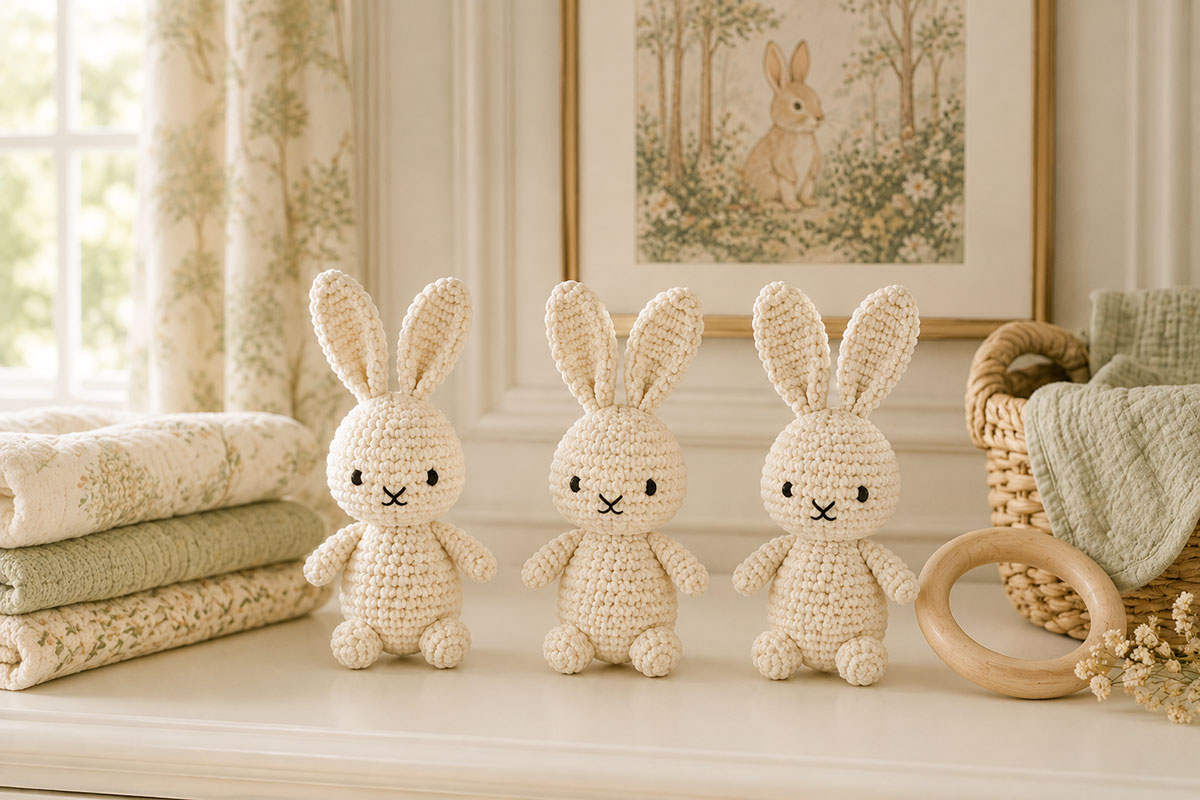
The bunnies are now ready to combine with the lighter cloud and star pieces. Those smaller shapes fill the open spaces around the rabbits without adding another bulky focal point.
Crochet Clouds and Stars for the Bunny Mobile
The bunnies carry most of the detail in this mobile, so I kept the clouds and stars simple. Their job is to fill the open spaces between the rabbits and give the mobile some height variation without turning every hanging cord into another focal point.
Make two lightly stuffed clouds and three flat stars.
Crochet Cloud
Make 4 cloud panels. Join the panels in pairs to make 2 clouds.
Use white or another light coordinating yarn.
For this section, dc = double crochet. The Ch 1 at the end of Rows 1 and 2 is a turning chain and does not count as a stitch.
Row 1: Ch 17. Sc in the 2nd ch from the hook and in each ch across. Ch 1, turn. (16 sts)
Row 2: Sc in each st across. Ch 1, turn. (16 sts)
Row 3: Sc in the first 2 sts. (Skip the next st, work 5 dc in the next st, skip the next st, sc in the next st) 3 times. Sc in the final 2 sts. (22 sts)
Fasten off. Weave in the short starting tail, but leave the finishing tail long on two of the four panels for joining.
Place two matching cloud panels together with the right sides facing out. Match the straight lower edges and line up the three rounded bumps across the top.
Use the long tail to sew around the outside edge, passing through both layers. Leave about 1 inch open along the bottom.
Add a very small amount of fiberfill. The cloud should have a little dimension without becoming round or heavy.
Finish sewing the opening closed and weave the tail securely through the inside of the cloud.
Repeat with the remaining two panels.
Before adding a hanging cord, hold each cloud by the center of its upper edge. If one side drops noticeably lower than the other, move your grip one stitch toward the heavier side. That point is where the hanging cord should eventually be attached.
Crochet Five-Point Star
Make 3.
The stars are worked as single flat pieces and are not stuffed.
Round 1: Work 10 sc in a MR. Join with a sl st to the first sc. (10 sts)
Round 2: Ch 4. Sl st in the 2nd ch from the hook, sc in the next ch, and dc in the final ch. Skip the next st of Round 1 and sl st in the following st.
Repeat the Round 2 sequence four more times to make five points:
Ch 4, sl st in the 2nd ch from the hook, sc in the next ch, dc in the final ch, skip the next st of Round 1, and sl st in the following st.
After the fifth point, fasten off and weave in the ends.
Gently shape each point with your fingers. If your star curls slightly, place it under a clean towel and flatten it by hand. It does not need to be perfectly rigid. A little movement looks natural once it is hanging.
I would keep these stars small instead of enlarging them another round. The rabbits should still be the first shapes you recognize when you look at the finished mobile.
If you like the mix of simple sky shapes with crochet figures, the crochet baby mobile pattern collection has other nursery themes that use clouds, stars and lightweight handmade pieces in different ways.
How to Assemble the Crochet Bunny Baby Mobile
Do not cut all of the hanging cords to their final lengths before you test the mobile. Crochet pieces rarely weigh exactly the same, even when you follow the same pattern three times. A little extra cord gives you room to correct the balance before you make the final knots.
Prepare the Hanging Cords
Cut eight lengths of strong cotton cord, each about 24 inches long. The extra length is intentional.
You will use one cord for each of these pieces:
- 3 crochet bunnies
- 2 crochet clouds
- 3 crochet stars
Attach a Cord to Each Bunny
- Thread one hanging cord through a yarn needle.
- With the bunny facing you, pass the needle under 2 adjacent crochet stitches at the top center of the head between the ears.
- Leave a short 2-inch cord tail beside the head and keep the remaining cord long.
- Tie the short end around the long cord with 2 tight overhand knots so the attachment is supported by both caught crochet stitches.
- Use the yarn needle to weave the short cord end beneath at least 3 nearby crochet stitches.
- Hold the bunny by the long cord and check its position.
The bunny should hang with its face mostly upright rather than pointing toward the floor. If the face tips downward, move the 2-stitch attachment point one stitch toward the front, on the embroidered-face side of the head. If one side of the bunny hangs lower than the other, move the attachment point one stitch toward that lower side. Test the bunny again after each adjustment.
Repeat with the other two bunnies.
Attach the Clouds
Pass the hanging cord beneath 2 adjacent edge stitches through both cloud layers at the top center of the middle bump. Leave a 2-inch tail, tie it around the long cord with 2 tight overhand knots, and weave the short end beneath at least 3 nearby stitches.
Hold the cloud up before settling on the final attachment point. It should remain nearly horizontal. Move the 2-stitch attachment point one stitch to either side if necessary.
Attach the Stars
For each star, pass the hanging cord beneath 2 adjacent stitches of Round 1 directly below one star point. Leave a 2-inch tail, tie it around the long cord with 2 tight overhand knots, and weave the short end beneath nearby stitches.
Leave all eight long cords untrimmed until the complete arrangement has been attached to the ring and balanced.
Arrange the Pieces Around the Ring
An 8 to 10 inch wooden ring gives these pieces enough breathing room without making them look scattered.
Start with the three bunnies. Space them roughly evenly around the ring. They do not have to sit at mathematically exact thirds, because the lighter clouds and stars will help fine-tune the finished balance.
Place a cloud between two of the bunnies. Place the second cloud in another open area. Use the stars to fill the three remaining spaces.
A useful starting arrangement is:
- Bunny 1: approximately 9 inches below the ring
- Cloud 1: approximately 12 inches below the ring
- Star 1: approximately 7 inches below the ring
- Bunny 2: approximately 14 inches below the ring
- Star 2: approximately 10 inches below the ring
- Cloud 2: approximately 15 inches below the ring
- Bunny 3: approximately 11 inches below the ring
- Star 3: approximately 8 inches below the ring
Attach each hanging piece at its chosen position on the wooden ring. Wrap the free end of the cord around the ring and tie one loose overhand knot around the standing cord. Adjust the piece to its starting height, but do not add the second securing knot yet. Repeat for all 8 hanging pieces. Keep every attachment adjustable and leave the cord tails untrimmed until the complete mobile has been balanced.
Avoid lining up all three rabbits at the same height. The staggered arrangement lets you see more of each bunny when the mobile turns.
It also helps to keep a star or cloud between neighboring rabbits instead of placing all three large pieces side by side. That small decision makes the finished mobile easier to read from across the room.
Make the Upper Support
If your mobile frame already includes its own hanging system, follow the manufacturer's instructions for that frame.
For a plain wooden ring, cut three equal lengths of strong cotton cord, approximately 24 inches each.
- Tie the first cord securely to the ring.
- Move approximately one third of the way around the ring and attach the second cord.
- Move another third of the way around and attach the third cord.
- Bring the three upper cords together above the center of the ring.
- Adjust them until the wooden ring hangs approximately level.
- Hold the three cords together with a loose temporary knot. Do not make the top connection permanent yet.
Keep all three upper cords untrimmed and adjustable until you have tested and balanced the complete mobile with every crochet piece attached.
How to Hang and Balance the Bunny Mobile
Balancing a handmade mobile is less about making every cord identical and more about distributing the weight around the ring. One bunny may have a little more stuffing than another. A cloud may be slightly heavier on one side. Correct those differences before you tighten and trim everything.
Balance the Ring Before Final Knots
- Hang the mobile temporarily from a secure support where you can work around it.
- Step back and look at the wooden ring from the front.
- Check whether one edge of the ring hangs lower.
- If one side drops, loosen the temporary top knot and pull the upper support cord on that side slightly higher.
- Re-form the temporary knot and check the ring again.
- Continue with very small adjustments until the ring sits level.
Now look at the crochet pieces rather than the ring.
If one bunny hangs too close to a cloud or star, slide its attachment point a little farther around the ring before you secure the knot. Leave enough open space for each piece to turn without constantly brushing against another one.
Check Each Bunny From Several Angles
Give the ring a gentle turn by hand and let it stop naturally.
Look at each rabbit from the front, back and side. The ears should remain upright enough to read as bunny ears, and the face should not point sharply toward the floor.
A bunny suspended from a single cord can turn around that cord as the mobile moves. That rotation is normal. Use the attachment-point adjustments to correct forward or sideways tilt, not to force the bunny to face one fixed direction.
Do not add beads, clips or other weights to control the rotation.
Secure the Final Hanging Points
Once the mobile hangs evenly, add a second overhand knot at each of the 8 hanging-cord attachment points on the wooden ring and tighten both knots securely. Then secure the three upper support cords to the purpose-built mobile arm or mounting hardware according to the manufacturer's directions for that hardware. Recheck that the wooden ring hangs level before trimming any cord.
Trim excess cord while leaving enough of each end to remain securely tied or woven in. Do not leave long loose tails hanging from the ring.
Inspect every crochet piece again before the mobile is installed. Tug gently on each ear, arm, leg and tail, both cloud seams, and every cord-to-piece attachment. Check all 8 hanging-cord knots at the wooden ring and the upper support connections. Confirm that every stitch marker has been removed and that no loose yarn or cord ends remain. Repair any connection that shifts before using the mobile as nursery décor.
The finished mobile does not need to spin rapidly. A slow turn from normal air movement is enough to show the different bunnies and the staggered shapes.
For a more detailed look at how different handmade mobile arrangements fit into a nursery, see the baby mobile ideas page. If you want a larger group of animals instead of a single repeating character, the crochet safari animal mobile pattern uses four different animals in one coordinated design.
Baby Mobile Safety for a Handmade Crochet Mobile
This crochet bunny mobile is decorative nursery décor. It is not a baby toy, teething toy or crib toy.
Keep the entire mobile, including the crochet pieces, wooden ring, mounting hardware and every hanging cord, completely out of a baby's reach. Do not tie, clip or otherwise attach this handmade mobile to the crib rails.
I would not add buttons, beads, bells, plastic safety eyes or other small decorations to this design. The embroidered faces give the bunnies all the detail they need without adding removable pieces.
If the mobile is displayed near a crib, check its position as the baby grows. Remove it by 5 months of age or sooner if the baby begins pushing up on hands and knees or can reach any part of the mobile.
The U.S. Consumer Product Safety Commission identifies mobiles and similar suspended crib toys as inappropriate once babies reach the stage when they can push up and reach them because of strangulation risk. The CPSC also recommends keeping an infant sleep space bare except for a fitted sheet.
See the CPSC Age Determination Guidelines for Toys for mobile guidance and the CPSC Safe Sleep page for current infant sleep-space guidance.
- Keep every hanging piece and cord completely out of reach.
- Do not place loose crochet pieces inside a crib, bassinet or other infant sleep space.
- Do not lengthen the mobile with ribbons or additional cords to bring it closer to the baby.
- Use a secure mounting method that is suitable for the location and the weight of the complete mobile.
- Check the mounting hardware, wooden ring, cords, knots and sewn pieces regularly.
- Remove the mobile immediately if any attachment becomes loose or damaged.
- Remove a mobile used near a crib by 5 months of age or when the baby begins pushing up on hands and knees, whichever happens first.
Taking the mobile down does not mean the handmade bunnies have to disappear. A mobile that is no longer appropriate near the crib can become wall décor or a hanging display elsewhere in the room, provided it remains safely out of the child's reach.
Crochet Bunny Baby Mobile Pattern FAQ
How many bunnies are on this crochet baby mobile?
This pattern uses three crochet bunnies, two clouds and three stars. Three rabbits give the mobile a clear bunny theme without making the wooden ring too crowded.
Can I make the three bunnies different colors?
Yes. Keep the same yarn weight and hook size so the rabbits remain close in size. Cream, white, soft gray and pale blush can be mixed while using the same embroidered face on all three.
Why are the bunny ears not stuffed?
The ears are left flat to reduce weight and help the rabbits hang more evenly. Stuffed ears would add bulk near the top of each bunny and could make the figures more likely to tip.
Can I use safety eyes instead of embroidery?
No. Use the embroidered eyes given in this pattern. The mobile is designed without plastic safety eyes, buttons, beads or similar added pieces.
Can I make the bunnies larger?
You can change yarn and hook size, but enlarging the rabbits also increases the weight of the mobile. If you want a larger bunny that is bound to become your baby's favorite animal friend, use my crochet bunny snuggler pattern. It's bigger and even more lovable than any amigurumi..at least that's how it turned out with my children.
For that larger project, my free crochet bunny pattern makes a seated stuffed rabbit with long floppy ears, shaped feet and an embroidered face.
Do the clouds need to be stuffed?
Only lightly. Use enough fiberfill to separate the two panels and show the cloud shape. They should still feel flat and lightweight when held in your hand.
Why are the stars flat?
The three bunnies already provide the dimensional shapes. Flat stars add small points of color and movement without putting more weight on the ring.
What size mobile ring should I use?
An 8 to 10 inch wooden ring is a practical size for the eight hanging pieces in this design. If you change the ring size, adjust the spacing between the cords before changing the crochet pattern itself.
How do I stop a crochet bunny from leaning forward?
If the face tips toward the floor, move the 2-stitch attachment point one stitch toward the front, on the embroidered-face side of the head, and test the position again. If one side hangs lower, move the attachment point one stitch toward that lower side.
How do I balance the finished mobile?
Attach all of the pieces before trimming the cords. Hang the ring temporarily, find the side that drops, and make small adjustments to the upper support cords and the positions of the hanging pieces. Test the mobile again after every adjustment.
Can this crochet mobile hang directly over a crib?
Treat this handmade mobile as decorative nursery décor and keep every part completely out of the baby's reach. Do not attach it to the crib rails. If it is displayed near or above the crib using suitable mounting hardware, remove it by 5 months of age or sooner if the baby begins pushing up on hands and knees or can reach any part of the mobile.
What can I do with the mobile after it comes down from the crib area?
Move it to a location where the child cannot reach it, such as a higher decorative display in the nursery. The little rabbits can continue to be part of the room after their time near the infant sleep area is finished.
For another bunny project that does not require building a hanging frame, try the free crochet bunny appliqué pattern. You can also browse the free baby crochet patterns collection for more handmade nursery projects.
When you click on links to various merchants on this site and make a purchase, this may result in this site earning a commission. This does not affect the price you pay.

UBGI Gold Standard 2026
Reviewed under the site's
editorial checklist.
Photos, decorating ideas, party setups and reader submissions are shared for inspiration unless a page is specifically presented as a pattern, tutorial, reference guide or step-by-step project. Follow the instructions, measurements, safety guidance and manufacturer directions provided for the particular project or product.
About Jan | Contact | Baby Nursery Ideas (Blog) | Site Map | Privacy Policy | Disclosure Policy | Disclaimer | Affiliate Disclosure | Earnings Disclosure | Facebook | Pinterest
I am a participant in the Amazon Services LLC Associates Program, an affiliate advertising program designed to provide a means for us to earn fees by linking to Amazon. As an Amazon Associate I earn from qualifying purchases.
Copyright © 2006-2026. All Rights Reserved.