Free Crochet Bunny Pattern with Long Floppy Ears
By Jan Bay
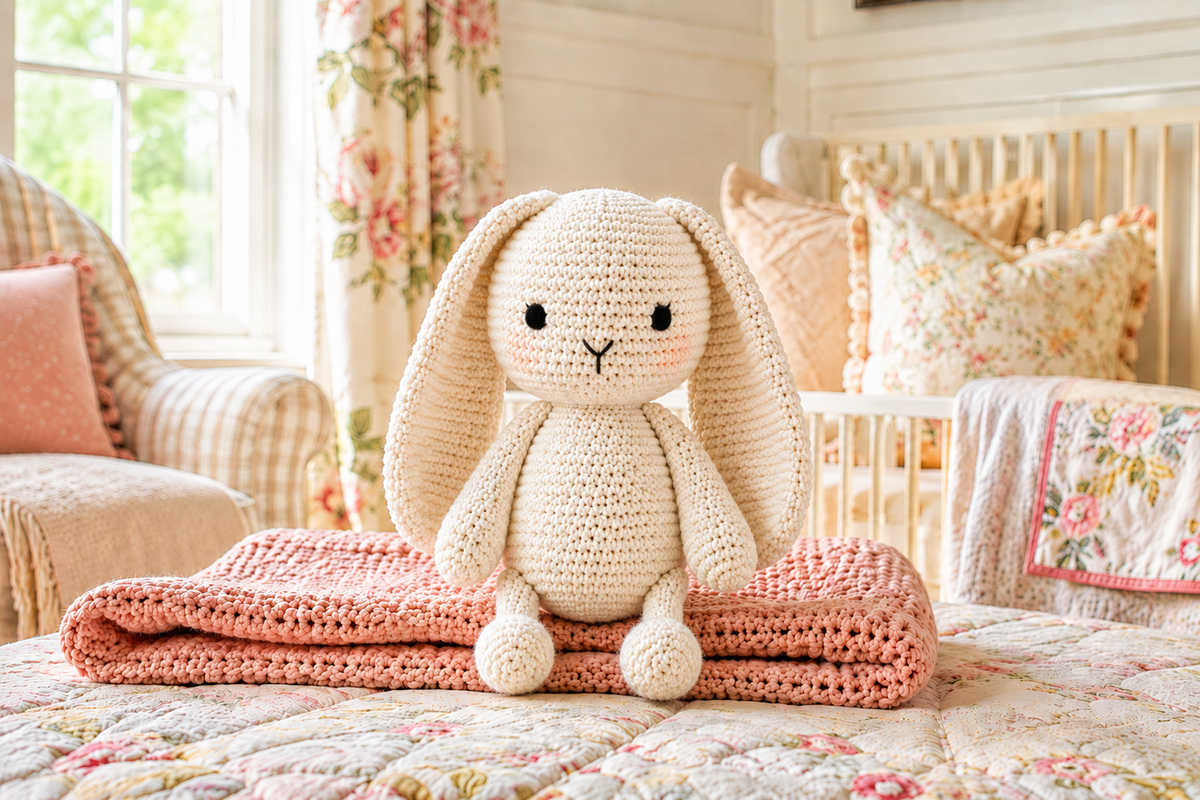
This free crochet bunny pattern makes a soft stuffed rabbit with long floppy ears, a rounded body, shaped feet and an embroidered face. The finished bunny has a classic seated shape that works as an everyday handmade gift, nursery keepsake or spring project without looking tied to Easter alone.
Explore More Bunny and Crochet Patterns
See Crochet Supplies for This Project
Free Crochet Bunny Pattern
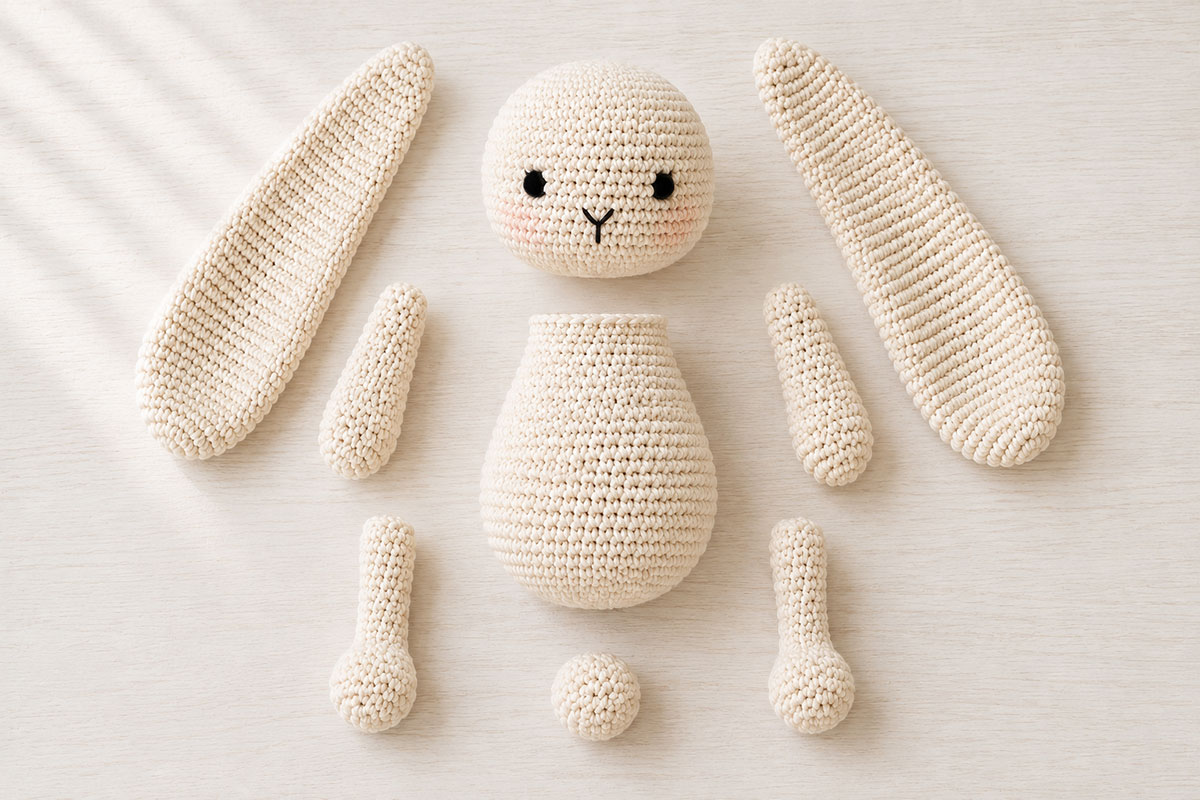
The finished bunny is built from nine crocheted pieces: one head, one body, two long ears, two arms, two legs and one small tail. The head and body are made separately so you can stuff and shape each piece before joining them. The ears stay unstuffed so they bend naturally along the sides of the head instead of standing stiffly upright.
Free Crochet Bunny Pattern for a Long-Eared Amigurumi Rabbit
This pattern uses simple single crochet rounds, increases and decreases to create a recognizable stuffed rabbit rather than a round body with ears added on top. The pear-shaped body is narrower at the shoulders, the feet project forward in a seated position, and the ear bases are narrow enough to fold without creating bulky seams.
I prefer to let the long ears do most of the visual work. The face stays simple, the feet remain visible from the front, and the bunny still reads clearly as a rabbit without a bow, clothing or a seasonal accessory.
- Skill level: Advanced beginner
- Expected finished seated height: Approximately 9 to 10 inches from the bottom of the body to the top of the head
- Expected ear length: Approximately 5 1/2 to 6 1/2 inches, depending on yarn and tension
- Construction: Continuous single crochet rounds with sewn assembly
- Face: Fully embroidered eyes, nose and mouth
- Crocheted pieces: 9
- Main stitch count: Head expands to 48 stitches; body expands to 42 stitches
- Ear construction: Crocheted as unstuffed tubes, tapered toward the base and flattened before attachment
- Finished position: Seated, with the feet directed forward and the ears hanging beside the head
The finished size is an estimate rather than a requirement. Yarn thickness, hook size and personal tension can change the measurements. Keep the fabric dense enough that the stuffing does not show through stretched stitches.
If you want a flatter project with the same animal theme, the crochet bunny lovey pattern uses a very different construction and makes a useful companion project.
Materials, Gauge and Pattern Notes
Materials
- Estimated 220 to 260 yards worsted weight yarn in the main bunny color
- Small amount of dusty rose, soft pink or another contrasting yarn or embroidery floss for the nose
- Black embroidery floss for the eyes and mouth
- 3.25 mm crochet hook
- Polyester fiberfill
- Yarn needle
- Embroidery needle
- Removable stitch marker
- Several locking stitch markers or pins for temporary positioning
- Scissors
- Measuring tape
A smooth worsted weight yarn makes the shaping easier to see while you work. Cotton, acrylic or a cotton blend can all work if the fabric stays firm. Very fuzzy yarn can hide stitch placement, especially around the ear decreases and the face.
Gauge
Exact gauge is not critical for this stuffed project. Fabric density is more important. Work tightly enough that the fiberfill cannot be seen between the stitches when the piece is stuffed.
As a useful checkpoint, the head should look round rather than flat after the first several even rounds at 48 stitches. If the fabric becomes loose as the circumference increases, move down one hook size before continuing.
Abbreviations
- sc: single crochet
- inc: work 2 single crochet stitches in the same stitch
- dec: invisible single crochet decrease over the next 2 stitches
- st: stitch
- sts: stitches
Pattern Notes
- Work all pieces in continuous rounds unless the instructions say otherwise.
- Move the stitch marker to the first stitch of each new round.
- The stitch count at the end of each round appears in parentheses.
- Use an invisible decrease whenever possible to keep the fabric smooth.
- Keep the normal right side of the crochet fabric facing outward on every piece, including the unstuffed ears.
- Secure the center of every magic ring before stuffing the piece. For each unstuffed ear, secure the magic ring before flattening and closing the opening.
- Do not stuff the ears. They are intentionally left empty so they can flatten and hang beside the head.
- Leave the sewing tails requested in the instructions. They are used during assembly.
Crochet the Bunny Head
Begin at the top of the head. The first eight rounds create the crown and upper face. The even rounds give the head enough length to look like a rabbit head rather than a flattened ball.
Round 1: Work 6 sc in a magic ring. (6)
Round 2: Inc in each stitch around. (12)
Round 3: [Sc in next st, inc in next st] 6 times. (18)
Round 4: [Sc in next 2 sts, inc in next st] 6 times. (24)
Round 5: [Sc in next 3 sts, inc in next st] 6 times. (30)
Round 6: [Sc in next 4 sts, inc in next st] 6 times. (36)
Round 7: [Sc in next 5 sts, inc in next st] 6 times. (42)
Round 8: [Sc in next 6 sts, inc in next st] 6 times. (48)
Rounds 9 through 15: Sc in each stitch around. (48)
Round 16: [Sc in next 6 sts, dec] 6 times. (42)
Round 17: [Sc in next 5 sts, dec] 6 times. (36)
Round 18: [Sc in next 4 sts, dec] 6 times. (30)
Round 19: [Sc in next 3 sts, dec] 6 times. (24)
Round 20: [Sc in next 2 sts, dec] 6 times. (18)
Stuff the head firmly, adding small amounts of fiberfill at a time. Fill the crown first, then press stuffing outward toward the sides and face. The head should feel full without becoming hard.
Round 21: [Sc in next st, dec] 6 times. (12)
Add a final small amount of stuffing before the opening becomes too narrow to reach.
Round 22: Dec 6 times. (6)
Fasten off. Thread the tail through the front loops of the remaining six stitches, pull the opening closed and secure the yarn. Hide the tail inside the head.
Roll the finished head gently between your hands. Flatten any pointed area at the crown and redistribute the stuffing until the front and side profiles look even.
Crochet the Bunny Body
The body starts at the bottom and widens quickly before tapering toward the neck. This creates the fuller lower body needed for a seated bunny and gives the legs enough surface for a secure attachment.
Round 1: Work 6 sc in a magic ring. (6)
Round 2: Inc in each stitch around. (12)
Round 3: [Sc in next st, inc in next st] 6 times. (18)
Round 4: [Sc in next 2 sts, inc in next st] 6 times. (24)
Round 5: [Sc in next 3 sts, inc in next st] 6 times. (30)
Round 6: [Sc in next 4 sts, inc in next st] 6 times. (36)
Round 7: [Sc in next 5 sts, inc in next st] 6 times. (42)
Rounds 8 through 13: Sc in each stitch around. (42)
Round 14: [Sc in next 5 sts, dec] 6 times. (36)
Rounds 15 and 16: Sc in each stitch around. (36)
Round 17: [Sc in next 4 sts, dec] 6 times. (30)
Rounds 18 and 19: Sc in each stitch around. (30)
Round 20: [Sc in next 3 sts, dec] 6 times. (24)
Rounds 21 and 22: Sc in each stitch around. (24)
Round 23: [Sc in next 2 sts, dec] 6 times. (18)
Rounds 24 and 25: Sc in each stitch around. (18)
Stuff the body firmly at the bottom and through the middle. Use slightly less stuffing near the last two rounds so the neck opening can sit flat against the head during assembly.
Do not close the opening. Fasten off and leave a sewing tail at least 24 inches long.
Set the body on a flat surface. The lower section should hold a rounded pear shape without rolling onto its side. Adjust the stuffing now because it becomes harder to redistribute after the legs and head are attached.
Make the Long Floppy Ears
Make two identical ears. Each ear begins at the rounded tip and narrows gradually toward the attachment edge. The pieces remain unstuffed so the finished ears can bend and fall naturally beside the head.
Round 1: Work 6 sc in a magic ring. (6)
Round 2: Inc in each stitch around. (12)
Round 3: [Sc in next st, inc in next st] 6 times. (18)
Rounds 4 through 9: Sc in each stitch around. (18)
Round 10: [Sc in next 4 sts, dec] 3 times. (15)
Rounds 11 through 15: Sc in each stitch around. (15)
Round 16: [Sc in next 3 sts, dec] 3 times. (12)
Rounds 17 through 22: Sc in each stitch around. (12)
Do not stuff the ear. Flatten the final round so the six stitches on the front line up with the six stitches on the back.
Working through both layers, sc across the opening to make a six-stitch closed edge. Fasten off and leave a long tail for sewing.
Repeat for the second ear.
Lay the two finished ears side by side before assembly. Their lengths and taper should be similar. A small difference in curl is not a problem because the ears are meant to hang rather than stay rigid.
Crochet the Arms and Legs
Arms
Make two. The arms have a rounded paw end and a narrower upper section. Stuff only the lower half so the shoulders stay flexible after sewing.
Round 1: Work 6 sc in a magic ring. (6)
Round 2: Inc in each stitch around. (12)
Rounds 3 through 5: Sc in each stitch around. (12)
Round 6: [Sc in next 4 sts, dec] 2 times. (10)
Rounds 7 through 13: Sc in each stitch around. (10)
Stuff the lower half of the arm. Leave the upper section unstuffed so the flattened attachment edge stays flexible for sewing.
Flatten the opening and sc through both layers across the top. (5)
Fasten off and leave a long sewing tail. Repeat for the second arm.
Legs and Feet
Make two. Each leg begins at the toe end. The first six rounds form the rounded foot, and the decrease in Round 7 narrows the piece into the leg.
Round 1: Work 6 sc in a magic ring. (6)
Round 2: Inc in each stitch around. (12)
Round 3: [Sc in next st, inc in next st] 6 times. (18)
Rounds 4 through 6: Sc in each stitch around. (18)
Round 7: [Sc in next st, dec] 6 times. (12)
Rounds 8 through 14: Sc in each stitch around. (12)
Stuff the foot firmly enough to hold its rounded shape. Continue the stuffing into the lower leg, then use less near the attachment end.
Flatten the opening and sc through both layers across the top. (6)
Fasten off and leave a long sewing tail. Repeat for the second leg.
Keep track of the orientation before assembly. The magic-ring end of each leg is the toe end. The flattened six-stitch closure is the end that attaches to the body.
Make the Bunny Tail
This small crocheted ball creates a permanent tail without adding a separate pompom.
Round 1: Work 6 sc in a magic ring. (6)
Round 2: Inc in each stitch around. (12)
Round 3: [Sc in next st, inc in next st] 6 times. (18)
Round 4: Sc in each stitch around. (18)
Round 5: [Sc in next st, dec] 6 times. (12)
Add a small amount of fiberfill. The tail should stay rounded without becoming hard.
Round 6: Dec 6 times. (6)
Fasten off and leave a long sewing tail. Thread the yarn through the remaining front loops and pull the opening closed.
At this point you should have all nine crocheted pieces: one head, one body, two ears, two arms, two legs and one tail.
Embroider the Bunny Face
Embroider the face while the head is stuffed but still separate from the body. It is easier to turn the head in your hand and compare both sides before the neck is attached.
Rotate the head until you find the smoothest, most symmetrical side. Mark the center front with a removable stitch marker.
Eyes
Place the eye centers between Head Rounds 11 and 12. From the center-front marker, count four stitch columns to the left for one eye center and four stitch columns to the right for the other. The eye centers should be approximately eight stitch columns apart.
Use black embroidery floss to make each eye as a small filled satin-stitch shape about one stitch wide. Make three or four short parallel stitches, then compare the two eyes from the front before securing the floss.
Do not use plastic eyes on a bunny intended for a baby. The embroidered eyes are part of the written design.
Nose
Mark the nose approximately two rounds below the eye line and directly on the center front.
Use dusty rose or soft pink floss to make a small horizontal triangular nose about two stitches wide. Build the shape with several short satin stitches rather than one thick strand.
Mouth
With black embroidery floss, make one short vertical stitch down from the center of the nose. Add one shallow diagonal stitch to each side to form a small Y-shaped mouth.
Check the face from several feet away before securing the final embroidery ends. Small placement differences become easier to see when you stop looking at individual stitches.
Secure the embroidery ends inside the head and trim only after you are satisfied with the placement.
Assemble the Crochet Bunny
Pin every major piece before you sew it permanently. I prefer to check the whole silhouette before committing to a seam because the ear drop, foot position and arm height change how the bunny reads from the front. The bunny should sit without leaning far to one side, and both feet should point forward rather than outward.
Attach the Head
Center the 18-stitch body opening against the underside of the head. The body should sit directly below the face rather than behind it.
Use the long body tail to sew the 18 stitches of the body opening to the 18 stitches of Head Round 20, matching one body stitch to one head stitch around the neck. Take small stitches and keep the seam even so the neck does not gather or flare.
Before closing the final inch of the seam, add a small amount of stuffing at the neck if you can feel a hollow area. Finish the seam, secure the yarn and hide the tail inside the body.
Attach the Ears
Place the ears on the upper sides of the head near Head Rounds 4 through 6. Position the six-stitch closed edge of each ear against the head.
Keep the inner edges of the ear bases approximately six to eight stitches apart across the top of the head. Pin both ears before sewing either one.
Let the ear lengths fall down the sides of the head. Do not twist the bases to force a particular curl.
Sew across each six-stitch attachment edge, then add one or two small anchoring stitches at each end of the seam. Secure and hide the yarn tails inside the head.
Attach the Legs
Place the leg closures against the lower front sides of the body around Body Rounds 8 through 11. The magic-ring ends of the legs are the toes and should point forward.
Pin both legs before sewing. Set the bunny on a flat surface and check that both feet touch the surface in a similar position.
Sew each six-stitch closure securely to the body. Keep the seam close to the body so the upper leg does not form a visible gap.
Attach the Arms
Place the five-stitch arm closures on the upper sides of the body around Body Rounds 18 through 20. Angle the arms slightly forward rather than straight out from the sides.
Compare the arm height from the front before sewing. Attach each flattened edge securely, then hide the yarn tails inside the body.
Attach the Tail
Center the tail on the back of the body around Body Rounds 8 through 10. Pin it in place and set the bunny down before sewing. The tail should not push the body so far forward that the feet lift from the surface.
Sew around the base of the tail with small stitches. Secure the yarn and bury the tail inside the body.
For another bunny-shaped crochet project with a completely different purpose, the crochet bunny basket pattern makes a useful seasonal companion to the stuffed rabbit.
Final Shaping and Safety Check
Set the finished bunny on a flat surface and look at it from the front, both sides and the back. Redistribute the stuffing with your fingertips before adding any corrective stitches.
Press the lower body gently downward to broaden the seated base. Shape each foot so the toe points forward. Smooth the head without flattening the cheeks.
The ears should hang freely. If one ear turns sharply backward at the base, loosen that attachment point and resew it without twisting the six-stitch edge.
Check every sewn seam by gently pulling the attached piece away from the body. Repair any loose area before the bunny is given as a gift.
- Confirm that no straight pins, locking stitch markers or removable stitch markers remain in the bunny.
- Check that every magic ring is securely closed.
- Check the neck, ear, arm, leg and tail seams for loose stitches.
- Make sure all yarn and embroidery ends are secured and hidden.
- Confirm that no stuffing is visible through the crochet fabric.
- Keep the embroidered face free of buttons, beads or other detachable decorations if the bunny is intended for a baby.
Do not place this crochet bunny in an infant sleep space.
It can be part of a nursery display or given as a keepsake, but it belongs outside the crib, bassinet or play yard. The U.S. Consumer Product Safety Commission says "Bare is Best" and advises using nothing but a fitted sheet in a crib, bassinet or play yard. You can review the current guidance on the CPSC Safe Sleep page.
If you are planning several handmade bunny pieces together, the bunny baby quilt pattern offers another way to carry the rabbit theme into a larger project.
Troubleshooting the Crochet Bunny
The head looks too round
Do not add extra increase rounds. First check the stuffing. Too much stuffing in the side walls can turn the head into a firm sphere. Move some fiberfill toward the crown and lower face, then reshape the head with your hands.
The ears look stiff instead of floppy
Make sure no stuffing has been added to the ears. The tapered tube needs to remain empty. If the yarn itself is very rigid, flex the finished ear gently along its length before attaching it.
One ear twists backward
The six-stitch attachment edge was probably rotated during pinning. Remove the ear seam, flatten the base again and attach the two layers without twisting them.
The bunny tips backward when seated
Check the tail first. A tail that is too low or too heavily stuffed can push the body forward or change its balance. Also check that the legs are attached on the lower front sides rather than directly underneath the body.
The feet point sideways
The magic-ring end of each leg should be directed toward the front before the flattened attachment edge is sewn to the body. If the feet turn outward sharply, reposition the leg seam rather than trying to twist the finished foot.
Stuffing shows between stitches
The fabric is too loose for the amount of stuffing inside the piece. Remove some fiberfill if the piece is already finished. For later pieces, use a smaller hook or firmer tension rather than stretching the stitches farther apart.
The face looks uneven
Remove the last embroidered feature that was added and remark the center front. Measure from that center point instead of judging each eye independently. Recheck the face from a normal viewing distance before securing the threads.
Frequently Asked Questions
Is this crochet bunny pattern suitable for a beginner?
The pattern is best for an advanced beginner who already knows single crochet, increases, decreases and how to work in continuous rounds. The individual stitches are simple. The main challenge is shaping, stuffing and positioning the pieces evenly.
Can I use chenille or blanket yarn?
Yes, but the finished bunny will be much larger and stitch placement can be harder to see. Use a hook that produces a dense fabric for the yarn you choose, and expect the finished measurements to change.
Can I make the bunny larger without changing the pattern?
The simplest method is to use a thicker yarn and an appropriate larger hook. I would not add extra increase rounds to the head or body because that changes the proportions as well as the size.
Can I make this into an Easter bunny?
Yes. The long ears and seated rabbit shape work naturally for spring or Easter, but the pattern itself is not dependent on seasonal colors or accessories. A neutral bunny can be used as an everyday handmade gift.
Can I use safety eyes instead of embroidery?
For a bunny intended for a baby, keep the embroidered eyes specified in the pattern. They also preserve the softer handmade expression shown in the finished design.
Why are the ears not stuffed?
Stuffing would make the ears thicker and more rigid. Leaving them empty allows the long ear tubes to flatten, fold and hang beside the head.
Can I add inner ear pieces?
You can add flat crocheted or embroidered inner-ear details if the bunny is intended as a decorative project. Keep any added elements securely stitched and avoid detachable decorations on a bunny intended for a young child.
How should I clean the finished bunny?
Follow the care directions for the yarn and fiberfill you used. If the materials have different care instructions, use the gentler method. Reshape the ears, feet and body after cleaning and allow the bunny to dry completely before storage.
What other bunny projects can I make?
The crochet bunny lovey pattern, crochet bunny basket pattern and bunny baby quilt pattern give you three different constructions without repeating the stuffed bunny project. For smaller nursery projects, the crochet bunny applique pattern gives you a flat rabbit motif, while the crochet bunny baby mobile pattern turns the theme into a hanging nursery decoration.
If the finished rabbit is part of a larger decorating plan, you can also browse the bunny nursery theme for ways to carry the motif into the room without making every item match.
When you click on links to various merchants on this site and make a purchase, this may result in this site earning a commission. This does not affect the price you pay.

UBGI Gold Standard 2026
Reviewed under the site's
editorial checklist.
Photos, decorating ideas, party setups and reader submissions are shared for inspiration unless a page is specifically presented as a pattern, tutorial, reference guide or step-by-step project. Follow the instructions, measurements, safety guidance and manufacturer directions provided for the particular project or product.
About Jan | Contact | Baby Nursery Ideas (Blog) | Site Map | Privacy Policy | Disclosure Policy | Disclaimer | Affiliate Disclosure | Earnings Disclosure | Facebook | Pinterest
I am a participant in the Amazon Services LLC Associates Program, an affiliate advertising program designed to provide a means for us to earn fees by linking to Amazon. As an Amazon Associate I earn from qualifying purchases.
Copyright © 2006-2026. All Rights Reserved.