Free Crochet Bunny Snuggler Pattern for a Soft Floppy Bunny
By Jan Bay
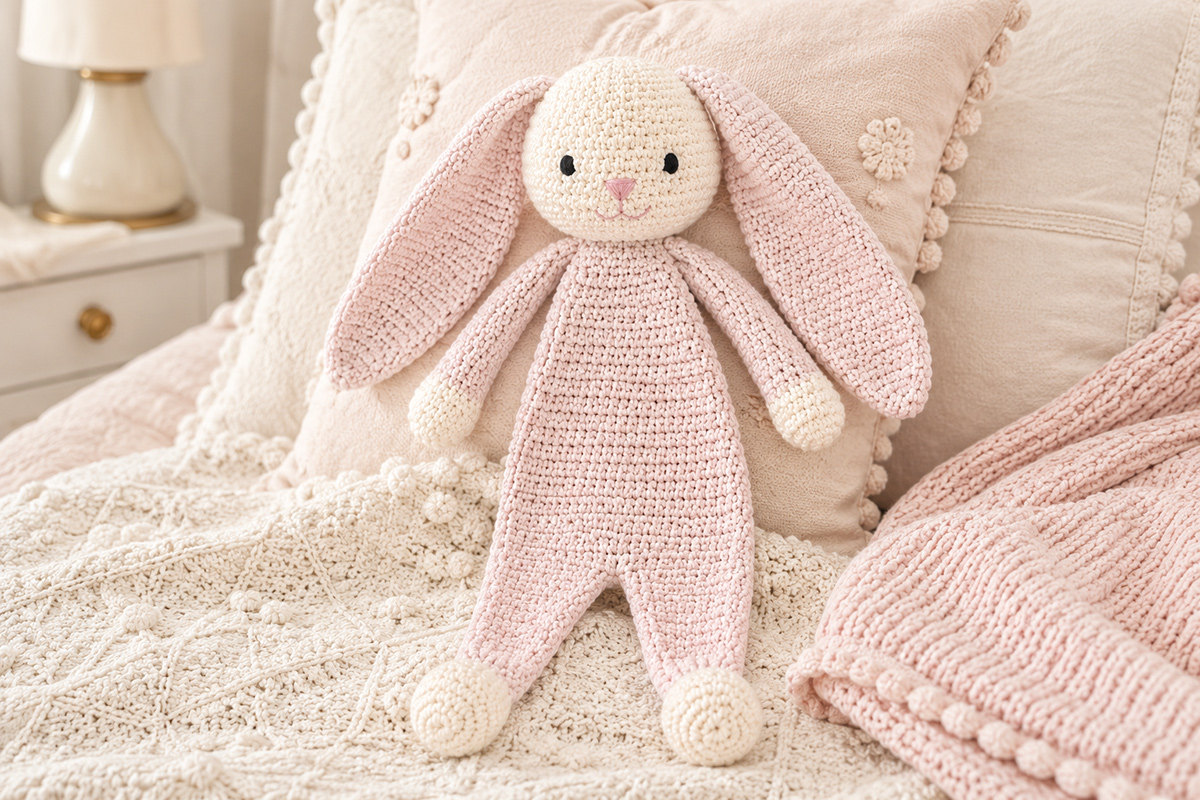
This free crochet bunny snuggler pattern makes a soft floppy rabbit with a lightly stuffed head, flat unstuffed body, long flexible arms and legs, and an embroidered face. Unlike a traditional bunny lovey with an attached blanket, this snuggler keeps the recognizable shape of a little rabbit while leaving the body soft enough to fold, hold and tuck into a handmade baby gift.
Explore More Free Crochet Baby Patterns
Crochet Baby Snuggler Patterns
Free Crochet Bunny Lovey Pattern
Free Bear Snuggler Crochet Pattern
Free Crochet Bunny Hat Pattern
Worsted Weight Yarn for the Bunny Snuggler
Jump to Crochet Bunny Snuggler Pattern
Free Crochet Bunny Snuggler Pattern
This bunny is built differently from a blanket-style lovey and differently from a fully stuffed amigurumi rabbit. The cream head gets just enough stuffing to hold its round shape, while the pink torso stays completely flat and unstuffed. The legs continue directly from the lower body instead of being sewn on as separate pieces, which gives the bunny the smooth floppy shape shown in the finished example.
If you want a traditional stuffed rabbit instead, my free crochet bunny pattern makes a seated amigurumi-style bunny with a rounded body, shaped feet, long unstuffed floppy ears and an embroidered face.
The arms stay loose too, with only a small amount of stuffing in the cream hands. The feet get the same treatment. That little bit of shaping at the ends keeps the paws from looking flat without turning the bunny into a stuffed toy.
Pattern at a Glance
- Skill level: Advanced beginner
- Terminology: U.S. crochet terms
- Expected finished size: Approximately 18 to 19 inches from the top of the head to the feet at the listed gauge
- Head: Cream and lightly stuffed
- Ears: Two long pink ears, completely flat and unstuffed
- Body: Two matching body-and-leg panels, blush pink with cream feet, joined around the edges with no torso stuffing
- Legs: Worked directly from the lower edge of each body panel so there is no horizontal seam across the abdomen; the pink leg sections remain unstuffed
- Hands and feet: Cream and very lightly stuffed
- Arms: Pink above the hands and left unstuffed so they hang loosely
- Piece count: Seven crocheted pieces before assembly
- Construction: One head, two ears, two body-and-leg panels and two arms
The flat body is intentional. Don't add stuffing to the middle because it looks thin while you're working on it. The finished snuggler should bend easily through the torso and legs, with just enough shape in the head, hands and feet to keep the rabbit recognizable.
Bunny Snuggler Supplies
You don't need much beyond basic worsted weight yarn for this one. I would choose a yarn that feels soft but still has enough stitch definition to hold the shape of the head. The body doesn't need to stand up on its own. In fact, it shouldn't. A lot of the bunny rabbit's charm comes from that loose, floppy shape.
- Yarn: Approximately 250 to 300 yards total of #4 worsted weight yarn, using soft blush pink for the body, ears and limbs and cream for the head, hands and feet. This amount is an estimate because the pattern has not been physically test-made.
- Hook: 4 mm (G-6) crochet hook, or the size needed to match gauge
- Stuffing: Polyester fiberfill for lightly stuffing the head and a very small amount for the hands and feet
- Black embroidery floss: For the open satin-stitch eyes
- Pink embroidery floss: For the nose and mouth
- Tapestry needle: For assembly and embroidery
- Stitch marker: For marking the first stitch of continuous rounds
- Straight pins: For holding the head in position during assembly
- Scissors
Gauge
Approximately 16 single crochet stitches and 18 rows = 4 inches.
Gauge matters most for keeping all of the pieces in proportion. If your stitches are quite a bit larger, you'll get a bigger head and a wider body. If they're smaller, the whole rabbit will shrink. You don't need to chase the gauge down to the fraction of an inch, but I would make a quick swatch before starting the head. I know, making swatches is boring, but they're worth doing when the success of the project depends on getting the gauge right.
Abbreviations
- ch: chain
- sc: single crochet
- inc: work 2 sc in the same stitch
- dec: single crochet decrease over the next 2 stitches
- sl st: slip stitch
- st/sts: stitch/stitches
- rnd: round
- MR: magic ring
If you run into a crochet abbreviation you don't recognize, the Craft Yarn Council crochet abbreviations guide is a handy reference for standard U.S. crochet terminology.
The head and arms are worked in continuous rounds, so don't join at the end of each round unless the instructions specifically tell you to. Place your stitch marker in the first stitch of each round and move it up as you go.
Turning chains: The ch 1 at the beginning of a flat row does not count as a stitch. Work the first sc of each row in the first stitch unless the instructions specifically tell you otherwise.
Crochet the Bunny Head
The head is the only part of this bunny that gets regular stuffing. Even here, I would keep it on the light side. You want enough filling to round out the crochet and support the embroidered face, but not so much that the head feels hard compared with the floppy body underneath it. Soft, delightful squishiness from head to toe is the goal.
With cream yarn:
Rnd 1: Make 6 sc in a MR. (6)
Rnd 2: Inc in each st around. (12)
Rnd 3: *Sc in next st, inc in next st.* Repeat around. (18)
Rnd 4: *Sc in next 2 sts, inc in next st.* Repeat around. (24)
Rnd 5: *Sc in next 3 sts, inc in next st.* Repeat around. (30)
Rnd 6: *Sc in next 4 sts, inc in next st.* Repeat around. (36)
Rnd 7: *Sc in next 5 sts, inc in next st.* Repeat around. (42)
Rnd 8: *Sc in next 6 sts, inc in next st.* Repeat around. (48)
Rnds 9 through 15: Sc in each st around. (48)
Rnd 16: *Sc in next 6 sts, dec.* Repeat around. (42)
Rnd 17: *Sc in next 5 sts, dec.* Repeat around. (36)
Rnd 18: *Sc in next 4 sts, dec.* Repeat around. (30)
Rnd 19: *Sc in next 3 sts, dec.* Repeat around. (24)
Add the stuffing now. Fill the head gradually and shape it with your fingers as you go. Stop before it becomes firm.
Rnd 20: *Sc in next 2 sts, dec.* Repeat around. (18)
Rnd 21: *Sc in next st, dec.* Repeat around. (12)
Add a little more stuffing only if the lower part of the head needs it.
Rnd 22: Dec around. (6)
Fasten off, leaving a long tail. Thread the tail through the front loops of the remaining 6 stitches and pull the opening closed. We will position the embroidered face before attaching the head to the body.
At the listed gauge, the head is expected to measure roughly 3 3/4 to 4 inches across. That's large enough to give the bunny a sweet, recognizable face without making the head look too heavy for the flat body.
Crochet the Long Bunny Ears
Make two ears. These stay completely unstuffed.
I would keep the ears long and fairly narrow rather than making them chunky. They should bend easily and fall to either side of the head. The shaping below starts at the rounded tip, widens the ear, then narrows it slightly again at the base so it doesn't look like a long rectangle sewn to the head.
With blush pink yarn, make 2:
Row 1: Ch 2. Work 3 sc in the second ch from the hook. Turn. (3)
Row 2: Ch 1. Inc in first st, sc in next st, inc in last st. Turn. (5)
Row 3: Ch 1. Inc in first st, sc in next 3 sts, inc in last st. Turn. (7)
Rows 4 through 22: Ch 1. Sc across. Turn. (7)
Row 23: Ch 1. Dec, sc in next 3 sts, dec. Turn. (5)
Rows 24 and 25: Ch 1. Sc across. Turn. (5)
Fasten off, leaving a long tail for sewing.
At the listed gauge, each ear is expected to measure approximately 5 1/2 inches long. Don't stuff them and don't add anything inside to make them stand upright. A little natural curl or bend is fine. These are supposed to be floppy rabbit ears.
I would leave the ears plain rather than add a second crocheted inner ear layer. They're already soft pink, and another layer would make them thicker and less flexible. Let them stay simple and floppy. Remember, our goal for this project is softness from head to toe.
Crochet the Flat Floppy Bunny Body
This is what separates the snuggler from the crochet bunny lovey pattern. Instead of attaching the rabbit head to a little blanket, we're making an actual bunny-shaped torso. It stays completely unstuffed, and the legs grow directly from the lower body rather than being sewn on afterward.
Make two identical body-and-leg panels. The upper section starts fairly narrow beneath the head, widens gently through the middle, then narrows again before dividing into two long legs. There is no horizontal seam between the belly and the legs. That's important. This is a flat, floppy bunny rabbit, not a fat bunny rabbit.
With blush pink yarn, make 2:
Row 1: Ch 17. Sc in second ch from hook and across. Turn. (16)
Rows 2 through 4: Ch 1. Sc across. Turn. (16)
Row 5: Ch 1. Inc in first st, sc in next 14 sts, inc in last st. Turn. (18)
Rows 6 through 10: Ch 1. Sc across. Turn. (18)
Row 11: Ch 1. Inc in first st, sc in next 16 sts, inc in last st. Turn. (20)
Rows 12 through 16: Ch 1. Sc across. Turn. (20)
Row 17: Ch 1. Inc in first st, sc in next 18 sts, inc in last st. Turn. (22)
Rows 18 through 24: Ch 1. Sc across. Turn. (22)
Row 25: Ch 1. Dec, sc in next 18 sts, dec. Turn. (20)
Rows 26 through 30: Ch 1. Sc across. Turn. (20)
Row 31: Ch 1. Dec, sc in next 16 sts, dec. Turn. (18)
Rows 32 through 36: Ch 1. Sc across. Turn. (18)
Divide the Body for the Legs
Now divide those 18 stitches into two legs with a small two-stitch space between them. Each leg is worked directly from the body panel, so don't fasten off and make separate leg pieces. That continuous construction is what keeps the lower belly smooth.
First Leg, Row 37: Ch 1. Sc in the first 8 sts. Turn. Leave the remaining stitches unworked for now. (8)
Rows 38 through 56: Ch 1. Sc across. Turn. (8)
Fasten off the blush pink yarn.
Foot, Row 57: Join cream yarn. Ch 1. Inc in first st, sc in next 6 sts, inc in last st. Turn. (10)
Rows 58 through 62: Ch 1. Sc across. Turn. (10)
Row 63: Ch 1. Dec, sc in next 6 sts, dec. Turn. (8)
Row 64: Ch 1. Dec, sc in next 4 sts, dec. (6)
Fasten off.
Second Leg, Row 37: Return to Row 36. Skip the center 2 stitches and join blush pink yarn in the first stitch after the skipped stitches. Ch 1. Sc in that same stitch and in each of the next 7 stitches. Turn. (8)
Rows 38 through 64: Repeat Rows 38 through 64 exactly as written for the first leg, including the change to cream yarn for the foot.
Fasten off.
Repeat the entire body-and-leg pattern for the second panel.
At the listed gauge, the torso portion is expected to measure about 8 inches from the neck edge to the point where the legs divide. The legs and feet are expected to add approximately another 6 inches. The widest part of the body is expected to be about 5 1/2 inches across.
Don't stuff the torso or the pink portion of the legs. Once the front and back panels are joined, we'll add only a small pinch of fiberfill to the cream feet. The rest stays flat and loose so the bunny can bend and flop naturally.
Lay the two completed panels together before moving on. Match the neck edge, side shaping, center leg opening and both feet. If something is off by a row, fix it now. A clean match between these two panels is what gives the finished bunny that smooth, continuous shape from the neck all the way down to the toes.
Crochet the Floppy Bunny Arms and Paws
The legs are already built into the body panels, so the only separate limbs left to make are the two arms. Each arm has a lightly stuffed cream hand and a long pink section that stays completely empty. That little bit of stuffing at the end gives you a rounded paw without taking away the flop.
With cream yarn, make 2:
Rnd 1: Make 6 sc in a MR. (6)
Rnd 2: Inc in each st around. (12)
Rnd 3: *Sc in next st, inc in next st.* Repeat around. (18)
Rnds 4 through 6: Sc in each st around. (18)
Rnd 7: *Sc in next st, dec.* Repeat around. (12)
Add a small pinch of fiberfill to the cream hand now. Keep the stuffing down in the cream section and don't pack it firmly. You're rounding out the paw, not making a stuffed arm.
Change to blush pink yarn.
Rnds 8 through 25: Sc in each st around. (12)
Do not add any stuffing to the pink section. Flatten the open end so 6 stitches sit in front and 6 sit behind. Work 6 sc through both layers to close the top of the arm.
Fasten off, leaving a long tail for sewing. At the listed gauge, each arm is expected to measure about 5 to 5 1/2 inches long. Lay the two finished arms beside one another and make sure they match before assembly.
Embroider the Bunny Face
I would embroider the face before attaching the head to the body. It's much easier to adjust the expression while you can still turn the head freely in your hands. For each embroidery color, bring the needle in from the underside of the head and leave a tail of about 4 inches there. The body will cover this fastening area later.
Eyes: With black embroidery floss, place the centers of the eyes between Rounds 11 and 12, about 7 stitches apart. Build each eye into a small upright oval with several closely packed satin stitches. Keep the eyes looking open rather than using curved lines that make them look closed.
Nose: With pink embroidery floss, make a small triangle centered around Round 14. Keep it about 2 stitches wide with the point facing down.
Mouth: With pink embroidery floss, bring one short stitch down from the point of the nose toward Round 16. Add a short curved stitch to each side to form the little bunny mouth.
Look at the face straight on before securing the embroidery ends. The eyes should sit level with one another and the nose should fall directly between them. If something looks crooked, fix it now. A stitch or two makes a surprising difference on a face this small. Once you're satisfied, bring the working end of each embroidery color back out on the underside of the head beside its starting tail. Tie the two ends together securely with a double knot. Thread the tails through the stuffed head one at a time, bring them out an inch or two away, pull gently and trim close to the surface so the cut ends retract into the stuffing.
For this baby-oriented project, I would stick with embroidery rather than plastic safety eyes or buttons. It also keeps the face soft, which fits the rest of the snuggler much better.
Assemble the Bunny Snuggler
Keep the assembly soft. Tight seams can make an unstuffed body feel stiff even when there isn't a bit of fiberfill inside it.
Join the Body and Shape the Feet
Place the two body-and-leg panels together with the matching sides aligned. The blush sections, cream feet, leg openings and neck edges should line up before you begin sewing.
Using blush pink yarn and a tapestry needle, begin at the upper left side near the neck. Whipstitch down the outer edge of the body and leg, taking one joining stitch through each matching row end.
When you reach the cream foot, fasten off the blush pink sewing yarn, leaving the tail to weave in later. Thread the tapestry needle with cream yarn and sew around the foot, but leave an opening of about 1 1/2 inches along the inner edge. Add a small pinch of fiberfill and spread it only through the cream section. The foot should have a little rounded shape but still feel soft. If it starts looking like a ball, that's too much stuffing.
Close the opening in the foot and fasten off the cream sewing yarn, leaving the tail to weave in later. Thread the tapestry needle with blush pink yarn and continue up the inner edge of that leg to the two-stitch center opening. Sew across those 2 matching center stitches, then continue down the inner edge of the second leg.
At the second cream foot, fasten off the blush pink sewing yarn and thread the tapestry needle with cream yarn. Repeat the same light stuffing and closing process. Fasten off the cream yarn, thread the needle with blush pink yarn, and sew up the outside of the second leg and body until you reach the neck edge.
Finish by sewing across the 16-stitch neck edge to the point where you started. Fasten off securely. The torso and all of the pink leg sections stay completely unstuffed. Leave the sewing tails for the final weaving-in step.
Attach the Arms
Position one arm on each side of the upper body with the closed 6-stitch end against the body edge. I would place the top of each arm about 1/2 inch below the neck edge so the arms hang naturally beside the torso.
Sew the 6 closed stitches at the top of each arm to 6 consecutive row ends along the body side. Match the placement on the opposite side before fastening anything permanently. Don't pull the sewing yarn tight enough to gather the body.
Attach the Ears
With the face looking straight toward you, place the ear bases symmetrically on the upper sides of the head. Leave about 1 inch between the inner edges of the two ear bases and angle the ears slightly outward so they can fall naturally beside the face.
Sew all 5 stitches along the base of each ear securely to the head. Keep the rest of the ears completely free and unstuffed.
Attach the Head
Center the 16-stitch neck edge of the body against the underside of the head. The body should meet the lower curve of the head all the way across. There shouldn't be a visible gap or a separate little neck between them.
Pin the center and both ends of the neck edge in place first. Using blush pink yarn, sew each of the 16 neck stitches to an evenly spaced point along the lower portion of the head, working into the area around Rounds 19 through 21. Take a second pass across the attachment if needed for security, but keep the stitches relaxed enough that the body stays flat.
Final Check and Care
After all of the sewing is complete, remove every pin and the stitch marker, then weave in all yarn and embroidery ends securely. Check the finished bunny from head to toe. Tug gently on the ears, arms and head, check the body and leg seams, and give each lightly stuffed hand and foot a gentle pull to make sure everything is secure. Make sure there are no loose yarn loops, exposed ends, pins, markers or other temporary construction items left anywhere on the bunny.
Follow the care instructions on the label of the yarn you used. After washing, reshape the head, ears, hands and feet and let the snuggler dry completely before it goes back into use.
This handmade bunny snuggler is a cuddle and play item, not an infant sleep product. Keep soft objects like this out of a crib, bassinet or play yard during infant sleep. The U.S. Consumer Product Safety Commission safe sleep guidance recommends a bare infant sleep space with only a fitted sheet.
Crochet Bunny Snuggler FAQ
Is a bunny snuggler the same thing as a bunny lovey?
The terms sometimes overlap, but I'm using them differently here. This snuggler has a flat animal-shaped torso and legs. A traditional crochet bunny lovey uses a small blanket-style body with a bunny head attached. If you want the blanket version, use that pattern instead.
Is the bunny's body stuffed?
No. The torso and pink sections of the legs stay completely unstuffed. Only the head and the cream hands and feet get fiberfill, and the hands and feet need only a small pinch. That's what gives this bunny its loose, floppy shape.
Can I make the bunny in one color?
Yes. The cream head, hands and feet are a design choice rather than a construction requirement. You can crochet the entire snuggler in one color if you prefer. Keep the same color changes in mind while following the instructions so you still know where the lightly stuffed paw sections begin.
Can I use a different yarn weight?
You can, but the finished size will change. A heavier yarn and larger hook will make a larger bunny, while a lighter yarn and smaller hook will make a smaller one. Make a gauge swatch first and keep the head, body, ears and limbs in the same proportions.
Can I use plastic safety eyes instead of embroidery?
For a bunny intended as a baby gift, I would use the embroidered satin-stitch eyes in this pattern rather than plastic eyes or buttons. The embroidered face also keeps the head soft and matches the finished bunny shown here.
How large is the finished crochet bunny snuggler?
At the listed gauge, the expected size is approximately 18 to 19 inches from the top of the head to the feet. The exact size can vary with yarn, hook size and individual crochet tension.
When you click on links to various merchants on this site and make a purchase, this may result in this site earning a commission. This does not affect the price you pay.

UBGI Gold Standard 2026
Reviewed under the site's
editorial checklist.
Photos, decorating ideas, party setups and reader submissions are shared for inspiration unless a page is specifically presented as a pattern, tutorial, reference guide or step-by-step project. Follow the instructions, measurements, safety guidance and manufacturer directions provided for the particular project or product.
About Jan | Contact | Baby Nursery Ideas (Blog) | Site Map | Privacy Policy | Disclosure Policy | Disclaimer | Affiliate Disclosure | Earnings Disclosure | Facebook | Pinterest
I am a participant in the Amazon Services LLC Associates Program, an affiliate advertising program designed to provide a means for us to earn fees by linking to Amazon. As an Amazon Associate I earn from qualifying purchases.
Copyright © 2006-2026. All Rights Reserved.