Free Crochet Bear Mobile Pattern with Teddy Bears, Clouds and Stars
By Jan Bay
This free crochet bear mobile pattern shows you how to make soft teddy bears, clouds and stars and arrange them on a hanging nursery mobile. The complete project includes the individual crochet pieces, embroidered bear faces, hanging layout, assembly steps and safety guidance for creating a handmade teddy bear nursery decoration.
Explore More Free Crochet Baby Patterns
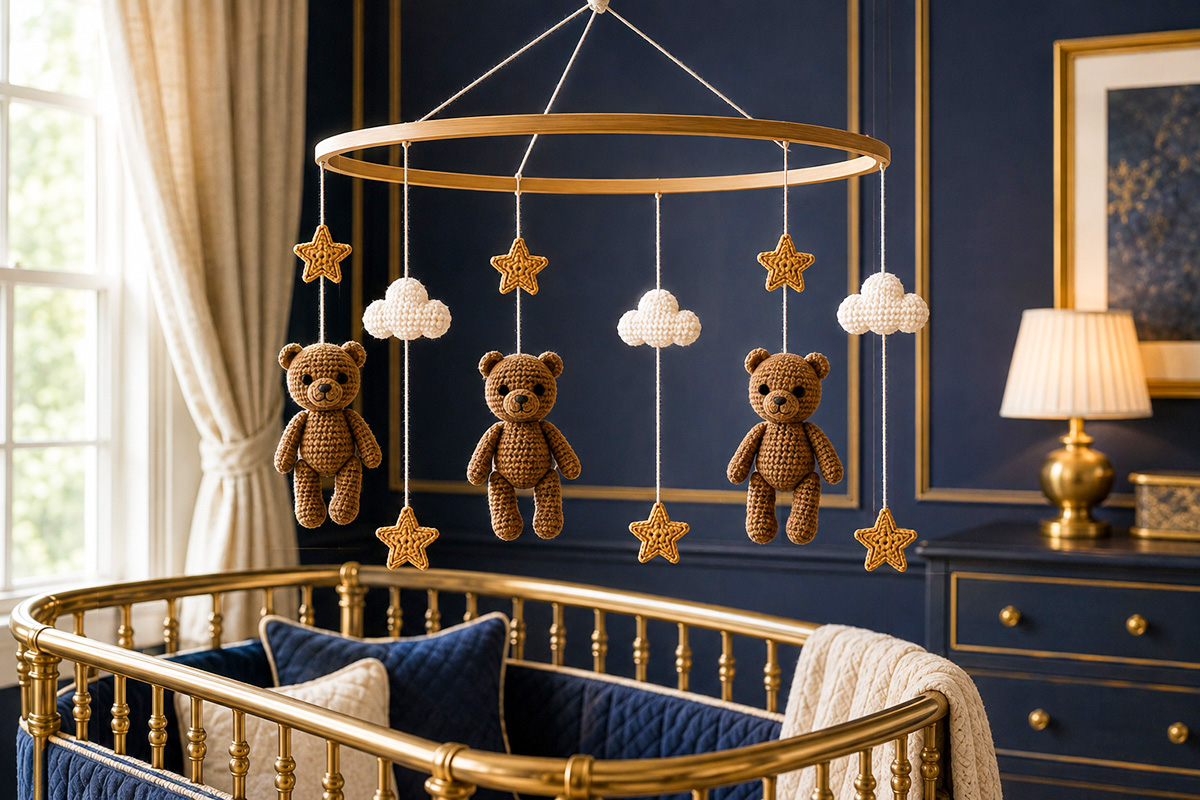
Supplies for This Crochet Bear Mobile
Jump to a Section
Free Crochet Bear Mobile Pattern with Teddy Bears: Project at a Glance
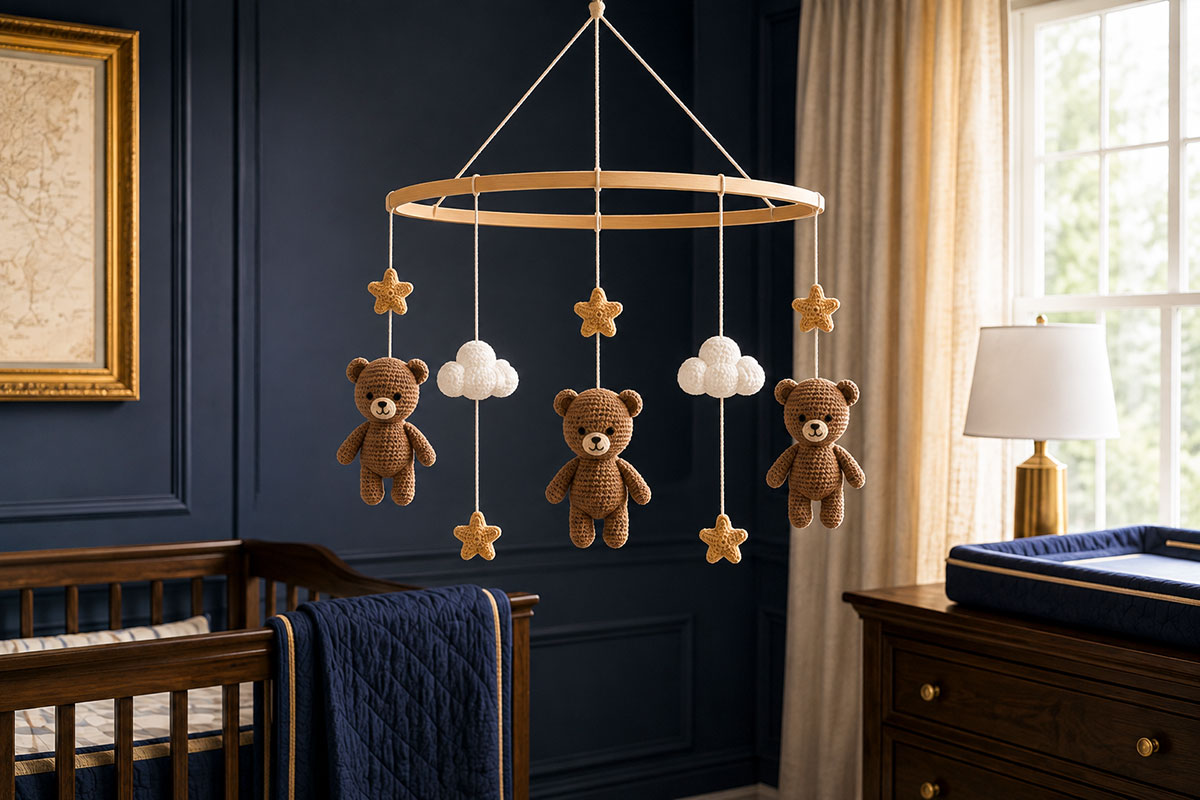
This crochet bear mobile is designed as a complete nursery decoration rather than a group of unrelated amigurumi pieces tied to a hoop. Three small teddy bears alternate with three clouds around a 10-inch wooden ring, while six stars repeat the shapes and colors at different heights. The staggered arrangement gives the finished mobile movement and depth without making it look crowded.
The bears use embroidered facial features instead of plastic safety eyes or buttons. Each bear is crocheted firmly enough to hold its shape with light stuffing, and the hanging cords are attached through secure crocheted stitches rather than through loose embellishments.
If you are comparing nursery-mobile projects before you begin, you can also browse the free crochet baby mobile patterns. This bear version is made specifically for a teddy bear or woodland-style nursery and uses a coordinated set of pieces that are sized for the same 10-inch hoop.
Finished mobile
- Wooden hoop: 10 inches in diameter
- Number of teddy bears: 3
- Expected bear height: approximately 4 1/2 inches from the top of the ears to the bottom of the feet
- Number of clouds: 3
- Expected cloud width: approximately 4 to 4 1/4 inches
- Number of stars: 6
- Expected star size: approximately 2 to 2 1/4 inches from point to point
- Hanging positions: 6 positions spaced evenly around the hoop
- Expected longest decorative drop below the hoop: approximately 18 inches at the longest hanging position, depending on the finished crochet dimensions and final balancing
The three bear positions alternate with the three cloud positions around the ring. Each bear line includes one small star above the bear. Each cloud line includes one star hanging below the cloud. That gives the mobile six balanced hanging lines without lining every piece up at the same height.
Project construction
Each teddy bear is made from a one-piece head and body with separately crocheted ears, arms and legs. Working the head and body as one continuous piece removes one major joining seam and helps each small bear hang straight. The ears remain unstuffed so they stay light and flat against the head.
The clouds are made as two matching flat panels that are joined around the outside and filled very lightly. The stars are also made as paired panels. A thin layer of filling gives them enough dimension to show from across the nursery without making them bulky.
Make all of the crochet pieces before you attach anything to the wooden hoop. Lay the finished bears, clouds and stars on a flat surface first. This lets you compare their size, correct a crooked face or uneven piece, and plan the hanging lengths before the mobile is assembled.
For a handmade mobile, a little variation between the three bears looks natural. The important checkpoints are more practical: keep their finished size reasonably close, place the faces at the same height, stuff them to a similar firmness and make certain every sewn part is secure.
Skill level
Advanced beginner to intermediate. The individual crochet stitches are basic, but the project also uses a magic ring, continuous rounds, increases, invisible decreases, small-piece assembly, embroidery, paired flat panels and final mobile balancing.
You do not need to make every hanging cord the same length. In fact, identical lengths would flatten the design into one horizontal row. The pattern uses deliberately staggered drops so a bear, cloud and star can be seen without one piece hiding directly behind another.
Before you begin
Use a removable stitch marker at the beginning of every continuous round. Count the stitches before moving to the next shaping round, especially on the small bear pieces. An extra increase or missed decrease is much more visible on a 4 1/2-inch bear than it would be on a large stuffed animal.
Keep the fabric dense enough that the filling does not show between the stitches. If you can easily see stuffing through the fabric, try a smaller hook before making the remaining pieces rather than pulling every stitch unusually tight.
Leave generous sewing tails on the ears, arms and legs. These parts are small, and a longer tail gives you enough yarn to sew through the body more than once and bury the end securely inside the bear.
The finished mobile is decorative nursery decor, not a crib toy. The later assembly and safety sections explain how to keep the hanging pieces out of a baby's reach and when a mobile over or near a crib must be removed.
Materials for the Free Crochet Bear Mobile Pattern
The yarn amounts below are planning estimates for three bears, three clouds and six stars, including extra yarn for sewing and matching the pieces. Actual yardage will vary with yarn, tension and finishing. Use the same yarn weight throughout the project so the finished shapes stay in proportion.
- Approximately 110 yards medium brown worsted weight yarn for the three teddy bears
- Approximately 70 yards ivory or soft white worsted weight yarn for the clouds
- Approximately 35 yards caramel, tan or another coordinating worsted weight yarn for the stars
- 3.25 mm crochet hook
- 10-inch unfinished or smoothly finished wooden mobile hoop
- Appropriate mobile mounting hardware for your installation location, selected and installed according to the hardware manufacturer's instructions
- Polyester fiberfill, have approximately 2 to 3 ounces available; the amount actually used will vary with stuffing density
- Black embroidery floss for the bear eyes, noses and mouths
- Small amount of brown yarn for sewing bear parts when the working yarn tails are not long enough
- Strong cotton yarn or crochet thread for suspending the pieces from the hoop
- Yarn needle with a blunt tip
- Embroidery needle suitable for the black floss
- Removable stitch markers
- Straight pins for positioning parts before sewing
- Scissors
- Measuring tape or ruler
Choose a smooth yarn with visible stitch definition rather than a fuzzy novelty yarn. Small mobile pieces need clean edges, especially around the bear ears and star points. A washable acrylic, cotton blend or smooth wool blend can all work as long as the finished fabric is dense and the yarn is not shedding fibers.
The wooden ring becomes part of the finished decoration, so inspect it before assembly. Sand or reject any hoop with splinters, cracks or rough edges that could cut the hanging yarn.
Yarn colors
You do not have to make a brown, white and caramel mobile. The same pattern can be worked in charcoal and white, soft rust and ivory, muted green and natural white, or another nursery palette. Keep enough contrast between the bears and the clouds so the individual shapes remain easy to see when the mobile is hanging.
If you want all six stars to match, make them in one color. For a more layered look, make three in the star color and three in the cloud color, then alternate them around the hoop.
Gauge and size control
Exact gauge is less important than dense, consistent fabric. Crochet one bear first and use it as the size reference for the other two. If the first finished body is much larger than expected, changing hook size before making the remaining pieces is easier than trying to compensate during assembly.
The stitches should sit close together without becoming stiff enough to distort the shaping. When the fabric is gently stretched, fiberfill should not be clearly visible between the stitches.
Abbreviations and Pattern Notes
This pattern uses standard US crochet terminology.
- MR = magic ring
- ch = chain
- sc = single crochet
- hdc = half double crochet
- dc = double crochet
- sl st = slip stitch
- inc = work 2 sc in the same stitch
- dec = invisible single crochet decrease over the next 2 stitches
- st = stitch
- sts = stitches
- FO = fasten off
Pattern notes
- The teddy bear head and body, ears, arms and legs are worked in continuous rounds. Do not join at the end of each round unless the instructions specifically say to do so.
- Move the stitch marker to the first stitch of every new round.
- The stitch count shown at the end of a round is the total number of stitches after that round is complete.
- Use invisible decreases on the stuffed pieces when possible. They create a smoother surface than a standard single crochet decrease.
- The turning or joining chains used later for flat pieces do not count as stitches unless the instructions state otherwise.
- Stuff the bear bodies lightly and evenly. A mobile figure needs to hold its shape without becoming heavy.
- Do not stuff the bear ears.
- Stuff only the lower half of each arm and leg very lightly, or leave them unstuffed if your yarn produces a firm fabric.
- Leave long yarn tails whenever a piece will be sewn to another piece.
- Make all three bears from the same hook, yarn and tension before making final hanging-length decisions.
Secure every magic ring before burying the starting tail. Pull the ring tightly closed, weave the tail beneath several stitches on the wrong side, change direction and weave it back through another section of stitches. Small hanging pieces are handled repeatedly during assembly, so the centers should not depend on one pulled tail alone.
Crochet the Three Teddy Bears
Make three bears using the instructions below. Each bear has one continuous head-and-body piece, two ears, two arms and two legs.
For the most even set, finish the first head and body before starting the second. Measure it from the top of the head to the lower edge and keep the other two within about 1/4 inch of that measurement.
Head and body
Make 3.
Begin at the top of the head with brown yarn.
Round 1: Work 6 sc into MR. 6 sts
Round 2: Inc in each stitch around. 12 sts
Round 3: (Sc 1, inc) 6 times. 18 sts
Round 4: (Sc 2, inc) 6 times. 24 sts
Rounds 5 through 8: Sc in each stitch around. 24 sts
After Round 8, flatten the head gently between your fingers and identify the center front. Place a removable marker between Rounds 6 and 7 at the center front. This marker will guide the eye and nose placement later.
Round 9: (Sc 2, dec) 6 times. 18 sts
Round 10: (Sc 1, dec) 6 times. 12 sts
Begin stuffing the head. Add small amounts of fiberfill at a time and shape the head into a rounded oval. Keep the front surface smooth so the embroidered face does not sink into overpacked stuffing.
Round 11: (Sc 1, inc) 6 times. 18 sts
This increase begins the shoulders and body directly below the head.
Round 12: (Sc 2, inc) 6 times. 24 sts
Rounds 13 through 17: Sc in each stitch around. 24 sts
Round 18: (Sc 2, dec) 6 times. 18 sts
Round 19: (Sc 1, dec) 6 times. 12 sts
Add fiberfill to the body, but do not pack it as firmly as the head. The finished body should stay rounded without feeling dense or heavy.
Stop here and leave the 12-stitch opening accessible. Do not complete the final decrease yet. The opening gives you access for securing the embroidered face and sewn limb ends later.
Place the body aside with the working yarn still attached. If you prefer to remove the hook, pull the working loop several inches long and secure it temporarily with a stitch marker.
Bear ears
Make 6 total, 2 for each bear.
Round 1: Work 6 sc into MR. 6 sts
Round 2: Inc in each stitch around. 12 sts
Round 3: Sc in each stitch around. 12 sts
FO, leaving an 8-inch sewing tail.
Do not stuff the ear. Flatten it gently so the two sides sit together. The lower edge will curve naturally when it is sewn to the head.
Make all six ears before sewing any of them in place. Pair two ears that are closest in size for each bear.
Bear arms
Make 6 total, 2 for each bear.
Round 1: Work 6 sc into MR. 6 sts
Round 2: (Sc 2, inc) 2 times. 8 sts
Rounds 3 through 6: Sc in each stitch around. 8 sts
If desired, place a very small amount of fiberfill into the lower half of the arm. Leave the upper half unstuffed so it can lie neatly against the body.
Flatten the final round. Work 4 sc through both layers across the opening to close it.
FO, leaving an 8-inch sewing tail.
Bear legs
Make 6 total, 2 for each bear.
Round 1: Work 6 sc into MR. 6 sts
Round 2: Inc in each stitch around. 12 sts
Rounds 3 through 5: Sc in each stitch around. 12 sts
Add a small amount of fiberfill to the lower half of the leg if needed. Keep the top flexible.
Flatten the final round. Work 6 sc through both layers across the opening to close it.
FO, leaving an 8-inch sewing tail.
Check the bear pieces before assembly
For each bear, you should now have:
- 1 head-and-body piece with a 12-stitch opening at the bottom
- 2 unstuffed ears
- 2 arms
- 2 legs
That gives you 21 crocheted bear pieces total for the three bears.
Lay the three bodies side by side before moving on. Their heads should be close in size, and the shoulder and lower-body shaping should begin at approximately the same height. Compare the paired ears, arms and legs as well.
A small difference in handmade pieces will disappear once the bears are hanging at different levels. A clearly longer arm or oversized ear is worth remaking now because repeated pieces make those differences easier to see.
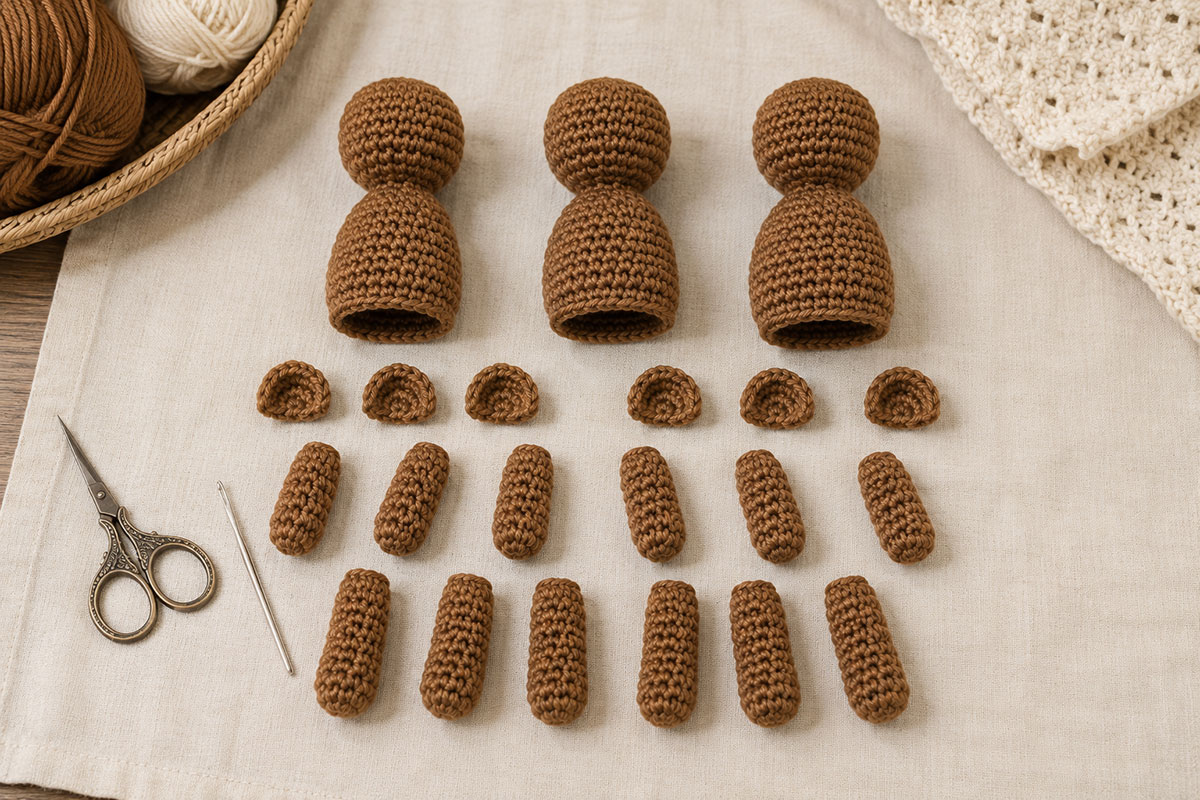
Do not sew the bear parts on yet. The face placement comes later, while the bottom opening still gives you access to the inside of each bear.
Crochet the Three Clouds
Each cloud is made from two matching flat panels. The top edge has three rounded lobes, while the lower edge stays fairly straight. This keeps the shape recognizable from across the room and prevents the clouds from looking like small white balls once they are hanging.
Make 6 cloud panels total, 2 panels for each finished cloud.
Cloud panel
With ivory or soft white yarn, ch 14.
Row 1: Sc in the second chain from the hook and in each remaining chain. 13 sts
Row 2: Ch 1, turn. Sc in each stitch across. 13 sts
Row 3: Ch 1, turn. Sc in each stitch across. 13 sts
Do not fasten off. You will now shape the three rounded sections across the top of Row 3.
Turn. Working across the 13 stitches of Row 3:
- Sl st in stitch 1.
- Skip stitch 2.
- Work 5 dc in stitch 3.
- Skip stitch 4.
- Sl st in stitch 5.
- Skip stitch 6.
- Work 7 dc in stitch 7.
- Skip stitch 8.
- Sl st in stitch 9.
- Skip stitch 10.
- Work 5 dc in stitch 11.
- Skip stitch 12.
- Sl st in stitch 13.
The center lobe has seven double crochets, so it should rise slightly higher than the two side lobes.
Ch 1. Work 3 sc evenly down the short side of the panel. Work 13 sc along the underside of the foundation chain. Work 3 sc evenly up the opposite short side.
Sl st into the first stitch at the beginning of the shaped top edge. FO and weave in the end.
Make six panels in the same way.
Join each pair of cloud panels
Place two matching panels together with the right sides facing outward. Line up the three top lobes, both short sides and the lower edge.
Thread a yarn needle with a length of matching yarn. Beginning at one lower corner, whipstitch the two panels together through the outer edge stitches.
Work around the first side, across the shaped top, down the second side and along the lower edge. Stop when approximately 1 1/2 inches of the lower edge remains open.
Add a thin layer of fiberfill. Push a little filling into each of the three lobes, but keep the center of the cloud fairly flat. Too much stuffing will turn the panel into a rounded pillow and make the scalloped outline harder to see.
Finish sewing the opening closed. Secure the yarn with several stitches inside the seam, then bury the end between the panels.
Repeat for the other two clouds.
Lay all three finished clouds together. The center lobes should face upward, and the lower edges should remain fairly level. Gently reshape any lobe that folded inward while you were sewing.
Crochet the Six Stars
The stars are intentionally smaller than the clouds and bears. They are accent pieces rather than six more competing focal points. Each finished star uses two matching motifs joined around the edge.
Make 12 star panels total, 2 panels for each finished star.
Five-point star panel
With caramel, tan or your chosen star color, make an MR.
Round 1: Work 10 sc into MR. Join with a sl st to the first sc. 10 sts
Pull the magic ring tightly closed and secure the beginning tail before continuing.
Round 2: The five points are made over pairs of stitches from Round 1.
Repeat the following sequence 5 times:
- Sc in the next stitch.
- Ch 4.
- Sl st in the second chain from the hook.
- Sc in the next chain.
- Hdc in the final chain.
- Sl st in the next stitch of Round 1.
After the fifth repeat, you will have five points spaced evenly around the center.
FO and weave in the ending tail securely.
Make 12 star panels.
Join the star panels
Pair the star motifs by size before sewing. Place two panels together with the right sides facing outward and line up all five points.
Using matching yarn and a yarn needle, whipstitch around the outer edge. Follow each point rather than sewing straight across the spaces between them.
Before closing the final point, insert only a small wisp of fiberfill into the center. The points do not need to be packed individually. A slightly padded center gives the star dimension while the tips remain crisp.
Finish the seam and bury the yarn end inside the star.
Repeat until you have six finished stars.

At this point, the decorative inventory for the mobile should include three teddy bear bodies with their separate parts, three finished clouds and six finished stars. Keep the stars together in one container or project bag. Small pieces have a talent for disappearing at exactly the moment you are ready to assemble everything.
Embroider the Bear Faces and Finish Each Teddy Bear
Finish one bear completely before sewing the second and third. Use the first finished bear as your placement reference so the three faces look related without trying to make them mechanically identical.
Position the ears
Place the head-and-body piece upright with the temporary center-front marker facing you.
Flatten one ear and position it across the upper side of the head between approximately Rounds 3 and 6. The lower part of the ear should sit against the head while the rounded upper edge remains visible.
Place the second ear at the same height on the opposite side.
Look at the bear from directly in front before sewing. The visible portions of the ears should be similar in size, and neither ear should sit noticeably higher than the other.
Pin both ears in place.
Using each ear's long tail, sew through both layers of the flattened ear and into the head stitches. Work across the attachment edge, then sew back across it in the opposite direction.
Bring the yarn tail into the open lower body and secure it on the inside. Do not leave a knot or loose yarn end on the outside of the head.
Position the arms
Pin one arm to each side of the body with the flattened upper edge near Rounds 12 and 13.
Angle the arms slightly downward rather than straight out to the sides. The finished bear should have a compact silhouette that hangs easily without an arm catching the cord beside it.
Sew each arm securely through the flattened top edge and the body stitches. Work across the attachment twice.
Bring the sewing tails through to the open lower body and secure the ends inside.
Position the legs
Place the two legs along the lower front and sides of the body. Position their flattened upper edges near Rounds 17 and 18.
Leave a small space between the legs at center front. The feet should point generally downward when the bear is held upright.
Pin both legs before sewing either one. Compare their length from the bottom of the body and adjust them until the feet hang at approximately the same level.
Sew each leg firmly through the flattened upper edge and the body stitches. Work back across the attachment before bringing the yarn tail inside the body.
Embroider open eyes with black floss
Use the center-front marker placed between Rounds 6 and 7 as your reference.
Place the eyes approximately between Rounds 6 and 7 with about 4 stitches of space between their inner edges. Check the face from straight ahead before you begin embroidery.
Thread an embroidery needle with black embroidery floss.
For each open eye, work several short satin stitches side by side to form a small horizontal oval. Keep the stitches close together so the yarn underneath does not show through the eye.
The two eyes should be approximately the same width. Avoid pulling the floss tightly enough to dent the crocheted head.
Embroider the nose and mouth
Center the nose approximately one round below the eyes.
Use black floss to work several short satin stitches into a small horizontal or softly triangular nose. Keep it in proportion with the small face. A large nose can make a 4 1/2-inch bear look much heavier through the muzzle area than the pattern intends.
Bring one short straight stitch down from the center of the nose.
From the bottom of that stitch, embroider two short diagonal stitches, one toward each side, to make a simple soft Y-shaped mouth.
Check the face before securing the floss. The eyes should remain the main feature, with the nose and mouth centered beneath them.
Bring all embroidery ends through the open bottom of the body. Tie or weave the floss securely into the inside crochet stitches, then trim the excess so no loose floss remains inside the finished bear.
Complete the body closure
Check the stuffing before closing the bear. Add a small amount if the lower body feels hollow, but keep enough flexibility that the figure remains light.
Return the hook to the working loop at the end of Round 19. Confirm that the opening still has 12 stitches.
Round 20: Dec around. 6 sts
FO, leaving a 6-inch tail.
Thread the tail onto a yarn needle. Pass the needle through the front loop of each of the 6 remaining stitches. Pull firmly to close the opening.
Take the yarn through the closed center and out through the side of the body. Make a small securing stitch through an interior crochet strand, then bring the needle out at another point and trim the yarn close to the surface. Massage the body lightly so the trimmed end slips back inside.
Remove the temporary center-front marker.
Finish all three bears
Repeat the same ear, arm, leg, embroidery and closure steps for the remaining two bears.
Stand or lay the three finished bears side by side. Compare these details before moving to the mobile assembly:
- The eyes are at approximately the same height on all three faces.
- All six ears are sewn firmly with no loose attachment edges.
- The arms angle generally downward.
- The legs hang below the body rather than projecting sideways.
- No embroidery floss tails are exposed.
- No fiberfill is visible through the stitches.
- Each body opening is completely closed.
- All straight pins and removable stitch markers have been removed.
Do not try to correct tiny handmade differences by pulling a hanging cord tighter on one bear later. Balance the mobile by changing the cord length, not by distorting the crocheted figures.
Assemble the Crochet Bear Mobile
Do not attach the crochet pieces to the hoop as soon as each one is finished. Assemble the hanging lines on a table first. The mobile is much easier to balance when you can move a bear or cloud up or down before making the final knots.
You will make six hanging lines. Three lines hold a star above a teddy bear. The other three hold a cloud above a star.
Prepare the wooden hoop
Inspect the entire 10-inch wooden hoop with your fingers. The surface should feel smooth, including the inner and outer edges. Do not use a ring with a crack, sharp edge or splinter.
Mark six temporary attachment positions around the hoop. Think of the ring as a clock and place the marks at approximately:
- 12 o'clock
- 2 o'clock
- 4 o'clock
- 6 o'clock
- 8 o'clock
- 10 o'clock
These positions do not have to be measured to the millimeter. What matters is keeping the six spaces reasonably even around the ring.
Alternate the hanging lines around the hoop in this order:
- Teddy bear with star above it
- Cloud with star below it
- Teddy bear with star above it
- Cloud with star below it
- Teddy bear with star above it
- Cloud with star below it
Alternating the larger shapes distributes the visual weight around the whole ring. All three bears stay separated rather than gathering on one side of the mobile.
Attach a suspension line to each bear
Cut a generous length of strong cotton yarn or crochet thread for each bear. It is easier to shorten a line during balancing than to replace one that was cut too short.
Thread one end onto a yarn needle.
At the top center of the bear's head, between the ears, pass the needle beneath two adjacent crochet stitch bars. Do not pass the suspension line through only one loose strand of yarn.
Pull the line through until both ends are equal. Tie the two ends together with a secure knot just above the top of the head. You now have a doubled suspension line running upward from the bear.
Hold the bear by the suspension line. It should face forward without tipping sharply to either side.
If the bear twists, move the attachment point by one stitch and check it again before proceeding.
Repeat for all three bears.
Add a star above each bear
Each bear line includes one star positioned above the bear.
Before tying the suspension line to the hoop, pass both strands through the upper point of one finished star. Catch secure edge stitches from both star panels rather than only the sewing yarn at the seam.
Slide the star down the doubled line until approximately 3 to 4 inches remain between the bottom of the star and the top of the bear's head.
Use matching yarn to make several small securing stitches around the doubled suspension line at the back of the star. Tie securely and bury the yarn ends between the two star panels.
The star should stay in position when the line is lifted vertically.
Prepare the cloud hanging lines
Cut three more generous lengths of strong cotton yarn or crochet thread.
For each cloud, pass the line beneath secure stitches near the center of the upper middle lobe. Pull it through until the two ends are equal and knot the doubled line just above the cloud.
Lift the cloud by the line. It should remain approximately level rather than tipping heavily toward one side.
Adjust the attachment point by a stitch if necessary.
Add a star below each cloud
Cut a separate length of suspension thread approximately 6 to 7 inches long.
Pass one end beneath secure stitches near the bottom center of the cloud. Tie it firmly and bury the short tail into the cloud seam.
Pass the lower end beneath secure stitches at the top point of a star.
Adjust the cord so approximately 3 to 4 inches of open space remain between the bottom of the cloud and the upper point of the star.
Tie securely. Bury the short tail between the star panels.
Repeat with the remaining two clouds and stars.
Give every suspended piece a gentle tug before it goes onto the hoop. A decorative mobile still needs secure construction. If a stitch stretches noticeably, a knot slips or an attachment point looks weak, repair it before continuing.
Arrange and Hang the Teddy Bear Mobile Pieces
The mobile looks more interesting when the six hanging lines stop at different heights. Avoid placing all three bears in one horizontal row and all three clouds in another. A small change in each drop gives the finished mobile depth while preserving the alternating bear-and-cloud pattern.
Start with three different drop lengths
Use the following measurements as starting points rather than rigid finished dimensions. Measure from the bottom edge of the wooden hoop to the top of the first crocheted piece on each line.
- Short drop: approximately 3 inches
- Medium drop: approximately 5 inches
- Long drop: approximately 7 inches
Use each drop length twice, but place matching lengths on opposite sides of the hoop.
For example:
- 12 o'clock bear line: short drop
- 2 o'clock cloud line: medium drop
- 4 o'clock bear line: long drop
- 6 o'clock cloud line: short drop
- 8 o'clock bear line: medium drop
- 10 o'clock cloud line: long drop
This sequence spreads the short, medium and long lines around the ring instead of creating a high side and a low side.
Temporarily attach all six lines
Tie each doubled suspension line loosely at its marked position on the wooden hoop. Do not trim the excess cord yet.
Lift the hoop and look at the mobile from several directions.
Check whether:
- all three bears can be seen clearly;
- no star rests directly against a bear or cloud;
- the clouds remain approximately level;
- one side of the hoop does not hang noticeably lower than the other;
- the decorative pieces have enough space to turn without repeatedly striking one another.
Move only one line at a time when making adjustments. Shorten or lengthen that line, lift the hoop again and check the result before changing another one.
A mobile does not need perfect visual symmetry from every angle. It does need physical balance. When suspended from the center, the wooden hoop should sit close to level.
Make the upper suspension
Cut three equal lengths of the same strong suspension yarn or thread. A starting length of approximately 24 inches for each strand gives you room to adjust and knot them.
Tie the first strand securely to the wooden hoop near the 12 o'clock position.
Tie the second strand near 4 o'clock.
Tie the third strand near 8 o'clock.
Bring the three upper ends together above the center of the hoop.
Lift them until all three strands carry approximately equal tension and the hoop hangs level. Tie the strands together securely to form the upper suspension point.
Do not trim the excess until you have lifted the complete mobile and checked the balance again.
If one side drops, adjust the upper strand on that side rather than adding weight to the opposite side.
Secure the final knots
Once the mobile hangs correctly, tighten every knot at the wooden ring.
For additional security, thread each loose end onto a yarn needle and pass it back through the knot before trimming. Leave a short tail rather than cutting directly against the knot.
Turn the hoop slowly through a full circle and inspect all six lower lines and all three upper suspension strands.
The finished arrangement should contain exactly:
- 3 teddy bears
- 3 clouds
- 6 stars
- 6 lower hanging positions
- 3 upper suspension strands
If you like the teddy bear theme but want another handmade project rather than another mobile, the teddy bear lovey crochet pattern uses the same familiar nursery character in a completely different project.
Baby Mobile Safety and Placement
This handmade crochet mobile is intended as hanging nursery decor. It is not a toy for a baby to hold, pull or sleep with.
Install the mobile and its mounting hardware according to the instructions for the ceiling hook, mobile arm or other support you use. The support must be suitable for the installation surface and the weight of the finished mobile.
Keep every part of the mobile, including the bears, stars, clouds, hoop and hanging cords, completely out of the baby's reach. Do not lengthen the strings to bring the crocheted pieces closer to the crib.
The U.S. Consumer Product Safety Commission advises that mobiles and similar suspended crib toys are no longer appropriate starting at about five months, when babies may begin pushing up on hands and knees or sitting up. For this handmade mobile, remove it by five months or sooner if the baby begins pushing up, sitting up or can reach any part of the mobile or its cords. You can read the CPSC Age Determination Guidelines for additional information.
Development does not happen on an exact calendar date. A baby's abilities are the important checkpoint. If a child can reach, grab, push up toward or otherwise access the hanging pieces or cords, remove the mobile from the crib area.
Before hanging the mobile, inspect every crocheted piece for loose yarn, open seams and exposed filling. Check the sewn arms, legs and ears individually. Make certain the embroidered facial features cannot be pulled loose.
Inspect the suspension cords and knots periodically while the mobile is displayed. Remove the mobile if a cord frays, a knot loosens, the wooden hoop develops damage or any crocheted piece needs repair.
The embroidered bear faces in this pattern deliberately avoid plastic safety eyes and buttons. That construction choice removes detachable plastic facial pieces, but it does not make the mobile appropriate for handling by a baby.
When the mobile is no longer appropriate above the crib, it does not have to disappear from the nursery. It can be relocated as decorative wall or ceiling decor in a position where a child cannot reach the hanging pieces or cords.
Frequently Asked Questions About the Crochet Bear Mobile Pattern
How many teddy bears are on this crochet mobile?
The pattern uses three teddy bears. They alternate with three clouds around a 10-inch wooden hoop. Six small stars complete the arrangement.
How large are the crochet bears?
Each bear is expected to measure approximately 4 1/2 inches from the top of the ears to the bottom of the feet. Your exact measurement can change with yarn, hook size, tension and stuffing.
Can I make the crochet bear mobile with only bears?
Yes, but the pattern is balanced around three bears, three clouds and six stars. Replacing the clouds with three additional bears adds more weight and changes the visual balance, so the hanging positions and upper suspension would need to be adjusted again.
Can I use safety eyes on the teddy bears?
This pattern uses embroidered black eyes, noses and mouths. The satin-stitched eyes also keep the three small faces lightweight and avoid adding plastic facial pieces to a hanging nursery decoration.
Can I make the bears in different colors?
Yes. The three bears can match or use related colors. If you make each bear a different color, repeating those colors in the stars can help the finished mobile look intentional rather than pieced together from unrelated projects.
Why are the bears, clouds and stars hung at different heights?
The staggered lengths keep the pieces from forming one flat row. They also help prevent one bear from hiding directly behind another when the mobile turns.
Do the clouds and stars need stuffing?
Only a small amount. The clouds need enough filling to define their three rounded lobes, and the stars need only a thin amount in the center. Heavy stuffing makes both shapes bulkier and adds unnecessary weight.
Can I use a larger mobile hoop?
Yes. The pattern is arranged for a 10-inch hoop, but a 12-inch hoop can also work. Keep the six hanging positions evenly spaced and rebalance the mobile before tightening the final knots.
Can I make this mobile for a woodland nursery?
Yes. Brown teddy bears, natural wood and simple clouds fit easily into a woodland nursery. You can find more coordinating handmade ideas on the woodland nursery patterns page.
What other crochet mobiles can I make?
The crochet baby mobile patterns collection includes other nursery themes if you want a different focal design. The crochet moon and stars baby mobile pattern is another option built around suspended shapes rather than animal figures.
When should a mobile be removed from above a crib?
Do not wait for a baby to actually grab it. Remove the mobile by five months or sooner if the baby begins pushing up on hands and knees, sitting up or can reach the hanging pieces or cords.
A finished mobile may be small compared with a blanket or stuffed animal, but the details matter just as much. Matching the repeated pieces, giving the bears secure embroidered faces and taking time to balance the six hanging lines are what turn a handful of crochet shapes into one finished nursery project.
When you click on links to various merchants on this site and make a purchase, this may result in this site earning a commission. This does not affect the price you pay.

UBGI Gold Standard 2026
Reviewed under the site's
editorial checklist.
Photos, decorating ideas, party setups and reader submissions are shared for inspiration unless a page is specifically presented as a pattern, tutorial, reference guide or step-by-step project. Follow the instructions, measurements, safety guidance and manufacturer directions provided for the particular project or product.
About Jan | Contact | Baby Nursery Ideas (Blog) | Site Map | Privacy Policy | Disclosure Policy | Disclaimer | Affiliate Disclosure | Earnings Disclosure | Facebook | Pinterest
I am a participant in the Amazon Services LLC Associates Program, an affiliate advertising program designed to provide a means for us to earn fees by linking to Amazon. As an Amazon Associate I earn from qualifying purchases.
Copyright © 2006-2026. All Rights Reserved.