Free Crochet Bear Basket Pattern for XXL Nursery Storage and Organization
By Jan Bay
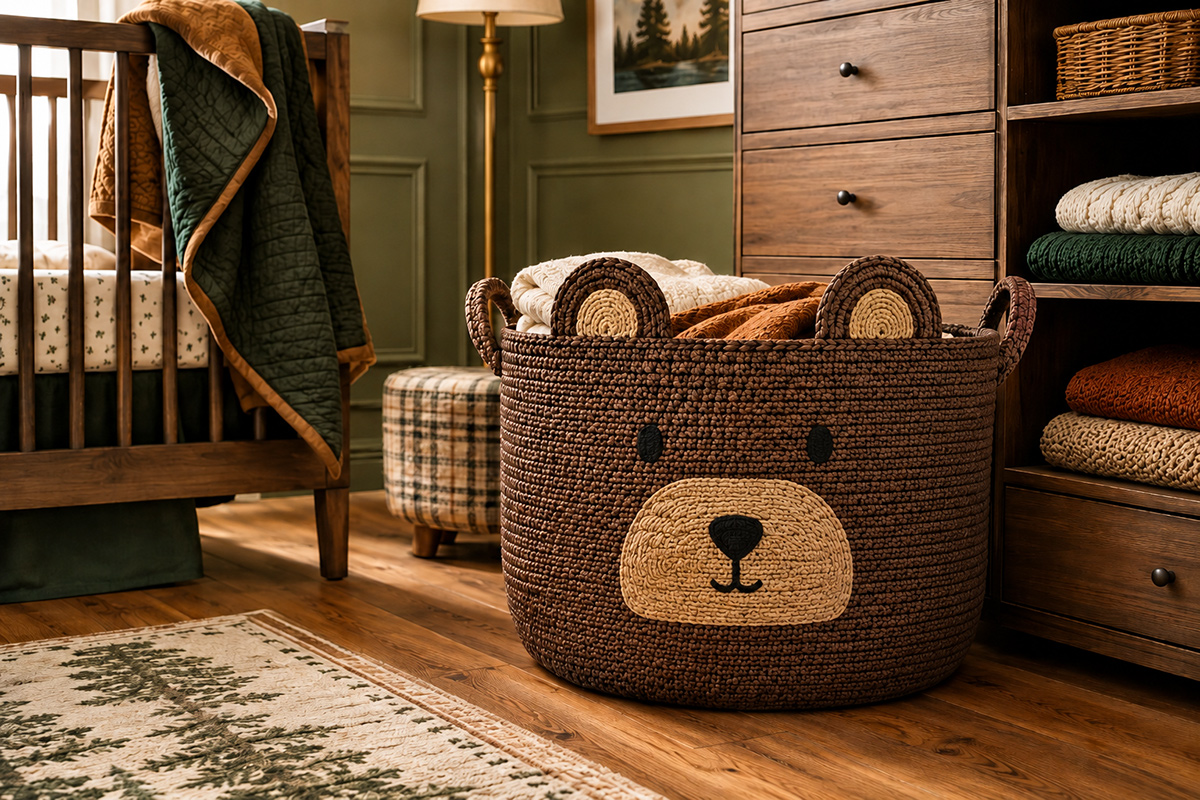
This free crochet bear basket pattern turns the XXL master storage basket into a warm woodland bear with rounded ears, a contrasting muzzle and simple embroidered facial features. The finished basket gives you substantial nursery storage without covering the sturdy base, reinforced rim or raised side handles that make the original basket useful.
Explore More Free Crochet Baby Patterns
XXL Master Crochet Basket Pattern
XXL Woodland Owl Basket Pattern
XXL Crochet Bunny Basket Pattern
XXL Woodland Fox Basket Pattern
See Jumbo Cotton Cord for This XXL Crochet Bear Basket
Jump to the Crochet Bear Basket Pattern
Finished Size and What the Basket Should Look Like
Position and Attach the Bear Features
Ways to Use the Bear Basket for Nursery Storage
Before You Begin the Crochet Bear Basket Pattern
This page contains the bear-specific pieces, placement measurements and assembly instructions for the finished XXL basket. Complete the XXL master crochet basket pattern before you begin the ears, muzzle or embroidered face.
The master basket gives the bear its structure. It has a reinforced double base, straight single-crochet walls, a level upper rim and two raised side handles. The bear pieces are decorative additions to that finished construction. They should not change the shape of the basket, pull on the rim or interfere with either handle.
Before adding the bear features, confirm that the completed basket has all of the following:
- An approximately 21 1/2 to 22 1/2-inch reinforced base
- Exactly 138 stitches around the finished walls and level upper rim
- An approximately 15-inch height from the bottom of the reinforced base to the level rim
- Two matching raised handles positioned directly opposite one another
- Handles that rise approximately 3 1/2 to 4 inches above the level rim
- Walls that remain upright when the empty basket is placed on a level surface
- A level rim that does not dip near either handle attachment
If the basket does not meet those checkpoints, correct the basket before adding the bear face. Decorative pieces can hide a stitch or seam, but they cannot correct a wall that is flaring, a base that rocks or a handle that pulls the rim out of shape.
Crochet Bear Basket Pattern for Woodland Nursery Storage
The bear design is intentionally simple. Two rounded ears, contrasting inner-ear pieces, one broad muzzle and embroidered facial features are enough to turn the large storage basket into a recognizable woodland bear.
I believe a bear basket looks better when some of the original basket is allowed to show. Covering the whole front with appliqués would make the face busier and add unnecessary weight to the wall. The open areas of cocoa or brown basket fabric become part of the bear's face, while the lighter muzzle and ear centers add just enough contrast to define it.
The finished design uses:
- Four matching outer-ear circles, joined in pairs to make two double-layered ears
- Two smaller contrasting inner-ear circles
- One contrasting crocheted muzzle
- Two embroidered black eyes
- One embroidered black nose
- One small embroidered mouth beneath the nose
The ears are made in two layers because a single circle of heavy basket cord can soften and fold when it stands above the rim. Joining two matching circles gives each ear more body without adding wire, plastic canvas or another rigid support.
The muzzle lies flat against the front wall. The nose and mouth are embroidered through the muzzle after its position has been checked. The eyes are embroidered directly onto the basket wall. There are no separate eye pieces, plastic safety eyes, buttons, glued felt pieces or loose embellishments.
Keep every decorative element firmly attached and smooth against the basket. The finished project is a nursery storage basket, not a toy or infant sleep accessory.
Mark the Front Before You Crochet the Bear Pieces
Stand the empty basket upright with the two raised handles at the sides. Choose either broad wall section between the handles to become the front.
At the left side, locate the reinforced handle attachment area that borders your chosen front wall and place a removable marker in the level rim immediately beside it. Repeat at the corresponding attachment area on the right side.
Use a flexible measuring tape to follow the curve of the level front rim from the left marker to the right marker. Mark the midpoint of that span. This midpoint establishes the center front even if the orientation markers from the master basket have already been removed.
Follow the vertical stitch column beneath the center-front marker and place a second removable marker several inches lower on the wall. These two markers establish the vertical center line for the muzzle, nose and mouth.
Set the basket on a level surface and look at it from several feet away. Confirm that the marked center faces forward while equal portions of the two side handles remain visible.
Leave the center-front markers in place until the complete bear face has been positioned and checked.
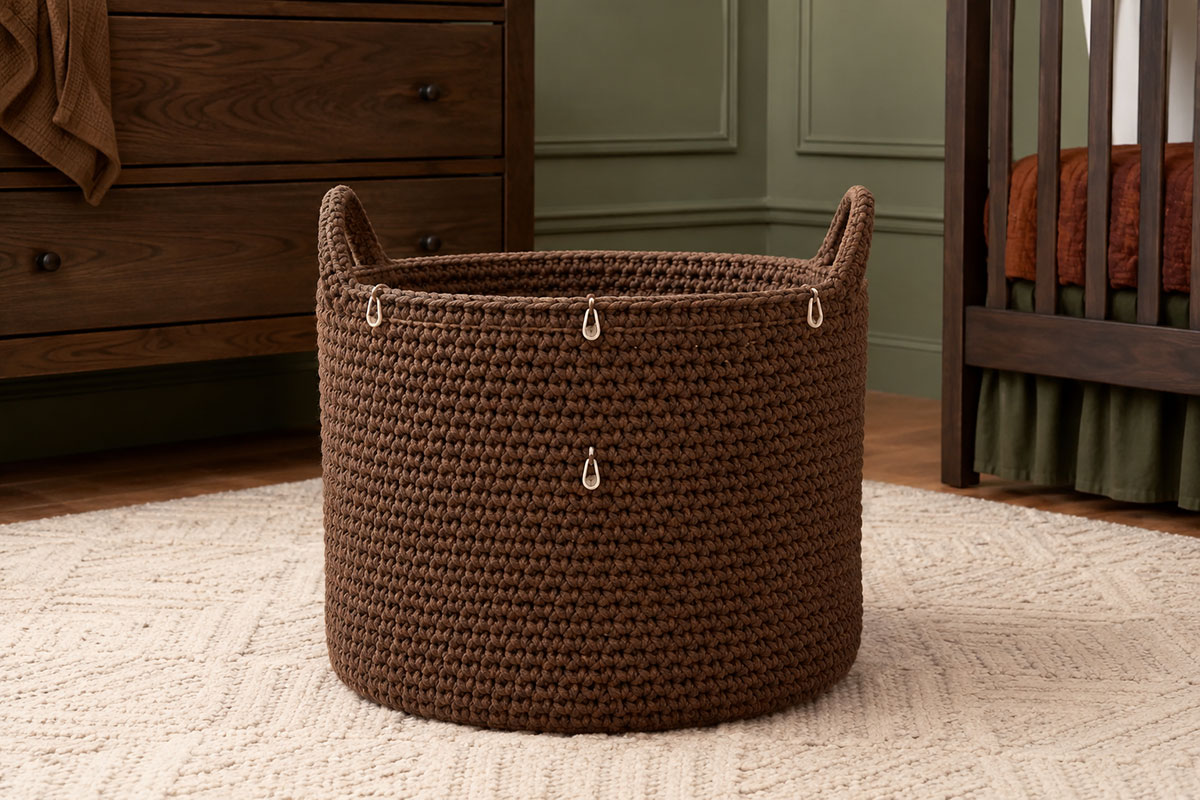
A center-front marker gives every bear feature the same reference point. Mark first, then measure outward from that line instead of positioning one eye or ear and trying to make the other side match it afterward.
Finished Size and What the Bear Basket Should Look Like
The bear features are designed specifically for the finished XXL master basket. Do not scale them from a smaller basket or attach them before the structural basket is complete.
At the stated gauge, the finished project should measure approximately:
- Reinforced basket base: 21 1/2 to 22 1/2 inches across
- Level basket height: approximately 15 inches from the bottom of the reinforced base to the upper rim
- Overall height at the side handles: approximately 18 1/2 to 19 inches
- Completed outer bear ear: approximately 5 to 5 1/2 inches across after the two layers are joined
- Inner-ear circle: approximately 2 3/4 to 3 inches across
- Bear muzzle: approximately 7 inches wide and 5 inches high before attachment
These are expected measurements based on the stated gauge and stitch counts. Cord construction and individual tension can change the finished dimensions slightly even when every stitch count is correct.
The bear ears should rise only a few inches above the front rim. They are deliberately shorter and rounder than the ears on the XXL crochet bunny basket. A bear needs a compact round ear silhouette. Making the ears taller may turn the shape into something that reads more like a rabbit, mouse or koala.
The muzzle should occupy the lower middle of the face without stretching from side to side across the basket. Leave plenty of the brown basket fabric visible around it. That open brown area is what makes the basket itself become the bear's head.
The two raised handles remain visible at the sides. From the front, the ears should sit between the handles and slightly behind the reinforced rim. From the side, neither ear should extend into a handle opening.
When the proportions are right, you should recognize the bear before any extra decoration is considered. There is no need to add paws, cheeks, eyebrows or a separate forehead piece just to fill space.
Skill level: Intermediate for the complete project. The bear pieces themselves use basic single crochet, increases, simple flat shaping, joining and embroidery. The intermediate rating reflects the XXL master basket construction, large stitch count, reinforced base, raised handles and the need to position the facial pieces accurately on a curved wall.
Materials and Supplies for the Bear Features
The following supplies are for the bear details only. They are in addition to the materials used to complete the large crochet basket with handles.
- One completed XXL master basket: Made with the required reinforced double base, straight walls, level rim and raised side handles
- Main-color basket cord: Approximately 40 to 50 additional yards for four outer-ear circles, joining the ear layers and attaching the completed ears
- Contrasting cord: Approximately 25 to 35 yards for two inner-ear circles, the muzzle and sewing tails
- Black embroidery material: Heavy matte black embroidery thread, black cotton yarn or another firmly twisted black fiber suitable for working through the thick basket fabric
- Crochet hook: Begin with the same 10 mm hook used for the master basket, then adjust only if necessary to obtain the stated feature gauge
- Large blunt tapestry needle: For sewing the inner-ear circles and attaching the completed ears and muzzle to the basket
- Embroidery needle or suitable yarn needle: Choose an eye large enough for the black material used for the eyes, nose and mouth
- Locking stitch markers: For the center line, ear placement and muzzle placement
- Flexible measuring tape: For checking the ear diameter, muzzle measurements and mirrored placement
- Rustproof pins, sewing clips or additional locking markers: For holding pieces temporarily while you check the complete face
- Sharp scissors
Choose Cord That Matches the Basket
Use the same firm 5 mm braided cotton cord or low-stretch rope yarn used for the basket whenever possible. The outer ears need enough body to remain rounded above the rim, and matching the basket material keeps their scale and stitch texture consistent.
The lighter inner ears and muzzle can be a different color, but keep the fiber and thickness close to the main cord. A thin worsted yarn sewn onto jumbo basket stitches can look undersized and may sink into the deeper texture of the wall.
Do not compensate for soft yarn by putting wire inside an ear. Use dense crochet fabric and the double-layer ear construction instead.
The estimated feature yardage includes joining and sewing allowances. Thick cotton cord varies considerably in yards per spool, so use the yardage on the label rather than assuming that two cords of equal weight contain the same amount.
Keep a few yards of both colors after the basket is finished. Matching repair cord is far more useful tucked away in a craft bin than discovering later that the exact shade is no longer available.
Gauge, Abbreviations and Bear Feature Pattern Notes
Feature gauge: Aim for approximately 8 single crochet stitches and 8 rows per 4 inches using the same firm cord selected for the bear features.
This matches the master basket gauge. The finished measurements matter more than forcing a particular hook size. The crochet should be dense enough that the ears hold their rounded shape and the muzzle lies smoothly against the wall.
If a completed ear is much larger than 5 1/2 inches across, make another test with a smaller hook. If it is noticeably smaller than 5 inches and the fabric feels unusually stiff, try a slightly larger hook.
Do not change the number of ear stitches simply to compensate for a gauge problem. Both ears need the same five-round construction so their shape remains predictable.
Abbreviations
- ch: chain
- FO: fasten off
- inc: work 2 single crochet stitches in the same stitch
- MR: magic ring
- rnd: round
- RS: right side
- sc: single crochet
- sc2tog: single crochet 2 stitches together
- sl st: slip stitch
- st: stitch
- sts: stitches
- WS: wrong side
This pattern uses standard U.S. crochet terminology. The Craft Yarn Council crochet abbreviations provide a useful reference for standard terms.
Pattern Conventions
- The round bear-ear pieces are worked in continuous rounds. Do not join at the end of a round unless the instructions specifically tell you to do so.
- Place a locking marker in the first stitch of each continuous round and move it upward as you work.
- Do not turn the circular ear pieces.
- The muzzle is worked separately in flat rows and is turned at the end of each row. Either side may be designated as the RS. Choose one side before positioning the muzzle; the opposite side is the WS, where the embroidery tails will be secured.
- A beginning chain on a flat piece does not count as a stitch.
- Numbers in parentheses give the completed stitch count.
- Use the same hook, cord and tension for all four outer-ear circles.
- Measure the first completed outer-ear circle before making the remaining three.
- Do not attach any bear piece to the basket until both completed ears and the muzzle have been measured and compared with the placement instructions.
For circular pieces worked without turning, use the side that faced you while crocheting as the RS. Mark that side on the two circles that will become the ear fronts. The matching second circle in each pair becomes the back layer.
Small differences that seem harmless on separate pieces become obvious when two ears sit side by side above a straight rim. Check the pair while they are still easy to remake.
Crochet the Double-Layered Bear Ears
Each finished bear ear uses two matching main-color circles. Make four outer circles in all. Two become the fronts and two become the backs.
Each circle is worked to 30 stitches. At the stated feature gauge, it should measure approximately 4 3/4 to 5 inches across before the layers are joined.
Outer Bear Ear Circle
Make 4 in the main basket color.
Round 1: Make an MR. Work 6 sc into the ring. Pull the ring closed and place a locking marker in the first sc. (6 sts)
Round 2: Inc in each st around. (12 sts)
Round 3: [Sc in next st, inc in next st] 6 times. (18 sts)
Round 4: [Sc in next 2 sts, inc in next st] 6 times. (24 sts)
Round 5: [Sc in next 3 sts, inc in next st] 6 times. (30 sts)
After the final stitch, sl st in the next stitch only to smooth the ending edge. Fasten off.
Weave the center starting tail securely through the WS of the circle and trim it. Weave in the fastening tail as well. Separate yarn will be used to join the completed ear layers and attach them to the basket.
Outer-Ear Checkpoint
Lay the first circle flat without stretching it. It should measure approximately 4 3/4 to 5 inches across and contain exactly 30 stitches in the final round.
The circle should lie flat. A slight soft curve is acceptable, but it should not form a cup or develop a ruffled edge.
If the circle cups noticeably, first recount every round. Missing increases can pull the edge inward. If the stitch counts are correct, the cord may be too stiff or the tension too tight for the selected hook.
If the edge ripples, check for extra increases. When all stitch counts are correct, excessive looseness may mean the hook is too large for the cord.
Once the first circle is correct, make the remaining three. Stack all four circles with their edges aligned before continuing. Their diameters should match within approximately 1/4 inch.
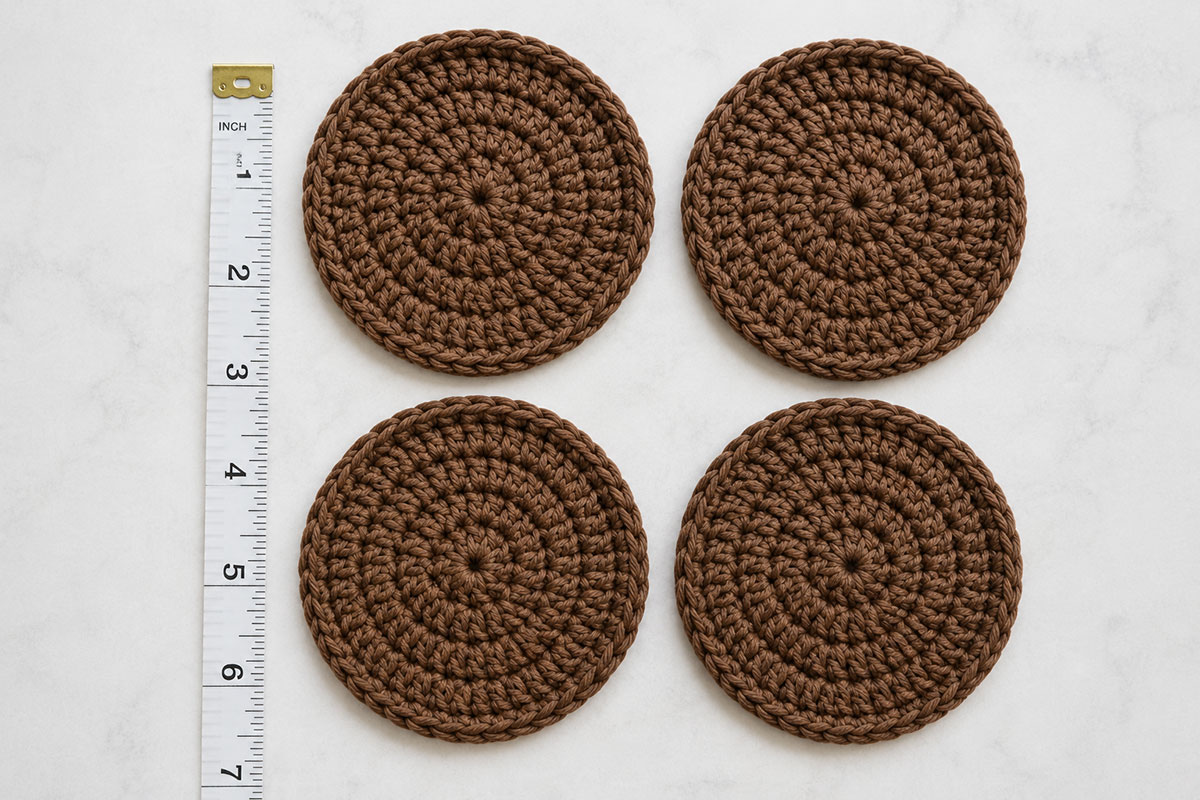
Do not join the outer layers yet. The contrasting inner-ear circles are sewn to the two front pieces first so their sewing tails remain hidden inside the completed ears.
Crochet and Attach the Inner Bear Ear Pieces
Make two smaller circles in the contrasting muzzle color. A warm tan, oatmeal or camel shade gives enough separation from a brown basket without making the ears look disconnected from the rest of the face.
Inner Bear Ear Circle
Make 2 in the contrasting color.
Round 1: Make an MR. Work 6 sc into the ring. Pull the ring closed and place a marker in the first sc. (6 sts)
Round 2: Inc in each st around. (12 sts)
Round 3: [Sc in next st, inc in next st] 6 times. (18 sts)
Sl st in the next stitch to smooth the ending edge. Fasten off, leaving a sewing tail approximately 30 inches long.
Weave the center starting tail securely into the WS of the inner-ear circle. Do not weave in the long fastening tail.
At the stated gauge, each inner-ear circle should measure approximately 2 3/4 to 3 inches across.
Position Each Inner Ear
Choose two matching outer-ear circles to become the fronts. Place them RS up.
Center one contrasting circle on each outer circle. Leave an approximately 1-inch border of the main bear color visible around the inner circle.
The border may be slightly wider near the outer edge if your cord compresses during sewing. What matters is that both inner circles are centered the same way and remain visibly smaller than the brown outer ears.
Secure each inner circle temporarily with locking stitch markers or rustproof pins. Place the two ear fronts beside each other and compare them before sewing.
Thread the long contrasting tail through the tapestry needle. Whipstitch around the inner-ear circle, catching the outer-ear fabric without passing all the way through any future back layer.
Keep the stitches firm enough to hold the circle flat but not tight enough to make the brown outer ear cup around it.
After sewing completely around the circle, take one additional securing stitch near the starting point. Carry the remaining tail to the WS of the outer-ear circle, weave it under several stitches, reverse direction and weave through several more stitches before trimming.
Repeat for the second ear front.
Join the Front and Back Ear Layers
Pair each decorated front circle with one plain main-color back circle.
Place the two circles WS together so the RS of the decorated circle faces forward and the RS of the plain circle faces backward. Align the stitches of Round 5 around both layers.
Using the main-color cord directly from the supply, leave a starting tail approximately 10 to 12 inches long. Make a slip knot and place it on the hook. Do not precut a fixed joining length.
Beginning near the lower edge of the ear, insert the hook through both loops of one stitch on the front layer and the corresponding stitch on the back layer. Work 1 sc through both layers. (1 joining st)
Work 1 sc through both layers in each of the remaining 29 corresponding stitch pairs around. Do not add increases. (30 sts)
Join with a sl st to the first joining sc. Cut the cord, leaving an ending tail approximately 10 to 12 inches long, and fasten off. Weave both joining tails securely between the two layers before trimming.
Repeat for the second ear.
Completed Bear Ear Checkpoint
Lay the two finished ears together.
- Each ear should measure approximately 5 to 5 1/2 inches across.
- The two diameters should match within approximately 1/4 inch.
- The inner-ear circles should be centered at the same position.
- The outer edges should remain rounded without visible puckers.
- Neither ear should feel noticeably softer or heavier than the other.
- All inner-ear sewing tails and joining tails should be securely enclosed or woven in.
Hold each ear upright by its lower edge. The double layer should support a rounded ear shape without wire or a rigid insert. A little flexibility is appropriate. The ear does not need to stand like a stiff disk.
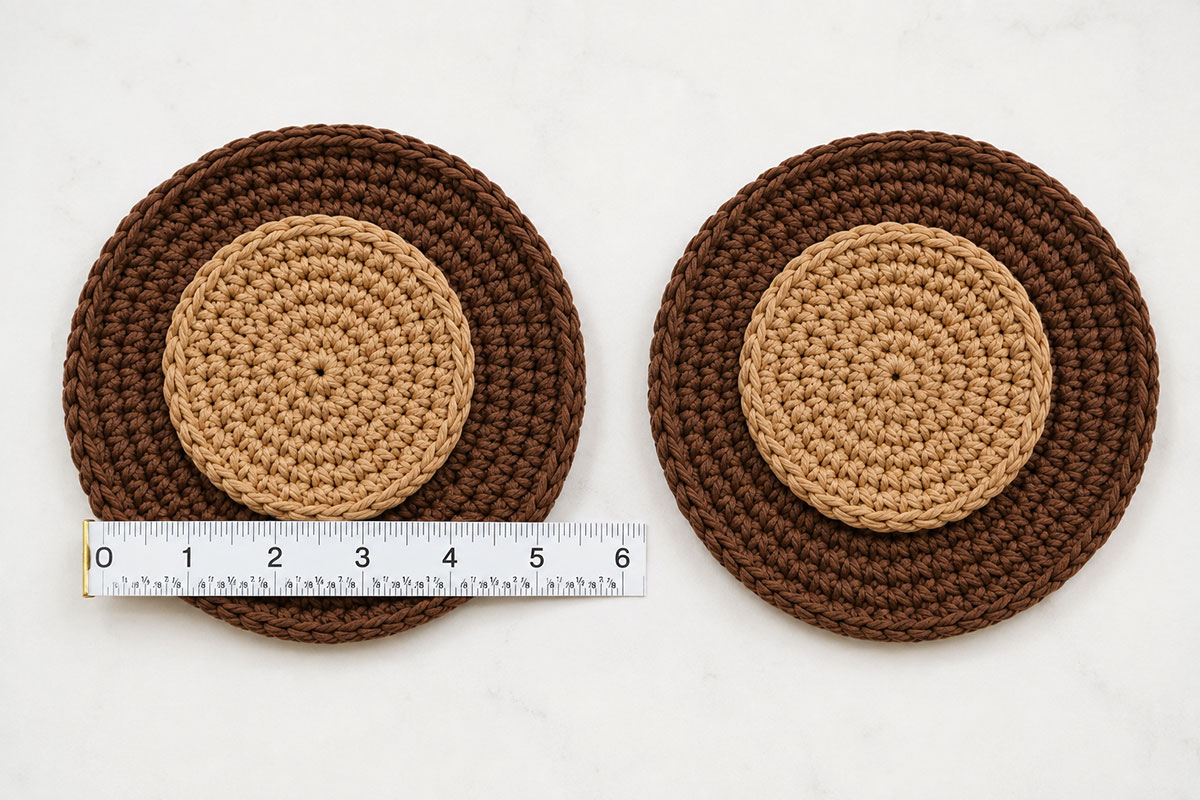
Set both completed ears aside without attaching them. Check the muzzle and eye positions first. The completed ears are positioned later with the finished face using the measured assembly instructions before either ear is permanently attached.
Crochet the Bear Muzzle
The muzzle is worked as one flat contrasting panel. Its tapered ends create a broad bear muzzle without adding a separate snout or stuffing.
At the stated gauge, the finished piece should measure approximately 7 inches across its widest point and approximately 5 inches from top to bottom.
Make 1 in the contrasting ear color.
Row 1: Ch 9. Sc in the second ch from the hook and in each remaining ch. Turn. (8 sts)
Row 2: Ch 1. Work 2 sc in the first st, sc in each of the next 6 sts, work 2 sc in the last st. Turn. (10 sts)
Row 3: Ch 1. Work 2 sc in the first st, sc in each of the next 8 sts, work 2 sc in the last st. Turn. (12 sts)
Row 4: Ch 1. Work 2 sc in the first st, sc in each of the next 10 sts, work 2 sc in the last st. Turn. (14 sts)
Rows 5 through 7: Ch 1. Sc in each st across. Turn. (14 sts)
Row 8: Ch 1. Sc2tog over the first 2 sts, sc in each of the next 10 sts, sc2tog over the final 2 sts. Turn. (12 sts)
Row 9: Ch 1. Sc2tog over the first 2 sts, sc in each of the next 8 sts, sc2tog over the final 2 sts. Turn. (10 sts)
Row 10: Ch 1. Sc2tog over the first 2 sts, sc in each of the next 6 sts, sc2tog over the final 2 sts. (8 sts)
Fasten off, leaving a sewing tail approximately 60 inches long.
Weave the beginning tail securely into the WS. Leave the long fastening tail for attaching the muzzle after the facial features have been checked.
Check the Muzzle Before Assembly
Lay the muzzle flat without pulling on the edges. The widest rows should measure approximately 7 inches across, and the complete 10-row piece should measure approximately 5 inches from top to bottom.
The top and bottom ends are narrower than the middle. The row increases and decreases create small stepped edges when the piece is lying loose. Do not add an edging round to hide them. Those edges soften when the muzzle is sewn flat against the curved basket wall.
Count the rows before continuing. There should be exactly 10 rows, with the widest section remaining at 14 stitches for Rows 4 through 7.
Check that the piece is symmetrical from left to right. The two long sides should taper at approximately the same angle.
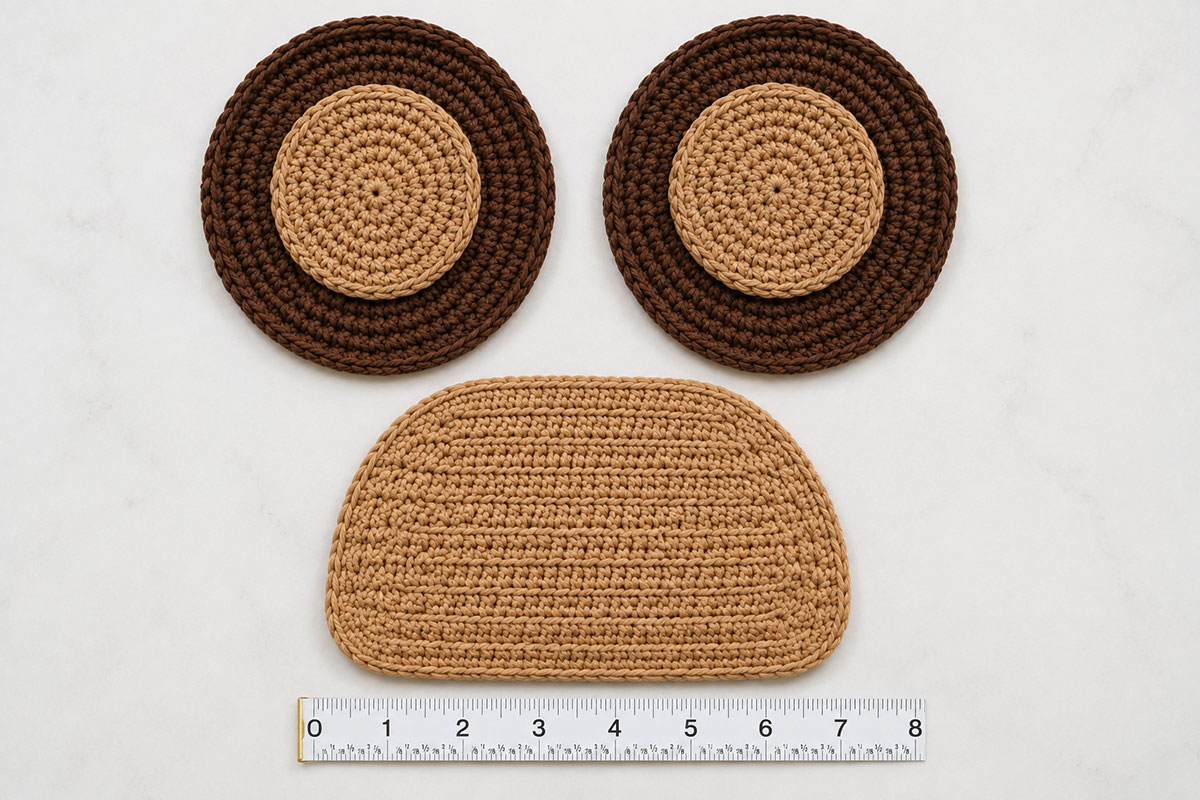
Do not sew the muzzle to the basket yet. Check the muzzle and eye positions first. The completed ears are positioned later using the measured assembly instructions before either ear is permanently attached.
Position and Embroider the Bear Face
Bring the completed basket, both ears and the muzzle to a large table or clean floor area. Keep the center-front markers in place.
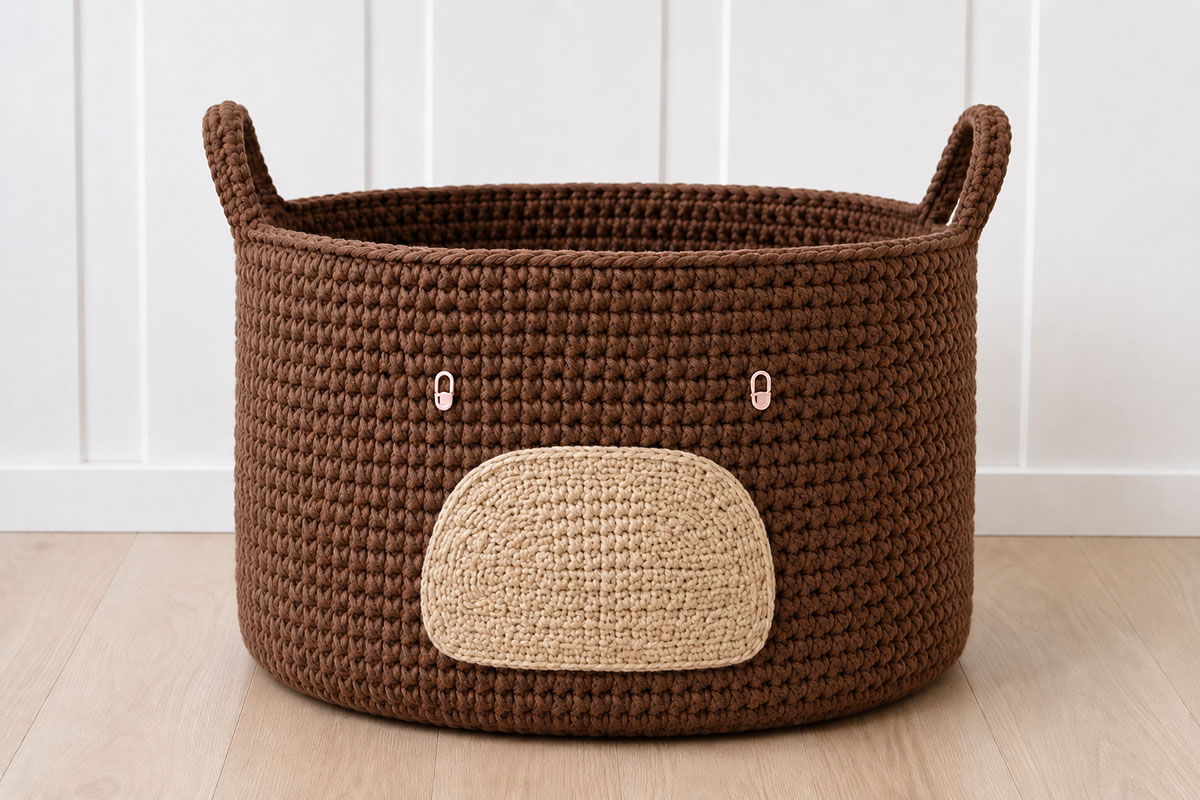
The measurements below give you a reliable starting position. Thick crochet fabric can shift slightly when it is standing instead of lying flat, so pin or clip the muzzle first and mark both eye positions before sewing or embroidering. The completed ears are positioned with the face later, using the measured placement instructions, before either ear is permanently attached.
Position the Muzzle
Place the muzzle RS out against the center front of the basket.
Align the vertical center of the muzzle with the center-front markers. Position the top edge approximately 5 1/2 inches below the level upper rim.
The muzzle should extend approximately 3 1/2 inches to each side of the center line at its widest point.
Measure from the left edge of the muzzle to the center line. Then measure from the center line to the right edge. Adjust the piece until those measurements match within approximately 1/4 inch.
Secure the muzzle temporarily around its perimeter with locking markers, clips or rustproof pins.
Do not stretch the muzzle wider to make it lie flat. Let the flat piece follow the natural curve of the basket wall.
Position the Eyes
Measure approximately 3 1/2 to 4 inches down from the level front rim and mark the horizontal eye line.
Place the center of the left eye approximately 2 inches to the left of the center-front line.
Place the center of the right eye approximately 2 inches to the right of the center-front line.
The eye centers should therefore be approximately 4 inches apart.
Use removable stitch markers to mark both positions before you embroider anything.
Measure from the rim to each eye marker. The two measurements should match within approximately 1/4 inch.
Now look at the face rather than the measuring tape. The eyes should sit above the muzzle with visible brown basket fabric between the eye line and the top of the contrasting muzzle.
A bear face can change expression with a very small shift in eye placement. Keep the eyes level and uncomplicated. Moving them too far toward the outer sides makes the face look stretched across the basket.
Position the Nose on the Muzzle
Keep the muzzle pinned to the basket while you mark the nose position.
Find the horizontal center of the muzzle and align it with the basket's center-front line.
Position the nose in the upper half of the muzzle, approximately 1 1/2 inches below its top edge.
The finished nose should be approximately 1 1/2 inches wide and approximately 1 inch high.
Mark the left edge, right edge and lower point with small removable markers or short contrasting yarn markers.
Remove the muzzle from the basket after you are satisfied with its position. Keep the placement markers in the muzzle.
Embroider the Black Bear Nose
Thread the black embroidery material through the appropriate needle. Do not use a bulky knot on the front or back of the muzzle.
Insert the needle from the WS near one upper corner of the marked nose area. Leave a tail several inches long on the back.
Work closely spaced satin stitches across the marked nose area. Keep the top edge approximately horizontal and gradually shorten the lower stitches so the nose forms a soft inverted triangle.
Add only enough parallel stitches to cover the contrasting cord beneath them. Do not keep layering black yarn after the nose is filled. An overly thick embroidered nose can pull the muzzle forward from the basket wall.
When the nose is complete, bring the working strand to the WS.
Embroider the Mouth Line
From the center point at the bottom of the nose, embroider a short vertical line downward approximately 3/4 inch. Then add a short shallow curve to each side to form a small friendly smile.
Keep the complete mouth centered on the muzzle and relatively compact. The smile should remain gentle and understated rather than wide or exaggerated. Do not add a separate mouth appliqué.
Secure the beginning and ending black tails on the WS of the muzzle. Weave each tail locally under several contrasting stitches, reverse direction and weave under several more stitches before trimming.
Do not carry a black strand across the WS from one feature to another.
Recheck the Muzzle Before Sewing
Return the embroidered muzzle to its marked position on the basket.
Align its center with the vertical center-front line and place the top edge approximately 5 1/2 inches below the rim again.
Step back and check the complete face.
The nose should sit directly beneath the space between the two eye markers. The vertical mouth line should continue down the same center line.
If the muzzle is crooked, correct its position now. Do not try to compensate later by moving one eye.
Embroider the Eyes
Once the muzzle position has been confirmed, leave it temporarily secured and embroider the eyes directly onto the brown basket wall at the two marked locations.
Each eye should form a compact vertical oval approximately 3/4 to 1 inch high and approximately 1/2 to 3/4 inch wide.
Begin at the first eye position. Bring the black strand through a gap between the basket stitches so the beginning tail remains on the inside of the wall.
Work several close vertical satin stitches across the eye area. Adjust the stitch lengths slightly at the outer edges to round the top and bottom.
Stop when the brown cord beneath the eye is covered. Keep the embroidery flat rather than building a raised knot.
Bring the working strand to the inside of the basket near the beginning tail. Secure the two ends locally through the dense wall stitches. Reverse direction at least once before trimming the tails.
Repeat for the second eye with a separate length of black material.
Do not carry yarn across the inside of the basket from one eye to the other. Separate embroidery keeps long loose strands off the interior wall and makes it easier to adjust one eye without disturbing the other.
After both eyes are complete, place the basket upright and compare them at normal viewing distance.
The eyes should match in height, width and distance from the center line. Small stitch-to-stitch differences are less important than an obviously level pair.
Position and Attach the Bear Features
Before permanent attachment, confirm that you have two completed double-layer bear ears and one separate muzzle. Those three attachment units were made from seven crocheted feature pieces in all: four outer-ear circles, two inner-ear circles and one muzzle.
Do not begin permanent ear attachment until the eyes and embroidered muzzle have been checked together.
Position the Bear Ears
Stand the basket upright with the bear face centered toward you.
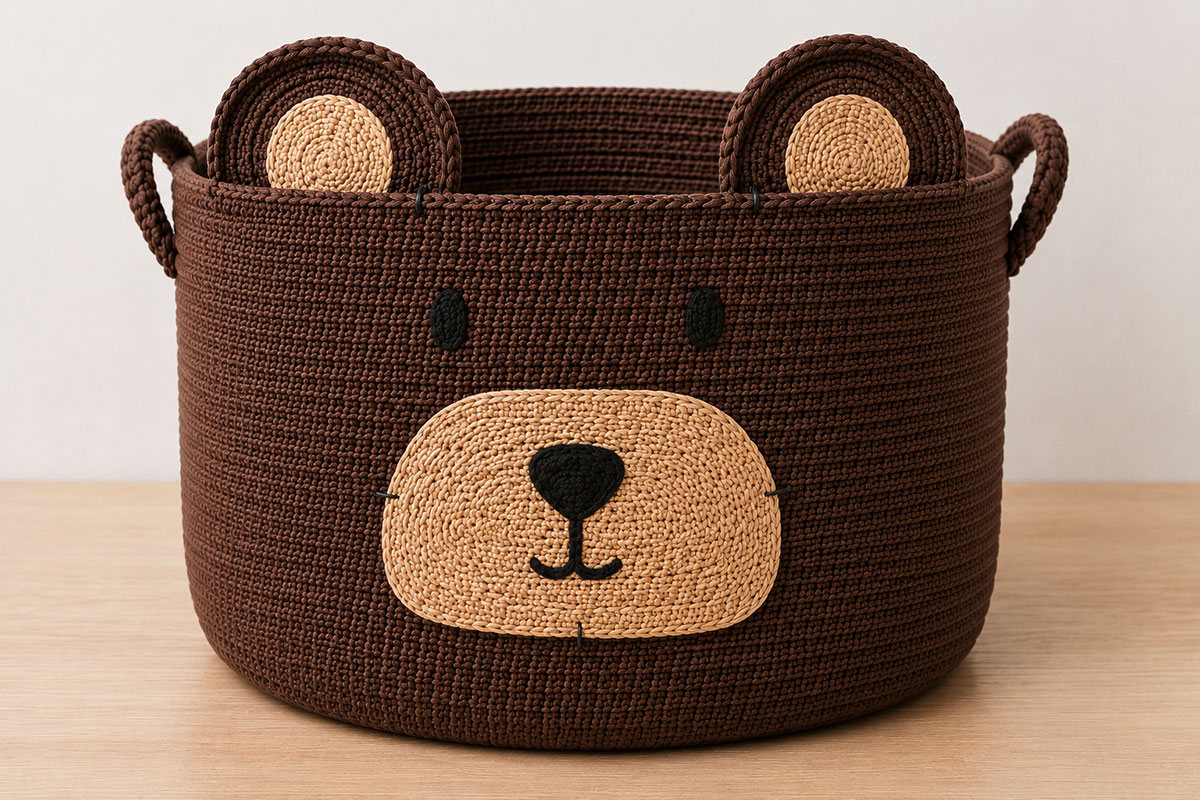
Place the lower section of one finished ear inside the basket against the upper left front wall. Place the second ear the same way at the upper right front wall.
Position the center of each ear approximately 6 inches from the center-front line. The two ear centers should therefore be approximately 12 inches apart.
Conceal approximately 1 1/2 to 2 inches of the lower portion of each ear against the inside front wall. The remaining rounded portion should rise above the rim.
Keep each inner-ear circle facing outward toward the front of the basket. The plain back of each ear should face the basket interior.
Keep the reinforced rim visible and unobstructed. The ears should remain inside the side-handle positions and should not cover, narrow or enter either handle opening.
Use several removable markers or clips to secure the concealed lower section of each ear against the inside front wall temporarily.
Measure from the center-front marker to the center of the left ear. Repeat on the right. Adjust the ears until the measurements match within approximately 1/4 inch.
Then measure from the level rim to the highest point of each ear. The two heights should also match within approximately 1/4 inch.
Look at the basket from the front and both sides. The ears should appear rounded and compact. If they resemble tall extensions of the basket, too little of the lower ear is overlapping the rim.
Attach the First Ear
Cut approximately 48 inches of main-color cord and thread it through the large tapestry needle.
Working from inside the basket, begin near one lower side of the concealed ear section. Pass the needle through both ear layers in the concealed area, then catch sturdy interior bars of the basket-wall stitches. Do not pass the needle completely through the basket wall to the exterior.
Keep every attachment stitch below the reinforced rim. Do not sew through or around the rim, and do not pull the stitches tightly enough to draw the rim inward.
Continue across the concealed lower section with firm stitches approximately 1/2 inch apart. Catch both ear layers and sturdy interior basket-wall stitches each time.
When you reach the opposite side of the attachment area, reverse direction and make a second securing pass through the same concealed section. Offset the second set of stitches slightly so the attachment is not concentrated along one line of cord.
Keep all attachment stitches on the inside of the basket and within the concealed lower portion of the ear.
Before securing the cord ends, stand the basket upright and confirm that the ear remains at the marked height and angle and that the reinforced rim remains level.
Secure both attachment tails into dense main-color stitches on the inside of the basket wall. Weave in one direction, reverse direction and weave through several more stitches before trimming.
Attach the Second Ear
Return the second ear to its marked position.
Measure both ear heights and distances from the center line again before sewing.
Attach the second ear with a separate 48-inch length of main-color cord using the same two-pass method.
After both ears are attached, check the handle openings from the sides. You should still be able to use each handle without pulling against an ear.
Sew the Muzzle to the Basket
Place the embroidered muzzle back at its marked location with the long contrasting sewing tail ready.
Align the center of the nose and mouth with the basket's center-front line.
Confirm once more that the top edge is approximately 5 1/2 inches below the level rim.
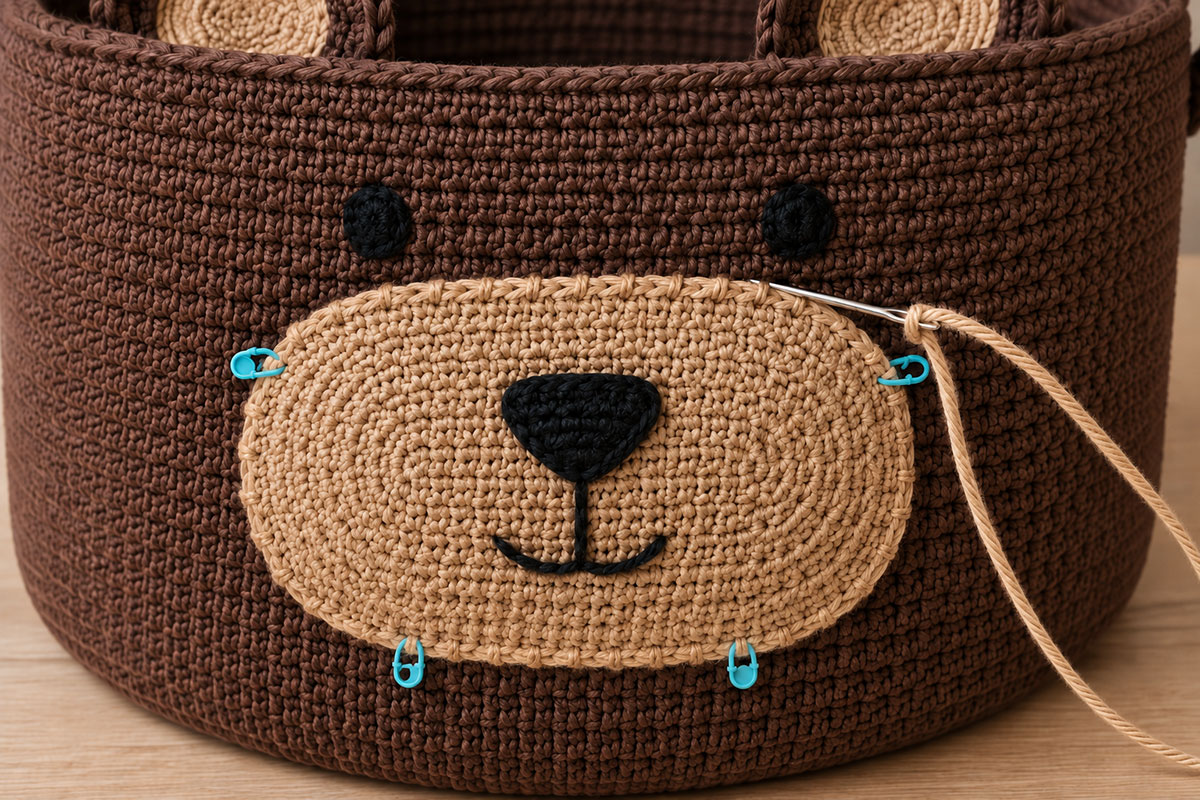
Secure the muzzle around its perimeter with several temporary markers. Use more than four markers on this large piece. Extra temporary points help the tapered sides follow the curved basket wall without shifting.
Thread the long contrasting tail through the tapestry needle and begin sewing at the corner where that tail exits the muzzle.
Whipstitch the outer edge to the basket wall, catching a substantial portion of the muzzle edge and the basket stitch directly beneath it. Continue around the complete perimeter in one direction, removing the temporary markers as you reach them.
Keep the sewing tension even. The muzzle should lie flat against the wall without puckering, but the stitches should not pull the basket wall inward.
When you return to the beginning point, make one additional securing stitch.
Carry the remaining contrasting tail to the inside of the basket. Weave it through several dense stitches, reverse direction and weave through several more before trimming.
Run your fingers around the complete muzzle edge. There should be no open section large enough to catch a finger or allow the edge to lift away from the wall.
Final Crochet Bear Basket Pattern Check
Set the finished basket upright on a level surface and empty it completely before making the final inspection.
Look at the bear first from several feet away. Then move closer and inspect every seam.
- The basket still measures approximately 15 inches from the bottom of the reinforced base to the level rim.
- The two raised side handles remain open and usable.
- Neither ear enters or pulls against a handle opening.
- The ears match within approximately 1/4 inch in height and distance from the center-front line.
- Each finished ear measures approximately 5 to 5 1/2 inches across.
- Both inner-ear circles remain centered and lie flat.
- The muzzle is centered on the vertical front line.
- The muzzle measures approximately 7 inches wide and 5 inches high before the slight curve created by attachment.
- The embroidered nose sits on the muzzle center line.
- The mouth remains centered beneath the nose and forms a small friendly smile.
- The eye centers are approximately 4 inches apart and level with one another.
- No long embroidery strand crosses the inside of the basket between facial features.
- The muzzle edge is sewn down completely.
- Both ear attachment areas have been reinforced with a second sewing pass.
- All cord and embroidery tails are secured and trimmed.
- All temporary pins, sewing clips and removable stitch markers have been removed.
- No wire, plastic canvas, safety eyes, buttons, beads or glued pieces have been added to the bear ears or facial features. This does not prohibit the optional enclosed base insert described in the master basket pattern.
- The basket stands upright without the decorative pieces pulling the front wall out of shape.
Give each ear a gentle tug near its attachment area. Then run your fingers around the muzzle edge and over both embroidered eyes. Nothing should lift, loosen or shift.
Turn the basket around and inspect the inside wall. Trim only tails that have already been woven securely. Do not cut a short tail simply because it is visible if it has not first been anchored through the dense crochet fabric.
The finished bear should look as if the basket itself became the animal. If the face reads clearly with only ears, muzzle and embroidery, the design has done its job.
Woodland Bear Color Ideas
The shape of the ears and muzzle does most of the work in this pattern, so you have room to change the colors without losing the bear.
A medium cocoa or chestnut brown basket with a warm tan muzzle is the clearest woodland version. It has enough contrast for the face to show from across the room, but the two colors still belong together.
For a softer teddy bear look, use oatmeal for the basket and a slightly lighter natural shade for the muzzle and inner ears. Keep the embroidered eyes and nose black so the expression does not disappear into the pale cord.
A dark chocolate basket with camel-colored details makes a more dramatic bear. This combination works especially well when the surrounding nursery has natural wood, warm neutrals or other woodland animals.
You can also make a black bear version by using charcoal or near-black cord for the basket and a warm brown or tan muzzle. Keep enough contrast between the two colors that the muzzle remains easy to see.
I would skip adding several accent colors to one bear. The basket is already large, and a simple two-color face keeps the finished project looking like nursery storage rather than a novelty container.
If you are planning several animal baskets for the same room, repeat one color across the collection. For example, the tan used inside the bear ears can reappear on the muzzle of the woodland fox crochet basket or as a coordinating neutral beside the XXL crochet owl basket.
The animals do not have to match perfectly. A shared neutral is enough to make separate handmade pieces feel related.
Ways to Use the Bear Basket for Nursery Storage
A basket this size earns its place by holding the soft, bulky things that never fit neatly into a small nursery drawer.
Use it for folded receiving blankets, swaddles, extra fitted sheets, lightweight quilts, burp cloths or other clean textiles that you want within easy reach. It can also hold larger craft supplies or handmade keepsakes when the nursery changes later.
The approximately 21 1/2 to 22 1/2-inch base gives the basket substantially more capacity than a small changing-table container. That is why I would not divide the inside with crocheted pockets. The open interior is more useful for bulky items, and the uninterrupted walls help the basket keep its shape.
Place the basket on the floor or on a low, stable surface that is large enough to support the complete reinforced base. Do not balance it on a narrow shelf with part of the base extending over the edge.
Use the two raised side handles when you need to reposition an empty or lightly filled basket. Lift with both handles together so the weight remains balanced.
Do not suspend the basket by one handle, hang it from a wall hook or use the handles to carry a child. The handles are part of a storage basket, not load-bearing straps.
The bear face belongs on the front, so keep the center-front marker relationship in mind when you decide where the basket will sit. Turn the embroidered face toward the room and leave both side handles accessible.
There is no reason to hide a useful storage basket once the everyday supplies are put away. The bear face gives a practical floor basket enough personality to stay out in the room.
For other large animal storage projects made from the same construction system, browse the free crochet basket patterns.
Matching Crochet Bear Patterns for a Handmade Nursery Set
The basket can stand alone, but the bear shape also gives you an easy starting point for a coordinated handmade gift or woodland nursery collection.
If you want a smaller bear project with a blanket base, the teddy bear lovey crochet pattern uses a compact crocheted bear with embroidered features. The scale and construction are different, so the two pieces coordinate without looking like copies of each other.
You can also use the bear basket as the container for a handmade gift set. Fold the smaller crochet pieces inside rather than permanently attaching them to the basket. The recipient can then use the XXL basket for storage after the gift is opened.
For a mixed woodland group, pair the bear with another animal instead of repeating the same face on every project. The XXL crochet bunny basket has long ears and a very different silhouette, while the fox and owl baskets bring their own shapes to the collection.
That variety matters visually. Four baskets built on the same master foundation can still look like four different animals when the ears, facial proportions and appliqué shapes are designed for the character rather than copied from one pattern to the next.
If you want to move from nursery storage into smaller handmade projects, the free baby crochet patterns collection keeps the other crochet categories together.
Finishing, Cleaning and Safe Nursery Use
Before using the basket, inspect every area that was added after the master basket was complete.
Check the two ear seams first. Hold the basket steady and tug each ear gently near its attachment point. The ear should flex, but the seam should not open or pull the upper rim inward.
Run a finger around the full muzzle perimeter. If you can lift an edge away from the wall, add another matching sewing stitch before the basket is used.
Check both embroidered eyes, the nose and the mouth line. No black strand should be loose on the outside or carried in a long span across the inside wall.
Inspect the basket regularly if it is used in a child's room. Repair a loose decorative seam before putting the basket back into service.
Cleaning the Finished Bear Basket
Follow the care instructions for the specific cord used to make the master basket and bear pieces. Braided cotton cord, recycled cotton cord and rope-style yarns can have different washing limits even when they look similar. If the care symbols on the label are unfamiliar, the Craft Yarn Council explains the standard washing, drying, bleaching and ironing symbols used on yarn labels.
Spot cleaning is the simplest option for a small mark. Use a clean damp cloth and a mild cleaner that is suitable for the fiber. Blot rather than scrubbing hard across the embroidered face.
If no optional base insert was used and the cord manufacturer permits full washing, remove the basket contents first and follow the stated water-temperature and drying directions. If the basket contains the optional enclosed base insert from the master pattern, spot clean unless the manufacturers of both the cord and the insert specifically permit another cleaning method. Do not soak the basket or apply high heat when an enclosed insert could warp. Reshape the base, walls, handles and ears while the basket is still damp whenever the approved cleaning method leaves them wet.
Allow the basket to dry completely before filling it again. Thick double-layer ears and the reinforced base can retain moisture longer than the single-crochet walls.
After washing, repeat the attachment inspection. Check the ears, muzzle, handles and embroidery before returning the basket to the nursery.
Use boundary: This is a nursery storage basket, not a toy, seat, carrier, bassinet or sleep product. Do not place a baby inside it or put the basket in a crib, bassinet or other infant sleep space.
Crochet Bear Basket Pattern FAQ
Is this a complete crochet basket pattern?
This page contains the complete instructions for making and attaching the bear ears, inner ears, muzzle and embroidered face. The basket body uses the separate XXL master crochet basket pattern. Complete that basket first, then return here for the bear-specific construction.
How large is the finished crochet bear basket?
The master basket has an approximately 21 1/2 to 22 1/2-inch reinforced base and measures about 15 inches high at the level rim. The raised side handles extend approximately 3 1/2 to 4 inches above the rim.
How big should the bear ears be?
Each completed double-layer ear should measure approximately 5 to 5 1/2 inches across. The contrasting inner-ear circle should measure approximately 2 3/4 to 3 inches across.
Why are the bear ears double layered?
The second layer gives the large round ears more body so they can rise above the basket rim without wire or a rigid insert. It also hides the back of the inner-ear sewing.
Can I use worsted weight yarn for the bear face?
I would use cord close to the same thickness and fiber as the master basket. Thin yarn can disappear into the texture of the large basket stitches and may produce features that look too small for a basket of this scale.
Can I make the bear basket smaller?
Yes, but the bear measurements on this page are proportioned for the XXL master basket. If you change the basket diameter or height, you will also need to resize the ears, muzzle and facial spacing. Do not use the XXL placement measurements unchanged on a substantially smaller basket.
Can I turn this into a black bear basket?
Yes. Use charcoal or black cord for the main basket and ears, then choose a brown or tan contrast for the muzzle and inner ears. Keep the embroidered facial features visible against both colors.
Can I make a polar bear version?
The same construction can be worked in white or soft ivory cord with a pale gray, beige or slightly darker neutral muzzle. Check the black eye and nose embroidery carefully against the lighter surface because high contrast makes uneven placement easier to see.
Can I use plastic safety eyes instead of embroidery?
The pattern is designed with embroidered eyes. Plastic eyes are unnecessary on a storage basket, and replacing the embroidery would add separate hard components to a design that works without them.
What can I store in the bear basket?
The large open interior works well for folded nursery linens, receiving blankets, swaddles, extra fitted sheets, burp cloths and similar lightweight items. Do not use the basket as a seat, infant carrier or sleep space.
Why is the muzzle made flat instead of stuffed?
A flat muzzle keeps the front wall usable and preserves the basket shape. Stuffing would add a projecting soft form to an item meant for storage and would make the face heavier than it needs to be.
How do I keep the face centered?
Stand the finished basket with the handles at the sides and choose the broad wall that will become the front. Mark the level rim beside the two handle attachment areas that border that front wall, measure the curved rim span between those marks and mark its midpoint. Use that midpoint as the vertical center line for the muzzle, eyes and ears, then measure outward from the center line for both sides.
What should I check before I call the basket finished?
Confirm that the basket still stands upright, both handles remain usable, both ears are secure and level, the muzzle is completely sewn down, the eyes are evenly placed and every yarn or embroidery tail is firmly secured. The decorative pieces should add the bear face without changing the structure of the original basket.
Once the bear is finished, the basket should still do what the original XXL pattern was designed to do: stand upright, hold useful nursery items and move easily by its two handles. The face gives it character, but the basket never has to stop being practical to look like it belongs in a woodland nursery.
When you click on links to various merchants on this site and make a purchase, this may result in this site earning a commission. This does not affect the price you pay.

UBGI Gold Standard 2026
Reviewed under the site's
editorial checklist.
Photos, decorating ideas, party setups and reader submissions are shared for inspiration unless a page is specifically presented as a pattern, tutorial, reference guide or step-by-step project. Follow the instructions, measurements, safety guidance and manufacturer directions provided for the particular project or product.
About Jan | Contact | Baby Nursery Ideas (Blog) | Site Map | Privacy Policy | Disclosure Policy | Disclaimer | Affiliate Disclosure | Earnings Disclosure | Facebook | Pinterest
I am a participant in the Amazon Services LLC Associates Program, an affiliate advertising program designed to provide a means for us to earn fees by linking to Amazon. As an Amazon Associate I earn from qualifying purchases.
Copyright © 2006-2026. All Rights Reserved.