Crochet Bunny Basket Pattern for an XXL Nursery Storage Basket
By Jan Bay
This crochet bunny basket pattern features tall rabbit ears and a securely sewn bow to the XXL storage basket. Make the featured feminine version in creamy ivory and blush pink, or choose warm oatmeal, cocoa and cinnamon shades for a more rustic woodland rabbit basket suitable for a boy's nursery or a gender neutral forest theme room. Begin with the complete master basket pattern for the reinforced double base, straight walls, firm upper rim and raised handles, then return here to get the pattern for the bunny rabbit details, with placement and finishing instructions.
Explore More Free Crochet Basket Patterns
Master XXL Crochet Basket Pattern

Jumbo Cotton Rope Yarn Used For My Large Crochet Storage Baskets
Jump to the Bunny Basket Pattern
Before You Begin the Crochet Bunny Basket Pattern
This page contains the bunny ears, inner-ear panels, crocheted bow and attachment instructions only. The large round basket underneath them is made with the same reusable foundation used for every XXL character basket in this series.
Complete the master XXL crochet basket pattern before beginning the bunny features. That pattern includes the two matching round base circles, optional enclosed base insert, reinforced double base, wall-transition ridge, tall straight sides, firm upper rim and two separately crocheted raised handles.
The master basket must be completely finished first.
Do not work the ears into the basket-wall rounds or use them in place of the raised handles. The handles remain on opposite sides of the finished basket. The concealed lower section of each bunny ear is sewn to the inside front wall immediately below the reinforced rim, with the full rim remaining visible across the outside front of the basket. The bow is centered beneath the ears on the exterior wall.
I designed this as a simple character variation rather than covering the basket with extra pieces. The two tall ears and one bow are enough to give the basket a clear rabbit shape while preserving the strong construction and useful storage space of the original basket.
Two Bunny Basket Colorways
Feminine blush bunny: Use creamy ivory or soft white for the basket and outer ears, pale blush for the inner-ear panels and dusty rose for the bow. This is the featured version shown at the top of the page.
Rustic woodland rabbit: Use oatmeal, flax, mushroom or warm taupe for the basket and outer ears. Cocoa brown works well inside the ears, with cinnamon, muted clay or chestnut for the bow.
Both versions use the same ear and bow patterns. Only the colors change, so there is no need to alter the stitch counts, shaping or placement when making the woodland rabbit.
Finished Design
The completed basket has two matching upright ears with contrasting inner-ear panels and one crocheted bow securely sewn to the front. There are no eyes, muzzle, paws, tail, buttons or detachable decorations.
The finished bunny features should sit between the two raised side handles without blocking them. The pleated lower 1 1/4 inches of each ear is concealed against the inside front wall, allowing both ears to rise from immediately behind the fully visible reinforced rim. From the front, the ears should appear evenly spaced and centered over the bow. From the side, both ears should lean at the same angle and remain clear of the handle openings.
Skill Level
Advanced beginner to intermediate
You should be comfortable working flat crochet pieces, following increases and decreases, making two matching pieces, measuring placement and sewing thick crochet securely. The master basket should already be complete before these instructions are started.
Materials and Supplies for the Bunny Features
- One completed XXL basket made from the reusable master crochet basket pattern
- The same structured yarn or cord used for the basket, in the main color for the outer ears
- Contrasting yarn or cord for the two inner-ear panels
- Contrasting yarn or cord for the bow and bow center band
- A crochet hook that produces the stated feature gauge and firm ear fabric; begin with the hook used for the master basket and adjust the hook size before making all matching ear panels if necessary
- Large tapestry or yarn needle suitable for thick cord
- Removable stitch markers
- Sharp scissors
- Flexible measuring tape
Choosing Yarn or Cord for the Features
Use the same yarn weight and fiber construction used for the basket whenever possible. Matching the material keeps the ears proportional to the oversized basket and gives the outer edges enough structure to remain upright.
A very soft blanket yarn may make the ears fold or droop, even when the stitch counts are correct. The feature pieces need a firm, dense fabric rather than a loose or plush one.
The inner-ear panels and bow may be worked in a different color, but they should remain close to the weight and thickness of the main basket cord. A noticeably thinner yarn can pull the ears out of shape when the inner panels are sewn in place.
Do not add wire, plastic eyes, buttons or loosely tied ribbon. The ears are supported by their crocheted construction and secure attachment. The bow is crocheted and sewn firmly to the basket rather than tied on as a removable decoration.
Feature-Pattern Notes
- The bunny ears, inner-ear panels, bow and center band are crocheted separately.
- Make both outer ears from the same yarn or cord and with the same hook.
- Check the first ear against the second as you work so their length, width and shaping remain consistent.
- Sew each inner-ear panel to its outer ear before attaching the completed ear to the basket.
- Complete and secure the bow before sewing it to the basket.
- Use removable stitch markers to test the placement of both ears and the bow before sewing.
- Weave in all feature ends before the final attachment whenever the ends will become difficult to reach later.
- Do not attach the ears or bow until the basket rim and both raised handles are complete.
Keep the finished master basket upright while checking the placement. Laying the basket flat can make the ears appear even when they are actually leaning in different directions.
Bunny-Feature Yarn Quantities
The amount needed will vary with the diameter, density and put-up of the cord used for the master basket. Use yardage rather than weight as the primary planning measurement because thick cords can vary substantially in grams per yard.
For the two double-layered ears, their joining seams, pleats and basket attachments, reserve approximately 55 to 65 yards of the main basket color. Depending on the exact cord used for the master basket, this may weigh approximately 250 to 300 grams, but check the yardage printed on the yarn or cord label.
Reserve approximately 14 to 22 yards of the inner-ear color for the two panels and their sewing tails. Allow approximately 18 to 25 yards of the bow color for the bow panel, center band, gathering and attachment. The weight of these amounts will vary with the selected material.
These quantities include a modest allowance for joining and sewing. Keeping a little extra main-color cord is helpful because the ear attachment stitches should match the basket.
Finished Bunny-Feature Measurements
- Each completed outer ear before pleating: approximately 12 inches long and 5 inches wide at the widest point
- Each inner-ear panel: approximately 10 inches long and 3 inches wide
- Closed lower edge of each completed ear before pleating: approximately 3 inches wide
- Visible pleated ear base before attachment: approximately 2 inches wide
- Lower section concealed inside the basket: approximately 1 1/4 inches tall
- Visible ear height above the reinforced rim after attachment: approximately 10 3/4 inches
- Finished bow: approximately 8 inches wide and 4 1/2 inches tall
- Bow center band: approximately 1 1/2 inches wide after wrapping
Measure each ear after the two outer layers have been joined. The pair should match within approximately 1/4 inch in both length and width before they are attached to the basket.
Feature Gauge
Aim for approximately 8 single crochet stitches and 8 rows in a 4-inch square worked in single crochet with the same yarn or cord selected for the outer ears.
The finished measurements are more important than matching the gauge perfectly. The ear fabric should be dense, firm and able to hold its shape when lifted from the lower edge. It should not be so stiff that the stitches are difficult to work or so loose that light is visible between them.
Check both stitch gauge and row gauge before making all four outer-ear panels. It is possible for a panel to measure the correct width while finishing too short or too long because stitch width and row height do not always change at the same rate.
If your first completed outer-ear panel is substantially wider than 5 inches, use a smaller hook and begin again without changing the stitch counts. If it is narrower than approximately 4 1/2 inches, use a slightly larger hook. If the width is correct but the 24 rows do not measure close to 12 inches, adjust your row tension or hook size and make another test panel before completing the remaining three outer-ear panels.
Abbreviations
- ch — chain
- sc — single crochet
- sc2tog — single crochet two stitches together
- st — stitch
- sts — stitches
- RS — right side
- WS — wrong side
Pattern Conventions
This pattern uses US crochet terminology. Chain 1 at the beginning of a row does not count as a stitch. Turn after every row unless the instructions state otherwise.
To increase, work 2 single crochet stitches in the indicated stitch. To decrease, work 1 sc2tog across the first or last 2 stitches as directed.
The number following the dash at the end of each row is the stitch count for that completed row. Count the stitches before beginning the next row, especially through the tapered upper section of each ear.
Because these flat single-crochet pieces do not have an automatically defined right side, choose the smoother-looking side of each completed piece as the RS and mark it with a removable stitch marker. Use the same chosen side for both decorated ear fronts and for the front of the bow. The opposite side is the WS.
Crochet the Double-Layered Bunny Ears
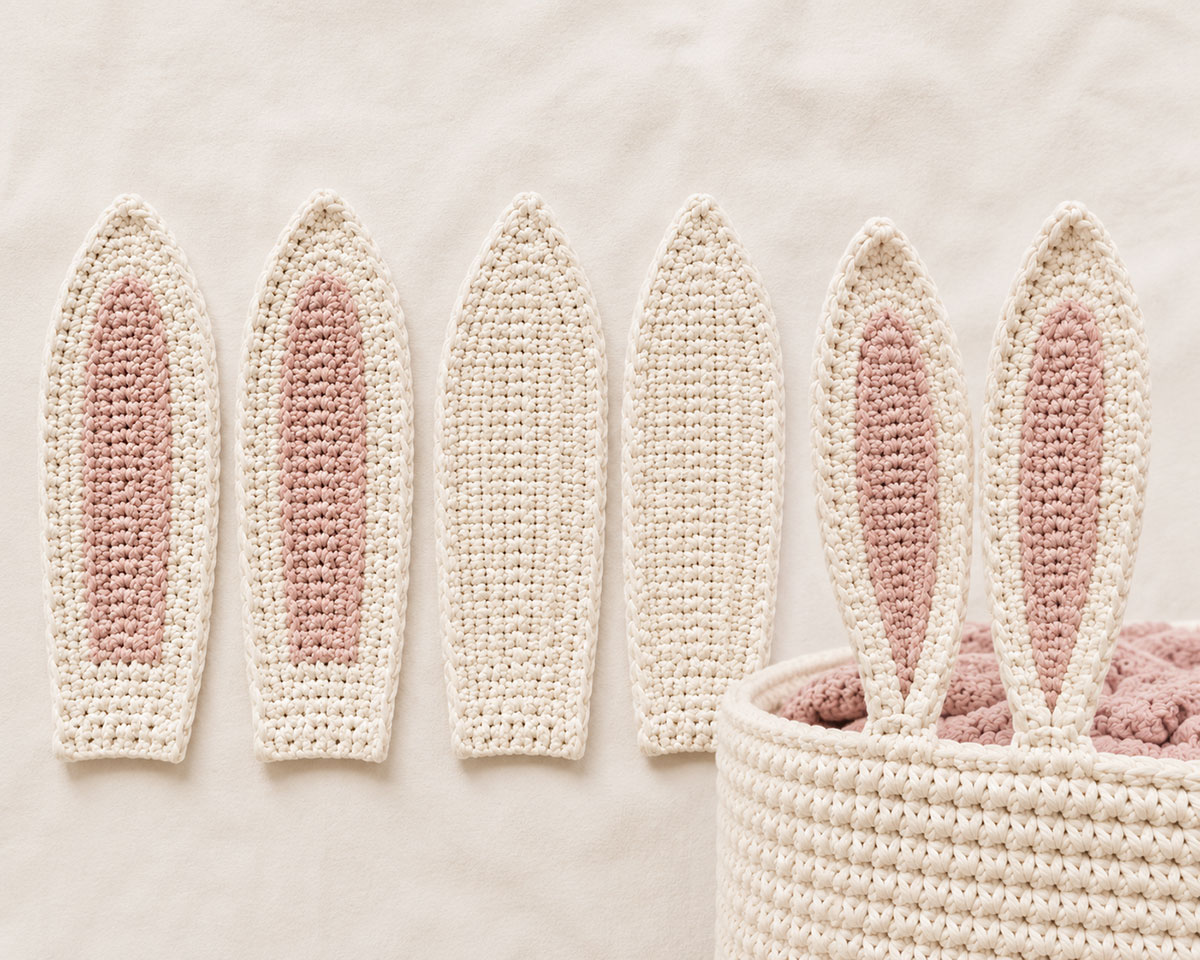
Each finished ear is made from two matching outer-ear panels. One panel becomes the front and receives an inner-ear panel. The second remains plain and becomes the back.
Make four outer-ear panels in the main basket color. Four panels are required to produce two complete double-layered ears.
Outer-Ear Panel
Chain 7.
Row 1: Work 1 sc in the second ch from the hook and in each remaining ch. Turn. — 6 sc
Row 2: Ch 1. Work 2 sc in the first st, 1 sc in each of the next 4 sts and 2 sc in the last st. Turn. — 8 sc
Row 3: Ch 1. Work 2 sc in the first st, 1 sc in each of the next 6 sts and 2 sc in the last st. Turn. — 10 sc
Rows 4–16: Ch 1. Work 1 sc in each st across. Turn. — 10 sc
Row 17: Ch 1. Sc2tog, work 1 sc in each of the next 6 sts, then sc2tog. Turn. — 8 sc
Row 18: Ch 1. Work 1 sc in each st across. Turn. — 8 sc
Row 19: Ch 1. Sc2tog, work 1 sc in each of the next 4 sts, then sc2tog. Turn. — 6 sc
Row 20: Ch 1. Work 1 sc in each st across. Turn. — 6 sc
Row 21: Ch 1. Sc2tog, work 1 sc in each of the next 2 sts, then sc2tog. Turn. — 4 sc
Row 22: Ch 1. Work 1 sc in each st across. Turn. — 4 sc
Row 23: Ch 1. Sc2tog twice. Turn. — 2 sc
Row 24: Ch 1. Sc2tog. — 1 sc
Fasten off and weave in the starting and ending tails. Block or hand-shape the panel to approximately 12 inches long and 5 inches wide. Do not stretch the lower 6-stitch edge wider than approximately 3 inches.
Outer-Ear Checkpoint
After completing the first panel, lay it flat without stretching it. Confirm that it measures approximately 12 inches long, 5 inches wide at the widest point and approximately 3 inches across the closed lower edge. The side edges should widen evenly from the 6-stitch lower edge, remain straight through the 10-stitch center section and taper symmetrically to the tip.
Do not begin all three remaining panels until the first panel has been checked for both width and length. Use the first completed panel as a template while making the remaining three. Lay the panels together after every few rows to catch differences in tension before they affect the finished length.
Crochet the Inner-Ear Panels
Make two inner-ear panels in the contrasting color. Only the two outer panels selected as the fronts of the ears receive an inner-ear panel.
Inner-Ear Panel
Chain 5.
Row 1: Work 1 sc in the second ch from the hook and in each remaining ch. Turn. — 4 sc
Row 2: Ch 1. Work 2 sc in the first st, 1 sc in each of the next 2 sts and 2 sc in the last st. Turn. — 6 sc
Rows 3–14: Ch 1. Work 1 sc in each st across. Turn. — 6 sc
Row 15: Ch 1. Sc2tog, work 1 sc in each of the next 2 sts, then sc2tog. Turn. — 4 sc
Rows 16–17: Ch 1. Work 1 sc in each st across. Turn. — 4 sc
Row 18: Ch 1. Sc2tog twice. Turn. — 2 sc
Row 19: Ch 1. Work 1 sc in each st across. Turn. — 2 sc
Row 20: Ch 1. Sc2tog. — 1 sc
Fasten off, leaving a sewing tail approximately three times the perimeter of the inner-ear panel. Weave in the starting tail. The completed panel should measure approximately 10 inches long and 3 inches wide.
Attach the Inner-Ear Panels
Choose two of the four outer-ear panels to become the fronts. Place one inner-ear panel on the RS of each selected outer panel.
Center the inner panel from side to side. Position its lower edge approximately 1 1/4 inches above the lower edge of the outer-ear panel. This should leave approximately 1 inch of the main color visible along each side at the widest area and approximately 3/4 inch of the main color above the pointed tip. After the lower 1 1/4 inches of the completed ear are concealed inside the basket, the lower edge of the contrasting inner-ear panel should sit approximately level with the upper edge of the visible reinforced rim.
Pin or hold the panel in place with removable stitch markers. Measure from the lower edge of each outer-ear panel and confirm that both inner panels begin approximately 1 1/4 inches above it and at the same height. At the stated gauge, 1 1/4 inches equals approximately 2 1/2 row-heights, so use the measurement rather than trying to align the lower edge with a whole-numbered row. Check that both inner panels point in the same direction.
Using the long sewing tail, whipstitch the inner panel to the outer panel just inside its edge. Pass the needle through the outer-ear fabric without pulling the stitches tight enough to pucker either layer.
Secure the sewing tail on the WS of the outer panel and weave it through several stitches before trimming it.
Join the Two Layers of Each Ear
Place one decorated front panel and one plain back panel together with WS facing. Match the lower corners, row ends and pointed tips.
Thread a tapestry needle with the main-color cord. Beginning at one lower corner, whipstitch through the corresponding edge loops of both layers. Sew up the first side, around the pointed tip, down the second side and across all 6 stitches of the lower edge.
Work 24 joining stitches up the first side, placing one stitch through each matching pair of row ends. Add 1 stitch around the pointed tip if needed to turn the seam cleanly, then work 24 joining stitches down the second side and 6 joining stitches across the lower edge. Each ear should use 54 joining stitches without the optional tip stitch or 55 joining stitches when the extra tip stitch is added. Use the same stitch distribution for the second ear. Keep the seam firm but relaxed so the edges do not gather, flare or curl.
Do not add a single-crochet border around the outside of the ear. The sewn join keeps the completed ear close to the intended 12-inch length and 5-inch width.
Secure the sewing cord with two small backstitches on the plain back layer. Weave both joining ends through several stitches in the plain back before trimming them. Repeat with the remaining decorated front and plain back panels to complete the second fully closed ear.
Ear-stability checkpoint
Hold each completed ear upright by its closed lower edge. The two joined layers should support one another without wire, stuffing or a plastic insert. A slight natural curve is acceptable, but the ear should not collapse at its center. If either ear folds sharply, use a smaller hook and remake all four outer-ear panels so both completed ears retain the same stitch counts, dimensions and density. Recheck the fit and placement of both inner-ear panels before joining the remade outer layers.
Crochet the Bunny Basket Bow
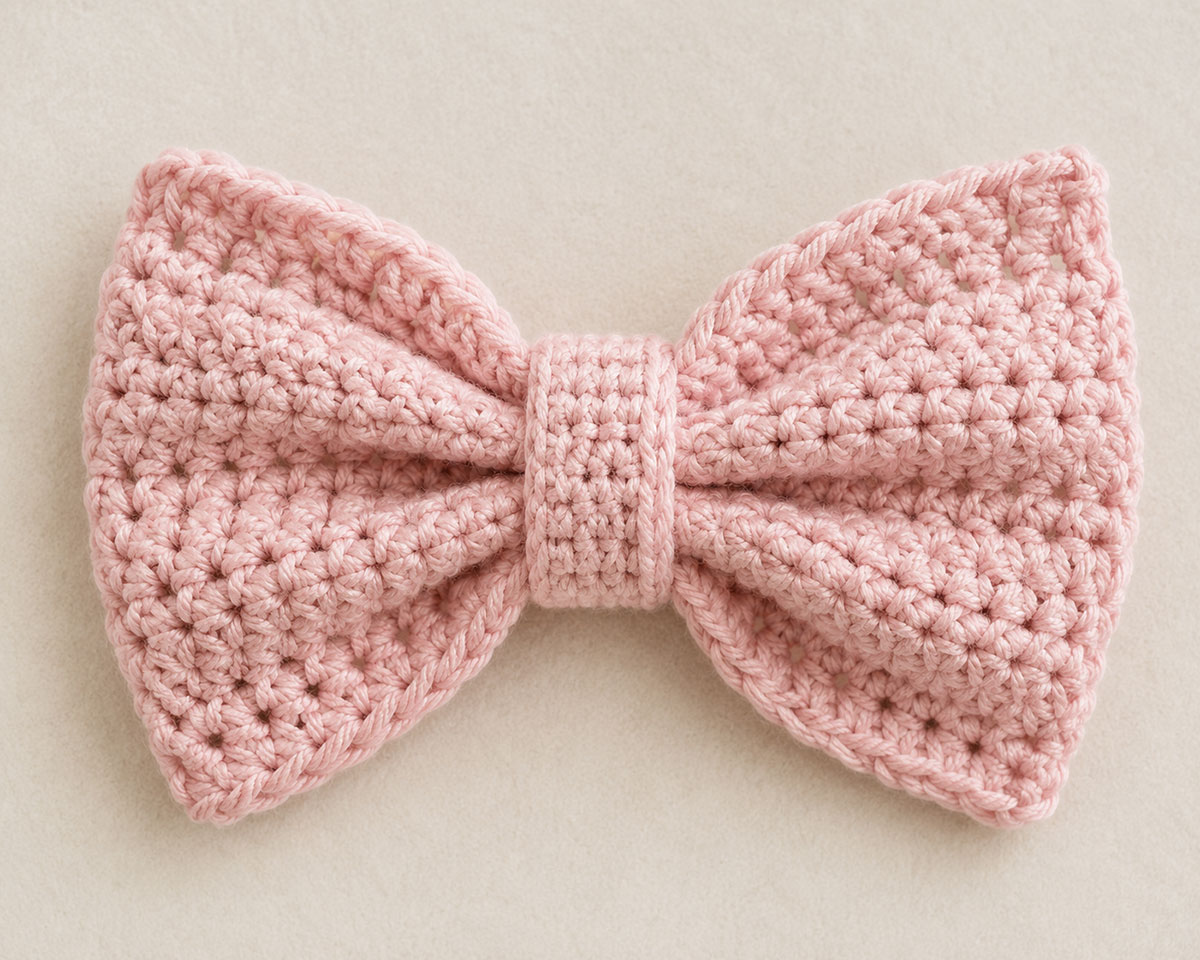
The bow is made from one flat rectangular panel that is gathered at the center and wrapped with a separately crocheted center band. Use the blush or dusty rose color for the feminine bunny and cinnamon, muted clay or chestnut for the woodland rabbit.
Bow Panel
Chain 17.
Row 1: Work 1 sc in the second ch from the hook and in each remaining ch. Turn. — 16 sc
Rows 2–9: Ch 1. Work 1 sc in each st across. Turn. — 16 sc
Fasten off, leaving a tail approximately 24 inches long. Weave in the starting tail.
Lay the bow panel flat and check that it measures approximately 8 inches wide and 4 1/2 inches tall. Hand-shape the corners so the upper and lower edges remain straight.
Shape the Bow
With the RS facing up, pinch the center of the rectangle into three even accordion folds. Bring the upper and lower edges slightly toward the center so the bow develops two rounded loops rather than remaining completely flat.
Thread the long ending tail onto the tapestry needle. Wrap the tail firmly around the gathered center several times, keeping the folds aligned. Pass the needle through the gathered layers twice to lock the shape.
Do not pull tightly enough to cut into or permanently flatten the cord. The center should be secure while both sides of the bow remain full and even.
Leave the remaining tail in place until the center band has been attached.
Bow Center Band
Chain 4.
Row 1: Work 1 sc in the second ch from the hook and in each remaining ch. Turn. — 3 sc
Rows 2–7: Ch 1. Work 1 sc in each st across. Turn. — 3 sc
After Row 7, the band should contain 7 total rows and measure approximately 3 1/2 inches long. Wrap it around the gathered bow center before fastening off. If the short ends do not meet at the back without stretching the band, repeat the previous row as needed. Each additional row adds approximately 1/2 inch at the stated gauge.
Fasten off, leaving a sewing tail approximately 18 inches long. Weave in the starting tail.
Wrap the band around the gathered center of the bow with its short ends meeting at the back. The finished band should appear approximately 1 1/2 inches wide from the front.
Use the sewing tail to join the two short ends securely at the back of the bow. Pass the needle through the gathered bow center several times so the band cannot slide or rotate.
Knot the center-band tail to the remaining bow-panel tail at the back. Weave in and trim the shorter tail. Leave the longer tail untrimmed for attaching the bow to the basket. If less than approximately 18 inches remains, thread a separate 24-inch strand of matching cord through the back of the center band and use that strand for the final attachment.
Bow Checkpoint
- The completed bow should measure approximately 8 inches from side to side.
- The two loops should be similar in width and fullness.
- The center band should sit vertically and remain centered.
- The bow should hold its shape when lifted by the center band.
- No loose wrapped strands or removable ties should remain.
If one side appears larger, loosen the center wrapping slightly, adjust the accordion folds and secure the center again before attaching the bow.
Place and Attach the Bunny Ears and Bow
Set the completed basket upright on a level surface with the two raised handles positioned at the sides. Choose the side that will become the front.
Measure along the chosen front half of the upper rim from the center of the left handle attachment to the center of the right handle attachment. Mark the halfway point with a removable stitch marker. This is the front center of the basket.
Form the Shallow Pleat at the Bottom of Each Ear
Lay the first completed ear flat with the contrasting inner-ear panel facing up.
Measure 1 1/4 inches upward from the closed lower edge. The section below this measurement will be concealed against the inside front wall of the basket.
With the contrasting inner-ear panel facing up, count the 6 stitches across the closed lower edge from right to left. The center falls between Stitches 3 and 4.
Place one removable marker in the space between Stitches 2 and 3 and a second marker in the space between Stitches 4 and 5. Bring the two marked spaces together at the center while pushing Stitches 3 and 4 toward the plain back of the ear. This folds the two center stitch-widths into a shallow pleat approximately 1/2 inch deep.
After folding, Stitches 1 and 2 should remain visible on one side of the pleat and Stitches 5 and 6 should remain visible on the other side. The visible lower edge should therefore measure approximately 4 stitch-widths, or about 2 inches at the stated gauge.
Continue this shallow fold upward only through the lower 1 1/4-inch section that will be concealed inside the basket. The pleat should gradually flatten immediately above that section rather than forming a sharp crease through the visible length of the ear.
Keep the entire two-stitch pleat below the contrasting inner-ear panel so the pink or brown panel remains flat and smooth.
Thread a tapestry needle with approximately 54 inches of matching main-color cord. Leave a starting tail approximately 10 to 12 inches long on the plain back at the center of the lower concealed section. Anchor the cord with two small backstitches immediately behind the pleat, then use the working end to sew through both ear layers at the pleat three or four times to hold the fold securely.
After the pleat is secure, weave the 10- to 12-inch starting tail through several dense stitches on the plain back within the concealed section and trim it. Do not cut or weave in the working end. Leave the working cord at the center of the plain back for attaching the first half of the ear to the basket. A separate 24-inch strand will be used for the remaining half as directed in the attachment instructions.
Repeat with the second ear. Lay the two pleated ears beside one another and confirm that the pleats are the same depth and that the lower edges are approximately the same width.
Pleat checkpoint
Each ear should be slightly narrower and more dimensional at the bottom without looking tightly gathered. The pleat must remain completely below the contrasting inner-ear panel.
Position the Ears Inside the Front Wall
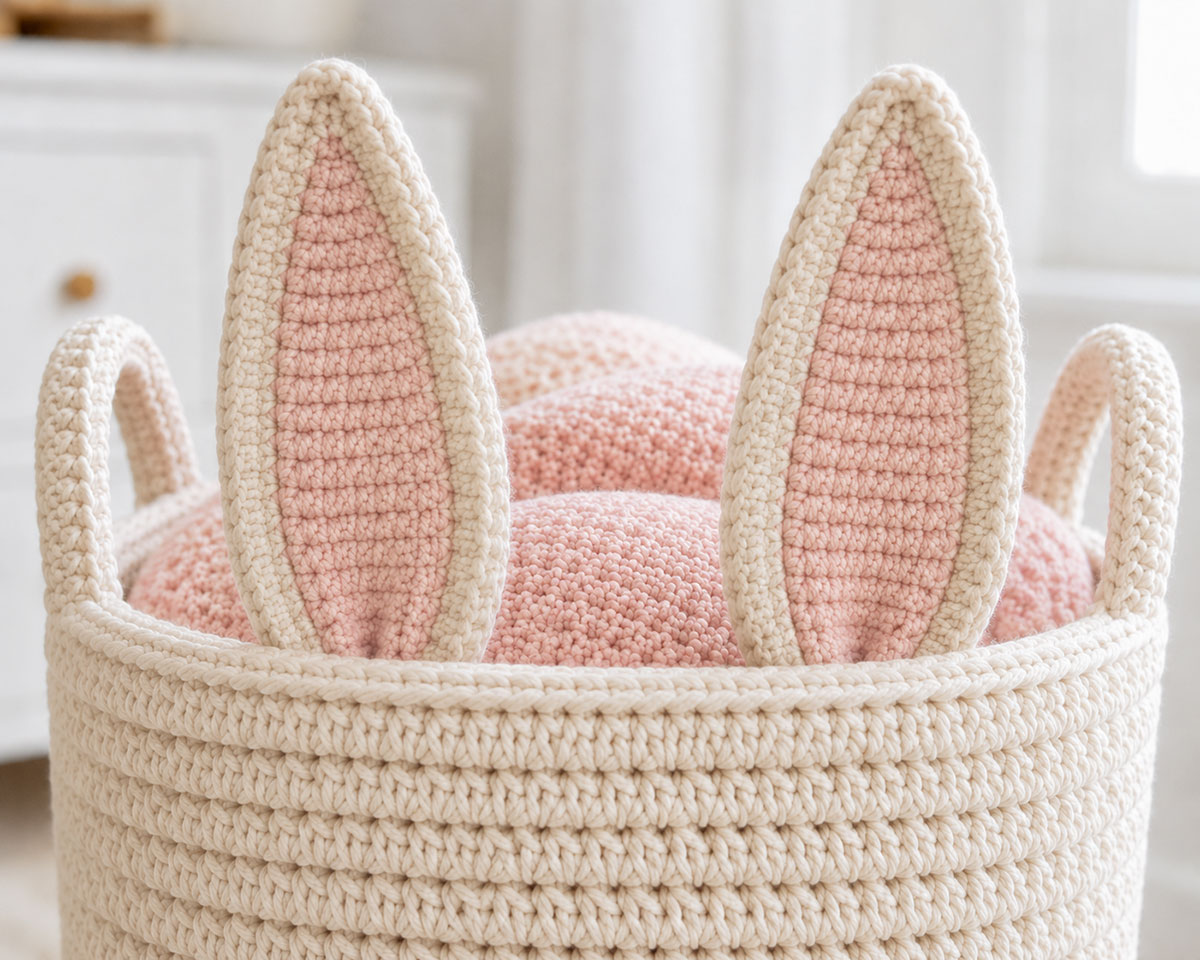
Place only the lower 1 1/4-inch concealed section of each ear inside the basket against the front wall. The remaining length of each ear should rise above the reinforced rim. The contrasting inner-ear panels should face outward toward the front of the basket, and the plain backs should face the basket interior.
Position the closed lower edge of each ear approximately 1 1/4 inches below the top edge of the reinforced rim. The entire concealed lower section should lie flat against the ordinary basket-wall stitches beneath the reinforced rim.
Do not place or sew any part of either ear over, through, around or across the reinforced rim. Treat the reinforced rim as a no-sew area. The complete rim must remain visible and unobstructed across the outside front of the basket.
Center the open space between the ears over the front-center marker. Leave approximately 2 to 2 1/2 inches between the inner lower edges of the ears.
Use removable stitch markers to hold the closed lower edge and both lower sides of each ear against the inside wall.
Stand directly in front of the basket and check that the ears are evenly spaced. They may stand straight or angle slightly away from one another, but they must remain clear of the two raised side handles.
Check the Ear Height and Symmetry
Measure from the top edge of the reinforced rim to the pointed tip of each ear. The two measurements should match within approximately 1/4 inch.
Check that the same 1 1/4-inch amount of each ear is concealed inside the basket and that both pleats begin at the same height.
View the basket from the front, back and both sides. Adjust the stitch markers until the ears match in height, spacing and angle.
Sew the Ears to the Inside Front Wall
Using the attached main-color cord, begin at the center of the first ear and add three or four concealed stitches through the center pleat, both ear layers and sturdy interior bars of the basket wall. Angle the needle carefully so it does not pass completely through the basket wall or appear on the exterior.
Continue from the center across one half of the closed lower edge to the first lower corner. Sew upward along that side of the concealed 1 1/4-inch section and stop immediately below the reinforced rim.
Thread a separate strand of matching main-color cord approximately 24 inches long. Anchor it securely at the center of the closed lower edge, then sew across the remaining half of the lower edge to the opposite corner. Continue upward along the second side of the concealed section and stop immediately below the reinforced rim.
The completed attachment should form a secure U-shaped seam around the full lower edge and both sides of the concealed section. No cord should cross the upper edge of the concealed section.
Do not sew through, over or around the reinforced rim.
Repeat the same attachment steps for the second ear, using the same placement depth, stitch spacing and tension.
Secure all cord ends inside the basket and weave them through several dense stitches before trimming.
Inspect the outside front of the basket. The reinforced rim should remain completely visible, and no ear fabric, tabs or attachment stitches should appear on the exterior.
Ear-attachment checkpoint
Move each ear gently from side to side near its base. The concealed lower section should remain flat against the inside wall, the pleat should stay closed and the complete reinforced rim should remain visible from the outside.
Position the Bow
Center the bow directly below the space between the ears. Place the top of the bow approximately 1 inch below the reinforced upper rim.
The vertical center band should align with the front-center marks used to position the ears. The bow should extend evenly to the left and right without covering either raised handle.
Pin the bow in place and step back several feet to check the overall balance. The bow may appear centered when viewed closely but sit slightly to one side when the full basket is visible.
Sew the Bow Securely
Using the remaining long tail at the back of the bow, sew the entire back of the center band firmly to the basket wall. Work through several basket stitches above, below and along both sides of the band.
Do not attach the bow with only one stitch through its center. The band should lie flat against the basket and should not rotate when touched.
Using matching yarn or cord, add two or three concealed stitches near the inside edge of each bow loop. These small tacking stitches keep the loops from folding forward while preserving the full bow shape.
Secure and weave all tails into the dense basket fabric on the inside. Check the outside carefully to make certain no loose ends remain visible beneath the bow.
Final Assembly Checkpoint
- The two ears are equal in height and width.
- The inner-ear panels face forward and begin at the same height.
- The space between the ears is centered on the front of the basket.
- The ears do not block or replace the raised side handles.
- The bow is centered beneath the ears.
- The bow center band is sewn flat against the basket wall.
- Both bow loops have been discreetly tacked in place.
- The reinforced upper rim remains level and has not puckered.
- All yarn or cord tails are securely woven in.
Rustic Woodland Rabbit Basket Colorway
The woodland rabbit uses the same basket foundation, ears, inner-ear panels, bow and placement instructions as the feminine blush bunny. Only the color palette changes.
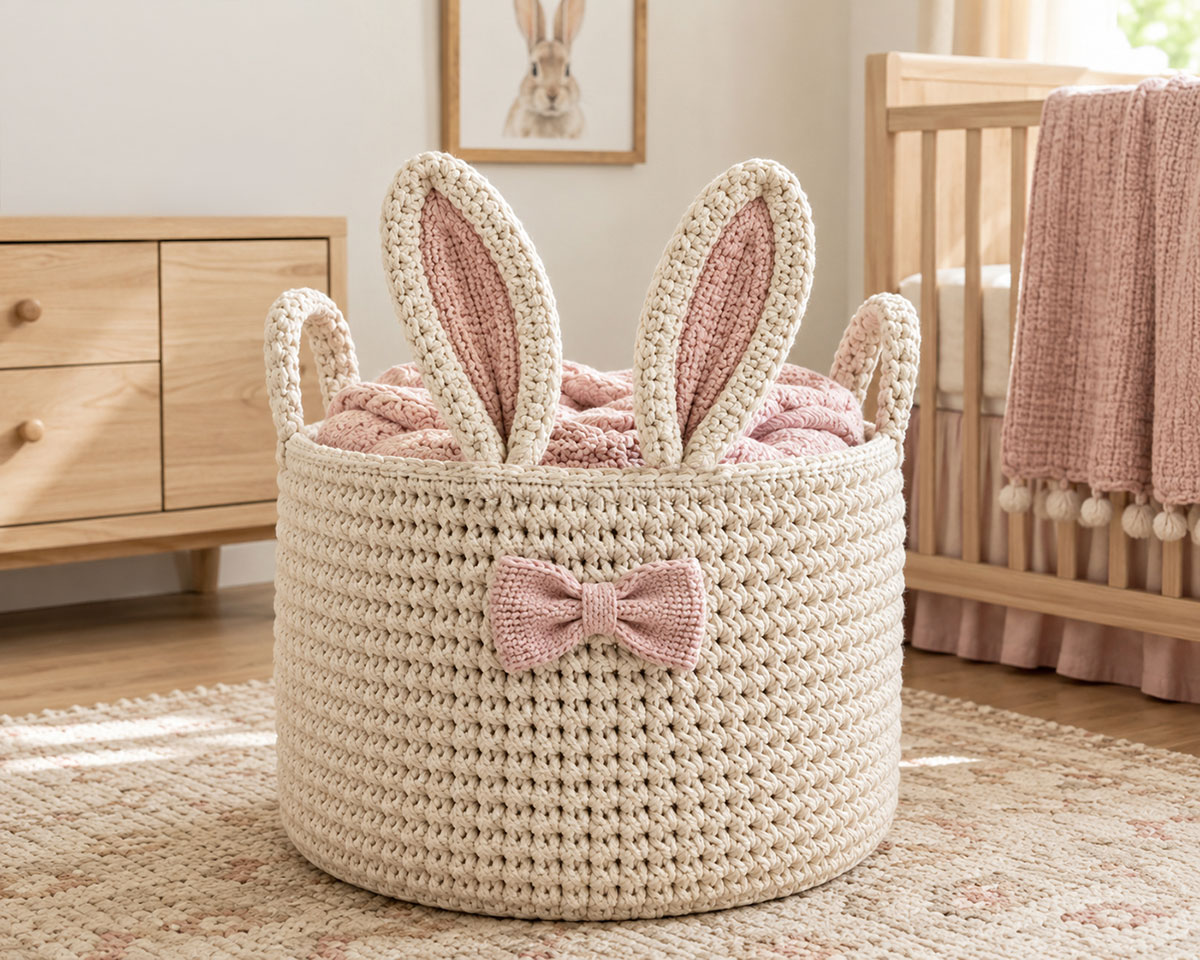
For a warm forest-inspired version, use oatmeal, flax, mushroom or warm taupe for the master basket and all four outer-ear panels. Add cocoa, walnut or deep taupe inner-ear panels, then finish the front with a cinnamon, muted clay, chestnut or subdued rust bow.
I would keep the palette limited to three colors so the finished basket still looks tailored and easy to place in a nursery:
- Main color: oatmeal, flax, mushroom or warm taupe
- Inner-ear color: cocoa, walnut or deep brown
- Bow color: cinnamon, muted clay, chestnut or subdued rust
A cord with a softly heathered or natural fiber appearance can make the woodland version look more rustic, but it should still produce the same dense, structured fabric required for the ears.
Do not substitute a fuzzy novelty yarn for the inner ears or bow. A large difference in yarn thickness can distort the ear fronts, weaken the bow and make the attachment stitches harder to secure.
The feminine and woodland baskets are two colorways of the same bunny pattern rather than separate constructions. Keep all measurements, stitch counts and placement points unchanged.
Finishing and Safe Nursery Use
Set the completed bunny basket upright and shape the walls, rim, ears and bow by hand. Smooth the front of the basket beneath the bow and make certain the reinforced rim remains level around the entire opening.
Check the ears from the front, back and both sides. If one ear leans more than the other, gently reshape it at the base rather than pulling on the tip. The double-layered construction should allow each ear to hold a soft upright curve without wire, plastic or added stuffing.
Inspect every attachment point before placing the basket in the nursery. The ears and bow should remain firmly connected when moved gently by hand, and no sewing tails should be visible or easy to pull free.
Final Construction Checkpoints
- The completed master basket remains round and stands upright without collapsing.
- The reinforced upper rim is level and has not been distorted by the ear attachment stitches.
- The two raised oval handles remain positioned on opposite sides of the basket.
- Both handles are completely unobstructed by the ears and bow.
- The ears match in length, width, angle and placement.
- Both inner-ear panels lie flat without puckering.
- The closed, pleated lower 1 1/4 inches of each ear is sewn securely to the inside front wall immediately below the fully visible reinforced rim.
- The bow is centered beneath the ears and cannot twist or rotate.
- The bow loops are lightly tacked to the basket wall.
- All loose ends have been securely woven into dense crochet fabric.
- No wire, buttons, plastic eyes, tied ribbon or detachable decorations have been added.
Using the Bunny Basket Safely
This XXL bunny basket is intended for lightweight nursery storage. It can hold folded blankets, soft toys, lightweight accessories and a limited number of board books when the weight is distributed evenly.
It is not designed to be used as a seat, step, climbing toy, infant carrier or sleep product. Never allow a child to sit, stand, climb or pull up on the basket or its ears and handles.
Keep the basket completely outside the crib, bassinet and every other infant sleep space. Blankets, baskets, toys and decorative accessories should not be placed inside an occupied infant sleep area. Review the CPSC safe-sleep guidance for current recommendations on keeping an infant’s sleep space bare.
The raised handles are intended for repositioning an empty or lightly filled basket. When moving heavier contents, support the reinforced base with both hands instead of lifting the full weight by the handles.
Inspect the basket regularly, paying particular attention to the ear bases, bow center, raised handles, upper rim and joining seam around the double base. Repair loosened stitches or damaged cord before returning the basket to use.
Nursery-safety reminder
The bunny ears and bow are decorative features, not handles. Lift the basket only by its two structural side handles, and support the base whenever the contents are more than lightly filled.
Frequently Asked Questions About the Crochet Bunny Basket Pattern
Does this page include the complete XXL basket pattern?
No. This page contains the bunny-specific ears, inner-ear panels, bow and attachment instructions. Begin by completing the free large crochet basket pattern, which provides the reinforced double base, tall walls, upper rim and two raised side handles used by every XXL character basket in this series.
Can I make the bunny basket smaller?
The bunny features were proportioned for the completed XXL master basket. Placing the full-size ears and bow on a much smaller basket may make it top-heavy or visually unbalanced. A smaller version would require the ears, inner panels, bow and placement measurements to be reduced together rather than changing only one piece.
Can I use a different yarn for the inner ears and bow?
Yes, provided it is close to the same thickness and structure as the yarn or cord used for the basket. A much thinner yarn may make the inner panels look undersized, while a thick plush yarn can pull the ears out of shape and make secure sewing more difficult.
Do the bunny ears need wire or plastic reinforcement?
No. Each ear is made from two joined crochet layers so the finished fabric can support itself. Wire and rigid plastic inserts are unnecessary and are not recommended for this nursery-storage design.
Can I add a face to the bunny basket?
This design intentionally uses only the ears and bow. Leaving off facial features keeps the basket simple, tailored and suitable for either the feminine blush or rustic woodland colorway. Adding eyes, a muzzle or other pieces would create a different design and require separate placement and attachment instructions.
Can the bow be made from ribbon?
A crocheted bow is recommended because it can be sewn securely to the basket. A tied ribbon may loosen, fray or become detachable. Do not use a removable bow, a safety pin or a loosely tied embellishment on a basket used in a nursery.
Where should the basket handles be positioned?
The two structural handles belong on opposite sides of the completed basket exactly as directed in the master pattern. The ears and bow are centered on the front between those handles. The ears do not replace the handles and should not be used for lifting.
Can I make the rustic woodland rabbit without changing the pattern?
Yes. Use the same stitch counts, measurements and assembly instructions. Substitute oatmeal, mushroom or warm taupe for the main color, cocoa or walnut for the inner ears and cinnamon, chestnut or muted clay for the bow.
What can I store in the completed basket?
Use it for lightweight nursery items such as folded blankets, soft toys, spare changing-pad covers and a limited number of board books. Avoid overfilling it with heavy objects that could strain the handles, base or decorative attachments.
Explore the Complete XXL Crochet Basket Series
The bunny basket is one character variation built on the reusable structural pattern. Visit the free crochet basket patterns collection to find the master construction and additional nursery-storage designs.
Two additional woodland variations use the same completed foundation: the XXL woodland owl crochet basket pattern adds layered eyes, wings and a beak, while the free crochet fox basket pattern adds pointed ears and contrasting facial pieces.
Once the master basket is complete, you can return to this bunny pattern to create the blush nursery version, the rustic woodland rabbit or both colorways without repeating the structural basket instructions.
When you click on links to various merchants on this site and make a purchase, this may result in this site earning a commission. This does not affect the price you pay.

UBGI Gold Standard 2026
Reviewed under the site's
editorial checklist.
Photos, decorating ideas, party setups and reader submissions are shared for inspiration unless a page is specifically presented as a pattern, tutorial, reference guide or step-by-step project. Follow the instructions, measurements, safety guidance and manufacturer directions provided for the particular project or product.
About Jan | Contact | Baby Nursery Ideas (Blog) | Site Map | Privacy Policy | Disclosure Policy | Disclaimer | Affiliate Disclosure | Earnings Disclosure | Facebook | Pinterest
I am a participant in the Amazon Services LLC Associates Program, an affiliate advertising program designed to provide a means for us to earn fees by linking to Amazon. As an Amazon Associate I earn from qualifying purchases.
Copyright © 2006-2026. All Rights Reserved.