Free Crochet Bat Wings Pattern
By Jan Bay
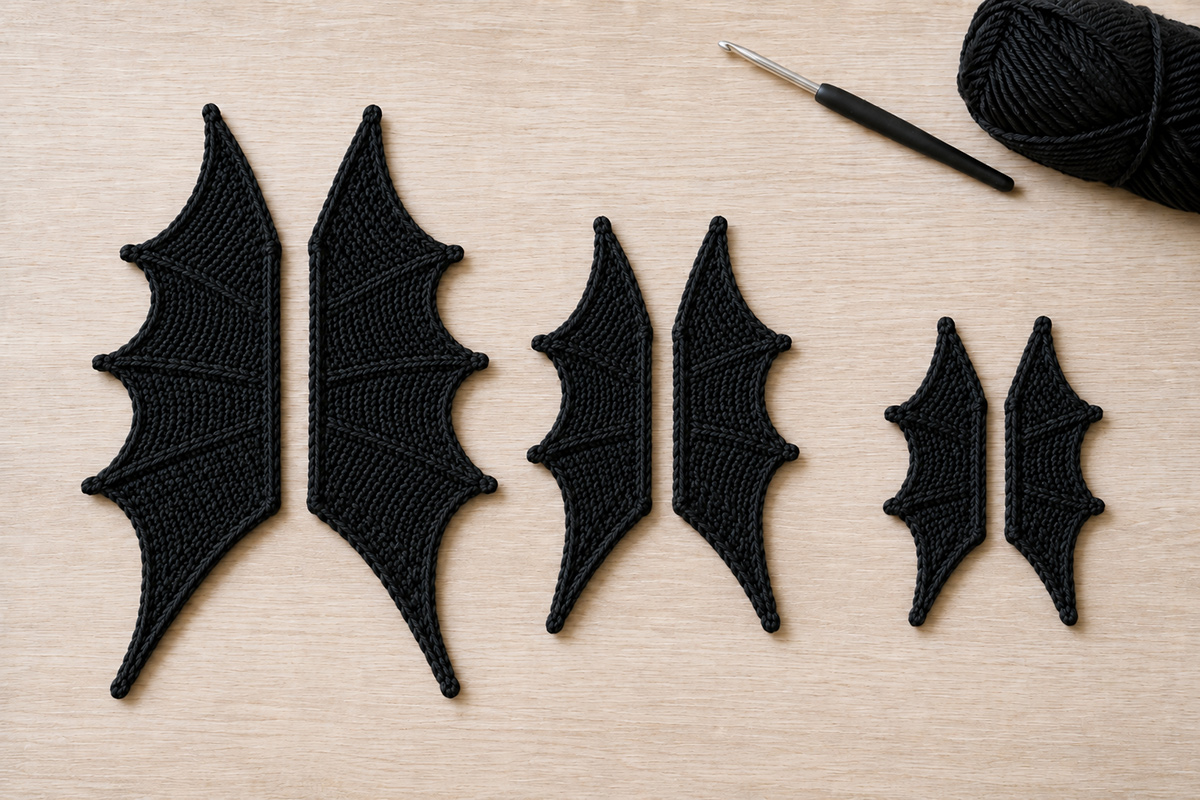
This free crochet bat wings pattern will produce bat wings with a shaped outer tip and pointed lower edge that give them a recognizable bat silhouette. The free crochet pattern includes three useful sizes, so you can make small wings for appliqués, medium wings for a crochet lovey or handmade gift, and larger wings for blankets, framed crochet art and seasonal nursery decor.
This is a bat-wing component pattern, not a complete stuffed bat pattern, costume-wing pattern or bat-wing shawl.
Explore More Free Halloween Crochet Patterns
Free Crochet Bat Applique Pattern
Crochet Supplies for This Pattern
Jump to a Section
Crochet Bat Wings Pattern at a Glance
Free Crochet Bat Wings Pattern
How to Make Matching Bat Wings
Small and Large Bat Wing Adjustments
Want to Make a Complete Crochet Bat?
Add the Wings to a Crochet Bat Lovey
Use Bat Wings on a Keepsake Blanket
More Ways to Use Crochet Bat Wings
Crochet Bat Wings Pattern at a Glance
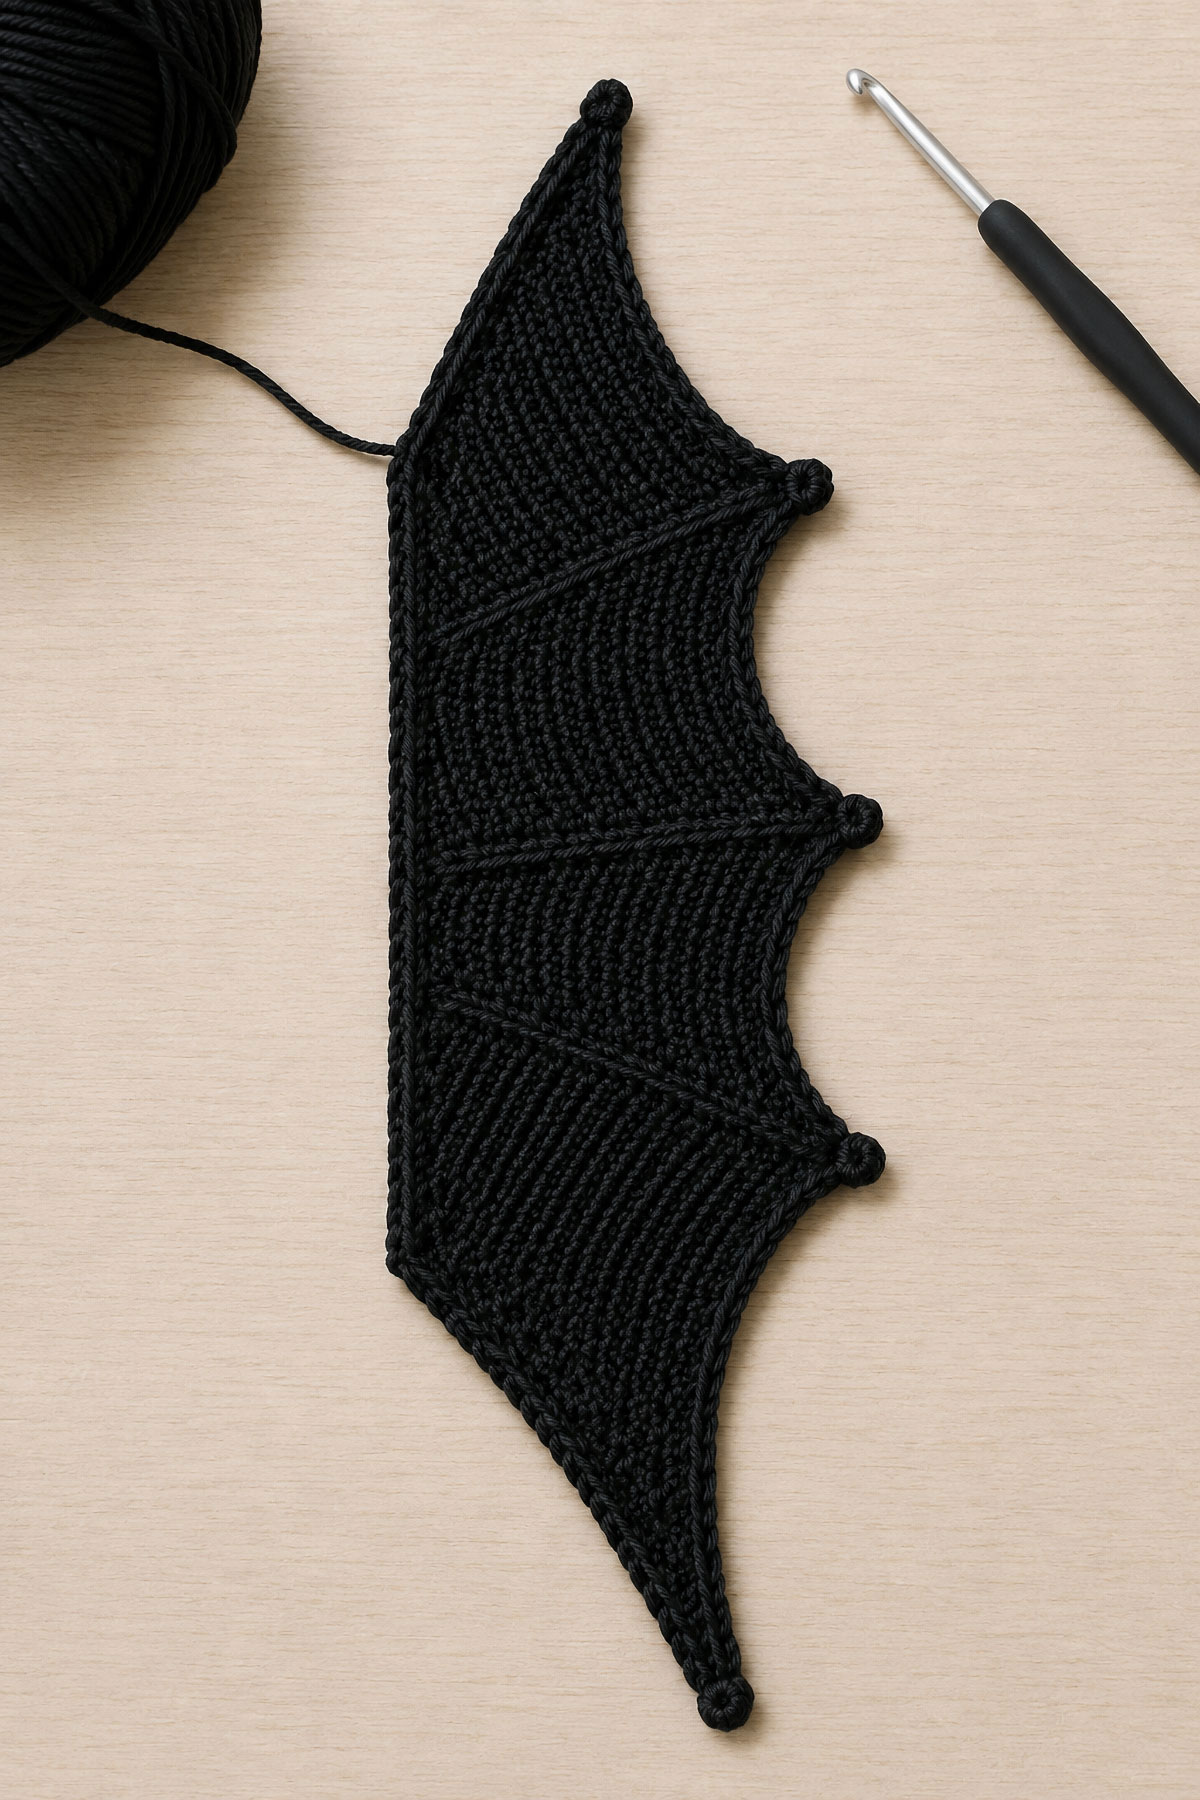
This pattern makes a flat, shaped bat wing with a narrow tip at each end, a nearly straight inner attachment edge and a wider shaped outer edge. The small points are added along that outer edge to give the finished piece its bat-wing outline.
The wings are worked flat in turned rows. Both wings are crocheted the same way, then one is flipped to create the mirrored pair before the vein detail is added and before the wings are attached. That keeps the pattern simpler because you do not need separate left-wing and right-wing instructions.
Pattern Details
Skill level: Easy to intermediate. You should be comfortable working turned rows, simple increases and decreases, and shaping an edge.
Yarn: Worsted weight, Category 4 yarn with enough body to hold the pointed wing shape.
Hook: 4.0 mm crochet hook, or the size needed to produce a firm fabric without making the stitches stiff.
Gauge: Exact gauge is not critical for this component pattern. Use the same yarn, hook and tension for both wings so the finished pair matches.
Sizes: Small, medium and large.
Construction: Each wing is worked in turned rows with one side kept relatively straight as the attachment edge. The opposite side widens, narrows and is finished with the pointed bat-wing edging.
Matching wings: Make two identical wings and flip one before sewing or joining.
Terms: Standard US crochet terminology.
The small size is useful when you want a compact bat appliqué. The medium size fits projects such as a crochet lovey, and the large version gives the wing enough presence for a blanket appliqué, framed crochet piece or seasonal nursery decoration.
Crochet Bat Wing Sizes
You can make the same basic bat-wing shape in three sizes. The difference is not simply a longer starting chain. Each size needs enough room for the outer tip and the lower wing points to stay in proportion, so the stitch counts change with the size.
Small bat wings are the best choice for a flat crochet bat appliqué, framed craft or small seasonal decoration. They keep the silhouette clear without adding too much bulk to a finished project.
Medium bat wings give you a little more stitch definition and are a useful size for a crochet bat lovey or another handmade Halloween project where the wings need to be easy to see.
Large bat wings work well when the wing itself is meant to be a noticeable design element. They can be used on a decorative keepsake blanket, mounted as crochet wall art or incorporated into seasonal nursery decor that is displayed securely out of a baby's reach.
Whichever size you choose, make both wings from the same yarn, hook and stitch tension. Even a small change in tension can make one wing look longer or more rounded than the other.
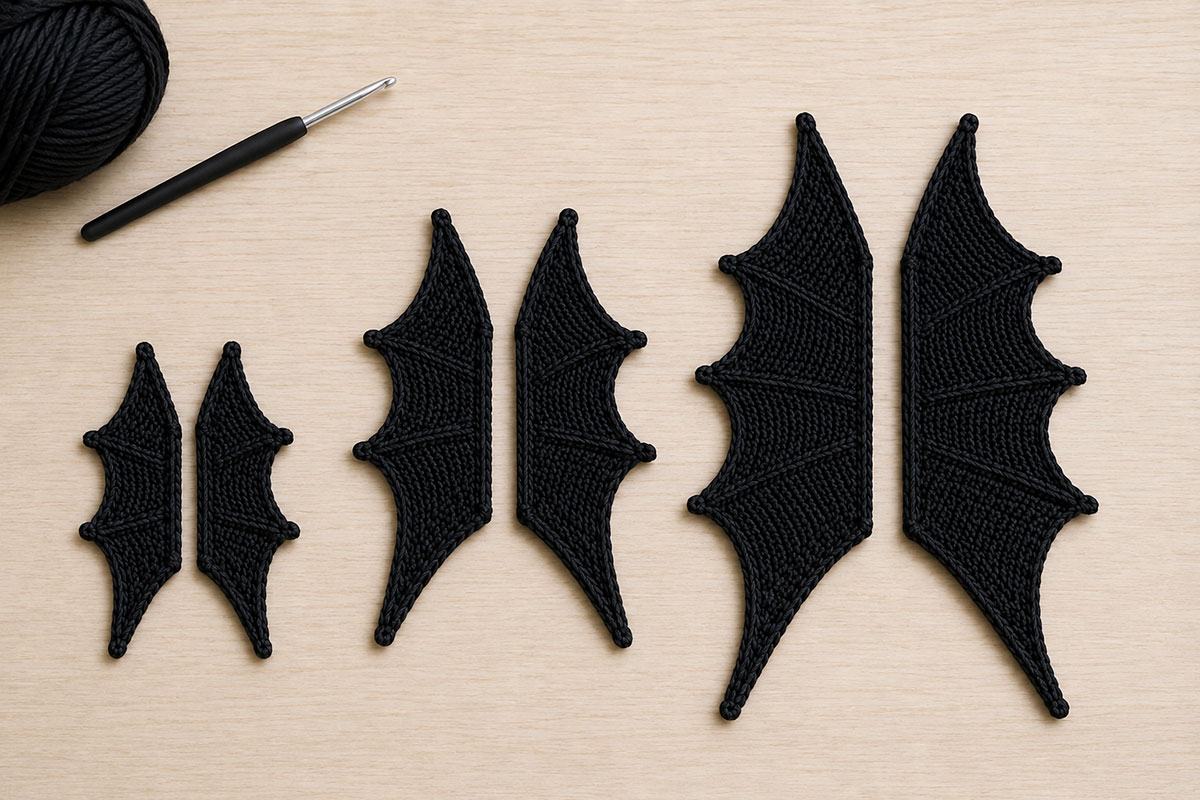
Materials
You do not need much yarn for these bat wings, which makes them a good project for using smaller amounts left from another crochet project.
- Worsted weight, Category 4 yarn in black, charcoal, deep plum, aubergine or another color of your choice
- 4.0 mm crochet hook
- Yarn needle for weaving in ends and attaching the wings
- Scissors
- Stitch marker, optional
- Blocking mat or other suitable pinning surface
- Rust-resistant blocking pins
A smooth yarn shows the wing points and stitch pattern more clearly than a fuzzy or heavily textured yarn. Cotton, cotton blends and smooth acrylic yarns can all work, but the finished feel and blocking method will be different for each fiber.
If the wings will be added to another crochet project, using the same yarn weight as the main piece helps them look like they belong together. For a flat appliqué or framed piece, a firm yarn with clear stitch definition makes the bat silhouette especially easy to see.
Abbreviations
- ch = chain
- sl st = slip stitch
- sc = single crochet
- sc2tog = single crochet 2 stitches together, decreasing 2 stitches to 1
- hdc = half double crochet
- dc = double crochet
- st = stitch
- sts = stitches
- turn = turn your work to begin the next row
The turning chain does not count as a stitch unless the pattern specifically says otherwise.
How the Bat Wing Is Shaped
The bat shape comes from changing the width of the rows and then giving the lower edge several distinct points. That combination matters. A wide triangle with one pointed end can look like a leaf or pennant, but the lower points make the finished piece read as a bat wing.
The attachment edge stays fairly straight so the wing can be sewn neatly to a lovey, appliqué body or other crochet project. The wing begins at one narrow tip, widens toward the center and then narrows again to the second tip while all increases and decreases stay on the opposite shaping edge.
After the basic wing is complete, the smaller bat-wing points are added along that shaped outer edge between the two narrow tips. Keep those points defined rather than rounding them off when you weave in the ends or block the wing.
You will crochet two wings from the same instructions. Leave the raised wing-vein detail until after the pair has been mirrored. Once one wing is turned over and both wings are facing the correct direction, add the vein detail to the display-facing side of each wing.
Free Crochet Bat Wings Pattern
The medium wing is the base version of this pattern. Crochet two identical pieces, then mirror the pair before adding the raised wing-vein detail. The small and large versions use the same basic construction with different row counts and widest stitch counts.
Medium Bat Wing
Ch 2.
Row 1: Sc in the second ch from the hook. Turn. 1 st.
Row 2: Ch 1. Work 2 sc in the only st. Turn. 2 sts.
Row 3: Ch 1. Sc in the first st, then work 2 sc in the last st. Turn. 3 sts.
Row 4: Ch 1. Work 2 sc in the first st, then sc in each remaining st across. Turn. 4 sts.
Row 5: Ch 1. Sc in each st to the last st. Work 2 sc in the last st. Turn. 5 sts.
Row 6: Ch 1. Work 2 sc in the first st, then sc in each remaining st across. Turn. 6 sts.
Row 7: Ch 1. Sc in each st to the last st. Work 2 sc in the last st. Turn. 7 sts.
Row 8: Ch 1. Work 2 sc in the first st, then sc in each remaining st across. Turn. 8 sts.
Rows 9 through 11: Ch 1. Sc in each st across. Turn. 8 sts.
You have reached the widest part of the wing. Continue shaping only along the same physical outer edge so the opposite attachment edge stays nearly straight.
Row 12: Ch 1. Sc2tog over the first 2 sts. Sc in each remaining st across. Turn. 7 sts.
Row 13: Ch 1. Sc in each st to the last 2 sts. Sc2tog. Turn. 6 sts.
Row 14: Ch 1. Sc2tog over the first 2 sts. Sc in each remaining st across. Turn. 5 sts.
Row 15: Ch 1. Sc in each st to the last 2 sts. Sc2tog. Turn. 4 sts.
Row 16: Ch 1. Sc2tog over the first 2 sts. Sc in each remaining st across. Turn. 3 sts.
Row 17: Ch 1. Sc in the first st. Sc2tog over the final 2 sts. Turn. 2 sts.
Row 18: Ch 1. Sc2tog. 1 st.
Fasten off. The wing now has one narrow tip at each end, a wider center and one nearly straight attachment edge.
Shape the Outer Bat Wing Points
Work the pointed edging along the shaped outer edge between the two narrow tips. Do not work this edging along the straight attachment edge.
Treat the narrow Row 1 end as the top of the wing and the narrow Row 18 end as the bottom. Join yarn at the Row 1 end and work along the shaped outer edge toward Row 18.
- Work 1 sc into each of the first 5 row-end spaces.
- Ch 4. Sl st in the second ch from the hook, sc in the next ch and hdc in the final ch. Sl st back into the same edge space. This makes the first outer-edge point.
- Work 1 sc into each of the next 6 row-end spaces and repeat the ch-4 point.
- Sc into each remaining row-end space until you reach the second narrow tip.
The two added outer-edge points plus the lower narrow tip give the medium wing three obvious lower points.
Fasten off and weave the ends securely through the edge stitches so they are inconspicuous from either side. Keep the edging relaxed so the outer edge can lie flat when blocked.
Make a second medium wing exactly the same way. Do not add the raised wing-vein detail yet. First arrange the two finished wings as a mirrored pair in the next section.
How to Make Matching Left and Right Wings
You do not need a separate left-wing pattern. Crochet two wings from the same instructions, including the pointed lower edging.
I prefer one repeatable wing that can be flipped for the second side. It is easier to count, easier to compare and much less fussy than keeping separate left and right instructions.
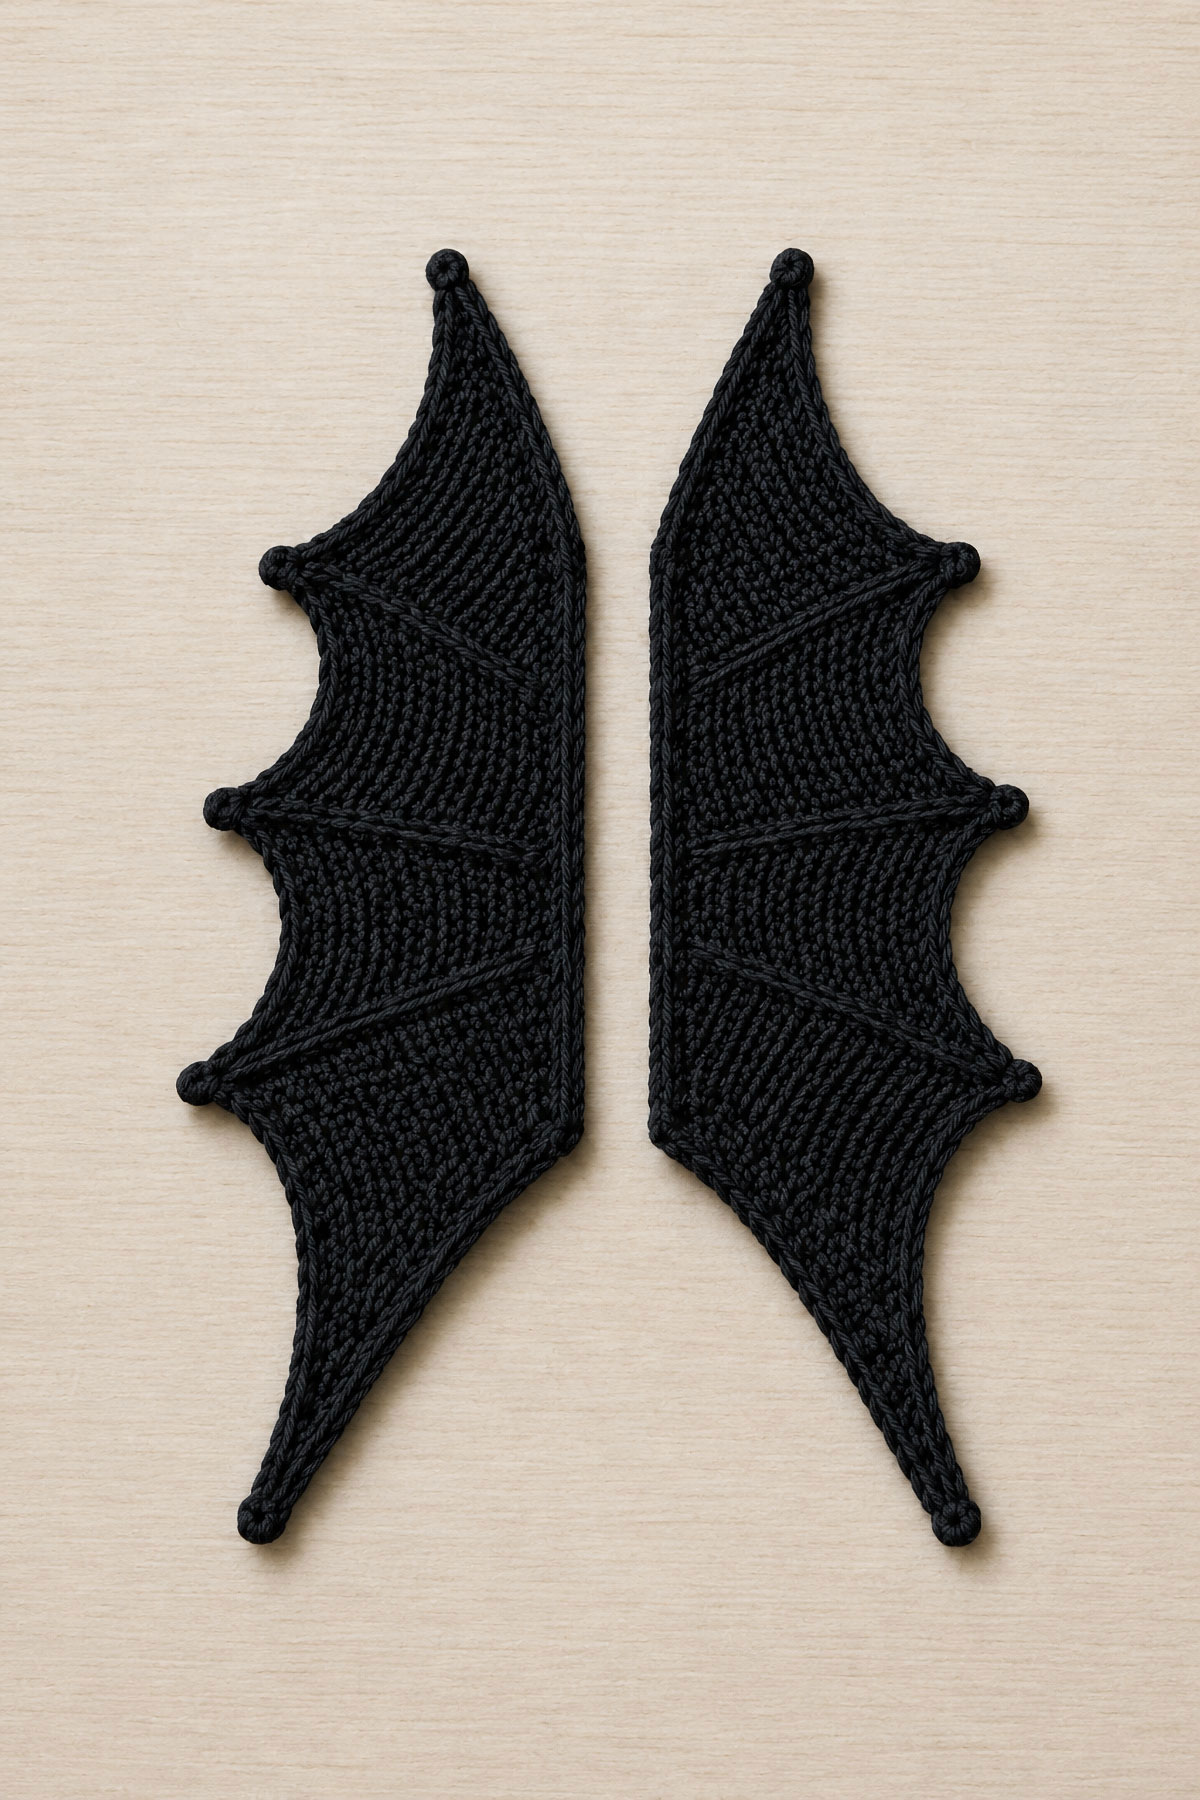
Lay both finished wings flat with the same side facing up and the Row 1 ends pointing upward. Keep the first wing in place. Turn the second wing over from side to side without rotating it end for end. Then move the pair together so the straight attachment edges face each other and the shaped outer edges face away from each other.
Add the Wing Vein Detail After Mirroring
On the display-facing side of the first wing, join matching yarn along the straight attachment edge and work one loose line of surface slip stitches toward each ch-4 point on the shaped outer edge. Do not work a vein line to either narrow end tip. Fasten each line off securely on the back.
Repeat on the display-facing side of the second wing. The small wing has one vein line, the medium wing has two and the large wing has three. Keep the surface stitches loose enough that the wings still lie flat. If you prefer plain wings, you can leave this detail off without changing the basic wing shape.
Before sewing them to another project, line up the widest part, outer tips and lower points. If one wing looks slightly shorter, gently reshape it before attaching anything. Small differences in crochet tension are much easier to correct at this stage.
If you plan to block the wings, do it now while they are still separate. Block the mirrored pair side by side and let them dry or cool completely before attaching them to a lovey, appliqué or other project.
If the wings will be sewn to a lovey or appliqué, pin or hold both in position first. Attach through the straight inner edge rather than stitching around the entire wing. Leaving the shaped outer edge free keeps the points visible.
Small and Large Crochet Bat Wing Adjustments
The medium wing above is the base pattern. For the small and large versions, the same shaping rule is used: increases are always placed along the same physical edge as you turn the work, and the opposite edge stays straight for attachment.
Small Crochet Bat Wings
Ch 2.
Row 1: Sc in the second ch from the hook. Turn. 1 st.
Row 2: Ch 1. Work 2 sc in the only st. Turn. 2 sts.
Row 3: Ch 1. Sc in the first st, then work 2 sc in the last st. Turn. 3 sts.
Row 4: Ch 1. Work 2 sc in the first st, then sc in each remaining st across. Turn. 4 sts.
Row 5: Ch 1. Sc in each st to the last st. Work 2 sc in the last st. Turn. 5 sts.
Row 6: Ch 1. Work 2 sc in the first st, then sc in each remaining st across. Turn. 6 sts.
Rows 7 and 8: Ch 1. Sc in each st across. Turn. 6 sts.
Row 9: Ch 1. Sc in each st to the last 2 sts. Sc2tog. Turn. 5 sts.
Row 10: Ch 1. Sc2tog over the first 2 sts. Sc in each remaining st across. Turn. 4 sts.
Row 11: Ch 1. Sc in each st to the last 2 sts. Sc2tog. Turn. 3 sts.
Row 12: Ch 1. Sc2tog over the first 2 sts. Sc in the remaining st. Turn. 2 sts.
Row 13: Ch 1. Sc2tog. 1 st.
Fasten off.
For the shaped outer edge, treat the narrow Row 1 end as the top of the wing and the narrow Row 13 end as the bottom. Join yarn at the Row 1 end. Sc into the first 6 row-end spaces and make one ch-4 point as described in the medium pattern. Sc through the remaining row-end spaces to the Row 13 end and fasten off. The added outer-edge point plus the lower Row 13 tip give the small wing two obvious lower points.
Make two identical small wings. Mirror the pair before adding any raised wing-vein detail.
Large Crochet Bat Wings
Ch 2.
Row 1: Sc in the second ch from the hook. Turn. 1 st.
Rows 2 through 10: Ch 1. Increase by 1 stitch on the same physical shaping edge on every row. On even-numbered rows, work 2 sc in the first st, then sc in each remaining st across. On odd-numbered rows, sc in each st to the last st, then work 2 sc in the last st. Turn after every row. 10 sts after Row 10.
Rows 11 through 14: Ch 1. Sc in each st across. Turn. 10 sts.
Row 15: Ch 1. Sc in each st to the last 2 sts. Sc2tog. Turn. 9 sts.
Row 16: Ch 1. Sc2tog over the first 2 sts. Sc in each remaining st across. Turn. 8 sts.
Row 17: Ch 1. Sc in each st to the last 2 sts. Sc2tog. Turn. 7 sts.
Row 18: Ch 1. Sc2tog over the first 2 sts. Sc in each remaining st across. Turn. 6 sts.
Row 19: Ch 1. Sc in each st to the last 2 sts. Sc2tog. Turn. 5 sts.
Row 20: Ch 1. Sc2tog over the first 2 sts. Sc in each remaining st across. Turn. 4 sts.
Row 21: Ch 1. Sc in each st to the last 2 sts. Sc2tog. Turn. 3 sts.
Row 22: Ch 1. Sc2tog over the first 2 sts. Sc in the remaining st. Turn. 2 sts.
Row 23: Ch 1. Sc2tog. 1 st.
Fasten off.
For the shaped outer edge, treat the narrow Row 1 end as the top of the wing and the narrow Row 23 end as the bottom. Join yarn at the Row 1 end. Sc into the first 5 row-end spaces and make a ch-4 point. Sc into the next 6 row-end spaces and make the second point. Sc into the next 6 row-end spaces and make the third point. Sc through the remaining row-end spaces to the Row 23 end and fasten off. The three added outer-edge points plus the lower Row 23 tip give the large wing four obvious lower points.
Make two identical large wings. Mirror the pair before adding any raised wing-vein detail.
The finished measurements will vary with yarn, hook size and tension. With worsted weight yarn and a 4.0 mm hook, expect the small wings to be roughly 3 inches long, the medium wings about 4 inches long and the large wings about 5 inches long after gentle blocking. Treat those measurements as a guide rather than a required gauge.
Want to Make a Complete Crochet Bat?
The small wings on this page are the size I use for my free crochet bat applique pattern. That separate pattern includes the round head, tapered body, tiny pointed ears, wing placement and complete assembly instructions. Use this page when you need bat wings in different sizes; use the complete bat pattern when you want the finished flat bat motif.
Add the Wings to a Crochet Bat Lovey
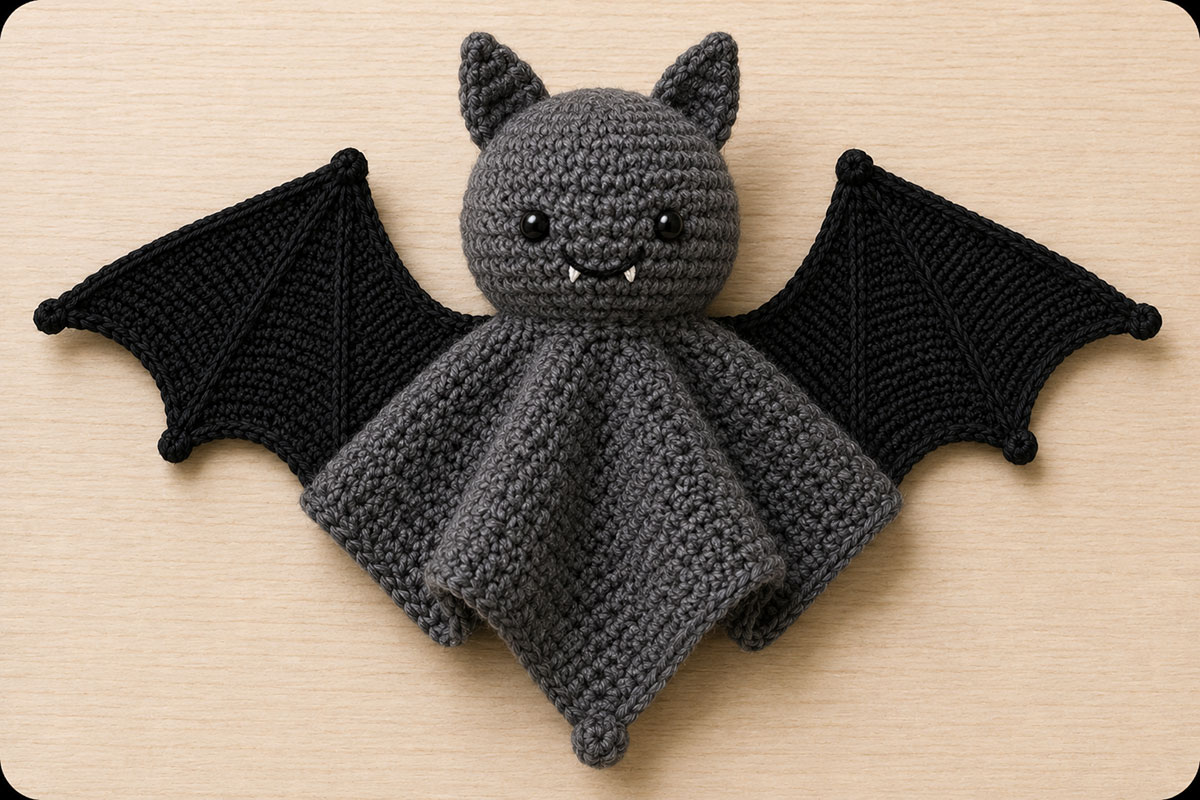
The medium wings are a good fit when you want to use this pattern with a handmade lovey. Their size gives the bat shape enough definition without making the wings look oversized beside the head and blanket portion.
If you are making the complete project, follow the free crochet bat lovey pattern for the head and lovey construction, then use the medium wings from this page in place of starting another wing pattern.
Before sewing, place both wings against the back or sides of the crocheted bat and check the angle. The straight attachment edges should sit close to the body while the pointed lower edges remain visible.
- Make two medium wings. If the wing ends have already been woven in, use a separate length of matching yarn for sewing.
- Arrange the wings in the mirrored orientation established above, with the straight attachment edges toward the bat and the vein detail facing outward.
- Position both wings before attaching either one permanently.
- Sew through the straight attachment edge with matching yarn.
- Secure the beginning and ending yarn tails, then weave them back through the crocheted fabric.
If the finished project will be used as a baby lovey, keep it for supervised awake use and do not place it in an infant sleep space.
Use Crochet Bat Wings on a Keepsake Blanket
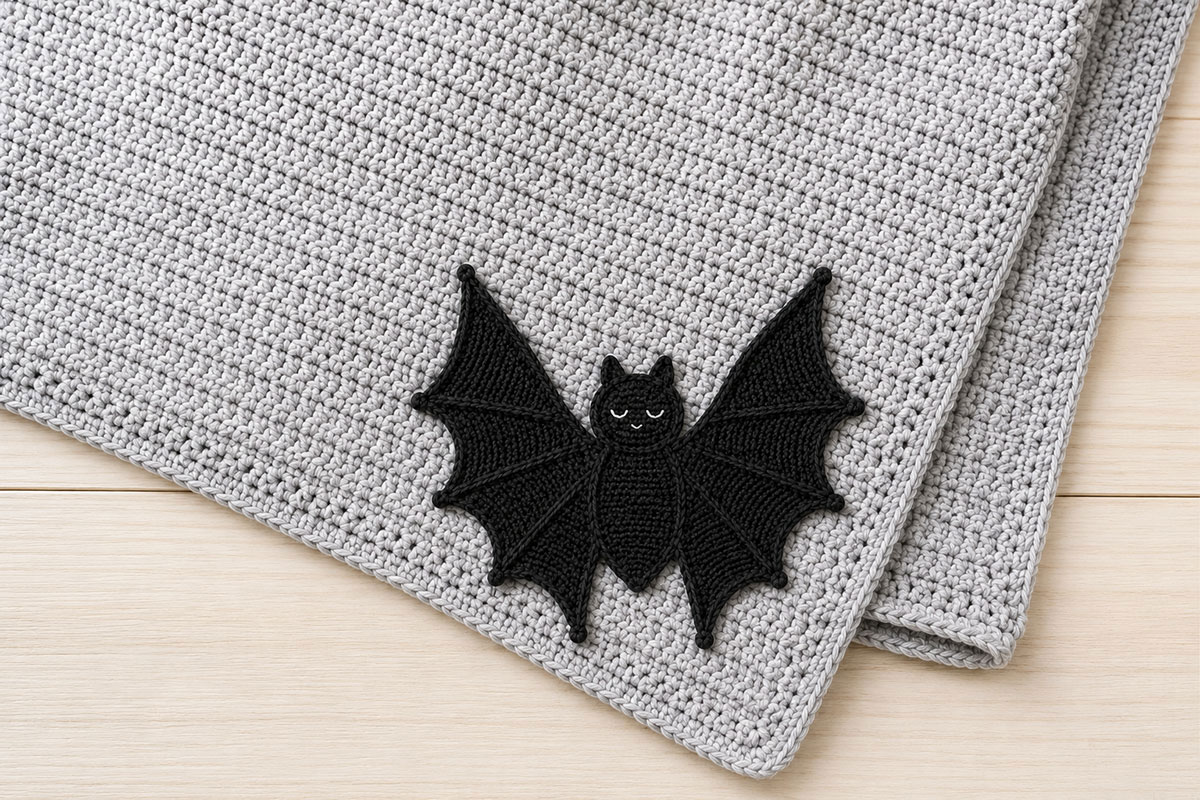
The blanket version looks more finished when the wings are connected to the flat bat body instead of being scattered as separate wing shapes. I would use one complete bat near a corner and let the rest of the blanket stay simple.
Use the small wings from this page with the head and tapered body in my complete crochet bat applique pattern. The straight attachment edges tuck behind the body, so the finished motif reads as one little bat instead of two separate pieces.
If you want to make the blanket as well as the appliqués, the simple chunky crochet blanket pattern gives you an easy handmade base for a decorative keepsake project.
Position the complete bat near one corner before sewing anything down. Once you like the angle and spacing, stitch the body and attachment edges securely to the blanket with matching yarn and weave the tails well into the back of the fabric.
For a baby-oriented keepsake, skip buttons, beads, bells and dangling pieces. An appliquéd or decorative blanket should also be treated as a keepsake or supervised-use item rather than loose bedding in an infant sleep space.
More Ways to Use Crochet Bat Wings
Once you have the basic wing shape, it can be reused without turning every project into another full crochet bat. Changing the size, color and placement gives the same pattern a surprisingly different look.
Framed crochet art: Mount a pair of small or medium wings, or the complete flat bat appliqué, on a fabric-covered backing inside a frame. Charcoal and black give the piece a graphic look, while deep plum or muted aubergine can soften the Halloween palette.
Seasonal nursery decor: A flat bat appliqué can be added to a fabric banner, framed piece or other Halloween decoration that is displayed securely out of a baby's reach. Keep cords, dangling pieces and small detachable embellishments out of baby-oriented projects.
Handmade gift accents: Sew one small bat appliqué onto a decorative gift bag, keepsake pouch or handmade blanket. A single well-shaped bat often has more impact than filling every available space with motifs.
Mix the wings with other Halloween crochet projects: If you want to build a coordinated group of handmade decorations and gifts, browse the free Halloween crochet patterns for more projects that can be made in the same color palette.
Save your yarn scraps after making the larger wings. The small version takes very little yarn, so matching appliqués are an easy way to carry the same bat detail into another handmade piece.
Blocking and Shaping Crochet Bat Wings
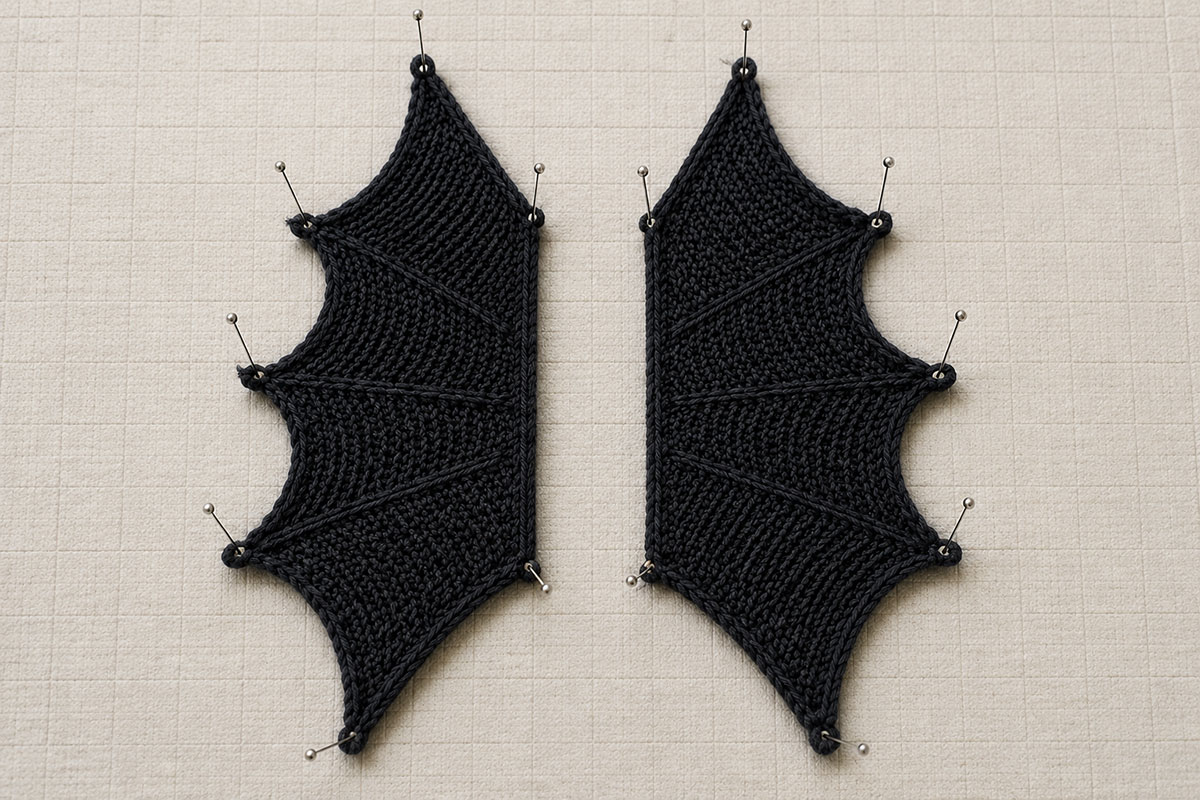
Blocking is worth doing on this pattern because the outer tip and lower wing points look much cleaner when they are shaped deliberately. You are not trying to stretch the wing larger. The goal is to help the edges lie flat and make each point easy to see.
Before blocking, weave in the ends that will not be used for assembly. Lay both wings side by side so you can compare their shape while you work.
For cotton or cotton-blend yarn: Lightly dampen the wings, press out excess moisture without twisting, then pin them into shape on a blocking mat. Pull each lower point gently outward and define the outer tip. Allow the wings to dry completely before removing the pins.
For acrylic yarn: Pin the dry wings into shape first. If the yarn benefits from steam blocking, hold the steam source above the fabric without pressing a hot iron directly onto the yarn. Acrylic can flatten or melt if exposed to too much heat, so use a light touch and follow the yarn manufacturer's care directions.
For wool or wool blends: Wet blocking is often a good choice. Soak the wings according to the yarn's care instructions, gently remove excess water, then pin them into shape and let them dry completely.
Pay particular attention to three areas:
Remove every blocking pin before attaching or displaying the wings.
- the narrow outer wing tip
- the lower decorative points
- the straight inner attachment edge
The two wings do not need to be perfectly rigid or identical down to every millimeter. They should simply look balanced when placed together, with the tips reaching outward at similar angles.
Frequently Asked Questions About Crochet Bat Wings
How do you crochet bat wings?
These bat wings are worked flat in rows from one narrow tip to the other. The fabric widens toward the middle and then narrows again while one attachment edge stays nearly straight. A shaped edging along the opposite outer edge adds the smaller points that give the finished piece its recognizable bat-wing silhouette.
Can I make the crochet bat wings larger?
Yes. The large version in this pattern is already sized up from the medium wing. If you want to experiment beyond that size, keep the same basic proportions rather than simply adding a very long starting chain. The increases, widest section, decreases and lower points all need to grow together for the shape to remain balanced.
How do I make two matching crochet bat wings?
Make two wings from the same instructions. You do not need separate left and right patterns. When both are finished, flip one wing so the outer tips point in opposite directions. Block them side by side before attaching them if you need to correct small differences in tension.
What yarn works best for crochet bat wings?
A smooth worsted weight yarn is a practical choice because it shows the stitch definition and pointed edges clearly. Cotton, cotton blends and smooth acrylic yarn can all work. Very fuzzy yarn can hide some of the shaping that makes the wing look distinctly bat-like.
How do I keep crochet bat wings flat?
Work at an even tension, avoid pulling the lower edging too tightly and block the finished wings. Pinning the outer tip and each lower point into position while the wing dries can make a noticeable difference in the finished outline.
Can I use these crochet bat wings as an appliqué?
Yes. The small wings can be used by themselves as decorative accents. If you want to turn them into a complete flat bat, use my free crochet bat applique pattern for the head, body, ears and assembly.
Can I sew crochet bat wings onto a baby blanket?
Yes, when the blanket is being made as a decorative keepsake or supervised-use piece. Sew the appliqués securely with yarn, weave in every end and avoid buttons, beads, bells or other detachable decorations. Decorative blankets and appliquéd blankets should not be used as loose bedding in an infant sleep space.
Using Crochet Bat Wings on Baby-Oriented Projects
Bat wings can be a charming detail on a handmade baby gift, but keep the finished use in mind while you are attaching them. Sew appliqués securely, weave in every yarn end and leave off buttons, beads, bells, cords and other pieces that could come loose.
For nursery wall art or seasonal decorations, place the finished project securely out of a baby's reach. A flat framed bat can bring in the Halloween theme without putting dangling crochet pieces near the crib.
If you add the wings or bat appliqué to a keepsake blanket, treat it as a decorative or supervised-use piece rather than infant sleep bedding. The U.S. Consumer Product Safety Commission recommends keeping an infant sleep space bare except for a fitted sheet. You can read the current CPSC safe sleep guidance before using handmade blankets or other decorative items around a baby's sleep area.
When you click on links to various merchants on this site and make a purchase, this may result in this site earning a commission. This does not affect the price you pay.

UBGI Gold Standard 2026
Reviewed under the site's
editorial checklist.
Photos, decorating ideas, party setups and reader submissions are shared for inspiration unless a page is specifically presented as a pattern, tutorial, reference guide or step-by-step project. Follow the instructions, measurements, safety guidance and manufacturer directions provided for the particular project or product.
About Jan | Contact | Baby Nursery Ideas (Blog) | Site Map | Privacy Policy | Disclosure Policy | Disclaimer | Affiliate Disclosure | Earnings Disclosure | Facebook | Pinterest
I am a participant in the Amazon Services LLC Associates Program, an affiliate advertising program designed to provide a means for us to earn fees by linking to Amazon. As an Amazon Associate I earn from qualifying purchases.
Copyright © 2006-2026. All Rights Reserved.