Free Woodland Winter Bunny Lovey Crochet Pattern
By Jan Bay
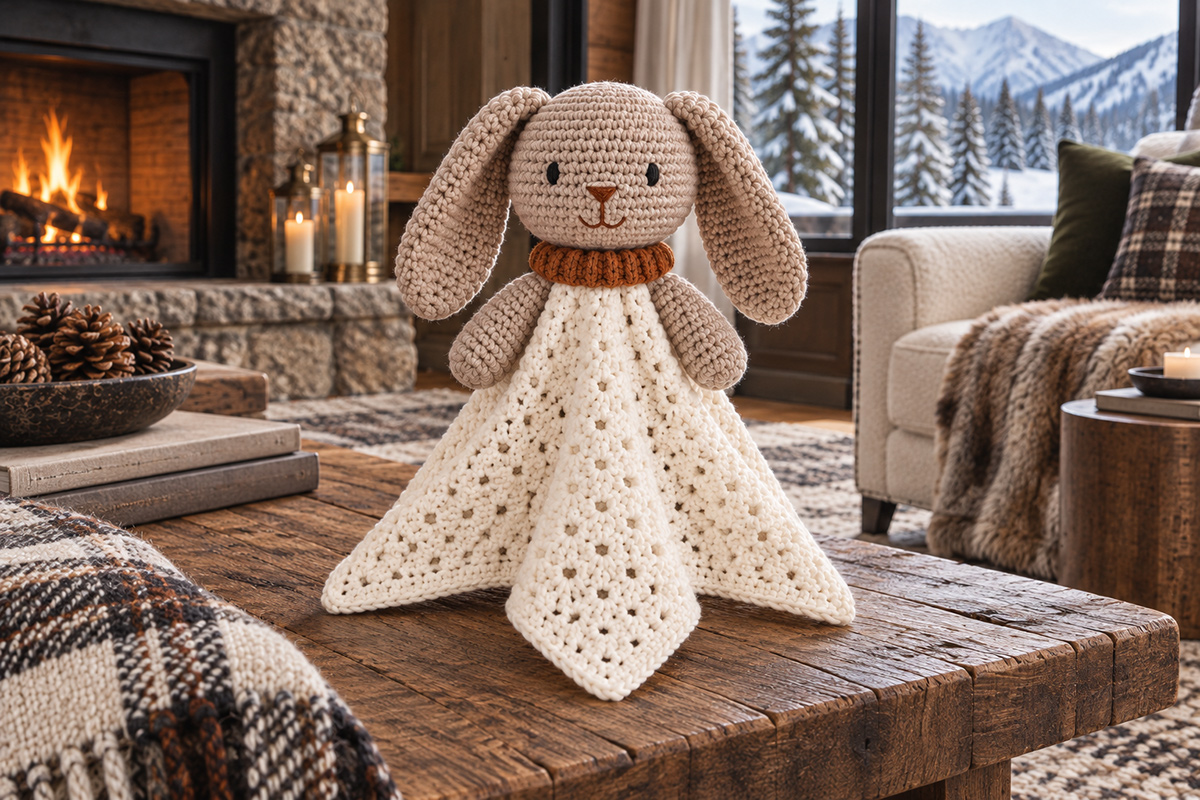
This free woodland winter bunny lovey crochet pattern makes a warmer seasonal version of my fuzzy spring bunny, keeping the long floppy ears and comforting security blanket body while adding a snug ribbed collar inspired by winter woodland colors. The ivory, mushroom and cinnamon palette gives the rabbit a cozy seasonal look while keeping the soft, comforting features that make a bunny lovey so appealing.
Explore More Free Crochet Baby Patterns
Crochet Supply
Jump to:
Materials for the Winter Bunny Lovey
I would use a smooth medium weight yarn for this bunny rather than fuzzy yarn. The stitches in the face, ears and draping body are part of the look, so you want them to show.
Yarn: #4 medium worsted weight yarn
Color A, warm ivory: about 180 to 220 yards for the lovey body
Color B, mushroom or soft taupe: about 180 to 210 yards for the head, ears and arms
Color C, cinnamon or soft rust: about 20 to 25 yards for the ribbed collar and embroidered nose
Face: black embroidery floss for the satin-stitched eyes
Hooks: 4.5 mm crochet hook for the lovey body and 3.75 mm crochet hook for the head, ears, arms and collar
Also needed: polyester fiberfill, yarn needle, embroidery needle, stitch markers and scissors
There are no plastic safety eyes, buttons, beads or other loose hardware in this pattern. The face is embroidered and the crochet pieces are sewn securely in place.
Finished Size, Gauge and Construction
The measurements below are expected measurements based on the stated yarn, hooks and gauge. Small differences in yarn and crochet tension can change the finished size.
Lovey body: about 12 1/2 to 13 inches square
Center-to-corner body drop: about 8 3/4 to 9 1/4 inches
Bunny head: about 4 3/4 to 5 inches across
Ears: about 7 1/2 to 8 inches long
Arms: about 4 inches long
Expected overall length: about 14 to 15 inches from the top of the bunny's head to the lowest point of the draping lovey body.
Pieces before assembly: 7 crochet pieces total: 1 lovey body, 1 head, 2 ears, 2 arms and 1 ribbed collar.
Stuffed-piece gauge: about 16 single crochet stitches and 18 rounds over 4 inches with the 3.75 mm hook.
Gauge matters most on the head because loose stitches can let the stuffing show. If your single crochet fabric has obvious gaps, go down one hook size instead of packing in more stuffing.
The body needs more movement, so it uses the larger 4.5 mm hook. After Round 4, the square should measure about 5 inches across. The finished body should measure close to 12 1/2 to 13 inches across before assembly.
Crochet terms: This pattern uses standard U.S. crochet terminology.
Abbreviations: ch = chain, dc = double crochet, sc = single crochet, sl st = slip stitch, sp = space, st = stitch, sts = stitches, inc = work 2 sc in the next st, dec = single crochet 2 stitches together over the next 2 sts, rnd = round.
Work the stuffed pieces in continuous rounds unless the instructions say otherwise. Place a stitch marker in the first stitch and move it up after each round.
The lovey body is worked from the center outward as a square. The bunny is attached over the exact center of that square. Nothing is folded or gathered underneath the head.
Once the head, arms and collar are attached, the square hangs naturally from the center. Turn the finished lovey so one corner points toward the front. That gives you the long center point shown in the finished bunny, while the other corners fall toward the sides and back.
Woodland Winter Bunny Lovey Crochet Pattern: Body
Use Color A and the 4.5 mm hook.
The body is a center-out granny-style square with small open spaces between the stitch groups. Keep your tension relaxed here. The body should drape rather than feel stiff.
Round 1: Make a magic ring. Ch 3. The beginning ch 3 counts as the first dc here and throughout the body. Work 2 dc into the ring, ch 2, then work [3 dc into the ring, ch 2] three times. Join with a sl st to the top of the beginning ch 3. Pull the ring closed. You should have four 3-dc groups and four ch-2 corner spaces.
Round 2: Sl st across the next 2 dc and into the first ch-2 corner sp. Ch 3, 2 dc, ch 2 and 3 dc in the same corner sp. Ch 1. Work [3 dc, ch 2, 3 dc] in the next corner sp, ch 1. Repeat in the remaining two corners. Join with a sl st to the top of the beginning ch 3.
Round 3: Sl st across to the first ch-2 corner sp. Ch 3, 2 dc, ch 2 and 3 dc in that corner. Ch 1. Work 3 dc in the next ch-1 sp, ch 1. Work [3 dc, ch 2, 3 dc] in the next corner, ch 1. Continue around in the same way, working 3 dc in every ch-1 side sp and [3 dc, ch 2, 3 dc] in every corner. Join to the top of the beginning ch 3.
Round 4: Sl st across the next 2 dc and into the first ch-2 corner sp. Ch 3, 2 dc, ch 2 and 3 dc in the same corner. Ch 1. Work 3 dc in each ch-1 sp along the next side, working ch 1 between neighboring 3-dc groups. In the next corner work [3 dc, ch 2, 3 dc], then ch 1. Continue around in the same way. Join with a sl st to the top of the beginning ch 3.
Measurement checkpoint: After Round 4, the square should measure about 5 inches across from one straight edge to the opposite edge.
Rounds 5 through 10: At the beginning of each round, sl st across the next 2 dc and into the first ch-2 corner sp. Ch 3, 2 dc, ch 2 and 3 dc in that corner, then ch 1. Work 3 dc in every ch-1 side sp, with ch 1 between neighboring 3-dc groups. Work [3 dc, ch 2, 3 dc] in every ch-2 corner sp. Continue the established pattern all the way around and join each round with a sl st to the top of the beginning ch 3.
Each new round adds one 3-dc group to each side. After Round 10, you should have 10 groups along each side, counting the groups beside the corner spaces, with 9 ch-1 spaces between them.
Lay the square flat without stretching it. It should measure about 12 to 12 1/2 inches across.
If Round 10 is substantially smaller or larger than that, stop and check your hook size and tension against the Round 4 measurement before adding the border. Don't add another full granny round just to chase the finished measurement because that also changes the center-to-corner drop of the lovey.
Border Round: Sl st across the next 2 dc and into the first ch-2 corner sp. Ch 1. In the same corner work sc, ch 2, sc. Work 1 sc in each dc and 1 sc in each ch-1 sp across the next side. In the next ch-2 corner work sc, ch 2, sc. Repeat around all four sides. Join with a sl st to the first sc. You should have 164 sc total plus four ch-2 corner spaces.
The finished square should measure about 12 1/2 to 13 inches across and should lie flat without ruffling.
Fasten off and weave in the ends.
Lay the body flat and locate the exact center of the square. Mark the center with a removable stitch marker. This is where the bunny will be mounted during final assembly.
Do not fold a corner beneath the head. Do not gather the center. The head and collar sit directly over the middle of the open square.
Before assembly, turn the square so it looks like a diamond with one corner pointing toward you. That front corner becomes the long center point shown in the finished lovey. The two side corners fall outward and the fourth corner falls behind the bunny.
Don't block the body stiff. A soft square that can fall into natural folds will reproduce the draping shape in the finished example much better.
Crochet the Bunny Head
Use Color B and the 3.75 mm hook.
The head is worked in continuous single crochet rounds. Keep the fabric firm enough that the stuffing doesn't show between stitches.
Round 1: Make a magic ring and work 6 sc into the ring. (6 sts)
Round 2: Inc in each st around. (12 sts)
Round 3: [Sc in next st, inc in next st] around. (18 sts)
Round 4: [Sc in next 2 sts, inc in next st] around. (24 sts)
Round 5: [Sc in next 3 sts, inc in next st] around. (30 sts)
Round 6: [Sc in next 4 sts, inc in next st] around. (36 sts)
Round 7: [Sc in next 5 sts, inc in next st] around. (42 sts)
Round 8: [Sc in next 6 sts, inc in next st] around. (48 sts)
Round 9: [Sc in next 7 sts, inc in next st] around. (54 sts)
Round 10: [Sc in next 8 sts, inc in next st] around. (60 sts)
Rounds 11 through 14: Sc in each st around. (60 sts)
The head should now have the broad, rounded shape shown in the finished bunny. Before you begin decreasing, decide which side will be the face and place a second removable marker at the center front. Leave this face marker in place as a stationary reference; it is separate from the first-stitch marker that moves up with each round.
Round 15: [Sc in next 8 sts, dec over next 2 sts] around. (54 sts)
Round 16: [Sc in next 7 sts, dec] around. (48 sts)
Round 17: [Sc in next 6 sts, dec] around. (42 sts)
Round 18: [Sc in next 5 sts, dec] around. (36 sts)
Begin stuffing the head. Add the fiberfill a little at a time and spread it evenly toward the top and sides. Keep the front of the face smooth.
Round 19: [Sc in next 4 sts, dec] around. (30 sts)
Round 20: [Sc in next 3 sts, dec] around. (24 sts)
Add more stuffing. The finished head should be rounded but not packed so tightly that the stitches stretch apart.
Round 21: [Sc in next 2 sts, dec] around. (18 sts)
Round 22: [Sc in next st, dec] around. (12 sts)
Finish stuffing and check the shape from the front and side.
Round 23: Dec around. (6 sts)
Fasten off, leaving a yarn tail about 24 inches long. Thread the tail through the front loops of the remaining 6 stitches and pull the opening closed. Secure the yarn, but do not cut the long tail. You'll use it to attach the head to the center of the lovey body.
The stuffed head should measure about 4 3/4 to 5 inches across. A small difference is fine. What matters more is keeping the head rounded and proportional to the long ears.
Crochet the Bunny Ears
Make 2 with Color B and the 3.75 mm hook.
The ears are worked as long crochet tubes and left unstuffed. Flattening the tubes gives them the thicker handmade edge you see in the finished bunny without making the ears stiff.
Round 1: Make a magic ring and work 6 sc into the ring. (6 sts)
Round 2: Inc in each st around. (12 sts)
Round 3: [Sc in next st, inc in next st] around. (18 sts)
Rounds 4 through 29: Sc in each st around. (18 sts)
Round 30: [Sc in next 4 sts, dec] 3 times. (15 sts)
Rounds 31 and 32: Sc in each st around. (15 sts)
Round 33: [Sc in next 3 sts, dec] 3 times. (12 sts)
Rounds 34 and 35: Sc in each st around. (12 sts)
Fasten off, leaving a 24-inch tail for sewing.
Do not stuff the ears.
Flatten each ear so the last round forms a straight edge with 6 stitches on the front and 6 on the back. The finished ear should measure about 7 1/2 to 8 inches long and roughly 2 inches across through the widest section.
Run your fingers down each flattened ear before sewing. You want a soft bend, not a sharply pressed crease. The ears should be able to fall beside the bunny's face on their own.
Crochet the Bunny Arms
Make 2 with Color B and the 3.75 mm hook.
The arms are lightly stuffed at the rounded ends and left flatter near the shoulders. That keeps them soft enough to hang beside the lovey body instead of sticking straight out.
Round 1: Make a magic ring and work 6 sc into the ring. (6 sts)
Round 2: Inc in each st around. (12 sts)
Round 3: [Sc in next st, inc in next st] around. (18 sts)
Rounds 4 through 10: Sc in each st around. (18 sts)
Add a small amount of fiberfill to the lower part of the arm. Keep it soft.
Round 11: [Sc in next st, dec] around. (12 sts)
Rounds 12 through 18: Sc in each st around. (12 sts)
Do not add stuffing to the last several rounds.
Fasten off, leaving an 18-inch tail.
Flatten the open end of the arm so 6 stitches sit along each side. Using the yarn tail, sew the opening closed through both layers. Secure the seam, but do not cut or weave in the remaining tail. You'll use it to attach the arm to the lovey body.
Each arm should measure about 4 inches long. Set them aside for assembly.
Crochet the Ribbed Cinnamon Collar
Use Color C and the 3.75 mm hook.
I would keep this collar fairly narrow. It needs enough cinnamon color to give the winter bunny its seasonal look, but it shouldn't cover the lower half of the face or turn into a bulky scarf.
Chain 5.
Row 1: Sc in the second ch from the hook and in each remaining ch. Turn. (4 sts)
Row 2: Ch 1. Working in the back loop only, sc in each of the 4 sts. Turn. (4 sts)
Rows 3 through 38: Repeat Row 2.
Without stretching it hard, the finished ribbed strip should measure about 8 to 8 1/2 inches long and about 1 inch wide.
Wrap the strip loosely around the lower part of the finished bunny head as a fit check. The short ends should meet comfortably without squeezing the head.
If your yarn or tension gives you a shorter strip, add one or two more rows. If the strip overlaps noticeably, remove one or two rows.
Fasten off, leaving an 18-inch tail for joining the collar during assembly. Do not sew the short ends together yet.
Leave the collar flat and unstuffed until the head has been attached to the lovey body.
Embroider the Bunny Face
Finish the face before sewing the head to the lovey body. It's much easier to check the eye and nose placement while you can turn the head in your hands.
Eyes: Use black embroidery floss. Use the center-front marker as the midpoint of the face. Place the eye centers at about Round 13, approximately 4 stitches to each side of that midpoint, so there are about 8 stitches between the eye centers.
Each eye should be a small vertical oval about 3/8 inch tall, filled solidly with close parallel black satin stitches.
These are open, awake-looking embroidered eyes rather than curved sleepy-eye lines.
Keep both eyes the same height. Before knotting the floss, hold the head at arm's length and check that neither eye has drifted higher or farther from the center.
Nose: Center the nose approximately two rounds below the eye line. Using Color C or matching cinnamon embroidery thread, work a small inverted triangle about 3/8 inch wide.
Fill the triangle with short satin stitches.
Bring one straight stitch down from the center point of the nose for about 1/4 inch.
From the bottom of that stitch, make one small curved stitch toward the left and another toward the right to form the simple mouth shown in the finished bunny.
To finish an embroidery tail on the closed head, bring it out through the back of the head, secure it, then pass the needle back through a nearby stitch and out several stitches away. Pull gently so the secured end disappears into the stuffing, then trim the yarn close to the crochet surface. Don't leave knots, loops or loose thread on the outside.
Assemble the Center-Mounted Bunny Lovey
Lay the ivory lovey square flat and find the center marker you placed earlier. Turn the square like a diamond so one corner points toward you. That corner will become the long front point of the finished lovey.
The bunny stays centered over the middle of the square. Don't move the head toward the front point to make the body look longer. The soft square will make that long drape on its own once you lift it from the center.
1. Position the arms.
Place one arm on each side of the center marker. Angle them slightly downward so the rounded ends hang beside the upper part of the ivory body.
The flattened shoulder ends should sit close to the center, about 1 to 1 1/4 inches apart beneath the future head position.
Using the yarn tails, sew the flattened tops of the arms securely to the lovey square. Stitch through several body stitches rather than attaching an arm to only one open space in the granny-style fabric.
Leave the upper inside edge of each arm available for one more small tack after the head is attached.
2. Attach the head at the exact center.
Place the bottom of the bunny head over the center marker with the face aimed directly toward the long front corner of the lovey. Check the placement, then remove the center marker before you begin sewing.
The center of the head should sit over the center of the square.
Using the long Color B tail from the head, sew the lower portion of the head securely to the body in a circle about 1 1/2 to 1 3/4 inches across.
Take small stitches into the lower head rounds and then through solid crochet stitches around the center of the lovey. Work all the way around the attachment area.
Check the bunny from the front before fastening off. The head should sit upright without leaning to either side.
Add a few additional stitches if the head still rocks noticeably at the base.
3. Finish the arm placement.
Bring each arm naturally against the lower side of the head. Use one or two small stitches near the upper inside edge of the arm to tack it to the lower side of the head.
Don't sew the whole arm against the body. The lower portion should remain loose so it hangs naturally.
4. Add the ribbed collar.
Wrap the cinnamon collar around the neck seam with the two short ends meeting at the center back. The collar should cover the head-to-body attachment without climbing high onto the face.
Using the 18-inch Color C tail, sew the two short ends of the collar together securely at the back. Weave in the remaining tail.
Thread a separate length of Color C onto your yarn needle. Sew the inside upper edge of the collar securely to the lower part of the bunny head, working all the way around the neck with small, evenly spaced stitches. Catch only the inside edge of the ribbing so the outside of the collar stays raised and textured rather than being sewn flat.
Check the complete collar seam before fastening off. There should be no loose section of the collar that can pull away from the head.
5. Attach the ears.
Position the flattened base of each ear on the upper side of the head, roughly at the 10 o'clock and 2 o'clock positions.
The ear bases should begin around Rounds 7 through 10 of the head. Keep them the same distance from the center of the face.
Sew through both layers of the flattened ear base and through the head stitches underneath. Go across the full 6-stitch width of the ear base, then return across it once more for a secure seam.
Let the ears fall before adding any extra stitches. They should hang beside the cheeks with a soft bend like the finished bunny.
If one ear sticks outward at the top, add one small hidden tack between the inside edge of the ear and the head. Don't sew farther down the ear.
6. Finish the lovey.
Weave in every remaining yarn end securely.
Run your fingers over the head, ear seams, arm seams and collar attachment. There should be no loose yarn loops or unsecured pieces. Remove every remaining stitch marker or other temporary marker before the lovey is used.
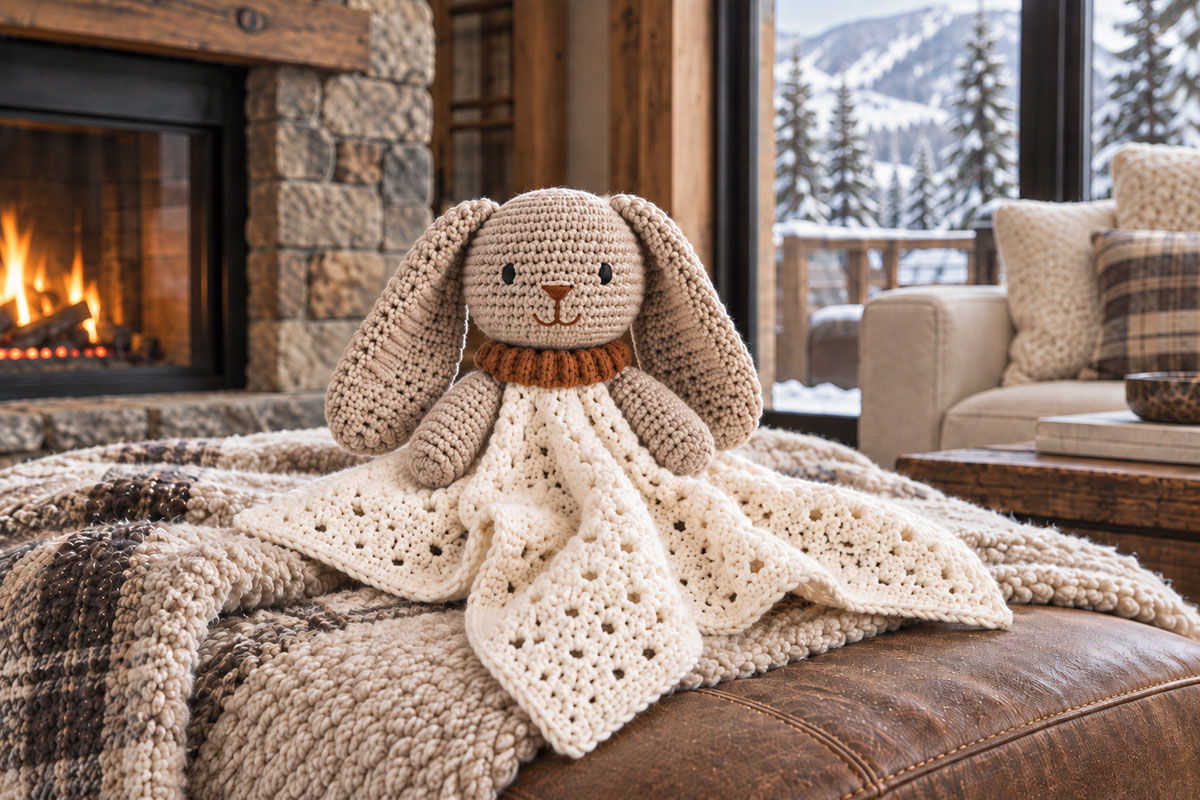
Pick the lovey up by the center beneath the head and let the ivory square fall naturally. One corner should hang forward beneath the face while the side corners fall away from it. That's the draping shape shown in the finished example.
Don't starch or stiffly block the finished lovey. If you want to neaten the body, smooth it by hand and reshape the corners while the yarn is slightly damp, then let it dry flat.
Baby-Safe Use for a Crochet Bunny Lovey
This pattern uses embroidered facial features instead of plastic eyes, and the ears, arms, head and collar are sewn in place without buttons, beads or removable hardware.
Check the finished lovey regularly. If a seam loosens, yarn breaks or stuffing begins to show, put it away until it can be repaired.
A handmade lovey is a soft object, not an infant sleep product. Use it only during supervised awake time with a baby.
The American Academy of Pediatrics recommends keeping soft objects and loose bedding out of an infant's sleep area. You can read its current safe sleep guidance for babies at HealthyChildren.org.
Keep this lovey out of cribs, bassinets and other infant sleep spaces.
If you would rather make the fuzzy square-style version, my crochet bunny lovey pattern is a separate design with super-bulky fuzzy yarn and a different finished look.
When you click on links to various merchants on this site and make a purchase, this may result in this site earning a commission. This does not affect the price you pay.

UBGI Gold Standard 2026
Reviewed under the site's
editorial checklist.
Photos, decorating ideas, party setups and reader submissions are shared for inspiration unless a page is specifically presented as a pattern, tutorial, reference guide or step-by-step project. Follow the instructions, measurements, safety guidance and manufacturer directions provided for the particular project or product.
About Jan | Contact | Baby Nursery Ideas (Blog) | Site Map | Privacy Policy | Disclosure Policy | Disclaimer | Affiliate Disclosure | Earnings Disclosure | Facebook | Pinterest
I am a participant in the Amazon Services LLC Associates Program, an affiliate advertising program designed to provide a means for us to earn fees by linking to Amazon. As an Amazon Associate I earn from qualifying purchases.
Copyright © 2006-2026. All Rights Reserved.