Free Winter Bear Lovey Crochet Pattern
By Jan Bay
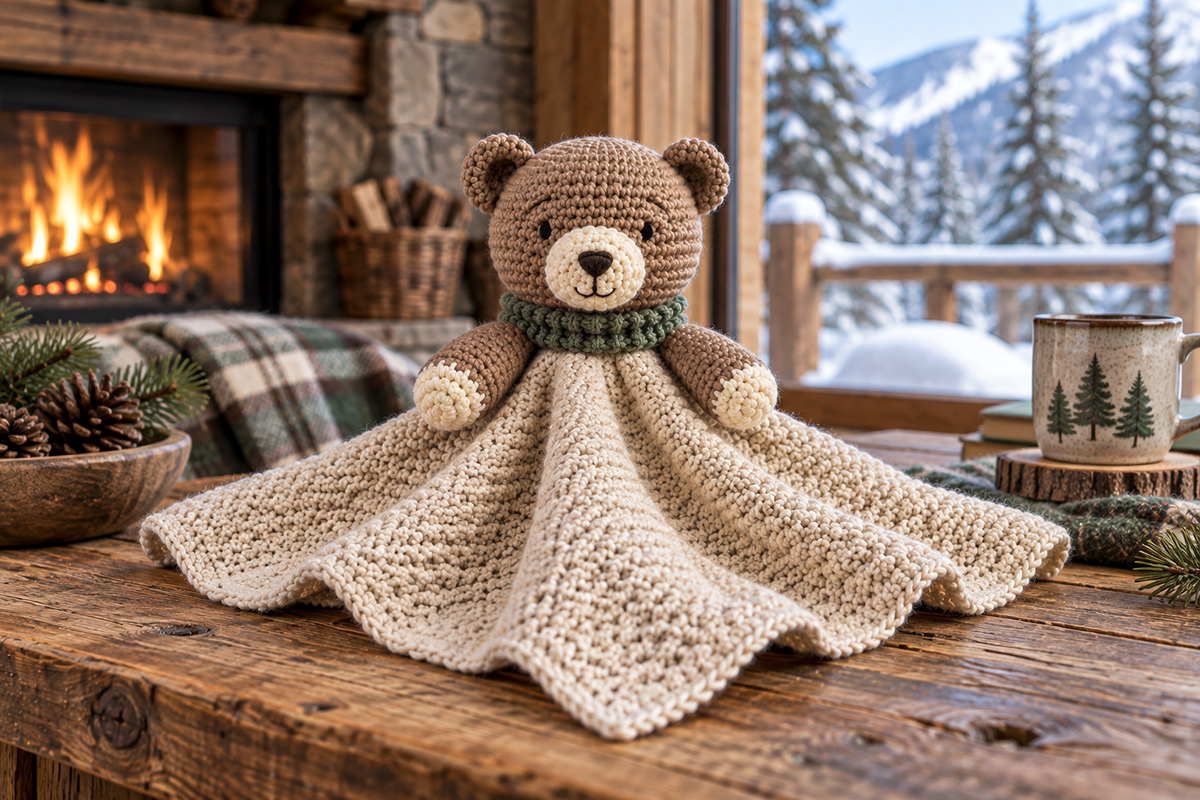
This free winter bear lovey crochet pattern makes a more rustic version of my teddy bear lovey and has darker fur than my polar bear lovey. This is a woodland bear with dark cocoa brown fur with warm oatmeal accents and a forest green neck warmer for a little seasonal pizzazz and a pop of color during the least colorful time of year.
More Woodland Crochet Patterns
Crochet Supply
This bear belongs to my woodland lovey collection, but I gave him a more rustic body than the softer woodland bunny. His oatmeal blanket is worked flat in a dense pebbled stitch with a plain border rather than the granny square style that I have used for previous bears and animal loveys. The finished square is turned like a diamond beneath the cocoa brown bear, which gives the body a nice long front point for that classic security blanket shape. He is also different from my teddy bear lovey with his small round ears, oatmeal muzzle and narrow forest green neck warmer added for his own winter woodland personality.
Jump to:
Materials for the Winter Bear Lovey
I would use a smooth medium weight yarn rather than fuzzy yarn for this pattern. The visible crochet stitches are part of the woodland collection look, and smooth yarn also makes the facial embroidery and small bear ears easier to place neatly.
Yarn: #4 medium worsted weight yarn
Color A, warm oatmeal or cream: about 180 to 220 yards for the lovey body
Color B, cocoa brown or mushroom taupe: about 130 to 160 yards for the head, ears and arms
Color C, lighter oatmeal or warm cream: about 20 to 25 yards for the muzzle and paw ends
Color D, muted evergreen: about 15 to 20 yards for the ribbed winter neck warmer
Face: black embroidery floss for the eyes and dark brown embroidery floss for the nose and mouth
Hooks: 5.0 mm crochet hook for the lovey body and 3.75 mm crochet hook for the head, muzzle, ears, arms and neck warmer
Also needed: polyester fiberfill, yarn needle, embroidery needle, removable stitch markers and scissors
This pattern does not use plastic safety eyes, buttons, beads, bells, pom-poms or detachable accessories. The face is embroidered and the winter neck warmer is sewn permanently in place.
Expected Finished Size, Gauge and Construction
The measurements below are expected measurements based on the stated yarn, hooks and gauge. Yarn thickness and individual crochet tension can change the final measurements.
Lovey body: about 12 3/4 to 13 inches square after the plain border is added
Center to corner body drop: about 9 to 9 1/4 inches
Bear head: about 4 1/4 to 4 1/2 inches across
Bear ears: about 1 1/4 to 1 1/2 inches tall
Muzzle: about 1 3/4 to 2 inches wide
Arms: about 4 inches long
Winter neck warmer: about 3/4 inch wide and 7 1/2 to 8 inches long before joining
Expected overall length: about 13 to 13 3/4 inches from the top of the bear to the lowest point of the draping body
Pieces before assembly: 8 crochet pieces total: 1 lovey body, 1 head, 1 muzzle, 2 ears, 2 arms and 1 ribbed neck warmer.
Stuffed piece gauge: about 16 single crochet stitches and 18 rounds over 4 inches with the 3.75 mm hook.
Gauge matters most on the stuffed pieces. If your single crochet fabric has visible gaps that could allow stuffing to show, use a slightly smaller hook rather than packing the head more tightly.
Body gauge: about 15 stitches and 12 rows over 4 inches in the alternating single crochet and double crochet texture with the 5.0 mm hook.
The body uses the larger 5.0 mm hook so the dense textured stitch can still drape. After Row 12, the piece should measure about 12 1/4 inches wide and about 4 inches tall without stretching. After Row 37 and the plain border, the finished body should measure about 12 3/4 to 13 inches square.
Abbreviations: ch = chain, dc = double crochet, sc = single crochet, sl st = slip stitch, sp = space, st = stitch, sts = stitches, inc = work 2 sc in the next stitch, dec = single crochet 2 stitches together over the next 2 stitches.
Work the muzzle, ears, arms and head in continuous rounds unless the instructions say otherwise. Do not join at the end of each round. Use a marker to show the first stitch and move it up after every round.
Secure every magic ring: After the first two rounds of the head, ears and arms, pull the starting tail firmly to close the center. Thread the tail onto a yarn needle, weave it beneath several stitches on the inside of the piece, reverse direction through a different group of stitches and pull it snug again. Leave the secured tail inside stuffed pieces. For the unstuffed ears, weave the tail completely into the wrong side before trimming it.
Winter Bear Lovey Crochet Pattern: Rustic Textured Body
Use Color A, warm oatmeal or cream, and the 5.0 mm hook.
This body is worked flat in rows instead of from the center. The alternating single crochet and double crochet stitches make a dense, lightly pebbled fabric without the open clusters of a granny square. That's the look I want here. The bear should feel woodsy and handmade, not lacy or frilly.
Expected body gauge: about 15 stitches and 12 rows over 4 inches in the textured stitch pattern.
The finished measurements are expected measurements rather than physically tested measurements. With the stated yarn, hook and gauge, the completed body should measure about 12 3/4 to 13 inches square after the plain border is added.
Chain 47.
Row 1: Sc in the second ch from the hook. Dc in the next ch. Repeat [sc in the next ch, dc in the next ch] across. Turn. (46 sts)
Row 2: Ch 1. The turning chain does not count as a stitch. Sc in the first st. Dc in the next st. Repeat [sc in the next st, dc in the next st] across. Turn. (46 sts)
Rows 3 through 37: Repeat Row 2. Keep 46 stitches in every row.
Because every row begins with sc and alternates sc and dc across, each new sc falls into the dc from the row below and each new dc falls into the sc below it. That alternating height is what gives the body its small, rustic texture.
Measurement checkpoint: After Row 12, the piece should measure about 12 1/4 inches wide and about 4 inches tall without stretching. If the width is substantially different, change hook size now instead of adding or removing stitches later.
After Row 37, the unbordered body should measure roughly 12 1/4 inches wide by 12 1/4 to 12 1/2 inches tall.
Do not add more rows simply to make the body larger if the width is already correct. A noticeably longer rectangle will change the way the finished lovey hangs once the square is turned like a diamond.
Plain Single Crochet Border
Do not fasten off after Row 37.
Ch 1. Do not turn.
First side edge: Work down the row ends. Repeat [2 sc around the end of the next row, 1 sc around the end of each of the next 3 rows] 9 times. Work 1 sc around the final row end. You should have 46 sc along this side.
Ch 1 for the corner.
Foundation edge: Work 1 sc in each of the 46 foundation stitches across. (46 sc)
Ch 1 for the corner.
Second side edge: Working upward from the foundation edge, repeat [1 sc around the end of each of the next 3 rows, 2 sc around the end of the next row] 9 times. Work 1 sc around the final row end. (46 sc)
Ch 1 for the corner.
Top edge: Work 1 sc in each of the 46 stitches across Row 37. (46 sc)
Ch 1 for the final corner and join with a sl st to the first sc.
You should have 184 sc total plus four ch-1 corner spaces.
Fasten off and weave in the end.
The border should stay simple and nearly disappear into the body. There are no shells, scallops or decorative edging rounds on this bear.
Mark the Center for Assembly
Lay the finished body flat without stretching it.
Count to Row 19. Across that row, locate the space between stitches 23 and 24. Place a removable stitch marker through the fabric at that point. That is the center of the body and the location where the bear's neck will be attached later.
Do not gather the center and do not fold fabric underneath the future head.
For assembly, turn the square so it sits like a diamond with one corner pointing toward the front. The head will sit directly over the center marker. The front corner should fall naturally beneath the bear while the two side corners spread outward and the fourth corner falls toward the back.
Don't stiffly block this body. The textured fabric needs to stay flexible enough to fall into the soft folds shown in the finished bear.
Crochet the Oatmeal Bear Muzzle
Use Color C and the 3.75 mm hook.
The muzzle is a small horizontal oval. It should soften the face without covering most of the bear's head.
Ch 6.
Round 1: Sc in the second ch from the hook and in each of the next 3 ch. Work 3 sc in the last ch. Turn the chain so you can work along the unused loops on the opposite side. Sc in the next 3 ch. Work 2 sc in the final ch. (12 sts)
Round 2: Inc in the first st, sc in the next 3 sts, inc in each of the next 3 sts, sc in the next 3 sts, then inc in each of the final 2 sts. (18 sts)
Round 3: Sc in each st around. (18 sts)
Fasten off, leaving an 18 inch tail for sewing.
The finished muzzle should measure about 1 3/4 to 2 inches wide. Leave it unstuffed for now. A very small amount of fiberfill can be added beneath it while sewing if you want a slightly rounded muzzle, but it should not look like a large protruding snout.
Crochet the Small Round Bear Ears
Make 2 with Color B and the 3.75 mm hook.
These ears are deliberately small and rounded. They should sit low against the upper sides of the head rather than standing tall like bunny ears.
Round 1: Make a magic ring and work 6 sc into the ring. (6 sts)
Round 2: Inc in each st around. (12 sts)
Round 3: [Sc in the next st, inc in the next st] around. (18 sts)
Rounds 4 and 5: Sc in each st around. (18 sts)
Round 6: [Sc in the next st, dec] around. (12 sts)
Fasten off, leaving an 18 inch tail.
Do not stuff the ears. Flatten each ear so 6 stitches sit along the front and 6 along the back. Using the yarn tail, sew the open edge closed through both layers. Keep the remaining tail for attaching the ear to the head.
Crochet the Bear Arms
Make 2 with Colors C and B and the 3.75 mm hook.
The oatmeal paw ends are small, so they read as part of the winter bear without turning the whole arm cream. Stuff only the lower portion. The upper arm stays soft and flexible so it can rest naturally against the lovey body.
Begin with Color C.
Round 1: Make a magic ring and work 6 sc into the ring. (6 sts)
Round 2: Inc in each st around. (12 sts)
Round 3: [Sc in the next st, inc in the next st] around. (18 sts)
Round 4: Sc in each st around. (18 sts)
Change to Color B. Fasten off Color C and secure the yarn ends inside the arm.
Rounds 5 through 10: Sc in each st around. (18 sts)
Add a small amount of fiberfill to the paw and lower part of the arm. Keep it soft rather than firm.
Round 11: [Sc in the next st, dec] around. (12 sts)
Rounds 12 through 18: Sc in each st around. (12 sts)
Do not add stuffing to these upper rounds. The shoulder portion needs to stay flexible.
Fasten off, leaving an 18 inch Color B tail.
Flatten the open end so 6 stitches sit along each side. Using the yarn tail, sew the opening closed through both layers. Secure the seam, but leave the remaining tail for attaching the arm to the lovey body.
Each finished arm should measure about 4 inches long.
Crochet the Evergreen Winter Neck Warmer
Use Color D and the 3.75 mm hook.
Keep this neck warmer narrow. It should add one strip of evergreen color around the bear's neck without climbing onto the muzzle or making the head look buried in a large collar.
Ch 4.
Row 1: Sc in the second ch from the hook and in each remaining ch. Turn. (3 sts)
Row 2: Ch 1. Working in the back loop only, sc in each of the 3 sts. Turn. (3 sts)
Rows 3 through 35: Repeat Row 2.
The finished ribbed strip should measure about 3/4 inch wide and about 7 1/2 to 8 inches long without being stretched hard. Fasten off, leaving an 18 inch tail, and set it aside without joining the short ends.
After the 30 stitch neck is finished, wrap the strip around it before assembly. The short ends should meet comfortably at the center back without squeezing or noticeably overlapping. If necessary, undo the fastening and add or remove a row or two, then fasten off again with an 18 inch tail.
Crochet the Rounded Woodland Bear Head
Use Color B and the 3.75 mm hook.
The bear head is worked in continuous single crochet rounds. It is slightly smaller than the woodland bunny head but still substantial enough to balance the 12 3/4 to 13 inch rustic lovey body.
Round 1: Make a magic ring and work 6 sc into the ring. (6 sts)
Round 2: Inc in each st around. (12 sts)
Round 3: [Sc in the next st, inc in the next st] around. (18 sts)
Round 4: [Sc in the next 2 sts, inc in the next st] around. (24 sts)
Round 5: [Sc in the next 3 sts, inc in the next st] around. (30 sts)
Round 6: [Sc in the next 4 sts, inc in the next st] around. (36 sts)
Round 7: [Sc in the next 5 sts, inc in the next st] around. (42 sts)
Round 8: [Sc in the next 6 sts, inc in the next st] around. (48 sts)
Round 9: [Sc in the next 7 sts, inc in the next st] around. (54 sts)
Rounds 10 through 14: Sc in each st around. (54 sts)
Choose the front of the head and place a second removable marker at the center front. Keep this marker stationary. It is separate from the first stitch marker that moves with each round.
Round 15: [Sc in the next 7 sts, dec] around. (48 sts)
Round 16: [Sc in the next 6 sts, dec] around. (42 sts)
Round 17: [Sc in the next 5 sts, dec] around. (36 sts)
Pause here while the lower opening is still wide enough to finish the face and ear attachments comfortably.
Attach the Muzzle
Center the oatmeal muzzle on the front of the head. Position its upper edge around Head Rounds 12 and 13, with the lower portion extending toward Rounds 15 and 16.
Pin or hold the muzzle in place and check it from straight ahead. It should be centered beneath the face marker.
Using the Color C tail, sew almost all the way around the outer edge of the muzzle.
If you want a gently rounded muzzle, place only a small pinch of fiberfill underneath before closing the final section. Do not overstuff it.
Finish sewing around the muzzle and secure the tail inside the still open head.
Embroider the Bear Face
Eyes: Use black embroidery floss. Place the eye centers around Head Round 11, approximately 4 stitches to each side of the center front marker.
Make each eye a small vertical oval about 3/8 inch tall, filled with close black satin stitches. Keep the eyes simple and open rather than using plastic eyes.
Nose: Use dark brown embroidery floss. Center a small inverted triangle near the upper middle of the cream muzzle. Keep it about 3/8 inch wide.
Fill the triangle with satin stitches. Bring one short straight stitch down from its lower point. Add a very small curved stitch to each side if you want a simple mouth.
Secure all embroidery tails inside the open head.
Attach the Bear Ears
Place one flattened ear on each upper side of the head. A good starting position is across approximately Head Rounds 5 through 8.
Keep the inner edges the same distance from the top center of the head. The ears should sit low and rounded against the head rather than pointing upward.
Using each ear's yarn tail, sew through both layers of the flattened ear base and through the head stitches underneath. Sew across the complete base, then return across it once more for a secure seam.
Secure the yarn tails inside the open head.
Finish the Bear Head
Begin stuffing the head. Add fiberfill gradually and spread it toward the top, cheeks and sides. Keep the face smooth and avoid packing the head so firmly that the stitches stretch apart.
Round 18: [Sc in the next 4 sts, dec] around. (30 sts)
Finish stuffing the rounded part of the head now. Shape the cheeks and lower sides before continuing. Keep the stuffing above the final neck rounds rather than packing fiberfill into the neck itself.
Rounds 19 and 20: Sc in each st around. (30 sts)
Do not stuff these final two rounds. They form the short flexible neck that will be sewn directly to the center of the lovey body.
Fasten off, leaving a 30 inch tail for assembly. Leave the 30 stitch neck opening open.
At the stated gauge, the open neck should measure about 7 1/2 inches around without stretching. That measurement also gives you a useful check against the finished evergreen neck warmer before assembly.
The rounded portion of the finished head should measure about 4 1/4 to 4 1/2 inches across. The wider open neck supports the upright lovey posture shown in the finished example without creating a separate stuffed torso beneath the head.
Assemble the Winter Woodland Bear Lovey
Lay the oatmeal lovey square flat. Turn it like a diamond so one corner points directly toward you. Find the center marker placed earlier.
The bear should stay centered over the middle of the square. Do not move the head toward the front corner to create more length. The body will form its long front drape naturally when lifted from the center.
1. Position the Arms
Place one arm on each side of the center marker and angle them slightly downward so the oatmeal paws hang beside the upper portion of the lovey body.
Position the inside edge of each flattened shoulder about 1 1/4 inches from the center marker. That leaves approximately 2 1/2 inches between the two inside shoulder edges for the bear's neck attachment.
Using the remaining yarn tails, sew the flattened shoulder ends securely to the body. Stitch through several body stitches so the attachment is spread across the dense textured fabric rather than concentrated in one stitch.
Leave the upper inside edge of each arm available for one final hidden tack after the head is attached.
2. Attach the Open Neck to the Body
Place the open 30 stitch neck directly over the center marker with the bear's face aimed toward the long front corner of the lovey.
Shape the neck opening into a circle about 2 1/4 to 2 1/2 inches across. Keep it centered between the two arms and flat against the lovey body rather than gathering the blanket into a point.
Check the face direction and shoulder spacing one more time, then remove the center marker.
Thread the long Color B tail onto the yarn needle. Sew each of the 30 neck stitches securely to the textured lovey body, distributing the attachment evenly around the circular opening.
Catch solid sections of the body fabric with each stitch, but do not pull so tightly that the center puckers.
When the first pass is complete, check the bear from the front and side. The head should sit above the blanket with the supported posture shown in the finished example, but there should be no separate stuffed torso underneath it.
If the head rocks noticeably, make a second pass around the complete neck attachment with small evenly spaced stitches. Keep the blanket underneath flat and ungathered.
3. Finish the Arm Placement
Bring each arm naturally against the lower side of the bear head.
Add one or two small hidden stitches near the upper inside edge of each arm to tack it to the lower side of the head.
Leave the rest of each arm loose so it can hang naturally.
4. Sew On the Winter Neck Warmer
Wrap the evergreen ribbed strip around the head to body seam with the two short ends meeting at the center back.
The neck warmer should cover the attachment seam without climbing high over the muzzle.
Using the 18 inch Color D tail, sew the two short ends together securely at the back.
Thread a separate length of Color D onto the yarn needle. Sew the inside upper edge of the neck warmer securely to the lower portion of the bear head all the way around.
Then add several small hidden stitches along the lower inside edge, catching the lovey body or the head to body seam underneath. This keeps the neck warmer fixed in position instead of allowing it to function as a loose accessory.
Check the entire neck warmer before fastening off. No section should pull freely away from the bear.
5. Finish the Lovey
Weave in every remaining yarn end securely.
Remove every remaining stitch marker, face marker, pin or other temporary construction aid.
Run your fingers over the ear seams, muzzle, head attachment, arm seams and neck warmer. Check for loose loops, weak seams or visible stuffing.
Pick the lovey up beneath the center mounted head and allow the oatmeal square to fall naturally. One corner should hang forward beneath the bear while the side corners fall away from it.
Do not starch or stiffly block the lovey. If the body needs reshaping, smooth it gently while slightly damp and let it dry flat.
Care for the Finished Crochet Bear Lovey
Follow the washing instructions for the yarn you chose. For a handmade lovey with securely sewn pieces, gentle washing is usually easier on the seams and embroidery than rough agitation.
If machine washing is allowed by the yarn label, place the lovey in a mesh laundry bag. Reshape the head, ears, arms and body after washing and allow them to dry completely before use.
Check the lovey regularly. If an embroidered feature loosens, a seam opens or stuffing begins to show, put the lovey away until it can be repaired.
Supervised Use and Infant Sleep Safety
This winter bear uses embroidered facial features instead of plastic eyes, and the ears, muzzle, arms, head and neck warmer are sewn securely in place without buttons, beads or removable trim.
A handmade crochet lovey is a soft object, not an infant sleep product. Use it only for supervised awake cuddling with a baby.
The American Academy of Pediatrics recommends keeping soft objects and loose bedding out of an infant's sleep area. You can read the current AAP safe sleep guidance at HealthyChildren.org.
Keep this lovey out of cribs, bassinets and other infant sleep spaces.
Want a Different Bear Lovey Style?
This winter woodland bear has its own construction and seasonal look. If you want a more traditional bear instead, there are several other bear projects on the site.
Try the teddy bear lovey crochet pattern for a classic bear with a larger granny square blanket.
The brown bear lovey pattern combines crochet with a soft faux fur body.
For a white Arctic version, use the polar bear lovey crochet pattern.
For more forest animals, visit the complete crochet animal lovey pattern collection or browse more projects on the woodland nursery patterns page.
When you click on links to various merchants on this site and make a purchase, this may result in this site earning a commission. This does not affect the price you pay.

UBGI Gold Standard 2026
Reviewed under the site's
editorial checklist.
Photos, decorating ideas, party setups and reader submissions are shared for inspiration unless a page is specifically presented as a pattern, tutorial, reference guide or step-by-step project. Follow the instructions, measurements, safety guidance and manufacturer directions provided for the particular project or product.
About Jan | Contact | Baby Nursery Ideas (Blog) | Site Map | Privacy Policy | Disclosure Policy | Disclaimer | Affiliate Disclosure | Earnings Disclosure | Facebook | Pinterest
I am a participant in the Amazon Services LLC Associates Program, an affiliate advertising program designed to provide a means for us to earn fees by linking to Amazon. As an Amazon Associate I earn from qualifying purchases.
Copyright © 2006-2026. All Rights Reserved.