Salt Dough Baby Christmas Ornaments: 4 Handprint & Footprint Keepsakes
By Jan Bay
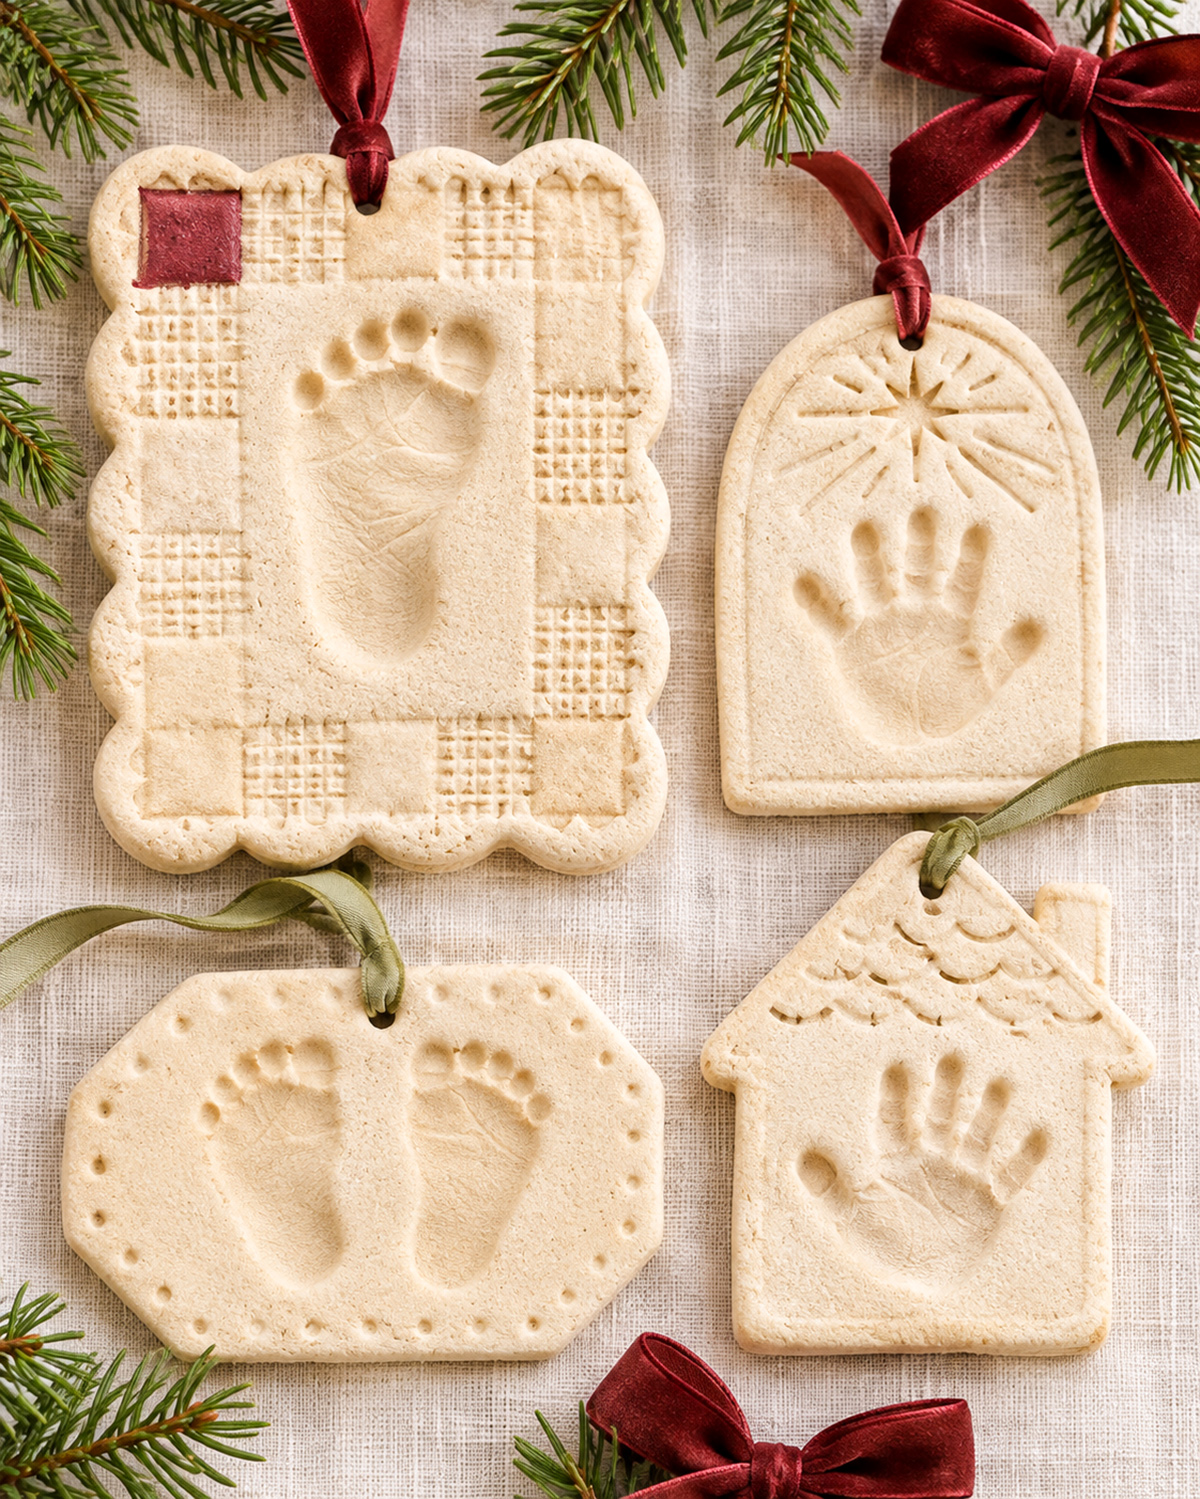
Salt Dough Baby Christmas Ornaments can capture the tiny hands and feet you'll want to remember forever. Baby handprint and footprint ornaments are nothing new, but I've taken a different approach with this collection that goes beyond the usual designs. I've included four keepsake ideas: a quilt-inspired footprint ornament, a handprint with a shining Christmas star, a double-footprint ornament, and a little Christmas cottage featuring baby's handprint. And the best part? They're relatively inexpensive to make! All four use a simple homemade salt dough recipe, with pretty textured details that turn those tiny impressions into special Christmas keepsakes you'll look forward to hanging on the tree or putting on display each year.
More Baby Christmas Keepsakes & Crafts
Baby Christmas Crafts & Keepsake Ideas
Baby Handprint Christmas Ornaments
See Supplies for This Project Here.
Jump to a Section
- Supplies & Materials
- Easy Salt Dough Recipe
- Prepare the Dough & Make Baby's Impressions
- Quilt-Inspired Baby Footprint Ornament
- Christmas Star Baby Handprint Ornament
- Little Feet Double-Footprint Ornament
- Baby's Christmas Cottage Ornament
- Drying & Baking Instructions
- Painting, Sealing & Finishing
- Troubleshooting Salt Dough Ornaments
- Storing Your Baby's Christmas Keepsakes
- Frequently Asked Questions
Supplies & Materials for Salt Dough Baby Christmas Ornaments
You won't need anything fancy to make these ornaments. Flour, salt, and water are the main ingredients, and most of the decorating tools are probably already in your kitchen or craft supplies.
We're making four different ornaments, so you'll also need a little room to roll out the dough and work on the details. I would make two batches rather than one enormous batch. It's easier to keep the dough from drying out while you're working.
Salt Dough Ingredients
- 4 cups all-purpose flour, divided into two batches
- 2 cups fine table salt, divided into two batches
- Approximately 1 1/2 to 2 cups water, added gradually
- A little extra flour for adjusting the dough
Each batch uses 2 cups flour, 1 cup salt, and up to 1 cup water. The amount you'll need depends on how large your baby's hands and feet are, how thick you roll the dough, and how much you trim away. Make extra dough if necessary rather than squeezing a print into a plaque that's too small.
Tools & Decorating Supplies
- Large mixing bowl and spoon
- Rolling pin
- Two 3/8-inch-thick rolling guides
- Parchment paper and baking sheets
- Ruler and paper for making shape templates
- Small craft knife or plastic clay-cutting tool
- Drinking straw for making hanging holes
- Toothpick or wooden skewer for engraving
- Small square of clean textured fabric or plastic canvas for the quilted design
- Small round-ended tool for making the dotted border
- Fine paintbrushes
- Cranberry-red acrylic paint
- Clear matte craft sealer suitable for fully dry salt dough
- Burgundy velvet ribbon
- Sage-green ribbon
- Optional fine sandpaper for smoothing fully dried edges
Keep all cutting tools, paints, and finishing products away from your baby. An adult should handle the dough, guide the impressions, and do all the decorating.
A note about salt dough: This is a keepsake craft, not edible dough or a baby toy. The high salt content can be dangerous if swallowed. Keep the dough and finished ornaments away from babies and pets, and wash your baby's hands or feet after making the impressions. If a child swallows salt dough, contact Poison Control at 1-800-222-1222 in the United States. For pet exposure, contact your veterinarian promptly. The ASPCA explains why salt dough ornaments are dangerous to pets, even after drying.
Easy Salt Dough Recipe for Baby Christmas Ornaments
These ornaments need dough that's firm enough to hold the tiny finger and toe impressions without spreading. I'd start with less water than the full recipe calls for. You can always add another spoonful, but trying to rescue a sticky batch with lots of extra flour is no fun.
Ingredients for One Batch
- 2 cups all-purpose flour
- 1 cup fine table salt
- 3/4 cup water to start, with up to 1/4 cup more if needed
Mixing Instructions
- Mix the dry ingredients. Put the flour and salt into a large bowl. Stir until they're evenly combined.
- Add the water. Pour in 3/4 cup water a little at a time, stirring as you go.
- Bring the dough together. Use your hands to gather the mixture into a ball. Add more water, a teaspoon or two at a time, only if dry crumbs won't hold together.
- Knead the dough. Work it on a clean surface for approximately 8 to 10 minutes, or until it feels smooth and pliable.
- Check the texture. Press one finger into the dough. The mark should remain visible without the surrounding dough collapsing into it.
- Adjust if necessary. If the dough sticks to your fingers, knead in a small amount of flour. If it cracks when you bend or press it, work in a few drops of water.
- Cover the dough. Keep any portion you're not using tightly covered so the surface doesn't begin to dry.
The finished dough should feel similar to firm modeling clay. It should be easy to press, but it shouldn't stick to baby's skin or stretch when you lift it from the work surface.
Recipe checkpoint: Roll a small test piece to 3/8 inch thick and press a fingertip into it. If the impression stays clear and the edges remain smooth, you're ready to make the ornaments.
Avoid self-rising flour. We're not trying to make these puff up in the oven. We want the impressions and decorative borders to stay as close as possible to the way they look before drying.
Prepare the Dough & Make Baby's Impressions
Before you begin cutting out shapes, take a look at your baby's hands and feet. The ornaments in our collection have generous borders around the impressions, and you'll want enough room for those little details.
The finished example shows four different shapes, but their sizes should be based on your baby's actual prints. A newborn's footprint and a six-month-old baby's footprint aren't going to need the same amount of space.
Plan the Ornament Sizes
These are suggested starting measurements for a small baby's impressions, not fixed sizes:
A little flexibility with sizes: The measurements I've given you are starting points, since every baby's hands and feet are a different size. Before cutting the dough, make sure there's plenty of room for the impression, decorative border, and hanging hole. If you need to make an ornament larger, go right ahead! The suggested two batches of salt dough haven't been tested with all four ornaments, so you may need to mix up a little extra. I'd rather have leftover dough than try to squeeze a precious little footprint into a space that's too small.
- Quilt-inspired footprint plaque: Approximately 6 inches wide and 8 inches tall, including the scalloped edge.
- Arched handprint ornament: Approximately 4 1/2 inches wide and 6 inches tall.
- Double-footprint ornament: Approximately 7 inches wide and 4 1/2 inches tall.
- Christmas cottage ornament: Approximately 5 1/2 inches wide and 6 inches tall, including the roof and chimney.
These sizes are only a guide. Make your paper template larger if the impression needs more room. The important thing is to keep the same shapes and proportions shown in the finished collection.
Large salt dough plaques can become heavy. Don't assume an ornament will be suitable for a Christmas tree just because it has a ribbon hole. Check its finished weight, the strength of the dried dough around the hole, and the support you plan to hang it from. A keepsake display stand is a good alternative for a heavier piece.
How Thick Should You Roll the Dough?
Roll the dough to approximately 3/8 inch thick, or about 9 to 10 mm. Use rolling guides on both sides so the thickness stays even.
A deeper impression needs enough dough underneath it to keep the ornament from becoming fragile. Aim for a clear impression without pressing all the way through.
Making the Handprints and Footprints
- Wash and dry your baby's hand or foot.
- Roll the dough on parchment paper to the planned thickness.
- Position your baby comfortably with another adult helping if needed.
- Gently lower the hand or foot straight onto the dough.
- Press lightly and evenly, supporting the fingers or toes rather than forcing them flat.
- Lift straight up without dragging across the surface.
- Check the impression before cutting out the final shape.
A good impression has distinct fingers or toes and enough detail to recognize the little hand or foot. Don't worry about trying to capture every wrinkle. If the print smears, roll that piece of dough out again and try once more.
If your baby pulls away or isn't comfortable, stop and try at another time. There's no reason to force a hand or foot into the dough.
Leave Room for the Borders
Keep at least 1/2 inch of dough between the impression and the nearest decorative edge where possible. Leave more room around the hanging hole. The scalloped quilt ornament needs an especially generous border because its patchwork texture surrounds the footprint.
Before moving on: The impression should be complete, the ornament should have a smooth bottom, and the dough beneath the deepest part of the print should still have enough thickness to remain intact during drying.
Quilt-Inspired Baby Footprint Salt Dough Ornament
This is the most detailed ornament in our collection, and the little quilted border makes it especially pretty. The design has a scalloped rectangular shape, a single baby footprint in the middle, and alternating plain and textured squares around the outside.
There's also one tiny cranberry-red square near the upper-left corner. It's a lovely finishing touch, but keep it small. The footprint is still the star of the ornament.
Finished Design
- One scalloped rectangular salt dough plaque
- One centered baby footprint, toes pointing toward the top
- A patchwork-style border with alternating textured squares
- One cranberry-red painted square near the upper-left corner
- One centered hanging hole at the top
- One burgundy velvet ribbon hanger
Step-by-Step Instructions
- Prepare the dough. Roll a portion of your salt dough to approximately 3/8 inch thick on parchment paper.
- Mark the overall shape. Make a paper rectangle approximately 6 inches wide and 8 inches tall. The finished plaque has gently scalloped edges, so allow room for those curves.
- Plan the footprint area. Mark a central panel large enough for baby's footprint, with approximately 3/4 to 1 inch of border space on each side. Allow a wider margin if needed for a larger foot.
- Make the footprint. Position baby's heel toward the lower part of the central panel and the toes toward the top. Press gently, then lift the foot straight up.
- Check the impression. Make sure all five toes and the heel are visible. If the print isn't clear, smooth or reroll the dough and try again before decorating.
- Cut the rectangle. Place the paper template around the footprint and carefully cut away the extra dough.
- Create the scalloped edge. Divide each outside edge into equal sections using small pencil marks on your paper template. Draw shallow rounded curves between the marks and trim the dough to follow them. The example has closely spaced, rounded scallops rather than large individual lobes.
- Smooth the edge. Use a slightly damp fingertip or a smooth tool to round the cut edges. Don't press so hard that you flatten the scallops.
- Mark the quilted border. Use a ruler and the blunt end of a wooden tool to mark a grid around the central footprint panel. Keep the marks shallow. Arrange the border into small square and rectangular areas, approximately 3/4 to 1 inch across where space allows.
- Add the textured squares. Press a small piece of clean plastic canvas or textured fabric lightly into selected squares. Lift it straight off to leave a fine crosshatched impression.
- Leave alternating areas plain. The approved design has both textured and plain squares. Don't fill every space with texture. The contrast is what makes the border resemble a little patchwork quilt.
- Mark the accent square. Near the upper-left corner, leave one small square smooth so it can be painted cranberry red after drying.
- Make the hanging hole. Use a straw to cut a centered hole in the upper border. Leave approximately 1/2 inch or more of dough between the hole and the outside edge, and keep it clear of the footprint.
- Inspect the finished shape. Check that the border is balanced, the scallops haven't collapsed, and the footprint remains clear.
Decorating the Quilt Ornament
Once the ornament is completely dry, paint the small upper-left square cranberry red. Leave the other squares in their natural dough color, just as shown in the example.
Let the paint dry, then apply the clear finish according to the product directions. Thread the burgundy ribbon through the hole and tie the ends into a hanging loop.
Design checkpoint: You should have one large footprint inside a quilt-inspired rectangular frame. The border has a mixture of plain and crosshatched squares, a small red accent, and rounded scallops all the way around.
First-make check: The large footprint plaque will be the heaviest design. Check the hanging-hole area after drying. If the weight or hole strength is questionable, display it upright on a stable keepsake stand rather than hanging it.
Christmas Star Baby Handprint Ornament
The second ornament has a beautiful arched shape with baby's handprint beneath a carved Christmas star. It's a simpler design than the quilted footprint plaque, but that little burst of rays above the fingers makes it special.
Keep the ornament mostly plain. A clean handprint, a few carefully placed lines, and a burgundy ribbon are all it needs.
Finished Design
- One tall, arched salt dough plaque
- A shallow engraved border following the arch
- One baby handprint in the lower center
- A carved eight-point starburst above the handprint
- One centered hole at the top
- One burgundy velvet ribbon hanger
Step-by-Step Instructions
- Roll the dough. Prepare an even sheet approximately 3/8 inch thick.
- Make the arch template. Draw a shape approximately 4 1/2 inches wide and 6 inches tall, with straight sides, a flat bottom, and a rounded top. The arch should look like a small window rather than a pointed doorway.
- Position the handprint. Leave room for the star at the top. Place baby's palm near the lower center, with the fingers pointing upward toward the arch.
- Press baby's hand. Gently support the palm and fingers while making the impression. Lift the hand without dragging it across the dough.
- Cut out the arch. Center the template around the impression and trim the dough.
- Smooth the outline. Gently round the outside edges while keeping the straight sides and curved top.
- Engrave the inner border. Using a blunt wooden tool, make a shallow line approximately 1/4 inch inside the outer edge. Follow the rounded arch at the top, continue down the sides, and finish with a straight line across the bottom.
- Mark the starburst. Locate the open space above the fingertips. Make a small central point and draw eight narrow rays radiating outward. The example has one longer vertical ray and several shorter angled rays.
- Carve the details. Use a toothpick or narrow modeling tool to gently deepen the starburst lines. Keep them shallow enough that they don't weaken the ornament.
- Make the ribbon hole. Place a small hole at the top center, above the starburst. Keep enough dough between the hole and the curved outer edge to prevent a thin, fragile section.
- Check the arrangement. The star should sit above the fingers without touching them, and the inner border should frame both the star and the handprint.
Finishing the Star Ornament
Leave the ornament in its natural cream color. Once thoroughly dry, seal it with a clear matte finish and add the burgundy ribbon.
I wouldn't paint the entire star or fill the handprint with color. The shallow carved lines give this design its character, and the natural dough finish keeps those details visible without making the ornament too busy.
Design checkpoint: The finished piece should resemble a little arched window, with a handprint beneath a simple radiating Christmas star and a narrow engraved border following the outside shape.
Little Feet Double-Footprint Ornament
Two tiny footprints side by side make a sweet Christmas keepsake. This design has a horizontally shaped plaque, gently angled corners, and a dotted border that looks like little stitches around the edge.
It's also the nicest option in the collection if you'd like to make a keepsake for a grandparent. The paired footprints are the whole decoration, so there's no need for additional painting.
Finished Design
- One wide, rounded eight-sided salt dough plaque
- Two baby footprints placed side by side
- Toes pointing toward the upper edge
- Small evenly spaced impressions around the border
- One centered hanging hole
- One sage-green ribbon hanger
Step-by-Step Instructions
- Roll the dough. Prepare a sheet approximately 3/8 inch thick.
- Plan both footprints. On a paper template approximately 7 inches wide and 4 1/2 inches tall, mark a centerline. Leave space for the footprints on either side, with their heels toward the bottom and toes toward the top.
- Make the first footprint. Press one foot gently into the dough, a little to the left of center. Lift carefully.
- Make the second footprint. Position the other foot to the right, keeping both heels at approximately the same height. Leave a small gap between the impressions.
- Check the spacing. Both sets of toes should be visible, with enough room around the outside for the dotted border.
- Cut the ornament shape. Draw a wide rectangle with angled corners, then round each transition slightly. The finished outline should have a broad flat top and bottom, short angled corners, and short side edges.
- Smooth the edges. Gently round the cut surface without changing the overall eight-sided outline.
- Mark the dotted border. Use the rounded end of a small tool to press individual dots approximately 1/4 inch inside the outside edge.
- Space the dots. Begin at the top center and work around both sides toward the bottom. Aim for roughly 3/8 inch between dots, adjusting the spacing so the pattern looks balanced.
- Make the hanging hole. Cut one centered hole in the upper border between the dotted details and the outside edge. Leave a generous amount of dough around it.
- Inspect the ornament. Check that neither footprint touches the dots and that the border follows the outline evenly.
Finishing the Double-Footprint Ornament
Let the ornament dry completely, then apply a clear matte sealer. Add the sage-green ribbon through the hole and tie a hanging loop.
Leave the dough unpainted. The little impressions and dotted border are already enough decoration.
Design checkpoint: Both footprints should sit side by side inside a wide, gently angled plaque. The dotted border should follow the outer shape without running into the toes or heels.
Baby's Christmas Cottage Salt Dough Ornament
The little Christmas cottage is my favorite shape in the collection. It has a steep roof, tiny overlapping shingles, a small chimney, and baby's handprint on the front.
There's no painted door or window. The handprint takes their place, which gives the cottage a lovely personal touch.
Finished Design
- One house-shaped salt dough plaque
- A steep triangular roof
- A small chimney on the upper-right side
- Several rows of shallow scalloped roof-shingle marks
- One centered baby handprint on the house front
- One hanging hole near the upper-left roof slope
- One sage-green ribbon hanger
Step-by-Step Instructions
- Roll the dough. Prepare a fresh sheet approximately 3/8 inch thick.
- Draw the cottage template. Start with a rectangular house body approximately 4 1/2 inches wide and 3 1/2 inches tall. Add a steep triangular roof above it, extending slightly beyond each side of the walls.
- Add the chimney. Draw a narrow rectangular chimney on the upper-right roof slope. Keep the chimney connected to the main outline rather than making it as a separately attached piece.
- Plan the finished size. The cottage may measure approximately 5 1/2 inches wide and 6 inches tall, depending on the roof overhang and the size of baby's hand.
- Mark the handprint position. Locate the center of the rectangular house body. The fingertips should point toward the roof, but the print should remain below the shingle area.
- Make baby's handprint. Press gently into the center of the house front. Lift carefully so the impression remains clear.
- Cut the cottage outline. Position the template around the handprint and trim the walls, roof slopes, roof overhangs, and chimney as one continuous piece.
- Shape the roof edges. Smooth the roof outline and gently round the overhanging corners. Keep the chimney upright and the roof peak clearly defined.
- Mark the shingle rows. Begin near the lower edge of the roof. Use a narrow, round-ended tool to draw a row of short overlapping scallops.
- Add the remaining shingles. Work upward with three or four staggered rows, keeping the marks shallow. Each row should overlap the one below it, resembling a simple tiled roof.
- Keep the roof separate from the handprint. Stop the shingle marks above the house walls. The handprint belongs in the open rectangular space below.
- Make the hanging hole. Place the hole near the upper-left roof slope, as pictured, where there is enough solid dough surrounding it. Keep it clear of the chimney and any deeply carved shingle lines.
- Check the silhouette. Make sure the chimney, roof peak, and overhangs are still visible. Smooth any thin or jagged edges before drying.
Finishing the Christmas Cottage
Leave the cottage its natural salt dough color. Once completely dry, apply clear matte sealer and thread a sage-green ribbon through the hanging hole.
The roof shingles should remain visible as shallow engraved lines, not raised pieces glued onto the roof. Making the cottage as one continuous piece avoids fragile seams between the roof and walls.
Design checkpoint: You should have a small house with an angled roof, shingle markings, a chimney on the right, and baby's handprint centered below the roof. The finished ornament should match the simple cottage silhouette in the example image.
First-make check: Pay particular attention to the narrow chimney and the dough surrounding the off-center hanging hole. If either section becomes fragile during drying, use the finished cottage as a standing display keepsake instead of hanging it.
Drying & Baking Salt Dough Christmas Ornaments
Now that your four ornaments are shaped, it's time to dry them. Don't rush this part. The little impressions and textured borders are worth preserving, and too much heat can cause the dough to puff or crack.
I'd use a low oven temperature and allow plenty of drying time. These plaques are thicker and larger than ordinary cookie-cutter ornaments, so they may need considerably longer than the usual small salt dough decorations.
Low-Temperature Oven Method
- Prepare the baking sheets. Keep the ornaments on their parchment paper and place them on flat baking sheets. Leave space between them.
- Check the shapes. Make sure the hanging holes are open, the cut edges are neat, and none of the decorative impressions have collapsed.
- Preheat the oven. Set it to 200°F (93°C). Use a reliable oven thermometer if your oven tends to run hot.
- Begin drying. Place the baking sheets in the oven. Start checking after approximately two hours. The surfaces should begin to feel firm rather than damp.
- Continue gradually. These larger plaques may need several more hours. Check them periodically rather than relying on one fixed baking time.
- Check for damp areas. Look carefully at the backs, edges, and deepest impressions. If any area remains pliable or noticeably damp, continue drying.
- Dry the backs if necessary. Once the ornaments are firm enough to handle, you can carefully turn them onto fresh parchment to help the backs dry. Support the entire plaque while turning it. Don't flip a piece that still bends or feels fragile.
- Cool completely. Remove the ornaments from the oven and let them cool on a flat surface.
- Check again. Before decorating, confirm that the backs and edges feel hard and dry, with no cool, damp, or yielding areas.
At 3/8 inch thick, drying time is difficult to predict without making a sample. The footprint plaques are quite large, and the handprint impressions leave some areas thinner than others. Treat the time above as a starting point, not a guarantee that the ornaments will be dry.
Drying checkpoint: The ornament should be firm throughout, with a hard back and no soft dough remaining beneath the impressions. If you're uncertain, allow additional drying time before sealing it.
Can You Air-Dry the Ornaments Instead?
Yes, but plan on several days or longer, particularly for the larger designs. Put the ornaments on a flat, ventilated surface in a dry room. Avoid damp areas, and carefully turn them only after they're firm enough to handle without bending.
Check the underside regularly. Salt dough can feel dry on top while moisture remains underneath. Don't paint or seal an ornament until it has dried thoroughly.
One thing I'd skip: High heat to speed things up. A puffed-up surface or distorted footprint would spoil the detail we've worked to create.
Before you hang your ornaments: These larger keepsakes, especially the quilt-inspired footprint plaque and Christmas cottage, need a little extra attention. The drying times are estimates, so check that each ornament is completely hard and dry, including the back and the deepest parts of the impressions. Once it's finished, check the weight and the dough around the ribbon hole for any cracks or weak spots. These larger designs haven't been physically tested for hanging strength, and I wouldn't risk breaking one just to get it onto the Christmas tree. If an ornament feels too heavy or the hanging hole looks fragile, display it on a sturdy keepsake stand instead. It'll be just as pretty!
Painting, Sealing & Finishing the Ornaments
The natural salt dough color is part of the look of this collection. You don't need to paint every ornament or fill in the little impressions. In fact, the engraved details are easier to appreciate when you leave most of the surface alone.
Paint the Quilt Accent
- Make sure the quilt-inspired footprint plaque is completely dry and cool.
- Use a small brush to paint the smooth square near the upper-left corner cranberry red.
- Keep the paint inside the marked square, leaving the surrounding textured areas unpainted.
- Allow the paint to dry fully according to the manufacturer's directions.
That's the only painted accent in the approved collection. The star ornament, double-footprint plaque, and cottage all keep their natural dough finish.
Apply a Clear Sealer
Salt dough absorbs moisture from the air, so a clear protective finish is useful once the ornaments have dried completely.
- Choose a clear matte craft sealer whose instructions permit use on thoroughly dry salt dough or similar porous crafts.
- Test the finish on a spare dried piece of dough first. Check whether it changes the natural cream color.
- Apply a thin, even coat to the front, following the product directions.
- Let it dry fully before coating the back and edges.
- Apply additional coats only as directed by the manufacturer.
- Allow the finished ornaments to cure completely before adding their ribbons or storing them.
Use spray finishes outdoors or in a well-ventilated area away from children and pets, according to the product label. Sealing helps protect the surface, but it doesn't make salt dough waterproof.
Add the Ribbon Hangers
Use burgundy velvet ribbon for the quilted footprint and star handprint ornaments. The double-footprint plaque and Christmas cottage have sage-green ribbon.
- Cut a ribbon long enough to pass through the hole and form a hanging loop.
- Thread the ribbon carefully through the dried ornament.
- Tie the ends together with a secure knot.
- Check that the ribbon lies flat and doesn't rub against a fragile edge.
- Support the ornament in your hands while gently testing the hanger.
Don't pull on the ribbon to test the dried dough. If the hole looks cracked, the plaque feels unusually heavy, or the top edge seems too thin, choose a display stand instead.
A Closer Look at the Finished Details
The quilted plaque has alternating crosshatched squares, the arch has a carved starburst, the paired footprints have a dotted outline, and the cottage has its little shingled roof. Those four textures are what make the ornaments look like a coordinated collection without making them identical.
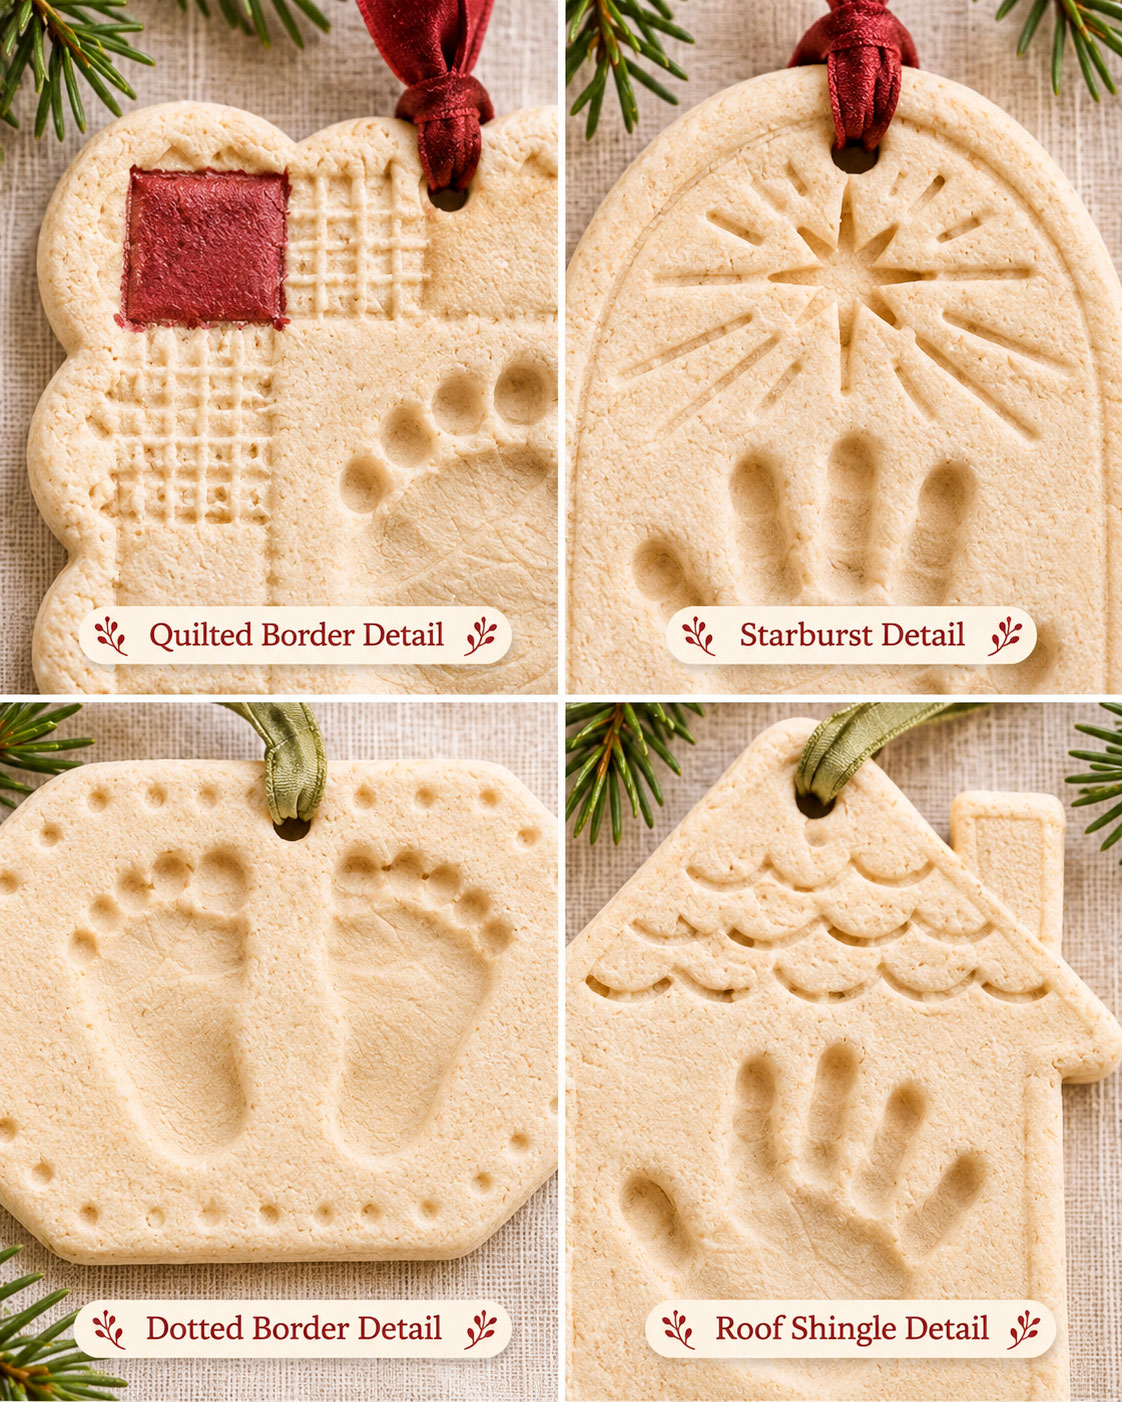
I'd keep the finishing simple. Let the impressions and the handmade textures do the decorating.
Troubleshooting Salt Dough Ornaments
If an ornament doesn't come out quite the way you expected, don't automatically throw the whole batch away. Some problems are easy to fix while the dough is still fresh. Others mean it's better to start that particular ornament again.
Why Is My Salt Dough Sticky?
Too much water can make the dough cling to your hands and blur the impressions. Knead in a small amount of flour, then try the fingertip test again. Add only enough to make the dough manageable.
Why Does the Dough Crack When I Cut It?
The dough may be too dry, or the edges may have started drying while you worked. Knead in a few drops of water if the whole batch is crumbly. For small surface cracks in fresh dough, gently smooth them with a slightly damp fingertip.
Deep cracks that appear after baking are harder to repair without changing the design. If a crack crosses the hanging hole or another narrow area, don't use that ornament as a hanging decoration.
Why Did My Ornament Puff Up?
Heat, trapped air, or uneven drying may cause parts of the dough to swell. Try a lower oven temperature and a longer drying period on your next batch. Plain flour rather than self-rising flour is also the better choice.
My Baby's Footprint Isn't Very Clear
Check the dough before changing anything else. If it feels too firm, a little more moisture and kneading may help. If it's sticky, the toes may smear when you lift the foot.
Try lifting straight up instead of rolling the foot away. A second adult can help support your baby while you make the impression. If your baby doesn't want to cooperate, try again another time.
Why Did the Decorative Lines Disappear?
The details may have been too shallow, or the dough may have changed shape while drying. Press the marks clearly enough to see them before baking, but don't cut so deeply that you weaken the plaque.
For the quilt border, use a small piece of textured material and lift it straight up. For the cottage shingles, use a rounded tool rather than cutting sharp grooves through the roof.
What If the Ornament Is Too Heavy?
Large handprint and footprint plaques can be heavier than expected. If the finished ornament puts too much strain on the hanging hole, display it on a stable keepsake stand or supported shelf.
Don't thin the back of a finished plaque or enlarge a cracked hole to make it hang. It's better to keep the ornament intact.
Storing Your Baby's Christmas Keepsakes
Once Christmas is over, you'll want to put these ornaments away where they won't get chipped, crushed, or exposed to moisture.
Make sure every ornament is thoroughly dry and the protective finish has fully cured before packing it.
- Wrap each ornament separately in clean, dry, acid-free tissue paper.
- Place the ornaments in a sturdy box with enough padding to prevent them from touching one another.
- Support the larger footprint plaques from underneath so their weight doesn't rest on a narrow edge.
- Keep the box in a dry, temperature-stable indoor location.
- Avoid damp basements, humid storage rooms, and areas with wide temperature changes.
- Check the ornaments for cracks, moisture, or changes in the finish before displaying them again.
You could also place a small note inside the box with your baby's name and the Christmas the ornaments were made. That way, you don't have to paint anything on the front and change the finished design.
These are decorative keepsakes rather than toys, so keep them out of reach of babies and pets even when they're on display.
Frequently Asked Questions About Salt Dough Baby Christmas Ornaments
What is the best salt dough recipe for baby handprints?
A simple mixture of 2 cups all-purpose flour, 1 cup fine table salt, and approximately 3/4 to 1 cup water is a useful starting point. Add the water gradually and knead until the dough is smooth enough to hold a clear impression.
How thick should salt dough baby ornaments be?
For these four designs, start with approximately 3/8 inch of dough. You need enough thickness to make the impression without pushing through the back. Check the dough beneath the deepest part of the print before drying.
Can you make salt dough ornaments with a newborn?
You can make a handprint or footprint keepsake with an infant when the impression is handled gently by an adult. Keep the dough away from the baby's mouth, avoid any forceful pressing, and wash the baby's skin afterward. If the baby resists, stop rather than trying to hold the hand or foot in place.
How long do salt dough baby ornaments take to dry?
Drying time depends on thickness, size, humidity, and oven temperature. Small ornaments may dry in a few hours in a low oven, but large plaques with deep impressions can take much longer. Check the backs and deepest areas carefully before decorating.
Can I paint baby's handprint after baking?
Yes, provided the ornament is fully dry and you use an appropriate craft paint. For this collection, though, the impressions stay unpainted. Only the quilt-inspired ornament has a small cranberry-red square.
How do I keep salt dough ornaments from cracking?
Start with evenly mixed dough, roll it to a consistent thickness, avoid deep cuts around thin edges, and dry the ornaments gradually. Make sure the dough surrounding the hanging holes is substantial enough to support the finished piece.
Can I hang a large salt dough footprint ornament on the Christmas tree?
Only if the fully dried ornament is light enough for the branch or hanger and the dough around the hole is sound. Large plaques may be better displayed on a stand. Never hang a heavy or cracked ornament where it could fall onto a child or pet.
Do I need to seal salt dough ornaments?
A clear finish helps protect the dry surface from ordinary handling and humidity, but it won't make salt dough waterproof. Store your ornaments indoors in a dry place, even after sealing them.
If you enjoy making little keepsakes with your baby's hands and feet, you can find more ideas in our baby handprint crafts collection and our baby footprint projects.
When you click on links to various merchants on this site and make a purchase, this may result in this site earning a commission. This does not affect the price you pay.

UBGI Gold Standard 2026
Reviewed under the site's
editorial checklist.
Photos, decorating ideas, party setups and reader submissions are shared for inspiration unless a page is specifically presented as a pattern, tutorial, reference guide or step-by-step project. Follow the instructions, measurements, safety guidance and manufacturer directions provided for the particular project or product.
About Jan | Contact | Baby Nursery Ideas (Blog) | Site Map | Privacy Policy | Disclosure Policy | Disclaimer | Affiliate Disclosure | Earnings Disclosure | Facebook | Pinterest
I am a participant in the Amazon Services LLC Associates Program, an affiliate advertising program designed to provide a means for us to earn fees by linking to Amazon. As an Amazon Associate I earn from qualifying purchases.
Copyright © 2006-2026. All Rights Reserved.