Baby Footprint Mistletoe Christmas Keepsake with Free Printable Background
By Jan Bay
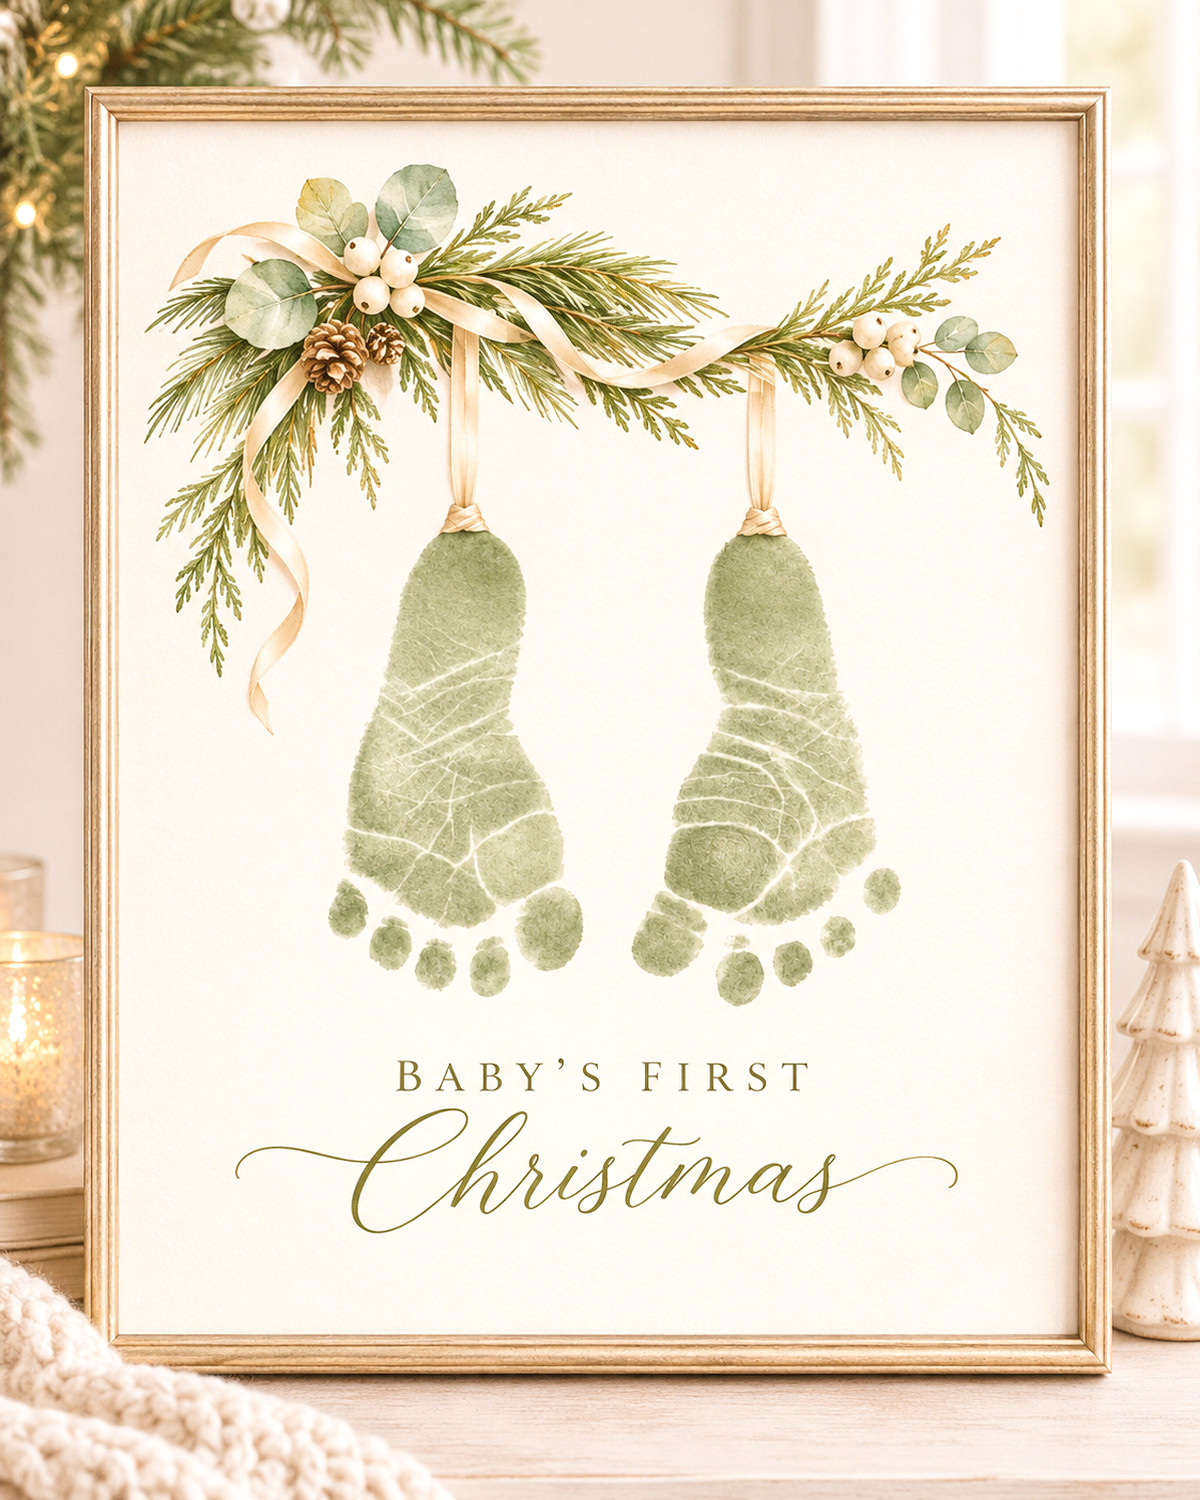
Make a beautiful Baby Footprint Mistletoe Christmas Keepsake using our free printable background and your baby's own little footprints. The printable features an elegant Christmas swag with evergreen branches, ivory ribbons, pinecones and white berries, leaving a blank space for you to add your baby's footprints with green washable paint. Follow the easy instructions to create a personalized Christmas keepsake that you can frame or give to grandparents.
Download the Free Printable Christmas Background (PDF)
You'll add your own baby's footprints. The printable includes the Christmas decorations and lettering, but no footprints or date. Feel free to add your own. The finished picture above shows how your keepsake can look once you've added those tiny feet.
Explore More Baby Christmas Crafts and Keepsakes
Baby Footprint Crafts and Keepsakes
Baby Footprint Christmas Ornaments
View Washable Craft Paint and Product Details.
Before buying: Washable doesn't automatically mean suitable for your baby's skin. Only use a product directly on your baby's feet if its label specifically allows that use for infants. Otherwise, choose a suitable baby footprint kit or an inkless printing method.
Free Baby Footprint Mistletoe Christmas Keepsake Printable Background
Here's the free printable background for your Christmas keepsake. I've left the two footprint spaces completely blank so you can add your own baby's little feet. The evergreen swag, ivory ribbons, white berries, pinecones and Christmas lettering are already included.
You don't need to paint the greenery, tie any ribbons or make the decorations yourself. Just print the background, add the footprints and let them dry. That's really the whole idea.
Download your free printable:
Download the Free Baby Footprint Mistletoe Printable Background (PDF)
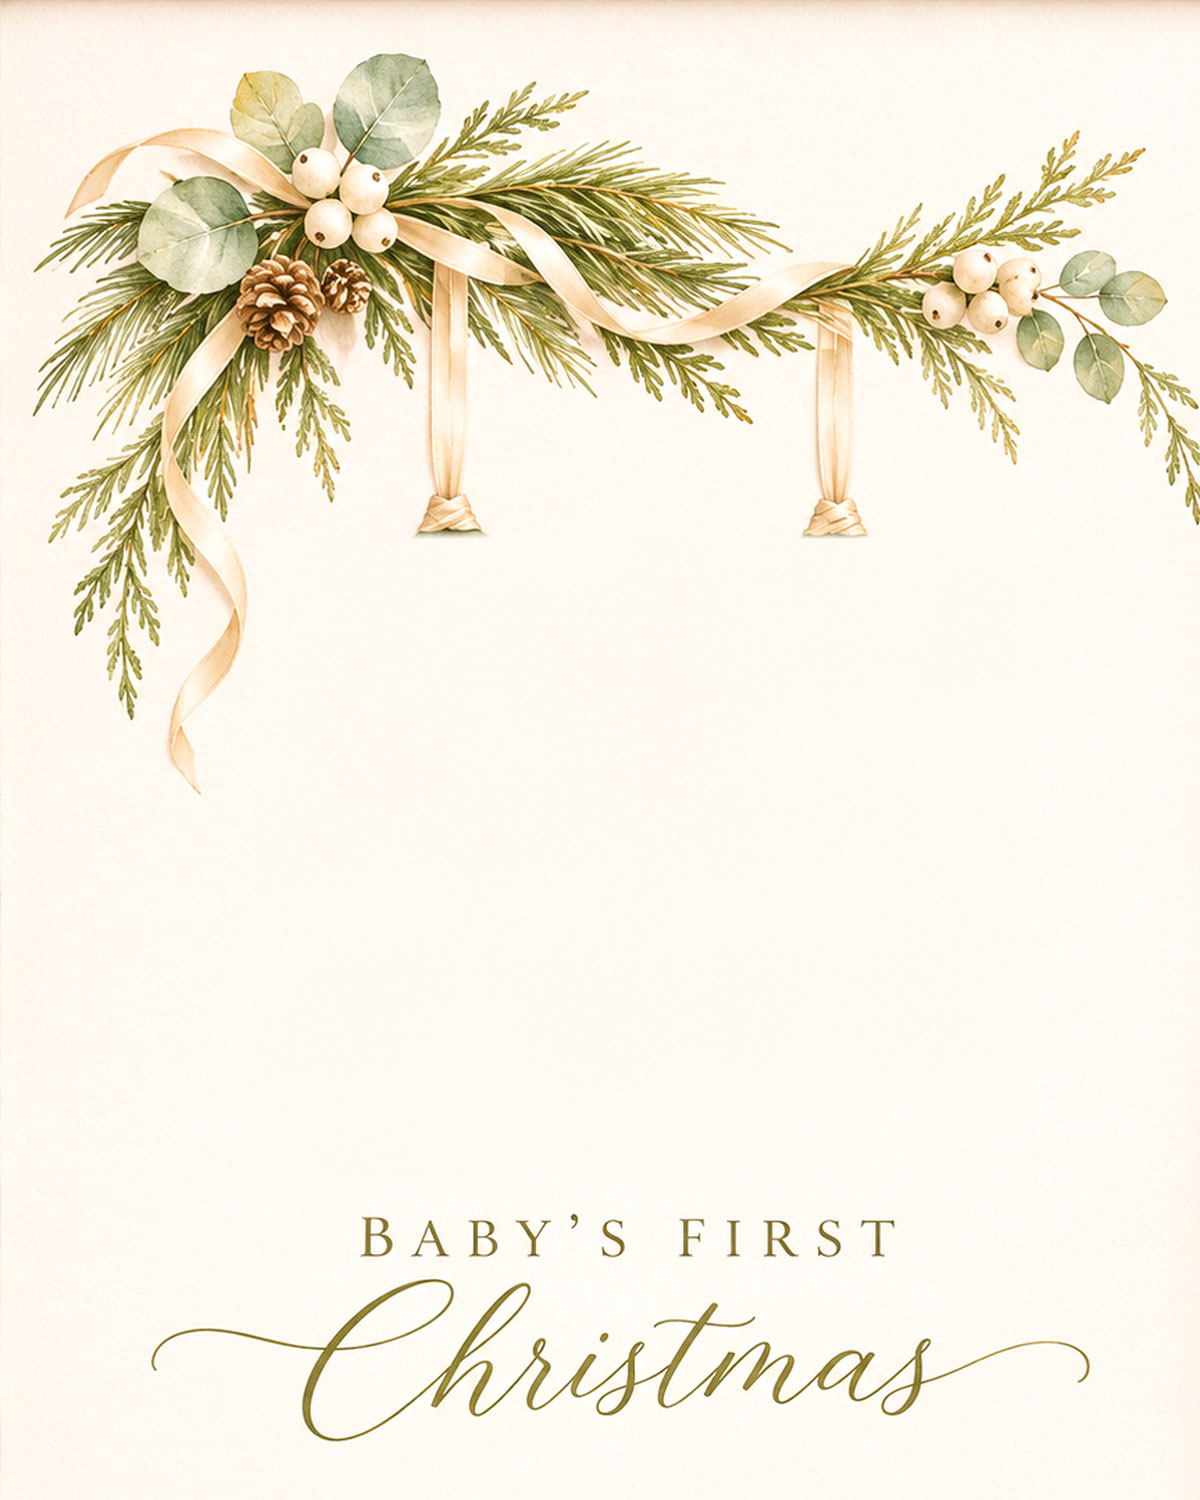
What's included: One printable background with a Christmas swag across the top, two hanging ivory ribbons, open spaces for your baby's footprints and elegant Baby's First Christmas lettering beneath them. There are no preprinted footprints and no date.
How to Print the Background
- Download the PDF and open it in a PDF reader.
- Load white, smooth, matte cardstock into your printer. Check the paper weight your printer accepts before buying heavy cardstock.
- Choose US Letter paper, measuring 8.5 by 11 inches.
- Select Actual Size or 100% in your printer settings. Turn off Fit to Page or automatic enlargement.
- Choose a good color-print setting so the greenery, ribbons and lettering print clearly.
- Print one copy and check that the entire design is visible, with plenty of blank space beneath the ribbons.
- Let the printer ink dry completely before adding footprints.
The artwork measures 8 by 10 inches on the letter-size sheet, with a little extra white paper around it. Leave that extra paper in place while you're making the footprints. You can trim it away when the finished keepsake is dry and ready for an 8-by-10-inch frame.
I'd print an extra copy or two. It's much nicer to have a fresh background handy than to try to repair a footprint that didn't turn out quite the way you wanted.
Check the footprint size first: At the intended 8-by-10-inch print size, there's approximately 4 inches of space between the bottom of each hanging ribbon and the Christmas lettering. A footprint around 3 1/2 inches long or shorter leaves comfortable room above and below. Measure a practice print from heel to longest toe before using your decorated background. Larger footprints may still fit, but check the actual space first. Don't squeeze or distort those little feet to make them fit.
And keep the background date-free. If you want to remember when the footprints were made, you can write that information on the back of the finished keepsake without changing the artwork on the front.
Supplies for Your Baby Footprint Christmas Keepsake
You won't need a long list of craft supplies for this one. The printable already has the Christmas decorations, so the main thing is choosing a footprint-making product that is appropriate for your baby's skin.
What You'll Need
- Free printable Christmas background: Print at least two copies on US Letter paper.
- White matte cardstock: Choose a smooth, sturdy sheet your printer can handle. Around 65 to 80 lb cover weight is a practical starting range if your printer supports it.
- Green footprint ink or paint: Choose a product whose manufacturer specifically permits the intended skin contact and age group. A baby footprint ink system is another option.
- Small foam applicator: Only if needed for the footprint product you've chosen.
- Plain practice paper: Two or three sheets to check the footprint before using the decorated background.
- A firm, flat surface: A tabletop or sturdy board to support the paper.
- A soft washcloth and clean towel: For cleanup if you're using a product that touches the foot.
- An 8-by-10-inch picture frame: For displaying the finished keepsake.
- Optional: A pencil, ruler, paper trimmer, acid-free backing board and archival storage sleeve.
Choosing the Footprint Color
The finished example uses a muted sage green. I would stay somewhere between sage and soft evergreen rather than choose a very dark forest green. The lighter color looks pretty with the ivory ribbons and cream berries, and it keeps the footprints from taking over the whole picture.
However, the color comes second to choosing an appropriate product. If you can't find green ink or paint specifically labeled for use on an infant's skin, don't substitute ordinary decorative craft paint just to match the picture.
A clean-touch or inkless baby footprint system is a good alternative when you want to avoid putting ink directly on the foot. Some of these systems make black or gray impressions. You can keep the original impression or scan it and change the color digitally before printing it onto the background.
For more help choosing and using footprint materials, see my guide to getting a clear baby footprint. It covers the little details that make the printing process easier, including curled toes and smudged heels.
A quick word about art materials: A product marked washable or non-toxic isn't automatically meant for painting a baby's skin. Read its intended-use directions, age guidance and warnings. Poison Control's guidance on art products explains why skin-contact labeling and proper cleanup matter.
Keep your baby supported and supervised throughout the project. Avoid using marking products on irritated or broken skin, keep materials away from your baby's mouth and eyes, and wash off any product according to its instructions. There's no reason to keep trying if your baby is uncomfortable. You can always finish the keepsake another day.
How to Make Your Baby Footprint Mistletoe Christmas Keepsake
Now comes the fun part, adding those tiny feet! The Christmas swag is already printed, and the two ivory ribbons show you where the footprints belong. You're going to place one footprint beneath each ribbon, with the heels at the top and the toes pointing down toward the Christmas lettering.
The ribbons are part of the printed artwork. Nothing needs to be attached to your baby's feet or added to the finished paper.
Step 1. Prepare Your Printed Background
Lay your printed background on a firm, flat surface. Don't trim it yet. The extra white paper around the picture gives you somewhere to hold it without touching the artwork.
Make sure the printer ink is completely dry. If you're using an inkjet printer, I'd also test your footprint material on a spare printed sheet. Some combinations of paper, printer ink and wet paint can smear.
Keep your clean cloth, towel, extra paper and footprint product within reach before you bring your baby over.
Step 2. Plan Where the Feet Will Go
Look at the two ivory ribbons hanging from the greenery. Each one ends above a blank area. That's where you'll place a footprint.
Use this arrangement:
- Left footprint: Center it beneath the left ivory ribbon.
- Right footprint: Center it beneath the right ivory ribbon.
- Heel position: Just below the ribbon end.
- Toe direction: Downward, toward the Christmas lettering.
- Space between the feet: Leave a clear gap so the two prints don't run together.
The finished picture should look as though the two little footprints are hanging from the Christmas swag.
There's no need to make the feet perfectly symmetrical. One can turn inward a little more than the other. Just keep them beneath their individual ribbons and away from the wording at the bottom.
Before applying anything to your baby's feet, you can use the practice paper to check the amount of room available. If the footprints won't fit comfortably between the ribbon ends and the lettering, don't force them into the design.
Step 3. Take a Practice Footprint
I'd make a practice print before touching the decorated background. It's a simple way to check whether your chosen material gives you a clear impression.
Have one adult support your baby while another handles the paper and marking material. Use the product according to its instructions.
If you're using a product approved for direct application to your baby's skin, apply only the amount directed by the manufacturer. Avoid heavy buildup that might fill in the little creases.
Support the ankle gently, lower the heel onto the practice paper and bring the rest of the foot down until the toes make contact. Lift straight up instead of dragging the foot sideways.
Take a look at the impression. Can you see the heel, the main part of the foot and the toes? Good. That's what you want.
You don't need to press harder to make every crease appear. A tiny footprint with a few natural variations looks much more personal than a thick, smeared shape.
Step 4. Add the First Footprint to Your Christmas Background
Once you're happy with the practice print, place your first footprint directly beneath the left ribbon.
- Keep the background flat and steady.
- Position the heel just beneath the printed ribbon end.
- Point the toes toward the bottom of the page.
- Lower the heel first, followed by the rest of the foot and toes.
- Make brief, gentle contact following your footprint product's instructions.
- Lift the foot straight away from the paper.
- Clean the foot as directed by the product manufacturer.
Look at your print before going any further. If it's a little lighter in one spot, you may prefer to leave it alone. Trying to press the same foot onto a wet print a second time can create a double outline.
If the impression is badly smeared, reach for a fresh printed background rather than trying to paint over the mistake.
Step 5. Add the Second Footprint
Now repeat the process beneath the right ribbon.
Make sure the heel is near the top and the toes point downward, just like the first print. Keep a little space between the two feet.
If one footprint is slightly larger or turns at a different angle, that's fine. These are your baby's actual footprints. They don't need to look like identical stamps.
For a newborn, I'd work with another adult so one person can concentrate on supporting the baby and the other can handle the paper. There's no need to hurry or attempt both feet at once.
Check your work: You should now have two separate footprints hanging beneath the swag, with all the Christmas lettering still visible below them.
Step 6. Let the Footprints Dry
Place the completed artwork somewhere flat, away from little hands and anything that might brush across the prints.
Let the footprint material dry completely according to the manufacturer's directions. Drying time depends on the product, how much was applied and the paper you're using.
Don't test the prints by rubbing your fingers across them. You don't want to discover they're still damp by leaving a fingerprint in the middle of your keepsake!
Once they're dry, check that the paper hasn't curled or buckled. If it has, leave it flat until it's fully dry before deciding how to mount it. Don't put a hot iron directly onto the artwork.
Step 7. Finish Your Keepsake
Trim the excess white paper to make an 8-by-10-inch print. Use a ruler and paper trimmer if you want crisp, even edges.
Turn the artwork over and add your baby's name or a short personal message on the back if you'd like. That keeps the front exactly as shown, without adding extra writing around the footprints.
Place the artwork in your chosen frame, using the frame's backing to hold it flat. Make sure the marking material has completely dried and won't transfer onto the glazing.
And that's your finished Christmas keepsake. Two little footprints, one lovely Christmas swag and a picture that's personal to your baby.
Tips for Adding Your Baby's Footprints to the Christmas Swag
Getting the footprints in the right place matters more than adding extra decorations. The greenery and ribbons give the design its shape, but those two little feet are what make the picture special.
Here are the details I'd pay attention to before using your good printed background.
Keep the Heels Near the Ribbon Ends
The ivory ribbons should appear to connect to the tops of the footprints. Try to position each heel directly beneath its ribbon rather than putting the feet too far down the page.
Don't cover the ribbon knots with a large patch of color. The little gap between the ribbon and the heel can stay visible if your baby's feet are small. It's part of the illustrated design, and there's no reason to fill it with extra paint.
Point the Toes Down
This is probably the most important placement detail for this particular picture.
The footprints should point downward, not upward toward the greenery. You'll be making the prints in the opposite direction from the way footprints are often displayed on baby keepsakes.
Check the direction before every impression. It's easy to get caught up in positioning a tiny foot and forget which way the toes are supposed to face.
Don't Try to Make Both Feet Identical
Real baby footprints don't always come out as neat little matching shapes. One foot may have a clearer heel. Another might show four toes very clearly and one only faintly.
I'd rather preserve a genuine little footprint than redraw every line until it looks manufactured.
If one toe doesn't appear, you can decide whether to make another impression on fresh paper. But don't add a painted dot unless you're comfortable with the finished print no longer being an exact impression of your baby's foot.
What If Your Baby Curls Her Toes?
Try making the print when your baby is relaxed and comfortable. Have the paper ready before you begin so you aren't waiting around while holding a foot in position.
Support the foot gently without trying to force the toes straight. If the toes curl or your baby pulls away, stop and try later.
Sometimes a practice impression is all you get during one session. That's plenty. You can save the background for another time.
What If You Can't Get Two Good Prints on the Same Page?
There's another way to make the keepsake, and it's especially useful if you've already captured a beautiful footprint on plain paper.
- Make or select one clear impression of each foot on separate paper.
- Let both impressions dry completely.
- Scan or photograph them from directly above in even light.
- Remove the surrounding paper digitally, keeping the genuine footprint shapes and textures.
- If desired, change the footprint color to sage green without changing the actual shapes.
- Place each digital footprint beneath its corresponding ribbon in a copy of the blank background.
- Print the finished composition on good-quality matte paper.
This version still uses your own baby's footprints. You're simply arranging the impressions on the page after you've taken them.
It also gives you the option of making several identical keepsakes from one good set of prints. That's handy if you're making gifts for more than one grandparent.
Should You Add Extra Decorations?
I'd leave the front exactly as it is. The greenery already includes different leaf shapes, white berries, pinecones and flowing ribbons. Adding glitter, stickers or another bow would crowd the little footprints.
If you want something personal beyond the prints themselves, put a handwritten message on the back or choose a frame that suits the person receiving it.
For other ways to use a baby's real footprints, browse my baby footprint crafts and keepsake ideas. There are plenty of projects where you can try a completely different style without changing this one.
Framing and Christmas Gift Ideas for Your Footprint Keepsake
I think this design looks lovely in a simple frame. The greenery, ivory ribbons and soft green footprints already do the decorating, so you don't need anything fancy around them.
I'd choose the frame after the footprints are finished. That way you can see which frame color brings out the print without competing with it.
A Light Natural Wood Frame
This would be my first choice for the finished example. A light oak or natural wood frame picks up the warm cream tones of the ribbons and paper, while the green footprints remain the main attraction.
An 8-by-10-inch frame with a simple, narrow profile is plenty. I'd skip heavy carved details or a wide decorated border.
A Simple White Frame
If you prefer a brighter look, a plain white frame is another pretty option. It lets the artwork blend easily with white shelves, light-colored furniture or a Christmas display with cream and silver decorations.
Make sure there's enough difference between the white frame and the cream background to keep the artwork from looking washed out.
A Larger Frame with a Mat
For a more formal Christmas gift, you could use an 11-by-14-inch frame with a mat cut for your 8-by-10-inch artwork.
Check the mat opening before you put everything together. Some mats overlap the edges of the artwork, and you don't want to cover the outer branches or ends of the decorative ribbon. A custom opening or wider backing may be needed if the mat covers the design.
I'd choose a warm ivory mat rather than a bright, contrasting color. The artwork has enough color already.
A Christmas Gift for Grandparents
This is the kind of gift that doesn't need much added to it. The footprints make it personal before you've wrapped a single ribbon around the frame.
If you're giving the keepsake to grandparents, you could include a small card explaining that the two prints were made using their grandchild's actual feet. Or write a little message on the back of the frame.
You could also print two finished copies if you've used the digital footprint method. One can stay at home while the other becomes a gift.
Displaying and Storing the Finished Keepsake
Place the frame on a shelf, mantel or another stable display surface where it won't be knocked over. Keep it out of your baby's reach.
I'd avoid a spot that gets direct sunlight for long periods. Light can fade some printed colors and footprint materials, so a shaded display area makes more sense for something you want to preserve.
If you're storing the artwork instead of framing it immediately, let it dry fully and place it flat in an acid-free sleeve or between suitable archival sheets. Don't seal damp paint or ink inside plastic.
And if you're in the mood for another little Christmas project, have a look at my baby footprint Christmas ornament ideas. An ornament makes a nice companion to the framed keepsake, especially if you'd like something to bring out with the Christmas decorations.
Frequently Asked Questions About Baby Footprint Mistletoe Christmas Keepsakes
Does the free printable include the baby footprints?
No. The free printable is the decorated Christmas background only. It has the evergreen swag, ivory ribbons, white berries, pinecones and Baby's First Christmas lettering, but the spaces beneath the ribbons are blank. You'll add your own baby's footprints to finish the keepsake.
Can I use a footprint that I've already taken?
Yes! If you have a clear footprint on another piece of paper, you can scan it, remove the surrounding background and arrange it beneath one of the ribbons digitally. You don't need to take another impression just for this project.
What if my baby's feet are too large for the printable?
Check the fit before using paint or ink. Both feet need to fit beneath the ribbons without touching each other or the Christmas lettering. If they don't fit, use a larger version of the artwork printed professionally, or save this design for a smaller footprint you've already captured. Don't squeeze or distort the prints to fit.
Can I use a clean-touch baby footprint kit?
Yes, if it's suitable for your baby's age and you follow the manufacturer's directions. Some clean-touch kits make the prints on their own paper, so you may need to scan the finished impressions and add them to the printable digitally. Check the kit's printing area before buying it.
Can I personalize the keepsake without changing the printed design?
Absolutely. Write your baby's name, a little Christmas message or the date the footprints were made on the back of the artwork. That keeps the front pretty and uncluttered. The printable itself has no date, so you can use it whenever you're ready to make your keepsake.
That's all you need to make this little Christmas project your own. Print the background, add those tiny feet and choose a frame you love. The decorations are already there, but the footprints are the part that makes the finished picture yours.
When you click on links to various merchants on this site and make a purchase, this may result in this site earning a commission. This does not affect the price you pay.

UBGI Gold Standard 2026
Reviewed under the site's
editorial checklist.
Photos, decorating ideas, party setups and reader submissions are shared for inspiration unless a page is specifically presented as a pattern, tutorial, reference guide or step-by-step project. Follow the instructions, measurements, safety guidance and manufacturer directions provided for the particular project or product.
About Jan | Contact | Baby Nursery Ideas (Blog) | Site Map | Privacy Policy | Disclosure Policy | Disclaimer | Affiliate Disclosure | Earnings Disclosure | Facebook | Pinterest
I am a participant in the Amazon Services LLC Associates Program, an affiliate advertising program designed to provide a means for us to earn fees by linking to Amazon. As an Amazon Associate I earn from qualifying purchases.
Copyright © 2006-2026. All Rights Reserved.