Free Ruffled Crochet Diaper Cover Pattern in 3 Baby Sizes
By Jan Bay
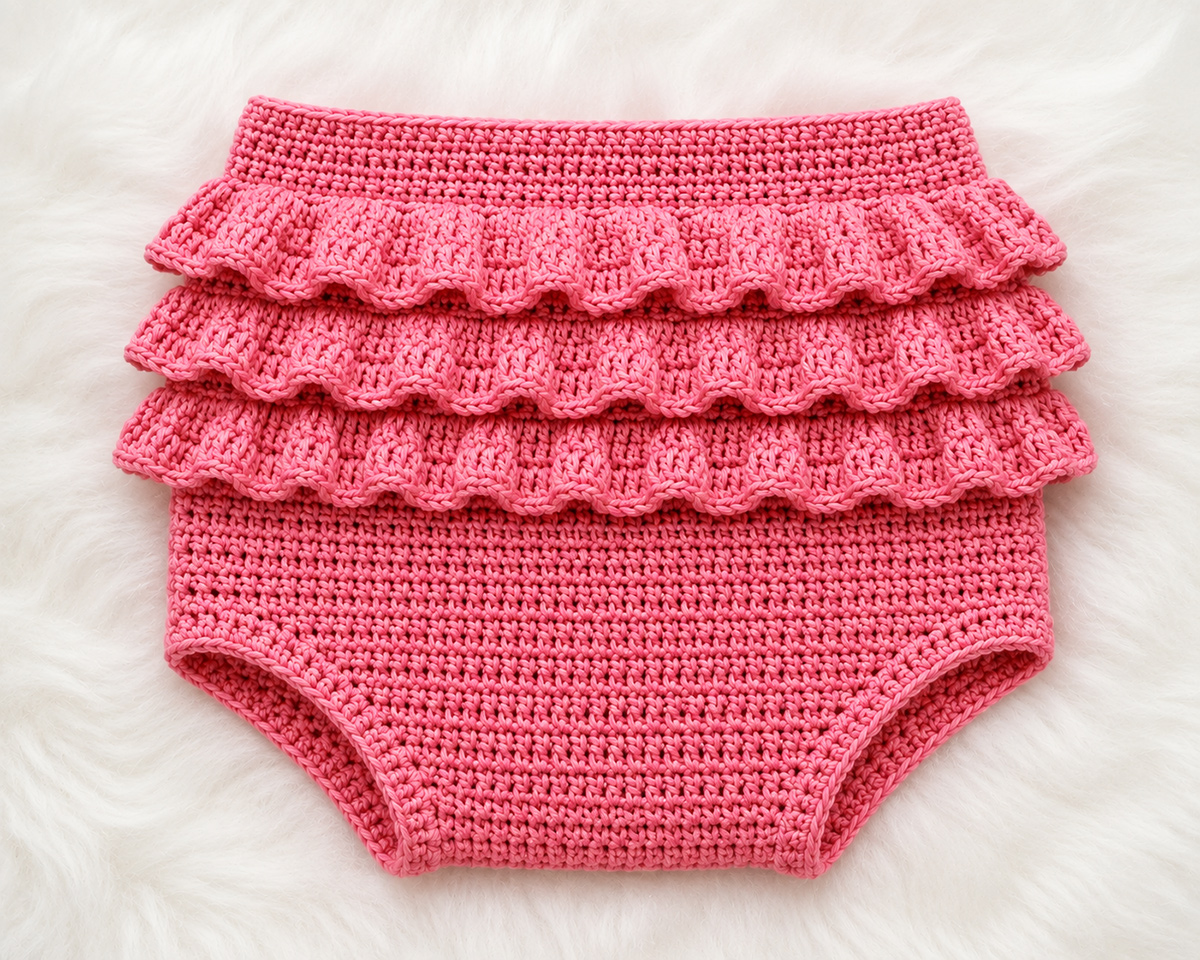
This free ruffled crochet diaper cover pattern makes a soft baby cover with a shaped front and back, comfortable leg openings and three rows of full crochet ruffles across the back. The pattern is written in three baby sizes and uses straightforward half double crochet construction so the shaping and ruffle placement are easy to follow.
Explore More Free Crochet Baby Patterns
Jump to:
Crochet Diaper Cover Sizes
This ruffled diaper cover pattern is written in three sizes: newborn/0–3 months, 3–6 months and 6–12 months. The age labels are only a starting point. If you can measure the baby, use the actual waist measurement and compare it with the calculated main-piece measurements below.
The cover is worked as one shaped piece from the back waist, down through the crotch and up to the front waist. The side seams are joined after the main piece is finished. The waistband and leg edging are then crocheted directly onto the cover, and three separate ruffles are attached across the back.
| Size | Main-Piece Waist Before Edging | Main-Piece Rise Before Waistband | Crotch Width |
|---|---|---|---|
| Newborn / 0–3 months | About 16 in. | About 14 3/8 in. | About 3 3/8 in. |
| 3–6 months | About 17 1/8 in. | About 16 in. | About 3 3/8 in. |
| 6–12 months | About 18 7/8 in. | About 17 5/8 in. | About 3 3/4 in. |
Those measurements are calculated from the stitch counts and half double crochet gauge used in the main piece. They do not include the added height of the three-round waistband, and the finished waist can vary slightly with your single crochet tension. They have not been taken from a physically test-crocheted sample, so checking your gauge before you start matters.
If the cover will be worn over a diaper, measure around the baby while the diaper is on. A bulky cloth diaper can need noticeably more room than a disposable diaper, especially through the rise and leg openings.
This is a decorative crochet diaper cover rather than a waterproof diapering layer. It can be used as part of a supervised outfit or photo outfit, but it doesn't replace the waterproof cover needed with a cloth diaper.
Materials and Gauge
Yarn: Smooth worsted weight number 4 yarn. Have about 200 yards available for newborn/0–3 months, 250 yards for 3–6 months and 300 yards for 6–12 months. Those amounts include a reasonable allowance for the three ruffles and finishing rather than a physically measured yarn total.
You can make the entire diaper cover in one color or use a contrasting color for the ruffles. If you're using two colors, keep enough of the main color for the waistband and leg edging before using the remainder for anything else.
Hook: US H/8, 5 mm crochet hook, or the hook size needed to match gauge.
Also needed: Yarn needle, scissors, stitch marker and measuring tape.
Gauge: 14 half double crochet stitches and 10 rows = 4 inches.
Make the gauge swatch in regular half double crochet. Measure across the center rather than along an edge. If you have more than 14 stitches in 4 inches, try a larger hook. If you have fewer than 14 stitches, try a smaller hook.
Don't skip this part just because a diaper cover is small. The waist and crotch widths are being produced directly by the stitch gauge, so even a fairly small difference can change the fit.
If you want to compare the number on your yarn label with standard yarn-weight categories, the Craft Yarn Council Standard Yarn Weight System is a useful reference.
Pattern Notes
This pattern uses US crochet terms.
ch: chain
sc: single crochet
hdc: half double crochet
dc: double crochet
sl st: slip stitch
st/sts: stitch/stitches
BLO: back loop only
hdc2tog: half double crochet two stitches together
The chain 1 used at the beginning of a half double crochet or single crochet row does not count as a stitch.
The chain 3 at the beginning of the second ruffle row does count as the first double crochet.
To make an hdc2tog: Yarn over, insert the hook into the next stitch, yarn over and pull up a loop. Yarn over, insert the hook into the following stitch, yarn over and pull up a loop. Yarn over and pull through all five loops on the hook.
To increase: Work 2 hdc into the same stitch.
The main diaper cover is worked back and forth in rows as one continuous piece. You begin at the back waist, work down through the crotch and finish at the front waist.
Rows 2, 4 and 6 of the back section are worked through the back loops only. That leaves three horizontal ridges of unused loops on one face of the back. Those ridges are important. The three ruffles will be crocheted into them after the cover is assembled.
Don't crochet over those unused loops or use them when joining the side seams.
Free Ruffled Crochet Diaper Cover Pattern
Choose the size before you begin. The instructions below give every size separately where the shaping changes so you don't have to keep translating a string of numbers while you're crocheting.
Newborn / 0–3 months: Begin with 28 stitches across the back and front waist. The crotch narrows to 12 stitches. The main piece has 36 rows.
3–6 months: Begin with 30 stitches across the back and front waist. The crotch narrows to 12 stitches. The main piece has 40 rows.
6–12 months: Begin with 33 stitches across the back and front waist. The crotch narrows to 13 stitches. The main piece has 44 rows.
Keep the stitch counts beside you as you work the shaping. If one decrease or increase is missed, the front won't return to the same width as the back.
Crochet the Back Section
Newborn / 0–3 months: Chain 29.
3–6 months: Chain 31.
6–12 months: Chain 34.
Row 1: Hdc in the second chain from the hook and in each chain across. Turn. You should have 28 (30, 33) hdc.
Row 2: Ch 1. Working in the BLO, hdc in every stitch across. Turn. 28 (30, 33) sts.
Row 3: Ch 1. Working through both loops again, hdc in every stitch across. Turn. 28 (30, 33) sts.
Row 4: Ch 1. Working in the BLO, hdc in every stitch across. Turn. 28 (30, 33) sts.
Row 5: Ch 1. Working through both loops, hdc in every stitch across. Turn. 28 (30, 33) sts.
Row 6: Ch 1. Working in the BLO, hdc in every stitch across. Turn. 28 (30, 33) sts.
You should now be able to see three unused horizontal loop ridges on one face of the fabric. Put a stitch marker on that face. That will be the outside of the back and is where the ruffles will go later.
Newborn / 0–3 months, Rows 7–8: Ch 1, hdc in every stitch across. Turn. 28 sts.
3–6 months, Rows 7–9: Ch 1, hdc in every stitch across. Turn. 30 sts.
6–12 months, Rows 7–10: Ch 1, hdc in every stitch across. Turn. 33 sts.
The full-width upper back is now finished. From here the fabric narrows toward the crotch.
Shape the Diaper Cover Crotch
For each decrease row, ch 1. Hdc2tog over the first 2 stitches, hdc across until 2 stitches remain, then hdc2tog over the final 2 stitches. Turn.
Newborn / 0–3 Months
Row 9: Decrease at both ends. 26 sts.
Row 10: Decrease at both ends. 24 sts.
Row 11: Decrease at both ends. 22 sts.
Row 12: Decrease at both ends. 20 sts.
Row 13: Decrease at both ends. 18 sts.
Row 14: Decrease at both ends. 16 sts.
Row 15: Decrease at both ends. 14 sts.
Row 16: Decrease at both ends. 12 sts.
Rows 17–20: Ch 1, hdc in each stitch across. Turn. 12 sts.
3–6 Months
Row 10: Decrease at both ends. 28 sts.
Row 11: Decrease at both ends. 26 sts.
Row 12: Decrease at both ends. 24 sts.
Row 13: Decrease at both ends. 22 sts.
Row 14: Decrease at both ends. 20 sts.
Row 15: Decrease at both ends. 18 sts.
Row 16: Decrease at both ends. 16 sts.
Row 17: Decrease at both ends. 14 sts.
Row 18: Decrease at both ends. 12 sts.
Rows 19–22: Ch 1, hdc in each stitch across. Turn. 12 sts.
6–12 Months
Row 11: Decrease at both ends. 31 sts.
Row 12: Decrease at both ends. 29 sts.
Row 13: Decrease at both ends. 27 sts.
Row 14: Decrease at both ends. 25 sts.
Row 15: Decrease at both ends. 23 sts.
Row 16: Decrease at both ends. 21 sts.
Row 17: Decrease at both ends. 19 sts.
Row 18: Decrease at both ends. 17 sts.
Row 19: Decrease at both ends. 15 sts.
Row 20: Decrease at both ends. 13 sts.
Rows 21–24: Ch 1, hdc in each stitch across. Turn. 13 sts.
Those four straight rows form the narrowest part of the crotch. Don't add extra rows here unless you're deliberately changing the rise because extra crotch length will also enlarge the leg openings.
Crochet the Front Section
The front reverses the shaping used on the back. On every increase row, ch 1. Work 2 hdc in the first stitch, hdc across to the last stitch, then work 2 hdc in the last stitch. Turn.
Newborn / 0–3 Months
Row 21: Increase at both ends. 14 sts.
Row 22: Increase at both ends. 16 sts.
Row 23: Increase at both ends. 18 sts.
Row 24: Increase at both ends. 20 sts.
Row 25: Increase at both ends. 22 sts.
Row 26: Increase at both ends. 24 sts.
Row 27: Increase at both ends. 26 sts.
Row 28: Increase at both ends. 28 sts.
Rows 29–36: Ch 1, hdc in every stitch across. Turn. 28 sts.
3–6 Months
Row 23: Increase at both ends. 14 sts.
Row 24: Increase at both ends. 16 sts.
Row 25: Increase at both ends. 18 sts.
Row 26: Increase at both ends. 20 sts.
Row 27: Increase at both ends. 22 sts.
Row 28: Increase at both ends. 24 sts.
Row 29: Increase at both ends. 26 sts.
Row 30: Increase at both ends. 28 sts.
Row 31: Increase at both ends. 30 sts.
Rows 32–40: Ch 1, hdc in every stitch across. Turn. 30 sts.
6–12 Months
Row 25: Increase at both ends. 15 sts.
Row 26: Increase at both ends. 17 sts.
Row 27: Increase at both ends. 19 sts.
Row 28: Increase at both ends. 21 sts.
Row 29: Increase at both ends. 23 sts.
Row 30: Increase at both ends. 25 sts.
Row 31: Increase at both ends. 27 sts.
Row 32: Increase at both ends. 29 sts.
Row 33: Increase at both ends. 31 sts.
Row 34: Increase at both ends. 33 sts.
Rows 35–44: Ch 1, hdc in every stitch across. Turn. 33 sts.
Fasten off, leaving a tail long enough to weave in securely.
Before you seam the cover, lay the entire piece flat. The back and front waist sections should be the same width, with a narrow four-row crotch between the decrease and increase sections.
Join the Side Seams
Fold the diaper cover so the back and front waist edges meet. Keep the face with the three ruffle ridges toward the inside while you're seaming. After the seams are finished, you'll turn the cover so those ridges face outward.
Line up the straight side edges at the waist. Don't continue the seam down into the decrease or increase shaping because those open edges form the leg openings.
Using a yarn needle and the same yarn, sew the row ends together with a neat whip stitch or mattress stitch.
Newborn / 0–3 months: Join the 8 straight back row ends to the 8 straight front row ends. Row 1 at the back waist lines up with Row 36 at the front waist, Row 2 with Row 35, continuing until Row 8 lines up with Row 29.
3–6 months: Join the 9 straight back row ends to the 9 straight front row ends. Row 1 lines up with Row 40, continuing until Row 9 lines up with Row 32.
6–12 months: Join the 10 straight back row ends to the 10 straight front row ends. Row 1 lines up with Row 44, continuing until Row 10 lines up with Row 35.
Repeat on the other side.
Turn the diaper cover right side out. The three unused horizontal ridges should now be visible across the outside of the back.
Crochet the Waistband
The waistband is worked directly around the top opening. There are no buttons and no drawstring.
With the right side facing you, join the yarn at one side seam.
Round 1: Ch 1. Sc once in each stitch across the front waist edge and once in each corresponding foundation stitch across the back waist edge. Join with a sl st to the first sc.
You should have 56 (60, 66) sc around the waist.
Round 2: Ch 1. Sc in each stitch around. Join with a sl st. 56 (60, 66) sts.
Round 3: Ch 1. Sc in each stitch around. Join with a sl st. 56 (60, 66) sts.
Fasten off.
Keep your waistband stitches relaxed. A tight round of single crochet can pull in much more than the body fabric and make the calculated waist measurement meaningless.
Finish the Leg Openings
Each leg opening is made from the exposed row ends between the back side seam and the front side seam. Because half double crochet rows are taller than single crochet stitches are wide, working only one single crochet into every row end can pull the opening too tight.
Join the yarn at the bottom of one side seam with the right side facing.
Each leg opening has 20 (22, 24) exposed row ends. Working the edging at a rate of 3 single crochet stitches for every 2 row ends gives the 30 (33, 36) stitches used below.
Round 1: Ch 1. Work 2 sc into the next row end and 1 sc into the following row end. Repeat that sequence around the entire leg opening. Join with a sl st to the first sc.
The expected count is 30 sc for newborn/0–3 months, 33 sc for 3–6 months and 36 sc for 6–12 months.
Round 2: Ch 1. Sc in every stitch around. Join with a sl st.
Fasten off.
Repeat on the second leg opening.
Before weaving in the ends, lay the cover flat and check both leg openings. They should lie smoothly without puckering or flaring. Row-edge tension varies more than ordinary stitch gauge, so if an opening begins to cup noticeably while you're making Round 1, undo that round and distribute one or two additional stitches around the edge rather than forcing it flat afterward.
Add the Three Crochet Ruffles
Now add the feature that turns the basic cover into the ruffled version. The three horizontal ridges you left across the back are the attachment lines.
Work the lowest ruffle first. That keeps the upper layers out of your way and lets each new ruffle fall over the one below it.
Place the diaper cover with the back facing you. Join the ruffle yarn in the first unused loop at one end of the lowest ridge.
Ruffle Row 1: Ch 1. Sc in the same unused loop and in every unused loop across the ridge. Turn.
You should have 28 (30, 33) sc.
Ruffle Row 2: Ch 3. The chain 3 counts as the first dc. Work 1 dc in the first sc, then work 2 dc in each remaining sc across.
You should have 56 (60, 66) dc.
Fasten off.
Repeat the same two rows on the middle ridge and then on the upper ridge.
When all three are finished, each attachment line has twice as many double crochet stitches as base stitches. That increase is what makes the fabric spread and form a ruffle instead of lying flat.
Let the ruffles overlap naturally. Don't sew their lower edges to the diaper cover. Only the straight upper edge of each ruffle is attached, so the three layers stay loose and full across the back.
Finishing the Ruffled Crochet Diaper Cover
Weave in every yarn end securely on the wrong side. Pay particular attention to the ends at the outer corners of the ruffles because those areas will be handled when the cover is put on and taken off.
Remove the stitch marker that identified the outside of the back.
Lay the finished diaper cover flat and smooth the waistband, leg openings and ruffles into shape with your hands.
If you block the cover, follow the care instructions for the yarn you're using. Don't stretch the waistband or leg openings larger during blocking because those measurements affect the fit.
The three ruffles should sit across the back only, with the upper ruffle overlapping the middle one and the middle ruffle overlapping the lowest one. The front remains plain, which keeps the bulk where the decorative detail belongs instead of adding extra fabric around the tummy.
Before using the cover, check the seams, edging and ruffle attachment points for loose yarn ends. This pattern intentionally leaves out buttons, ties and a drawstring.
For a coordinated photo outfit with a matching accessory, my crochet flower headband and diaper cover set pairs a large crocheted flower headband with a decorative baby cover.
If you're making a matching baby outfit, you can find more clothing and accessory projects on my free baby crochet patterns page.


When you click on links to various merchants on this site and make a purchase, this may result in this site earning a commission. This does not affect the price you pay.

UBGI Gold Standard 2026
Reviewed under the site's
editorial checklist.
About Jan | Contact | Baby Nursery Ideas (Blog) | Site Map | Privacy Policy | Disclosure Policy | Disclaimer | Affiliate Disclosure | Earnings Disclosure | Facebook | Pinterest
I am a participant in the Amazon Services LLC Associates Program, an affiliate advertising program designed to provide a means for us to earn fees by linking to Amazon. As an Amazon Associate I earn from qualifying purchases.
Copyright © 2006-2026. All Rights Reserved.