Free Oversized Crochet Christmas Stocking Pattern with Matching Baby Santa Hat
By Jan Bay
This oversized crochet Christmas stocking pattern started with a simple thought. Most Christmas stockings are made to hold little presents, but I wanted one big enough to photograph alongside a parent's most precious gift at baby's first Christmas. The extra large stocking is designed to measure approximately 32 inches long, with a wonderfully roomy red body, a thick ivory ribbed cuff, and a rounded ivory heel and toe. I've added a matching Santa hat to complete the look. It's a decorative prop to display beside the baby during supervised pictures, then a Christmas keepsake to bring out and enjoy every December.Explore More Christmas Stocking and Crochet Patterns
Free Crochet Santa Stocking Pattern
Mini Crochet Christmas Stocking Pattern
Free Crochet Baby Santa Hat Pattern
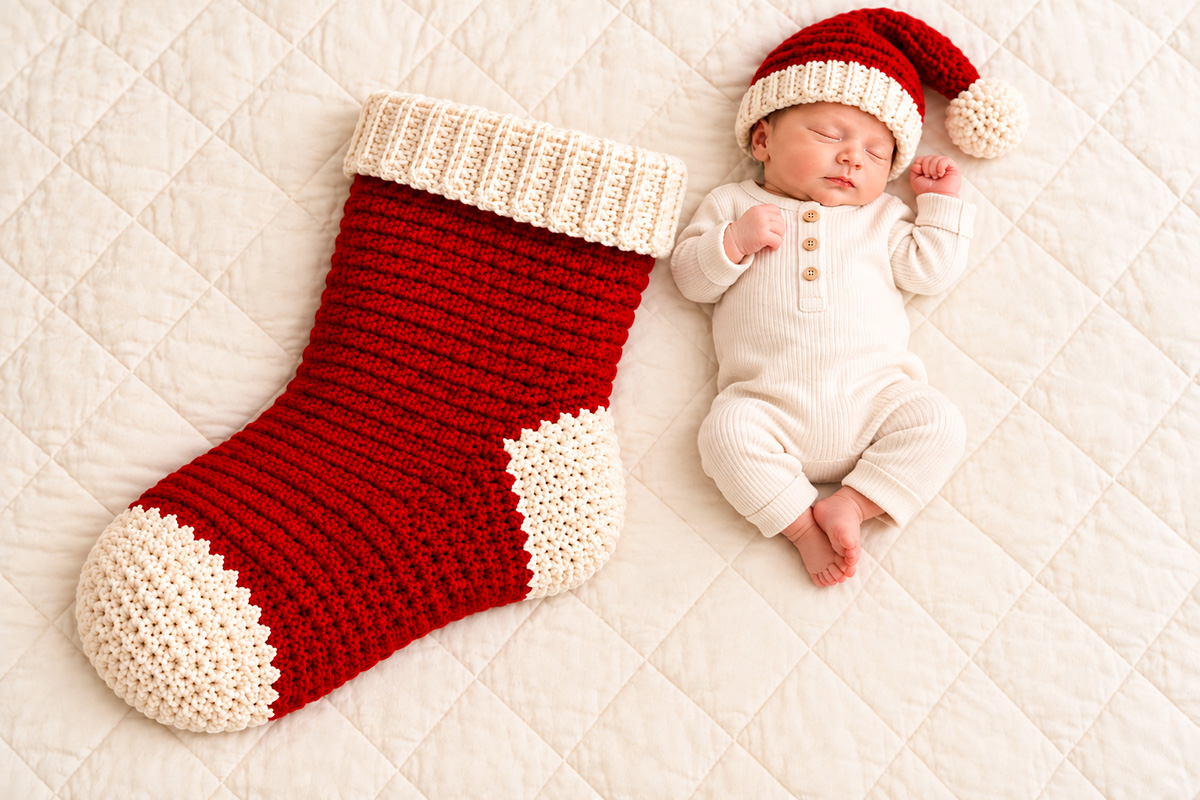
Photo note: This is a styled Christmas portrait, not a safe sleep setup.
Jump to the Free Crochet Pattern
Oversized Crochet Christmas Stocking Pattern: Finished Measurements
Before picking up your crochet hook, take a look at the size of this stocking. It's much bigger than the stockings you'd normally hang on the mantel, and that's intentional. I wanted the finished shape to look like a proper Christmas stocking, with enough width to look wonderfully oversized rather than long and skinny.
Finished stocking measurements:
- Overall length: approximately 32 inches, following the stocking's centerline from cuff to toe
- Upper body width, laid flat: 15 to 16 inches
- Cuff opening, laid flat: 14 to 15 inches
- Foot width, laid flat: 12 to 14 inches
- Folded ivory cuff: approximately 4 1/2 inches deep
Skill level: Intermediate. The stitches are simple, but the large size, short-row heel and shaped toe require careful counting.
Construction: The stocking is worked from the cuff toward the toe. The ivory cuff is crocheted in rows and joined into a ring. The red leg is worked in rounds, the ivory heel is shaped with short rows, and the foot continues in red before changing to ivory for the rounded toe.
Matching hat: The baby Santa hat is made separately, using a lighter yarn and smaller hook than the stocking. It has a narrow ivory ribbed brim, a long red crown that bends gently to one side, and an ivory pom-pom.
The two yarn weights are intentional. The stocking needs a substantial chunky texture to hold its oversized shape. The baby hat needs a smaller, softer fabric so its stitches and proportions suit a newborn.
Pattern measurements: These are calculated targets based on the stitch counts and gauge below. The stocking and hat have not been physically test-crocheted, so their final dimensions and fit remain subject to sample verification.
Don't skip the gauge swatch on this project. A small difference across 80 stitches can change the body width by several inches. That's enough to turn our roomy stocking into a completely different shape.
Yarn and Materials for the Stocking and Matching Santa Hat
I'd keep the yarn smooth, soft and fairly substantial. The red body has plenty of texture without needing bobbles or extra decorations, and the ivory sections should look like they're part of the stocking rather than patches added afterward.
For the Oversized Christmas Stocking
- Super bulky weight yarn, Category 6, in Christmas red
- Matching super bulky yarn in soft ivory
- 8 mm (L) crochet hook, or the size needed to match gauge
- Several locking stitch markers in contrasting colors
- Large blunt yarn needle
- Scissors
- Flexible measuring tape
Estimated yarn quantities: Allow approximately 450 to 600 yards of red and 250 to 350 yards of ivory for the stocking. These are generous planning allowances, not measured consumption. The actual amount will depend on the yarn and the amount used by your gauge swatch.
For the Matching Baby Santa Hat
- Soft bulky weight yarn, Category 5, in coordinating Christmas red
- Matching ivory bulky yarn
- 6 mm (J) crochet hook, or the size needed to match the hat gauge
- Yarn needle
- Scissors
- Measuring tape
- Small pom-pom maker or sturdy cardboard template
Estimated hat yarn: Allow approximately 70 to 100 yards of red and 30 to 50 yards of ivory, including the pom-pom. These amounts also need confirmation with a finished sample.
I wouldn't choose a heavily shedding chenille or eyelash yarn for either piece. A smoother yarn gives you clearer stitches, easier counting and more control over the heel and toe. It also avoids adding loose fibers around a baby's face during photography.
You don't need buttons, bells, beads, ribbons or a decorative buckle. The red body, ivory cuff, heel and toe already give the stocking its classic Christmas look.
Crochet Gauge, Abbreviations and Stitch Notes
Here's where the size of the finished stocking is decided. The measurements are tied to the stitch counts, so make your swatches before starting the cuff.
Stocking Gauge
With Category 6 yarn and the stocking hook, the target gauge is:
- 10 single crochet stitches = 4 inches
- 10 single crochet rounds = 4 inches
- 10 back-loop ribbing rows = approximately 4 inches across the ribbed band
Make a swatch larger than 4 inches square and measure the center portion without stretching it. Make a separate ribbing swatch, because the width of a back-loop ribbing row may differ from the height of an ordinary single crochet round.
Stocking measurement calculations:
- 80 body stitches at the target gauge give a 32-inch circumference, or 16 inches laid flat.
- 72 cuff ribbing rows at the target row gauge give approximately 28.8 inches around, or 14.4 inches laid flat.
- 68 foot stitches give approximately 27.2 inches around, or 13.6 inches laid flat.
These calculations describe the fabric at the target gauge. The short-row heel and the way the stocking hangs will affect its final shape, so check the completed piece as well.
Matching Baby Hat Gauge
With Category 5 yarn and the hat hook, aim for:
- 14 single crochet stitches = 4 inches
- 14 single crochet rounds = 4 inches
- 14 back-loop ribbing rows = approximately 4 inches across the band
At that ribbing gauge, 48 rows form a band approximately 13.7 inches around. Check the actual head measurement before considering the hat for brief supervised wear. Newborn head sizes vary, and the pattern has not been fit-tested.
Stitch Abbreviations
- ch: chain
- sc: single crochet
- sc2tog: single crochet two stitches together
- sl st: slip stitch
- BLO: back loop only
- st or sts: stitch or stitches
- rnd: round
- RS: right side
- WS: wrong side
Pattern Notes
Use US crochet terminology throughout. Unless instructed otherwise, begin each joined round with ch 1, work the first single crochet into the first stitch, and join with a slip stitch to that first single crochet. The starting chain and joining slip stitch do not count as stitches.
Place a marker in the first stitch of each round. Move it upward as you work. For the heel, use additional markers to separate the heel stitches from the front of the stocking.
Color changes: Begin the last single crochet in the old color. Before pulling through the final two loops, draw through the new color. This keeps the change between red and ivory neater.
Single crochet decrease: Insert the hook into the next stitch and pull up a loop. Repeat in the following stitch. Yarn over and pull through all three loops. One stitch has been decreased.
Direction: The stocking is worked from cuff to toe. The folded ribbing extends above the red leg, and the heel shapes the bend between the leg and foot.
Don't stretch the stocking while measuring. Lay it flat, smooth the fabric gently and check the width at the widest section of the upper leg and again across the straight portion of the foot.
Free Oversized Crochet Christmas Stocking Pattern
We'll begin with the ivory cuff, work the red leg down to the heel, and then turn the corner into the foot. The contrasting ivory heel is crocheted directly into the stocking instead of being sewn on as a decorative patch. That way, the ivory section does the actual shaping rather than just adding color.
Part 1: Crochet the Deep Ivory Ribbed Cuff
With Category 6 ivory yarn and the 8 mm hook, ch 24.
Row 1: Sc in the second chain from the hook and in each chain across. Ch 1 and turn. (23 sc)
Rows 2 through 72: Sc BLO in each stitch across. Ch 1 and turn after every row except Row 72. (23 sc per row)
The 72 rows form the circumference of the cuff. The 23 stitches across each row form its depth.
Measurement checkpoint: The completed ribbing should measure approximately 28.8 inches along the 72-row edge and 9.2 inches across the 23-stitch direction. When folded later, it should form a cuff approximately 4.6 inches deep.
With the right sides together, bring the first and last rows together. Slip stitch through corresponding stitches to join the short ends and form a continuous ribbed tube. Fasten off, leaving the seam on the inside.
Check that the tube lies flat at approximately 14.4 inches across. The ribbed opening should remain flexible and should not pull inward sharply.
Part 2: Begin the Red Stocking Body
Turn the ribbed tube so the seam is inside. With red yarn, join at one long edge of the cuff.
Round 1: Work one single crochet into each of the next 8 ribbing row ends, then work 2 single crochets into the next row end. Repeat this nine-row sequence 8 times around. Join. (80 sc)
Rounds 2 through 36: Ch 1. Sc in each stitch around. Join. (80 sc per round)
Keep the beginning-of-round marker in place. The first 40 stitches of the next section will form the back heel. The remaining 40 stitches form the front of the stocking.
Measurement checkpoint: The red body should measure approximately 16 inches wide when laid flat, with 80 stitches around. At the target round gauge, the 36 red rounds measure approximately 14.4 inches before the heel is worked.
Fold the ivory cuff outward so its top half covers the lower half of the ribbed section. The upper fold becomes the top of the stocking, while the lower edge rests near the red-and-ivory join.
You should now have a broad ivory cuff and a substantial red upper leg. If the red leg is noticeably narrower than 15 inches laid flat, stop and recheck your gauge before beginning the heel.
Part 3: Crochet the Shaped Ivory Heel
The heel is worked in ivory across 40 of the 80 body stitches. The other 40 stitches stay unworked until we begin the foot.
Lay the red leg flat and identify the side where you want the heel to appear. The ivory heel belongs at the outside bend of the finished stocking, opposite the top of the foot. Mark the 40 consecutive stitches that will form the heel, leaving the other 40 stitches for the front.
Fasten off the red yarn. Join ivory at the beginning of the marked 40-stitch heel section.
Heel Row 1: Sc in each of the 40 heel stitches. Ch 1 and turn. (40 sc)
Heel Row 2: Skip the first stitch, placing a removable marker in that skipped stitch. Sc in each remaining stitch across. Ch 1 and turn. (39 sc)
Heel Row 3: Skip the first stitch and mark it. Sc across the remaining stitches. Ch 1 and turn. (38 sc)
Heel Row 4: Repeat the decrease-row method, marking the skipped stitch. Ch 1 and turn. (37 sc)
Heel Row 5: Repeat the decrease-row method. Ch 1 and turn. (36 sc)
Heel Row 6: Repeat the decrease-row method. Ch 1 and turn. (35 sc)
Heel Row 7: Repeat the decrease-row method. Do not chain or turn at the end of this row. (34 sc)
Picking up the heel stitches: During Rows 8 through 13, each waiting stitch is the marked stitch skipped on an earlier decrease row. It sits one or more rows below the current working edge. Work into both top loops of that marked stitch, not into the turning chain or the side of a stitch post. Recover exactly one marked stitch at the end of each return row, alternating sides as you turn. Remove its marker after working it. All six markers must be recovered by the end of Row 13. Keep the yarn comfortably snug at each turn to reduce openings along the heel.
Heel Row 8: Ch 1 and turn. Sc across all 34 active stitches. Work one sc into the nearest marked waiting stitch at the end of the row. Remove that marker. Ch 1 and turn. (35 sc)
Heel Row 9: Sc across all 35 active stitches. Work one sc into the nearest marked waiting stitch at the end of the row. Remove its marker. Ch 1 and turn. (36 sc)
Heel Row 10: Sc across all 36 active stitches. Work one sc into the next marked waiting stitch at the end of the row. Remove its marker. Ch 1 and turn. (37 sc)
Heel Row 11: Sc across all 37 active stitches. Work one sc into the next marked waiting stitch at the end of the row. Remove its marker. Ch 1 and turn. (38 sc)
Heel Row 12: Sc across all 38 active stitches. Work one sc into the next marked waiting stitch at the end of the row. Remove its marker. Ch 1 and turn. (39 sc)
Heel Row 13: Sc across all 39 active stitches. Work one sc into the final marked waiting stitch. Remove the marker. Do not chain or turn. (40 sc)
Heel stitch-count check: 40, 39, 38, 37, 36, 35, 34, 35, 36, 37, 38, 39, 40.
All six waiting stitches should now be recovered. The heel should form a shallow curved pouch, not a long rectangular flap. Check the turning points for openings. These may require closing when the yarn ends are woven in.
Heel depth checkpoint: After Row 13, measure the heel along its center from the red-and-ivory join to the final heel row. Ordinary turned single crochet rows may have a different height from your joined-round gauge, so use the actual measurement when checking the finished cuff-to-toe length. The short-row curve will also affect the assembled depth.
Count the 40 stitches in the final heel row before continuing. Fasten off the ivory yarn securely.
Part 4: Rejoin the Foot and Shape Its Width
The foot returns to working in joined rounds. It begins with 80 stitches, matching the upper leg, and gradually decreases to 68 stitches. That gives us the slightly narrower foot shown in the example image.
Foot Round 1: With the right side facing, join red yarn in the first of the 40 waiting front stitches, immediately beside the completed heel. Ch 1. Sc across all 40 waiting front stitches, then sc across the 40 stitches of the final ivory heel row. Join with a slip stitch to the first sc. Do not count the beginning chain or joining slip stitch. (80 sc)
Check both heel corners before continuing. The foot should form one continuous 80-stitch opening without an unworked gap at either side of the ivory heel. Place a removable marker at each heel-to-front junction and move the markers upward as the foot grows.
Foot Round 2: Ch 1. Repeat [sc in next 38 stitches, sc2tog] twice. Join. (78 sc)
Foot Round 3: Sc in each stitch around. Join. (78 sc)
Foot Round 4: Repeat [sc in next 37 stitches, sc2tog] twice. Join. (76 sc)
Foot Round 5: Sc in each stitch around. Join. (76 sc)
Foot Round 6: Repeat [sc in next 36 stitches, sc2tog] twice. Join. (74 sc)
Foot Round 7: Sc in each stitch around. Join. (74 sc)
Foot Round 8: Repeat [sc in next 35 stitches, sc2tog] twice. Join. (72 sc)
Foot Round 9: Sc in each stitch around. Join. (72 sc)
Foot Round 10: Repeat [sc in next 34 stitches, sc2tog] twice. Join. (70 sc)
Foot Round 11: Sc in each stitch around. Join. (70 sc)
Foot Round 12: Repeat [sc in next 33 stitches, sc2tog] twice. Join. (68 sc)
Foot Rounds 13 through 24: Sc in each stitch around. Join after every round. (68 sc per round)
Length checkpoint before the toe: Lay the stocking flat with the heel forming its natural bend. Measure from the top of the folded cuff, following the stocking's centerline around the bend to the end of the red foot. Allowing approximately 3.2 inches for the eight ivory toe rounds, the working length should be near 28.8 inches before you begin the toe. This is a calculated checkpoint, not a physically verified measurement.
If you need a small length adjustment, add or remove straight red foot rounds while keeping 68 stitches in each round. At the target gauge, each round changes the length by approximately 0.4 inch. If the difference is substantial, check your gauge and heel shaping instead of adding several inches to the foot. Once the length is close to your target, continue with the ivory toe.
Foot measurement checkpoint: At the target gauge, 68 stitches make a circumference of approximately 27.2 inches, or 13.6 inches laid flat. Measure across the straight section of the foot rather than across its curved heel.
The 24 red foot rounds measure approximately 9.6 inches at the target round gauge. The ivory toe will add approximately another 3.2 inches before finishing.
Lay the stocking flat with the heel turned to one side. The leg should remain broad, but the foot should be a little narrower. The ivory heel should sit at the outside bend, not underneath the toe.
Part 5: Crochet the Rounded Ivory Toe
Change to ivory yarn. The toe is worked with evenly distributed decreases so the end closes into a rounded shape instead of a long pointed tip.
Toe Round 1: Repeat [sc in next 7 stitches, sc2tog, sc in next 6 stitches, sc2tog] four times. (60 sc)
Toe Round 2: Repeat [sc in next 6 stitches, sc2tog, sc in next 5 stitches, sc2tog] four times. (52 sc)
Toe Round 3: Repeat [sc in next 5 stitches, sc2tog, sc in next 4 stitches, sc2tog] four times. (44 sc)
Toe Round 4: Repeat [sc in next 4 stitches, sc2tog, sc in next 3 stitches, sc2tog] four times. (36 sc)
Toe Round 5: Repeat [sc in next 3 stitches, sc2tog, sc in next 2 stitches, sc2tog] four times. (28 sc)
Toe Round 6: Repeat [sc in next 2 stitches, sc2tog, sc in next stitch, sc2tog] four times. (20 sc)
Toe Round 7: Repeat [sc in next stitch, sc2tog, sc2tog] four times. (12 sc)
Toe Round 8: Sc2tog six times. (6 sc)
Cut the ivory yarn, leaving a long tail. Thread the tail through the front loops of the remaining six stitches and draw the opening closed. Secure on the wrong side and weave in the end.
Toe checkpoint: The toe should be full and rounded, with no long point and no large hole at the center. The ivory section should make a clear color block at the end of the red foot.
Part 6: Check the Complete Stocking
Lay your stocking flat without stretching it. Smooth the cuff, body and foot into their natural shapes.
- The folded cuff should be approximately 4 1/2 inches deep.
- The upper body should measure 15 to 16 inches across.
- The cuff opening should measure 14 to 15 inches across.
- The straight section of the foot should measure 12 to 14 inches across.
- The overall centerline length should be approximately 32 inches.
- The heel should form a visible bend between the leg and foot.
- The toe should look rounded and full.
The 32-inch finished length is our design target, but the shaped heel means you cannot confirm that measurement simply by adding the cuff, leg and foot row heights. Measure the finished stocking with a flexible tape, following its centerline around the bend from the top of the cuff to the toe. The actual length needs verification with a completed sample.
Make length adjustments before completing the ivory toe, using the earlier length checkpoint. Add or remove straight red foot rounds while keeping 68 stitches in each round. At the target gauge, each round changes the length by approximately 0.4 inch. If the stocking is already finished and needs a substantial correction, the toe must be undone before the foot can be reworked. Changing the red leg length would require undoing additional sections. Do not stretch the completed stocking to force it to measure 32 inches.
If your dimensions are outside these ranges, don't stretch the finished stocking to make the numbers agree. Record the actual measurements and correct the gauge or construction before treating the pattern as a confirmed 32-inch design.
Matching Crochet Baby Santa Hat Pattern
The matching Santa hat is the little extra that makes the Christmas set feel complete. I wanted it to look like a miniature version of a classic Santa hat, with a soft ivory ribbed brim and enough length in the red crown to fall naturally to one side.
We're changing to the lighter Category 5 yarn and 6 mm hook for this piece. Using the stocking yarn for a newborn hat would make the fabric much thicker than it needs to be.
Expected hat measurements at gauge:
- Brim circumference: approximately 13.7 inches
- Brim depth: approximately 1.7 inches
- Overall hat length before pom-pom: approximately 10.5 inches
The hat is intended as a temporary photography accessory, not sleepwear. Measure the baby's head and check the finished fabric before use. Never force on a hat that feels tight, and remove it immediately if it shifts toward the face.
Part 1: Crochet the Ivory Hat Brim
With Category 5 ivory yarn and the 6 mm hook, ch 7.
Row 1: Sc in the second chain from the hook and in each chain across. Ch 1 and turn. (6 sc)
Rows 2 through 48: Sc BLO in each stitch across. Ch 1 and turn after each row except Row 48. (6 sc per row)
The 48 ribbing rows form the circumference of the brim. The six stitches across each row form its depth.
Bring the short ends together with the right sides facing. Slip stitch through corresponding stitches to make a ring. Fasten off the ivory yarn and weave the end securely into the seam. Turn the seam to the inside.
Checkpoint: The brim should measure approximately 13.7 inches around at the target ribbing gauge. It should stretch gently without creating pressure.
Part 2: Crochet the Red Hat Crown
Join Category 5 red yarn at the upper edge of the ivory brim.
Round 1: Work one sc into each of the 48 ribbing row ends. Join. (48 sc)
Rounds 2 through 10: Sc in each stitch around. Join after each round. (48 sc per round)
We now begin tapering the crown. Each decrease round removes two stitches, evenly spaced on opposite sides.
Round 11: Repeat [sc in next 22 stitches, sc2tog] twice. (46 sc)
Round 12: Repeat [sc in next 21 stitches, sc2tog] twice. (44 sc)
Round 13: Repeat [sc in next 20 stitches, sc2tog] twice. (42 sc)
Round 14: Repeat [sc in next 19 stitches, sc2tog] twice. (40 sc)
Round 15: Repeat [sc in next 18 stitches, sc2tog] twice. (38 sc)
Round 16: Repeat [sc in next 17 stitches, sc2tog] twice. (36 sc)
Round 17: Repeat [sc in next 16 stitches, sc2tog] twice. (34 sc)
Round 18: Repeat [sc in next 15 stitches, sc2tog] twice. (32 sc)
Round 19: Repeat [sc in next 14 stitches, sc2tog] twice. (30 sc)
Round 20: Repeat [sc in next 13 stitches, sc2tog] twice. (28 sc)
Round 21: Repeat [sc in next 12 stitches, sc2tog] twice. (26 sc)
Round 22: Repeat [sc in next 11 stitches, sc2tog] twice. (24 sc)
Round 23: Repeat [sc in next 10 stitches, sc2tog] twice. (22 sc)
Round 24: Repeat [sc in next 9 stitches, sc2tog] twice. (20 sc)
Round 25: Repeat [sc in next 8 stitches, sc2tog] twice. (18 sc)
Round 26: Repeat [sc in next 7 stitches, sc2tog] twice. (16 sc)
Round 27: Repeat [sc in next 6 stitches, sc2tog] twice. (14 sc)
Round 28: Repeat [sc in next 5 stitches, sc2tog] twice. (12 sc)
Round 29: Repeat [sc in next 4 stitches, sc2tog] twice. (10 sc)
Round 30: Repeat [sc in next 3 stitches, sc2tog] twice. (8 sc)
Round 31: Repeat [sc in next 2 stitches, sc2tog] twice. (6 sc)
Fasten off with a long tail. Thread the tail through the remaining stitches, close the tip and weave the end securely into the inside of the hat.
The crown should narrow gradually and fall naturally to one side. Don't stuff the hat or put wire inside the tip. The soft yarn and its own length should give it the gentle droop shown in the example.
Part 3: Make the Ivory Pom-Pom
Use the ivory hat yarn to make one compact pom-pom approximately 1 1/2 to 2 inches across.
Wrap the yarn around a small pom-pom maker or cardboard template. Tie the center firmly with a long doubled strand of the same yarn. Cut the loops and trim the ends evenly.
Thread both long tying ends through the closed tip of the hat. Knot securely inside and sew through the tip several times to anchor the pom-pom.
Check that no short yarn ends pull free. The pom-pom is decorative, and the hat should not be left on an unattended or sleeping baby.
Part 4: Check the Hat
The finished brim should sit flat without rolling. The red crown should taper smoothly, with no sudden bulge or tight knot near the top.
Measure the brim circumference and crown length. Those measurements matter more than the word "newborn" on a yarn label or pattern description.
I'd keep the pom-pom modest rather than making an enormous one. There's already plenty of personality in the long red crown, and a smaller ivory pom-pom matches the simple stocking much better.
Assembly and Finishing the Christmas Stocking Set
The main stocking doesn't need a lot of extra assembly, which is one reason I like this construction. The cuff, heel, foot and toe are already connected. Most of the finishing work comes down to making the joins neat and getting the stocking to lie in its natural shape.
Finish the Stocking
- Turn the stocking wrong side out and weave in every loose yarn end, including the red-and-ivory changes.
- Check the short-row heel carefully. Close any small corner gaps with matching ivory yarn, securing the stitches without pulling the heel out of shape.
- Check the gathered toe opening. If you can see a gap, pass the closing yarn through the remaining stitches again and fasten securely.
- Remove all remaining temporary stitch markers from the stocking, including those used at the heel and foot junctions. Check the inside for forgotten markers and loose yarn ends.
- Turn the stocking right side out.
- Fold the ivory cuff neatly outward to approximately 4 1/2 inches deep.
- Lay the stocking flat and arrange the heel at the outside of the bend.
- Smooth the rounded toe without stretching its stitches.
I'd skip a hanging loop on this version. The approved design has a clean cuff, and an oversized stocking this substantial doesn't need another decorative detail competing with it. If you decide to display it on a mantel, lay it across the mantel rather than hanging it by the cuff or filling it with heavy presents.
Finish the Matching Hat
Weave in the red and ivory ends on the inside of the hat. Check the brim seam, then inspect the pom-pom attachment carefully. Trim any loose fibers that could work free.
The crown should be soft enough to bend without a wire or internal support. Let it droop naturally rather than trying to make the tip stand upright.
Blocking and Shaping
Check the yarn label before wetting or steaming either piece. If the yarn permits gentle blocking, lightly dampen the stocking and smooth it into shape on a clean, flat surface. Keep the cuff opening at its intended width and arrange the foot so the heel and toe remain distinct.
Don't pull the stocking longer or wider to make it match the listed measurements. Blocking can smooth the stitches, but it shouldn't be used to disguise a gauge problem.
Let both pieces dry completely before storing or displaying them. Keep the stocking unstuffed when measuring it. Stuffing would change the width and could make the heel appear much rounder than the actual crochet construction.
Final Measurement Check
Before calling the project finished, record these measurements from the completed stocking:
- Overall cuff-to-toe length, following the centerline
- Flat upper-body width
- Flat cuff-opening width
- Flat foot width
- Folded cuff depth
- Matching hat brim circumference
- Matching hat length before the pom-pom
Compare those measurements with the finished-size targets near the beginning of the pattern. If the measurements differ substantially, adjust the gauge and repeat the affected piece rather than changing the final design proportions.
Once it's finished, I think the red-and-ivory stocking looks best without another ornament or embellishment added to it. The size is what makes it special. Let that be enough.
Using the Oversized Christmas Stocking for Newborn Photos
The oversized stocking and little Santa hat make a lovely Christmas combination, but the photograph is a styling illustration, not a guide for positioning a newborn.
This stocking is a decorative photography prop. It is not a baby bed, sleep sack, swaddle, carrier or sleep product.
For a real newborn photo session, the safer approach is to place the stocking beside the baby rather than enclosing a sleeping infant inside it. The roomy stocking can still be the focal point of the picture, with the baby close enough to show just how oversized it is.
Keep these precautions in mind:
- Do not use the stocking for infant sleep, even during a brief photo session.
- For sleeping infants, use a firm, flat, approved sleep surface and place them on their backs.
- Do not position a sleeping newborn on fluffy rugs, loose blankets or other soft decorative surfaces.
- Keep the stocking, yarn ends, pom-pom and any other loose decorations away from the baby's face and airway.
- Use the Santa hat only briefly while the baby is awake and directly supervised. Remove it for sleep.
- Never suspend, hang, carry or lift a baby in the stocking.
- Have an adult within arm's reach during any awake photo styling, and stop if the baby becomes uncomfortable.
The U.S. Consumer Product Safety Commission's Safe Sleep guidance explains why soft objects, loose bedding and unsupported positions are unsuitable for infant sleep.
You don't have to reproduce every detail of a styled photograph to make a beautiful Christmas picture. A baby in a comfortable outfit beside the finished stocking, with the matching hat displayed nearby, still makes a sweet first-Christmas keepsake.
After the photographs, put the stocking away as a holiday decoration or keepsake. Keep it out of the crib and away from unsupervised infant play.
Oversized Crochet Christmas Stocking Questions
Can I make this stocking with regular worsted-weight yarn?
You can make a stocking with worsted-weight yarn, but not at these stitch counts if you want the same finished dimensions. The pattern is calculated for super bulky yarn at 10 single crochet stitches per 4 inches. A thinner yarn would make the stocking considerably smaller unless you recalculated the construction.
How can I tell whether my stocking is going to be 32 inches long?
Check the gauge before starting, then measure after completing the red leg and again after finishing the foot and toe. The final measurement should follow the centerline from the cuff opening around the stocking's bend to the end of the toe. If your measured length differs, record it rather than stretching the stocking to reach 32 inches.
Why is the body wider than the foot?
I wanted the upper part to look generous and oversized, while the lower part still had a recognizable Christmas stocking shape. The 80-stitch body gradually narrows to a 68-stitch foot, and the shaped heel gives it the bend you expect from a traditional stocking.
Can I use the stocking as a newborn sleeping bag?
No. This is a decorative stocking, not wearable sleep clothing or an infant sleep product. Its size and opening were designed for the appearance of an oversized Christmas stocking, not for safe sleep. Keep it beside the baby for photographs rather than placing a sleeping infant inside it.
Can I make the matching Santa hat in a larger size?
Yes, but the brim circumference and crown shaping must be recalculated for the intended head measurement. The version on this page is designed around a newborn-size brim of approximately 13.7 inches at the stated gauge. Check the actual head size and fabric flexibility before use.
Can the finished stocking be used as a Christmas decoration?
Absolutely. I like that it can become a keepsake after the first Christmas photographs. Lay it across a mantel, display it with the holiday decorations or pack it away with the baby's first Christmas treasures. Just remember that the oversized crochet construction isn't intended to hold heavy gifts, and keep it away from infants during sleep or unsupervised play.
For other stocking sizes, including much smaller versions for gifts and decorations, visit my baby Christmas stocking ideas collection. The mini crochet Christmas stocking pattern is another option if you want something that takes far less yarn.
Pattern development note: The stitch counts and construction have been reviewed mathematically for internal consistency. The finished dimensions, yarn quantities, heel shaping and hat fit are estimates, and the pattern has not been physically test-crocheted. The complete stocking and hat require verification with finished samples before the measurements, appearance and fit can be confirmed.
When you click on links to various merchants on this site and make a purchase, this may result in this site earning a commission. This does not affect the price you pay.

UBGI Gold Standard 2026
Reviewed under the site's
editorial checklist.
Photos, decorating ideas, party setups and reader submissions are shared for inspiration unless a page is specifically presented as a pattern, tutorial, reference guide or step-by-step project. Follow the instructions, measurements, safety guidance and manufacturer directions provided for the particular project or product.
About Jan | Contact | Baby Nursery Ideas (Blog) | Site Map | Privacy Policy | Disclosure Policy | Disclaimer | Affiliate Disclosure | Earnings Disclosure | Facebook | Pinterest
I am a participant in the Amazon Services LLC Associates Program, an affiliate advertising program designed to provide a means for us to earn fees by linking to Amazon. As an Amazon Associate I earn from qualifying purchases.
Copyright © 2006-2026. All Rights Reserved.