Free Crochet Santa Stocking Pattern in 3 Sizes: Baby, Child & Adult
By Jan Bay
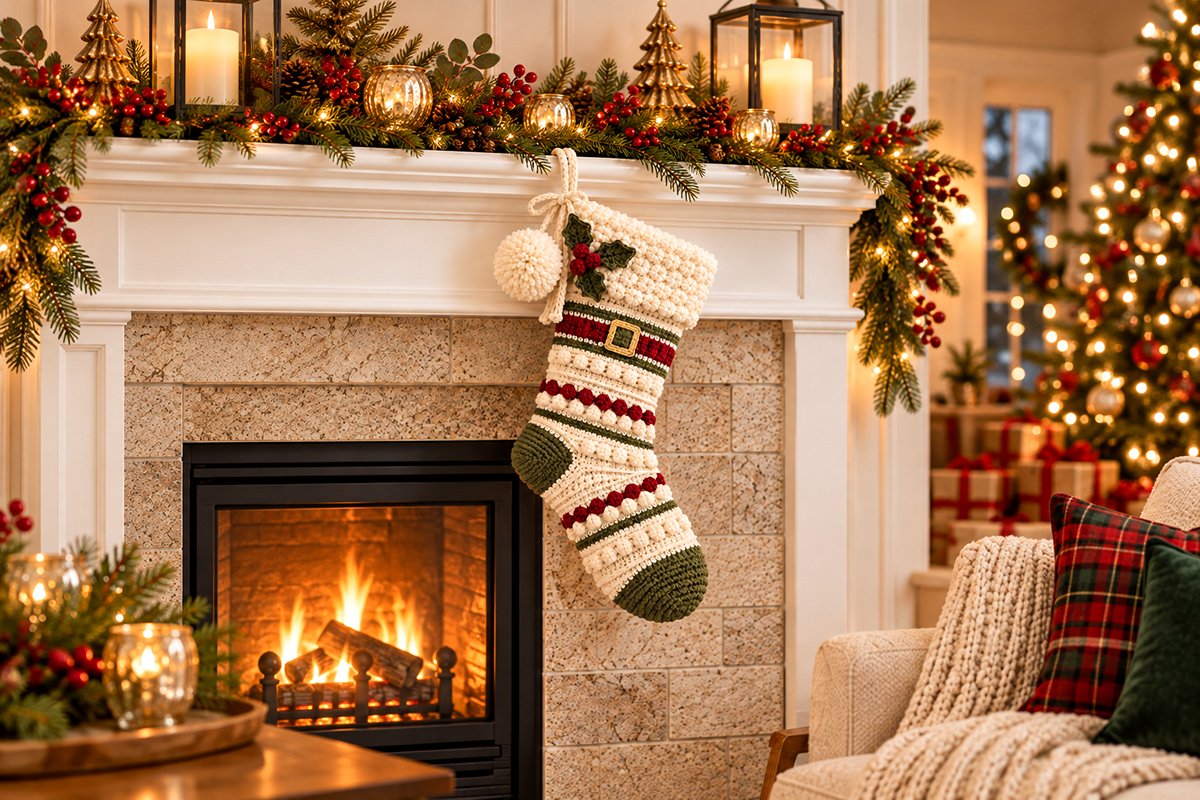
This free crochet Santa stocking pattern combines chunky, raised stitches with a fluffy white cuff, large pom pom, holly leaves and a trim Santa-inspired belt for a little added HO HO HO. The neutral oatmeal, cranberry and olive-green colors give it an old-fashioned Christmas charm without all that blinding bright red some people want to avoid. With three sizes for baby, child and adult, you can make a matching set for the whole family, including a special baby's first Christmas keepsake to bring out every December.
Explore More Christmas Crochet Patterns
Free Christmas Crochet Patterns
Crochet Holly Leaves and Berries
Jump to the Free Santa Stocking Pattern
Three Sizes and Finished Measurements
Before you get started, choose the stocking size you want to make. The little baby version is meant for a first Christmas keepsake, the child size has more room for small gifts, and the adult version is a full-size mantel stocking. All three use the same colors, chunky texture, holly and Santa-inspired belt, so they'll look like a matching set.
| Measurement | Baby | Child | Adult |
|---|---|---|---|
| Target length along stocking | 12–13 in. | 15–16 in. | 18–19 in. |
| Calculated body circumference | 10⅔ in. | 13⅓ in. | 16 in. |
| Body stitches per round | 32 | 40 | 48 |
| Skill level | Intermediate | ||
The lengths are estimates based on the working gauge and the number of rounds. Measure along the stocking from the upper rim, around the heel bend and toward the toe, rather than treating it as a straight vertical measurement. The fluffy cuff folds over the upper leg, so it doesn't add its full height to the stocking length.
Don't worry about choosing a size that matches someone's actual foot. These are decorative Christmas stockings, not wearable socks. Even the baby size has a hollow foot and an opening for a few small gifts.
Size instructions: Whenever three numbers appear together, they are given in baby (child, adult) order. For example, 32 (40, 48) means 32 stitches for baby, 40 for child and 48 for adult.
Materials and Yarn for the Crochet Santa Stocking
I'd choose a soft bulky-weight yarn for the stocking itself, something substantial enough to show off the raised stitches without making the fabric stiff as a board. The oatmeal color is carrying the bulk of the visual load here. Cranberry and olive bring in Christmas color, and the fluffy ivory cuff gives the stocking that little touch of Santa.
Yarn
- Oatmeal: Main stocking body.
- Olive green: Contrasting heel and toe, accent rounds and holly leaves.
- Muted cranberry: Santa belt, raised accent stitches and berries.
- Ivory: Textured folded cuff, oversized pom pom, braided hanging loop and decorative cords.
- Antique gold: A small amount for the crocheted belt buckle.
Use category 5 bulky yarn for the body, with similar-weight yarn for the colored details. For the ivory cuff, choose a soft, lofty bulky yarn that forms full, rounded puff stitches while remaining flexible enough to fold. A gently fuzzy yarn can add softness, but heavily textured boucle or slippery chenille may make the stitch tops difficult to find. Check the cuff gauge against the stocking opening before completing the cuff. Closely spaced, staggered puff stitches create the fuller ivory texture.
Estimated Yarn Allowances
| Size | Estimated total yardage |
|---|---|
| Baby | 220–280 yards |
| Child | 300–390 yards |
| Adult | 420–550 yards |
These are generous planning estimates for all colors combined, including the cuff and decorations. They have not been measured from completed samples. You'll need considerably more oatmeal than cranberry or olive, and only a small scrap of gold.
Other Supplies
- 6.5 mm (K/10½) crochet hook, or the size needed to meet the working gauge
- Appropriately sized hook for the ivory cuff if the yarn requires a change
- Yarn needle with a large eye
- Stitch markers, preferably four
- Scissors
- Flexible measuring tape
- Pom-pom maker or two cardboard circles
- Strong matching yarn for attaching the hanging loop and decorations
You don't need buttons, metal buckles, beads, glue or wire. The gold buckle is crocheted, the berries are made from yarn, and the pom pom hangs from a separate braided ivory cord secured to the main stocking body.
Gauge, Abbreviations and Special Stitches
Don't skip the gauge check on this one. Chunky yarns can vary quite a bit, and a stocking that's supposed to be the baby size can grow surprisingly large if your stitches are much looser than the pattern calls for.
Provisional body gauge: 12 stitches across 4 inches, measured in ordinary half double crochet, with an estimated average of 12 rounds per 4 inches across the mixed stitch pattern.
About the finished example: The main image shows the intended design. The stitch counts have been reviewed mathematically, but the actual texture, shaping and finished dimensions haven't been verified with a crocheted sample. The olive heel and toe are worked in plain single crochet, so they'll have a smoother texture than shown in the illustration. The fullness of the fluffy cuff and raised popcorn stitches may also vary depending on your yarn and tension.
Gauge check: With the body yarn and suggested hook, crochet a sample containing at least 16 half double crochet stitches across several rows. Measure four inches across the middle without stretching it. For a closer check of the textured fabric, make a second sample using the four-stitch popcorn repeat described below.
If the sample is too wide, try a smaller hook. If it's too narrow, try a larger one. The Craft Yarn Council's gauge guidance explains why checking your tension before starting can save quite a bit of unraveling later.
Abbreviations (U.S. Terms)
- ch: Chain
- sc: Single crochet
- hdc: Half double crochet
- dc: Double crochet
- sl st: Slip stitch
- sc2tog: Single crochet two stitches together
- PC: Four-double-crochet popcorn stitch
- st/sts: Stitch/stitches
- rnd/rnds: Round/rounds
- RS: Right side, the outside of the stocking
Four-Double-Crochet Popcorn Stitch
Work four double crochets into the same stitch. Remove your hook from the working loop, insert it through the top of the first double crochet, catch the dropped loop and pull it through. Chain one to secure the popcorn. The completed popcorn counts as one stitch, and its securing chain does not add another stitch to the round count.
Three-Draw-Up Puff Stitch for the Ivory Cuff
PS (puff stitch): Yarn over, insert the hook into the next stitch, yarn over and pull up a loop slightly taller than an ordinary half double crochet. Repeat (yarn over, insert the hook into the same stitch, yarn over and pull up a loop) two more times. You should have seven loops on the hook. Yarn over and pull through all seven loops, then chain one to secure the puff.
The completed puff and its securing chain together count as one stitch, not two. On the following round, work into the securing chain at the top of each puff as its stitch position. Keep the drawn-up loops reasonably even so the puffs remain full without becoming tight, stiff knots.
This puff stitch is used only for the ivory cuff. Continue using the four-double-crochet popcorn stitch for the oatmeal and colored stocking-body rounds.
Four-Stitch Popcorn Repeat
Work the following repeat whenever the pattern says popcorn round:
(Sc in next stitch, PC in next stitch, sc in each of next 2 stitches); repeat around.
Each repeat uses four stitches and produces four completed stitches. You'll work eight repeats for baby, ten for child and twelve for adult.
Important: Work the next round into the completed top of each popcorn, not into the extra securing chain. The raised part of every popcorn should face the outside of the stocking.
Joining and Color Changes
Work the stocking body, foot, toe and heel with the right side facing outward. The folded ivory cuff is the exception. Work it with the stocking turned inside out so the raised puff stitches face outward after folding. At the beginning of each round, chain one unless otherwise specified. That beginning chain does not count as a stitch. Work the first stitch into the same stitch used for the join, continue around and slip stitch into the first actual stitch to close the round. The securing chain belonging to each cuff puff is part of that puff, not an additional stitch.
Change yarn colors at the joining point before beginning the next round. Fasten off unused colors and weave in the ends. Avoid carrying long strands of yarn across the inside where they could catch on gifts.
Place a marker in the first stitch of each round and move it upward as you work. This will make the heel opening and color placement much easier to follow.
Free Crochet Santa Stocking Pattern: Body Instructions
We're starting at the open top and working downward toward the toe. The little Santa belt is crocheted right into the upper leg, and the raised stitches go directly into the oatmeal and colored sections. That means fewer separate pieces to sew on later.
The stocking is worked as a hollow tube. We'll leave an opening for the heel when we reach the foot, shape the toe, and then return to finish the heel separately.
Step 1. Make the Foundation Ring
With oatmeal yarn and the 6.5 mm hook, chain 32 (40, 48). Join with a slip stitch into the first chain, taking care not to twist the foundation. Keep the chain edge loose enough to form a comfortable stocking opening.
Round 1: Chain 1. Work one hdc into the back bump of each foundation chain, leaving the two upper loops of the original chain available for attaching the cuff later. Join to the first hdc. You should have 32 (40, 48) stitches.
Place a stitch marker in the first stitch. This marks the beginning of each round and the toe-facing side of the stocking, opposite the heel opening you'll make later. Move the marker upward as you work. It does not mark the decorated front surface, which you'll choose after the heel and toe are complete.
Step 2. Work the Upper Leg and Santa Belt
The upper oatmeal section will eventually be partly covered by the ivory cuff. Beneath it, the olive-bordered cranberry band becomes Santa's belt. We'll add the little gold buckle after the heel and toe are finished.
Baby Size: 32 Stitches Per Round
- Rounds 2–6: With oatmeal, hdc in every stitch. (32)
- Round 7: Change to olive. Sc in every stitch. (32)
- Rounds 8–9: Change to cranberry. Hdc in every stitch. (32)
- Round 10: Change to olive. Sc in every stitch. (32)
Child Size: 40 Stitches Per Round
- Rounds 2–7: With oatmeal, hdc in every stitch. (40)
- Round 8: Change to olive. Sc in every stitch. (40)
- Rounds 9–11: Change to cranberry. Hdc in every stitch. (40)
- Round 12: Change to olive. Sc in every stitch. (40)
Adult Size: 48 Stitches Per Round
- Rounds 2–8: With oatmeal, hdc in every stitch. (48)
- Round 9: Change to olive. Sc in every stitch. (48)
- Rounds 10–12: Change to cranberry. Hdc in every stitch. (48)
- Round 13: Change to olive. Sc in every stitch. (48)
Don't change the stitch count while working the belt. The gold buckle will be sewn over the cranberry section later, and the narrow olive borders help it stand out against the oatmeal.
Step 3. Crochet the Textured Stocking Leg
Now for the raised stitches that give this stocking its chunky, old-fashioned look. You'll alternate fairly plain rounds with the popcorn rounds, including a few cranberry and olive accents.
Use the following chart for all three sizes. Start at Textured Round 1 immediately after completing the upper-leg instructions for your size.
| Textured Round | Color | Instructions |
|---|---|---|
| 1 | Oatmeal | Hdc around |
| 2 | Oatmeal | Popcorn round |
| 3 | Oatmeal | Hdc around |
| 4 | Oatmeal | Sc around |
| 5 | Cranberry | Popcorn round |
| 6 | Oatmeal | Sc around |
| 7 | Olive | Sc around |
| 8 | Oatmeal | Hdc around |
| 9 | Oatmeal | Popcorn round |
| 10 | Oatmeal | Hdc around |
| 11 | Oatmeal | Sc around |
| 12 | Oatmeal | Hdc around |
| 13 | Cranberry | Popcorn round |
| 14 | Oatmeal | Sc around |
| 15 | Olive | Sc around |
| 16 | Oatmeal | Hdc around |
| 17 | Oatmeal | Popcorn round |
| 18 | Oatmeal | Hdc around |
| 19 | Oatmeal | Sc around |
| 20 | Oatmeal | Popcorn round |
Stop at the following point:
- Baby: Complete Textured Rounds 1–12. Your leg ends after overall Round 22.
- Child: Complete Textured Rounds 1–16. Your leg ends after overall Round 28.
- Adult: Complete Textured Rounds 1–20. Your leg ends after overall Round 33.
Every round should still contain 32 (40, 48) stitches. If you've lost a stitch, check that you worked into the top of each popcorn rather than skipping over it.
You'll have a little more texture and additional colored rounds on the larger stockings. That's intentional. It keeps the proportions balanced instead of making the adult stocking look like an oversized copy of the baby version.
Step 4. Leave the Opening for the Heel
Before starting the foot, make sure the beginning-of-round marker is still on the toe-facing side, opposite the intended heel opening. The heel opening will sit across the back portion of the stocking, with the foot continuing below it. The beginning-of-round marker does not identify the decorated front surface.
Change to oatmeal yarn.
Foot Round 1, Baby: Sc in the next 10 stitches, chain 12, skip the next 12 stitches, then sc in the remaining 10 stitches. Join. (20 sc plus 12 chains = 32 positions)
Foot Round 1, Child: Sc in the next 12 stitches, chain 16, skip the next 16 stitches, then sc in the remaining 12 stitches. Join. (24 sc plus 16 chains = 40 positions)
Foot Round 1, Adult: Sc in the next 14 stitches, chain 20, skip the next 20 stitches, then sc in the remaining 14 stitches. Join. (28 sc plus 20 chains = 48 positions)
Place a marker in the first and last skipped stitches so you can find the heel opening easily later. Keep those skipped stitches unworked.
Foot Round 2: Chain 1 and hdc in every stitch around, working one hdc into each chain across the heel bridge. Join. You should again have 32 (40, 48) stitches.
Look at the opening before moving on. It should be a clear oval-shaped gap beneath the chain bridge, with the skipped leg stitches forming its opposite edge. Don't close it or sew anything across it.
Step 5. Finish the Textured Foot
Foot Rounds 1 and 2 are already complete. Continue from Foot Round 3 using this chart.
| Foot Round | Color | Instructions |
|---|---|---|
| 3 | Oatmeal | Popcorn round |
| 4 | Oatmeal | Hdc around |
| 5 | Cranberry | Popcorn round |
| 6 | Oatmeal | Sc around |
| 7 | Olive | Sc around |
| 8 | Oatmeal | Hdc around |
| 9 | Oatmeal | Popcorn round |
| 10 | Oatmeal | Hdc around |
| 11 | Oatmeal | Sc around |
| 12 | Cranberry | Popcorn round |
| 13 | Oatmeal | Sc around |
| 14 | Olive | Sc around |
| 15 | Oatmeal | Popcorn round |
| 16 | Oatmeal | Hdc around |
Where to stop:
- Baby: Stop after Foot Round 11.
- Child: Stop after Foot Round 13.
- Adult: Stop after Foot Round 16.
Don't fasten off the oatmeal yarn until you've completed your last foot round. Then cut it and join olive yarn for the rounded toe.
At this point, you should have an open-ended foot attached to the stocking leg, with the heel opening still waiting to be filled in. The toe is next.
Crochet Heel and Rounded Toe
The heel and toe give the stocking its familiar Christmas shape. Both are worked in olive green with simple single crochet, so the textured sections stay where they belong and the shaping remains easy to see.
Step 6. Crochet the Rounded Toe
Join olive yarn after the last oatmeal foot round. The toe is worked entirely in single crochet, with the decreases spread evenly around the circumference.
Baby Toe: Starting with 32 Stitches
- Round 1: Sc in every stitch around. (32)
- Round 2: Repeat (sc 2, sc2tog) eight times. (24)
- Round 3: Repeat (sc 1, sc2tog) eight times. (16)
- Round 4: Sc2tog eight times. (8)
Child Toe: Starting with 40 Stitches
- Round 1: Sc in every stitch around. (40)
- Round 2: Repeat (sc 3, sc2tog) eight times. (32)
- Round 3: Repeat (sc 2, sc2tog) eight times. (24)
- Round 4: Repeat (sc 1, sc2tog) eight times. (16)
- Round 5: Sc2tog eight times. (8)
Adult Toe: Starting with 48 Stitches
- Round 1: Sc in every stitch around. (48)
- Round 2: Repeat (sc 10, sc2tog) four times. (44)
- Round 3: Repeat (sc 9, sc2tog) four times. (40)
- Round 4: Repeat (sc 3, sc2tog) eight times. (32)
- Round 5: Repeat (sc 2, sc2tog) eight times. (24)
- Round 6: Repeat (sc 1, sc2tog) eight times. (16)
- Round 7: Sc2tog eight times. (8)
Close the toe: After your final round, cut the yarn, leaving a tail about 12 inches long. Thread the tail through a yarn needle, pass it through the front loops of the remaining eight stitches and pull them together. Secure the yarn on the inside and weave in the end.
Use your fingers to round out the toe gently. Don't stuff it. The entire stocking, including the toe, needs to remain hollow so it can hold gifts.
Step 7. Pick Up the Heel Opening
Now go back to the opening we left between the leg and foot. The olive heel is worked directly into that opening, so there's no separate heel piece to sew on.
Hold the stocking with the right side facing you and the opening accessible. Find the skipped leg stitches and the underside of the chain bridge. The two little gaps where these sections meet are the heel corners.
Join olive yarn in the first skipped leg stitch at one end of the opening. Chain one.
Heel Foundation Round, Baby: Sc across the 12 skipped leg stitches, work one sc into the corner gap, sc into the underside of each of the 12 chain stitches, and work one sc into the second corner gap. Join. (26)
Heel Foundation Round, Child: Sc across the 16 skipped leg stitches, work one sc into the corner gap, sc into the underside of each of the 16 chain stitches, and work one sc into the second corner gap. Join. (34)
Heel Foundation Round, Adult: Sc across the 20 skipped leg stitches, work one sc into the corner gap, sc into the underside of each of the 20 chain stitches, and work one sc into the second corner gap. Join. (42)
Each heel has two equal halves. Place a marker after the first half and another at the end of the round, immediately after the second corner stitch. This helps keep the decreases balanced.
Heel Round 2: Sc in every stitch around without decreasing. The stitch count stays at 26 (34, 42). As you reach each marker, move it up to the corresponding stitch in this new round. Keep the two equal halves marked so you can place the decreases correctly in the following rounds.
Step 8. Shape the Heel
The following decrease rounds are shared by all three sizes, but each size begins at a different starting count. Don't begin at the top of the chart unless you're making the adult stocking.
| Starting Stitches | Work the Following Twice Around | Ending Stitches |
|---|---|---|
| 42 | Sc 1, sc2tog, sc 15, sc2tog, sc 1 | 38 |
| 38 | Sc 1, sc2tog, sc 13, sc2tog, sc 1 | 34 |
| 34 | Sc 1, sc2tog, sc 11, sc2tog, sc 1 | 30 |
| 30 | Sc 1, sc2tog, sc 9, sc2tog, sc 1 | 26 |
| 26 | Sc 1, sc2tog, sc 7, sc2tog, sc 1 | 22 |
| 22 | Sc 1, sc2tog, sc 5, sc2tog, sc 1 | 18 |
| 18 | Sc 1, sc2tog, sc 3, sc2tog, sc 1 | 14 |
| 14 | Sc 1, sc2tog, sc 1, sc2tog, sc 1 | 10 |
Baby: Start with the 26-stitch row and work downward through the chart. You'll complete four decrease rounds, ending with 10 stitches.
Child: Start with the 34-stitch row and work downward through the chart. You'll complete six decrease rounds, ending with 10 stitches.
Adult: Start with the 42-stitch row and work downward through the chart. You'll complete eight decrease rounds, ending with 10 stitches.
Each instruction in the middle column covers half the heel. Work it twice to complete the round, then slip stitch to join. Move the corner markers to the last single crochet of each half as you work.
Close the heel: Cut the yarn with a 12-inch tail, thread it through the front loops of the remaining 10 stitches and draw the opening closed. Secure the end on the inside.
Check both sides where the heel joins the leg and foot. If there's a small gap at a corner, close it with a few careful stitches using a separate length of matching olive yarn. Don't pull so tightly that the heel puckers.
With the right side of the stocking still facing outward, gently shape the closed heel with your fingers. It should form a rounded pocket rather than a flat seam. Leave the stocking right side out until you're ready to attach the ivory cuff.
Fluffy White Crochet Stocking Cuff
The wide ivory cuff is one of my favorite details on this stocking. It's the little nod to Santa's fur trim, but the raised crochet stitches keep it looking handmade instead of like an ordinary strip of artificial fur.
We're using the same number of stitches as the stocking opening, so the cuff can be worked directly onto the upper edge and folded down. Choose soft ivory yarn with a gauge close to the oatmeal body yarn.
Step 9. Attach the Ivory Yarn
Turn the stocking so the open upper rim is facing you. Find the unused upper loops of the original foundation chain, which were left free when you worked the first oatmeal round.
Turn the stocking inside out before attaching the cuff. With the inside of the stocking now facing outward, join ivory yarn into the unused foundation loops near the heel-facing side of the upper opening. The hanging loop will be attached on this side later. Keep the stocking inside out while crocheting the cuff, with the raised puff stitches projecting toward you as you work. When the stocking is turned right side out and the cuff folded down, the puffs should face outward.
Work away from the original rim to extend the cuff upward. When it's finished, you'll fold it down over the outside of the oatmeal upper leg.
Cuff Round 1: Chain one, sc into the available foundation loops of each chain all the way around, and join. Work one stitch for each original foundation chain: 32 (40, 48) stitches. This completes Round 1 in the size-specific cuff instructions below. Do not work Round 1 a second time. Continue with Round 2 for your size.
Step 10. Work the Dense Puff-Stitch Cuff
We'll work raised puff stitches in every remaining cuff round instead of separating the textured rows with plain rounds. The puffs are staggered so they fill the spaces between the puffs below, creating a thick, closely textured cuff.
Puff Round A: Repeat (sc in next stitch, PS in next stitch) all the way around. Join.
Puff Round B: Repeat (PS in next stitch, sc in next stitch) all the way around. Join.
Each puff counts as one stitch. Both repeats use two existing stitch positions and produce two stitches. Work into the securing chain at the top of a puff when that position is reached on the following round. The alternate rounds offset the puffs by one stitch.
Baby Cuff: 32 Stitches
- Round 1: Sc around, already completed in Step 9. Do not repeat. (32)
- Round 2: Puff Round A, 16 puffs and 16 sc. (32)
- Round 3: Puff Round B, 16 puffs and 16 sc. (32)
- Round 4: Puff Round A, 16 puffs and 16 sc. (32)
- Round 5: Puff Round B, 16 puffs and 16 sc. (32)
Child Cuff: 40 Stitches
- Round 1: Sc around, already completed in Step 9. Do not repeat. (40)
- Round 2: Puff Round A, 20 puffs and 20 sc. (40)
- Round 3: Puff Round B, 20 puffs and 20 sc. (40)
- Round 4: Puff Round A, 20 puffs and 20 sc. (40)
- Round 5: Puff Round B, 20 puffs and 20 sc. (40)
- Round 6: Puff Round A, 20 puffs and 20 sc. (40)
Adult Cuff: 48 Stitches
- Round 1: Sc around, already completed in Step 9. Do not repeat. (48)
- Round 2: Puff Round A, 24 puffs and 24 sc. (48)
- Round 3: Puff Round B, 24 puffs and 24 sc. (48)
- Round 4: Puff Round A, 24 puffs and 24 sc. (48)
- Round 5: Puff Round B, 24 puffs and 24 sc. (48)
- Round 6: Puff Round A, 24 puffs and 24 sc. (48)
- Round 7: Puff Round B, 24 puffs and 24 sc. (48)
Early fit check: After completing Round 3, temporarily turn the stocking right side out and fold the cuff down to check its circumference. It should lie comfortably over the oatmeal upper leg without pulling the opening inward or flaring widely. If necessary, undo the cuff rounds and adjust the hook size before continuing. Keep the stated stitch counts. Turn the stocking inside out again to continue crocheting.
After completing the cuff rounds for your size, leave the working yarn attached. Turn the stocking temporarily right side out and fold the cuff outward and downward to check its length. The staggered puffs should cover nearly the entire visible cuff, and the lower edge should sit just above the olive-bordered cranberry Santa belt.
If the cuff is too short, turn the stocking inside out again and work one additional puff round, alternating Round A and Round B from the preceding round. Check the fit again. If the cuff is too long, undo the final puff round and check again. Keep 32 (40, 48) stitches around the cuff, depending on your size. A different number of rounds may be necessary if your yarn works up taller or shorter than expected.
Once the cuff fits, fasten off and weave in the end. Turn the stocking right side out if necessary, then fold the cuff downward over the upper oatmeal section. The raised puffs should face outward and form a full, softly rounded lower edge without a broad smooth band through the middle.
There's no need to sew the entire cuff flat against the stocking. Leave it folded naturally, but tack it discreetly at two opposite points if it tries to roll upward. The opening should remain roomy enough to reach inside.
Santa Belt, Buckle, Holly Leaves and Berries
Here's where our stocking gets its little bit of Santa personality. The cranberry belt is already in place, so we only need to add the gold buckle and the small cluster of crocheted holly on the cuff.
I'd keep the embellishments right where they are in the finished example. The textured stitches are pretty enough without covering them up with a lot of extra decoration.
Ivory belt edging: Before attaching the buckle, use ivory yarn to add the two narrow decorative lines visible along the cranberry Santa belt. Working from the outside of the finished stocking, join ivory yarn at the color boundary between the upper olive border and the cranberry belt. Surface slip stitch around this boundary, making approximately one loose slip stitch per stitch position of the original round: 32 (40, 48) stitches. Join, fasten off and weave in the ends.
Repeat along the color boundary between the lower cranberry edge and the lower olive border. Keep the surface stitches relaxed so the belt remains flat and the stocking does not gather. These decorative slip stitches are worked onto the finished fabric and do not count as additional body rounds or change the stocking circumference.
Step 11. Crochet the Santa Belt Buckle
Use antique-gold yarn and the body hook. The buckle is a small open frame with an olive-green center insert. The olive insert shows through the open gold frame, while the cranberry belt remains visible around it.
Baby Buckle:
- Chain 12. Slip stitch into the first chain to form a ring without twisting it.
- Chain 1.
- Repeat the following four times: sc into each of the next three foundation chains, then chain 1 for a corner.
- Slip stitch into the first sc. Fasten off, leaving a long sewing tail.
You should have 12 single crochet stitches and four chain-one corner spaces.
Child and Adult Buckle:
- Chain 16. Slip stitch into the first chain to form a ring without twisting it.
- Chain 1.
- Repeat the following four times: sc into each of the next four foundation chains, then chain 1 for a corner.
- Slip stitch into the first sc. Fasten off, leaving a long sewing tail.
You should have 16 single crochet stitches and four chain-one corner spaces.
Olive-green buckle insert: Make one small flat insert to sit behind the gold frame.
Baby: With olive yarn, chain 3. Row 1: Sc in the second chain from the hook and in the remaining chain. (2 sc) Chain 1 and turn. Row 2: Sc in both stitches. (2 sc) Fasten off, leaving a sewing tail.
Child and adult: With olive yarn, chain 4. Row 1: Sc in the second chain from the hook and in each remaining chain. (3 sc) Chain 1 and turn. Rows 2–3: Sc in all 3 stitches, chaining 1 and turning between rows. Fasten off, leaving a sewing tail.
Keep the insert flat. It should cover the opening inside the gold buckle without extending visibly beyond the outer frame. Check the fit before sewing, since bulky yarn thickness may affect its finished dimensions.
Arrange the buckle into a neat rectangular frame. Lay the completed stocking flat with the olive heel curving to the left and the rounded toe pointing to the right. Choose the broad surface facing upward as the decorated front. Center the olive insert on the cranberry belt and sew it flat with small stitches. Position the antique-gold buckle directly over the insert so the olive center shows through the frame, with the cranberry belt visible around the outside. Keep one olive belt border above and the other below. Check the placement before securing the buckle.
Sew the four corners down first, then secure the sides with small hidden stitches. Keep the olive-green insert visible through the center of the gold frame. The buckle should lie flat rather than bulging away from the body.
Step 12. Crochet the Holly Leaves
Make three olive-green holly leaves. They'll sit together on the left side of the ivory cuff, with the berries tucked near their center.
The leaves are deliberately small because the stocking already has plenty of chunky texture. Use the body yarn and hook, keeping your tension firm enough that the leaves hold their shape. If your yarn is especially thick, a slightly smaller hook may help.
Baby Holly Leaf: Make Three
- Chain 6.
- Sc in the second chain from the hook.
- Hdc in the next chain.
- Dc in the next chain, then make one picot.
- Hdc in the next chain.
- In the last chain, work (sc, ch 2, sc) to form the pointed leaf tip.
- Rotate the work to crochet along the opposite side of the starting chain.
- Hdc in the next available chain underside, dc in the next and make one picot, hdc in the next, then sc in the final chain underside.
- Fasten off, leaving a sewing tail.
Child Holly Leaf: Make Three
- Chain 7.
- Sc in the second chain from the hook.
- Hdc in the next chain.
- Dc in each of the next two chains, making one picot after the first dc.
- Hdc in the next chain.
- In the last chain, work (sc, ch 2, sc).
- Rotate the work to crochet along the opposite side.
- Hdc in the next available chain underside, dc in each of the next two, making one picot after the first dc, hdc in the next, then sc in the final chain underside.
- Fasten off, leaving a sewing tail.
Adult Holly Leaf: Make Three
- Chain 8.
- Sc in the second chain from the hook.
- Hdc in the next chain.
- Dc in each of the next three chains, making picots after the first and third dc.
- Hdc in the next chain.
- In the last chain, work (sc, ch 2, sc).
- Rotate the work to crochet along the opposite side.
- Hdc in the next available chain underside, dc in each of the next three, making picots after the first and third dc, hdc in the next, then sc in the final chain underside.
- Fasten off, leaving a sewing tail.
Picot instructions: Chain 2, then slip stitch into the first of those two chains. Continue with the next stitch in the leaf instructions. The picot adds a small point along the edge.
Once the leaves are finished, straighten their points gently with your fingers. If you prefer a flatter shape, lightly block them using a method suitable for your yarn. Don't press raised stitches with a hot iron.
Step 13. Crochet the Cranberry Berries
Make three berries using cranberry yarn. These should be small raised details, not large stuffed balls.
Baby Berries:
- Round 1: Make a magic ring and work 4 sc into it. Pull the ring closed. (4)
- Round 2: Sc in every stitch. (4)
- Fasten off, leaving a sewing tail.
Child Berries:
- Round 1: Make a magic ring and work 5 sc into it. Pull the ring closed. (5)
- Round 2: Sc in every stitch. (5)
- Fasten off, leaving a sewing tail.
Adult Berries:
- Round 1: Make a magic ring and work 6 sc into it. Pull the ring closed. (6)
- Round 2: Sc in every stitch. (6)
- Fasten off, leaving a sewing tail.
Thread the tail through the front loops of the final round and draw them together to form a little rounded berry. No stuffing is needed.
Step 14. Arrange and Attach the Holly Cluster
Place the three leaves on the left side of the folded cuff. Arrange one pointing upward, one outward and one downward, with their lower ends meeting near the center.
Sew the leaves firmly to the cuff, working through their center sections and several points along their edges. Leave the pointed tips slightly raised if you like the dimensional look, but don't leave them loose enough to catch easily.
Arrange the three cranberry berries where the leaves meet and sew each one down with several secure stitches.
If you want to use a separate holly design on another project, there's also a crochet holly leaf pattern with berries that can be made independently.
That's plenty of decoration. The holly, buckle and pom pom already give this stocking its Christmas character.
Pom Pom and Reinforced Hanging Loop
We're keeping the big ivory pom pom from the finished example. It gives the stocking a playful little Santa-hat touch without adding a face or another large decoration.
The hanging loop needs a little more attention than the pom pom. It carries the weight of the stocking, so it must attach to the main crocheted body rather than just to the fluffy cuff.
Step 15. Make the Braided Hanging Loop
Using ivory yarn, cut nine strands, each approximately 18 (21, 24) inches long for baby (child, adult). Divide them into three bundles of three strands each. These are generous cutting allowances so you'll have enough yarn to braid the required length and leave several inches at both ends for fastening.
Tie the three bundles together at one end, leaving several inches of yarn for attaching the braid. Braid the bundles evenly and secure the opposite end.
Make the following approximate braid lengths before folding:
- Baby: 4 inches
- Child: 5 inches
- Adult: 6 inches
Fold the braid in half to form a loop. Lay the stocking flat with its decorated front facing up, the olive heel on the left and the toe pointing right. Position both braid ends inside the upper edge on the heel-facing side, just behind the folded cuff. Keep the loop extending above the upper opening while you sew the ends securely to the main oatmeal body.
Use a yarn needle and strong matching yarn to sew both braid ends through several stitches of the main oatmeal body, about an inch below the opening. Stitch back and forth through the attachment area several times and secure the ends inside.
The two ends should sit close together so the loop rises neatly above the cuff. Don't attach the loop to the cuff alone.
Decorative bow: Cut three additional ivory yarn strands, approximately 16 (18, 20) inches long for baby (child, adult). Braid a central section approximately 10 (12, 14) inches long, leaving the loose ends available for fastening. Tie the braid into a small bow near the base of the hanging loop, on the heel-facing side of the upper cuff. Leave two short ends hanging beside the cuff. Sew the center knot securely to the main stocking body with matching yarn. The bow is decorative and must not carry the stocking's weight.
Step 16. Make the Oversized Ivory Pom Pom
Use ivory yarn that matches the cuff as closely as possible.
Pom-Pom Size:
- Baby: Approximately 2 to 2½ inches across
- Child: Approximately 2½ to 3 inches across
- Adult: Approximately 3 to 3½ inches across
Wrap the yarn around a pom-pom maker or cardboard circles until it's full and dense. Tie the center firmly with a separate length of strong yarn, securing it with a tight knot.
Cut the loops, remove the maker and trim the pom pom into a rounded shape. Keep the center ties long enough to reinforce the attachment to the separate braided hanging cord described below.
Pom-pom hanging cord: Cut three additional ivory yarn strands, each approximately 10 (12, 14) inches long for baby (child, adult). Braid a section approximately 3 (3½, 4) inches long, leaving the remaining yarn at both ends for fastening. Secure both ends of the braid so it cannot unravel.
Sew one end of the braided cord securely into several stitches of the main oatmeal stocking body, beside the hanging-loop attachment on the heel-facing side. Pass the opposite yarn tails through the firmly tied center of the ivory pom pom several times, knot securely and weave the ends into the pom-pom center. Arrange the cord so the pom pom hangs freely beside the upper left side of the cuff, near but not covering the holly decoration. The pom pom must be supported by the separate cord rather than sewn directly against the stocking body.
Gently check the hanging loop, decorative bow and pom-pom cord for loose stitches or knots. The pom pom should hang freely from its cord without slipping at either attachment. Reinforce any loose fastening before displaying the stocking.
Display note: Crochet decorations and pom poms can be damaged by heat and pulling. Hang the stocking away from open flames and hot fireplace surfaces, and keep it out of reach of babies and young children. The loop has not been load-tested, so use a separate supporting method for heavy gifts rather than relying on the crochet loop alone.
Baby's First Christmas Stocking Personalization
One reason I like this design for a baby's first Christmas is that it doesn't look like a stocking you'll want to put away once the baby gets older. The colors and chunky stitches are just as pretty for a child or adult, so the little stocking can stay part of the family's decorations.
If you're making the baby size, you can leave it exactly as shown or add a small personalized detail.
Adding a Baby's Name
The easiest option is a small, flat embroidered name label sewn securely onto the stocking. The fluffy cuff and raised popcorn stitches are not good surfaces for tiny letters, so I'd avoid trying to embroider a long name directly over either one.
Choose a smooth fabric label or crocheted patch large enough for the name, embroider the lettering before attaching it, and then sew the label flat with small stitches all around its edge.
Keep the label below the cuff or on a flat portion that doesn't interfere with the belt buckle. A simple name is enough.
Adding Baby's First Christmas
You could also include a short first-Christmas message and the year on the label. Another option is to stitch the year discreetly on the back, leaving the decorated front as shown in the finished design image.
If you're making matching stockings for siblings, use the same colors and embellishments for every size. Personalize them individually, but keep the basic design consistent. That matching look is part of their charm.
For a baby gift, remember that the stocking is a keepsake decoration, not a toy. Avoid loose tags, detachable charms, beads or decorations a baby could pull free.
Troubleshooting and Finishing Tips
Before you hang your finished Santa stocking, take a few minutes to check its shape and the little details. With chunky crochet, a loose stitch or twisted section can make more of a difference than it would with fine yarn.
Final Finishing Checklist
- Check that the stocking opening is roomy and the folded cuff doesn't pull it closed.
- Confirm that the heel and toe are completely closed, with the yarn ends secured inside.
- Make sure all loose color-change tails have been woven in so gifts won't catch on them.
- Remove all temporary stitch markers from the stocking, including those used for the beginning of rounds and heel shaping.
- Lay the stocking flat with the heel on the left and the toe pointing right. Position the buckle on the visible front.
- Check that the holly leaves and berries are sewn securely to the cuff.
- Reinforce the hanging loop and make sure the pom pom is firmly attached.
- Gently arrange the textured stitches and folded cuff without stretching the stocking out of shape.
What If My Stocking Is Too Large or Too Small?
Check the body gauge first. The pattern is calculated around 12 stitches per four inches. If you're getting fewer stitches across that distance, your stocking will be wider. If you're getting more, it will be narrower.
Changing the hook size can correct a gauge difference, but it also affects the height of the rounds. If your stitch gauge matches and only the length needs adjusting, you can add or remove a plain oatmeal round near the bottom of the textured leg or immediately before the toe.
Make those adjustments before shaping the toe or adding the cuff. Don't add or remove stitches from the circumference unless you're prepared to recalculate the heel opening and decrease sequences.
What If My Popcorn Stitches Look Too Bulky?
Check that you're making four double crochets in each popcorn, closing them together and chaining only once to secure the stitch. The surrounding single crochet stitches should lie flat.
Try to keep your popcorn tension even. If the fabric becomes stiff or puckered, make a small gauge sample with a larger hook before continuing the entire stocking.
What If My Heel Has Small Holes at the Corners?
Small openings can appear where the skipped leg stitches meet the underside of the chain bridge. Don't add random stitches to every heel round, because that changes the shaping calculations.
Instead, use a separate length of matching olive yarn to close any small corner gaps neatly. Weave the repair yarn through several nearby stitches so the fabric stays flexible.
What If the Toe Looks Pointed?
First check the decrease counts. The final toe round should have eight stitches, regardless of size.
Gently round the toe with your fingers after closing it. A different yarn or tighter tension may produce a more tapered shape than the example. If that happens, the toe may need a gauge adjustment or further shaping changes rather than additional stuffing.
What If the Ivory Cuff Is Too Tight?
The cuff should fit around the upper opening without gathering the oatmeal body. Because fluffy yarns vary, check that your ivory stitch gauge is close to the main stocking gauge.
If the cuff pulls inward, work a new cuff with a slightly larger hook. If it flares too much, try a smaller hook. Keep the required stitch count unless you're recalculating the cuff circumference.
What If the Stocking Twists When Hanging?
Before changing the loop, check that the buckle is centered on the visible front and the heel falls naturally to the back and left. A loop attached too far forward can rotate the stocking.
Move the hanging loop toward the heel-facing side if necessary, and spread its anchoring stitches across a small area of the main body. Don't attach the loop only to the cuff.
Displaying Your Finished Stocking
I'd hang the adult stocking on the mantel, use the child size for a smaller holiday display and keep the baby stocking as a first-Christmas keepsake. They look especially nice together when the colors and decorations match.
Keep filled stockings away from heat sources and anything a young child can reach or pull down. Place heavier gifts underneath the display rather than suspending them from an untested crochet hanging loop.
If you're making a few Christmas gifts to go along with the stockings, you might also like the long Santa hat crochet pattern or the crochet Mrs. Claus hat pattern. Both make sweet companions to the handmade stocking idea.
Pattern Development Note
Pattern development note: The stitch counts and construction have been reviewed mathematically for internal consistency. The finished dimensions and yarn quantities are estimates, and the pattern has not been physically test-crocheted. The heel shaping, textured stitch proportions and cuff fit also require verification with a completed sample.
When you click on links to various merchants on this site and make a purchase, this may result in this site earning a commission. This does not affect the price you pay.

UBGI Gold Standard 2026
Reviewed under the site's
editorial checklist.
Photos, decorating ideas, party setups and reader submissions are shared for inspiration unless a page is specifically presented as a pattern, tutorial, reference guide or step-by-step project. Follow the instructions, measurements, safety guidance and manufacturer directions provided for the particular project or product.
About Jan | Contact | Baby Nursery Ideas (Blog) | Site Map | Privacy Policy | Disclosure Policy | Disclaimer | Affiliate Disclosure | Earnings Disclosure | Facebook | Pinterest
I am a participant in the Amazon Services LLC Associates Program, an affiliate advertising program designed to provide a means for us to earn fees by linking to Amazon. As an Amazon Associate I earn from qualifying purchases.
Copyright © 2006-2026. All Rights Reserved.