Free Mini Crochet Christmas Stocking Pattern in 3 Styles
By Jan Bay
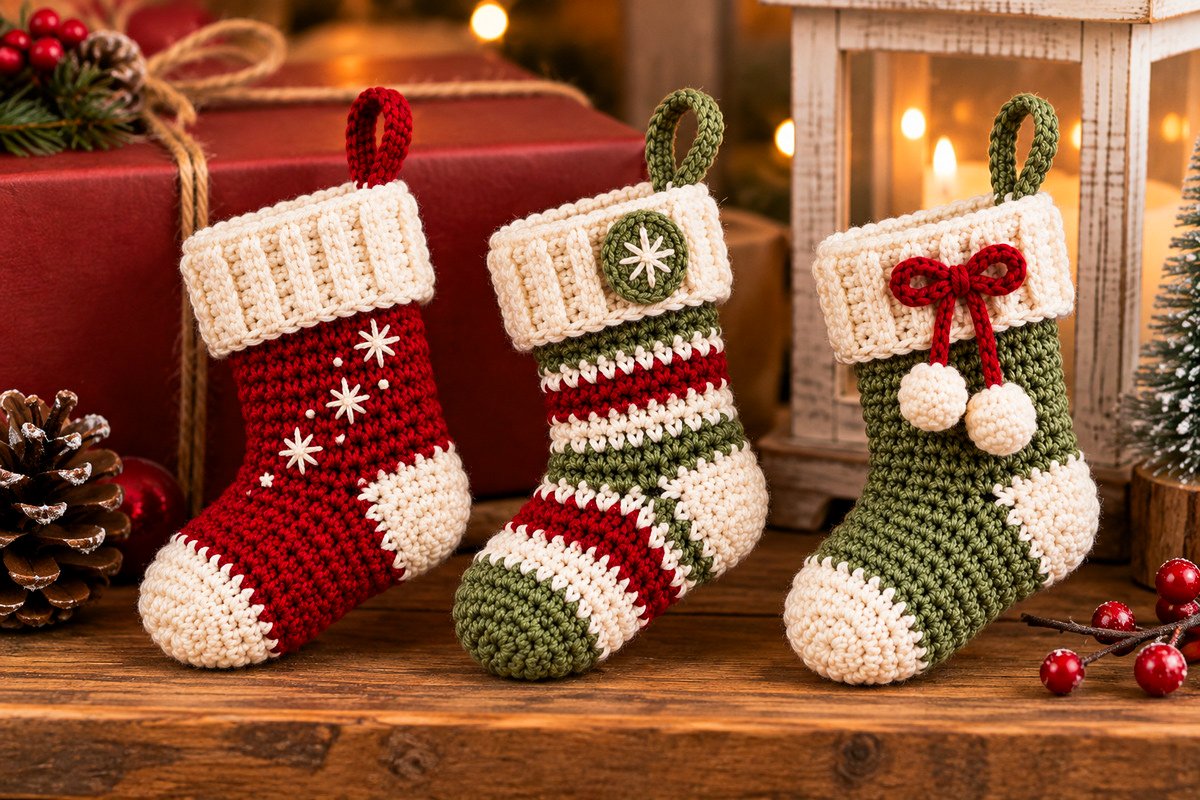
This free mini christmas stocking crochet pattern gives you three festive little stockings from one basic design, each with a deep ribbed cuff, a shaped heel and a rounded toe. Make the cranberry red stocking with its trail of embroidered snowflakes, try the cheerful red and green stripes, or finish the soft sage version with a little red bow and dangling pom-poms. They're just the right size for Christmas tree ornaments, garlands or gift toppers. For something extra, tuck a tiny surprise inside. I think you'll enjoy them. Their small size also makes them a fun way to use up leftover holiday yarn.
Explore More Christmas Stocking Patterns
Free Crochet Santa Stocking Pattern in 3 Sizes
Free Crochet Santa Face Stocking Pattern
Free Quilted Christmas Stocking Pattern
Worsted-Weight Yarn for Mini Crochet Christmas Stockings
Jump to the Free Mini Christmas Stocking Pattern
Pattern Details and Finished Size
All three stockings start with the toe, work toward the top, and use the same stitch counts. The heel is added separately, which lets you give it a contrasting color without interrupting the main stocking. Then you'll crochet a ribbed cuff, fold it over the top, and add the decorations.
The finished stockings are expected to measure approximately 3½ to 4 inches tall, excluding the hanging loop, with a body about 2¼ inches wide when laid flat. Those are calculated estimates based on the stitch counts and working gauge, not measurements from a completed stocking. Your yarn, hook, and tension will affect the actual finished dimensions.
Pattern at a glance:
- Skill level: Confident beginner to intermediate. The basic stitches are simple, but the heel opening and ribbed cuff take a little more attention.
- Yarn weight: Worsted-weight, category 4.
- Hook: 3.5 mm (US E/4), or the size needed for the stated gauge.
- Estimated finished height: Approximately 3½ to 4 inches, excluding the hanging loop; not physically verified.
- Estimated flat body width: About 2¼ inches.
- Construction: Toe-up, joined rounds with an added heel and separate ribbed cuff.
- Stitch terminology: US crochet terms.
- Versions: Cranberry Snowfall, Christmas Stripes, and Sage Christmas Bow.
You won't need to learn a different stocking construction for each color. Make the first one, and you'll already know the basic steps for the other two.
The stocking stays open at the top, so you can slip in a little note or another lightweight surprise. I'd keep anything you put inside small and light. These are miniature ornaments, not full-size gift stockings.
Yarn and Supplies
I'd choose a smooth worsted-weight yarn for these. You'll be working with small stitches, changing colors, and adding embroidery, so being able to see the individual stitches makes life easier. Save the fuzzy or heavily textured yarn for another project.
Yarn colors:
- Cranberry red for the first stocking, stripes, bow, and red hanging loop.
- Muted sage green for the second and third stockings, the medallion, and green hanging loops.
- Warm ivory for cuffs, contrasting toes and heels, stripes, snowflake embroidery, and pom-poms.
Allow approximately 35 to 55 yards of worsted-weight yarn per stocking, including a little extra for decorative pieces and finishing. For all three, approximately 105 to 165 yards across the three colors is a preliminary planning allowance. Actual consumption has not been measured from finished samples.
Other supplies:
- 3.5 mm crochet hook.
- Yarn needle with an eye large enough for worsted-weight yarn.
- Two removable stitch markers.
- Scissors.
- Measuring tape or small ruler.
- A few straight pins or locking stitch markers for positioning decorations.
- A very small amount of polyester fiberfill or yarn scraps for the two crocheted pom-poms.
You won't need buttons, beads, bells, wire, or plastic ornaments. The snowflakes are embroidered, and the other decorations are crocheted from yarn.
Gauge: The working target is 22 single crochet stitches and 24 rounds over 4 inches, using joined rounds and the 3.5 mm hook. Check this with a practice tube rather than a flat square, since the main stocking is worked in the round. The cuff should also be checked separately because back-loop ribbing behaves differently from ordinary single crochet.
If your practice tube is much wider than expected, try a smaller hook. If it's too narrow or stiff, try a larger one. You want a fairly firm fabric that holds its shape without making the stitches painfully tight.
Stitches and Pattern Notes
Before you start, choose which of the three stockings you're making. The stitch counts stay the same for every version, but the colors change at different rounds. You'll find the complete color guide in the Three Christmas Stocking Styles section below.
Abbreviations (US terms):
- ch = chain
- sc = single crochet
- sl st = slip stitch
- st = stitch
- sts = stitches
- rnd = round
- BLO = back loop only
- inc = work 2 sc in the same stitch
- dec = single crochet 2 stitches together
- MR = magic ring
- RS = right side
- WS = wrong side
Invisible single crochet decrease: Insert your hook through the front loop of each of the next two stitches, yarn over, pull through both front loops, yarn over again, and pull through the remaining two loops. The decrease uses two stitches and makes one.
Joining rounds: Unless a round says otherwise, begin with ch 1, work the indicated stitches, and join with a slip stitch to the first single crochet. The beginning chain and joining slip stitch do not count as stitches. Do not work into either of them on the following round.
Use a marker in the first real stitch of each round. Move it up as you work. This matters when you reach the heel opening and start changing colors.
Color changes: When the next round uses a new color, work the final single crochet of the current round until two loops remain on your hook. Yarn over with the new color and pull through both loops to finish. Join the round using the new color, then continue with the next round. Keep the yarn tails on the inside and weave them in securely before closing the heel.
Working the cuff: The ribbing is made separately in back-loop single crochet, with seven stitches across each row. Work enough rows for the strip to fit the actual 24-stitch upper opening, finishing with a total row count divisible by four. The long edge is sewn evenly around the opening, then the cuff is folded down over the outside. The cuff row count may differ from the stocking's 24 upper stitches because row gauge and stitch gauge aren't necessarily the same.
Which side is the front? After the heel is attached, lay the stocking flat with the toe pointing left and the heel pointing right. The side facing you becomes the decorated front. The joining seam and cuff seam can sit toward the back.
A quick checkpoint: The toe must end with 24 stitches. Every full body and leg round must also contain 24 stitches. If you accidentally include a joining slip stitch in the count, the shape will gradually get wider. Check before going any farther.
Crochet the Basic Mini Stocking
Free Mini Crochet Christmas Stocking Pattern: Toe and Foot
Start at the rounded toe and work toward the heel. You'll be crocheting a small tube at first, then leaving an opening for the contrasting heel. Don't stuff the foot. It needs to stay hollow so the finished stocking can hold a little surprise.
Choose your starting color:
- Cranberry Snowfall: Start with ivory.
- Christmas Stripes: Start with sage green.
- Sage Christmas Bow: Start with ivory.
Toe
Rnd 1: Make a magic ring. Ch 1 and work 6 sc into the ring. Pull the ring closed and join to the first sc. (6 sts)
Rnd 2: Ch 1, work 2 sc in each stitch around. Join. (12 sts)
Rnd 3: Ch 1, *sc in next st, 2 sc in next st; repeat from * around. Join. (18 sts)
Rnd 4: Ch 1, *sc in each of next 2 sts, 2 sc in next st; repeat from * around. Join. (24 sts)
The rounded toe is finished. You should have 24 stitches, with no gaps around the starting ring.
Foot
Rnds 5–12: Ch 1, sc in each of the 24 stitches around. Join after each round. (24 sts per round)
Follow the color schedule for your chosen stocking. For the solid versions, change from ivory to cranberry or sage at the beginning of Rnd 5. The striped version has several color changes, so check its round-by-round guide below.
At the end of Rnd 12, your foot should be a narrow little tube with a rounded closed toe and an open working end. The length from the toe tip to the working edge is expected to be approximately 2 inches at the stated gauge.
Leave the Opening for the Heel
Here comes the only part that looks a little odd while you're working it. You're going to leave 12 stitches unworked and chain across them. Those unworked stitches will become one edge of the heel opening. We'll come back and fill it in with ivory yarn later.
Rnd 13: After joining Rnd 12, do not make the usual beginning ch 1. Instead, ch 12. Count the 24 stitches of Rnd 12, treating the stitch that received the joining slip stitch as stitch 1. Leave stitches 1–12 unworked, then work 1 sc in each of stitches 13–24. Join with a slip stitch to the first chain of the ch-12 section. (12 chains and 12 sc = 24 positions)
Important: Do not crochet into the 12 skipped stitches. Leave their top loops available for the heel. Mark the two corners of the opening so you can find them easily.
Rnd 14: Ch 1. Work 1 sc under the two upper strands of each of the 12 chains, leaving the single back bump on the underside of each chain unworked for the heel. Then work 1 sc in each of the 12 single crochets from Rnd 13. Join to the first sc. (24 sts)
Count carefully. You should be back to 24 single crochets, and there should be a 12-stitch opening on the heel side of the stocking.
Work the Upper Leg
Rnds 15–26: Ch 1, sc in each of the 24 stitches around. Join after every round. (24 sts per round)
Follow the color chart for your chosen version. Don't add increases or decreases to the upper leg. The stocking gets its shape from the contrasting heel and the way the foot turns below it, not from widening the top.
After Rnd 26, fasten off and weave in the yarn tail. The top is left open. Check that you have 24 stitches around the opening before making the cuff.
Add the Contrasting Ivory Heel
Turn the stocking so you can see the opening left beneath the leg. There should be 12 unworked stitches along the foot side and 12 available chain undersides along the leg side.
With the right side of the stocking facing you, join ivory yarn at the corner immediately before the 12 unworked foot stitches, so you can crochet across those 12 stitches first. The 12 unused chain undersides form the opposite edge of the opening and will be worked next.
Heel Rnd 1: Ch 1. Work 1 sc in each of the 12 unworked foot stitches along the lower edge of the heel opening. Continue around the opening, working 1 sc into the unused back bump beneath each of the 12 foundation chains. Join to the first sc. (24 sts)
Heel Rnd 2: Ch 1, sc in each stitch around. Join. (24 sts)
Heel Rnd 3: Ch 1, *sc in each of next 2 sts, dec over next 2 sts; repeat from * around. Join. (18 sts)
Heel Rnd 4: Ch 1, sc in each stitch around. Join. (18 sts)
Heel Rnd 5: Ch 1, *sc in next st, dec over next 2 sts; repeat from * around. Join. (12 sts)
Heel Rnd 6: Ch 1, dec six times. Join. (6 sts)
If you want a slightly fuller heel, add a very small pinch of fiberfill now, before closing the six remaining stitches. This is optional. Leave the toe and the rest of the stocking hollow.
Fasten off, leaving a 10-inch tail. Thread the tail through the front loops of the six remaining stitches, pull gently to close, then take the needle through the center of the heel and weave in the end on the inside.
If a small gap remains at either corner where the heel joins the leg, thread a separate 10-inch length of ivory yarn through your needle. Take two or three small stitches across the opening, drawing the edges together without puckering them. Weave the ends securely into the inside. Don't add another round or extra shaping stitches to the heel.
Now lay the stocking flat and gently arrange the foot so it points to one side while the leg stands upright. The heel should curve around the back rather than forming a flat square patch.
That's the basic stocking. All three versions use these same rounds.
Ribbed Cuff and Hanging Loop
The ivory cuff is what gives these little stockings that traditional Christmas look. It's deeper than a simple white edging, with raised vertical ribs that stand out against the smoother stocking underneath.
Make one cuff for each stocking, using ivory yarn and the same hook you used for the body.
Crochet the Ivory Ribbed Cuff
Row 1: Ch 8. Sc in the second chain from the hook and in each remaining chain. (7 sc)
Row 2: Ch 1, turn. Working in the BLO, sc in each of the 7 stitches across. (7 sc)
Rows 3 onward: Repeat Row 2, working 7 sc in each row. Start by completing 24 rows in total. Hold the strip around the top of the stocking to check its length. If it's too short, add four more rows and check again. If it's too long, undo four rows and check again. Finish with a total row count divisible by four. (7 sc per row)
Bring the two short ends together temporarily to check the fit before fastening off. At the stated gauge, the stocking's upper opening measures approximately 4⅜ inches around. The cuff should fit around it snugly without gathering the stocking fabric or stretching the ribbing excessively. Aim for a completed cuff circumference of roughly 4⅛ to 4⅜ inches, allowing the ribbing a little stretch.
Once the fit is correct, fasten off, leaving a yarn tail approximately 18 inches long for joining and sewing.
You should have a rectangular strip seven single crochet stitches wide, with raised ridges running across its width. Count the completed rows and write down that number. You'll use it to distribute the cuff evenly around the 24-stitch opening.
The expected cuff depth is approximately 1¼ inches, but check the actual piece before attaching it. Don't add stitches across the width to make the cuff longer around the stocking. Add rows instead.
Join and Attach the Cuff
Step 1: Bring the two short ends of the ribbed strip together, keeping the ridges on the outside. Sew the ends together using a neat whipstitch through the edge loops. You now have a small ribbed ring.
Step 2: Turn the stocking right side out. Position the cuff ring around the top edge with its seam at the back. Place one long edge of the cuff against the upper edge of the stocking, with the ribbed section extending upward.
Step 3: Divide the completed cuff into four equal sections by counting its row ends. Divide the 24-stitch stocking opening into four sections of six stitches each. Mark the four matching points with removable markers.
Step 4: Sew each quarter of the cuff to its corresponding six-stitch section of the stocking opening. Distribute the attachment stitches evenly, working through every cuff row end and every stitch around the stocking opening. If a cuff quarter has more than six row ends, attach two neighboring row ends to the same stocking stitch where needed. If it has fewer than six row ends, take two small attachment stitches through one cuff row end to cover the extra stocking stitch. Space these adjustments evenly around the opening. Keep the seam smooth without pulling it tight.
Step 5: Fold the cuff down over the outside of the stocking so the ribbing shows and the joining seam is covered. Smooth it into place with your fingers.
If the folded cuff wants to turn upward, use a few small ivory stitches at the back seam and the two sides to hold it down. Keep those stitches loose enough that the top opening stays usable.
Don't pull the cuff into a tight band. The stocking needs to keep its slightly relaxed, folded-over appearance.
Add the Hanging Loop
Choose the loop color that belongs to your stocking:
- Cranberry Snowfall: Cranberry red.
- Christmas Stripes: Sage green.
- Sage Christmas Bow: Sage green.
Join the chosen yarn securely at the center back of the top opening, anchoring it through a stitch of the stocking body just beneath the cuff attachment.
Loop: Ch 14. Bring the chain around to form a loop without twisting it. Sl st into an adjacent stitch at the same upper back edge.
Fasten off, leaving a 10-inch tail.
Using your yarn needle, take the yarn tail through both loop attachment points and through several stitches of the stocking body. Make two or three reinforcing passes, then weave the tail securely into the inside of the stocking.
Hold the stocking by its loop before trimming the yarn. If it twists badly to one side, adjust the attachment position slightly before securing the final stitches.
Don't attach the hanging loop only to the loose folded portion of the cuff. It needs to be anchored to the actual stocking body so the weight hangs from the stronger construction underneath.
Three Christmas Stocking Styles
Now comes the fun part. The stockings all have the same shape, but each one gets its own little Christmas personality. You can make three matching ornaments in one color, but I'd use all three variations for a set like the one pictured. The different finishes make them look like a collection rather than three copies of the same stocking.
Style 1: Cranberry Snowfall Mini Stocking
The cranberry stocking has an ivory toe and heel, a deep ivory cuff, and a little trail of snowflakes embroidered up the front. There's no need to crochet separate snowflake pieces. Simple embroidery keeps the decoration small enough for a miniature stocking.
Color schedule:
- Rnds 1–4: Ivory toe.
- Rnds 5–12: Cranberry foot.
- Rnds 13–26: Cranberry heel-opening section and upper leg.
- Separate heel, Rnds 1–6: Ivory.
- Ribbed cuff: Ivory.
- Hanging loop: Cranberry.
- Snowflake embroidery: Ivory.
Complete the stocking using the basic construction instructions above. Attach the cuff and hanging loop before adding the embroidery.
Embroider the Diagonal Snowflakes
Lay the finished stocking flat with the toe pointing left and the heel pointing right. The decorated front is the side facing you.
Using ivory yarn and a yarn needle, plan a gentle diagonal line of four snowflakes. Place the first small snowflake just above the foot, then work upward toward the cuff, spacing the others along the visible cranberry section.
For each snowflake:
- Bring the ivory yarn needle from inside the stocking to the center of the planned snowflake.
- Make one straight stitch across the center from left to right.
- Make a second straight stitch diagonally across the first.
- Make a third straight stitch crossing the center in the opposite diagonal direction.
- Adjust the six visible spokes so they spread evenly around the center.
- Take the needle back inside, secure the embroidery yarn, and weave in the ends.
Make the two middle snowflakes a little larger, approximately ¼ to ⅜ inch across, and keep the snowflakes near the ends of the diagonal slightly smaller. These are placement targets rather than physically verified dimensions.
Add six to eight tiny ivory seed stitches around the snowflakes to suggest falling snow. Each seed stitch is just one short straight stitch worked across a small space in the cranberry fabric.
Keep the snowflakes on the body rather than covering the cuff or the contrasting toe. You want the cranberry color to show around them.
When you're finished, the snowflakes should look like a little trail running up the stocking, not four large appliqués competing for space.
Style 2: Red, Sage and Ivory Striped Stocking
The striped stocking uses the same shaping, but the color changes give it a completely different look. The rounded toe stays sage green, the heel and cuff are ivory, and the rest of the stocking alternates narrow bands of cranberry, ivory, and sage.
Follow this color schedule while working the basic stocking rounds.
| Rounds | Yarn Color |
|---|---|
| 1–5 | Sage green |
| 6–7 | Ivory |
| 8–9 | Cranberry |
| 10 | Ivory |
| 11–12 | Sage green |
| 13 | Ivory |
| 14–15 | Cranberry |
| 16 | Ivory |
| 17–26 | Sage green |
Work the separate heel and ribbed cuff entirely in ivory. Use sage green for the hanging loop. Most of the upper sage rounds will be covered when you fold down the cuff, leaving the narrower sage band visible just below it. Check the color placement before sewing the cuff in place, since your actual cuff depth may vary slightly.
Change colors at the indicated rounds, keeping every body and leg round at 24 stitches. Don't add stitches to compensate for color changes.
Cut and weave in the old yarn when changing colors instead of leaving long strands floating inside the stocking. With so many short stripes, you'll have more ends to manage, but the inside will be neater and the opening will stay usable.
Round Sage Medallion With Embroidered Snowflake
The little round decoration on the cuff is worked separately in sage green. Make it small enough that the ivory ribbing still shows all around it.
Medallion Rnd 1: With sage yarn, make a magic ring. Ch 1, work 6 sc into the ring, pull closed, and join. (6 sts)
Medallion Rnd 2: Ch 1, work 2 sc in each stitch around. Join. (12 sts)
Fasten off, leaving a 10-inch tail for sewing. Flatten the medallion gently with your fingers.
Using ivory yarn and a needle, embroider a small six-spoke snowflake across the center of the medallion. Make three short straight stitches crossing at the middle. Keep the ends of the spokes inside the outer edge.
Position the finished medallion on the front of the ivory cuff, a little toward the outer side as shown in the example image. Sew around the sage edge, taking small stitches into the cuff without pulling the ribbing flat.
Keep the top of the medallion below the cuff's upper edge so it doesn't interfere with the opening or hanging loop.
Weave the sewing tail into the inside of the cuff. The snowflake medallion should sit flat, with its embroidered center facing outward.
Style 3: Sage Stocking With Red Bow and Pom-Poms
The sage stocking is the simplest of the three when it comes to color changes. The body stays sage from the end of the ivory toe all the way to the upper opening. The red bow and two little ivory pom-poms do the decorating.
Color schedule:
- Rnds 1–4: Ivory toe.
- Rnds 5–12: Sage foot.
- Rnds 13–26: Sage heel-opening section and upper leg.
- Separate heel, Rnds 1–6: Ivory.
- Ribbed cuff: Ivory.
- Hanging loop: Sage green.
- Bow and dangling cords: Cranberry.
- Two crocheted pom-poms: Ivory.
Complete the basic stocking, heel, cuff, and hanging loop before making the bow.
Crochet the Cranberry Bow
Using cranberry yarn, ch 18. Join with a slip stitch to the first chain, taking care not to twist the chain into a figure eight.
Bow Rnd 1: Ch 1, sc in each of the 18 chains around. Join to the first sc. (18 sts)
Bow Rnd 2: Ch 1, sc in each stitch around. Join. (18 sts)
Bow Rnd 3: Ch 1, sc in each stitch around. Join. (18 sts)
Fasten off and weave in the short end. You should have a small crocheted tube forming a ring.
Flatten the ring, placing the joining seam at the back. Pinch the center together to divide it into two rounded loops. Wrap a separate length of cranberry yarn around the pinched center five or six times, then secure the wrapping with a small stitch at the back. Leave two yarn tails approximately 10 inches long for sewing the bow to the cuff. Do not weave them in yet.
Keep the two bow loops reasonably even. You can adjust their shape with your fingers before tightening the final center wrap.
Make the Two Dangling Cords
With cranberry yarn, make two separate chains of 10 stitches each. Fasten off both ends of each chain, leaving one long tail for attaching it to the bow and one for attaching its pom-pom.
Secure the upper ends to the lower back of the bow's wrapped center. Let both cords hang downward, side by side.
Don't tie the cords into another knot beneath the bow. The example design has two simple hanging strands, each ending in a small ivory crocheted ball.
Crochet Two Ivory Pom-Poms
Make two identical small crocheted balls using ivory yarn.
Pom-Pom Rnd 1: Make a magic ring. Ch 1, work 6 sc into the ring, pull closed, and join. (6 sts)
Pom-Pom Rnd 2: Ch 1, work 2 sc in each stitch around. Join. (12 sts)
Pom-Pom Rnd 3: Ch 1, sc in each stitch around. Join. (12 sts)
Pom-Pom Rnd 4: Ch 1, dec six times. Join. (6 sts)
Before closing, add a tiny amount of fiberfill or a few short ivory yarn scraps. You need only enough to round out the little ball.
Fasten off, leaving a 10-inch tail. Thread the tail through the front loops of the six remaining stitches and pull closed. Keep the tail for attaching the pom-pom.
Repeat for the second pom-pom.
Attach the Bow and Pom-Poms
Place the completed cranberry bow across the front of the ivory cuff, slightly toward the outer side. The loops should spread horizontally, with the two red cords hanging down onto the sage body below.
Use the cranberry wrapping tails to sew the center of the bow firmly to the cuff. Take several stitches through the cuff and into the upper stocking fabric underneath. This gives the bow a more secure foundation than attaching it to the loose cuff edge alone.
Attach one ivory pom-pom to the lower end of each cranberry cord. Thread the pom-pom tail through the final chain stitch and then through several stitches inside the pom-pom. Repeat the attachment passes before weaving the end inside.
Let the two pom-poms hang at slightly different heights if that helps them sit naturally. Keep both close to the upper part of the stocking, like the example photograph.
Don't make the cords especially long. These stockings are small, and the bow should decorate the upper body rather than dangle all the way to the toe.
Once everything is attached, lift the stocking by its hanging loop and check that the bow stays centered and the pom-poms hang freely.
Assembly and Finishing
Give each stocking one last look before you call it finished. At this size, a loose yarn end or crooked cuff is easy to spot, and taking a few minutes to tidy things up makes a difference.
Final Assembly Check
- Check that the ivory heel is closed, rounded, and securely joined at both corners.
- Make sure the rounded toe is completely closed at its starting ring.
- Check the 24-stitch upper opening to make sure the cuff attachment hasn't pulled it closed.
- Smooth the folded cuff downward and check that its seam sits toward the back.
- Pull gently on the hanging loop to check that both attachment points are secure.
- Check every snowflake, the round cuff medallion, the bow, and both pom-poms for loose yarn ends.
- Remove all temporary stitch markers and positioning pins from the stocking, cuff, heel, and decorations.
- Weave remaining tails back through several stitches on the inside, changing direction at least once before trimming.
If the cuff is uneven, don't try to fix it by pulling hard on one section. Spread the ribbing gently around the opening and adjust the little holding stitches at the sides if needed.
If a heel looks a bit flat, you can gently round it with your fingers. Don't stuff the whole stocking to force it into shape. The hollow opening is part of the design.
Blocking and Shaping
Most of the shaping can be done by hand. Arrange the foot, heel, and leg while the stocking is dry, then smooth the cuff and decorations into position.
If your yarn permits damp blocking, lightly moisten the stocking, gently reshape it, and let it dry completely on a towel. Follow the care instructions for the yarn you've used. Don't stretch the ribbing or press the crocheted pom-poms flat.
The stocking should keep its rounded toe, curved heel, and upright leg, with the folded cuff sitting neatly above the colored body.
Ways to Use Your Mini Crochet Stockings
A matching trio looks lovely hanging on a Christmas tree, but you don't have to make all three at once. One stocking tied to a wrapped gift is enough to make the package feel special.
You can also crochet several for a Christmas garland, hanging each stocking by its reinforced loop along a separate cord. Keep some space between them so the cuffs and little decorations don't get tangled together.
For a small keepsake, slip a folded holiday message inside. You could even add a handwritten date to the note before putting the stocking away with the Christmas decorations.
I'd skip heavy candy, bulky gifts, or anything that stretches the opening. These are decorative little stockings, and their small size is part of their charm.
If you enjoy making miniature Christmas decorations, my free mini crochet Santa hat pattern makes another little ornament that pairs nicely with these stockings. You can also browse my Christmas crochet patterns for larger handmade holiday projects.
A Christmas Decorating Safety Note
These miniature stockings are decorative ornaments, not baby toys. The hanging loops, crocheted pom-poms, and other attached pieces aren't intended for handling or chewing by babies or toddlers.
Keep the stockings, garlands, and any small treats placed inside them out of young children's reach. Don't attach them to a crib, bassinet, or other infant sleep space.
The U.S. Consumer Product Safety Commission's holiday decorating guidance also advises keeping decorations with small removable parts out of reach of young children.
There's plenty of room to enjoy handmade Christmas decorations without putting them where little hands can grab them.
Pattern Development Note
Pattern development note: The stitch counts and construction have been reviewed mathematically for internal consistency. The finished dimensions and yarn quantities are estimates, and the pattern has not been physically test-crocheted. The afterthought-style heel, cuff fit, and final shape still require verification with a completed sample.
When you click on links to various merchants on this site and make a purchase, this may result in this site earning a commission. This does not affect the price you pay.

UBGI Gold Standard 2026
Reviewed under the site's
editorial checklist.
Photos, decorating ideas, party setups and reader submissions are shared for inspiration unless a page is specifically presented as a pattern, tutorial, reference guide or step-by-step project. Follow the instructions, measurements, safety guidance and manufacturer directions provided for the particular project or product.
About Jan | Contact | Baby Nursery Ideas (Blog) | Site Map | Privacy Policy | Disclosure Policy | Disclaimer | Affiliate Disclosure | Earnings Disclosure | Facebook | Pinterest
I am a participant in the Amazon Services LLC Associates Program, an affiliate advertising program designed to provide a means for us to earn fees by linking to Amazon. As an Amazon Associate I earn from qualifying purchases.
Copyright © 2006-2026. All Rights Reserved.