Free Baby Car Seat Cover Pattern and Sewing Tutorial
This free baby car seat cover pattern makes a simple removable canopy for an infant carrier using basic fabric pieces and easy sewing. I'll give you the fabric requirements, cutting measurements and step-by-step sewing directions so you can make the cover from start to finish.
The finished cover is designed as an outer canopy rather than a liner or replacement seat cover. Nothing from this project should go behind the baby, under the harness or between the baby and the car seat. Always follow the instructions for your specific car seat before adding or using any accessory.
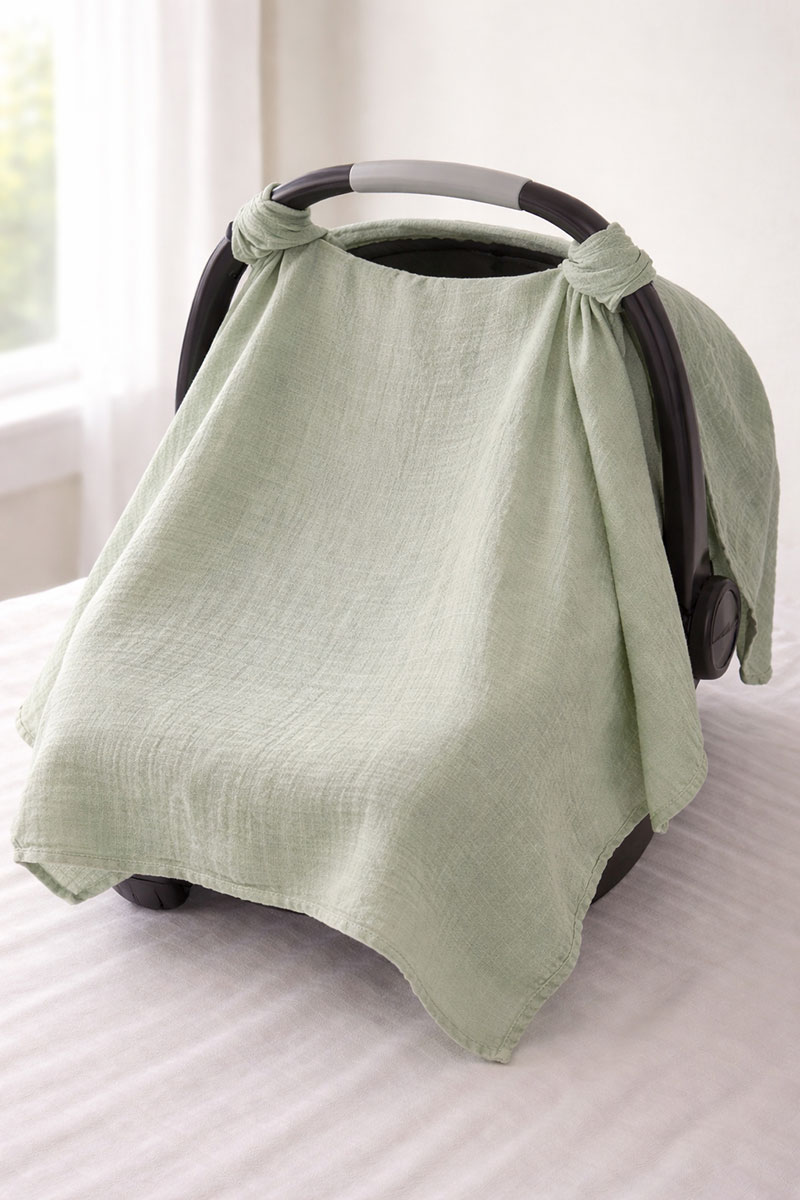
Safety note: The closed canopy in the example image is shown so you can see the finished shape of the cover. Don't leave the canopy fully closed over an occupied car seat. Keep the baby's face completely uncovered, maintain plenty of open airflow and check the baby frequently.
Jump to:
Free Baby Car Seat Cover Pattern
How to Sew the Baby Car Seat Cover
Free Baby Car Seat Cover Pattern
This baby car seat cover pattern is a cut-by-measurement sewing project, so there isn't a paper template to print and tape together. The cover is made from one large outer rectangle, one matching lining rectangle and two lined handle straps that are sewn to the canopy and fasten around the carrier handle. That's it. There are no front slits, separate flaps, elastic sections or shaped hood pieces.
The finished cover is expected to measure about 35 inches wide by 41 inches long. I placed the handle straps a little closer to the head end so there is about 4 inches more fabric toward the foot end. That gives the front enough length to drape down over the outside of the carrier instead of stopping short.
Finished size: About 35 inches wide by 41 inches long
Cut size: 36 inches wide by 42 inches long
Construction: One continuous reversible rectangle with two attached handle straps
Seam allowance: 1/2 inch throughout
Front drop: About 22 1/2 inches of fabric from the strap line to the finished foot-end edge
Head-end drop: About 18 1/2 inches of fabric from the strap line to the finished head-end edge
Those last two measurements are the lengths of fabric on either side of the handle attachment line. They aren't the exact vertical drop you'll see on every carrier because handle height, handle angle and shell shape vary from one car seat to another.
The dimensions here are calculated from the cut sizes and 1/2-inch seam allowance. This project has not been physically test-sewn from these instructions, so I don't want to pretend those are measurements taken from a finished sample. Before attaching the straps permanently, set the sewn canopy over your own carrier and check the placement against its handle.
Finished Size and Fit
The 35-inch finished width is meant to give the fabric enough room to fall down both sides of a typical infant carrier without turning the cover into a fitted shell. The 41-inch length runs from the head end to the foot end.
There's an important distinction here. We're making a canopy that hangs over the outside of the carrier, not a replacement upholstery cover. Nothing from this pattern goes beneath the baby, behind the baby's back or between the baby and the harness.
I also wouldn't try to make the canopy hug every curve of the seat. The loose rectangular shape is what keeps this project simple and lets you lift or remove the cover without disturbing the car seat itself.
Once the cover is finished, the two handle straps should sit across the top with the longer section of fabric hanging toward the foot end. If you accidentally put that longer section toward the baby's head, simply turn the canopy around before fastening it.
Materials for the Baby Car Seat Cover
Outer fabric: 1 1/4 yards of 44 to 45-inch-wide quilting cotton. The floral fabric in the example is a good weight for this project because it has enough body to hang neatly without needing batting.
Lining: 1 1/4 yards of 44 to 45-inch-wide lightweight cotton. I like the contrast of a small pink gingham with the floral outer fabric, especially because you'll see the lining whenever the canopy is lifted or turned back.
Sew-on hook-and-loop tape: 4 inches of 1-inch-wide hook tape and 4 inches of matching 1-inch-wide loop tape.
Thread: All-purpose sewing thread that coordinates with the outer fabric.
Needle: A universal 80/12 sewing-machine needle works for ordinary quilting cotton.
You'll also need: Fabric scissors or a rotary cutter and mat, a long ruler or measuring tape, washable fabric marker or tailor's chalk, pins or sewing clips, an iron and ironing board.
You don't need batting for this version. I'd skip fleece, minky and other thick layers too. Two layers of cotton give us the finished edge and contrasting lining without adding a lot of bulk.
Baby Car Seat Cover Pattern Cutting Guide
Prewash and dry cotton fabric first if you expect to wash the finished canopy later. Press both fabrics before measuring. A small wrinkle across a 42-inch piece can throw the cutting line off more than you'd think.
From the floral outer fabric, cut:
1 rectangle measuring 36 inches wide by 42 inches long.
2 strap pieces measuring 3 inches wide by 10 inches long each.
From the pink gingham lining, cut:
1 rectangle measuring 36 inches wide by 42 inches long.
2 strap pieces measuring 3 inches wide by 10 inches long each.
Choose one 36-inch edge of both large rectangles as the head end and mark it lightly on the wrong side. The opposite 36-inch edge becomes the foot/front end. Once the rectangles are sewn together, that little mark will keep us from guessing which end gets the longer drop.
Round all four corners of both large rectangles with a 2-inch radius. An easy way to do that is to use a round object about 4 inches in diameter. Position it at each corner so the curve meets each straight edge about 2 inches from the corner, mark the curve and cut through the outer and lining pieces separately.
Don't round the strap pieces. Leave those as plain 3-by-10-inch rectangles.
How to Sew the Baby Car Seat Cover
Set the two large canopy pieces right sides together. Match all four edges and the rounded corners, then pin or clip them in place.
Starting along the middle of the head-end edge, sew around the canopy with a 1/2-inch seam allowance. Leave an opening about 8 inches long along that head edge for turning.
Slow down around each rounded corner instead of trying to swing the fabric around the needle in one motion. After sewing, trim the curved seam allowances to about 1/4 inch. You can also make a few small clips into the curved seam allowance, but don't cut through the stitching.
Turn the whole canopy right side out through the 8-inch opening. Push the curved corners out gently with a blunt turning tool, then press the perimeter so the seam sits right at the edge.
Turn the raw edges of the opening inward by 1/2 inch and press them level with the sewn edge.
Topstitch around the entire canopy about 1/8 inch from the edge. That closes the turning opening at the same time and gives the large rectangle a cleaner edge.
Lay the canopy flat with the floral side facing up. Measure it before moving on. Something close to 35 by 41 inches is what we'd expect from the original 36-by-42-inch cut pieces and the 1/2-inch seams.
Make the Two Handle Straps
Pair one floral 3-by-10-inch strap piece with one gingham strap piece, right sides together. Sew around the pair with a 1/2-inch seam allowance, leaving about 3 inches open along one long side.
Trim the four corners without cutting the stitches. Turn the strap right side out, press it flat and turn the raw edges at the opening inward.
Topstitch about 1/8 inch from all four edges. The finished strap should be about 2 inches wide by 9 inches long.
Make the second strap the same way.
Cut the hook tape into two 2-inch pieces. Cut the loop tape into two 2-inch pieces. Each finished strap gets one hook piece and one loop piece.
On the first end of a strap, center the hook piece across the 2-inch strap width about 1/2 inch from the end. Sew around all four sides of the tape.
Turn the strap over. Sew the matching loop piece to the opposite end and opposite side of the strap. That matters because the two fastener pieces need to face each other when the strap wraps around the carrier handle.
Repeat with the second strap.
Attach the Straps to the Canopy
Put the finished canopy floral side up with the head end at the top and the foot/front end closest to you.
Measure 18 1/2 inches down from the finished head edge and make a light mark near the center. This is the handle-strap attachment line. It leaves about 22 1/2 inches of canopy beyond the line toward the foot end.
Now find the center of the finished 35-inch width. It should be about 17 1/2 inches from either side.
From that center point, measure 3 3/4 inches to the left and make a mark. Measure 3 3/4 inches to the right and make another mark. Those are the center positions for the two straps.
The strap centerlines will be about 7 1/2 inches apart. Since each finished strap is about 2 inches wide, that leaves about 5 1/2 inches between the inside edges of the straps.
Lay each strap lengthwise from the head end toward the foot end, with its midpoint centered on the 18 1/2-inch attachment line. The floral side of the strap should face up.
Before sewing, set the canopy over the carrier and bring the straps around the handle. Make sure both straps reach comfortably and that the canopy sits where you want it. Car seat handles aren't all the same size, so this is the point to adjust a strap position if your particular carrier needs it.
Take the canopy back off the carrier before sewing.
At the midpoint of each strap, sew a rectangle about 2 inches wide by 1 inch long through the strap and canopy. Sew an X inside that rectangle as well. That secures the middle of the strap while leaving both ends free to wrap around the handle.
Don't sew either strap to the car seat itself. The canopy and straps remain one removable fabric piece.
Check the Finished Fit
Fasten both straps around the carrier handle and let the canopy fall naturally over the outside of the seat.
The foot/front section should be longer than the head section. The fabric should also fall down both sides as part of that same continuous rectangle. There should be no cut opening or separate front panel because we never made one.
If the cover looks crooked, check the strap positions before changing the fabric. Even a half-inch difference between the two attachment points can make a large rectangle hang noticeably to one side.
If the canopy is simply too long or wide for your particular carrier, don't start trimming the finished cover while it's hanging on the seat. Measure how much you actually want removed, take the canopy off and adjust a future version at the cutting stage. Changing the finished rectangle also changes the lining and strap-placement math.
Final check before use: Remove every pin and sewing clip, remove any visible chalk or fabric-marker lines according to the marker's directions, and trim loose threads. Tug gently on both handle straps and each hook-and-loop piece to make sure the stitching is secure. Put the canopy on the empty carrier first and make sure the straps don't interfere with the harness, buckle or movement of the carrier handle.
Baby Car Seat Cover Safety
This sewing pattern makes a removable outer canopy. It does not make a replacement car seat pad, harness cover, head support or liner. Nothing from this project should go underneath the baby, behind the baby's back, beneath the harness straps, around the buckle or anywhere else that changes the way the restraint fits.
This is a homemade aftermarket accessory, not a part supplied with your car seat, and this project has not been crash-tested or flammability-tested with your particular restraint. The National Highway Traffic Safety Administration recommends following the instructions for your specific car seat and your vehicle owner's manual. If the car seat manufacturer doesn't permit a canopy or an accessory attached to the handle, don't use this project on that seat.
Keep the handle in a position specifically allowed by the car seat manufacturer. The fabric and straps must not interfere with the harness, buckle, carrier handle, installation hardware or any other part of the restraint.
Never leave this canopy fully closed over a baby. Keep the baby's entire face uncovered and make sure air can circulate freely around the baby. Check the baby frequently, particularly in warm conditions. I'd keep this version to the two lightweight cotton layers in the pattern rather than adding batting, fleece, minky or another insulating layer.
Don't leave a baby unattended in the carrier with the canopy in use. The American Academy of Pediatrics advises keeping a baby's face uncovered when using a car seat cover and keeping bulky material out from underneath the baby or between the baby and the harness.
The cover also doesn't turn a car seat into a routine sleep space. The AAP's safe sleep guidance says that if a baby falls asleep in a car seat, the baby should be moved to a firm, non-inclined sleep surface as soon as possible.
Keep toys, blankets, pacifier clips and other loose items from being attached to or held in place by the canopy. If anything about the finished cover interferes with the seat or conflicts with its instructions, take the canopy off. Don't modify the car seat to make the cover fit.
Baby Car Seat Cover Pattern Variations
The easiest way to change this pattern is with fabric rather than construction. Once you have the rectangular size and strap placement working for your carrier, you can get a completely different look without adding more pieces.
Make it reversible. Choose two quilting cottons that you like equally and use the same construction. Just remember that the strap fasteners will still be visible on their respective sides.
Make a lighter version. Keep quilting cotton on the outside and use cotton lawn or another lightweight woven cotton for the lining. I would still avoid anything sheer enough to lose the clean two-layer finish at the edges.
Make a boy or neutral version. Nothing about the measurements changes. Tiny checks, woodland prints, stars, simple stripes or small geometric prints all work with the same pattern.
Skip extra decoration. I wouldn't add buttons, dangling trim, beads, pom-poms or anything else that can come loose around a baby. The contrast lining and print are enough.
If you want more projects that use straightforward measurements rather than complicated pattern pieces, you can browse my free baby patterns for more sewing, crochet and handmade ideas.
When you click on links to various merchants on this site and make a purchase, this may result in this site earning a commission. This does not affect the price you pay.

UBGI Gold Standard 2026
Reviewed under the site's
editorial checklist.
Photos, decorating ideas, party setups and reader submissions are shared for inspiration unless a page is specifically presented as a pattern, tutorial, reference guide or step-by-step project. Follow the instructions, measurements, safety guidance and manufacturer directions provided for the particular project or product.
About Jan | Contact | Baby Nursery Ideas (Blog) | Site Map | Privacy Policy | Disclosure Policy | Disclaimer | Affiliate Disclosure | Earnings Disclosure | Facebook | Pinterest
I am a participant in the Amazon Services LLC Associates Program, an affiliate advertising program designed to provide a means for us to earn fees by linking to Amazon. As an Amazon Associate I earn from qualifying purchases.
Copyright © 2006-2026. All Rights Reserved.