Free Gummy Bear Crochet Pattern for an Easy Candy Bear Plushie
By Jan Bay
This free gummy bear crochet pattern turns colorful yarn into a soft, candy inspired bear with a plump rounded body, tiny ears and short arms and legs. The simple stuffed design uses embroidered facial features and works up quickly for a playful handmade gift, nursery accent or colorful addition to a crochet animal collection.
Explore More Bear Patterns and Baby Ideas
Free Baby Crochet PatternsFree Crochet Teddy Bear Pattern
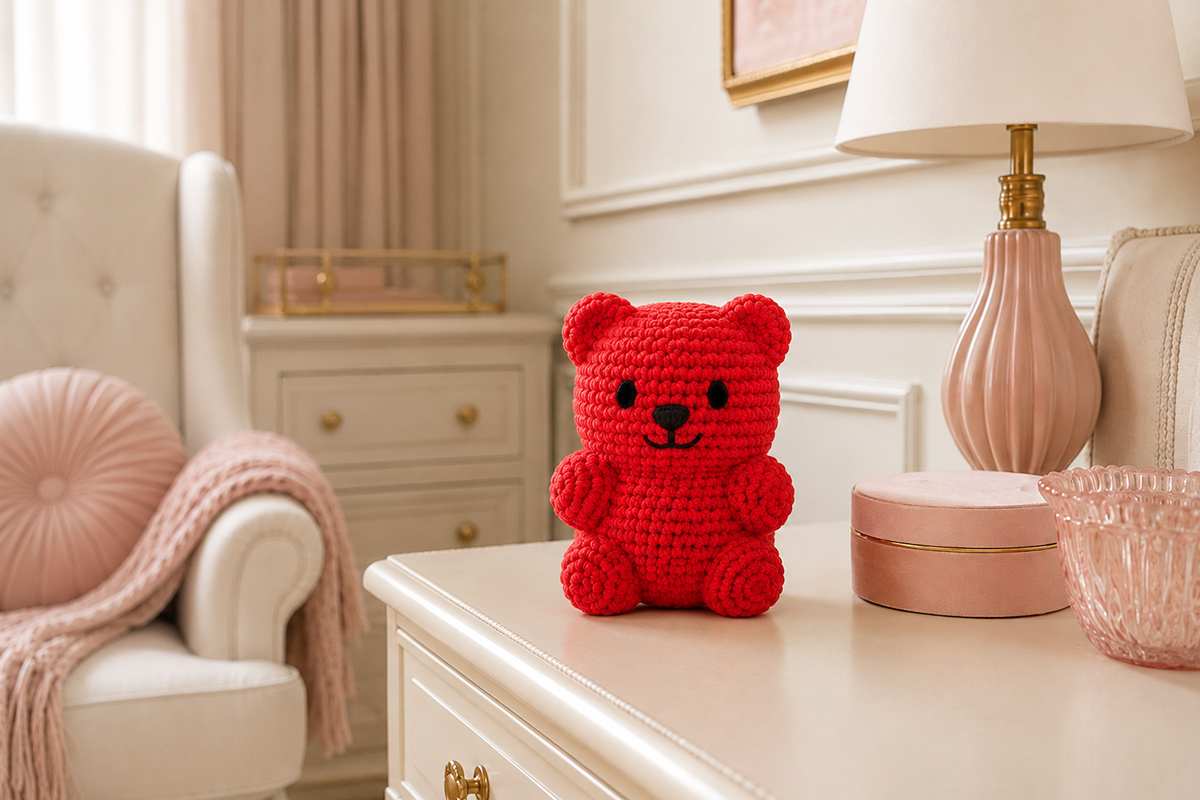
Get the crochet supplies for this project here
Jump to a Section
Gummy Bear Crochet Pattern Supplies and Materials
A gummy bear gets most of its personality from its silhouette, so the yarn and hook combination matters more than you might expect. I recommend a smooth medium-weight yarn that lets the rounded head, small ears and stubby limbs keep their shape. Very fuzzy yarn can hide those little details and make the finished bear look more like a teddy than a piece of candy.
You can make the entire bear in one bright color. Cherry red, orange, lemon yellow, lime green and berry purple all give the project that familiar candy-shop look. A single-color bear also keeps the construction simple because there are no color changes to manage.
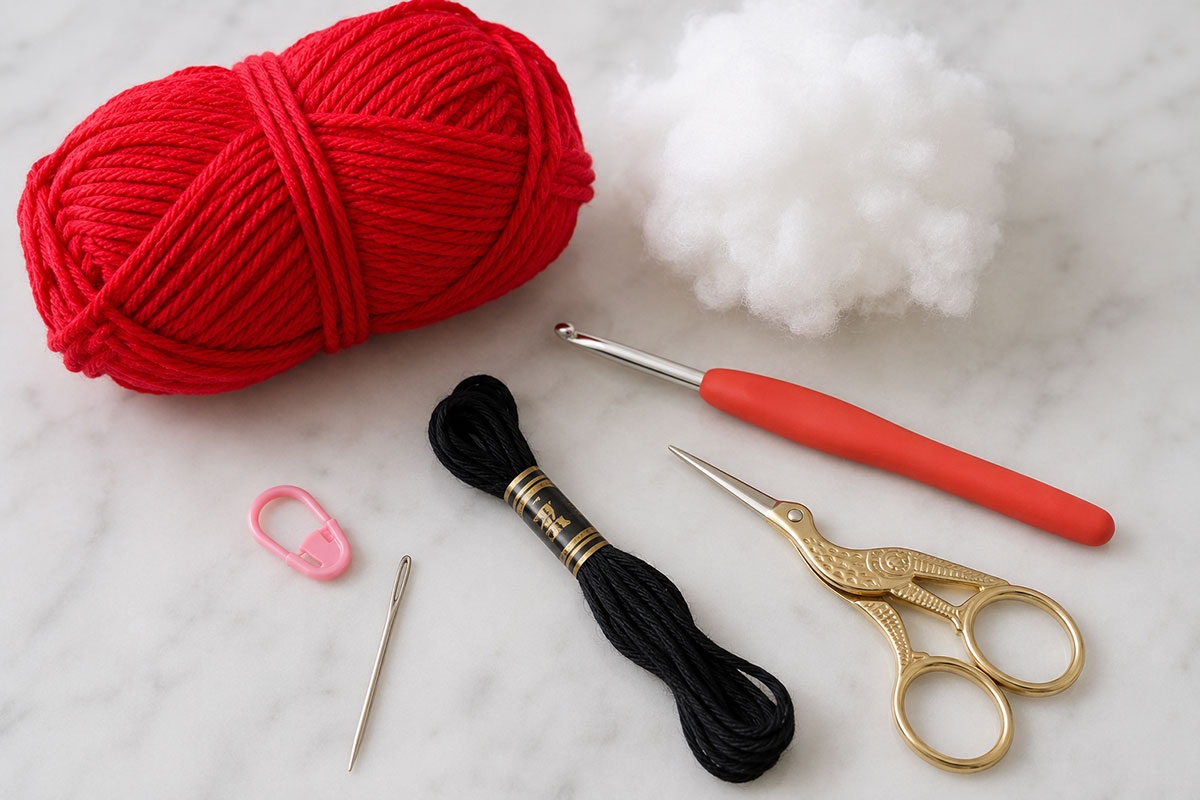
- Worsted weight yarn, size 4: approximately 70 to 90 yards in one color
- 3.5 mm crochet hook: or the hook size needed to make a firm fabric with no large gaps
- Polyester fiberfill: approximately 1.5 to 2 ounces
- Black embroidery floss: for the eyes, nose and mouth
- Tapestry needle: for sewing pieces together and weaving in yarn ends
- Embroidery needle: for the facial details
- Stitch marker: for marking the first stitch of each continuous round
- Scissors
- Straight pins or locking stitch markers: helpful when positioning the ears and limbs before sewing
Abbreviations used in this pattern:
- MR = magic ring
- ch = chain
- sc = single crochet
- inc = 2 single crochet stitches in the same stitch
- dec = invisible single crochet decrease
- sl st = slip stitch
- st/sts = stitch/stitches
- FO = fasten off
Skill level: Advanced beginner. You should already know how to make a magic ring, single crochet, increase, invisible decrease, slip stitch and work in continuous rounds.
Terminology: This pattern uses U.S. crochet terms.
Secure each magic ring: After Round 2 of every piece that begins with a magic ring, pull the starting tail firmly to close the center. Thread the tail beneath several stitches on the inside or wrong side, reverse direction through another group of stitches and pull snug again. Leave the secured tail inside stuffed pieces. For the unstuffed ears, weave the tail completely into the wrong side before trimming it.
Front and back: When the head and body are complete, use the side with the most visible round-start jog as the back. Use the opposite side as the front when positioning the face and limbs.
Final safety check: Remove every straight pin, stitch marker and temporary positioning thread before the finished bear leaves your work area.
The pattern is worked primarily in continuous rounds. Do not join at the end of a round unless the instructions specifically tell you to do so. Move the stitch marker to the first stitch of each new round.
Keep the stitches firm enough that the fiberfill cannot show between them. If your crochet fabric looks loose, move down one hook size rather than pulling every stitch unusually tight. Your hands will thank you before you reach the second arm.
For another rounded crochet bear with a more traditional shape, see the free crochet teddy bear pattern. The gummy bear on this page is intentionally simpler, smaller and more compact, with short limbs and a smooth candy-inspired outline.
Finished Size and Pattern Notes for the Crochet Gummy Bear
With worsted weight yarn and a 3.5 mm hook, the finished gummy bear measures approximately 6 1/2 to 7 inches tall from the top of the ears to the bottom of the feet. The widest part of the stuffed body should measure approximately 2 1/2 to 3 inches across before the arms are attached.
The goal is not to make a miniature teddy bear. A gummy bear has a much simpler outline. The head and body are plump, the ears are small and round, the arms sit high on the sides, and the legs are short enough that the entire figure keeps that compact candy shape.
I would resist the temptation to lengthen the arms or legs. Even a small change can shift the look from gummy bear to ordinary amigurumi bear.
Construction at a glance:
- The head and body are crocheted as one continuous stuffed piece.
- Two small ears are made separately and sewn near the top of the head.
- Two short arms are crocheted separately, lightly stuffed and attached high on the body.
- Two rounded legs are made separately and attached close together at the lower front and sides of the body.
- The eyes, nose and mouth are embroidered after the head has enough stuffing to hold its final shape.
The project uses simple single crochet shaping. The increases create the rounded candy-like curves, while the decreases bring the head into the neck and taper the bottom of the body without creating a narrow waist.
Gauge: Exact gauge is not critical for this project, but the stitches must form a dense fabric. A useful reference is approximately 5 to 5 1/2 single crochet stitches per inch. More important than matching that number is making sure the filling does not show through the finished crochet.
Stuffing: Add fiberfill in small amounts rather than pushing in one large handful. The head should be rounded without becoming hard, and the body should remain softly plump. Pack a little extra filling around the neck area so the head does not fold forward.
Right side: Keep the normal right side of the single crochet fabric facing outward throughout the project. If the piece begins turning inside out while you work, gently push it back into shape before continuing.
Invisible decreases: Work decreases through the front loops when possible. They are less noticeable on a small stuffed project and help preserve the smooth surface that suits the candy-inspired design.
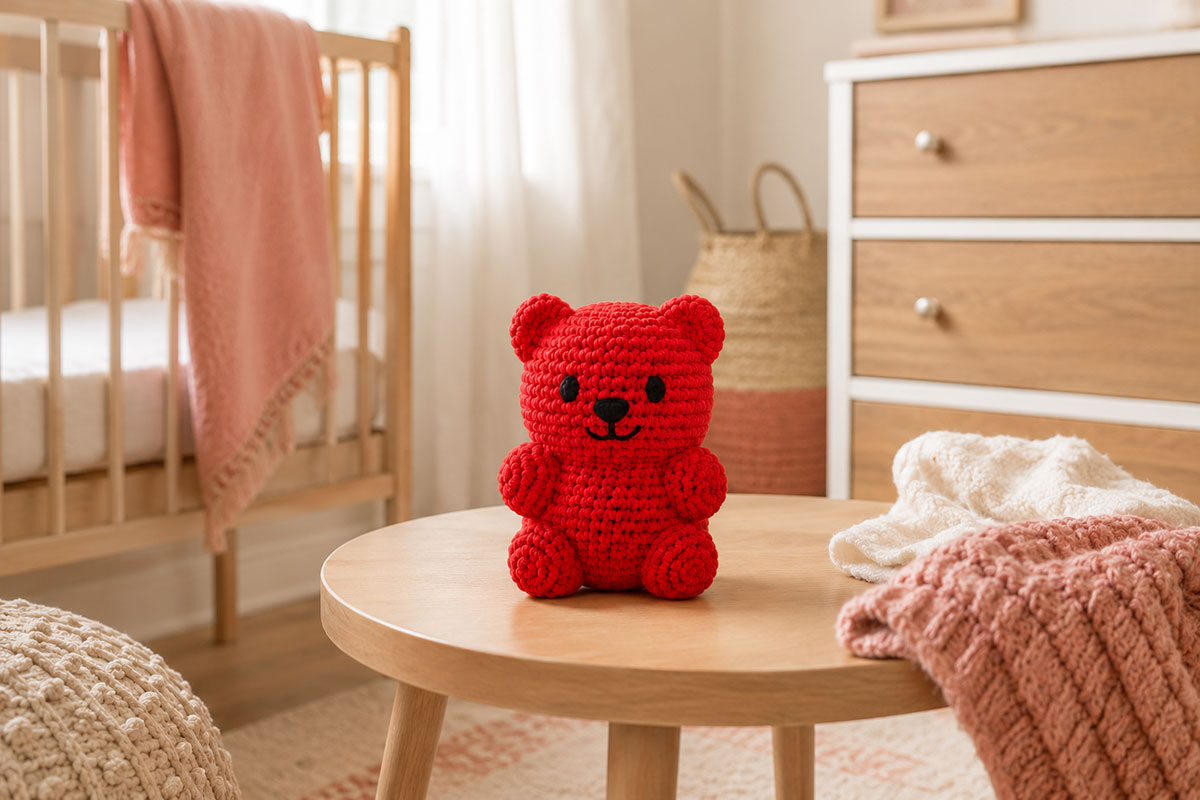
The image above shows the proportions to aim for before you start adjusting placement. The ears should stay close to the head, the arms should not extend far beyond the body, and the feet should read as rounded bumps rather than long teddy bear legs.
If you plan to make several bears in different colors, use the same yarn line and hook size for the whole group. That keeps their proportions consistent even when the colors change.
For a baby gift, keep every facial feature embroidered and secure all sewn pieces carefully. Avoid buttons, beads and other small removable decorations. A handmade crochet figure should also be kept out of an infant's sleep space. The U.S. Consumer Product Safety Commission safe sleep guidance explains why cribs and other infant sleep spaces should remain free of toys and other loose objects.
Crochet the Gummy Bear Head and Body
The head and body are worked as one continuous piece from the top of the head downward. This keeps the center of the gummy bear smooth and eliminates a neck seam. The shaping is deliberately rounded rather than anatomical. Think soft candy silhouette, not a teddy bear with a separate head and torso.
Use your main yarn color throughout this section.
Begin at the top of the head.
Round 1: Make 6 sc in a MR. (6 sts)
Round 2: Inc in each st around. (12 sts)
Round 3: (Sc in next st, inc in next st) around. (18 sts)
Round 4: (Sc in next 2 sts, inc in next st) around. (24 sts)
Round 5: (Sc in next 3 sts, inc in next st) around. (30 sts)
Round 6: (Sc in next 4 sts, inc in next st) around. (36 sts)
Rounds 7 through 11: Sc in each st around. (36 sts)
At this point the piece should resemble a rounded cup with a broad crown. Do not flatten the top. The small ears will be added later and will supply the familiar bear outline.
Round 12: (Sc in next 4 sts, dec) around. (30 sts)
Round 13: (Sc in next 3 sts, dec) around. (24 sts)
The decrease rounds form the lower cheeks and bring the head inward without creating a narrow teddy-bear neck.
Round 14: (Sc in next 3 sts, inc in next st) around. (30 sts)
Round 15: (Sc in next 4 sts, inc in next st) around. (36 sts)
Round 16: (Sc in next 5 sts, inc in next st) around. (42 sts)
The body now begins immediately below the head. The quick increase from 24 to 42 stitches creates the broad upper body associated with a gummy bear and prevents the figure from developing a long visible neck.
Rounds 17 through 23: Sc in each st around. (42 sts)
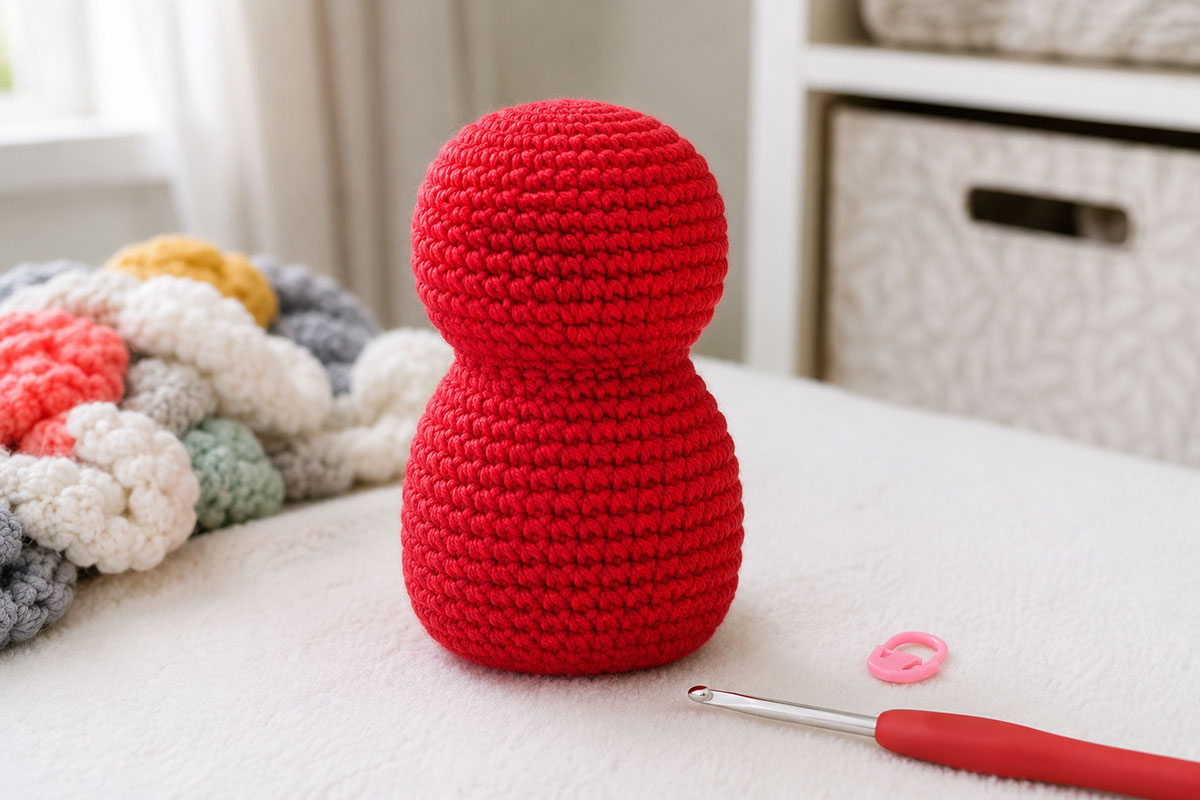
Begin stuffing once you have several body rounds completed. Fill the top of the head first. Add small pieces of fiberfill and distribute them evenly around the sides.
Shape the head with your fingers as you stuff. It should look softly rounded from the front and slightly deeper from front to back. Avoid packing the crown so firmly that it becomes pointed.
Add a little more filling where the head narrows into the body. That section needs enough support to keep the finished bear upright, but it should not look like a separate neck.
Round 24: (Sc in next 5 sts, dec) around. (36 sts)
Round 25: (Sc in next 4 sts, dec) around. (30 sts)
Round 26: (Sc in next 3 sts, dec) around. (24 sts)
Continue adding fiberfill to the body. Keep the center plump, but do not stretch the stitches. The lower body should remain rounded enough to blend naturally into the two short legs that will be sewn on later.
Check the shape from the side before closing the opening. If the back appears flat, move some filling toward that area with the blunt end of your crochet hook or a stuffing tool. If the front bulges sharply, remove a little filling and redistribute it.
Round 27: (Sc in next 2 sts, dec) around. (18 sts)
Add the final small amounts of stuffing now. Pay particular attention to the lower sides of the body. Leaving hollow spots there can make the attached legs appear disconnected from the center of the bear.
Round 28: (Sc in next st, dec) around. (12 sts)
Round 29: Dec around. (6 sts)
FO, leaving a yarn tail about 8 inches long. Thread the tail through the front loops of the remaining 6 stitches. Pull gently to close the opening, secure the yarn and weave the end into the body.
Roll the finished piece lightly between your palms to settle the filling. Then set it upright and check the silhouette from the front. The head should be rounded, the body should be slightly broader through its middle, and the transition between them should be compact.
A perfectly symmetrical stuffed shape is not necessary. What matters is that the figure still reads clearly as the simple molded shape of a gummy bear once the ears and stubby limbs are added.
If the body looks too long, do not try to correct it by pulling hard on the bottom closure. Instead, gently compress the filling upward and reshape the lower body with your hands. The finished proportions depend more on the rounded silhouette than on making every stuffed section rigid.
Make the Short Gummy Bear Arms and Rounded Legs
The limbs are intentionally compact. Long arms or narrow legs would give the bear a traditional amigurumi shape, while a gummy bear needs short rounded bumps that stay close to the body.
Make both arms before starting the legs so you can compare the pair and correct any difference in stuffing while the openings are still accessible.
Make Two Short Arms
Use the same yarn color as the head and body.
Round 1: Make 6 sc in a MR. (6 sts)
Round 2: Inc in each st around. (12 sts)
Rounds 3 through 5: Sc in each st around. (12 sts)
Round 6: (Sc in next 2 sts, dec) around. (9 sts)
Round 7: Sc in each st around. (9 sts)
Place a small amount of fiberfill in the rounded end of the arm. Leave the upper portion more lightly filled so it can lie against the body without creating a bulky attachment.
Do not pack the arms firmly. They should hold their rounded shape while still compressing slightly when you press them between your fingers.
Flatten the final round so the stitches at the front and back meet. FO, leaving a 12-inch yarn tail for sewing. Do not close the opening into a circle. The flattened upper edge becomes the attachment seam.
Repeat for the second arm.
Lay the two arms beside each other before attaching them. Their lengths should match closely, and the rounded ends should have approximately the same amount of filling.
Make Two Stubby Rounded Legs
The legs begin with a wider rounded end to create the gummy bear's characteristic feet. They taper near the top so the attachment seam can disappear against the lower body.
Round 1: Make 6 sc in a MR. (6 sts)
Round 2: Inc in each st around. (12 sts)
Round 3: (Sc in next st, inc in next st) around. (18 sts)
Rounds 4 through 6: Sc in each st around. (18 sts)
Round 7: (Sc in next st, dec) around. (12 sts)
Round 8: Sc in each st around. (12 sts)
Stuff the rounded lower portion more fully than the top. The foot should feel plump, while the final round should remain flexible enough to flatten for sewing.
Flatten the opening. FO and leave a 14-inch yarn tail for attachment.
Repeat for the second leg.
Compare both legs from the front and side. If one looks larger, remove or redistribute a little filling rather than stretching the smaller piece. Matching the amount of stuffing is often enough to make the pair look even.
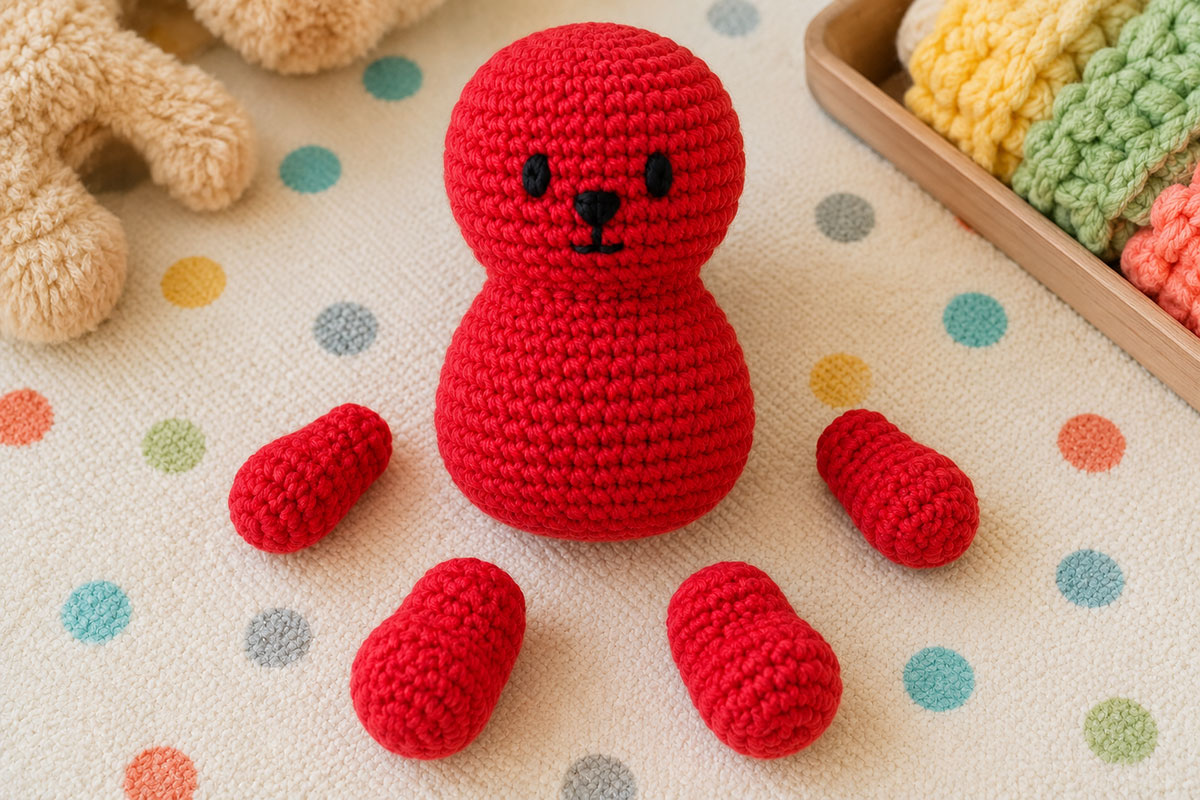
Position the Arms
Choose the smoothest side of the stuffed body for the front. Mark the center front with a removable stitch marker. This gives you a reference point for positioning the limbs and, later, the embroidered face.
Pin one arm to each side of the upper body. Place the flattened attachment edges approximately across body Rounds 16 through 19. The rounded ends should point downward with a very slight forward angle.
Look at the bear straight on before sewing. The arms should sit at approximately the same height and should not project far beyond the body's widest point.
Use the long yarn tail to sew the flattened edge of each arm securely to the body. Pass through both layers of the arm edge and into the body stitches without pulling deeply enough to distort the stuffing.
Make a second pass across the attachment if needed. A neat, secure seam matters more than hiding every stitch because much of the join will settle naturally into the rounded body.
Position the Legs
Pin the legs at the lower front and sides of the body, approximately across Rounds 23 through 26. Keep the pair close together without letting them overlap.
The upper flattened edges should angle slightly inward. The rounded feet can turn outward just a little, but they should not spread into a wide seated teddy-bear stance.
Viewed from the front, leave approximately 6 to 8 body stitches between the inner edges of the two attachment seams. Adjust by a stitch or two if your gauge creates a noticeably different proportion.
Check the figure from the side before sewing. The feet should extend slightly forward from the body, while the back of each leg remains close enough to the lower torso to preserve the compact outline.
Sew each flattened leg edge securely to the body with its yarn tail. Make several small anchoring stitches at the inner and outer ends of the seam so the leg cannot rotate easily after attachment.
Leave the arm and leg yarn tails attached for now. Tuck them out of the way while you add the ears and embroider the face. You will use these tails to make any final placement adjustments and reinforce the limb seams during the assembly check.
Set the bear upright again. At this stage, it should already have the recognizable gummy bear proportions even without ears or a face: a large rounded head, broad compact body, tiny arms and two plump little feet.
If it starts to look like a seated teddy, move the legs slightly closer together before making any more changes. Small adjustments in limb placement have a bigger visual effect than adding extra shaping rounds.
Crochet and Attach the Small Rounded Gummy Bear Ears
The ears finish the candy-bear silhouette, but they should stay small. Large projecting ears make the figure look more like a teddy bear, so these are simple flat circles that sit close to the head.
Make two ears with the same yarn used for the rest of the bear.
Make Two Small Crochet Ears
Round 1: Make 6 sc in a MR. (6 sts)
Round 2: Inc in each st around. (12 sts)
Round 3: Sc in each st around. (12 sts)
Sl st in the next st. FO, leaving a yarn tail about 10 inches long for sewing.
Do not stuff the ears. Gently flatten each circle between your fingers. The slight thickness created by the three crochet rounds is enough to give the ears definition without making them look like separate stuffed balls.
If the ears curl, place them under a book for a short time or shape them lightly with your fingers. They do not need to be perfectly flat because the lower portion will curve against the head when sewn in place.
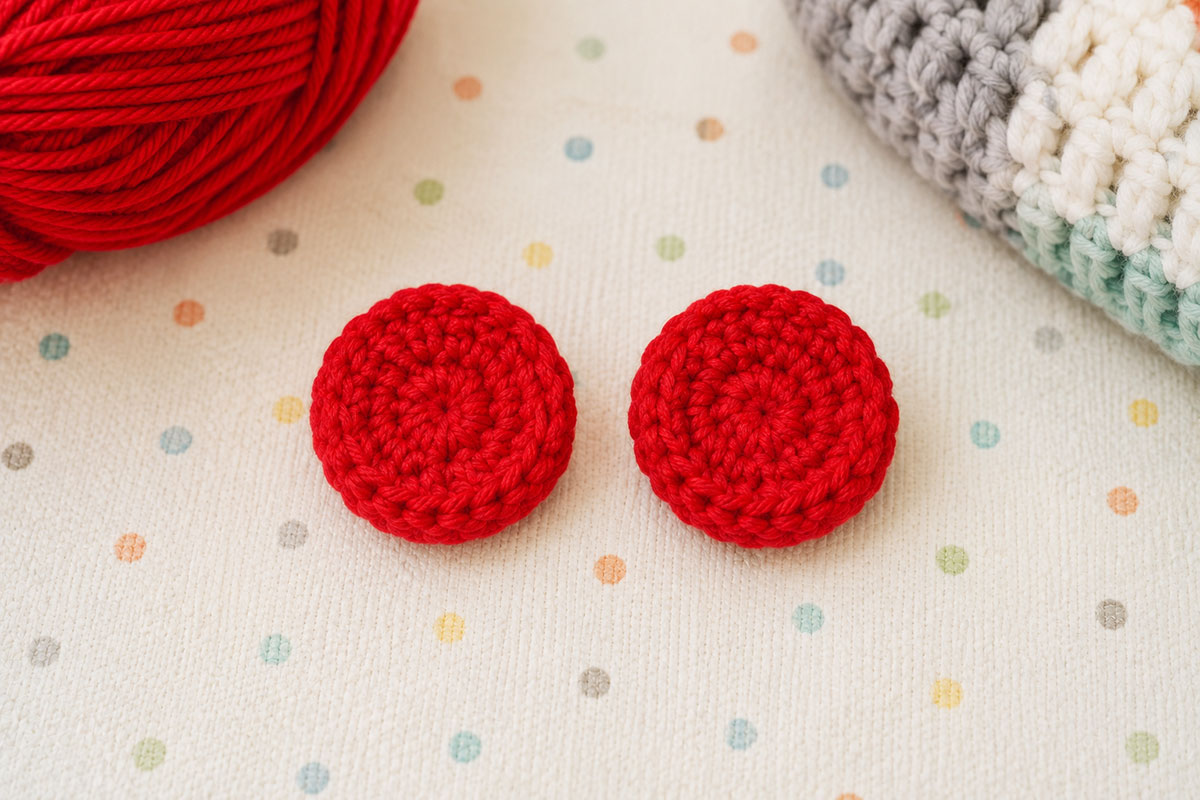
Place the Ears Before You Sew
Set the bear upright with the front facing you. Pin one ear near each upper side of the head, approximately across Head Rounds 3 through 6.
Leave several stitches of rounded crown visible between the ears. They should not meet across the top of the head.
Angle each ear slightly outward. About one-third of the circle can overlap the head, leaving the rest visible beyond the outer edge.
Step back and look at the entire bear before sewing. The ears should complete the gummy bear outline without becoming the first feature you see.
If they look too prominent, move them slightly lower or overlap more of each circle against the head. If they nearly disappear, shift them outward by one stitch at a time.
Sew the Ears Securely to the Head
Thread the yarn tail onto a tapestry needle. Sew the lower inside portion of the first ear to the head with small stitches, passing through the ear edge and the crochet fabric beneath it.
Continue around the attached portion of the ear until it sits securely against the head. Leave the outer rounded edge free so the ear keeps its soft circular shape.
Repeat with the second ear.
Check the pair from the front, back and above before weaving in the tails. If one ear tilts noticeably higher, remove the last few stitches and reposition it now. Small differences become much easier to see once the face is embroidered.
When you are satisfied with the placement, weave each yarn tail securely into the stuffed head and trim the excess.
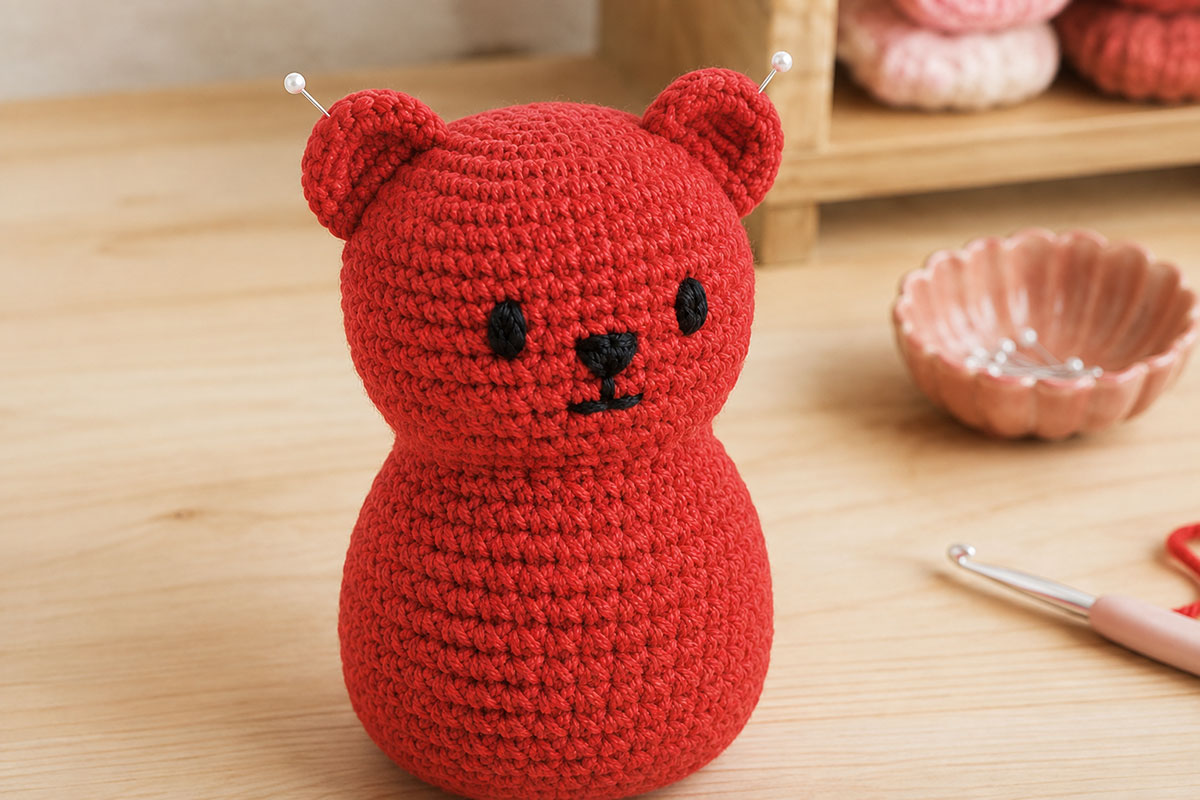
At this point the bear should read clearly from its outline alone. The rounded crown, tiny side ears, compact body and short limbs are what separate this project visually from the more traditional proportions in the teddy bear lovey crochet pattern.
Embroider the Gummy Bear Face
The face should stay simple so the rounded candy shape remains the focus. Small embroidered eyes, a compact nose and a short mouth give the bear expression without turning the front of the head into a detailed teddy-bear face.
Use black embroidery floss and an embroidery needle. Separate the floss if necessary so the stitches do not become thick and raised against the crochet fabric.
Mark the Eye Placement First
Set the bear upright and find the center front of the head. Use two removable stitch markers or short pieces of contrasting yarn to mark the eye positions before you make any permanent stitches.
Place the eyes approximately across Head Rounds 8 and 9. Leave about 5 to 6 crochet stitches between their inner edges.
Look at the face from directly in front. The eyes should sit level with each other and slightly below the widest part of the head.
Move the markers by one stitch if necessary. A tiny placement change can alter the expression, so it is worth checking now rather than correcting embroidery later.
Embroider Two Small Eyes
Thread the needle with black embroidery floss and tie a small secure knot at the end.
Insert the needle through the back or underside of the head and bring it out at the first marked eye position. Pull gently until the knot slips just beneath the crochet surface and remains buried in the stuffing. Work 3 or 4 short vertical satin stitches over the same small area to form a neat oval eye.
Keep the stitches close together, but do not pull them tightly enough to sink into the stuffing.
Carry the floss through the inside of the head to the second eye position. Make the second eye with the same number and approximate length of stitches.
Before securing the floss, compare both eyes from the front. They should be small, solid and similar in height.
The finished eyes do not need highlights or extra colors. Plain black embroidery keeps the expression clean and avoids adding removable pieces.
Add a Small Nose and Short Mouth
Place the nose approximately 2 rounds below the eyes and centered between them.
Make 3 to 5 short horizontal satin stitches to form a tiny rounded triangle or compact oval. Keep the nose noticeably smaller than the space between the eyes.
Bring the needle out directly below the center of the nose and make one short vertical stitch downward.
From the bottom of that stitch, add one short diagonal stitch toward the left and one toward the right to form a small curved-looking smile.
Keep the mouth close to the nose. Long smile lines can make the face dominate the entire project.
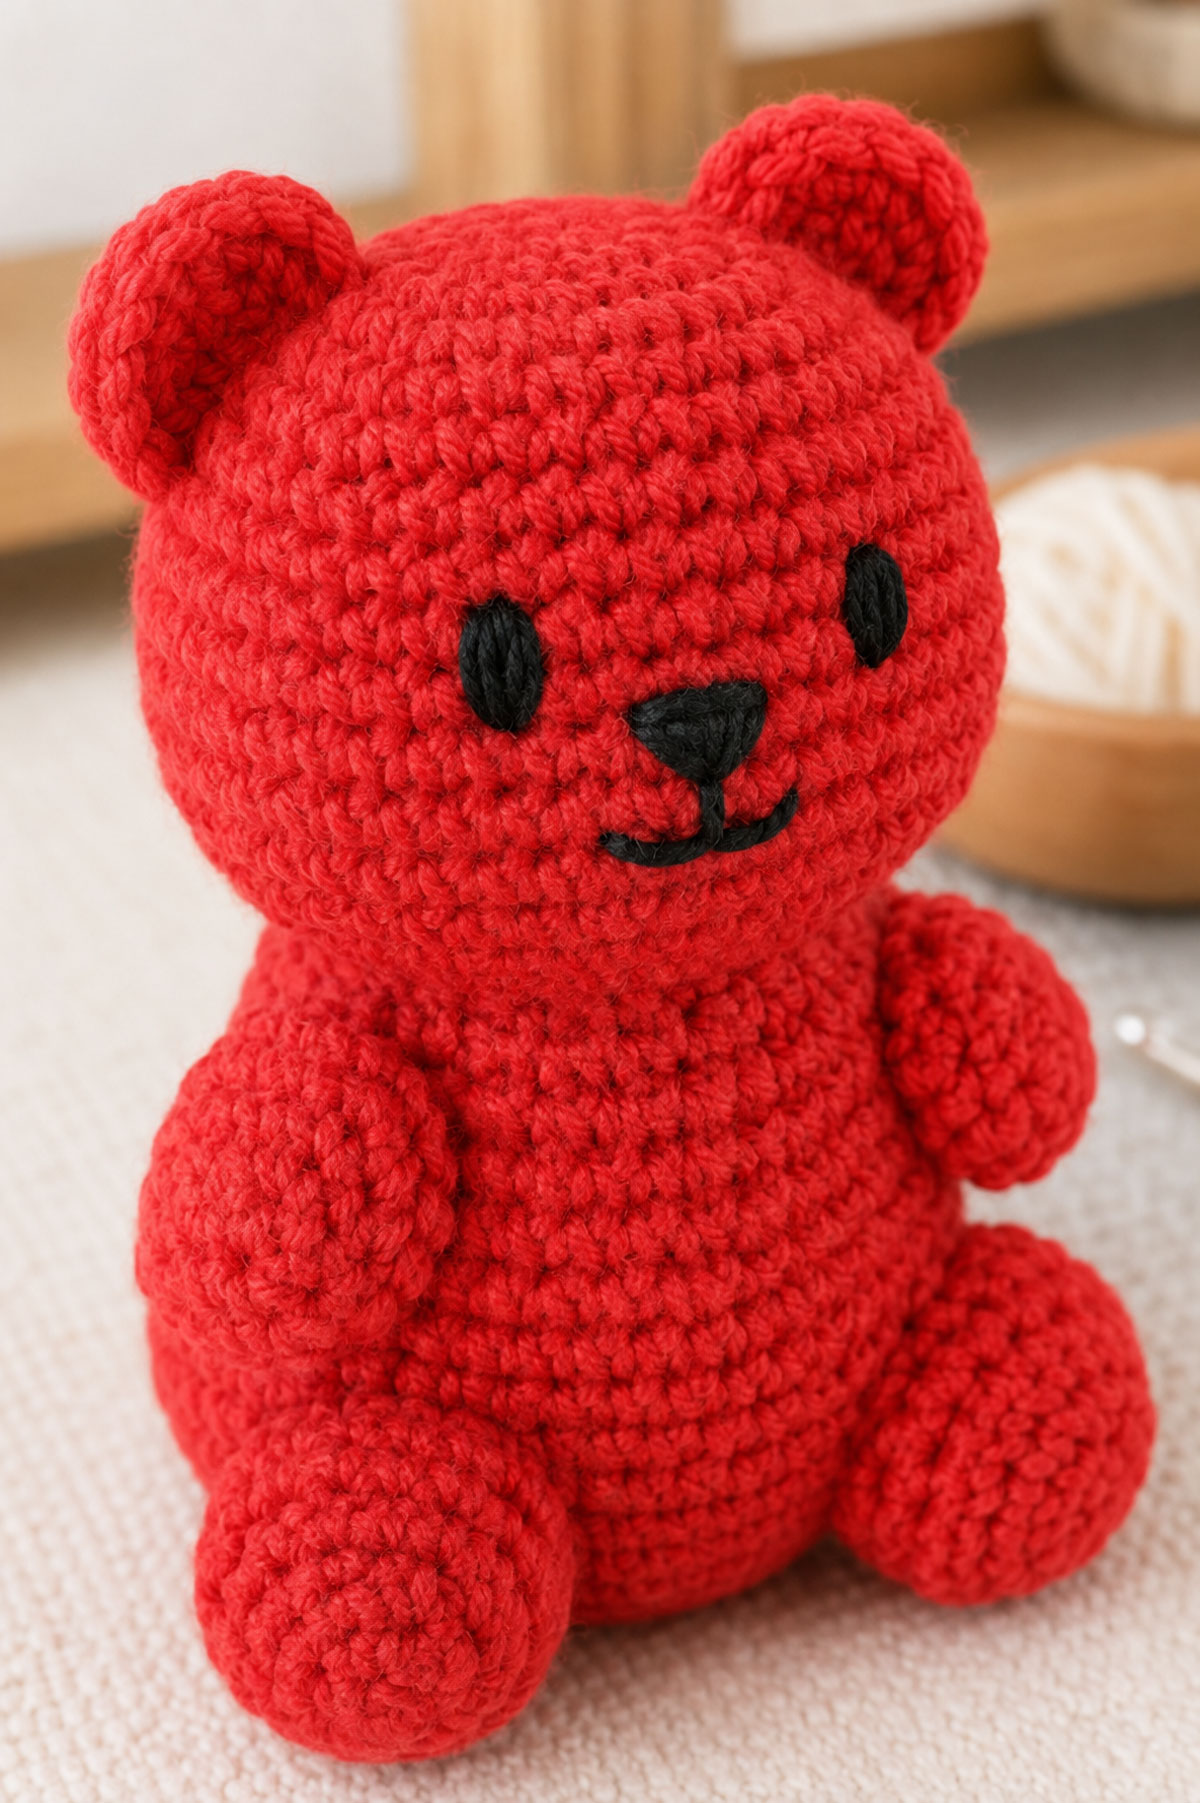
Check the Expression Before Securing the Floss
Set the bear down and look at the complete figure rather than concentrating only on the stitches. The face should feel proportionate to the tiny ears and short limbs.
If an eye looks too tall, remove one stitch rather than adding more embroidery to the other eye. If the mouth looks too wide, shorten the outer stitches. Keeping the features restrained preserves the gummy bear look.
Once you are satisfied, bring the needle out at the back or underside of the head. Take one small anchoring stitch beneath the crochet surface, pass the needle through the stuffed head again and bring it out at a different point. Pull gently and trim the floss close to the fabric so the cut end retracts inside the head.
Gently massage the head around the embroidery to settle any filling that shifted while you worked.
A finished face this small does not need cheeks, eyebrows or additional decoration. The colorful yarn already supplies plenty of personality, and the simpler expression keeps a whole group of different colored bears looking like a coordinated set rather than unrelated characters.
Assemble the Crochet Gummy Bear and Check the Final Proportions
Before you weave in the last attachment tails, give the entire bear one careful proportion check. The individual pieces can look perfectly reasonable on their own and still need a small adjustment once they are together. A gummy bear depends on a compact outline, so placement matters just as much as stitch count.
Check the Bear From the Front
Set the bear upright on a flat surface and look at it directly from the front.
The ears should sit close to the upper sides of the head. The arms should begin high on the body and angle gently downward. The legs should remain close together beneath the rounded torso.
Look for a continuous outline from the head into the body. There should not be a pronounced neck, long shoulders or a large gap between the torso and the legs.
If one arm sits higher than the other, adjust the attachment before securing its yarn tail. If one leg rotates outward too far, add one or two small anchoring stitches near the inner edge of the seam.
The bear does not need to stand perfectly straight without support. Its short rounded legs are part of the candy-inspired shape, not structural feet designed for standing.
Check the Bear From the Side
Turn the bear to a side view. The head should project slightly forward from the upper body without drooping. The belly can have a gentle rounded curve, but it should not extend so far forward that the figure appears seated.
The arms should lie close to the sides rather than sticking straight outward. The feet can project slightly forward, which gives the lower silhouette its familiar rounded gummy shape.
If the head leans forward, use your fingers to move a little fiberfill toward the neck transition. Work slowly so you do not distort the embroidered face.
If the lower body feels hollow after the legs are attached, first redistribute the existing filling through the crochet fabric. If more filling is truly needed, carefully reopen the gathered bottom closure, add a small amount of fiberfill, then draw the remaining 6 stitches closed and secure the yarn again. Do not force extra stuffing through the crochet stitches because that can stretch the fabric and make the shape uneven.
Reinforce the Limb Attachments
Use the matching yarn tails to reinforce any seam that feels loose.
For each arm, make several small stitches through the flattened upper edge and the body beneath it. Keep the stitches close to the attachment line so they disappear into the crochet texture.
For each leg, reinforce both ends of the flattened seam. These small anchoring stitches help prevent the legs from twisting away from the body.
Do not pull attachment stitches so tightly that they create deep dents. The seam should hold the piece securely while allowing the body to keep its rounded surface.
After the seams are secure, weave each yarn tail through several nearby stitches inside the stuffed body. Bring the needle out at a different point, pull the yarn gently and trim it close to the surface. The cut end should settle back inside the bear.
Shape the Finished Silhouette
Hold the bear between both hands and gently shape the head into a rounded oval. Smooth the sides of the body with your fingers and lightly compress the lower torso so the legs blend into it rather than appearing to hang beneath it.
Pinch each ear lightly at its attachment point if you want it to sit closer to the head. Do not fold the entire ear. The visible outer portion should remain rounded.
Massage the arms and legs to distribute the fiberfill evenly. The ends should stay plump, while the attachment areas remain slightly flatter.
Now look at the bear from several feet away. That wider view is useful because the overall silhouette becomes more obvious than the individual stitches.
You should see a broad rounded head, tiny ears, a compact torso, short arms and two chunky little feet. If those proportions are clear, the project reads as a gummy bear before anyone studies the facial details.
For a different bear shape with a defined muzzle, longer limbs and a more traditional stuffed-animal profile, the free crochet teddy bear pattern is the better match. Keeping those proportions separate is what gives this little candy bear its own character.
Finishing and Shaping Your Gummy Bear Crochet Pattern
The last few minutes are mostly about refining the silhouette. Because this gummy bear crochet pattern uses a one-piece head and body, there are very few seams to hide. A little careful shaping now can make the finished bear look much more like molded candy and much less like a tiny teddy.
Settle the Stuffing Without Flattening the Bear
Roll the head gently between your palms, then shape the body with your fingertips. Move any firm lumps of fiberfill toward areas that look hollow.
Keep the head full and rounded. The lower cheeks can narrow slightly before the body widens again, but there should be no obvious neck.
Press the belly very lightly from front to back if it looks too deep. Do not flatten it completely. The body needs enough fullness to keep the arms and legs visually connected.
Check the bottom closure as well. If it creates a small point, massage the surrounding stuffing outward until the lower body looks softly rounded.
Refine the Short Arms and Feet
Shape each arm into a short rounded cylinder with a softly curved end. The upper attachment area should stay flatter than the lower half.
Use your fingers to round the feet without stretching the stitches. They should look plump from the front and slightly deeper from the side.
If one foot points farther outward than the other, gently rotate it toward the center. Add a discreet anchoring stitch at the upper edge only if the piece will not remain in position.
The legs do not need to create a wide sitting base. Keeping them relatively close together preserves the unmistakable gummy-bear outline.
Give the Ears Their Final Shape
Flatten the attached section of each ear gently against the head while leaving the outer curve visible.
Compare both ears from the front. If one appears larger, check whether more of the other ear has been sewn beneath the head surface. You can often correct the difference by adjusting the visible curve rather than removing the entire seam.
Small ears are intentional here. They should read as two rounded bumps along the top corners of the head rather than large teddy-bear ears.
Check All Seams and Embroidery
Run your fingers around each sewn attachment and look for loose yarn loops. Secure any loose area with matching yarn and weave the tail back into the stuffed piece.
Check the black facial embroidery from several angles. The satin stitches should lie flat against the crochet fabric with no long loose loops that can catch on fingers or other objects.
If the bear will be given as a handmade gift, inspect every seam again before wrapping it. Handmade details are part of the charm, but they still need to be firmly secured.
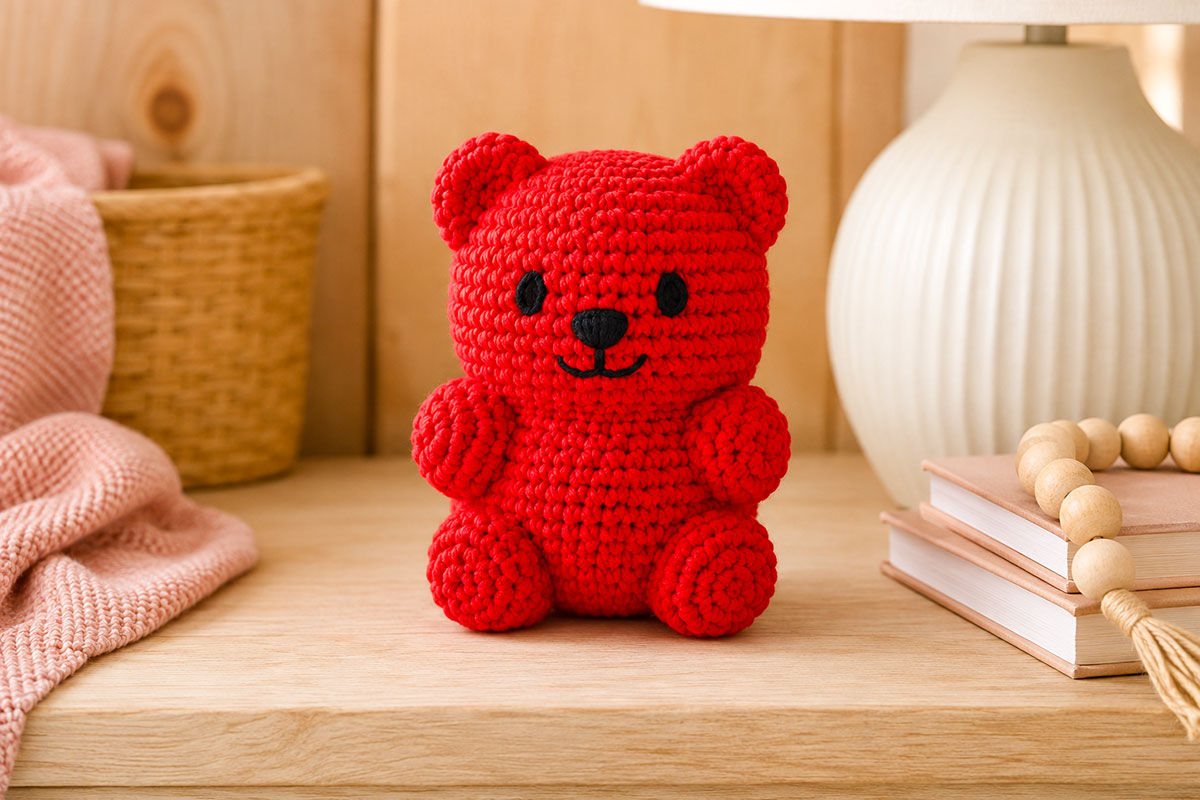
Making a Set of Colorful Crochet Gummy Bears
This pattern is especially suited to making a small group because the color can change while every construction detail stays the same. Red, orange, yellow, green and purple immediately suggest a cheerful candy assortment when the bears are displayed together.
Use the same yarn weight, hook and stuffing method for every bear in the set. Even yarns labeled with the same weight can vary slightly in thickness, so using one yarn line makes it easier to keep all of the finished bears close to the same size.
You can also change the scale by changing yarn and hook size, but treat that as a complete size change. Do not make only the limbs larger or smaller. The compact relationship between the head, body, ears and feet is what makes the design recognizable.
For a handmade baby gift basket, a gummy bear can add a bright crochet accent alongside practical gifts. If it is intended as nursery decor rather than a toy, place it on a shelf or other display area outside the crib and away from an infant's sleep space.
A row of these little bears does not need extra bows, patches or candy decorations to make the idea clear. The rounded shape and bold yarn colors do the job nicely on their own.
Care, Cleaning and Storage for a Crochet Gummy Bear
A finished gummy bear can collect lint and dust between the stitches, especially when it is displayed on an open shelf. Gentle cleaning helps preserve the rounded shape and keeps the embroidered face looking neat.
Always check the care instructions for the yarn you used before washing the finished project. Yarn fibers can react differently to water, heat and agitation, so the yarn manufacturer's directions should take priority.
For Light Cleaning
Remove surface lint with clean fingers or a soft lint roller used very lightly. Avoid pulling at individual crochet stitches.
For a small spot, dampen a clean cloth with cool water and gently blot the area. Do not scrub the embroidery or rub the yarn back and forth.
If the Bear Needs Washing
If the yarn label allows washing, place the bear in a mesh laundry bag or pillowcase to reduce friction. Use cool water and a gentle cycle.
A hand wash is another option for yarn that permits it. Support the entire bear while it is wet rather than lifting it by an arm, leg or ear.
Press out excess water gently. Do not twist or wring the stuffed bear because that can move the fiberfill into uneven lumps.
Reshape the head, body and limbs while the bear is damp. Allow it to dry completely according to the yarn manufacturer's instructions before displaying or storing it.
Storing a Finished Bear
Store the bear in a clean, dry place away from direct sunlight. Long exposure to bright sun can fade some yarn colors, particularly the vivid reds, oranges and purples that look so good for this project.
Do not compress a finished bear beneath heavy objects. If the body becomes flattened during storage, gently reshape the stuffing with your fingers after removing it.
If you make several colors, storing them together in a roomy container can help the set stay organized without crushing the little ears and feet.
Frequently Asked Questions About Crochet Gummy Bears
Is a crochet gummy bear the same as a crochet teddy bear?
No. Both are bears, but the proportions are different. A gummy bear has a compact candy-inspired silhouette with a large rounded head, tiny ears, short arms and stubby rounded legs. A traditional teddy generally has a more defined muzzle, longer limbs and a clearer separation between the head and body.
Is this gummy bear crochet pattern suitable for beginners?
It is a good next project for someone who already knows how to make a magic ring, single crochet, increase and decrease in continuous rounds. The stitches are simple. The main skill is keeping track of the stitch count while shaping the head and body.
If you are new to stuffed crochet projects, use a stitch marker at the beginning of every round and count the stitches before moving to the next shaping round. That small habit prevents many size and proportion problems.
Can I make the gummy bear without a magic ring?
Yes. Chain 2 and work the first 6 single crochet stitches into the second chain from the hook. Continue with Round 2 as written.
The center may leave a slightly larger opening than a tightly closed magic ring. Use the starting tail to close that opening securely before weaving it into the piece.
Can I use cotton yarn?
Yes. Smooth cotton yarn can give the stitches a crisp, well-defined appearance. Cotton generally has less stretch than acrylic, so the finished bear may feel firmer and the exact size can change slightly.
Choose a hook that produces dense fabric without making the stitches difficult to work. Stuffing should not show between the single crochet stitches.
Can I use blanket yarn or chunky yarn?
You can, but the finished bear will be much larger and the proportions can look different because thick yarn adds bulk around small areas such as the ears and limb seams.
If you want a larger gummy bear, changing the yarn and hook together is preferable to adding extra rounds to only the head or body. Enlarging the whole pattern proportionally helps preserve the candy-like shape.
Why does my crochet gummy bear look like a teddy bear?
Check the ears and limbs first. Oversized ears, long arms and widely separated legs can quickly create a teddy-bear appearance.
The head should also flow directly into the broad upper body. If the neck area looks narrow or elongated, gently redistribute the stuffing and check that you followed the increases immediately after Head Round 13.
Keep the embroidered face compact as well. A large nose or long mouth can make the bear look more like a detailed stuffed animal than a simple gummy bear.
How much yarn does one gummy bear use?
Plan on approximately 70 to 90 yards of worsted weight yarn for one bear made at the size described in this pattern. Your exact amount can vary with yarn thickness, tension and how long you leave the sewing tails.
Can I make the face before stuffing the head?
You can, but I recommend embroidering the face after the head is stuffed enough to hold its final shape. Stuffing changes the curve of the crochet fabric, so features that appear evenly spaced on a flat or partially filled head can move once it becomes rounded.
Can I make these in different candy colors?
Yes. That is one of the easiest ways to vary the project without changing the pattern. Red, orange, yellow, green and purple make a recognizable assortment, while softer colors create a different look with exactly the same construction.
Keep the face embroidery consistent from bear to bear if you want the group to look coordinated.
Can I add plastic safety eyes instead of embroidery?
For the version shown on this page, use the embroidered eyes in the pattern. They suit the simple gummy bear face and avoid adding separate plastic components.
If you are making the project for display only and decide to change the construction, remember that any modification can affect how the finished item should be used. For a baby-related handmade gift, simple securely embroidered features are the choice I recommend.
What other bear projects can I make?
If you want to stay with the bear theme but try a different construction, make the crochet teddy bear next. For a softer comfort-style project, the teddy bear lovey crochet pattern combines a bear head with a flat crocheted lovey body.
You can also carry the motif into nursery projects with bear baby quilt patterns or browse bear crib mobile ideas for another way to use the theme beyond stuffed crochet.
Gummy Bear Crochet Pattern at a Glance
Before you start another color, here is the complete construction in one place. This is useful for checking that every piece from the pattern is present before final assembly.
- Finished height: approximately 6 1/2 to 7 inches
- Yarn: worsted weight, size 4
- Hook: 3.5 mm or the size needed for dense single crochet fabric
- Main construction: head and body worked continuously as one piece
- Separate pieces: 2 ears, 2 arms and 2 legs
- Face: embroidered black eyes, nose and mouth
- Assembly: ears sewn close to the upper head, arms high on the body and legs close together at the lower body
- Approximate yarn required: 70 to 90 yards per bear
The easiest detail to double-check is the overall outline. The finished bear should have very little visible neck, tiny rounded ears, short arms and chunky feet. Those proportions are more important to the gummy bear look than making every finished measurement identical.
Keep your first completed bear nearby if you make a second or third color. Comparing the pieces as you work makes it much easier to maintain the same ear size, limb placement and stuffing level across the set.
Common Gummy Bear Shape Problems and How to Fix Them
Small stuffed crochet projects can change appearance quickly when the stuffing, ear placement or limb position shifts by only a little. If your bear does not have the rounded candy shape you expected, check the silhouette before changing the stitch counts.
The Head Looks Too Small
First check the stuffing. A lightly filled head can collapse inward and appear smaller than the body even when the crochet rounds are correct.
Add or redistribute fiberfill toward the sides and crown of the head. Keep the surface rounded without stretching the stitches far enough to expose filling.
Also check the ear position. Ears sewn too low can visually shorten the head. Moving them slightly upward can restore the rounded gummy bear outline without changing the crochet piece itself.
The Bear Has a Noticeable Neck
The transition between the head and body should be compact. If a narrow neck appears, work the filling into that area with your fingers or the blunt end of a crochet hook.
Make sure you followed the body increases immediately after the head decreases. Those increases are what bring the body outward quickly beneath the cheeks.
Do not wrap yarn around the neck or cinch it inward. That shaping technique suits some stuffed animals, but it works against the molded candy look of this pattern.
The Arms Look Too Long
Check how much of each arm extends below the attachment seam. The arms should sit high on the body with much of their upper edge sewn against the torso.
If an arm hangs too low, remove the attachment stitches and move it upward before changing the crochet rounds. Placement is often the cause.
If both arms are noticeably long even after repositioning, compare your row count with the pattern. Each arm has only seven rounds because the short shape is intentional.
The Feet Look Like Teddy Bear Legs
Move the legs closer together and slightly higher against the lower body. A wide gap between them creates a traditional seated-bear stance.
The rounded lower portions should project forward only a little. Keep the flattened attachment edges tucked against the torso so the feet appear to grow out of the body rather than hang beneath it.
If the feet look elongated, check that you made only one straight round after the decrease to 12 stitches.
One Side of the Bear Looks Larger
Uneven stuffing is often responsible. Massage the larger side gently and move some fiberfill toward the smaller side.
Check the limb seams next. An arm or leg attached farther from the center can make one half of the body appear wider.
Use the embroidered nose as the center reference and compare the distance from it to each arm and leg. Adjust the attachment before adding extra stitches to the bear itself.
The Face Looks Too Large for the Head
Keep each eye small and leave plenty of colored crochet visible around the facial features. The nose should be compact, and the mouth should remain close beneath it.
If the expression feels too prominent, removing embroidery is preferable to adding more stitches elsewhere to balance it. A gummy bear gets much of its character from shape and color, so the face can stay pleasantly simple.
The Finished Bear Will Not Sit Upright
This pattern is designed around a rounded candy silhouette rather than a flat sitting base, so the bear does not need to balance perfectly on its own.
If you want it to rest more steadily for display, gently flatten the bottom of the stuffed body with your fingertips and angle the feet forward by the same amount. Do not spread the legs far apart just to create a wider base.
For photography or shelf display, the bear can also rest lightly against a stable background object outside the camera frame. The crochet construction does not need to be altered simply to make it stand unsupported.
The Crochet Fabric Shows Fiberfill
Do not solve visible gaps by packing in more stuffing. Extra filling can make the openings larger.
If the bear is already finished, redistribute the fiberfill away from the stretched area and reshape it gently.
For the next bear, use a smaller hook with the same yarn. A dense single crochet fabric gives the smoothest result and keeps the stuffing contained without requiring unusually tight hand tension.
When something looks slightly off, compare the entire outline before undoing several rounds of work. With a project this compact, ear placement, stuffing and limb angle can change the finished appearance more than a small difference in gauge.
Choosing Yarn Colors and Surface Texture for a Candy-Like Finish
The stitches do not need to imitate real gummy candy. In fact, trying to make crochet look translucent can quickly turn the project into something fussy. The better approach is to use color, proportion and a smooth yarn surface to suggest the familiar candy shape.
A clean, tightly worked single crochet fabric gives the bear a more molded appearance. Highly textured yarn can break up the outline, while very fuzzy fibers can blur the tiny ears and short limbs that make this project recognizable.
Bright Solid Colors Keep the Shape Easy to Read
Red, orange, yellow, green and purple are natural choices because they immediately connect with classic gummy candy colors. A clear saturated shade also photographs well against a simple background and makes the black embroidered face easy to see.
For a softer look, try coral, apricot, pale yellow, mint or lavender. Keep each bear one color from ears to feet so the silhouette remains uninterrupted.
Variegated yarn can be attractive, but it changes the effect. Frequent color changes can make the little bear look striped or speckled rather than candy-inspired. If you want variation, I would make several solid-color bears instead.
Matte or Slightly Smooth Yarn Works Best
A smooth acrylic, cotton or cotton-blend yarn can all work well. The main requirement is that the stitches stay defined and the finished fabric remains dense enough to contain the stuffing.
A yarn with a slight natural sheen can give the finished bear a polished surface without looking glossy. Avoid adding coatings, sprays or other finishes to imitate candy. The crochet should remain simply yarn and fiberfill.
If you are choosing between two hook sizes, make a small single crochet swatch first. Stretch it gently between your fingers. If you can clearly see through the fabric, use the smaller hook.
Make a Coordinated Five-Color Set
A five-bear collection can be made without changing the pattern at all. Use the same yarn line in five colors and keep the hook, stitch tension and stuffing level consistent.
- Red: cherry or raspberry
- Orange: tangerine or apricot
- Yellow: lemon or golden yellow
- Green: lime, apple or fresh leaf green
- Purple: grape, violet or berry
There is no need to assign flavors or add labels to the finished bears. The colors are enough to create the candy assortment effect.
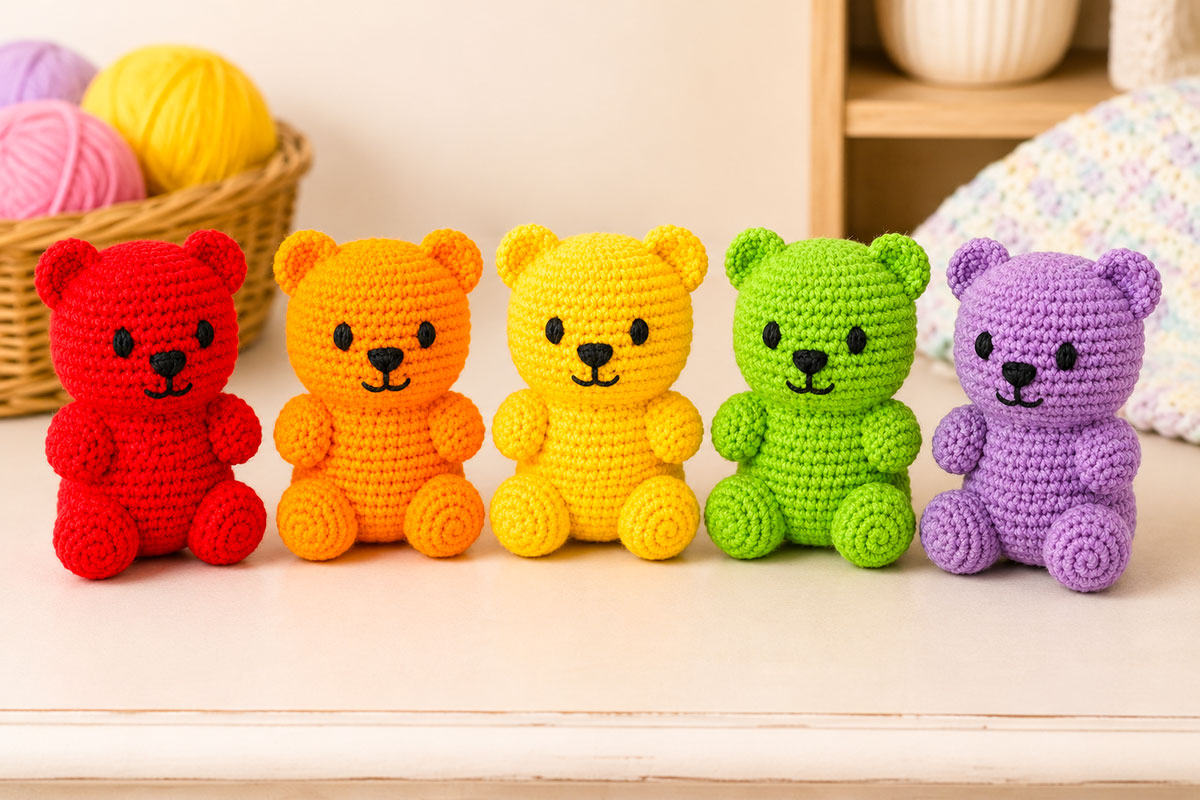
When you arrange several bears together, vary their angle slightly rather than lining them up like identical figures. One can face forward, another can turn slightly to the side, and one can sit just behind the others. The construction stays consistent while the display feels less rigid.
If you are making the set as a handmade gift, a simple basket or open box can hold the bears together without adding extra decorations. Keep any nursery display outside an infant's sleep area.
How to Make a Smaller or Larger Crochet Gummy Bear
You can change the finished size without rewriting the shaping rounds. The simplest method is to change the yarn thickness and hook size together while keeping every stitch count exactly the same.
That approach matters with this design because the head, body and stubby limbs depend on each other. Adding rounds only to the body or making the legs longer can quickly change the silhouette from gummy bear to ordinary stuffed bear.
For a Smaller Gummy Bear
Use a lighter yarn with a hook that produces firm single crochet fabric. DK or light worsted yarn can make a smaller version while preserving the same proportions.
Follow every round exactly as written. Do not remove rounds from the head or limbs just because the yarn is thinner.
Use less fiberfill and add it in very small amounts. A smaller piece can become distorted quickly if the stuffing is packed too firmly.
For a Larger Gummy Bear
Use a thicker yarn with a hook sized for dense amigurumi fabric. Bulky yarn can create a noticeably larger bear without changing the construction.
Check the fabric after the first several rounds. If you can see large openings between stitches, move down a hook size before continuing.
A larger bear will require more stuffing, but the same rule applies: fill gradually and keep the head and body rounded rather than rigid.
Keep Every Part on the Same Scale
Use the same yarn and hook for the head and body, ears, arms and legs. Mixing yarn weights between pieces can make the ears look oversized or the limbs look too thin for the body.
The embroidered face should scale with the finished bear too. On a smaller version, use fewer or shorter satin stitches. On a larger bear, increase the stitch length slightly rather than making the eyes dramatically wider.
If you want several sizes for a display, make one complete bear at each yarn weight before starting the next. That gives you a finished proportion reference instead of trying to judge individual pieces while they are still flat or partially stuffed.
The reliable rule is simple: change the materials, not the shaping. Keeping the written rounds intact preserves the rounded head, broad little body and short gummy-bear limbs that give the pattern its distinctive look.
More Free Crochet Baby Patterns to Make Next
If you enjoyed the compact construction of this project, there are plenty of other ways to keep going without making another identical bear.
The free baby crochet patterns collection brings together more handmade projects for gifts, nursery accents and keepsakes.
For another stuffed animal, the free crochet teddy bear pattern uses a more traditional bear shape with a defined muzzle, longer limbs and larger paws.
If you would rather make something flatter and easier to pair with a blanket or gift set, browse the crochet animal applique patterns. For a soft comfort-style project, the crochet animal lovey patterns offer another direction.
This gummy bear is a small project, but the shape gives it plenty of personality. Keep the proportions compact, use one clear color, and let those tiny ears and stubby feet do the talking.
When you click on links to various merchants on this site and make a purchase, this may result in this site earning a commission. This does not affect the price you pay.

UBGI Gold Standard 2026
Reviewed under the site's
editorial checklist.
Photos, decorating ideas, party setups and reader submissions are shared for inspiration unless a page is specifically presented as a pattern, tutorial, reference guide or step-by-step project. Follow the instructions, measurements, safety guidance and manufacturer directions provided for the particular project or product.
About Jan | Contact | Baby Nursery Ideas (Blog) | Site Map | Privacy Policy | Disclosure Policy | Disclaimer | Affiliate Disclosure | Earnings Disclosure | Facebook | Pinterest
I am a participant in the Amazon Services LLC Associates Program, an affiliate advertising program designed to provide a means for us to earn fees by linking to Amazon. As an Amazon Associate I earn from qualifying purchases.
Copyright © 2006-2026. All Rights Reserved.