Gingerbread House Garland: Easy DIY Paper Craft with Free Pattern Template
By Jan Bay
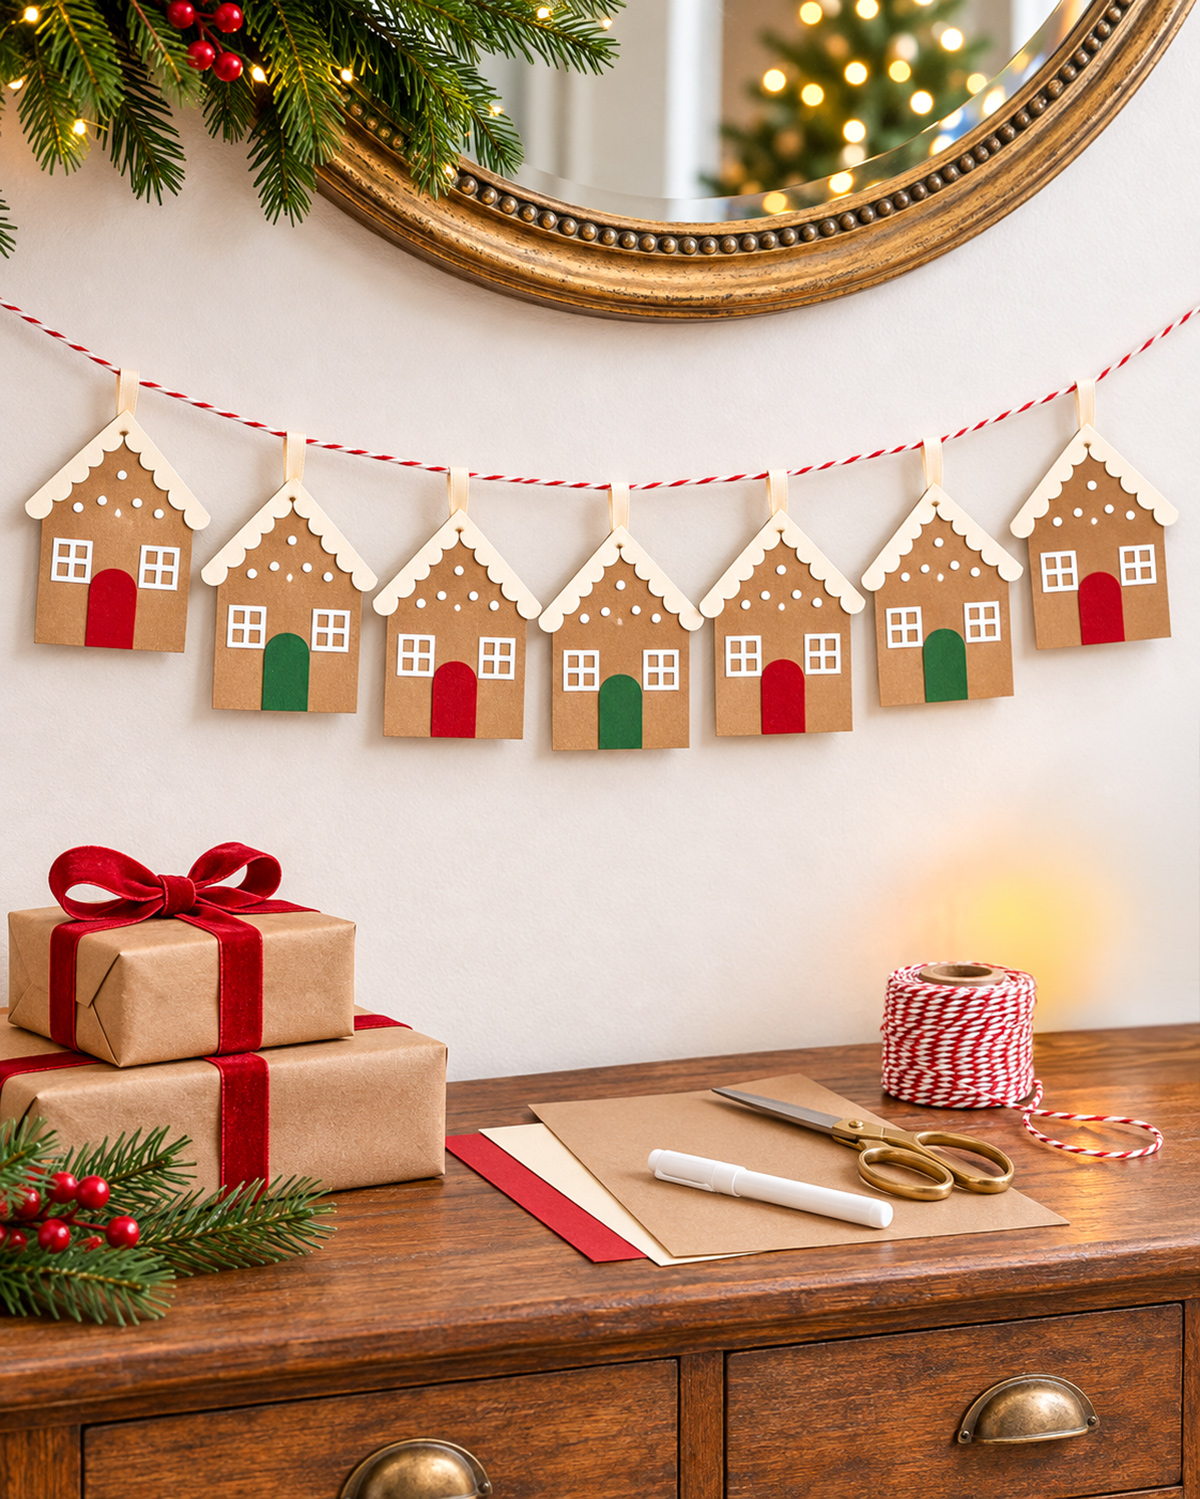
Make a Gingerbread House Garland with little paper houses that look as though they've been decorated with Christmas icing. These have brown paper walls, snowy white roofs, tiny windows, and cheerful red and green doors. I'll show you how to cut the houses from cardstock, add the decorations, and hang all seven on a Christmas garland. There's a free printable pattern template to make the cutting easier, too. It's a sweet little Christmas craft for a mantel, party table, or holiday baby shower display, and you won't need much more than paper, glue, and string.
Explore More Handmade Christmas Decorations
Folded Paper Christmas Star Garland
See Supplies for This Project Here.
Jump to the Gingerbread House Garland Tutorial
Supplies for Your Gingerbread House Garland
You'll make seven little paper houses for this garland. Each one has a kraft-brown body, a scalloped ivory roof, two white four-pane windows, and a rounded red or green door. The houses are all the same size, so once you've finished the first one, you'll know exactly how to make the rest.
I'd use sturdy kraft cardstock rather than ordinary construction paper. It holds its shape better when the houses are hanging, and the brown color gives them that gingerbread-cookie look without painting every piece.
Finished Measurements
- Number of houses: Seven.
- House size: 3 3/4 inches wide and 4 1/2 inches tall.
- Door size: Approximately 0.82 inch wide and 1.48 inches tall.
- Windows: Two 0.65-inch square windows on each house.
- House spacing: 4 1/4 inches between neighboring house centers.
- Main garland cord: 44 inches before making the end loops.
- Hanging span: Approximately 36 inches between the two end-loop bases.
- Individual house hangers: Seven flat ivory ribbon tabs, each 1/4 inch wide and 3 inches long before folding.
- Skill level: Beginner paper craft.
- Construction: Cutting, gluing, drawing, folding ribbon, and hanging.
The finished measurements are based on the printable pattern and planned construction. Allow a little variation in the hanging length once the knots are tied and the garland is draped.
Materials and Tools
- Three US Letter sheets of brown kraft cardstock, approximately 180-220 gsm
- Ivory cardstock for the snowy scalloped roof pieces
- Red cardstock for four doors
- Dark green cardstock for three doors
- White opaque paint pen for the windows and icing dots
- Red-and-white baker's twine or twisted cotton cord, 44 inches long
- Seven 3-inch lengths of 1/4-inch-wide ivory ribbon
- Seven small kraft-cardstock backing patches, approximately 3/4 x 1/2 inch each
- Paper scissors
- Pencil and ruler
- Paper craft glue for the cardstock decorations
- Ribbon-safe craft glue for attaching the hangers
- Small clips for holding the ribbon attachments while the glue dries
- Printed gingerbread house templates
You don't need a cutting machine, glitter, expensive embellishments, or special craft equipment. The little roof scallops and white windows do most of the decorating.
Before you begin: Count your supplies. You'll be cutting seven house bodies, fourteen roof trims, and seven colored doors. The windows and icing dots will be drawn directly onto the brown cardstock.
Keep the decoration lightweight and flat. You won't need to build a three-dimensional gingerbread house for this project.
Download the Free Gingerbread House Garland Template
Here's the part that makes the cutting easier. The free printable includes the house outline, separate scalloped roof pieces, a rounded door template, and a guide for the windows.
All seven houses use the same templates. You won't have to measure and draw seven separate rooflines or try to make the little doors match by eye.
Download the Free Gingerbread House Garland Template (PDF)
What's Included in the Printable?
- Page 1: Project overview, finished measurements, and materials.
- Page 2: Full-size house-body template with window, door, and icing-dot placement guides.
- Page 3: Mirrored left and right scalloped roof trims, rounded door template, and window drawing guide.
- Page 4: Cutting, decorating, and house assembly instructions.
- Page 5: Hanging instructions, cord measurements, and seven-house spacing guide.
Print the Templates at Actual Size
- Open the PDF and select Print.
- Choose US Letter paper, measuring 8 1/2 x 11 inches.
- Under the print sizing options, choose Actual Size or 100%.
- Turn off Fit to Page or any automatic scaling.
- Print pages 2 and 3 for the cutting templates. You may also print the other pages if you'd like the instructions beside you.
- Measure the 1-inch test square on each template page with a ruler.
If the test square isn't exactly 1 inch, check the printer settings before cutting your good cardstock. A template printed too small or too large will change the house measurements.
Adobe explains the difference between scaling and printing at actual size in its PDF printing instructions.
Template checkpoint: The house outline should measure 3 3/4 inches across its bottom edge and 4 1/2 inches from the bottom to the roof peak.
You can print one copy of each cutting template and use it repeatedly. Just keep the paper pattern pieces flat while tracing.
Cut the Gingerbread Paper Houses and Decorations
Start with the brown houses, then cut all the colored doors and ivory roof trims. I would get the cutting finished before opening the glue. It's easier to see how many pieces you have that way, and you won't have wet glue on the table while you're still working with the templates.
Step 1. Cut Seven Brown House Bodies
- Print the full-size house template from page 2 of the PDF.
- Cut out the house outline, following the solid outer cutting line.
- Place the template on your kraft cardstock and trace around it with a sharp pencil.
- Cut out the first house, following the pencil line.
- Check that the bottom is straight, both side walls are even, and the two roof slopes meet at a centered peak.
- Repeat until you have seven matching houses.
Important: Don't cut out the printed window and door placement guides. Those are there to show you where the decorations belong. The house body stays in one piece.
Each house should measure 3 3/4 inches wide and 4 1/2 inches tall. If one looks noticeably different from the others, correct it now.
Step 2. Cut the Ivory Scalloped Roof Trims
The roof icing is made from two separate pieces, one for each sloping roof edge. The template includes both mirrored shapes, so you don't have to guess how to turn one piece around.
- Find the left and right roof-trim templates on page 3 of the PDF.
- Cut out both paper templates, following the scalloped outlines.
- Trace seven left roof trims onto ivory cardstock.
- Trace seven right roof trims onto ivory cardstock.
- Cut all fourteen pieces carefully, keeping the rounded scallops intact.
- Pair one left trim and one right trim for each house.
Take your time around the rounded edges. You'll get a prettier icing effect from smooth scallops than from lots of tiny, uneven snips.
Roof checkpoint: You should have fourteen ivory pieces, seven for the left roof slopes and seven for the right.
Step 3. Cut Four Red Doors and Three Green Doors
- Cut out the rounded door template from page 3.
- Trace the door four times onto red cardstock.
- Trace the same door three times onto dark green cardstock.
- Cut out all seven doors, keeping the rounded tops smooth and the bottom edges straight.
- Check that each finished door is approximately 0.82 inch wide and 1.48 inches tall.
Don't add a cutting allowance. The doors are glued flat onto the fronts of the houses, with their bottom edges lined up with the bottoms of the brown house bodies.
Step 4. Arrange the Pieces Before Decorating
Lay the seven brown houses in a row. Place the colored doors on them in this order:
RED - GREEN - RED - GREEN - RED - GREEN - RED
The first, third, fifth, and seventh houses have red doors. The second, fourth, and sixth have green doors.
Set one pair of ivory roof trims beside each house.
Final cutting count: Seven brown house bodies, fourteen ivory roof trims, four red doors, and three green doors. That's twenty-eight separate cardstock pieces altogether.
Once every piece is counted, you're ready for the icing details and assembly.
Decorate the Gingerbread Houses with Icing, Windows, and Doors
Now your paper houses can start looking like gingerbread cookies. The white windows and snowy roofs are what give them that frosted Christmas look, and the little red and green doors add just enough color.
Keep the decorations the same on all seven houses for this version. The alternating door colors give you variety without needing seven different patterns.
Step 1. Glue the Colored Doors in Place
- Place the first brown house face up on a clean work surface.
- Take one red door and apply a thin layer of paper glue to its back.
- Position the door in the horizontal center of the house, with its straight bottom edge exactly even with the bottom of the brown house.
- Press the door gently into place. Don't use so much glue that it squeezes out around the edges.
- Repeat on the second house using a green door.
- Continue through all seven houses, alternating red and green doors.
- Set the houses aside until the glue holds the doors firmly.
Door checkpoint: Every door should have its rounded top facing upward and its straight bottom lined up with the bottom of the house. The fourth house, in the middle of the garland, has a green door.
Step 2. Draw the Four-Pane Windows
Each house gets two matching white windows, one on either side of the door. You won't cut holes through the paper. You'll draw the window frames so the kraft-brown cardstock remains visible inside the panes.
- Use the placement guide on page 2 of the printable to locate both windows.
- With a ruler and pencil, lightly mark the outline of the first 0.65-inch square window.
- Repeat for the second window on the opposite side of the door.
- Check that the windows are level and evenly spaced. The bottom edge of each window should sit approximately 1.42 inches above the bottom of the house. The center of each window will be approximately 1.75 inches above the bottom.
- Trace the square outlines with your opaque white paint pen.
- Draw one vertical white line through the center of each square.
- Draw one horizontal white line through the center of each square, forming four panes.
- Repeat on all seven houses.
- Allow the white paint to dry before handling the houses again.
You should see the brown cardstock between the white lines. There's no need to fill the windows with white paint.
Window checkpoint: Each house has two square windows with four panes apiece. Across the seven-house garland, you'll have fourteen windows.
Step 3. Add Six Little Icing Dots
Look at the triangular space below each roof peak. That's where the six small white dots belong. They look a little like icing sprinkled onto the front of a gingerbread cookie.
- Use the six placement marks on the house template as your guide.
- Draw one small white dot near the top of the group.
- Draw two dots below the first, with one on each side of the centerline.
- Draw three dots in a row below those.
- Keep the dots small and approximately equal in size.
- Repeat the same one-two-three arrangement on all seven houses.
- Let the white paint dry completely.
Don't put the dots right against the roof edge. Leave enough brown paper showing so the icing details don't disappear underneath the ivory roof trim.
Icing checkpoint: Six dots per house, for a total of forty-two white icing dots.
Step 4. Glue on the Scalloped Roof Pieces
The separate ivory roof strips are worth taking a little extra care with. They're what make the paper houses look as though someone piped icing along the snowy roof edges.
- Take the left ivory roof trim and lay it against the left sloping edge of the first house.
- Turn the trim so its straight edge follows the outside roof slope and the rounded scallops face inward toward the house.
- Check that the trim fits from the roof peak toward the lower roof corner.
- Apply a thin line of glue to the back of the trim.
- Place it along the left roof slope and press gently.
- Position the matching right trim along the other roof slope in the same way.
- Bring the upper ends of both trims neatly together at the roof peak.
- Repeat until all seven houses have both ivory roof strips attached.
- Lay the decorated houses flat and allow the glue to dry.
The ivory strips should cover the sloping roof edges without hiding the windows, doors, or icing dots.
Step 5. Inspect All Seven Houses
Before you attach the ribbon hangers, line up the completed houses and compare them.
- All seven houses are the same size.
- Four doors are red and three are green.
- Every door is centered at the bottom.
- Each house has two white four-pane windows.
- Each house has six white icing dots.
- Both roof slopes on every house have ivory scalloped trim.
- All glue and paint are dry.
If a white line looks a little faint, you can add a second coat after the first has dried. Don't keep going over wet paint. That can make the lines look messy instead of neat.
Now you have seven little paper gingerbread houses ready to hang.
How to Assemble the Gingerbread House Garland
You've finished decorating the houses. Now you'll attach them to the red-and-white cord using flat ivory ribbon tabs, just like the ones in the finished example.
The ribbon folds over the main cord, and its two loose ends are glued behind the roof peak. A small piece of kraft cardstock covers and reinforces the glued ends. No holes are needed in the paper houses.
Step 1. Cut the Ivory Ribbons and Backing Patches
- Cut seven lengths of narrow ivory ribbon, each measuring 3 inches long and 1/4 inch wide.
- Cut seven small rectangles from scrap kraft cardstock, each approximately 3/4 inch wide and 1/2 inch tall. These will reinforce the ribbon attachments behind the houses.
- Place one ribbon and one backing patch beside each finished house.
- Check that the decorated roof peaks are completely dry before attaching anything to the backs.
Cutting checkpoint: You should have seven ivory ribbons, each 3 inches long, and seven kraft-cardstock backing patches. The house bodies remain intact, without punched holes.
Step 2. Check the Ribbon Attachment Positions
- Turn the first decorated house face down on a clean work surface.
- Find the center of the back of the roof, directly below the peak.
- Place one kraft backing patch against that area to check the fit. The patch should stay within the house outline.
- Set the ribbon and patch beside the house without gluing them yet.
- Repeat for the other six houses.
You'll fold each ribbon over the main garland cord after the cord has been measured and marked. Then the ribbon ends will be attached behind the corresponding house.
Keep the ribbons flat rather than twisting them. That's what gives the finished garland the neat ivory hanging tabs shown in the example image.
Step 3. Prepare the Red-and-White Garland Cord
- Cut a 44-inch piece of red-and-white twisted cotton cord.
- Fold approximately 4 inches of the left end back toward the main cord.
- Secure the doubled section with a firm knot to form a hanging loop.
- Repeat with approximately 4 inches at the right end.
- Check that the distance between the bases of the two hanging loops is approximately 36 inches. Small differences caused by the knots are fine.
- Lay the cord straight on your work surface, with the end loops pointing outward.
These end loops are for attaching the garland to wall hooks or other secure supports. You don't need to attach the houses directly to the wall.
Step 4. Mark the Seven House Positions
Measure from the base of the left hanging loop, not from the loose end of the cord.
Make seven small removable marks along the main cord at these distances:
- First house: 5 1/4 inches
- Second house: 9 1/2 inches
- Third house: 13 3/4 inches
- Fourth house: 18 inches
- Fifth house: 22 1/4 inches
- Sixth house: 26 1/2 inches
- Seventh house: 30 3/4 inches
The distance between neighboring marks is 4 1/4 inches. Since each house measures 3 3/4 inches wide, this leaves approximately 1/2 inch between neighboring houses when they hang level.
You can use little removable pieces of tape to mark the positions. Remove them after the ribbon tabs are attached and the glue has dried.
Step 5. Attach the Houses with Flat Ivory Ribbon Tabs
- Lay the main garland cord on your work surface with all seven positions marked.
- Take the first 3-inch ivory ribbon and fold it at its midpoint over the cord at the first mark. Both 1 1/2-inch ribbon tails should hang downward together.
- Put a tiny amount of ribbon-safe craft glue inside the folded top to keep the ribbon from sliding along the cord.
- Take the first gingerbread house, which has a red door, and turn it face down. Keep its decorated roof supported against the table.
- Bring the two ribbon tails down against the back of the roof peak, keeping them flat and aligned.
- Apply ribbon-safe craft glue to the bottom 1/2 inch of both tails and attach them at the center of the back of the roof. Leave approximately 1 inch of the ribbon visible between the main cord and the roof peak.
- Place one 3/4 x 1/2-inch kraft-cardstock backing patch over the glued ribbon ends. Press it gently into place.
- Use a small clip to hold the attachment while the glue dries. Position the clip so it doesn't crease the decorative roof.
- Repeat at the second mark with a green-door house.
- Continue along the cord in this exact color order: red, green, red, green, red, green, red.
- Leave the garland flat until all the ribbon attachments have dried completely, following the glue manufacturer's directions.
- Remove the clips. Hold each house over the table and give its ribbon tab a gentle pull to check that the glued attachment holds.
Don't lift the entire garland until all seven ribbon tabs have passed that little check. If an attachment loosens, reglue it and allow it to dry again before hanging the decoration.
Assembly checkpoint: You should have seven houses attached with flat ivory ribbon tabs, spaced 4 1/4 inches apart. The fourth and middle house has a green door. No holes are punched through the roofs.
Step 6. Check the Finished Garland
Lay the finished garland on a clean table for one last look.
- Count seven houses.
- Check that all seven ivory ribbon tabs are firmly glued behind the roof peaks.
- Make sure every kraft backing patch is attached and each ribbon stays in position on the main cord.
- Look for loose roof trim or door corners.
- Remove all temporary marking tape and clips.
- Check that both cord end loops are secure and no loose ribbon ends are showing beneath the backing patches.
That's the finished garland. The last thing to do is find a pretty place to hang it.
Hang and Display Your Gingerbread House Christmas Garland
These little houses look especially pretty hanging beneath a Christmas mirror, across a wall, or above a holiday gift-wrapping table. The red-and-white cord gives the garland that candy-cane look, while the flat ivory ribbon tabs let each little house hang neatly below it.
If you're decorating a mantel, I would hang the paper houses where you can see the full shape of every roof. There's no reason to cover up all those scallops after you've taken the time to cut them.
Hang the Garland
- Choose a wall or display area with two secure hanging points approximately 3 feet apart.
- Attach hooks suitable for your wall surface and the weight of the decoration, following the hook manufacturer's instructions.
- Place the left end loop over the first hook.
- Bring the garland across to the opposite hook and attach the right end loop.
- Let the main cord hang in a gentle curve.
- Check that the fourth house, with its green door, hangs near the center and lowest part of the curve.
- Turn any house that has twisted so its windows and colored door face forward.
If the curve is too deep, move the attachment points a little farther apart. If the garland looks too straight, bring them slightly closer together. You don't need to pull the string tight.
Decorate Around the Garland
For the Christmas look shown in the finished example, you can arrange wrapped presents and red ribbon bows on a table beneath the houses. A gold-framed mirror makes a pretty background, too.
Evergreen decorations and warm white LED lights can go nearby, but hang them independently. The paper garland cord is only intended to carry the seven lightweight houses.
A red-and-white striped table runner or a few kraft-paper packages would look lovely with the little gingerbread village. You already have plenty of color in those red and green doors, so you don't need to crowd the display with lots of extra ornaments.
Use It for a Christmas Baby Shower
For a Christmas baby shower, hang the garland above a dessert or favor table. You could use kraft gift bags and red ribbons beneath it to keep the decorations coordinated.
You'll find more ideas for a holiday party on my Christmas Baby Shower Ideas page.
Decoration note: This is a paper decoration, not a baby toy. Keep the houses, ribbon hangers, and main cord completely out of reach of babies and young children. Never hang the garland on a crib, bassinet, or other infant sleep space. Keep paper away from open flames, active fireplaces, hot lights, and candles. Use cool-running LED decorations at a suitable distance instead.
Gingerbread House Garland Colors and Decorating Variations
The red-and-green garland is the main project, but you can use the same house templates for other Christmas decorations. You won't need to change the house measurements or learn a different construction method.
Traditional Red and Green Gingerbread Village
For the version shown here, keep the brown kraft houses, ivory roofs, and alternating red and green doors. Hang them from red-and-white baker's twine.
This combination goes well with red ribbon, greenery, gold ornaments, and traditional Christmas decorations.
Pink Gingerbread House Garland
If you're decorating with pink Christmas colors, cut four doors from dusty pink cardstock and three from a darker rose color. Keep the brown houses and ivory roofs so they still look like little gingerbread cottages.
Pink-and-white baker's twine would work nicely in place of the red-and-white cord.
You can find more projects to go with that color scheme in my DIY Pink Christmas Decorations collection.
White and Gold Gingerbread Houses
For a simpler Christmas display, use ivory doors on the kraft houses and add a small gold paper circle above each door as an optional decoration.
You can keep the white icing dots and scalloped roofs exactly as they are. A plain ivory cord would be a nice alternative to the striped baker's twine.
Make Individual Gingerbread House Ornaments
You don't have to use all seven houses in one garland. Each finished house can also hang separately as a lightweight Christmas ornament.
Make the house using the same template and decorations. For an individual ornament, cut a 5-inch length of narrow ivory ribbon and fold it in half to form a hanging loop. Glue the bottom 1/2 inch of both ribbon ends to the back of the roof peak, then cover them with a small kraft-cardstock backing patch. Let the glue dry completely before hanging the ornament.
That's a good way to use a spare house if you decide to make a few extras.
Store the Garland for Another Christmas
When you're ready to put the decorations away, carefully remove the main cord from the hooks and lay the houses flat in a shallow box.
Place plain tissue paper between overlapping houses so the painted windows and scalloped roof pieces don't rub against one another.
Keep the box in a dry location. Don't stack heavy Christmas decorations on top of the paper houses.
With a little care, you can put the garland away without flattening the decorations or bending the roof corners.
Frequently Asked Questions About Gingerbread House Garlands
Can I make the gingerbread houses from cardboard instead of cardstock?
Yes, if the cardboard is thin enough to cut neatly. Lightweight cardboard from a clean cereal box may work, but you might want to cover the printed side with kraft paper. I'd skip thick corrugated cardboard for this version. It makes the little roof details harder to cut and adds unnecessary weight to the ribbon hangers.
What if my white paint pen doesn't show up well on kraft paper?
Try the pen on a scrap of the same cardstock first. Let the first white line dry before adding a second coat. You can also use white acrylic craft paint and a fine brush if you don't have an opaque paint pen.
Can I make larger gingerbread houses with the printable?
Yes, but the supplied template is designed for houses measuring 3 3/4 x 4 1/2 inches. If you enlarge it, enlarge the roof trims and door by the same percentage so the pieces still fit together. Make sure your printer can accommodate the larger pattern. You'll also need to increase the space between houses and use a longer garland cord.
What should I do if a ribbon hanger comes loose?
Take the house down and let the loose attachment come away without pulling on the cardstock. Replace the ribbon if it's damaged. Glue the ribbon ends back onto the center of the roof's underside, cover them with a fresh kraft-cardstock backing patch, and let the glue dry completely. Give the repaired hanger a gentle pull over the table before putting the decoration back up.
Can I make the garland without a cutting machine?
Absolutely. The full-size templates are meant to be traced and cut with ordinary paper scissors. You'll use craft glue to attach the decorations and ribbon hangers. There's no need for a hole punch, die-cutting machine, or electronic cutter.
Can I put the gingerbread house garland on my Christmas tree?
You can make smaller individual house ornaments for a Christmas tree, or drape the finished garland across branches that can support its weight. Keep the cardstock away from hot bulbs and use cool-running LED lights. Don't pull the cord tightly around branches or put strain on the glued ribbon tabs.
If you're looking for more handmade Christmas decorations, visit my DIY Christmas Garland collection. You'll find more ideas using fabric, felt, paper, and ribbon, including projects that work nicely with this little gingerbread village.
When you click on links to various merchants on this site and make a purchase, this may result in this site earning a commission. This does not affect the price you pay.

UBGI Gold Standard 2026
Reviewed under the site's
editorial checklist.
Photos, decorating ideas, party setups and reader submissions are shared for inspiration unless a page is specifically presented as a pattern, tutorial, reference guide or step-by-step project. Follow the instructions, measurements, safety guidance and manufacturer directions provided for the particular project or product.
About Jan | Contact | Baby Nursery Ideas (Blog) | Site Map | Privacy Policy | Disclosure Policy | Disclaimer | Affiliate Disclosure | Earnings Disclosure | Facebook | Pinterest
I am a participant in the Amazon Services LLC Associates Program, an affiliate advertising program designed to provide a means for us to earn fees by linking to Amazon. As an Amazon Associate I earn from qualifying purchases.
Copyright © 2006-2026. All Rights Reserved.