Folded Paper Christmas Star Garland: Easy DIY Christmas Decorations Tutorial
By Jan Bay
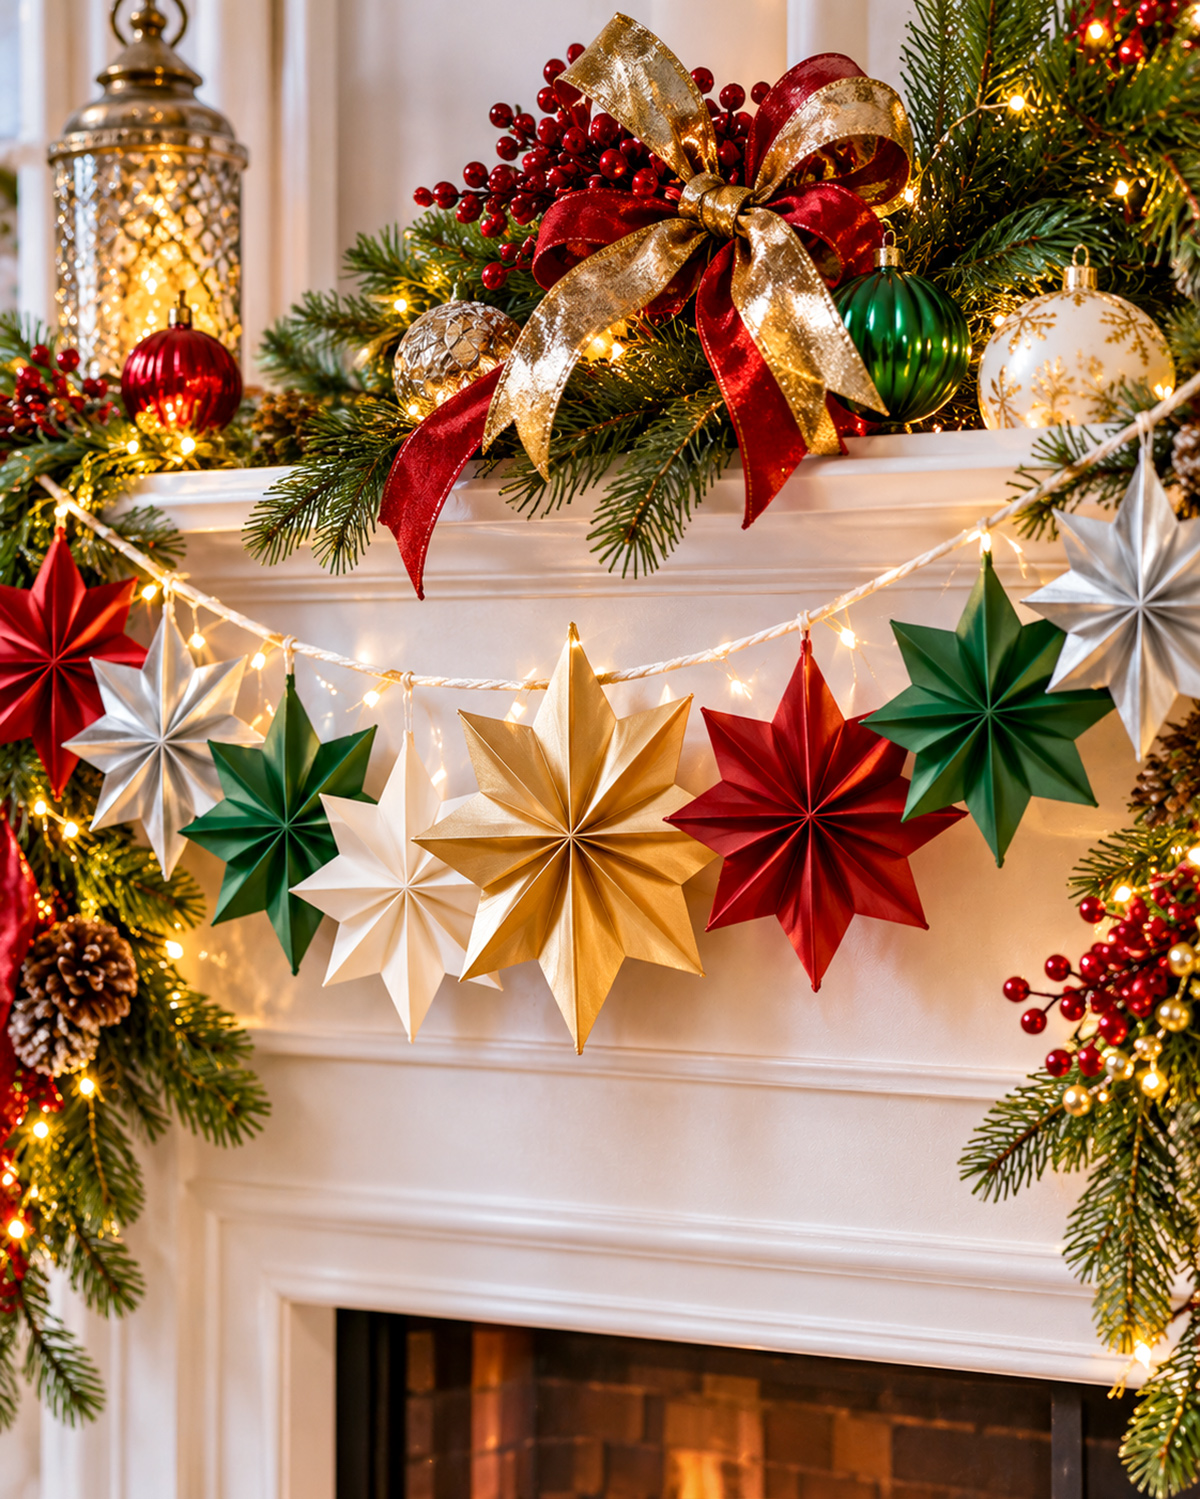
Make a Folded Paper Christmas Star Garland with a few sheets of pretty paper, some string, and a little folding. These dimensional paper stars look lovely hanging across a mantel, doorway, baby shower or Christmas party table. I'll show you how to make the folded stars, join them into a garland, and adjust the colors and length to fit your decorating plans. It's an inexpensive Christmas craft that you can make without special tools.
Explore More Handmade Christmas Decorations
DIY Pink Christmas Decorations
See Supplies for This Project Here.
Jump to the Folded Paper Christmas Star Garland Tutorial
Supplies for the Folded Paper Christmas Star Garland
You'll make seven dimensional paper stars for this garland. Each star has eight points, and the folds give it that pretty raised shape you see in the finished Christmas decoration.
I'd make a mix of red, green, gold, silver, and ivory stars rather than using just one color. You can arrange them any way you like, but repeating a few colors will help everything look as though it belongs together.
Finished measurements:
- Individual star: Approximately 5 1/2 inches across from point to point.
- Number of stars: Seven, with eight points on each star.
- Garland cord: 7 feet long, including extra cord for hanging.
- Star spacing: Approximately 8 inches from the center of one star to the next.
- Finished display: Allow about 4 to 5 feet across, depending on how much you let the cord dip.
- Skill level: Beginner to confident beginner.
- Estimated working time: Approximately 1 1/2 to 2 1/2 hours, depending on your folding speed and glue drying time.
Materials You'll Need
- 14 squares of lightweight craft paper, each measuring 4 x 4 inches
- Red, dark green, metallic gold, metallic silver, and ivory paper
- 7 feet of cotton cord or narrow decorative Christmas ribbon
- Scissors
- Ruler
- Pencil
- Glue suitable for paper crafts
- Small binder clips or paper clips for holding glued folds
- Bone folder or the smooth edge of a ruler for making crisp creases
- Small pieces of matching paper for reinforcing the hanging loops
- Optional low-heat glue gun for attaching the hanging loops, with adult handling
Paper choice: Lightweight paper is easier to fold than thick cardstock. Choose paper that holds a crease without cracking. Metallic paper with a paper backing is a good option, but test one fold before cutting all your pieces.
You'll need two matching squares for each finished star. That means 14 paper squares for the seven-star garland.
Keep the decoration itself lightweight. You'll have an easier time hanging it, and the stars won't pull the cord down as much.
Choose and Cut Paper for Your Christmas Stars
Before you start folding, decide where the finished garland will hang. If you're decorating a Christmas mantel, I'd use the red, green, silver, and gold papers together, with an ivory star or two to lighten the arrangement.
There's no need to buy expensive paper. What matters more is that the paper folds neatly and keeps its shape.
Cut the Paper Squares
- Place your paper on a flat cutting surface.
- Measure and mark a 4 x 4-inch square.
- Cut along the marked lines, keeping the corners square.
- Cut a second square exactly the same size and color.
- Repeat until you have seven matching pairs, making 14 squares altogether.
Cutting checkpoint: Each pair should contain two identical 4-inch squares. If one is larger than the other, trim it now. Matching pieces make the finished star easier to assemble.
A Christmas Color Arrangement
For a seven-star garland, you could use this combination:
- 2 metallic silver stars
- 2 Christmas red stars
- 1 metallic gold star
- 1 dark evergreen green star
- 1 ivory star
Arrange them in this order: silver, red, green, ivory, gold, red, silver. That gives you a little variety without making the garland look too busy.
If your Christmas tree has mostly gold decorations, you can replace one of the silver stars with another gold one. Or use more silver if that's what you already have.
Before folding: Make one test star from ordinary paper. Once you're satisfied with the folds, use your good metallic and colored papers for the finished set.
How to Make Folded Paper Christmas Stars
Now for the folding. Each finished Christmas star is made from two matching pieces of paper. You'll fold four raised points into each piece, then join the two pieces together to make an eight-pointed star.
Make the first star from plain paper if you haven't tried this type of folding before. Once you've made one, the remaining stars use the same steps.
Step 1. Fold the First Paper Square
- Lay one 4 x 4-inch paper square on your table with the decorative side facing down.
- Fold the square in half from left to right. Crease firmly, then open it again.
- Fold the paper in half from top to bottom. Crease and reopen.
- Turn the paper over.
- Fold one corner diagonally to the opposite corner. Crease and reopen.
- Fold the other two opposite corners together. Crease and reopen.
- Turn the paper back over so the decorative side faces down again.
You should now see four crease lines crossing at the center of the square: one vertical, one horizontal, and two diagonal.
Folding checkpoint: The creases should meet at the center, 2 inches from each straight edge. Your square should still lie flat when opened.
Step 2. Cut the Four Straight Creases
- Find the center of the top edge of the square.
- Measure 7/8 inch inward along the vertical crease and make a small pencil mark.
- Cut from the top edge toward the center, stopping at the mark.
- Make the same 7/8-inch cut from the bottom edge along the vertical crease.
- Repeat on the left and right edges along the horizontal crease.
You should have four short cuts, one at the middle of each straight side. Do not cut along the diagonal creases.
Cutting checkpoint: There should be four cuts, each measuring 7/8 inch. The center of the square must remain intact.
Step 3. Fold the Four Raised Star Points
Look at one corner of your paper. The two short cuts on either side have made a pair of little flaps. You'll fold these toward the diagonal crease to shape the first point.
- Keep the decorative side of the paper facing down.
- Start with the upper-left corner of the square. The diagonal crease runs from this corner toward the center of the paper.
- Take the section of the top edge between the upper-left corner and the cut at the middle of the top edge. Fold it inward so that edge lines up with the diagonal crease.
- Now take the section of the left edge between the upper-left corner and the cut at the middle of the left edge. Fold it inward toward the same diagonal crease. The two folded sections form a pointed shape.
- Rotate the paper 90 degrees and repeat these two folds at the next corner.
- Continue until all four corners have matching pointed folds. Leave the folded flaps loose until the gluing step.
At this stage, the paper should have four pointed corners with two overlapping flaps available to shape each point.
Step 4. Glue the Points Into Shape
- Lift the two folded flaps forming the first star point.
- Place a thin line of paper glue on the decorative face of one flap where the other flap will overlap it.
- Bring the second flap across the first, overlapping just enough to hold the raised, three-dimensional shape.
- Press the glued area together. Use a paper clip to hold the join if needed.
- Repeat for the remaining three points.
- Allow the glue to set before handling the piece again.
Don't flatten the points while gluing. The little raised ridges are what give the star its dimensional appearance.
Shape checkpoint: You now have one four-pointed paper star with raised, folded points. Each point should extend toward one of the original square's corners.
Step 5. Make the Second Star Layer
- Take the second matching 4 x 4-inch paper square.
- Repeat Steps 1 through 4, using the same 7/8-inch cuts and folding method.
- Check that all four points are similar in size and height.
- Allow the glue to set.
You should now have two separate four-pointed stars in the same color.
Step 6. Join the Layers Into an Eight-Pointed Star
- Place the first folded star on your table with its raised points facing up.
- Turn the second star so its four points sit halfway between the four points of the first star. The second layer will be rotated approximately 45 degrees.
- Check the arrangement from above. You should see eight pointed tips arranged around the center.
- Apply a small amount of glue to the center contact area between the two layers.
- Press the layers together at the center only, leaving the raised points free.
- Hold the center in position until the glue has set.
That's your first finished paper Christmas star!
Finished-star checkpoint: Count eight visible points, four from each layer. The star should measure approximately 5 1/2 inches across, with the exact measurement depending on the angle and height of your folded points.
Make the other six stars in the same way. Lay all seven on your table before you start putting the garland together.
Assemble Your Folded Paper Christmas Star Garland
Once all seven stars are finished, lay them out in the order you want them to hang. I like to arrange everything on the table first rather than start tying stars onto the cord and then decide I want the colors in a different order.
Remember, the finished garland doesn't need every star to be exactly the same distance from the floor. The cord can dip gently between the ends. That's part of what makes it look pretty hanging across a mantel.
Step 1. Prepare the Hanging Cord
- Cut a 7-foot length of cotton cord or decorative ribbon.
- Lay it out across your work surface.
- Measure 18 inches from one end and mark the cord lightly with a small removable piece of tape.
- Make six additional marks, each 8 inches apart.
- Check that you have seven star positions, with approximately 18 inches of cord remaining beyond the last mark.
The extra cord at both ends gives you room to hang and adjust the garland. You can trim it after you've decided where it will go.
Step 2. Make the Paper Hanging Loops
Rather than punching holes through the decorative star points, make little hanging loops that attach behind the stars. That way, the folded points stay intact.
- Cut seven strips of lightweight paper, each measuring 1/2 inch wide and 2 1/2 inches long.
- Fold each strip in half to make a small loop, with the decorative side facing outward.
- Overlap the two loose ends by approximately 1/2 inch.
- Glue the overlapped ends together, leaving the folded end open for the hanging cord.
- Allow the glue to set.
You'll have seven small paper loops, one for each star.
Step 3. Attach the Loops Behind the Stars
- Turn the first star face down on your work surface. Support its raised points so you don't crush them.
- Position a paper loop at the back of one upper point, with the closed loop extending approximately 1/2 inch beyond the star.
- Place the joined ends of the loop against a flat section of the back of the star.
- Glue the ends in place.
- Cut a small matching paper patch, approximately 3/4 inch square, and glue it over the attached ends of the loop to reinforce the join.
- Repeat for the remaining six stars.
- Let all the glued attachments dry completely before hanging the stars.
Attachment checkpoint: Hold each star by its loop over the table for a few seconds. The loop should remain firmly attached without pulling the folded star layers apart. If the glue loosens, reinforce the attachment and allow it to dry again.
Step 4. String the Seven Christmas Stars
- Thread the garland cord through the hanging loop on the first star.
- Slide the star to the first marked position on the cord.
- Tie a small overhand knot in the cord directly above the loop, or add a second small knot on the opposite side to prevent the loop from sliding.
- Thread the second star onto the cord and position it at the next mark.
- Continue until all seven stars are attached.
- Lay the finished garland out and check the spacing.
- Adjust any stars that have shifted before hanging the garland.
Assembly checkpoint: You should have seven stars spaced approximately 8 inches apart along the cord, with enough extra cord at each end for hanging.
Take a look at the colors before you put the garland up. If two similar colors ended up next to each other and you don't like the arrangement, it's easier to change them now.
How to Hang and Display Your Paper Star Garland
These folded paper stars make a pretty decoration on their own, but they really come to life when they're surrounded by Christmas greenery, ornaments, and lights.
For a mantel display, I'd hang the star garland just below the mantel edge, with a full evergreen garland resting along the top. That gives you two separate layers of decoration without hiding all the paper stars.
Hang the Garland Across a Mantel
- Choose two secure hanging points near the outer ends of the mantel.
- Attach hooks suitable for the surface and the weight of your decorations, following the manufacturer's instructions.
- Tie one end of the garland cord to the first hook.
- Bring the cord across the mantel and attach the opposite end to the second hook.
- Adjust the cord until it forms a gentle curve.
- Check that every star hangs freely and faces forward.
- Trim any excess cord after the arrangement is finished.
Try to keep the paper stars a little below the evergreen decorations rather than pressing them into the branches. You'll see more of the folding that way.
Add Christmas Greenery and Ornaments
If you want the full Christmas look shown in the finished example image, add a few decorations around the garland:
- Evergreen garland across the mantel
- Red berry picks tucked into the greenery
- Gold or silver ribbon bows
- Lightweight Christmas ornaments among the greenery
- Frosted pinecones
- Warm white battery-operated LED fairy lights
Keep the heavier decorations on the mantel or on their own secure supports. The paper-star cord is intended to carry the stars, not glass ornaments, large bows, or evergreen branches.
Important: Keep paper decorations away from open flames, candles, hot bulbs, fireplace openings, and other heat sources. For a working fireplace, choose another location well away from heat and sparks. Use only cool-running LED lights and follow their manufacturer's placement instructions.
Other Places to Display the Garland
You can also hang the stars along a Christmas party table, across a window, or on a wall above a holiday dessert display. A garland made with red and silver stars would look especially nice with traditional Christmas decorations.
If you're decorating for a Christmas baby shower, you can use the same folding method with colors that match your party decorations.
Keep hanging cords and paper decorations well out of children's reach, especially around cribs, bassinets, and other sleeping areas.
Folded Paper Christmas Star Garland Color and Decorating Ideas
You don't need a different tutorial every time you want a new color scheme. Once you've made one set of stars, you can use the same folds for several different Christmas looks.
Traditional Red, Green, Gold, and Silver
For traditional Christmas decorating, use deep red, evergreen green, metallic gold, and bright silver. Add ivory if you want another color between the darker stars.
This combination looks especially festive with evergreen branches, red berries, gold ribbon, and warm Christmas lights.
Elegant Gold and Ivory Christmas Stars
Gold and ivory paper stars are a good choice if your Christmas decorations already include champagne ribbon, pearl ornaments, or warm white lights.
I'd choose a mixture of matte ivory and metallic gold paper. You don't need glitter on every piece. The raised folds are decorative enough on their own.
Silver and White Winter Christmas Garland
For a winter look, alternate metallic silver stars with white or ivory ones. Hang them against a darker background so the pale colors don't disappear.
White snowflakes or silver ornaments can be arranged nearby, but keep them separate from the paper-star cord.
Pink and Silver Christmas Stars
If you're using pink Christmas decorations, try dusty rose, pale pink, silver, and ivory paper. You can make the stars exactly the same way, then arrange them with your other handmade decorations.
You'll find more projects to go with them in my DIY Pink Christmas Decorations collection.
Make Smaller or Larger Paper Stars
You can change the finished size by changing the starting paper squares. Keep both squares the same size for each star.
- Smaller stars: Try two 3 x 3-inch squares per star. Begin with cuts approximately 5/8 inch deep.
- Standard stars: Use the 4 x 4-inch squares and 7/8-inch cuts from this tutorial.
- Larger stars: Try two 6 x 6-inch squares per star, with cuts approximately 1 5/16 inches deep.
These are proportional starting measurements, not physically tested finished sizes. Make one sample before cutting a complete batch. Larger stars may need firmer paper and stronger hanging-loop attachments.
If you're making a long garland, I would keep the stars fairly close in size. A few larger ones mixed with smaller ones can look pretty, but too many different sizes may make the cord hang unevenly.
Tips for Making Neat Folded Paper Christmas Stars
Paper stars aren't difficult, but a few small things can make a big difference in how the finished garland looks. Most problems come from uneven cutting, paper that's too thick, or trying to glue the folds before they're lined up.
Keep the Paper Squares the Same Size
Measure the first square carefully and use it as a guide for the others. If your two layers don't match, the points may sit at different angles.
Make Sharp Creases
Run your fingernail or a bone folder along each crease. Crisp folds make the raised star points easier to shape.
If you're using metallic paper, fold a scrap first. Some coated papers crack along the crease, especially when the decorative coating is thick. If that happens, choose a lighter paper or crease it more gently.
Use Small Amounts of Glue
A thin line of glue is enough for most of the folded flaps. Too much glue can soak into the paper, leave marks, or make the points lose their shape.
Hold each glued section in place until it stays together without slipping. If necessary, use a small clip while the glue sets.
Check the Star Before Adding the Hanging Loop
Lay the finished star on your table and look at it from above. You should see eight points, with the second layer positioned between the points of the first.
If one point looks out of place, check whether a folded flap has opened or the two layers shifted while the glue was wet. Fix it before attaching the loop.
Keep the Finished Stars Flat Enough for Storage
Don't press the raised folds completely flat. Instead, place the stars in a shallow box with enough space around them to keep their points from bending.
Keep them dry and away from direct sunlight when they're not being displayed. Metallic coatings and colored papers can change appearance with prolonged exposure to light and moisture.
If you're interested in other paper-folding methods, the Brandywine Museum of Art's folded paper star tutorial shows another way to build handmade stars from folded paper.
Frequently Asked Questions About Folded Paper Christmas Star Garlands
What kind of paper is best for folded Christmas stars?
Lightweight craft paper or sturdy colored paper is a good place to start. The paper needs to hold a crease without becoming difficult to fold. Metallic paper is fine too, provided it has a flexible paper backing.
Can I use regular printer paper?
Yes. Regular printer paper is good for practicing the folds. You can also use it for the finished stars if you prefer plain white Christmas decorations. Colored craft paper gives you more decorating options.
How many paper stars do I need for a Christmas garland?
This tutorial uses seven stars, spaced approximately 8 inches apart along a 7-foot cord. For a longer garland, add more stars and extend the cord. Keep enough extra length at both ends for hanging.
How do I keep the paper stars from sliding along the cord?
Use small knots on the cord to hold the hanging loops in place. You can also tie the loops individually to the cord if you prefer. Check that the loops are firmly attached before hanging the garland.
Can I make the stars without glue?
The raised points in this version need their folded flaps joined together. Paper glue is the simplest choice. You could experiment with double-sided craft tape, but you'll need to check that it holds the raised folds firmly. The finished layers also need to be secured at their centers.
Can I use these folded stars as Christmas ornaments?
Yes. Make one star, attach a hanging loop behind it, and hang it on a Christmas tree branch that can support it. You can also make smaller stars using the proportional measurements in the color variations section.
How should I store my paper star garland after Christmas?
Remove the garland carefully and lay the stars in a shallow storage box. Don't stack heavy decorations on top of them. Store the box somewhere dry so the paper and glued folds keep their shape.
Once you've made your stars, you can try another handmade decoration from my DIY Christmas Garland collection. There are plenty of ways to mix paper, fabric, ribbon, and other Christmas crafts into your holiday decorating.
When you click on links to various merchants on this site and make a purchase, this may result in this site earning a commission. This does not affect the price you pay.

UBGI Gold Standard 2026
Reviewed under the site's
editorial checklist.
Photos, decorating ideas, party setups and reader submissions are shared for inspiration unless a page is specifically presented as a pattern, tutorial, reference guide or step-by-step project. Follow the instructions, measurements, safety guidance and manufacturer directions provided for the particular project or product.
About Jan | Contact | Baby Nursery Ideas (Blog) | Site Map | Privacy Policy | Disclosure Policy | Disclaimer | Affiliate Disclosure | Earnings Disclosure | Facebook | Pinterest
I am a participant in the Amazon Services LLC Associates Program, an affiliate advertising program designed to provide a means for us to earn fees by linking to Amazon. As an Amazon Associate I earn from qualifying purchases.
Copyright © 2006-2026. All Rights Reserved.