Free Crochet Wreath Ornament Pattern with Baby's First Christmas Option
By Jan Bay
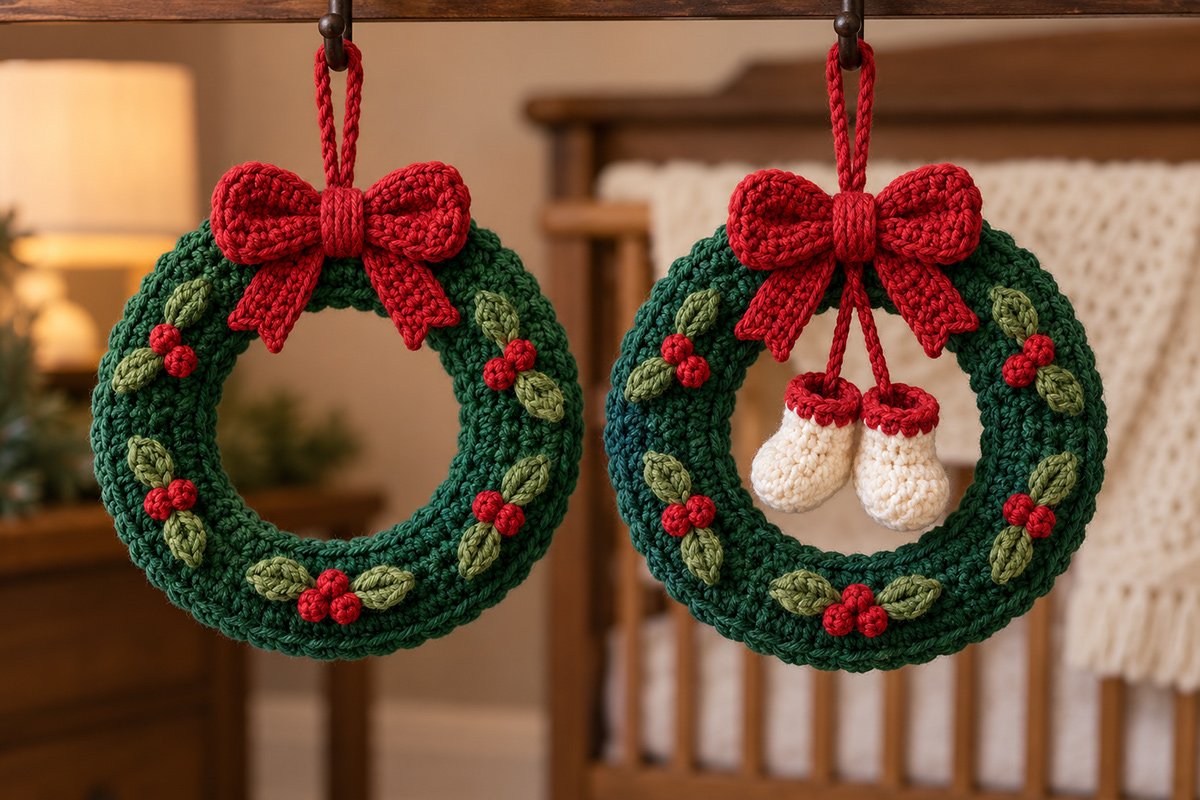
This free crochet wreath ornament pattern gives you two ways to make a little Christmas keepsake. Make a traditional evergreen wreath with a pretty red bow, or turn it into a baby's first Christmas ornament with a pair of tiny crocheted baby booties dangling inside the wreath. Both versions use the same wreath base, so you can make matching ornaments for the Christmas tree, a special baby gift, or a family keepsake collection.
More Crochet Christmas Ornaments and Keepsakes
Free Crochet Santa Ornament Pattern
Free Crochet Angel Ornament Pattern
See Supplies for This Project Here.
On This Page
Free Crochet Wreath Ornament Pattern: Materials and Supplies
You won't need a whole shopping cart of yarn for these little wreaths. Four Christmas colors, a crochet hook, and a bit of stuffing will take care of most of it. The classic wreath uses three colors, and you'll add ivory for the baby booties version.
Yarn: DK or light worsted weight yarn, category 3. The amounts below are estimates for one ornament, not measured yarn consumption.
- Evergreen: approximately 40–60 yards for the wreath.
- Olive green: approximately 8–12 yards for the holly leaves.
- Cranberry red: approximately 12–20 yards for the bow, berries, and hanging loop.
- Ivory: approximately 8–12 yards for the two miniature baby booties, if making the baby's first Christmas version.
Other supplies:
- 3.25 mm crochet hook, or the size needed to obtain the intended gauge.
- Small amount of polyester fiberfill.
- Yarn needle for sewing pieces together.
- Stitch markers.
- Scissors.
- Measuring tape.
Choose yarn with enough stitch definition to show the little leaves and textured bow. A smooth cotton or cotton-blend yarn would be a sensible choice. Very fuzzy yarn can hide the small details, and that's half the charm of this ornament.
You don't need a purchased wreath ring for this construction. The two crocheted wreath panels are sewn together and lightly padded to hold their rounded shape.
Stitches, Abbreviations and Pattern Notes
This pattern uses US crochet terminology. The wreath is worked in rounds, while the bow is worked in rows. The miniature booties are made separately and attached only after the wreath is decorated.
- Ch: Chain.
- Sc: Single crochet.
- Hdc: Half double crochet.
- Dc: Double crochet.
- Sl st: Slip stitch.
- Inc: Work 2 sc in the same stitch.
- Sc2tog: Single crochet two stitches together.
- BLO: Work in the back loop only.
- MR: Magic ring.
- St(s): Stitch or stitches.
- Rnd: Round.
If you need a refresher on the stitch abbreviations, the Craft Yarn Council's crochet abbreviation guide is a useful reference.
Gauge and Finished Size
Proposed gauge: Approximately 22 sc and 24 rows over 4 inches, worked firmly with the yarn and hook specified above.
Expected wreath size: Approximately 5 1/2–6 inches across, with an opening approximately 3 1/2 inches wide before decorating.
Expected miniature bootie size: Approximately 1–1 1/4 inches long, depending on yarn and tension.
These measurements are calculated construction targets rather than measurements taken from a completed sample. Check your gauge before making the wreath. The opening needs to be large enough for both miniature booties to hang without touching the lower edge.
Work the wreath panels in continuous rounds unless otherwise stated. Move your stitch marker at the beginning of each round. The joining slip stitch in the foundation chain and the turning chains in the bow do not count as stitches.
Crochet the Evergreen Wreath Base
Start with the wreath itself. You'll make two matching rings, join them around the inner and outer edges, and add just enough stuffing to give the wreath some body. Don't pack it tightly. You're making a Christmas ornament, not a little green doughnut that's about to burst.
Front Wreath Panel
With evergreen yarn, ch 60. Join with a sl st in the first chain, taking care not to twist the chain. The chain used for the slip-stitch join is also the first foundation chain you will work into.
Rnd 1: Work 1 sc in the same first chain used for the slip-stitch join, then work 1 sc in each of the remaining 59 chains. Place a stitch marker in the first sc. Continue in rounds without joining. (60 sts)
Rnd 2: [Sc in next 9 sts, inc in next st] 6 times. (66 sts)
Rnd 3: [Sc in next 5 sts, inc in next st, sc in next 5 sts] 6 times. (72 sts)
Rnd 4: Working in BLO, [sc in next 11 sts, inc in next st] 6 times. (78 sts)
Rnd 5: [Sc in next 6 sts, inc in next st, sc in next 6 sts] 6 times. (84 sts)
Rnd 6: Working in BLO, [sc in next 13 sts, inc in next st] 6 times. (90 sts)
Rnd 7: [Sc in next 7 sts, inc in next st, sc in next 7 sts] 6 times. (96 sts)
Sl st into the next stitch to finish. Fasten off, leaving a long tail for joining the panels.
Size checkpoint: At the proposed gauge, the first panel should measure approximately 5 1/2 inches across the outside and 3 1/2 inches across the center opening before stuffing. These are calculated targets. If your panel is substantially smaller or larger, adjust your hook or yarn before making the backing panel. Both panels need to match in stitch count and finished diameter.
The back-loop rounds add subtle raised ridges to the front of the wreath. Keep the panel flat while working and spread out the increases evenly. The increasing stitch counts are what give you a circular ring rather than a narrow crocheted strip.
Back Wreath Panel
Make a second wreath panel using the same foundation chain and seven-round stitch-count sequence.
For this panel, work every round through both loops. Do not use BLO on Rounds 4 and 6. The backing doesn't need the extra texture.
Fasten off and weave in the beginning yarn tail, leaving enough yarn at the outer edge for sewing if needed.
Join and Lightly Stuff the Wreath
Place the two panels together with wrong sides facing. Match the inner foundation-chain edges first. Using evergreen yarn and a yarn needle, sew the unused foundation-chain loops together around the complete inner circle.
Next, match the 96 outer-edge stitches of the two panels. Whipstitch through corresponding outer-edge stitches, working around the circle and leaving an opening of approximately 2–3 inches.
Add a small amount of polyester fiberfill through the opening. Spread it evenly between the two panels so the wreath has a gently rounded front and back. Keep the center opening clear and the ring width consistent.
Before closing the remaining opening, lay the wreath flat and check its shape. If one section looks fuller than the others, redistribute the stuffing through the opening until the ring has an even thickness. Keep the center opening round and free of stuffing.
Close the remaining outer seam and weave the yarn tail securely into the backing. The finished wreath should have a smooth circular outline with no hard lumps.
Set the finished base aside while you make the decorations.
Crochet the Holly Leaves and Red Berries
Each wreath has five little groups of greenery and berries. Every group gets two olive-green leaves and three red berries. That gives you ten leaves and fifteen berries for one wreath.
The decoration is spaced around the ring, leaving the top center open for the large cranberry bow. You don't need extra leaves tucked into every spare inch. Five evenly arranged clusters give the wreath the same look as the finished example.
Small Olive-Green Leaves
Make 10 leaves for each wreath.
With olive-green yarn, ch 7.
Leaf: Sl st in the second ch from hook, sc in next ch, hdc in next ch, dc in next ch, hdc in next ch, sc in last ch. (6 sts)
Turn the work clockwise and continue along the unused loops on the opposite side of the foundation chain.
Sc in the same end chain, hdc in next ch, dc in next ch, hdc in next ch, sc in next ch, sl st in last ch. (6 additional sts)
Join with a sl st to the beginning of the leaf. Fasten off and weave in the finishing tail, leaving the beginning tail available for sewing the base of the leaf to the wreath.
The leaf should have a narrow point at each end and a slightly fuller middle. Gently shape it with your fingers if necessary.
Make the remaining nine leaves in the same way.
Little Cranberry Berries
Make 15 berries for each wreath.
With cranberry yarn, make a magic ring.
Rnd 1: Work 4 sc in the ring. Pull the ring closed. (4 sts)
Rnd 2: Sc in each stitch around. (4 sts)
Fasten off, leaving a sewing tail. Thread the tail through the front loops of the four stitches in the last round and pull the opening closed. This produces a tiny raised berry. Keep the closing side underneath when sewing it to the wreath.
Repeat until you have fifteen berries.
Arrange the Five Berry Clusters
Lay the wreath in front of you with the future bow position at 12 o'clock.
Position five clusters around the ring at approximately 2, 4, 6, 8, and 10 o'clock. Leave the area at 12 o'clock undecorated for the bow.
For each cluster, place two leaves at slight angles, with their pointed tips directed away from the three berries. Arrange the berries in a small triangle at the meeting point of the leaves.
At the bottom of the wreath, turn the two leaves outward to the left and right and place the berries between them. On the sides, let the leaves follow the curve of the wreath rather than sticking straight out.
Once you're satisfied with the spacing, sew each leaf near its base and secure the berries over the meeting point. Make a few small anchoring stitches through the underside of each leaf so it doesn't curl completely away from the wreath.
Don't sew across the entire surface of a leaf. A little raised texture is part of the finished look.
Make the Large Crochet Christmas Bow
That cranberry bow gives the wreath its Christmas look, so don't make it too small. It should sit comfortably across the top of the ring, with two broad loops, a narrow center wrap, and two tapered tails hanging toward the opening.
Bow Loops
With cranberry yarn, ch 16.
Row 1: Sc in second ch from hook and in each ch across. (15 sts)
Rows 2–8: Ch 1, turn. Sc in each stitch across. (15 sts)
Fasten off and weave in the yarn tails.
Lay the rectangle horizontally with the right side facing you. Bring the upper and lower long edges together at the center and pinch the middle into several small folds, leaving the outer ends full and rounded. Curve the upper and lower edges of each outer end slightly backward to give the two bow loops the softly cupped shape shown in the finished ornament. If the curved edges won't hold their shape, secure them with one or two small stitches on the underside using matching cranberry yarn. Keep the outer ends open and rounded rather than flattening or closing them.
Wrap a short length of cranberry yarn tightly around the pinched middle several times. Knot securely on the back, taking care not to crush the outer loops.
Bow Tails
Make 2.
With cranberry yarn, ch 5.
Row 1: Sc in second ch from hook and in each remaining ch. (4 sts)
Rows 2–6: Ch 1, turn. Sc in each stitch across. (4 sts)
Row 7: Ch 1, turn. Sc2tog twice. (2 sts)
Row 8: Ch 1, turn. Sc2tog. (1 st)
Fasten off, leaving a sewing tail.
The final decreases give each tail a pointed end. Make both tails the same length.
Bow Center Band
With cranberry yarn, ch 3.
Row 1: Sc in second ch from hook and next ch. (2 sts)
Rows 2–11: Ch 1, turn. Sc in each stitch across. (2 sts)
Fasten off, leaving a long sewing tail.
Put the Bow Together
Place the two tails behind the gathered bow, angling one down toward the left and the other toward the right. Sew their wide upper ends to the underside of the bow's gathered center.
Wrap the narrow center band around the middle of the bow, covering the gathering yarn and the upper ends of both tails. Sew the ends of the band together on the back.
Shape the two loops with your fingers until they're reasonably even. The bow should have some dimension rather than lying completely flat.
Set it aside until you're ready to assemble the ornament.
Crochet the Miniature Baby Booties
Here's the extra little detail that turns the wreath into a baby's first Christmas keepsake. You'll make two tiny ivory booties with cranberry cuffs and hang them side by side beneath the bow.
These aren't regular baby booties made smaller by switching hooks. They're miniature decorative booties designed specifically for this ornament. Each one has an oval sole, a rounded toe, and a short ankle opening.
Make two matching booties.
Ivory Bootie Sole
With ivory yarn, ch 5.
Rnd 1: Work 2 sc in second ch from hook, sc in each of next 2 ch, and 4 sc in last ch. Continue around the opposite side of the foundation chain. Sc in each of next 2 ch, then work 2 sc in the same foundation chain that holds the beginning 2 sc. (12 sts)
Place a marker in the first stitch. Do not join. Continue working in rounds.
Rnd 2: [Sc in next st, inc in next st] 6 times. (18 sts)
The sole should now be a small oval. The end where you worked 4 sc into the last foundation chain in Round 1 is the toe. The opposite end, where you began Round 1, is the heel. Keep these ends identified as you work. The four decreases in Round 5 must be centered across the toe end, leaving the heel unshaped.
Shape the Foot and Ankle
Rnd 3: Working in BLO, sc in each stitch around. (18 sts)
Rnd 4: Sc in each stitch around. (18 sts)
Rnd 5: Sc in next 5 sts, sc2tog 4 times, sc in remaining 5 sts. (14 sts)
The four decreases are worked across the rounded toe. They pull the front of the bootie inward while leaving the heel higher and fuller.
Rnd 6: Sc in each stitch around. (14 sts)
Fasten off the ivory yarn, leaving the top open. If necessary, add a very small wisp of polyester stuffing inside the toe to maintain its rounded shape. Keep the ankle opening free of stuffing.
Cranberry Bootie Cuff
Join cranberry yarn at the back of the ankle opening.
Rnd 7: Sc in each stitch around. (14 sts)
Rnd 8: Hdc in each stitch around, working a second hdc in stitches 3, 7, 10, and 14. Join with a sl st to the first hdc. (18 sts)
Fasten off and weave in the tail securely.
The four extra half double crochets give the cranberry cuff a gentle flare above the ivory bootie. Shape the edge with your fingers so it stays open and slightly wavy rather than folding down over the ankle.
Make the second bootie using the same instructions.
Check the Bootie Pair
Set the two finished booties next to each other with their cuffs at the top and the toes pointing slightly outward.
The pair should fit comfortably within the wreath's center opening, with room beneath them for the lower green edge of the wreath to remain visible.
If your booties are too large for the opening, check that you used the intended yarn weight and hook size. Don't force the booties into the space or stretch the wreath to make them fit.
Assemble the Classic Crochet Wreath Ornament
Now you can put the traditional Christmas wreath together. You've already made its decorations, so most of the work is finished.
Place the large cranberry bow at the top center of the wreath, directly above the opening. The two loops should spread across the upper green ring, while the pointed tails angle downward into the opening.
Using a yarn needle and matching cranberry yarn, sew the bow securely to the wreath through the back of its center band. Add small anchoring stitches beneath each bow loop if necessary, keeping them hidden from the front.
Check the five leaf-and-berry clusters and adjust any leaves that became flattened while you handled the wreath.
That's your classic ornament. It doesn't need any extra decoration in the middle.
The open center and the five evenly spaced berry clusters are what distinguish this version from the baby's first Christmas keepsake.
Assemble the Baby's First Christmas Wreath Ornament
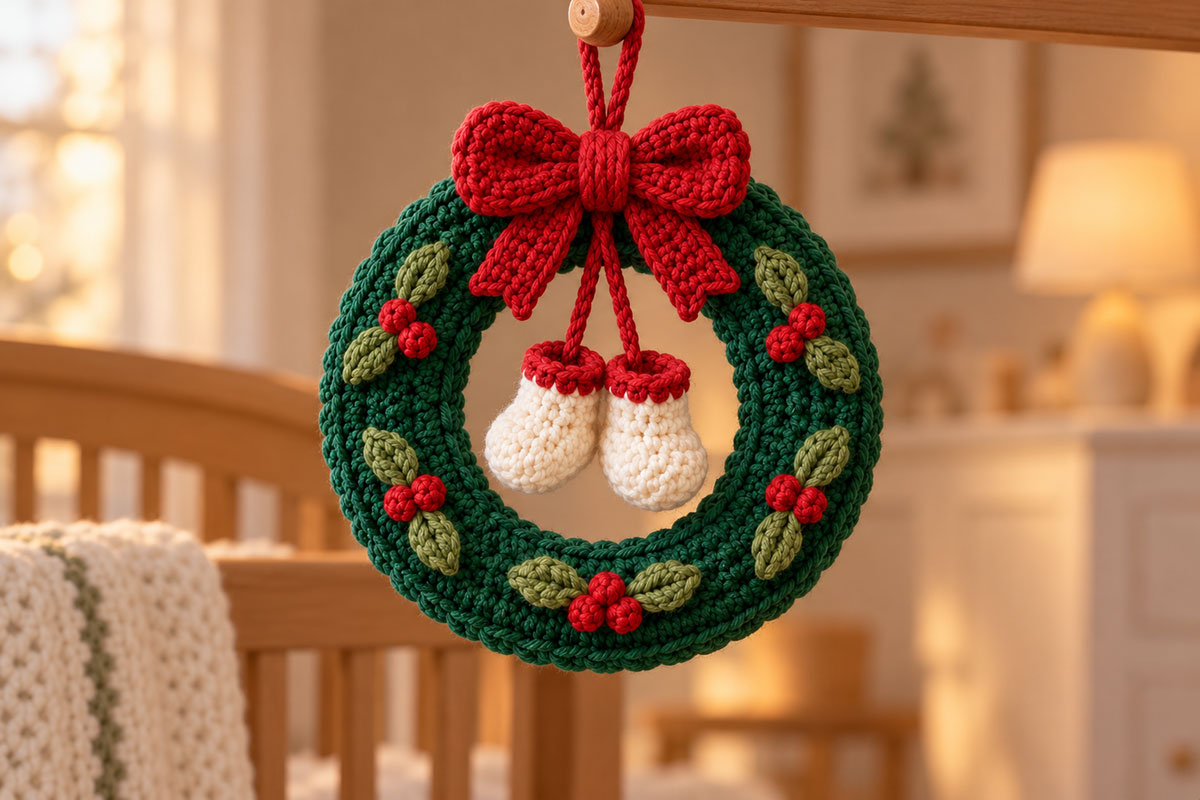
The baby's first Christmas version begins with the same decorated wreath. The difference is the little pair of booties hanging beneath the bow, right in the middle of the opening.
Use the two miniature booties you made earlier, along with two matching cranberry suspension cords.
Make the Bootie Suspension Cords
Make 2.
Leaving a 6-inch beginning tail for sewing, ch 8 with cranberry yarn.
Sl st in second ch from hook and in each remaining ch across. (7 sl sts)
Fasten off, leaving another 6-inch sewing tail. You'll use one tail to attach the cord to the bootie cuff and the other to secure it beneath the wreath's bow.
These short cords are intended to measure approximately 1 inch at the proposed gauge. Measure yours before attaching them, since chain tension can change their length.
Attach the Booties
Sew one end of a cranberry cord securely to the inside back of each bootie cuff. Pass the needle through several stitches of the cuff and upper ivory section so the cord doesn't pull loose.
Position the booties side by side, with a small space between the cuffs. Angle the toes slightly outward so both miniature shoes remain recognizable from the front.
Bring the upper ends of the two cords together beneath the center of the large bow. Stitch them securely through the wreath's upper inner edge and the back of the bow center.
Let the booties hang freely near the center of the wreath opening, with their cuffs side by side and their toes pointing slightly outward. Keep both booties clear of the lower green edge of the wreath so they hang naturally without resting against it.
Before securing the final stitches, hold the wreath upright at its top edge at 12 o'clock, where the hanging loop will be attached later. Check that both booties face forward, the cords are close in length, and neither bootie touches the lower wreath edge.
If you need to shorten a cord, adjust its upper attachment beneath the bow rather than pulling the bootie cuff out of shape.
Once everything hangs correctly, knot and weave the cord ends into the back of the wreath.
Make the Hanging Loop and Finish the Ornaments
Both wreath versions use the same cranberry hanging loop. Keep it centered behind the bow so the ornament hangs straight.
Crochet Hanging Loop
Leaving a 6-inch beginning tail for sewing, ch 24 with cranberry yarn.
Sl st in second ch from hook and in each remaining chain across. (23 sl sts)
Fasten off, leaving a second 6-inch sewing tail. Use both tails to secure the folded hanging loop to the upper back edge of the wreath.
Fold the crocheted cord into a loop, bringing its two ends together. Sew both ends securely to the upper back edge of the wreath at 12 o'clock, directly behind the bow.
Work through several stitches of the wreath backing rather than attaching the loop to a single stitch. Bring the yarn tails through the backing and secure them firmly before weaving them in.
Final Shaping
Hold the wreath by its hanging loop and let it settle naturally. Straighten the bow, arrange the leaves, and check that the red berries are still evenly spaced. Remove all temporary stitch markers before hanging, storing, or giving away the ornament.
For the baby's first Christmas ornament, check that both booties hang in the center without twisting. You should be able to see their cranberry cuffs and rounded ivory toes clearly.
If the wreath needs a little shaping, lay it flat and gently adjust the padding through the crocheted fabric. Avoid pressing the bow or leaves completely flat.
A Few Practical Tips
Keep the holly leaves and berry clusters securely stitched to the wreath. Small decorations may loosen when an ornament is packed away and brought out again the following Christmas.
These ornaments are intended for Christmas trees, wreath displays, and decorative keepsakes. They're not baby toys, and the miniature booties are not suitable for wearing. Keep the ornaments and their small attached pieces out of a baby's reach and away from sleeping areas.
If you're making one as a gift, I'd choose the baby's first Christmas version for the keepsake and make the traditional wreath to go with it. They look especially nice as a matching pair, and you can use the same yarn colors for both.
You can also make other handmade Christmas keepsakes to accompany them. The crochet Santa ornament and crochet angel ornament are two more options for a coordinated collection.
For the rest of my handmade holiday projects, take a look at the free Christmas crochet patterns collection. It includes more ornaments, baby accessories, and Christmas keepsakes.
Pattern note: This pattern has been reviewed for construction sequence, stitch-count arithmetic, and consistency with the intended finished design. It has not yet been physically crocheted from these instructions. A completed sample is needed to confirm the finished measurements and any adjustments required for exact photographic fidelity.
When you click on links to various merchants on this site and make a purchase, this may result in this site earning a commission. This does not affect the price you pay.

UBGI Gold Standard 2026
Reviewed under the site's
editorial checklist.
Photos, decorating ideas, party setups and reader submissions are shared for inspiration unless a page is specifically presented as a pattern, tutorial, reference guide or step-by-step project. Follow the instructions, measurements, safety guidance and manufacturer directions provided for the particular project or product.
About Jan | Contact | Baby Nursery Ideas (Blog) | Site Map | Privacy Policy | Disclosure Policy | Disclaimer | Affiliate Disclosure | Earnings Disclosure | Facebook | Pinterest
I am a participant in the Amazon Services LLC Associates Program, an affiliate advertising program designed to provide a means for us to earn fees by linking to Amazon. As an Amazon Associate I earn from qualifying purchases.
Copyright © 2006-2026. All Rights Reserved.