Free Crochet Christmas Wreath Pattern for a Door or Wall
By Jan Bay
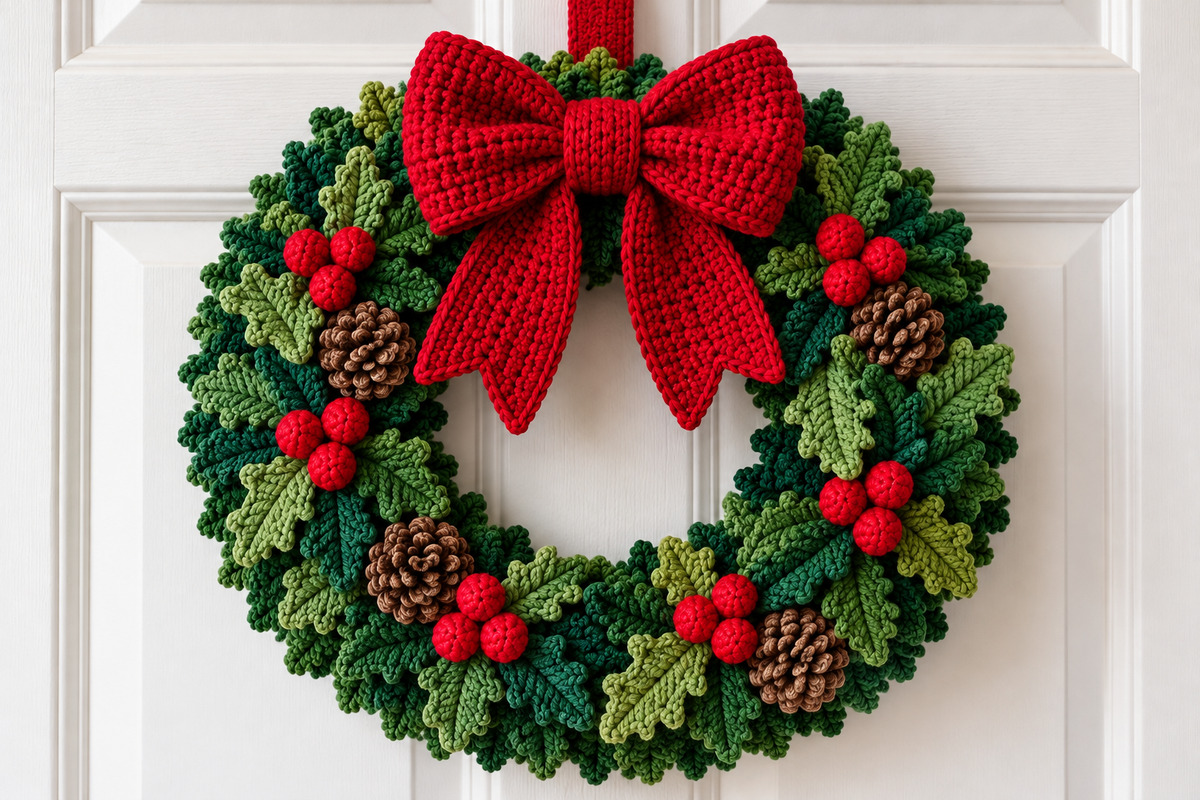
This free crochet Christmas wreath pattern brings together layers of textured evergreen sprigs and holly leaves, clusters of bright red berries, little brown pinecones and an extra-large red bow that steals the show. There's something about a big, cheerful Christmas wreath that makes a door feel ready for the holidays, especially when you're celebrating baby's first Christmas. Designed to measure approximately 12 inches across, it would make a lovely decoration for a nursery wall, baby's bedroom door or even a hospital room door where decorations are permitted. It's a substantial project, but there's something satisfying about watching all that Christmas greenery come together, one crocheted piece at a time.
Explore More Christmas Crochet Patterns
Free Christmas Crochet Patterns
Jump to the Christmas Wreath Pattern Instructions
Materials and Supplies | Gauge
Wreath Foundation | Evergreen Sprays
Crochet Pinecones | Christmas Bow
Free Crochet Christmas Wreath Pattern
If you're making this wreath for baby's first Christmas, you'll have a decoration that can come back out every December. The big red bow gives it that cheerful Christmas look, while all the little crocheted branches, berries and pinecones make it something special. It's a larger project than a Christmas ornament, but you can work on the pieces a few at a time and put everything together when you're ready.
The wreath starts with a foam ring covered in green crochet. From there, you'll build three layers of evergreen sprigs, tuck lighter holly-style leaves between them and finish with six red berry clusters and four brown pinecones. The bow sits right at the top with two long, V-notched ribbon tails. That's the finished design we're making, so there's no need to add flowers, bells or other decorations.
Plan on an approximately 12-inch finished wreath, including the greenery. The measurements are estimates based on the yarn, hook sizes and foundation described below. This pattern has been checked for stitch-count consistency, but a completed sample hasn't been physically test-crocheted.
Finished Wreath Size and Skill Level
Expected finished diameter: Approximately 12 inches, including the outer greenery.
Foundation: A 10-inch foam wreath form with an approximately 2-inch-thick circular body.
Expected center opening: Approximately 4 to 5 inches after the greenery is arranged.
Skill level: Intermediate. Most of the individual stitches are familiar, but there's a fair amount of shaping, layering and sewing involved.
Construction: Separate crocheted pieces sewn to a covered circular foundation.
Terminology: US crochet terms.
Measure your wreath form before cutting any yarn. A form sold as 10 inches across may have a different inner opening or body thickness from the one used for these calculations. The covering can be adjusted, but it's easier to make those changes before you've sewn it onto the foam.
Free Christmas Wreath Crochet Pattern: Materials and Supplies
- Deep evergreen #4 worsted-weight yarn: Approximately 200 to 260 yards for the foundation covering and 36 fir sprays.
- Forest green #4 worsted-weight yarn: Approximately 65 to 110 yards for 24 fir sprays.
- Moss or olive green #4 worsted-weight yarn: Approximately 40 to 75 yards for 12 fir sprays and 12 shaped leaves.
- Lighter sage green #4 worsted-weight yarn: Approximately 20 to 40 yards for 12 shaped leaves.
- Bright Christmas red #4 worsted-weight yarn: Approximately 100 to 150 yards for the bow, hanging strap and 18 berries.
- Warm brown #4 worsted-weight yarn: Approximately 50 to 80 yards for four pinecones.
- One 10-inch foam wreath form, approximately 2 inches thick.
- 5 mm (H/8) crochet hook for the covering, foliage, bow and hanger.
- 3.5 mm (E/4) crochet hook for the berries and pinecones.
- A small amount of polyester fiberfill.
- Blunt yarn needle.
- Stitch markers or removable pins for arranging the pieces.
- Scissors and a measuring tape.
These yardages are estimates rather than amounts measured from a completed wreath. Allow extra yarn if your stitches are larger, your wreath form is thicker or you decide you need additional foliage to fill a visible gap.
I'd use a smooth worsted-weight yarn rather than fuzzy novelty yarn. The fir sprigs have little branching tips, and the pinecones have overlapping scales. You want those details to show instead of disappearing into a fuzzy surface.
Gauge and Measurements
Foundation covering target gauge: 15 single crochet stitches and 18 rows = 4 inches using the 5 mm hook.
Bow target gauge: 14 half double crochet stitches and 11 rows = 4 inches using the 5 mm hook.
These are working gauge targets, not measurements from a physically completed sample.
Make a small swatch and measure it without stretching. The foundation covering needs to fit your particular wreath form, while the bow gauge helps keep the finished loops and tails in proportion to the wreath.
If your foundation swatch is noticeably wider than the target, try a smaller hook. If it's too narrow, try a larger hook. Check the row gauge separately, because changing the hook can affect both measurements.
Here's a useful checkpoint: at the target gauge, the foundation covering should measure approximately 6.4 inches wide and 25.3 inches long. The number of rows can be adjusted if your foam form has a different centerline circumference.
Crochet Abbreviations and Special Stitches
- ch = chain
- sc = single crochet
- hdc = half double crochet
- dc = double crochet
- sl st = slip stitch
- st(s) = stitch(es)
- inc = 2 single crochet stitches in the same stitch
- sc2tog = single crochet 2 stitches together
- hdc2tog = half double crochet 2 stitches together
- hdc3tog = half double crochet 3 stitches together
- BLO = back loop only
- FLO = front loop only
- RS = right side
- WS = wrong side
Picot: Ch 3, then sl st into the first of those 3 chains. A picot does not use another stitch from the foundation.
Sc2tog: Insert the hook in the next stitch and pull up a loop. Insert the hook in the following stitch and pull up another loop. Yarn over and pull through all 3 loops on the hook.
Hdc2tog: Yarn over, insert the hook in the next stitch and pull up a loop. Yarn over, insert the hook in the following stitch and pull up another loop. Yarn over and pull through all 5 loops on the hook.
Hdc3tog: Yarn over, insert the hook in the next stitch and pull up a loop. Repeat in each of the next 2 stitches without completing a half double crochet. Yarn over and pull through all 7 loops on the hook.
Magic ring: Work the specified number of stitches into an adjustable yarn loop, then pull the starting tail to close the center.
Turning chains don't count as stitches unless a section says otherwise. The small stuffed pieces are worked in continuous rounds. Use a stitch marker to identify the beginning of each round and move it as you complete each round.
Part 1: Crochet the Wreath Foundation Cover
Start with the plain green covering. It won't be visible beneath most of the finished foliage, but it matters. Without it, the foam could show between the branches, and you'd have nowhere neat to attach the decorative pieces.
Use deep evergreen yarn and the 5 mm hook.
Ch 25.
Row 1: Sc in the second chain from the hook and in each remaining chain. (24 sc)
Rows 2 through 114: Ch 1, turn. Sc in each stitch across. (24 sc)
Fasten off, leaving a long tail for sewing.
At the target gauge, your rectangle should measure approximately 6.4 inches wide and 25.3 inches long.
Check the Covering Against Your Foam Form
Before sewing, measure your foam ring around the center of its circular body. On the specified 10-inch form with a 2-inch-thick body, that centerline is approximately 8 inches in diameter, giving a calculated circumference of 25.13 inches.
The 114-row strip is designed to fit that measurement with a little room for sewing. If your centerline circumference is different, add or remove complete rows until the strip fits comfortably around the ring.
Now check the width by wrapping the short direction around the thickness of the foam. The edges should meet without a large gap or a big overlapping fold. If they don't, adjust the starting chain count and work a new strip to the width you actually need.
Sew the Covering onto the Wreath
- Wrap the strip around the foam form with its long direction following the circular wreath.
- Bring the two short ends together at the 12 o'clock position.
- Sew those short ends together to form a continuous loop of crochet fabric.
- Bring the two long edges together around the foam so their seam will sit on the back of the wreath.
- Use a mattress stitch to join those long edges, working gradually around the ring.
- Ease the fabric around the inner curve and distribute any small gathers evenly. Don't pull the seam so tightly that the covering twists.
- Secure the sewing yarn and weave the ends into the covering.
Turn the wreath over and check the front. It should be completely green, with no exposed foam. Don't worry if the covering isn't perfectly smooth. The branches will hide minor uneven areas, but the covering itself should stay firmly in place.
Part 2: Crochet the Evergreen Fir Sprays
These little fir sprays do most of the work in making the wreath look full. Each one has a narrow center stem with seven short branches on each side and one small branch at the tip.
Make 72 sprays:
- 36 in deep evergreen.
- 24 in forest green.
- 12 in moss or olive green.
Use the 5 mm hook. Leave a beginning yarn tail approximately 10 inches long for sewing each spray to the covered wreath.
Fir Spray Instructions
Ch 12.
You'll work down one side of the foundation chain toward the base, then rotate the piece and work back up the opposite side toward the tip.
First side: Begin in the second chain from the hook.
Branchlet repeat: Sl st in the next unused foundation chain, ch 4, sl st in the second chain from the hook, then sl st in each of the remaining 2 chains of that small branchlet.
Work the complete branchlet repeat 7 times. You'll have used 7 foundation chains and made 7 short side branches.
Sl st in each of the 4 remaining foundation chains to reach the base of the spray.
Opposite side: Rotate the piece so you can work into the unused loops on the underside of the original foundation chain. Start at the base and work toward the tip.
Sl st in each of the first 4 unused foundation-chain loops.
Work the same branchlet repeat 7 times across the remaining 7 unused foundation-chain loops:
Sl st in the next unused loop, ch 4, sl st in the second chain from the hook, then sl st in the remaining 2 chains of the branchlet.
Tip: Ch 3, sl st in the second chain from the hook and in the remaining chain. Sl st into the tip of the central stem to anchor the little pointed branch.
Fasten off and weave in the final working end. Keep the beginning tail for sewing.
Stitch checkpoint: Each completed spray has 14 side branchlets, 1 tip branchlet and a central stem worked over 11 foundation-chain positions.
Spread the branches gently with your fingers. They should make a small, flattened evergreen spray rather than a tight, twisted strip.
Check Your First Four Fir Sprays
Make four sprays before committing to the whole batch. Place them on the covered wreath with the tips pointing outward and the stems overlapping a little.
At the expected gauge, each spray should measure roughly 2.5 to 3 inches along its stem, with short branches extending from both sides. The exact size hasn't been verified by a physical sample.
If the sprays are stiff and tightly curled, try a slightly larger hook. If they're so floppy that the branches won't hold their shape, try a smaller hook.
Once you like their size, make the remaining sprays using the same hook and tension. Keep the finished pieces sorted by color. That will make arranging the three layers much easier later.
Part 3: Crochet the Shaped Holly Leaves
The fir sprays make a thick evergreen background. The holly-style leaves are broader and lighter, with little pointed edges that break up all that dark green. They shouldn't look like a separate ring of leaves. They'll be tucked among the branches in pairs.
Make 24 leaves:
- 12 in moss or olive green.
- 12 in lighter sage green.
Use the 5 mm hook. Leave a beginning tail approximately 10 inches long on every leaf.
Holly Leaf Instructions
Ch 12.
First side: Beginning in the second chain from the hook, work the following across the 11 foundation chains:
Sl st in next chain, sc in next chain, hdc in next chain, dc in each of the next 2 chains, picot, dc in next chain, dc in each of the next 2 chains, picot, hdc in next chain, sc in next chain, sl st in final chain.
Opposite side: Rotate the work and continue into the unused loops on the underside of the same foundation chain, beginning at the base.
Sl st in next loop, sc in next loop, hdc in next loop, dc in each of the next 2 loops, picot, dc in next loop, dc in each of the next 2 loops, picot, hdc in next loop, sc in next loop, sl st in final loop.
Fasten off, weave in the final working end and preserve the beginning sewing tail.
Stitch checkpoint: Each leaf has 11 body stitches on each side of its foundation chain and 4 picots in total.
The leaf should have a fuller middle, narrower ends and small points along its sides. Gently flatten the piece with your fingers so the foundation chain forms a visible center line.
At the expected gauge, each leaf should be approximately 2 to 2.5 inches long. That size is an estimate.
Arrange the Leaves in Pairs
Lay two differently colored leaves together with their bases slightly overlapping and their tips pointing in different directions.
You'll need 12 pairs altogether. Six pairs will sit near the berry clusters, four will fill the areas around the pinecones and two will add greenery along the lower curve.
Don't sew all the pairs together yet. Wait until they're positioned on the wreath so you can turn each leaf in the direction that looks best.
If you'd like to make holly as a separate decoration later, my crochet holly leaf and berries pattern includes different sizes for other Christmas projects. For this wreath, keep the 24 leaves described above so the finished arrangement stays consistent with the example photograph.
Part 4: Crochet the Red Berries
You'll need 18 little red berries, arranged in six groups of three. They're stuffed just enough to hold a round shape, so they stand out from the foliage without looking like large Christmas ornaments.
Use the 3.5 mm hook and bright red yarn.
Make 18 berries.
Berry Instructions
Round 1: Make a magic ring and work 6 sc into the ring. (6)
Round 2: Inc in each stitch around. (12)
Round 3: Sc in each stitch around. (12)
Round 4: Sc in each stitch around. (12)
Pull the magic-ring starting tail firmly closed and weave it through several stitches on the inside of the berry. Add a small amount of polyester fiberfill. Just enough to round the berry is plenty.
Round 5: Sc2tog 6 times. (6)
Fasten off, leaving a long sewing tail. Thread the tail through the front loops of the remaining 6 stitches and pull the opening closed.
Secure the yarn, but keep the remaining tail for assembly.
Stitch checkpoint: 6, 12, 12, 12 and 6 stitches across the five rounds.
At the expected gauge, each finished berry should be approximately 1/2 to 3/4 inch across. The measurement is an estimate.
Make Six Berry Clusters
Divide the 18 berries into six groups of three.
Arrange each group with two berries beside one another and the third slightly above or below them. They should touch, but they don't have to form a perfectly even triangle.
Use the sewing tails to make a few concealed stitches between the berries where they meet. Leave enough yarn to sew the entire group to the wreath foundation later.
Keep all six clusters approximately the same size. Don't add a fourth berry to fill a gap. The finished design has six clusters of three, and the lighter leaves will fill the surrounding spaces.
Part 5: Crochet the Brown Pinecones
The four brown pinecones bring a little woodland character to the wreath. They're made with a tapered crocheted core and separate tiers of overlapping scales. It takes more work than crocheting a plain brown oval, but those little raised scales are what make the pinecones recognizable.
Make 4 complete pinecones.
Use warm brown worsted-weight yarn and the 3.5 mm hook.
Make the Pinecone Core
Work in continuous rounds, starting at the narrower tip. Move your stitch marker up at the beginning of each round.
Round 1: Work 4 sc in a magic ring. (4)
Round 2: Inc in each stitch around. (8)
Round 3: Working in BLO, sc in each stitch around. (8)
Round 4: (Sc in next stitch, inc in next stitch) 4 times. (12)
Round 5: Working in BLO, sc in each stitch around. (12)
Round 6: (Sc in next stitch, inc in next stitch) 6 times. (18)
Round 7: Working in BLO, sc in each stitch around. (18)
Round 8: (Sc in each of the next 2 stitches, inc in next stitch) 6 times. (24)
Round 9: Working in BLO, sc in each stitch around. (24)
Round 10: (Sc in each of the next 2 stitches, sc2tog) 6 times. (18)
Round 11: (Sc in next stitch, sc2tog) 6 times. (12)
Pull the starting magic ring closed again if necessary and secure its tail inside the core. Add a little polyester fiberfill, keeping the narrower end pointed and the broader section gently rounded.
Round 12: Sc2tog 6 times. (6)
Fasten off with a long tail. Thread the tail through the front loops of the final 6 stitches, pull the opening closed and secure it. Keep the remaining yarn tail for sewing the pinecone to the wreath.
Core stitch counts: 4, 8, 8, 12, 12, 18, 18, 24, 24, 18, 12, 6.
Don't overstuff the core. You want an oval pinecone shape rather than a firm little ball.
Add the Overlapping Pinecone Scales
Remember those four rounds worked in the back loops only? Working Round 3 in BLO leaves the front loops of Round 2 unused. In the same way, working Rounds 5, 7 and 9 in BLO leaves the front loops of Rounds 4, 6 and 8 available. Those four sets of saved loops are where you'll attach the overlapping pinecone scales.
Work one complete tier at a time. Hold the pinecone with its narrow starting tip facing upward. Begin with the smallest tier near the tip and continue toward the wider part of the pinecone.
How to Crochet Each Pinecone Scale
Scale stitch: Ch 4. Sc in the second chain from the hook, hdc in the next chain and dc in the final chain. You now have a small, tapered scale extending from its attachment point.
First scale of each tier: Join brown yarn with a sl st into the first unused front loop of that tier. Work the scale stitch. Sl st back into the same front loop where you joined the yarn. Then sl st into the next unused front loop to anchor the opposite side of the scale's base.
Remaining scales: Sl st into the next unused front loop, work another scale stitch, then sl st back into that same loop. Sl st into the following unused front loop to complete the attachment.
Continue around the tier until you've used all its available front loops.
Each scale uses two previously unused front loops: one for the scale itself and one for its second attachment. Don't work two scales into the same pair of loops.
Pinecone Scale Placement and Counts
Use the following attachment rounds and scale counts:
- First tier: Use the 8 front loops of Round 2, saved when you worked Round 3 in BLO. Make 4 scales.
- Second tier: Use the 12 front loops of Round 4, saved when you worked Round 5 in BLO. Make 6 scales.
- Third tier: Use the 18 front loops of Round 6, saved when you worked Round 7 in BLO. Make 9 scales.
- Fourth tier: Use the 24 front loops of Round 8, saved when you worked Round 9 in BLO. Make 12 scales.
After completing each tier, fasten off and weave the yarn ends into the core before moving to the next tier.
Total: 31 scales per pinecone, arranged in four tiers of 4, 6, 9 and 12 scales.
Gently lift and spread the scales with your fingers. They should overlap in staggered rows, with the smaller tier near the narrow tip and the fuller tiers covering the middle and lower portion.
The lower tiers may need a little shaping so they sit naturally rather than sticking straight outward. Keep the core visible only in the small spaces between the scales.
Repeat the entire construction for the other three pinecones.
Pinecone Measurement Checkpoint
Expect each completed pinecone to measure roughly 1.5 to 2 inches long, depending on gauge and how the scales are arranged. This is an estimate, not a physically verified measurement.
Make the first pinecone completely before finishing the other three. Its scales should remain dimensional without making the piece so large that it dominates the berries and greenery.
Prepare the Pinecones for Assembly
Check that the narrow tips are closed, the stuffing is concealed and all four tiers of scales are secure.
Keep the long attachment tail from each pinecone core. You'll use it to sew through the core and into the covered wreath foundation at two points. Don't attach the pinecones by their decorative scales alone.
Set all four finished pinecones aside until the evergreen foliage and holly leaves have been arranged on the wreath.
Part 6: Crochet the Oversized Red Christmas Bow
Now for the part that really makes this wreath look ready for Christmas. The bow is intentionally big, with broad, gathered loops, a thick center band and two long ribbon tails. A little bow would get lost against all that evergreen foliage.
Take a look at the finished wreath before starting. Each ribbon tail has a V-shaped notch at the bottom, leaving two pointed corners. We'll crochet those shapes rather than tapering the tails into single points.
Use bright Christmas red worsted-weight yarn and the 5 mm hook.
Crochet the Bow Loops
Ch 41.
Row 1: Hdc in the third chain from the hook and in each remaining chain. (39 hdc)
Rows 2 through 7: Ch 2, turn. Hdc in each stitch across. (39 hdc)
Fasten off, leaving a long sewing tail.
At the target gauge, the rectangle should measure approximately 11 inches long and 2.5 inches high.
Bring the two short ends together and sew them securely, forming a continuous loop of crocheted fabric.
Lay the loop flat with its joining seam centered at the back. Arrange the fabric into two broad, rounded loops, one extending to the left and one to the right.
Pinch the middle of the flattened loop, gathering its upper and lower edges toward the center. Wrap a separate length of red yarn around the gathered middle several times to hold the folds.
Before gathering, the flattened bow should measure approximately 5.5 inches across at the target gauge. The finished width will be slightly smaller once the center is tightened.
Don't flatten the loops into narrow strips. They should have plenty of body, with soft folds radiating outward from the center.
Crochet the Two V-Notched Bow Tails
Make two ribbon tails, one left and one right. The tails are mirrored, with a shorter outside point and a longer inside point on each one. This gives the bow the same notched ribbon shape shown in the finished wreath photograph.
Use bright red yarn and the 5 mm hook.
Make the Ribbon Tail Rectangles
Make 2.
Before making the starting chain of each ribbon tail, leave a long beginning yarn tail for sewing its upper edge to the back of the bow.
Ch 13.
Row 1: Hdc in the third chain from the hook and in each remaining chain. (11 hdc)
Rows 2 through 6: Ch 2, turn. Hdc in each stitch across. (11 hdc)
Fasten off, leaving the starting tail at the upper edge for assembly.
Lay each rectangle flat with its right side facing you and its starting edge at the top. Row 6 is the lower edge. Count the 11 stitches of Row 6 from left to right.
You'll work the two points separately into this lower edge. Keep the right side facing you while counting the stitches of Row 6 from left to right. Each time you join yarn to begin a new point, make the joining slip stitch with the right side facing you, then turn the piece so the wrong side faces you before working Row 7. You can then crochet across the selected five stitches in the usual direction. After Row 7, follow the ch-2-and-turn instructions for the remaining shaping rows. Return the piece to right-side-facing before locating the starting stitch for the next point. The single middle stitch, stitch 6, remains unworked to form the upper center of the V-shaped notch.
Shape the Left Ribbon Tail
The left tail needs its shorter point on the left outside edge and its longer point on the right inside edge.
Short Outside Point
Join red yarn with a sl st into the first stitch at the left end of Row 6.
Row 7: Ch 2. Hdc in the same stitch where you joined the yarn and in each of the next 4 stitches. Leave the remaining 6 stitches unworked. (5 hdc)
Row 8: Ch 2, turn. Hdc2tog over the first 2 stitches, hdc in the next stitch, then hdc2tog over the final 2 stitches. (3 hdc)
Row 9: Ch 2, turn. Hdc3tog over the remaining 3 stitches. (1 hdc)
Fasten off and weave in the yarn end.
Long Inside Point
With the right side of the rectangle facing you and the starting edge at the top, join red yarn with a sl st into stitch 7 of Row 6, counting from the left.
Row 7: Ch 2. Hdc in the same stitch where you joined the yarn and in each of the next 4 stitches, working toward the right edge. (5 hdc)
Row 8: Ch 2, turn. Hdc in each of the first 3 stitches, then hdc2tog over the final 2 stitches. (4 hdc)
Row 9: Ch 2, turn. Hdc2tog over the first 2 stitches, then hdc in each of the remaining 2 stitches. (3 hdc)
Row 10: Ch 2, turn. Hdc in the first stitch, then hdc2tog over the final 2 stitches. (2 hdc)
Row 11: Ch 2, turn. Hdc2tog over the remaining 2 stitches. (1 hdc)
Fasten off and weave in the end.
The left ribbon tail now has a short outer point and a longer inner point, separated by a narrow V-shaped notch.
Shape the Right Ribbon Tail
The right tail is the mirror image. Its longer inside point will be on the left, and its shorter outside point will be on the right.
Long Inside Point
Join red yarn with a sl st into the first stitch at the left end of Row 6.
Row 7: Ch 2. Hdc in the same stitch where you joined the yarn and in each of the next 4 stitches. Leave the remaining 6 stitches unworked. (5 hdc)
Row 8: Ch 2, turn. Hdc2tog over the first 2 stitches, then hdc in each of the remaining 3 stitches. (4 hdc)
Row 9: Ch 2, turn. Hdc in each of the first 2 stitches, then hdc2tog over the final 2 stitches. (3 hdc)
Row 10: Ch 2, turn. Hdc2tog over the first 2 stitches, then hdc in the remaining stitch. (2 hdc)
Row 11: Ch 2, turn. Hdc2tog over the remaining 2 stitches. (1 hdc)
Fasten off and weave in the end.
Short Outside Point
With the right side facing you and the starting edge at the top, join red yarn with a sl st into stitch 7 of Row 6, counting from the left.
Row 7: Ch 2. Hdc in the same stitch where you joined the yarn and in each of the next 4 stitches, working toward the right edge. (5 hdc)
Row 8: Ch 2, turn. Hdc2tog over the first 2 stitches, hdc in the next stitch, then hdc2tog over the final 2 stitches. (3 hdc)
Row 9: Ch 2, turn. Hdc3tog over the remaining 3 stitches. (1 hdc)
Fasten off and weave in the end.
Check the Two Ribbon Tails
Place the tails side by side with their right sides facing you and their upper edges at the top.
The shorter points should face outward, while the longer points face toward the center where the tails will hang beneath the bow.
Each tail has 11 stitches across its main rectangle. The short point extends three rows below the rectangle, and the long point extends five rows below it.
At the target bow gauge, each tail should measure approximately 3.1 inches wide and 4 inches long at its longest point. The shorter outside point should finish approximately 3/4 inch higher than the longer inside point.
These are calculated measurements, not dimensions taken from a completed sample.
Gently shape the points with your fingers. Keep the V-shaped notch open and the two tails arranged as mirror images.
Attach the Bow Tails
- Place the gathered bow loops front side up on a flat surface.
- Position the two ribbon tails behind the gathered center with their wider starting edges slightly overlapping.
- Angle the left tail down toward the left and the right tail down toward the right.
- Arrange the two V-notched ends so they remain visible below the bow loops.
- Use the reserved yarn tails to sew the upper ends securely to the back of the gathered bow.
- Turn the bow over and check its appearance before fastening off.
The tails should angle into the upper portion of the wreath's open center. Don't worry if one hangs a little more vertically than the other. That slight difference gives the bow a natural, relaxed appearance.
Crochet the Bow Center Band
Ch 6.
Row 1: Sc in the second chain from the hook and in each remaining chain. (5 sc)
Rows 2 through 12: Ch 1, turn. Sc in each stitch across. (5 sc)
Fasten off with a long sewing tail.
Wrap the narrow strip around the gathered center of the bow, covering the attachment area of both tails.
Bring the short ends together at the back and sew them securely.
If the band is too tight or loose for your finished bow, add or remove complete rows before sewing it closed. Keep the width at five stitches.
Arrange the center band so its crochet texture runs vertically across the front of the bow.
Shape the two broad loops with your fingers. Straighten the tails and check that both V-shaped notches remain clearly visible.
Set the completed bow aside until the greenery and other decorations are attached to the wreath.
Part 7: Crochet the Red Hanging Strap
The wreath needs a proper hanging strap, not just a little loop sewn into the greenery. All those crocheted branches and pinecones add weight, so the hanger should wrap around the supporting foundation itself.
Use the 5 mm hook and bright Christmas red yarn.
Ch 46.
Row 1: Sc in the second chain from the hook and in each remaining chain. (45 sc)
Rows 2 through 5: Ch 1, turn. Sc in each stitch across. (45 sc)
Fasten off, leaving a long sewing tail.
At the foundation target gauge, the strap should measure approximately 12 inches long and a little over 1 inch wide.
Attach and Reinforce the Hanging Strap
- Find the 12 o'clock position on the covered wreath foundation, where the large red bow will eventually sit.
- Pass the strap around the entire covered foam ring at that position, leaving its two free ends extending above the wreath.
- Bring those ends together and overlap them by approximately 1 inch to form a hanging loop.
- Thread the long sewing tail into a blunt yarn needle.
- Stitch across the full width of the overlapped ends, then work along both sides of the overlap.
- Make several additional passes through the overlapped fabric to reinforce the seam.
- Use matching yarn to tack the lower back section of the strap to the crocheted foundation covering so the hanger cannot slide around the wreath.
- Fasten off securely and weave the remaining yarn through the back of the covering.
Hang the covered wreath briefly from a sturdy hook before adding the decorations. Check that the strap stays centered and the foundation doesn't twist or tilt.
Don't attach the hanging loop to the fir sprays or holly leaves. They aren't meant to carry the wreath's weight.
The finished bow will cover the lower front portion of the strap, leaving a neat red hanging loop visible above the greenery.
The hanging assembly hasn't been physically load-tested, so check its sewn connections and balance again after every decoration is attached.
Part 8: Assemble the Christmas Wreath
Now you get to see the whole wreath come together. Before sewing everything down, lay the covered form on a table and arrange the branches, berries, pinecones and bow in their approximate positions. It's much easier to move a few loose pieces now than to remove a decoration after you've sewn it in place.
Keep the front of the wreath facing you as you work. The clock positions below refer to that front view, with 12 o'clock at the top and 6 o'clock at the bottom.
Step 1: Mark the Evergreen Positions
Divide the wreath into 24 approximately equal positions around its circumference. Use removable stitch markers along the covered foundation to help with the spacing.
You'll use those positions as a guide for three foliage layers, with 24 fir sprays in every layer.
Don't stack all three sprays at a position directly on top of one another. Stagger their bases so the branches cover the foam from different directions.
Step 2: Sew On the Outer Evergreen Layer
Choose these 24 sprays:
- 12 deep evergreen.
- 8 forest green.
- 4 moss green.
Arrange them around the outer portion of the wreath, with their tips extending slightly beyond the outside edge of the foam.
Angle each spray a little around the circle so the greenery follows the shape of the wreath instead of looking like straight spokes on a wheel.
Use the reserved sewing tail to stitch each spray securely to the foundation covering near its base. Add a second concealed attachment farther along its center stem.
Work all the way around, overlapping neighboring branches. Approximately 1 inch of foliage beyond the outer edge is the working target for the finished 12-inch diameter.
Step 3: Add the Inner Evergreen Layer
Choose another 24 sprays:
- 12 deep evergreen.
- 8 forest green.
- 4 moss green.
Place these closer to the inner edge of the foam, with their leafy tips pointing partly toward the open center.
Offset the stems from those in the outer layer. That staggered arrangement helps hide the covering and keeps the greenery from looking like neat rows.
Sew each spray down at its base and at one additional concealed point along the stem.
Keep the center opening visible. The greenery should soften the inner edge, not fill the whole middle of the wreath.
Step 4: Fill the Front of the Wreath
Use the final 24 fir sprays:
- 12 deep evergreen.
- 8 forest green.
- 4 moss green.
Position them across the front of the wreath, tucking their stems between the outer and inner foliage layers.
Angle some clockwise and others counterclockwise. Try not to line up all the tips or create obvious bands of light and dark green.
Secure each spray to the underlying covering rather than relying on another branch to hold it.
Now look at the wreath from a few feet away. The front should appear full, with the center opening clearly defined and no exposed foam.
If you can see a small patch of covering, reposition nearby sprays before adding more. You may not need another piece at all.
Step 5: Place the Holly Leaves
Arrange the 24 shaped leaves in 12 pairs, mixing the sage and moss greens.
Use the following arrangement:
- Six leaf pairs near the planned berry clusters.
- Four pairs near the brown pinecones.
- Two pairs along the lower curve to fill spaces between the larger decorations.
For each pair, overlap the leaf bases slightly and angle their tips in different directions.
Sew each leaf down at its base. Add a small concealed stitch farther along the center if needed to keep the leaf from turning or drooping.
Let the pointed edges remain visible above the darker evergreen branches. Those lighter green shapes give the wreath some contrast without introducing another decorative color.
Step 6: Position the Four Pinecones
Lay the completed pinecones over the greenery in these approximate positions:
- Upper left: Around 10 o'clock.
- Upper right: Around 2 o'clock.
- Lower left: Around 7:30.
- Lower right: Around 4:30.
Angle the narrow ends slightly outward or downward so each pinecone follows the curve of the wreath.
Don't line them up in a perfect square. The arrangement should feel scattered through the greenery, with the bow remaining the largest focal point.
Use the sewing tail to stitch through each pinecone core and into the covered wreath foundation. Make several passes through the core at two different points so the pinecone can't rotate or sag.
Avoid pulling your sewing yarn over the outside of the decorative scales. Keep those attachment stitches hidden underneath.
Step 7: Arrange the Six Berry Clusters
Place the six groups of three berries around the wreath:
- Cluster 1: Around 10:30, just above the upper-left pinecone.
- Cluster 2: Around 1:30, above the upper-right pinecone.
- Cluster 3: Around 9 o'clock, along the left side.
- Cluster 4: Around 3:30, along the right side.
- Cluster 5: Around 7 o'clock, on the lower-left curve.
- Cluster 6: Around 5 o'clock, on the lower-right curve.
Move the clusters a little if needed to keep them from hiding the pinecones. The red berries should appear throughout the wreath without looking as though someone placed them at perfectly measured intervals.
Sew each cluster to the underlying foundation covering with several concealed stitches through the berry bases.
Check that all 18 berries are firmly attached and that none can swing freely from a long sewing thread.
Step 8: Attach the Large Red Bow
Place the completed bow at 12 o'clock, centered across the top of the wreath.
Keep the two big loops extending horizontally, with the V-notched ribbon tails angled down into the center opening. The left tail should hang toward approximately 7 o'clock and the right tail toward approximately 5 o'clock.
The bow should sit over the greenery, not disappear into it.
Use matching red yarn to sew the gathered center and center band firmly to the covered foundation. Make several passes through the bow's center and the supporting covering.
If the loops tilt forward, add small hidden anchoring stitches behind each loop. Keep those stitches loose enough that they don't flatten the bow.
Arrange the tails so they hang naturally, with both V-shaped notches visible. They should extend into the open center without covering the pinecones or berry clusters on either side.
The hanging strap should remain centered behind the bow, with its red loop showing above the wreath.
Part 9: Final Shaping and Finishing
You're almost finished. Give the wreath a good look from the front before trimming those last sewing tails. It's much easier to shift a pinecone or straighten a bow tail while you still have some yarn to work with.
- Check the overall circular shape and gently spread the evergreen branches where needed.
- Make sure the dark and lighter greens are distributed around the whole wreath.
- Confirm that all four pinecones are securely attached.
- Count the six berry clusters and check that each contains exactly three berries.
- Adjust the 12 pairs of holly leaves so their pointed edges remain visible.
- Shape the two large bow loops and straighten the V-notched tails.
- Check that the hanger is centered behind the bow.
- Weave in every remaining yarn end securely.
- Turn the wreath over and remove all temporary markers and sewing pins.
- Hang the wreath from a sturdy hook and look for shifting or sagging decorations.
If a pinecone or berry cluster starts to lean forward, add another concealed attachment through its base and the wreath covering.
Avoid pressing acrylic yarn with a hot iron. The greenery and bow should be shaped gently by hand. If a small flat leaf needs attention, lightly dampen it and let it dry in the desired position before attaching it.
There should be no exposed foam, loose embellishments or dangling sewing ends when the wreath is finished.
Christmas Wreath Crochet Pattern Troubleshooting
My Foundation Covering Doesn't Fit the Form
Measure the form instead of relying only on the size printed on the package. The covering needs to fit around the thickness of the foam and follow the circumference of the ring.
If the rectangle is too short, add rows. If it's too long, remove rows. If the edges won't meet around the thickness of the form, change the starting chain count and remake the strip to the width your form needs.
The Evergreen Foliage Looks Too Sparse
Before crocheting additional sprays, check the placement of the three layers. The inner, outer and front layers should overlap rather than sit in separate narrow rings.
Move some front-layer sprays over visible areas of covering. If you've arranged all 72 sprays and still have noticeable gaps, make a few additional sprays using the same construction. Keep their placement discreet so the berries and pinecones remain visible.
My Pinecones Look Like Brown Balls
Check the scales. They should stand out from the core in overlapping tiers instead of lying flat against it.
Use your fingers to lift the scales gently. If you've packed the cores tightly with fiberfill, the rounded shape may also be making the pinecones look too much like balls. Stuff them lightly enough to keep a tapered profile.
The Red Bow Won't Hold Its Shape
Make sure the center band is snug and the loops are gathered firmly beneath it. A few hidden stitches from the back of the loops into the wreath covering can help hold the bow in position.
If the bow fabric is unusually loose, a smaller hook may give the loops more body. Check that the finished dimensions remain close to the intended proportions before attaching it.
Can I Make This Wreath for Baby's First Christmas?
Of course. It would make a festive keepsake for a nursery wall, an interior door or a supervised holiday photo setting. A hospital room door may also be an option where the facility permits decorations.
Keep the wreath securely hung where a baby can't reach or pull it down. It's a decoration, not a toy, and its small dimensional berries and pinecones aren't intended for handling by babies.
For a nursery, keep decorations away from the crib and sleeping area. The U.S. Consumer Product Safety Commission's safe sleep guidance explains why infant sleep spaces should remain clear of loose objects.
A Handmade Christmas Wreath Worth Keeping
Once it's hanging on the door, all those little crocheted pieces finally make sense together. The dark green branches give the wreath its fullness, the lighter holly leaves keep it from looking too heavy, and the red berries lead your eye right back to that big Christmas bow.
You could make this one for baby's first Christmas and bring it back out as part of the holiday decorations each year. I wouldn't add another ornament to it. Between the pinecones, berries and generous bow, there's already plenty going on, and that's what gives this wreath its cheerful Christmas look.
Pattern Development Note
Pattern development note: The stitch counts and construction have been reviewed mathematically for internal consistency. The finished dimensions and yarn quantities are estimates, and the pattern has not been physically test-crocheted. The foliage density, pinecone scale structure, bow shaping and hanging assembly also require verification with a completed sample.
When you click on links to various merchants on this site and make a purchase, this may result in this site earning a commission. This does not affect the price you pay.

UBGI Gold Standard 2026
Reviewed under the site's
editorial checklist.
Photos, decorating ideas, party setups and reader submissions are shared for inspiration unless a page is specifically presented as a pattern, tutorial, reference guide or step-by-step project. Follow the instructions, measurements, safety guidance and manufacturer directions provided for the particular project or product.
About Jan | Contact | Baby Nursery Ideas (Blog) | Site Map | Privacy Policy | Disclosure Policy | Disclaimer | Affiliate Disclosure | Earnings Disclosure | Facebook | Pinterest
I am a participant in the Amazon Services LLC Associates Program, an affiliate advertising program designed to provide a means for us to earn fees by linking to Amazon. As an Amazon Associate I earn from qualifying purchases.
Copyright © 2006-2026. All Rights Reserved.