Free Crochet Angel Ornament Pattern with Baby Bootie Option
By Jan Bay
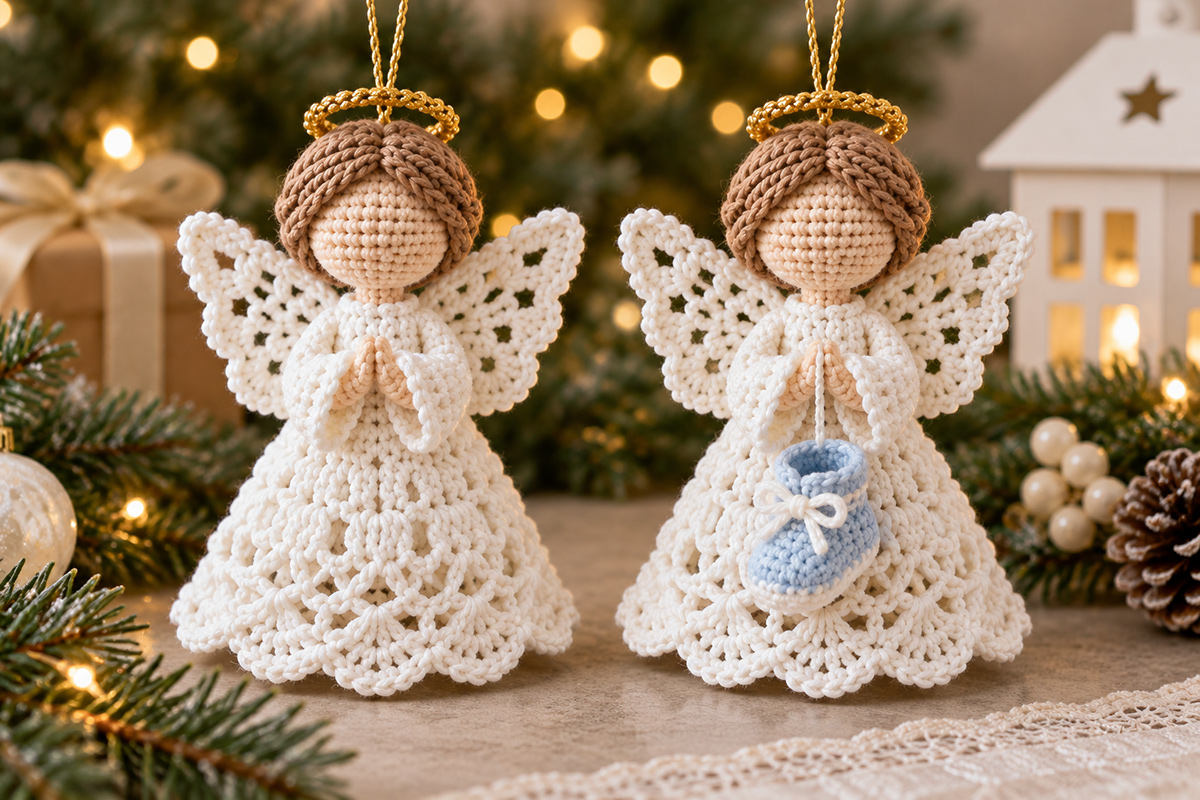
This free crochet angel ornament pattern makes a classic keepsake for your baby's first Christmas. The little angel has delicate lace wings, a golden halo, praying hands and a pretty scalloped gown. Even without a complicated face, she's obviously perfectly angelic and will shine on your Christmas tree. I've also included a pattern for a tiny crocheted baby bootie that she can hold as a sweet reminder of just how little those precious feet once were. It's a Christmas keepsake that can be treasured for many years.
More Free Christmas Crochet Patterns
Crochet Angel Appliqué Pattern
Free Christmas Crochet Patterns for Baby Gifts and Keepsakes
See Supplies for This Project Here.
On This Page
Supplies for Your Crochet Angel Ornament
You'll need a little ivory yarn for the gown, sleeves and wings, some brown for her hair, a flesh-colored shade for her face and hands, and a touch of gold for the halo. If you're making the baby's first Christmas version, add a small amount of pale-blue yarn for the bootie.
I'd choose smooth cotton yarn for this ornament. The lace openings and scalloped edges are a big part of her appearance, and a yarn with good stitch definition will show them much more clearly than something fuzzy or heavily textured.
Materials:
- Fingering-weight cotton yarn, ivory: one 50 g ball, with sufficient yardage for the gown, sleeves and wings; actual yarn consumption has not been physically measured
- Flesh-colored fingering-weight cotton: approximately 5–8 yards
- Medium-brown fingering-weight cotton: approximately 15–20 yards to allow for the hair cap, six decorative braids, back bun and sewing tails; actual consumption has not been measured
- Gold cotton yarn or compatible decorative crochet thread: approximately 2–3 yards
- Pale-blue fingering-weight cotton: approximately 3–5 yards, optional
- Small amount of polyester stuffing for the head
- 2.25 mm crochet hook
- Yarn needle and stitch marker
- Small scissors
- Gold hanging cord or additional gold yarn
- Optional fabric stiffener for the halo and wings
The yardage amounts are allowances for the proposed construction, not amounts measured from a completed sample. You may use less, but having a little extra of the main ivory color is helpful.
Size and Gauge
The design is intended to finish approximately 4–4¾ inches tall, excluding its hanging cord. The gown should be wide enough to show the lace without making the angel look bulky.
Proposed gauge: approximately 28 single crochet stitches and 32 rounds over 4 inches, worked firmly in fingering-weight cotton with a 2.25 mm hook. This gauge is a starting target and has not been physically verified for the finished ornament.
Make a small gauge sample before starting. If your stitches are substantially larger, try a smaller hook. Keep the head and hands fairly firm, but don't pull the lace stitches so tight that the skirt loses its openwork appearance.
Classic Angel or Baby's First Christmas Angel?
Both ornaments use exactly the same angel pattern. The classic version ends with her little hands clasped in front. For the baby's first Christmas version, you'll crochet one tiny bootie separately and attach it beneath those hands.
That means you don't need to change the gown, wings, halo or any of the angel's stitch counts when adding the bootie. You can even make the bootie in pink, blue or another color that means something special to you.
Crochet Stitches and Abbreviations
This pattern uses U.S. crochet terminology. If you're familiar with basic stitches, increases, decreases and working in the round, you should be able to follow the instructions. The lace sections need a little more attention, but their repeats are straightforward once you get started.
Skill level: Intermediate. You'll use basic crochet stitches along with puff stitches, lace repeats, increases, decreases, working around a foundation chain, and sewing several small pieces together. The instructions are written step by step, but some experience with shaping and assembling crochet projects will be helpful.
For a reference to the standard stitch names, see the Craft Yarn Council's U.S. crochet abbreviations.
Abbreviations:
- ch: chain
- sc: single crochet
- hdc: half double crochet
- dc: double crochet
- sl st: slip stitch
- st/sts: stitch/stitches
- sp: space
- sk: skip
- inc: work 2 stitches into the same stitch
- sc2tog: single crochet 2 stitches together
- BLO: back loop only
- RS: right side
- rnd: round
Magic ring: Make an adjustable loop and work the stated number of stitches into it, then pull the yarn tail to close the center.
Picot: Ch 3, then sl st into the first of those three chains to make a small decorative point.
Puff stitch (puff): Yarn over, insert the hook into the indicated chain space, yarn over and pull up a loop to approximately double-crochet height. Repeat this sequence twice more in the same space. You should have seven loops on the hook. Yarn over and pull through all seven loops, then ch 1 to secure the puff. The securing chain does not count as an additional stitch. Each finished puff counts as one stitch when working the following round.
Special notes: The head, hands, sleeves and bootie are worked in continuous rounds unless stated otherwise. The gown is worked in joined rounds without turning. Join each gown round with a sl st into its first actual stitch.
For gown rounds, use ch 1 before sc or hdc rounds and ch 2 before dc rounds. These beginning chains do not count as stitches. In the lace rounds, chain spaces remain open and are filled on the following round. Don't count a chain space as an ordinary double crochet stitch.
Use a stitch marker to mark the beginning of continuous rounds. Keep checking the counts, especially while shaping the head, sleeves and miniature bootie. A missed increase in one of those little pieces can change the finished shape quite noticeably.
Crochet Angel Ornament Pattern Free: Gown, Head and Sleeves
We'll make the angel in separate pieces, beginning with her ivory gown. The upper part is worked fairly close together so there's a good place to attach the arms and head. Lower down, the stitches open into eight repeating lace sections, ending in a row of scallops.
You'll make one complete angel whether you're choosing the classic ornament or the version with the baby bootie. The optional bootie is added after the angel has been assembled.
Part 1: Crochet the Ivory Gown
With ivory yarn, ch 16. Join with a sl st to the first chain to form a ring, taking care not to twist it.
Work in joined rounds without turning. The beginning chain used to raise the height of each round does not count as a stitch.
Rnd 1: Ch 1, sc in each chain around. Join. (16 sc)
Rnd 2: Ch 1, [sc in next st, 2 sc in next st] 8 times. Join. (24 sc)
Rnd 3: Ch 1, hdc in each st around. Join. (24 hdc)
Rnd 4: Ch 1, [hdc in next 2 sts, 2 hdc in next st] 8 times. Join. (32 hdc)
Rnd 5: Ch 1, hdc in each st around. Join. (32 hdc)
Rnd 6: Ch 1, [hdc in next 3 sts, 2 hdc in next st] 8 times. Join. (40 hdc)
Rnd 7: Ch 1, hdc in each st around. Join. (40 hdc)
Rnd 8: Ch 1, [hdc in next 4 sts, 2 hdc in next st] 8 times. Join. (48 hdc)
Rnd 9: Ch 2, dc in each st around. Join. (48 dc)
The upper gown is now complete. The next rounds form the openwork sections that give the lower skirt its lacy appearance.
Part 2: Make the Openwork Lace Skirt
Keep using ivory yarn. The lace is organized into eight repeating sections. Place a removable stitch marker at the beginning of one repeat if that helps you keep track.
Rnd 10: Ch 2, [dc in next 2 sts, ch 2, sk next 2 sts, dc in next 2 sts] 8 times. Join. (32 dc and 8 ch-2 spaces)
Rnd 11: Ch 2, [dc in next 2 dc, work (dc, puff, dc) into the next ch-2 space, dc in next 2 dc] 8 times. Join. (48 dc and 8 puff stitches; 56 stitches total)
Rnd 12: Ch 2, [dc in next 3 sts, work 2 dc into the next puff stitch, dc in next 3 sts] 8 times. Join. (64 dc)
Rnd 13: Ch 2, [dc in next 2 sts, ch 4, sk next 4 sts, dc in next 2 sts] 8 times. Join. (32 dc and 8 ch-4 spaces)
Rnd 14: Ch 2, [dc in next 2 dc, work (2 dc, puff, 2 dc) into the next ch-4 space, dc in next 2 dc] 8 times. Join. (64 dc and 8 puff stitches; 72 stitches total)
Rnd 15: Ch 2, dc in each st around, working into the top of each puff as one stitch. Join. (72 dc)
Rnd 16: Ch 2, [dc in next 2 sts, ch 5, sk next 5 sts, dc in next 2 sts] 8 times. Join. (32 dc and 8 ch-5 spaces)
Rnd 17: Ch 2, [dc in next 2 dc, work (3 dc, puff, 3 dc) into the next ch-5 space, dc in next 2 dc] 8 times. Join. (80 dc and 8 puff stitches; 88 stitches total)
Rnd 18: Ch 2, dc in each st around, working into the top of each puff as one stitch. Join. (88 dc)
Check that you have eight evenly spaced fan sections. Each fan begins at an open chain space and grows progressively wider through the skirt. The final round provides eleven stitches per fan section for the scalloped hem.
Before continuing, check that you have eight evenly spaced lace sections around the skirt. Each repeat should line up with the one above it. If the openings have started drifting around the dress, check the previous round before making the edging.
Part 3: Scalloped Hem
Rnd 19: Ch 1, [sc in next st, sk next 4 sts, work 9 dc in next st, sk next 5 sts] 8 times. Join with a sl st into the first sc. (8 scallops, made from 8 sc and 72 dc)
Fasten off and weave in the yarn tail along the inside of the skirt.
The gown should now have a narrower upper section, a widening lace skirt and eight rounded scallops along the bottom. Smooth the scallops outward with your fingers. Don't pull them into long points. We want that soft, full shape shown in the finished example.
Leave the bottom of the gown open. The ornament is meant to look like a little crocheted dress, not a stuffed doll with a closed lower body.
Part 4: Crochet the Angel's Head
With flesh-colored yarn, make a magic ring. Work in continuous rounds and move your stitch marker at the beginning of each round.
Rnd 1: Work 6 sc in the magic ring. (6 sc)
Rnd 2: Inc in each st around. (12 sc)
Rnd 3: [Sc in next st, inc in next st] 6 times. (18 sc)
Rnd 4: [Sc in next 2 sts, inc in next st] 6 times. (24 sc)
Rnd 5: [Sc in next 3 sts, inc in next st] 6 times. (30 sc)
Rnds 6–10: Sc in each st around. (30 sc in each round)
Rnd 11: [Sc in next 3 sts, sc2tog] 6 times. (24 sc)
Rnd 12: [Sc in next 2 sts, sc2tog] 6 times. (18 sc)
Rnd 13: [Sc in next st, sc2tog] 6 times. (12 sc)
Stuff the head firmly enough to hold its rounded shape, but don't stretch the stitches so far that you can see the stuffing through them.
Rnd 14: Sc2tog 6 times. (6 sc)
Fasten off, leaving a long sewing tail. Thread the tail through the front loops of the remaining six stitches, pull the opening closed, and secure the yarn.
The head should have a smooth, rounded face. There's no need to embroider eyes, a nose or a mouth. Her simple, faceless appearance is part of the approved design.
Part 5: Make the Short Neck
With flesh-colored yarn, leave a 12-inch beginning tail, then ch 16. Join with a sl st to form a ring, taking care not to twist the chain.
Rnd 1: Sc in each foundation chain around. (16 sc)
Rnd 2: Sc in each st around. (16 sc)
Fasten off, leaving a second 12-inch sewing tail at the upper edge.
Leave both ends of the short neck tube open. The foundation edge has 16 stitches to match the 16-stitch gown neckline, while the upper edge will be sewn beneath the head.
Keep the tube short. Most of it will be hidden when the head and gown are joined, leaving just enough neck visible beneath the angel's face.
Part 6: Crochet the Two Flared Sleeves
Make two identical sleeves with ivory yarn. Begin each sleeve at the narrow shoulder end and work toward the wider cuff.
Rnd 1: Leave a 12-inch beginning yarn tail, then make a magic ring and work 6 sc into it. Pull the ring closed, keeping the beginning tail available for attaching the narrow shoulder end to the gown. (6 sc)
Rnd 2: Sc in each st around. (6 sc)
Rnd 3: [Sc in next st, inc in next st] 3 times. (9 sc)
Rnd 4: Sc in each st around. (9 sc)
Rnd 5: [Sc in next 2 sts, inc in next st] 3 times. (12 sc)
Rnd 6: Sc in each st around. (12 sc)
Rnd 7: [Sc in next 3 sts, inc in next st] 3 times. (15 sc)
Rnd 8: Sc in each st around. (15 sc)
Rnd 9: [Sc in next st, sk next st, work 3 hdc in next st, sk next st, sc in next st] 3 times. (3 small cuff scallops)
Fasten off at the wide cuff and weave in the ending yarn tail. Keep the long beginning tail at the narrow shoulder end for assembly.
These are bell-shaped sleeves, not straight little tubes. The narrow ends attach to the shoulders, while the wider scalloped ends hang toward the center front of the gown.
Part 7: Crochet the Praying Hands
Make two small hands with flesh-colored yarn.
Rnd 1: Work 4 sc in a magic ring. (4 sc)
Rnd 2: Inc in each st around. (8 sc)
Rnds 3–4: Sc in each st around. (8 sc in each round)
Fasten off each hand, leaving a sewing tail. Don't overstuff these small pieces. They need to stay narrow enough to meet neatly beneath the angel's face.
During assembly, tuck the open ends into the sleeve cuffs and position the rounded ends together as praying hands. The palms should meet gently at the center rather than crossing over one another.
Crochet Angel Wings with Openwork Lace
Her wings are almost as important as the gown. They're wide enough to be noticed behind the sleeves, with open spaces that let the Christmas tree lights show through. They also have softly rounded upper tips and gently scalloped outer edges.
Make two wings using ivory yarn. Both use the same instructions, but you'll turn one over when attaching them so the finished pair mirrors itself.
Make the First Wing
With ivory yarn, ch 4.
Row 1: Work 3 dc in the fourth ch from the hook. The beginning ch 3 counts as the first dc. (4 dc)
Row 2: Ch 3 and turn. The ch 3 counts as the first dc. Dc in the first st, dc in each of the next 2 sts, and work 2 dc in the last st. (6 dc)
Row 3: Ch 3 and turn (counts as the first dc). Dc in the same first st, ch 1, sk next st, dc in next st, ch 1, sk next st, dc in next st, and work 2 dc in the last st. (6 dc and 2 ch-1 spaces; 8 positions)
Row 4: Ch 3 and turn (counts as the first dc). Dc in the same first st, dc in each of the next 2 dc, ch 1, sk the next ch-1 space, dc in next dc, ch 1, sk the next ch-1 space, dc in next dc, and work 2 dc in the last st. (8 dc and 2 ch-1 spaces; 10 positions)
Row 5: Ch 3 and turn (counts as the first dc). Dc in the same first st, dc in next dc, ch 1, sk next dc, dc in next ch-1 space, ch 1, sk next dc, dc in next ch-1 space, ch 1, sk next dc, dc in next dc, ch 1, sk next dc, and work 2 dc in the last st. (8 dc and 4 ch-1 spaces; 12 positions)
Row 6: Ch 3 and turn (counts as the first dc). Dc in the same first st, dc in next dc, ch 1, sk next ch-1 space, dc in next dc, ch 1, sk next ch-1 space, dc in next dc, ch 1, sk next ch-1 space, dc in next dc, ch 1, sk next ch-1 space, dc in each of the next 2 dc, and work 2 dc in the last st. (10 dc and 4 ch-1 spaces; 14 positions)
Row 7: Ch 3 and turn (counts as the first dc). Dc in the same first st. Work 1 dc into each of the next 12 positions, working into each of the four ch-1 spaces as one position. Work 2 dc in the last st. (16 dc)
The wing now has twelve openwork spaces distributed across Rows 3–6. Row 7 forms a firm sixteen-stitch attachment edge. Do not fasten off; continue with the rounded wing border.
Wing Border
Do not fasten off after Row 7. Ch 1. The border creates three small rounded lobes along each sloping wing edge, with a softly rounded outer tip.
First sloping edge: Beginning at the broad Row 7 edge, work 2 sc around the end of Row 7, 3 hdc around the end of Row 6, 2 sc around Row 5, 3 hdc around Row 4, 2 sc around Row 3, 3 hdc around Row 2, and 2 sc around Row 1. (17 border stitches: 8 sc and 9 hdc)
Rounded outer tip: Work 5 hdc into the original starting-chain point at the narrow end of the wing. (5 hdc)
Second sloping edge: Work 2 sc around the opposite end of Row 1, 3 hdc around Row 2, 2 sc around Row 3, 3 hdc around Row 4, 2 sc around Row 5, 3 hdc around Row 6, and 2 sc around Row 7. (17 border stitches: 8 sc and 9 hdc)
Broad attachment edge: Work 1 sc in each of the 16 dc across Row 7. Join with a sl st into the first border sc. (55 border stitches total: 32 sc and 23 hdc)
The 3-hdc groups form softly rounded edges rather than sharp picots. Smooth the border into a gentle outward curve without stretching the wing wider than its natural shape.
Fasten off, leaving a long sewing tail.
Make the Second Wing
Repeat Rows 1–7 and the rounded border exactly as written for the first wing. Both wings must finish with 16 dc across Row 7 before the border is added. Turn one finished wing over during assembly so the pair mirrors itself.
The finished wings should have softly rounded outer tips, broad 16-stitch attachment edges, openwork lace and gently scalloped outer borders.
When attaching them, position the broad edges toward the upper back of the gown and angle the rounded outer tips upward and outward. The left and right wings should mirror one another, with the decorative edges spreading away from the shoulders.
Don't sew the entire wings flat against the gown. Attach their broad inner edges securely, but leave the outer portions free so they stand out behind the angel's shoulders.
If your wings curl, lightly dampen and pin them into matching shapes before assembly. Allow them to dry completely. Optional fabric stiffener can help them hold their shape, but test it first on a separate yarn sample to check for discoloration or unwanted stiffness.
Crochet Angel Hair and Golden Halo
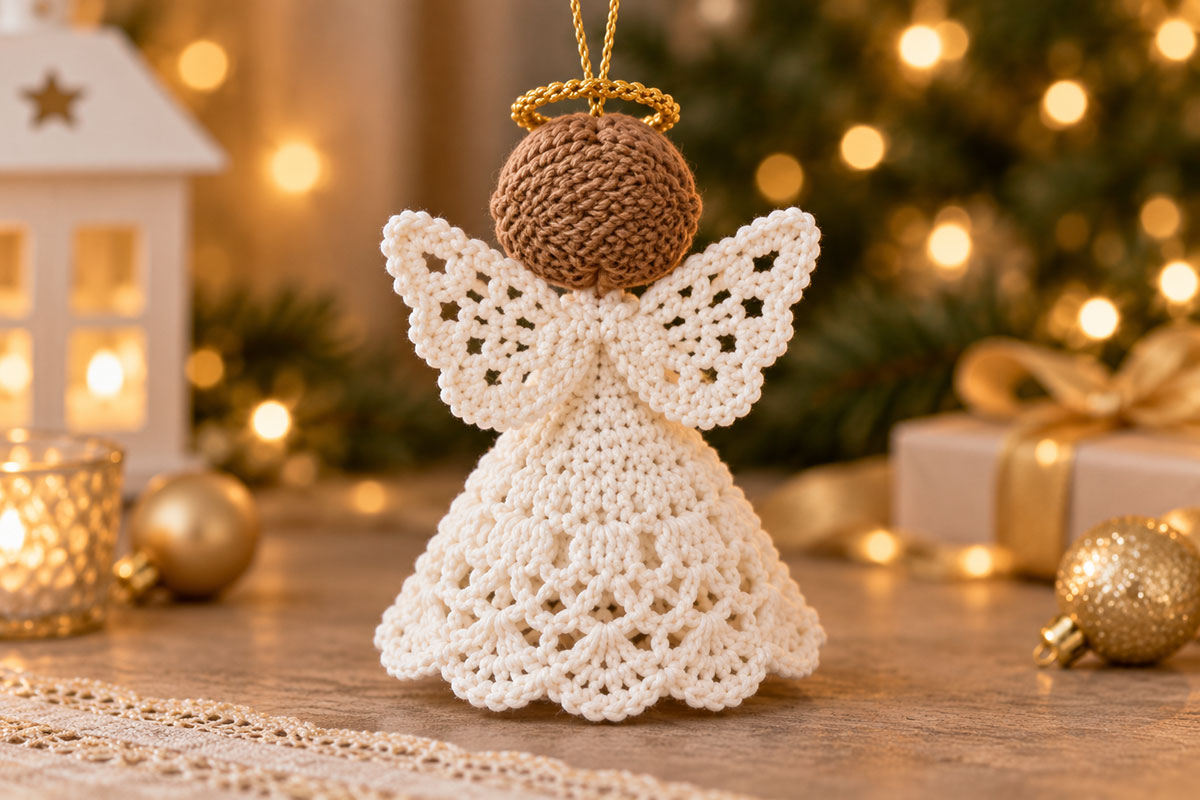
The brown hair gives this little angel much of her personality. It's made with a crocheted cap and a pair of braided sections sweeping away from the center of her forehead. The golden halo sits just above the hair, leaving her sweet little face completely plain.
Part 1: Crochet the Brown Hair Cap
With medium-brown yarn, make a magic ring.
Rnd 1: Work 6 sc into the magic ring. (6 sc)
Rnd 2: Inc in each st around. (12 sc)
Rnd 3: [Sc in next st, inc in next st] 6 times. (18 sc)
Rnd 4: [Sc in next 2 sts, inc in next st] 6 times. (24 sc)
Rnd 5: [Sc in next 3 sts, inc in next st] 6 times. (30 sc)
Rnds 6–7: Sc in each st around. (30 sc in each round)
Fasten off, leaving a long sewing tail.
Place the cap over the top of the finished head. It should cover the crown and upper sides while leaving a generous rounded area of the face visible.
Stitch the cap in place around its lower edge using small, evenly spaced stitches. Keep the lower front hairline slightly higher than the side sections so the face stays open.
Part 2: Make the Braided Hair Sections
Cut six brown yarn lengths, approximately 6 inches long, for each braid. Pair the strands to form three slightly thicker bundles.
Secure the three bundles together at one end and braid them, keeping the tension even. Make each finished braid approximately 1½ inches long, allowing for adjustment to fit the head. Tie off the end securely and trim the excess only after checking the fit.
Make five additional matching braids, for six braids total. Arrange them into two matching groups of three, one group for each side of the head.
Begin positioning the braids near the top center of the hair cap. Fan three braids toward the left temple and three toward the right, following the curved surface of the head. Place them close together so the upper crown has the raised braided texture visible in the finished photograph.
Adjust the braid lengths as needed before trimming any ends. Keep the center part neat and leave the rounded face fully visible beneath the front hairline.
Sew each braid firmly in place with matching brown yarn. Secure the upper ends near the crown, then follow the braid toward the temple with small attachment stitches. Tuck the lower ends beneath the hair cap at the sides.
You want the braids to look like part of her hairstyle, not two loose pieces dangling beside her face.
Part 3: Small Back Hair Bun
For the gathered section at the back of the hair, use medium-brown yarn.
Rnd 1: Work 6 sc in a magic ring. (6 sc)
Rnd 2: Inc in each st around. (12 sc)
Rnd 3: Sc in each st around. (12 sc)
Fasten off, leaving a sewing tail.
Flatten the small piece slightly and sew it to the lower back of the hair cap. Arrange the stitches into a rounded gathered bun. Keep it small so it doesn't overpower the head or interfere with the wings.
Part 4: Crochet the Golden Halo
With gold yarn or suitable decorative crochet thread, ch 24. Join with a sl st to form a ring, making sure the chain isn't twisted.
Rnd 1: Ch 1, sc in each of the 24 foundation chains around. Join with a sl st. (24 sc)
Fasten off, leaving a long sewing tail.
Arrange the ring into a smooth circle. If the gold yarn is very soft, you can apply a small amount of suitable fabric stiffener and allow it to dry in the desired shape before attaching it.
Hold the halo horizontally above the hair to check its position, with the front edge visible over the forehead. Keep the long gold sewing tail attached, then set the halo aside until Step 6 of assembly. You'll secure it after the wings, sleeves and praying hands are attached.
Keep the halo centered. It should look as though it's floating just above her head, not sitting down over her face like a hat brim.
Important: The halo is decorative. Don't attach the ornament's weight-bearing hanging loop to the halo alone. The loop will be secured through the head and reinforced at the neck during final assembly.
Optional Mini Crochet Baby Bootie for a First Christmas Ornament
Here's the little extra that makes the second version so special. Instead of changing the angel herself, you'll add one tiny crocheted baby bootie hanging from her praying hands.
The bootie has a rounded toe, a pale-blue body, an ivory sole, a narrow ivory band beneath its rolled blue cuff, and a tiny ivory bow. It's supposed to look like a miniature baby shoe, not a Christmas stocking. That distinction matters, especially at this size.
You'll need only a small amount of pale-blue and ivory yarn. Use the same 2.25 mm hook as the angel unless your stitches are too loose to hold the bootie's shape.
Part 1: Crochet the Bootie Sole
With ivory yarn, ch 5.
Rnd 1: Sc in the second ch from the hook, sc in each of the next 2 chains, and work 3 sc in the last chain. Continue around the opposite side of the foundation chain. Sc in each of the next 2 chains, then work 2 sc in the remaining end chain. (10 sc)
Place a stitch marker in the first stitch. The three-stitch end is the rounded toe end. The opposite end forms the heel.
Rnd 2: Inc in the first st, sc in next 2 sts, inc in each of the next 3 sts, sc in next 2 sts, and inc in each of the last 2 sts. (16 sc)
The sole should now be a small oval with a rounded front. Don't pull it into a circle.
Part 2: Shape the Blue Bootie
Change to pale-blue yarn.
Rnd 3: Working in BLO, sc in each st around. (16 sc)
Rnd 4: Sc in each st around. (16 sc)
Rnd 5: Sc in next 4 sts, sc2tog 3 times, then sc in remaining 6 sts. (13 sc)
Rnd 6: Sc in next 3 sts, sc2tog, sc in next st, sc2tog, then sc in remaining 5 sts. (11 sc)
Rnd 7: Sc in each st around. (11 sc)
These decreases pull the front of the bootie inward to make the rounded toe while leaving a smaller opening at the top. The bootie should have a recognizable foot shape with a slightly raised ankle.
Part 3: Make the Ivory Band and Blue Cuff
Change to ivory yarn for the narrow contrasting band directly beneath the cuff.
Rnd 8: Sc in each st around. (11 sc)
Change to pale-blue yarn for the rolled cuff.
Rnd 9: [Sc in next st, inc in next st] 5 times, then sc in last st. (16 sc)
Rnd 10: Sc in each st around. (16 sc)
Join with a sl st and fasten off. Weave in the end carefully so the little opening stays visible.
Gently roll the upper blue edge outward. Keep Round 8 visible as a narrow ivory band beneath the blue cuff. The cuff should be softly rounded and open at the top, matching the miniature bootie in the finished photograph.
Part 4: Crochet the Tiny Bow
With ivory yarn, ch 14. Join with a sl st into the first chain to make a small loop.
Fasten off, leaving a long tail. Flatten the loop so it forms two little sides, then wrap the yarn tail around the center four times to make a bow.
Secure the wrapped center at the back with a yarn needle. Stitch the finished bow onto the pale-blue front of the bootie, just below the narrow ivory band beneath the rolled blue cuff. Center the bow above the rounded toe.
Keep the bow small. It shouldn't be larger than the bootie itself or cover the rounded toe.
Part 5: Make the Bootie Hanging Cord
With ivory yarn, leave an 8-inch beginning tail, then ch 5. Fasten off, leaving another 8-inch tail.
The five-chain section forms the short visible hanging cord. During assembly, tuck any excess into the attachment points so the bootie hangs approximately 1/4–1/2 inch below the praying hands. The yarn tails are for sewing and should not remain loose.
Attach one end securely inside the back of the bootie cuff. Stitch through several crochet loops and weave the tail back into the fabric.
Leave the other end free until the angel has been assembled.
When the bootie is attached, it should hang just below the angel's praying hands, centered against the upper part of her gown. The tiny shoe needs to be visible without covering all that pretty lacework.
If you're making the classic ornament, simply leave the bootie off. The finished angel doesn't need anything else in her hands.
Assembling Your Crochet Angel Ornament
You've made all the individual pieces. Now we'll put them together so the wings stand away from the dress, her hands meet neatly at the front and the halo sits above her hair.
Don't rush the positioning. A few small adjustments before you sew everything down can make quite a difference in how the finished angel looks.
Check your pieces before assembly: You should have 18 components: one gown, one head, one neck, two sleeves, two hands, two wings, one brown hair cap, six hair braids, one back hair bun and one golden halo.
For the baby's first Christmas version, you'll also need the miniature bootie, its ivory bow and the short hanging cord. The angel's gold tree-hanging loop is added during assembly.
Step 1: Attach the Neck and Head
Position the short flesh-colored neck tube inside the 16-stitch opening at the top of the ivory gown, with its foundation edge at the neckline.
Using the beginning yarn tail, sew the 16 foundation stitches of the neck to the 16 stitches of the gown neckline, matching one stitch to one stitch all the way around. Keep the seam even. There's no need to gather the opening.
Position the head above the neck with the closed end of the head facing downward. Center the neck beneath the head, just outside the final closing rounds.
Using the upper neck sewing tail, attach the 16 upper neck stitches to 16 evenly distributed stitches around Round 12 on the underside of the head. Round 12 has 18 stitches, so leave one unused head stitch on each of two opposite sides to distribute the attachment evenly.
Work all the way around the neck opening and secure the seam. The neck should sit partly beneath the head, with the head centered over the gown. Weave in both sewing tails after the joins are secure.
The head should sit upright above the gown. If it leans forward or backward, adjust the stitching before moving on.
Step 2: Position the Wings
Lay the angel face down on a clean, flat surface. Place one wing against each side of the upper back.
Each wing has a broad 16-stitch edge from Row 7 and a narrower, softly rounded outer tip at its original foundation chain. Place the broad edges toward the upper back of the gown, with the rounded tips extending upward and outward.
On each 16-stitch Row 7 edge, identify stitches 6 through 11. These six central stitches form the attachment area. Leave the five stitches on either side free so the wing can spread outward.
Position both wings at matching angles. The rounded outer tips should rise beside the lower portion of the hair, while the scalloped outer edges remain visible beyond the shoulders. Check the arrangement from the front before sewing.
Position the six-stitch attachment area against the upper back of the gown, angling it from approximately Round 3 near the shoulder toward Round 7 of the upper bodice. Keep the left and right attachment areas equally spaced from the center back.
Using the long sewing tails, stitch each of the six attachment stitches securely to the gown along this diagonal path. Catch the gown fabric beneath each stitch without pulling it into gathers.
Check the wings from the front before securing the tails. Both softly rounded outer tips should rise beside the lower portion of the hair, and the openwork borders should spread outward beyond the shoulders. Neither wing should cover the angel's face. Add one small hidden reinforcing stitch at the upper attachment if needed.
Leave the outer portions free. The wings should open away from the body rather than lying completely flat across the back.
Compare both sides before tying off the yarn. The wings should be close in height, angle and distance from the head.
Step 3: Sew on the Sleeves
Turn the angel face up again.
Position the narrow end of each sleeve at the upper sides of the gown, directly below the neck. Angle the sleeves gently inward so their wide cuffs meet near the center front.
Using the beginning yarn tail left at the narrow end of each sleeve, sew the shoulder securely to the gown. Pass the tail through the closed shoulder end and the corresponding upper-gown stitches, then add a few small anchoring stitches along the upper side of the sleeve. Leave the lower portion free enough to hang naturally. Secure and weave in the remaining tail.
Check that the sleeves cover the shoulder attachment stitches without hiding the wings.
Step 4: Attach the Praying Hands
Insert the open end of each flesh-colored hand slightly inside its matching ivory sleeve cuff.
Stitch the hands securely to the inner cuffs, keeping the rounded ends visible.
Bring the hands together at the center of the angel's chest with their inner edges touching. Sew the inner edges together using a few small flesh-colored stitches.
Keep the hands pointing gently upward, with the sleeves hanging below them. They should form a praying pose rather than appearing folded across the gown.
Once you're happy with their position, add small anchoring stitches behind the hands where they meet the gown. These help prevent the arms from shifting when the ornament is hung.
Step 5: Secure the Hairstyle
Check that the brown hair cap is firmly attached and that both braided sections curve evenly away from the center of the forehead.
Smooth the braids into position and add a few extra stitches where necessary. The face should remain completely visible below the hairline.
Make sure the small back bun sits neatly against the hair cap and doesn't interfere with the upper wing attachments.
Step 6: Attach the Halo
Place the golden halo just above the top of the hair, keeping it centered over the head.
Secure the ring with two short gold-yarn attachment points, one on either side toward the upper crown. Add a small rear attachment if necessary to stop the halo from tipping forward.
The ring should remain open and rounded. Don't pull the supporting stitches so tight that the halo folds or becomes oval.
Step 7: Make a Secure Hanging Loop
Cut approximately 20 inches of gold yarn or suitable hanging cord. Fold it in half, leaving a loop approximately 2–2½ inches long at the fold.
The two remaining tails will be used to secure the loop through the hair cap and head, reinforce the attachment at the back of the neck, and weave into the upper gown. Don't trim them before those attachments are finished.
Pass the folded hanging loop upward through the open center of the golden halo, leaving the two free cord ends below the ring. Thread those two ends through separate stitches near the top center of the brown hair cap, passing through the underlying head stitches as well.
Secure the ends with several small stitches, then run the remaining ends down the back of the head and reinforce the neck attachment before weaving them into the upper gown.
The visible hanging loop should rise through the center of the halo, but the weight of the ornament must be carried by its reinforced head and neck attachments, not by the halo itself.
Adjust the visible loop to approximately 2–2½ inches long, or the length you prefer for your Christmas tree.
Gently lift the ornament by the loop to check its balance. The angel should hang upright, with the gown directly beneath the head.
If she tilts, move the upper attachment slightly toward the heavier side before securing everything permanently. The hanging loop must support the angel independently of the halo.
Step 8: Add the Optional Baby Bootie
For the baby's first Christmas version, position the tiny bootie directly below the praying hands.
Use the free end of the bootie's ivory chain cord to attach it through the joined inner edges of the hands. Pass the yarn through several stitches, secure the connection, and weave the ends into the sleeves.
Shorten the visible cord if necessary so the bootie hangs close to the hands. Angle the bootie slightly so its rounded toe, rolled blue cuff, narrow ivory band and small ivory bow are visible from the front.
Check that the bootie doesn't pull the hands apart or make the ornament lean. If it does, reinforce the hand attachment behind the sleeves.
Step 9: Shape the Finished Angel
Smooth the skirt downward, spreading the eight scallops evenly around the bottom. Adjust the wings so they sit at matching angles and gently arrange the sleeve cuffs around the praying hands.
If you want the lace to keep a slightly firmer shape, dampen the gown lightly and arrange the scallops over a suitable rounded form while it dries. Don't soak the stuffed head or pull the skirt out of proportion.
Allow everything to dry completely before hanging the ornament.
Remove every blocking pin and temporary stitch marker. Check the inside of the gown, the backs of the wings and the attachment points for loose yarn ends. Secure and weave in any remaining tails, then check the halo, hands, wings, hanging loop and optional bootie once more before putting the ornament on your Christmas tree.
That's your finished angel. Leave her just as she is for the classic Christmas version, or add the tiny bootie to turn her into a baby's first Christmas keepsake.
Crochet Angel Ornament Pattern Notes and Tips
Keeping the Gown's Pretty Shape
The skirt is supposed to be full and gently rounded, with the scallops hanging freely at the bottom. If yours looks too narrow, check that you haven't accidentally skipped an increase round or worked too tightly through the openwork sections.
I'd leave the lower gown unstuffed. Filling the entire dress would push against the lace openings and could change that lovely open appearance. The head needs stuffing, but the skirt should keep its shape through the crochet fabric and careful finishing.
Making the Angel Hang Straight
The head, wings and sleeves should be balanced on either side of the gown. Before making the final knots in the hanging loop, hold the ornament up and check it from the front.
If it tilts, don't try to fix the problem by pulling the halo to one side. Adjust the hanging-loop attachment or the placement of the heavier pieces instead.
Choosing a Color for the Baby Bootie
Pale blue looks especially pretty against the ivory gown, but the little bootie can certainly be made in pink, white, sage or a color that matches your baby's first Christmas decorations.
I'd keep the sole, narrow band beneath the cuff, and bow ivory, whatever color you choose for the body of the bootie. Make the rolled cuff the same color as the bootie itself. Those little contrasting details make it easier to recognize the miniature shoe.
Is This Angel a Toy?
No. This pattern is intended for a decorative Christmas ornament, not a baby toy. The hanging loop, miniature bootie and small attached pieces aren't suitable for a child to play with or chew.
Keep the ornament out of a baby's reach, and don't hang it from a crib, bassinet or anywhere a child could pull on the cord or detach the small pieces.
A Little Angel for Other Christmas Projects
If you like the idea of a handmade angel but need something flat for a blanket, bib or stocking, my free crochet angel appliqué pattern is made for those kinds of projects.
And if you're putting together a collection of tiny handmade Christmas keepsakes, the mini crochet Christmas stockings would be pretty hanging nearby.
There's something especially sweet about a little handmade ornament that can come out of the Christmas box again and again. The classic angel is lovely on her own, but that tiny baby bootie gives the second version a story all its own.
Pattern review note: This original pattern has been reviewed for its proposed stitch counts, increases, decreases and construction sequence. It has not been physically crocheted or test-made from these instructions. Finished measurements, fabric behavior and exact reproduction of the example image have not been verified with a completed sample.
When you click on links to various merchants on this site and make a purchase, this may result in this site earning a commission. This does not affect the price you pay.

UBGI Gold Standard 2026
Reviewed under the site's
editorial checklist.
Photos, decorating ideas, party setups and reader submissions are shared for inspiration unless a page is specifically presented as a pattern, tutorial, reference guide or step-by-step project. Follow the instructions, measurements, safety guidance and manufacturer directions provided for the particular project or product.
About Jan | Contact | Baby Nursery Ideas (Blog) | Site Map | Privacy Policy | Disclosure Policy | Disclaimer | Affiliate Disclosure | Earnings Disclosure | Facebook | Pinterest
I am a participant in the Amazon Services LLC Associates Program, an affiliate advertising program designed to provide a means for us to earn fees by linking to Amazon. As an Amazon Associate I earn from qualifying purchases.
Copyright © 2006-2026. All Rights Reserved.