Free Crochet Snowman Baby Rattle Pattern
By Jan Bay
This free crochet snowman baby rattle pattern features a sleepy-eyed snowman wearing a navy snowflake top hat with embroidered holly and a blue winter scarf. If you prefer a wide-awake snowman, you can easily embroider the eyes differently than my example. I just like my snowmen relaxed, I guess. The smooth wooden ring is left uncovered at the bottom, giving little hands a place to hold on. Made in ivory, navy and icy blue, the snowman coordinates with my matching snowman quilt and crochet blanket lovey for a handmade winter baby gift set that would be right at home in a Christmas-themed baby shower gift basket.
Explore More Free Crochet Baby Patterns
Matching Snowman Pinwheel Lovey Blanket Pattern
Free Crochet Bear Rattle Pattern
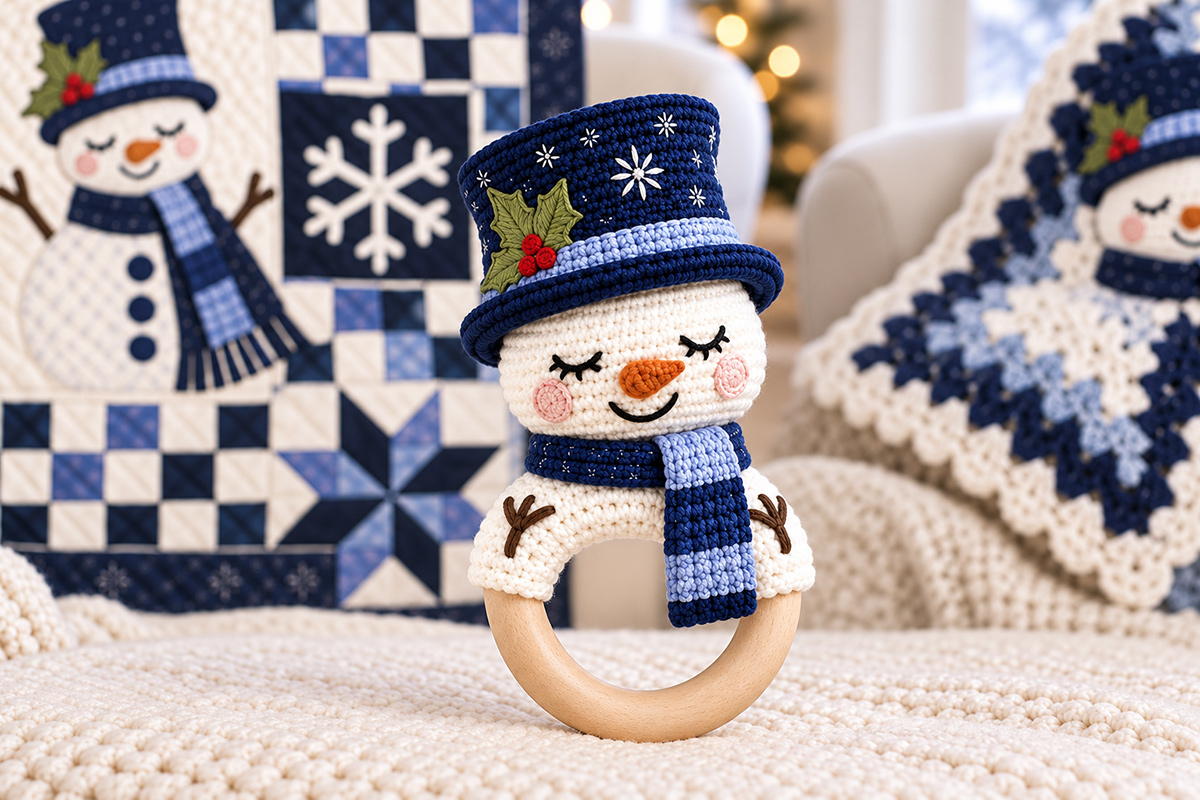
See Supplies for This Project Here.
- Supplies and Materials
- Finished Size and Gauge
- Crochet Stitches and Abbreviations
- Crochet Snowman Head and Face
- Snowflake Top Hat and Flat Embroidered Holly
- Attaching the Snowman to the Wooden Ring
- Scarf and Final Assembly
- Baby Rattle Safety and Care
Before you begin: This is an original, mathematically reviewed crochet pattern for an untested snowman rattle prototype. The finished construction has not been physically verified for infant use. Please keep completed samples out of babies' reach until the materials, dimensions, sound insert and attachments have passed the applicable safety evaluation.
Crochet Snowman Rattle Pattern: Supplies and Materials
Let's get everything together before starting. You'll be crocheting the snowman's head, his tall winter hat, the ivory cover that wraps around the wooden ring, and his little striped scarf. The face and other small decorations are embroidered, apart from the carrot nose.
I'd stick with smooth cotton yarn for this project. The stitches need to be close together, particularly around the stuffed head. You don't want big gaps where the filling can work its way through.
Yarn and Materials
- Approximately 15 grams of ivory DK cotton yarn for the head and ring cover
- Approximately 12 grams of navy DK cotton yarn for the hat and scarf
- Approximately 5 grams of icy-blue DK cotton yarn for the hatband and scarf stripes
- Small amount of orange cotton yarn for the carrot nose
- Brown cotton embroidery thread for the twig arms
- Black embroidery thread for the closed eyes and smile
- Dusty-pink embroidery thread for the cheeks
- Olive-green embroidery thread for the holly leaves
- Red embroidery floss for the three flat holly berries
- White embroidery thread for the snowflakes
- One smooth, solid wooden ring approximately 70 mm in outside diameter, with a 45 mm opening and approximately 12 mm wood thickness
- One manufactured, fully enclosed rattle sound insert, approximately 20 mm, for evaluation in the finished prototype
- Small piece of tightly woven cotton fabric for an inner sound-insert pouch
- Polyester fiberfill
- 2.5 mm crochet hook, or the size needed to achieve a firm fabric
- Yarn needle, embroidery needle, stitch markers and scissors
The yarn amounts are estimates for the proposed dimensions, so allow a little extra. Try to use the same yarn weight for all the crocheted pieces. Mixing a thick yarn for the hat with a finer yarn for the head can throw off their proportions.
About the wooden ring: The measurements matter here. The ivory cover is calculated to fit a ring with the dimensions above. A substantially thicker or larger ring will need a different cover size. Choose a solid, smoothly finished ring without cracks, splinters, detachable components or questionable coatings. Material suitability and the finished assembly still need to be verified for infant use.
A note about the sound insert: Don't improvise one with rice, beads, bells or loose pellets. The proposed rattle uses a sealed manufactured insert inside a separate sewn fabric pouch, enclosed within the stuffed head. That arrangement still needs to pass the applicable safety tests before the finished item can be used as an infant toy.
Finished Size and Crochet Gauge
Using the specified 70 mm wooden ring and the gauge below, the finished snowman is expected to measure approximately 6 to 6 1/2 inches tall, including the hat and ring, and about 3 inches across the brim of his hat.
These are calculated measurements. The finished size needs to be checked against a crocheted sample before treating them as final.
- Target head and hat gauge: 26 single crochet stitches across and 30 rounds over 4 inches (10 cm)
- Ring-cover gauge: Measure the width of 12 flat single crochet rows separately. The proposed cover needs a width close to 4 cm before joining, subject to the actual wooden ring and seam fit.
- Head: Approximately 2 1/3 inches wide
- Hat: Approximately 3 inches across the brim
- Shaped ring cover: Approximately 4 1/4 inches along the widest outer-arc row, 2 3/4 inches along each 18-stitch inner seam edge, and approximately 1 5/8 inches across the 12-row wrap before joining. These are calculated targets requiring a physical fit check.
- Exposed ring: Approximately the lower half of the wooden circle
Make a small single crochet gauge sample before beginning. The head should have a firm fabric with no visible stuffing between the stitches. If your crochet is loose, use a smaller hook.
Check the ring cover against the actual wooden ring before sewing it closed. It should fit snugly without stretching so much that the stitches open up.
Crochet Stitches and Abbreviations
This pattern uses US crochet terms. The head and hat are worked in continuous rounds unless otherwise stated. The ring cover and scarf are worked in rows.
- ch: Chain
- sc: Single crochet
- sl st: Slip stitch
- inc: Work 2 single crochet stitches into the same stitch
- inv dec: Invisible single crochet decrease over the next 2 stitches
- MR: Magic ring
- BLO: Back loop only
- st/sts: Stitch/stitches
- rnd: Round
- FO: Fasten off
Use a stitch marker to mark the beginning of each round. A turning chain does not count as a stitch unless the instructions specifically say otherwise.
Crochet Snowman Head and Embroidered Face
The head is made in ivory with a gently rounded shape. I want his cheeks to look full without turning him into a perfectly round snowball. The hat will sit across the upper part of his head, and the scarf will cover the join at the bottom.
Snowman Head
Using ivory yarn and a 2.5 mm hook, begin with a magic ring. Work in continuous rounds.
Round 1: Work 6 sc into MR. (6 sts)
Round 2: Inc in every st. (12 sts)
Round 3: Inc in every st. (24 sts)
Round 4: (1 sc, inc) repeat 12 times. (36 sts)
Round 5: (5 sc, inc) repeat 6 times. (42 sts)
Round 6: (6 sc, inc) repeat 6 times. (48 sts)
Rounds 7–11: Sc in every st for 5 rounds. (48 sts per round)
Round 12: (6 sc, inv dec) repeat 6 times. (42 sts)
Pause here to embroider the face while the head is still open.
Embroider the Sleepy Eyes
Choose the front center of the head and mark it. Position the two closed eyes across approximately Rounds 8 and 9, with their centers about 9 stitches apart along the front curve.
Using black embroidery thread, stitch each eye as a gentle downward curve spanning approximately 3 stitches. Add three short eyelashes along the lower edge of each curve.
Keep the eyes balanced on either side of the carrot nose. The little downward curves are what give the snowman his sleepy expression.
If you prefer a wide-awake snowman, embroider two small open-looking eyes instead. Use thread only, not buttons, beads or plastic safety eyes.
Make the Carrot Nose
Using orange cotton yarn, crochet the following small tapered piece.
Round 1: Work 4 sc into MR. (4 sts)
Round 2: Sc in each st. (4 sts)
Round 3: (1 sc, inc) repeat twice. (6 sts)
Round 4: Sc in each st. (6 sts)
Round 5: (2 sc, inc) repeat twice. (8 sts)
Fasten off, leaving a long sewing tail. Do not stuff the nose.
Position the wider eight-stitch base between the eyes, around Head Rounds 9 and 10, with the base slightly to the viewer's left of center. Angle the narrower carrot tip toward the viewer's right, matching the sideways-pointing nose in the example.
Sew around all eight stitches at the base, then anchor the narrow tip against the crocheted face with concealed stitches so it cannot project freely. Secure the yarn ends inside the head.
The small carrot nose is part of the photographed design, but its attachment and durability require physical testing. A nose that can pull loose is not acceptable on an infant rattle.
Add the Cheeks and Smile
Using dusty-pink embroidery thread, position two small, matching circular cheeks just below the outer ends of the sleepy eyes, around Head Rounds 10 and 11.
Beginning at the center of each cheek, embroider a small spiral using closely spaced backstitches, gradually working outward. Fill any noticeable gaps with short satin stitches while leaving the spiral lines visible.
Keep both cheeks flat against the ivory crochet. Do not attach separate crocheted circles or add padding. Secure the embroidery ends inside the head.
With black thread, embroider a small curved smile below the carrot nose, around Rounds 11 and 12. A gentle upward curve at each end gives him the same happy expression as the example.
Secure the embroidery ends inside the head.
Enclose the Sound Insert and Close the Head
For the proposed 20 mm sealed sound insert, cut two 2-inch (5 cm) squares of tightly woven cotton fabric. Place the squares right sides together and sew around the edges with a 1/4-inch (6 mm) seam allowance, leaving an opening large enough to insert the rattle mechanism.
Turn the pouch right side out and place the sealed sound insert inside. Close the opening with small, closely spaced stitches, then reinforce the closure with a second line of stitching. Secure the thread ends inside the pouch.
Place the pouch inside the crocheted head, surrounded by polyester filling. Do not leave the pouch opening exposed or rely on the crochet fabric alone to contain the sound insert.
These pouch dimensions are proposed for the test sample. The completed pouch and its seams must be evaluated for durability and containment before the rattle can be approved for infant use.
Before working the closing rounds, check the position of the enclosed sound insert and distribute the polyester filling evenly around it. Add filling gradually so the head holds its rounded shape without stretching the crochet stitches apart. Continue adjusting the filling as you decrease, making the final adjustments while the opening is still large enough to reach inside.
Round 13: (5 sc, inv dec) repeat 6 times. (36 sts)
Round 14: (1 sc, inv dec) repeat 12 times. (24 sts)
Round 15: Inv dec 12 times. (12 sts)
Round 16: Inv dec 6 times. (6 sts)
Fasten off, leaving a long yarn tail. Thread it through the front loops of the remaining 6 stitches, pull closed, and secure it inside the head.
Inspect the completed head. The closing stitches should be drawn securely together, no filling should be visible between the crochet stitches, and the sound insert must remain completely enclosed inside its sewn fabric pouch and the stuffed head.
Crochet the Navy Snowflake Top Hat
The hat is what really ties this snowman to the matching quilt and lovey. I like the tall navy crown, the icy-blue band and those little white snowflakes scattered across the front.
Keep the crown fairly straight, with a little fullness at the top and a brim that turns outward. It should look like a proper snowman's top hat rather than a winter beanie.
Top Hat Crown and Brim
Using navy cotton yarn and your 2.5 mm hook, work in continuous rounds.
Round 1: Work 6 sc into MR. (6 sts)
Round 2: Inc in every st. (12 sts)
Round 3: (1 sc, inc) repeat 6 times. (18 sts)
Round 4: (2 sc, inc) repeat 6 times. (24 sts)
Round 5: (3 sc, inc) repeat 6 times. (30 sts)
Round 6: (4 sc, inc) repeat 6 times. (36 sts)
Round 7: (5 sc, inc) repeat 6 times. (42 sts)
Round 8: (6 sc, inc) repeat 6 times. (48 sts)
The first eight rounds form the closed, circular top of the hat.
Round 9: Working in BLO, sc in every st. (48 sts)
Rounds 10–18: Sc in every st for 9 rounds. (48 sts per round)
On the final sc of Round 18, stop before the last yarn-over and pull icy-blue yarn through to complete the stitch. Cut the navy working yarn, leaving a tail long enough to weave securely into the inside of the hat.
Rounds 19–20: Continue in icy blue, working sc in every st for 2 rounds. (48 sts per round)
On the final sc of Round 20, change back to navy during the last yarn-over. Cut the icy-blue yarn, leaving a tail long enough to weave securely into the inside of the hat.
Continue working in continuous rounds without joining. Keep the stitch marker in place and weave the color-change tails securely into the inside of the crown before attaching the hat to the head. Do not leave loose carried strands.
Round 21: Sc in every st using navy yarn. (48 sts)
Round 22: (7 sc, inc) repeat 6 times. (54 sts)
Round 23: (8 sc, inc) repeat 6 times. (60 sts)
Round 24: Sc in every st. (60 sts)
Fasten off, leaving a long tail for sewing the hat to the head.
The icy-blue rows form the hatband without needing a separate strip of crochet. The last three rounds widen the lower edge into a small brim.
Give the hat a gentle shape with your fingers. Don't stretch the brim into a flat plate. It should curve outward just enough to frame the snowman's face.
Embroider the White Snowflakes
Before attaching the hat to the head, embroider the snowflakes onto the navy crown using white embroidery thread.
Start with one larger eight-rayed snowflake toward the upper front of the hat. Add approximately six smaller snowflakes around it, spreading them across the front and visible sides between Rounds 10 and 18.
Large snowflake: Using white embroidery thread, work four straight stitches crossing at the center: one vertical, one horizontal and two diagonal. This creates eight rays. Keep the stitches close against the navy crochet.
Smaller snowflakes: For each smaller snowflake, work three crossing straight stitches to form six short rays. Keep these noticeably smaller than the prominent snowflake.
Secure all embroidery ends inside the hat. Do not add beads, sequins or separate decorative pieces.
Keep the snowflakes fairly small. I wouldn't crowd the whole hat with them. The contrast between the white snowflakes and the navy crochet is enough without filling every space.
Do not add beads or separate sequins to the snowflakes.
Flat Embroidered Holly Leaves and Berries
Now for the holly on the left front of the hat. This decoration needs to be worked directly into the crocheted surface. There are no separate crocheted berries in this pattern.
Holly leaves: Using olive-green embroidery thread, outline two holly leaves approximately 1/2 to 5/8 inch long on the viewer's left front of the hat, immediately above the icy-blue hatband. Position one leaf pointing upward and the other angling outward toward the left side.
Give each leaf a pointed tip and two or three small pointed notches along its edges. Bring the lower ends of both leaves together above the three red berries, as shown in the example.
Fill the outlined leaves with closely spaced olive-green satin stitches worked directly through the underlying crochet. Embroider a darker olive-green center vein and short diagonal side veins on each leaf.
Keep the leaves flat against the hat. Do not stuff them, make separate padded pieces or leave any projecting edges.
Holly berries: Using cranberry-red embroidery floss, stitch exactly three tiny berries at the point where the leaves meet.
Arrange the berries with one above and two below. Each berry should be approximately 2 to 3 mm across.
Work each berry with several very short, parallel satin stitches directly through the navy crochet. Lay the stitches close together to create a small, filled red circle.
The berries must be flat satin-stitch embroidery only. Do not crochet separate berry balls, work bobbles or French knots, add padding, or build up raised edges.
Secure every embroidery end inside the hat, away from the outside surface.
The example photograph shows the appearance we're aiming for, but the written construction governs this detail. The berries are embroidered flat, regardless of how dimensional the small red details may appear in the photograph.
Position the Hat
Place the finished hat over the upper part of the snowman's head. The brim should sit above the embroidered eyes without hiding them.
Position the hat with the embroidered holly on the viewer's left front. Give the crown a slight tilt toward the viewer's left, matching the photographed example. The brim should sit a little lower on the left side and higher on the right, without covering either embroidered eye.
Use Hat Round 21 as the attachment circumference. Temporarily secure the front center of this round near Head Round 7. At the viewer's left side, position the attachment approximately one head round lower, near Head Round 8. At the viewer's right side, position it approximately one head round higher, near Head Round 6. Position the back center near Head Round 7.
Head Rounds 6, 7 and 8 each contain 48 stitches. Gradually transition between these marked attachment positions around the head, keeping the hat's 48-stitch attachment circumference evenly distributed. Check the placement from the front and both sides before sewing permanently.
If the tilted position pulls the hat out of shape, gathers the head or hides an eye, reduce the angle until the pieces meet smoothly. Do not force a tilt by stretching the stitches.
Thread the long navy yarn tail from Round 24 onto a yarn needle. Pass the needle through the underside of adjacent crochet stitches in Rounds 24, 23 and 22 until the yarn reaches Round 21. Keep the yarn concealed within the stitches rather than leaving a loose strand beneath the brim.
Using this yarn, sew the 48 stitches of Hat Round 21 to 48 corresponding attachment positions around the upper head, following the temporary placement marks. Work gradually between the indicated head rounds, keeping approximately one attachment stitch per corresponding stitch position without skipping or doubling the hat stitches.
Maintain even tension so the slight diagonal attachment does not gather the head or distort the crown. Leave Hat Rounds 22–24 free to curve outward. The tilted attachment must be checked on a finished test sample before the method can be considered physically verified.
Make a second reinforcing pass along the attachment seam. Secure the remaining yarn inside the crochet without exposed loops or long traveling strands.
Leave Hat Rounds 22–24 free to curve outward. Do not sew the outer edge of the brim flat against the face. Secure the yarn tail inside the hat and check that the crown stays upright without wire, cardboard or a removable support.
The proposed attachment matches the intended construction, but its fit, stability and strength still need to be checked on a finished sample.
Check that the crown stays upright without a separate wire, cardboard insert or removable support. If the proposed hat needs additional shaping, that needs to be resolved during test-making rather than adding a rigid piece inside the toy.
Attaching the Snowman to the Wooden Ring
Here's the construction detail I especially want you to follow. The snowman sits on a crocheted ivory arch that wraps around the upper portion of the wooden ring. His body shouldn't look as though it's perched on top of two little posts.
The lower half of the ring stays uncovered. That's the part I prefer to leave as smooth natural wood.
Crochet the Shaped Ivory Ring Cover
The ivory cover needs to follow the wooden ring's curved upper half. Because the outside curve is longer than the inside curve, we'll make a shaped panel rather than a straight rectangle.
Using ivory DK cotton yarn and a 2.5 mm hook, ch 19.
Row 1: Sc in the second ch from the hook and in each remaining ch. Ch 1, turn. (18 sts)
Row 2: Work 2 sc in the first st, sc across to the last st, and work 2 sc in the last st. Ch 1, turn. (20 sts)
Row 3: Work 2 sc in the first st, sc in each st until 1 st remains, then work 2 sc in the last st. Ch 1, turn. (22 sts)
Row 4: Work 2 sc in the first st, sc in each st until 1 st remains, then work 2 sc in the last st. Ch 1, turn. (24 sts)
Row 5: Work 2 sc in the first st, sc in each st until 1 st remains, then work 2 sc in the last st. Ch 1, turn. (26 sts)
Row 6: Work 2 sc in the first st, sc in each st until 1 st remains, then work 2 sc in the last st. Ch 1, turn. (28 sts)
Row 7: Sc in every st. Ch 1, turn. (28 sts)
Row 8: Inv dec over the first 2 sts, sc in each st until 2 sts remain, then inv dec over the last 2 sts. Ch 1, turn. (26 sts)
Row 9: Inv dec over the first 2 sts, sc in each st until 2 sts remain, then inv dec over the last 2 sts. Ch 1, turn. (24 sts)
Row 10: Inv dec over the first 2 sts, sc in each st until 2 sts remain, then inv dec over the last 2 sts. Ch 1, turn. (22 sts)
Row 11: Inv dec over the first 2 sts, sc in each st until 2 sts remain, then inv dec over the last 2 sts. Ch 1, turn. (20 sts)
Row 12: Inv dec over the first 2 sts, sc in each st until 2 sts remain, then inv dec over the last 2 sts. (18 sts)
Fasten off, leaving approximately 24 to 30 inches of ivory yarn for joining and reinforcement.
The panel should be widest through Rows 6 and 7, with matching 18-stitch edges at Rows 1 and 12. The wider center follows the outside of the wooden ring, while the two shorter edges meet along the inside curve.
At the target stitch gauge of 26 sc per 4 inches, the 28-stitch center measures approximately 10.8 cm and the 18-stitch seam edges measure approximately 6.9 cm. These correspond closely to the calculated outside and inside upper semicircles of the specified ring.
The panel is still 12 rows deep. Its actual depth depends on your flat-row gauge and needs to be checked around the wood.
Important fitting checkpoint: Before decorating or permanently joining the cover, wrap the shaped panel around the actual wooden ring. Check that the wider center follows the outer curve and that the two 18-stitch edges can meet along the inner curve without being pulled together under excessive tension.
If the center is too short, the inner edges overlap heavily, or the fabric develops pronounced folds, stop. The gauge or shaping must be corrected using the actual test piece before the pattern can be considered finalized. Do not force the cover onto the ring.
Embroider the Brown Twig Arms
Before wrapping the ivory panel around the wooden ring, embroider the twig arms while you can still reach the wrong side of the crochet.
Lay the shaped panel flat with its right side facing you. Rows 6 and 7 form the widest center that will follow the outside curve of the ring.
Using brown embroidery thread, mark two small twig positions toward the left and right ends of the wider center, approximately 5 to 7 stitches inward from each end. Keep them on the visible outer portion of the cover, away from the two 18-stitch seam edges.
Embroider one short, slightly angled stem at each position. Add two short branching stitches near the upper end of each stem. Each finished twig should be approximately 1/2 inch tall, with no loops or projecting pieces.
Check the appearance by curving the panel temporarily around the ring. The twigs should sit on the two visible ivory shoulders, one on each side of the snowman's head.
Secure the embroidery ends firmly on the wrong side of the panel before closing the cover. Remove any temporary position markers.
Wrap the Ring Cover
Place the shaped ivory panel around the upper half of the wooden ring, with the embroidered twig arms facing outward.
Center Rows 6 and 7 along the outer upper curve of the wooden ring, with the middle of these rows positioned at the very top of the ring. The panel's left and right side edges should finish near the corresponding sides of the wooden ring.
Wrap the panel around the thickness of the wood without twisting it. Bring Row 1 and Row 12 together along the inside upper curve of the ring. These are the two matching 18-stitch joining edges. Align the 18 foundation-stitch positions of Row 1 with the 18 finished stitches of Row 12 before sewing.
Using the long ivory sewing tail, join the two 18-stitch edges together with 18 evenly spaced joining stitches, matching corresponding stitches from the two edges.
Keep the seam on the inside of the ring. Work a second reinforcing pass along the joined edge and secure the yarn within the seam stitches.
Check that the cover follows the entire upper arc without excessive stretching, bunching or twisting. The twigs should remain visible on the two outer shoulders.
Do not proceed if the cover can slide freely around the ring, the seam opens under ordinary handling, or the outer curve exposes wood between stretched stitches. The fit must be corrected and evaluated on the actual prototype.
The finished cover should resemble a gently curved ivory arch. Leave the lower half of the wooden ring completely uncovered.
Attach the Snowman Head
Center the completed head directly above the ivory arch, with the face looking forward and the scarf area resting near the top of the wooden ring.
Cut a fresh length of ivory yarn approximately 24 to 30 inches long and thread it onto a yarn needle.
Center the finished snowman head over the top of the ivory arch, with its closed lower end resting against the middle of the ring cover.
Anchor the new yarn securely through several stitches on the underside of the head, keeping the starting end concealed inside the crochet.
Sew the head to the cover by working back and forth through several adjacent stitches across the lower head and the upper surface of the ivory arch. Spread the attachment across the contact area rather than joining only the six stitches at the head's closing point.
Continue around the front and back of the contact area, maintaining even tension so the head stays centered without distorting the cover.
Continue the seam along the front and back of the contact area. Make a second reinforcing pass through the attachment stitches and secure the yarn inside the crocheted fabric.
The head should sit centrally on the arch, with the ivory shoulder sections visible on both sides.
Do not rely on glue, a single tied yarn strand or two widely spaced stitches to hold the head in place.
This assembly method is a proposed construction that matches the reference image. Its resistance to pulling, twisting and repeated impact must be established on a finished sample before the item can be approved for infant use.
Crochet the Blue Winter Scarf and Finish the Snowman
Our snowman is almost dressed. His brown twig arms are already embroidered onto the ivory shoulders, so all he needs now is that little striped scarf.
I'd keep the scarf just as it appears in the example, with a navy band around the neck and a short striped section hanging down the front. No fringe. It doesn't need any.
Crochet the Navy Neck Band
Using navy yarn, ch 37.
Row 1: Sc in the second ch from the hook and in each remaining ch. Ch 1, turn. (36 sts)
Row 2: Sc in each st across. Ch 1, turn. (36 sts)
Row 3: Sc in each st across. (36 sts)
Fasten off, leaving a long sewing tail.
Wrap the navy band around the lower part of the snowman's head, positioning its upper edge near Head Round 13, where the head has 36 stitches. Bring the short ends together at the back.
Check that the band lies smoothly around this part of the head before sewing. Join the short ends at the back, then sew the upper edge of the collar to the head with evenly spaced stitches around the 36-stitch circumference.
Bring the lower edge toward the ivory ring cover. Secure it to the underlying ivory crochet wherever the pieces naturally meet. At the back, add small attachment stitches through the collar and underlying crochet to keep the band from lifting away.
Do not gather the lower collar edge or force its 36 stitches to follow the much narrower closing rounds of the head. Keep the original three-row collar width and a smooth, snug appearance.
The collar must remain attached rather than functioning as a removable scarf. Check the assembled fit and attachment strength on the finished prototype.
Crochet the Striped Scarf Front
Using icy-blue yarn, ch 7.
Row 1: Sc in the second ch from the hook and in each remaining ch. Ch 1, turn. (6 sts)
Row 2: Using icy-blue yarn, sc in each st across. Ch 1, turn. (6 sts)
Row 3: Sc across in icy blue. On the final sc, stop before the last yarn-over, pull navy yarn through to complete the stitch, then ch 1 with navy yarn and turn. (6 sts)
Cut the icy-blue working yarn, leaving an end long enough to weave securely into the finished fabric. Do not carry unused yarn loosely along the scarf's edge.
Rows 4–9: Using navy yarn, sc in each st across. Ch 1 and turn after each row. (6 sts per row)
Row 10: Sc across in navy. On the final sc, change to icy-blue yarn during the last yarn-over. Ch 1 with icy-blue yarn and turn. (6 sts)
Cut the outgoing navy yarn, leaving enough length to secure the end within the crocheted fabric.
Rows 11–12: Using icy-blue yarn, sc in each st across. Ch 1 and turn after each row. (6 sts per row)
Row 13: Sc across in icy blue. On the final sc, change to navy yarn during the last yarn-over. Ch 1 with navy yarn and turn. (6 sts)
Cut the outgoing icy-blue yarn, leaving enough length to weave in securely.
Row 14: Using navy yarn, sc in each st across. (6 sts)
Fasten off and securely weave in the navy yarn tail along the wrong side of the lower scarf section.
To attach the scarf front, use a separate length of icy-blue yarn at the upper edge, where the scarf begins. This avoids carrying navy sewing yarn visibly across the icy-blue stripes.
The striped scarf front is 6 stitches wide and 14 rows long. Its estimated measurements are approximately 7/8 to 1 inch wide and 1 7/8 inches long, although the finished length depends on your flat-row gauge. Keep all 14 rows and the scarf's pictured drop. Check the finished panel against the snowman's head and ivory ring cover before attaching it.
Keep the striped scarf front at its full 14-row length, just as shown in the example. Position its upper edge over the navy collar, slightly to the viewer's right of center.
Thread the separate icy-blue sewing yarn through the top edge of the striped panel. Stitch all six upper-edge stitches securely to the navy collar, then add closely spaced attachment stitches along both upper sides wherever the scarf overlaps the underlying crochet.
Keep the full 14-row length and its pictured drop. Do not pull the panel shorter or attach its lower edge to the wooden ring.
Secure the sewing yarn within the crocheted collar and weave in the remaining end without leaving any exposed loops.
Let the lower section extend slightly into the wooden ring opening, matching the photographed design. Do not attach the scarf to the bare wooden ring, and do not add fringe.
The scarf length is part of the approved design. However, its projecting lower section and attachment have not been tested for infant use. Until the completed rattle passes the applicable safety evaluation, it must remain an out-of-reach display piece rather than a baby toy.
Final Assembly Check
Before calling the snowman finished, go over every detail.
- The head is centered and securely joined across the ivory ring cover.
- The ring cover wraps around the upper arc without sliding or twisting.
- The lower wooden ring remains uncovered.
- The hat is sewn continuously to the head.
- The white snowflakes are embroidered with no added beads.
- The olive-green holly leaves lie flat against the hat.
- The three red berries are flat satin stitches, not separate crocheted pieces.
- The carrot nose is secured around its base and at its tip.
- The cheeks, eyes, smile and twig arms are embroidered.
- The 14-row scarf front has no fringe. Its upper portion is securely stitched in place, and its lower section extends slightly into the wooden ring opening as pictured. This free end requires infant-toy safety testing.
- The sound insert remains fully enclosed inside its sewn inner pouch and the stuffed head.
- All temporary stitch markers, pins, positioning threads and other removable construction aids have been taken out of the finished project.
Give the finished snowman a careful visual inspection. Check for gaps in the crochet, exposed thread ends, loose stitches and anything that might detach.
Don't mistake a good-looking finished sample for a completed safety evaluation. The wooden-ring connection, nose, hat, scarf, sound insert and overall rattle dimensions still need physical testing.
Baby Rattle Safety and Care
A handmade baby rattle needs more attention than an ordinary crochet decoration. Even when all the visible details are embroidered, the finished toy must stay intact and meet the requirements that apply to infant rattles.
The U.S. Consumer Product Safety Commission explains the federal requirements in its rattle safety guidance. These include dimensional requirements and testing for impact, tension, torque and compression. Children's toy testing and certification requirements also apply where required by law.
Important: This crochet pattern is an untested construction draft. The stitch counts have been reviewed mathematically, but a finished sample has not been made and independently tested for infant use. The pattern, photograph and suggested materials do not establish that the finished rattle meets applicable safety standards.
Before a finished rattle is provided to a baby, its materials, dimensions, enclosed sound insert, seams and attachments need to be evaluated for compliance with the applicable requirements. Do not rely on hand-pulling the pieces or checking that they look secure as a substitute for the required testing.
Until those checks are complete, keep the finished sample out of a baby's reach and use it only as a display piece.
If the rattle is eventually approved for infant use, follow the care instructions appropriate to its tested materials and construction. A wooden ring and stuffed crocheted head should not be soaked or machine-washed without confirmation that those cleaning methods are suitable for the complete assembly.
Make a Matching Snowman Baby Gift Set
I especially like this little snowman with the navy and icy-blue projects we've already been working on. The colors look right together without every piece having to be exactly alike.
The matching snowman pinwheel crochet lovey blanket carries the same sleepy-eyed snowman and winter colors into a soft crocheted blanket. Add the coordinating snowman quilt, and you have three projects that belong together.
If you're putting together a Christmas-themed baby shower gift basket, I'd fold the blanket at the bottom, place the quilt behind it and arrange the snowman rattle design near the front. Until the rattle has completed its safety evaluation, use it only as an out-of-reach display sample rather than an infant toy.
You could also change the embroidered eyes to give the snowman a wide-awake expression, although I think I'll stick with my sleepy version. He looks as though he's perfectly content to let the other Christmas decorations do all the work.
When you click on links to various merchants on this site and make a purchase, this may result in this site earning a commission. This does not affect the price you pay.

UBGI Gold Standard 2026
Reviewed under the site's
editorial checklist.
Photos, decorating ideas, party setups and reader submissions are shared for inspiration unless a page is specifically presented as a pattern, tutorial, reference guide or step-by-step project. Follow the instructions, measurements, safety guidance and manufacturer directions provided for the particular project or product.
About Jan | Contact | Baby Nursery Ideas (Blog) | Site Map | Privacy Policy | Disclosure Policy | Disclaimer | Affiliate Disclosure | Earnings Disclosure | Facebook | Pinterest
I am a participant in the Amazon Services LLC Associates Program, an affiliate advertising program designed to provide a means for us to earn fees by linking to Amazon. As an Amazon Associate I earn from qualifying purchases.
Copyright © 2006-2026. All Rights Reserved.