Free Crochet Snowman Lovey Blanket Pattern with Pinwheel Blanket
By Jan Bay
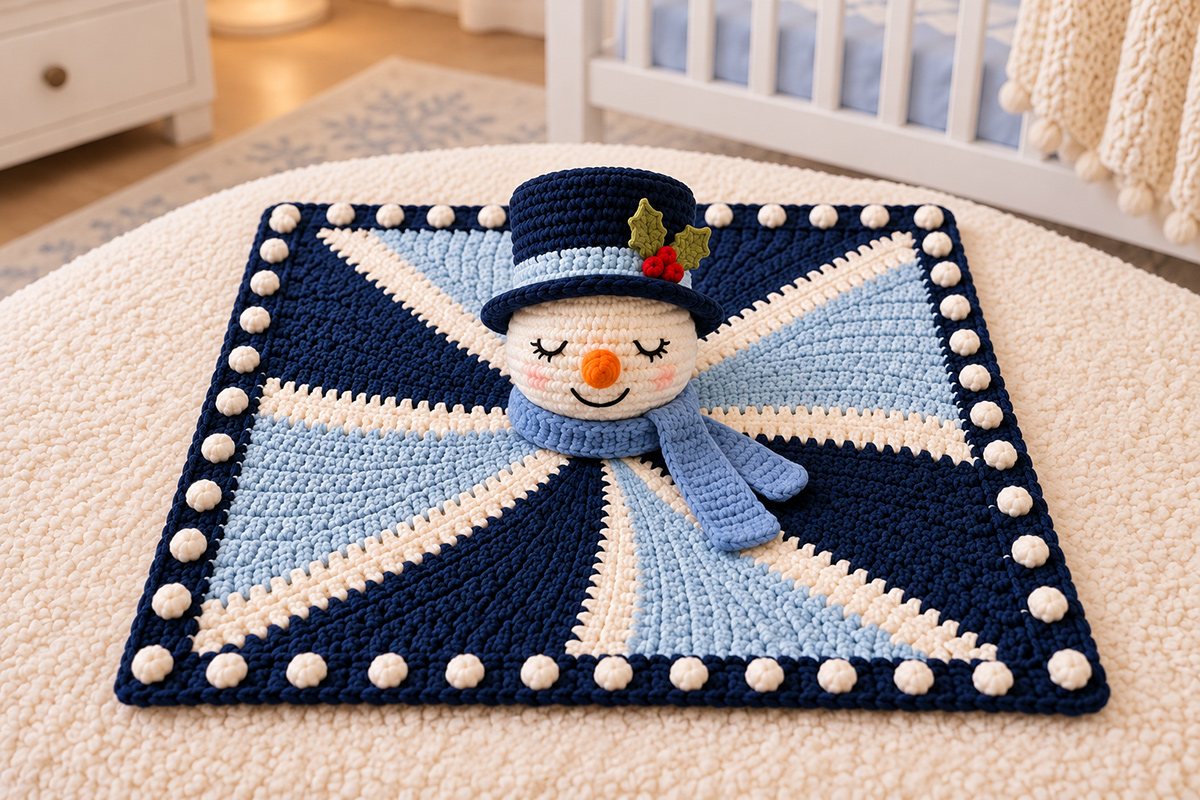
This free crochet snowman lovey blanket pattern features a sleepy-eyed snowman wearing a navy top hat and a soft blue scarf, sitting right in the center of a four-section pinwheel blanket. The navy, icy-blue and ivory wedges create a striking design, finished with a dark blue border dotted with ivory bobbles that look like tiny snowballs surrounding our snowman. It's a cheerful little winter project that makes a lovely handmade baby gift or Christmas keepsake.
Explore More Free Crochet Baby Patterns
See Supplies for This Project Here.
On This Page
Free Crochet Snowman Lovey Blanket Pattern
The snowman may get all the attention at first, but that pinwheel blanket is what makes this pattern a little different. Instead of using ordinary granny squares, we'll crochet four matching panels that fit together around the snowman's head.
Each panel has navy, icy blue and ivory stitches, and we'll turn the finished panels to make the colors sweep around the center. The ivory lines separate the colors, while the little bobbles around the edge give us those snowballs I like so much.
Make the blanket first. Once it's joined and lying flat, we'll add the snowman's head, top hat, holly and scarf. That order makes it much easier to keep everything centered.
Skill level: Intermediate. You'll need to be comfortable with color changes, increases, slip-stitch seams, working in the round and sewing small crochet pieces together. The stitch types are familiar, but keeping all four pinwheel sections evenly matched takes a little patience.
Materials and Supplies
You'll need medium-weight yarn, size 4, with a smooth finish that shows the stitches clearly. A soft, machine-washable yarn makes sense for a baby gift, and I would skip fuzzy or loosely spun yarn that sheds fibers.
- Dark navy worsted-weight yarn: approximately 350 yards available
- Icy-blue worsted-weight yarn: approximately 300 yards available
- Ivory worsted-weight yarn: approximately 160 yards available
- Small amounts of orange, olive green, red and blush-pink yarn
- Muted dusty-blue or periwinkle-blue worsted-weight yarn for the scarf, a shade darker than the icy-blue blanket yarn
- Black embroidery floss or tightly twisted black cotton yarn
- 5 mm crochet hook for the blanket, or the size needed for gauge
- 3.5 mm crochet hook for the snowman and small decorations
- Polyester fiberfill for the head
- Yarn needle, embroidery needle and stitch markers
- Scissors, measuring tape and four or more yarn bobbins
Those yarn amounts are allowances for this calculated pattern, not amounts measured from a completed sample. Check the yardage on your skeins before starting. Having extra navy is particularly helpful because it's used in the blanket, border and hat.
Don't use plastic safety eyes, buttons, beads or glued-on decorations. All the facial details and little pieces will be crocheted or embroidered, then stitched securely into place.
Finished Size and Gauge
The planned blanket is approximately 19 inches square, with a snowman head about 4 inches across. The top hat adds roughly 2 inches above the head, depending on your tension.
Blanket gauge (design target): Aim for 18 single crochet stitches and 24 rows per 4 inches in a flat single crochet swatch. This is the gauge used to calculate the panel dimensions, not a measurement taken from a finished sample.
Snowman gauge (design target): Approximately 21 single crochet stitches and 26 rounds per 4 inches using the smaller hook. Check your own stitches carefully. They should be close enough that the stuffing doesn't show through.
The blanket gauge matters because the triangles must form a square when they're joined. Make a swatch first. If your stitches are wider or your rows are taller than these measurements, you'll need to adjust your hook or tension before making the four panels.
Finished measurements are calculated estimates. A sample made from these instructions is still needed to establish the final dimensions and confirm the fit of every component.
Crochet Stitch Abbreviations
- ch: chain
- sc: single crochet
- hdc: half double crochet
- dc: double crochet
- sl st: slip stitch
- inc: two single crochets in the same stitch
- dec: single crochet two stitches together
- BLO: back loop only
- MR: magic ring
- RS: right side
- WS: wrong side
- st/sts: stitch/stitches
- rnd/rnds: round/rounds
All instructions use US crochet terms. A turning chain doesn't count as a stitch unless the instructions specifically say otherwise.
Crochet the Four-Section Pinwheel Blanket
We're making four matching triangular panels. Each one starts with a tiny ivory point and gradually widens until the outside edge measures approximately 18 inches.
Every panel has a navy section, a three-stitch ivory stripe and an icy-blue section. Once the panels are joined, those colors form the pinwheel around the snowman's head.
It looks more complicated than it is, but there's one rule worth following: keep all four panels the same size. Don't add extra rows to one just because it looks a little short before blocking.
Before You Start the First Panel
Use the 5 mm hook and three separate working strands or bobbins: navy, ivory and icy blue.
Work in single crochet, turning after every row. Change yarn colors in the last yarn-over of the stitch before the new color begins. Keep the unused yarn strands on the wrong side, and twist the working strands together at each color boundary so you don't leave holes.
The ivory stripe stays exactly three stitches wide. All increases happen at the two outside edges of the panel, never inside the ivory stripe.
Panel 1
Row 1: With ivory yarn, ch 2. Work 3 sc in the second chain from the hook. Ch 1, turn. (3 sc)
Row 2: Join icy blue and make 1 sc in the first stitch. Change to ivory and make 1 sc in that same first stitch, 1 sc in the next stitch and 1 sc in the final stitch. Change to navy and make 1 sc in that same final stitch. Ch 1, turn. (5 sc: 1 icy blue, 3 ivory, 1 navy)
Row 3: With navy, work 2 sc in the first stitch. Change to ivory and work 1 sc in each of the next 3 stitches. Change to icy blue and work 2 sc in the last stitch. Ch 1, turn. (7 sc: 2 navy, 3 ivory, 2 icy blue)
Row 4: Work 1 sc in each stitch across, keeping the same colors over their matching stitches. Ch 1, turn. (7 sc)
Row 5: Work 2 sc in the first stitch, 1 sc in each stitch across until the last stitch, then 2 sc in the last stitch. Maintain the three-stitch ivory center stripe and the original navy and icy-blue sections. Ch 1, turn. (9 sc)
Rows 6 through 53: Continue the established color arrangement. On increase rows, work 2 sc in the first stitch and 2 sc in the last stitch, with 1 sc in every stitch between them. Keep the ivory center stripe three stitches wide. On rows without increases, work 1 sc in every stitch. Ch 1 and turn after every row, including Row 53.
Do not increase on Rows 8, 12, 16, 20, 24, 28, 32, 36, 40, 44, 48 and 52. On those rows, work one sc in every stitch without increases.
Row 54: Work one sc into every stitch across without increasing. Do not add an extra row. (81 sc)
Panel Row-Count Check
Use these counts to check your progress. The turning chain is not included in any count.
| Rows | Stitches at end of each row |
|---|---|
| 1–8 | 3, 5, 7, 7, 9, 11, 13, 13 |
| 9–16 | 15, 17, 19, 19, 21, 23, 25, 25 |
| 17–24 | 27, 29, 31, 31, 33, 35, 37, 37 |
| 25–32 | 39, 41, 43, 43, 45, 47, 49, 49 |
| 33–40 | 51, 53, 55, 55, 57, 59, 61, 61 |
| 41–48 | 63, 65, 67, 67, 69, 71, 73, 73 |
| 49–54 | 75, 77, 79, 79, 81, 81 |
At Row 54, each panel should have 39 navy stitches, 3 ivory stitches and 39 icy-blue stitches across its outer edge. It will be about 18 inches across that edge and 9 inches from the center point to the outside edge at the stated gauge.
Fasten off the three yarn colors, leaving enough tail length to weave them securely into their own color sections.
Make the Remaining Three Panels
Repeat Rows 1 through 54 three more times. You'll have four matching triangles, each with the same navy, ivory and icy-blue arrangement.
Lay them on a flat surface before joining. Put all four narrow points together in the center, with each wide 81-stitch edge forming one outside edge of the square.
Rotate each panel one-quarter turn clockwise from the previous panel. Keep the navy half on the same clockwise side of each panel's ivory center stripe. This creates the alternating colors around the pinwheel.
The four ivory center stripes will run toward the middle of each outside edge. The seams between the panels will run toward the four corners.
Join the Four Pinwheel Panels
Place the panels with their wrong sides together along the adjoining diagonal edges so the join will show on the right side. Match the center tips, row ends and outer corners.
With ivory yarn and the 5 mm blanket hook, work one loose slip stitch through the matched row-end loops of both panels. Start at the outside corner, matching Row 54 to Row 54. Continue with Row 53 matched to Row 53, working toward Row 1 at the center. Each seam has 54 slip stitches. Keep the joining tension loose enough that the diagonal edges don't pull inward or pucker.
Each diagonal join connects 54 row ends from one panel to 54 row ends from its neighbor. Don't skip a row end or work twice into the same row end to make up a difference.
After completing each 54-slip-stitch seam at the center, fasten off the ivory yarn, leaving a long tail for securing the join. Attach a fresh strand of ivory yarn at the next outside corner and work the next seam toward the center, matching corresponding row ends from Row 54 through Row 1. Repeat until all four seams are complete. Do not carry the working yarn across the blanket between seams. Check that the four center tips meet neatly without pulling one panel higher than the others. Leave the joining tails available until the center has been secured in the following step.
To give the four diagonal joins the wider ivory appearance shown in the finished design, add two decorative surface-crochet lines beside each completed seam. With the right side facing, use ivory yarn to work one loose surface slip stitch into the top of the stitch immediately beside the seam at each of the 54 row positions, from the outside corner toward the center. Fasten off and repeat along the opposite side of that seam. Work the same two lines beside all four diagonal seams.
Keep the surface stitches loose and flat so they do not shorten the diagonal edges. Each seam now has its original joining line plus two neighboring ivory accent lines. These surface stitches do not change the panel or border stitch counts.
These four visible ivory joins give the blanket its other diagonal spokes. Together with the four three-stitch ivory center stripes, you'll see the eight lines radiating around the pinwheel.
Before weaving in the joining ends, secure the exact center where all four panels meet. With ivory yarn and a yarn needle, stitch through the starting chain beneath the first three single crochets of each panel, bringing all four starting points together. Make a second securing pass, then weave the tail into the wrong side of the blanket.
Keep the center flat. Don't pull the stitches into a tight knot or create a raised bump. Check both sides for an opening or loose stitches before attaching the reinforced center circle. Weave in the remaining joining ends securely.
Lay the square flat and measure it before starting the border. It should be close to 18 inches on all four sides, with no noticeably longer edge or puckered seam.
The Navy Border and Little Snowball Bobbles
Here's where we add the little ivory snowballs around the outside. They're integrated crochet popcorn stitches, not separate balls sewn onto the blanket.
Popcorn stitch: Work 5 dc into the specified stitch. Remove your hook from the working loop, insert it from front to back through the top of the first dc, catch the dropped loop and pull it through. Ch 1 to close the popcorn. The complete popcorn counts as one stitch. Do not count its closing chain as an additional stitch. On the following round, work into each popcorn once, just as you would work into one regular stitch.
Joining the border rounds: Work the three border rounds as separately joined rounds. After joining Round 1 with a slip stitch, fasten off the navy yarn. Begin Round 2 with a fresh navy strand in any corner ch-2 space. After the final six navy single crochets of Round 2, join with a navy slip stitch, then fasten off both the navy and ivory strands. Begin Round 3 with a fresh navy strand in any corner ch-2 space. Joining slip stitches do not count toward the stated stitch totals. After Round 3, fasten off and weave in the ends as instructed.
Border Round 1: With navy yarn and the right side facing, join at any outer corner, where two panel bases meet. Work (sc, ch 2, sc) into the corner gap. Work 1 sc into each of the 81 stitches across the next panel's outer edge, from its first stitch through its last stitch. Do not count or work additional stitches into the ivory slip-stitch seam at the corner. At the next corner gap, work (sc, ch 2, sc). Repeat around all four sides. Join with a sl st to the first sc. (332 sc and four ch-2 corner spaces)
Border Round 2: Join navy at a corner ch-2 space. Work 2 sc in navy, ch 2, then 1 sc in navy and 1 ivory popcorn into the same corner space. (4 counted stitches and one ch-2 space)
Across the next 83 stitches, repeat (6 sc in navy, 1 ivory popcorn) 11 times. Then work 6 more sc in navy. This uses all 83 stitches and places 11 evenly spaced ivory popcorns along the straight side, in addition to the popcorn worked at the corner.
Repeat the same corner and side instructions around the remaining three sides. Join with a slip stitch to the first sc. (348 counted stitches, including 48 ivory popcorns, and four ch-2 corner spaces)
For the popcorn round, keep a separate ivory strand available as you work the navy stitches. Change to ivory for each popcorn, then return to navy. Enclose the unused strand inside the surrounding stitches and catch it regularly so there are no loose floats on the wrong side. The navy stitches should still look navy, with the ivory showing mainly in the raised popcorns.
Border Round 3: With navy, join at a corner ch-2 space. Work (2 sc, ch 2, 2 sc) in that corner. Work 1 sc into each counted stitch along the next side, including the closing top of each popcorn. Repeat around all four sides. Join with a sl st. (364 sc and four ch-2 corner spaces)
Fasten off and weave in the yarn ends securely. Spread the corners into shape and check that none of the ivory bobbles has a loose strand or opening behind it.
You should now have a finished square pinwheel blanket with a continuous navy border and 48 evenly spaced ivory snowball-style bobbles, including one at each corner.
Crochet the Snowman Head and Face
Now for our snowman. His head is a simple stuffed crochet sphere, but give yourself a little time for the face. Those sleepy eyes and that small smile are what give him his personality.
Switch to the 3.5 mm hook and ivory yarn. Work in continuous rounds without joining unless instructed otherwise. Use a stitch marker to keep track of the beginning of each round.
Snowman Head
Round 1: Make a magic ring and work 6 sc into it. (6)
Round 2: Work 2 sc in each stitch around. (12)
Round 3: Repeat (1 sc, inc) 6 times. (18)
Round 4: Repeat (2 sc, inc) 6 times. (24)
Round 5: Repeat (3 sc, inc) 6 times. (30)
Round 6: Repeat (4 sc, inc) 6 times. (36)
Round 7: Repeat (5 sc, inc) 6 times. (42)
Round 8: Repeat (6 sc, inc) 6 times. (48)
Round 9: Repeat (7 sc, inc) 6 times. (54)
Round 10: Repeat (8 sc, inc) 6 times. (60)
Rounds 11–18: Work 1 sc in every stitch around. (60 each round)
Stop here and embroider the face before closing the head. It's much easier to secure the embroidery ends on the inside while you can still reach them.
Embroider the Sleeping Eyes
Choose the front of the head, keeping the beginning-of-round line toward the back.
With black embroidery floss, make two gently curved closed eyes across Rounds 11 and 12. Leave approximately 7 or 8 stitches between their inner ends, adjusting the spacing so both eyes sit evenly on the rounded face.
Add two or three short embroidered lashes near the outer end of each eye. Keep the stitches snug against the crochet surface, but don't pull them so tightly that they pucker the head.
Fasten the embroidery securely inside the head. These are stitched eyes, not plastic safety eyes.
Crochet the Round Orange Nose
With orange yarn and the 3.5 mm hook, work in continuous rounds to make the small, slightly raised circular nose shown in the finished design.
Round 1: Make a magic ring and work 6 sc into it. (6)
Round 2: Work 2 sc in each stitch around. (12)
Round 3: Work 1 sc in every stitch around without increasing. (12)
Fasten off, leaving a long sewing tail. Keep the starting spiral facing outward and gently shape the final round into a shallow raised edge. Do not add stuffing.
Position the nose in the center of the face around Rounds 13 and 14. Sew all 12 stitches of its outer edge securely against the head, keeping the round orange center visible and slightly raised.
Embroider the Smile and Cheeks
Using black embroidery floss, stitch a small curved smile below the nose, approximately across Rounds 16 and 17. A few short stitches will give the mouth a gentle upward curve.
With blush-pink yarn or embroidery floss, work several closely spaced short stitches into each cheek around Rounds 14 and 15. Keep the pink stitches flat against the head so they look like soft rosy cheeks rather than raised decorations.
Step back and look at the face before closing the head. The eyes should be level, the nose centered, and the smile comfortably below it. You can adjust the embroidery now without taking the whole snowman apart later.
Finish Shaping the Head
Return to ivory yarn and continue the rounds.
Round 19: Repeat (8 sc, dec) 6 times. (54)
Round 20: Repeat (7 sc, dec) 6 times. (48)
Round 21: Repeat (6 sc, dec) 6 times. (42)
Round 22: Repeat (5 sc, dec) 6 times. (36)
Round 23: Repeat (4 sc, dec) 6 times. (30)
Begin stuffing with small amounts of polyester fiberfill. Fill the rounded sides evenly without pushing the stuffing into hard lumps. The face should stay smooth.
Round 24: Repeat (3 sc, dec) 6 times. (24)
Round 25: Repeat (2 sc, dec) 6 times. (18)
Check the stuffing now, while the opening is still large enough to work through. Add a little more fiberfill if needed, spreading it evenly so the head stays rounded without becoming overstuffed.
Round 26: Repeat (1 sc, dec) 6 times. (12)
Round 27: Work 6 decreases around. (6)
Fasten off, thread the tail through the front loops of the remaining six stitches, and pull the opening closed.
Secure the end inside the head. Don't cut the yarn close to the surface, where it could work loose.
The head should be rounded rather than tall or pointed, with the face looking forward. We'll attach it to the exact center of the blanket after the hat and scarf are ready.
Crochet the Navy Top Hat and Holly
Keep the top hat. It's one of the details that sets this snowman apart from the usual little fellow wearing a floppy winter cap.
We'll make a flat top, straight sides and a brim that widens gently around the head. The icy-blue band picks up the blanket colors, and the holly adds just a touch of Christmas without turning the whole project red and green.
Navy Top Hat
With navy yarn and the 3.5 mm hook, work in continuous rounds. Begin at the top of the hat.
Round 1: Make a magic ring and work 6 sc into it. (6)
Round 2: Work 2 sc in each stitch around. (12)
Round 3: Repeat (1 sc, inc) 6 times. (18)
Round 4: Repeat (2 sc, inc) 6 times. (24)
Round 5: Repeat (3 sc, inc) 6 times. (30)
Round 6: Repeat (4 sc, inc) 6 times. (36)
Round 7: Repeat (5 sc, inc) 6 times. (42)
Round 8: Repeat (6 sc, inc) 6 times. (48)
The first eight rounds form the flat crown. At the smaller hook gauge, it should measure approximately 3 inches across.
Round 9: Working through back loops only, sc in every stitch around. (48)
Rounds 10–17: Sc in every stitch around, working through both loops. (48 each round)
Change to icy-blue yarn.
Rounds 18–19: Sc in every stitch around. (48 each round)
These two rounds form the light-blue hatband.
Change back to navy yarn.
Round 20: Working through front loops only, sc in every stitch around. (48)
Round 21: Repeat (7 sc, inc) 6 times. (54)
Round 22: Repeat (8 sc, inc) 6 times. (60)
Round 23: Repeat (9 sc, inc) 6 times. (66)
Round 24: Repeat (10 sc, inc) 6 times. (72)
Join with a slip stitch and fasten off, leaving a long sewing tail.
The four gradual increase rounds widen the brim from 48 to 72 stitches. Flatten it gently with your fingers, keeping the outer edge smooth rather than pulling it out of shape.
The hat should have a straight navy crown, an icy-blue band and a brim wider than the head's upper crown. It doesn't need wire, cardboard or any other stiff insert.
Crochet Two Olive-Green Holly Leaves
Make two leaves using olive-green yarn and the smaller hook.
Leaf 1: Ch 10. Starting in the second chain from the hook, work 1 sl st, 1 sc, 1 hdc and 1 dc. Make a picot by chaining 2 and slip stitching into the first of those 2 chains. Work 2 more dc. Make a second ch-2 picot in the same way. Finish this side with 1 hdc, 1 sc and 1 sl st. (9 stitches worked into the foundation chain, excluding the picot chains)
Ch 1 to turn around the end of the foundation chain. Working back along the opposite side, work 1 sl st, 1 sc, 1 hdc and 1 dc. Make a small picot by chaining 2 and slip stitching into the first of those 2 chains.
Continue with 1 dc and 1 more dc. Make a second ch-2 picot in the same way. Finish the return side with 1 hdc, 1 sc and 1 sl st. (9 stitches on this side, excluding the picot chains)
Join with a slip stitch at the starting end. The two picots along each long edge give the leaf four little points and a more recognizable holly shape. Don't add additional picots afterward.
Fasten off with a long sewing tail.
Leaf 2: Repeat the same instructions.
Flatten the leaves so they lie against the hat rather than curling outward.
Crochet Three Flat Red Berries
With red yarn, make a magic ring and work 6 sc into it. Close the ring firmly, join with a slip stitch and fasten off, leaving a sewing tail.
Make three identical small flat circles. There's no stuffing in these berries, and they shouldn't stand away from the hat like little dangling balls.
Attach the Holly to the Hat
Arrange the two leaves on one side of the icy-blue hatband, angling them slightly away from each other. Place the three red berries together at the base of the leaves.
Sew around the perimeter of each leaf, catching the little pointed sections so they can't lift or curl into loose loops. Secure each berry with stitches around its entire outer edge and through its center.
Bring the sewing ends to the inside of the hat, fasten securely and weave them into neighboring stitches. Don't leave long tails hanging inside the crown.
The finished holly cluster should look like one neat decoration, permanently attached to the hat.
Crochet the Soft Blue Scarf
The blue scarf needs enough length to wrap naturally around the lower part of the snowman's head, with two short ends draping toward the front of the blanket.
There's no need for tassels or fringe. They'll only add loose pieces that don't belong on a baby lovey.
With the muted dusty-blue or periwinkle-blue scarf yarn and the 3.5 mm hook, ch 8.
Row 1: Sc in the second chain from the hook and in each chain across. Ch 1, turn. (7 sc)
Row 2 and following rows: Working through back loops only, sc in each stitch across. Ch 1 and turn after every row except the final row. Continue until the scarf measures approximately 16 inches from end to end when laid flat. Keep 7 sc in every row.
Fasten off and weave in the ends. The back-loop stitches form gentle horizontal ridges that give the scarf some texture.
The scarf is planned to be approximately 1 1/3 inches wide and 16 inches long. The exact number of rows depends on your yarn and row gauge, so use the finished length as your stopping point. Check the fit around the snowman's head before attaching the scarf permanently.
Wrap it once around the lower head, bringing both ends forward and slightly to one side. Arrange one end over the other so they lie flat instead of hanging freely.
Don't tie a bulky knot. We'll sew the scarf to the head and blanket during assembly so the wrap and both ends stay in place.
Assemble and Finish Your Snowman Lovey
We're ready to put our snowman together. Before sewing anything down, spread the blanket on a table and arrange the head, hat and scarf just as they'll look when finished.
The head belongs directly over the center where the four pinwheel panels meet. It shouldn't sit behind that point or look as though it's attached to the back half of the blanket.
Look at the amount of blanket extending in front of and behind the head, and check both sides too. We worked hard to get that balanced square, so let's keep it that way.
Make a Reinforced Center Base
We'll use a small ivory crochet circle underneath the snowman's head. It will be hidden in the finished lovey but gives us a wider area for stitching the head securely to the blanket.
With ivory yarn and the 3.5 mm hook, work in continuous rounds.
Round 1: Make a magic ring and work 6 sc into it. (6)
Round 2: Work 2 sc in each stitch. (12)
Round 3: Repeat (1 sc, inc) 6 times. (18)
Round 4: Repeat (2 sc, inc) 6 times. (24)
Round 5: Repeat (3 sc, inc) 6 times. (30)
Fasten off, leaving a long sewing tail.
Lay the circle flat over the pinwheel's exact center, covering the meeting point of the four panels. With the blanket right side facing up, sew through the outer stitches of the circle and into the blanket below.
Work around the entire circle, catching solid blanket stitches rather than just the decorative joining ridge. Secure the yarn on the wrong side.
Attach the Snowman Head
Place the finished head upright on the reinforced circle, with its face pointing toward the front edge of the blanket.
Using a long strand of matching ivory yarn, sew around the lower portion of the head near Round 24, catching the circle and the blanket beneath it. Space the sewing stitches around the circumference rather than fastening the head through only its six-stitch closing point.
Make a second reinforcing pass with a separate yarn strand, stitching through a different set of neighboring stitches around the attachment area.
The goal is a head that stands naturally at the center without pulling the blanket into a cone. If the blanket puckers, loosen the attachment and spread the sewing stitches over a wider area.
Fasten off both strands separately and weave their ends securely into the wrong side of the blanket.
Sew on the Top Hat
Position the navy top hat on the upper part of the head, with the holly facing slightly toward one side of the snowman's face.
The icy-blue hatband should remain visible above the brim. Leave the sleepy embroidered eyes completely uncovered.
Using the navy sewing tail or another matching strand, sew the inside lower crown to the ivory head, working around the hat's circumference. Catch several rows of the hat and head so the attachment doesn't depend on one line of stitches.
Keep the hat brim smooth as you work. It should project beyond the narrower crown without curling sharply upward.
Secure the sewing yarn and hide the end inside the crochet fabric.
Arrange and Attach the Blue Scarf
Wrap the finished scarf around the lower part of the snowman's head. Bring the two ends forward, slightly off center, and lay them over the front of the blanket.
Position the scarf so it looks softly draped, as in the finished example, without making a tight knot around the neck.
Using matching blue yarn, sew the wrapped portion to the head at several points around the back and sides. Then tack both hanging ends flat to the blanket along their lengths, including near the tips.
There should be no free-hanging scarf ends or loops that a baby could pull around a finger or neck.
Final Finishing Check
Before you call your snowman finished, give him one careful look from every side.
- Make sure the four blanket panels lie flat and their seams are secure.
- Check the back of the blanket for loose yarn ends or long carried strands.
- Gently test the head attachment for movement.
- Check the entire hat brim and both holly leaves for lifting edges.
- Make sure all three berries and the orange nose are stitched securely.
- Check that the embroidered eyes, smile and cheeks have no loose loops.
- Make sure the scarf wrap and both scarf ends are firmly attached.
- Check every ivory border bobble for loose strands.
- Remove every stitch marker and any temporary positioning aids before gifting.
Weave in any remaining ends, keeping them inside the crochet fabric. Trim only after the ends have been secured.
If the blanket needs shaping, gently dampen it, lay it flat to the expected square dimensions and let it dry completely. Don't stretch the corners so far that the center or the seams begin to pull.
That's our snowman, surrounded by his little ivory snowballs.
Baby Safety and Care
A crochet lovey can make a sweet handmade gift, but it isn't suitable for an infant's crib or other sleep space.
The American Academy of Pediatrics' safe sleep recommendations say to keep blankets, stuffed toys and other soft objects out of an infant's sleeping area.
Use this snowman lovey for decoration, photographs or supervised awake-time play as appropriate for the child's development. Remove it before sleep, and never leave a baby unattended with it.
Check the crochet regularly, especially the head attachment, nose, hat, holly, berries and scarf. If any stitching loosens, put the lovey away until it's repaired. Don't use beads, buttons or detachable embellishments as replacements.
Washing Your Finished Snowman
Follow the washing instructions for your chosen yarn. For a heavily decorated project like this one, I'd choose gentle washing and reshape the hat, scarf and blanket while they're still damp.
Dry it completely before storing or gifting it, paying particular attention to the stuffing inside the head.
A Note About This Crochet Pattern
This pattern has been mathematically reviewed for its stitch counts, increases, decreases and planned assembly. The measurements are calculated estimates, and the instructions have not been physically test-crocheted. Your finished dimensions and details may vary with yarn, gauge and tension.
If you're making one for a Christmas gift, give yourself enough time to check the fit of the pieces and secure every decoration before wrapping it up.
When you click on links to various merchants on this site and make a purchase, this may result in this site earning a commission. This does not affect the price you pay.

UBGI Gold Standard 2026
Reviewed under the site's
editorial checklist.
Photos, decorating ideas, party setups and reader submissions are shared for inspiration unless a page is specifically presented as a pattern, tutorial, reference guide or step-by-step project. Follow the instructions, measurements, safety guidance and manufacturer directions provided for the particular project or product.
About Jan | Contact | Baby Nursery Ideas (Blog) | Site Map | Privacy Policy | Disclosure Policy | Disclaimer | Affiliate Disclosure | Earnings Disclosure | Facebook | Pinterest
I am a participant in the Amazon Services LLC Associates Program, an affiliate advertising program designed to provide a means for us to earn fees by linking to Amazon. As an Amazon Associate I earn from qualifying purchases.
Copyright © 2006-2026. All Rights Reserved.