Free Crochet Elf Lovey Pattern: Christmas Lovey Doll Snuggler
By Jan Bay
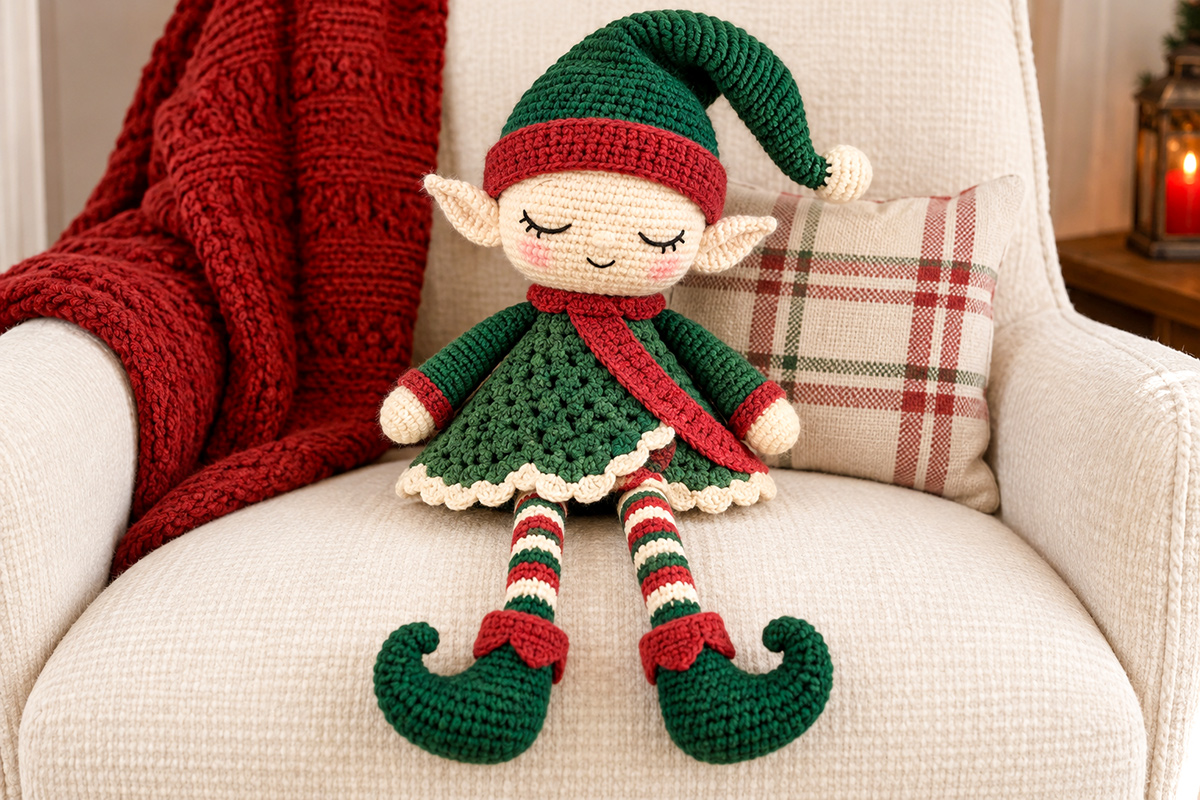
This free crochet elf lovey pattern makes a Christmas elf doll that will not be left sitting on the shelf. He will be loved and kept as a keepsake from Baby's First Christmas for many years. From the top of his large green hat, to his little pointed elf ears down to the curling toes of his elf shoes, this fellow looks as though he has just finished a long shift in Santa's workshop and settled down for a nap. His embroidered sleepy face, floppy striped legs and soft green tunic make him a Christmas lovey snuggler that's just as much fun to look at as it is to crochet.
Explore More Christmas Crochet Patterns
Free Christmas Crochet Patterns
Free Crochet Baby Snuggler Patterns
Supplies for this project here.
Jump to a Section
Yarn and Supplies for Your Christmas Elf Lovey
You'll need three main yarn colors to make this little fellow, plus a little black and pink for the embroidered face. There's no reason to get carried away buying special supplies. The forest green does most of the work, while brick red gives the hat, collar, tunic and shoes their Christmas character. Ivory takes care of the face, hands, hat tip and scalloped edging.
I'd use smooth worsted-weight yarn for the whole project. The embroidery is easier to place against an even surface, and the tunic's raised stitches will show without making the body too stiff. Save the fuzzy yarn for something else.
Materials List
- Medium-weight #4 forest-green yarn, approximately 160 to 200 yards
- Medium-weight #4 brick-red yarn, approximately 70 to 100 yards
- Medium-weight #4 ivory yarn, approximately 60 to 85 yards
- A small amount of pink embroidery floss or yarn for the cheeks
- Black embroidery floss for the sleeping eyes, eyelashes and smile
- 3.5 mm crochet hook, or size needed to obtain firm stitches
- Polyester fiberfill for the head and a little for shaping the shoes and hands
- Yarn needle
- Stitch markers
- Scissors
Those yardages are estimates rather than amounts weighed from a completed sample. The tall hat and oversized shoes take additional green yarn, so having a little extra on hand makes sense.
Choose yarns of similar thickness, even if you mix brands. A thin ivory yarn and a much heavier green yarn could throw off the proportions of the head, hat and body.
Finished Size and Gauge
The finished Christmas elf is intended to measure approximately 16 to 19 inches from the resting curve of the hat to the bottom of the shoes. That includes the long dangling legs, which give him so much of his personality.
The head is lightly stuffed to hold its round shape. The tunic and legs stay unstuffed so they'll bend and drape. The shoes get just enough filling to keep their rounded fronts from collapsing.
Target gauge for the head and smaller pieces: approximately 20 single crochet stitches and 24 rounds over 4 inches.
Target gauge for the tunic: approximately 20 half double crochet stitches and 22 rounds over 4 inches, measured on a sample worked in the round using the same hook and yarn.
Check the fabric before you start stuffing the head. You shouldn't see large openings between the stitches when the fabric is gently stretched. If you do, try a smaller hook rather than packing in more stuffing.
The measurements are calculated targets, not measurements taken from a physically completed elf. Your yarn, tension and final shaping will affect the size.
Skill level: Intermediate. You should be comfortable crocheting in continuous rounds, working increases and decreases, making puff stitches, embroidering facial features and securely joining shaped crochet pieces. The curved hat and elf shoes require additional attention during finishing.
Stitches and Abbreviations
This pattern uses US crochet terminology. Mark the first stitch of every continuous round, especially while you're shaping the hat and making those long striped legs.
- MR: magic ring
- ch: chain
- sc: single crochet
- hdc: half double crochet
- dc: double crochet
- sl st: slip stitch
- inc: 2 single crochet stitches in one stitch
- dec: single crochet decrease over the next 2 stitches
- hdc inc: 2 half double crochet stitches in one stitch
- st or sts: stitch or stitches
- Rnd: round
- Row: row
- BLO: back loop only
- FO: fasten off
Reading the counts: The number in parentheses at the end of an instruction is the total number of stitches after that round or row. Beginning chains don't count as stitches unless specifically stated.
Special Stitch: Raised Puff
The green tunic gets its textured appearance from raised puff stitches worked among ordinary half double crochet stitches.
Raised puff: Yarn over, insert your hook into the indicated stitch, yarn over and pull up a loop. Repeat twice more in that same stitch. You'll have 7 loops on the hook. Yarn over and pull through all 7 loops, then chain 1 to close the puff. That closing chain does not count as an additional stitch.
Each finished puff counts as one stitch in the round. Keep the loops even and don't pull the closing chain so tightly that the puff disappears into the fabric.
Work the puffs with the outside of the tunic facing you. They should stand slightly above the surrounding stitches without making the fabric rigid.
Crochet Elf Lovey Pattern Free: Christmas Doll Lovey Snuggler
Let's start with that sleepy little face. Once the head and hat are finished, the elf already has most of his personality. The tunic, striped legs and enormous curling shoes come next.
Work all numbered rounds in continuous spirals unless a section specifically tells you to turn or join. Keep a marker in the first stitch of each round.
Part 1: Crochet the Elf's Head
Using ivory yarn:
Rnd 1: Work 6 sc in a MR. (6)
Rnd 2: Inc in each stitch around. (12)
Rnd 3: (Sc in next st, inc in next st) 6 times. (18)
Rnd 4: (Sc in next 2 sts, inc in next st) 6 times. (24)
Rnd 5: (Sc in next 3 sts, inc in next st) 6 times. (30)
Rnd 6: (Sc in next 4 sts, inc in next st) 6 times. (36)
Rnd 7: (Sc in next 5 sts, inc in next st) 6 times. (42)
Rnd 8: (Sc in next 6 sts, inc in next st) 6 times. (48)
Rnd 9: (Sc in next 7 sts, inc in next st) 6 times. (54)
Rnds 10 through 18: Sc in each stitch around. (54 each round)
Rnd 19: (Sc in next 7 sts, dec) 6 times. (48)
Leave the head open while you mark the face. Choose one side as the front and put a removable marker at its center, approximately halfway around from the beginning-of-round marker.
Using black embroidery floss, make two gently curved sleeping eyes across Rnds 14 and 15. Each closed eye should span approximately 4 stitches. Leave about 7 to 9 stitches between their inner ends. Add two short eyelashes at the outside of each eye.
Embroider a small curved smile centered around Rnds 18 and 19. Keep it approximately 2 to 3 stitches wide. Add a few short pink satin stitches beneath each eye for the rosy cheeks.
Make the expression small and relaxed. Those sleepy eyes are part of what gives this Christmas elf his character. Big open eyes would make him look like an entirely different doll.
Secure all embroidery ends on the inside of the head. Continue crocheting.
Rnd 20: (Sc in next 6 sts, dec) 6 times. (42)
Rnd 21: (Sc in next 5 sts, dec) 6 times. (36)
Rnd 22: (Sc in next 4 sts, dec) 6 times. (30)
Stuff the head evenly, shaping it into a wide rounded ball. Add small amounts of fiberfill at a time rather than forcing a large handful through the opening.
Rnd 23: (Sc in next 3 sts, dec) 6 times. (24)
FO, leaving a long ivory tail for joining the head to the tunic. Do not close the 24-stitch neck opening.
Make the Head's Inner Neck Lining
The head needs a small internal lining to keep its stuffing separate from the unstuffed tunic. This piece sits entirely inside the neck opening and won't be visible on the finished elf.
Using ivory yarn:
Rnd 1: Work 6 sc in a MR. (6)
Rnd 2: Inc in each stitch around. (12)
Rnd 3: (Sc in next st, inc) 6 times. (18)
Rnd 4: (Sc in next 2 sts, inc) 6 times. (24)
FO, leaving a long sewing tail.
Place the disk inside the head, directly against the stuffing, with its 24-stitch outer edge aligned with the 24-stitch neck opening. Sew the disk's outer stitches to the back loops of the head's final round, matching one stitch to one stitch.
Keep the front loops of the head's 24 neck stitches free for attaching the tunic. Work all the way around, then secure the lining tail inside the head. Check that no stuffing can escape through the opening.
Part 2: Crochet the Pointed Elf Ears
Make two in ivory. Work in turned rows.
Row 1: Ch 2. Sc in second ch from hook. (1)
Row 2: Ch 1, turn, work 2 sc in the only stitch. (2)
Row 3: Ch 1, turn, inc in each stitch. (4)
Row 4: Ch 1, turn, inc in first stitch, sc in next 2 sts, inc in last stitch. (6)
Row 5: Ch 1, turn, sc in each stitch. (6)
Row 6: Ch 1, turn, dec, sc in next 2 sts, dec. (4)
Row 7: Ch 1, turn, sc in each stitch. (4)
FO, leaving a long sewing tail. Row 1 forms the pointed outer tip, and Row 7 is the attachment base.
Pin one ear to each side of the head, with the attachment bases spanning approximately Rnds 13 through 17. Point the narrow ends outward and a little upward. The upper parts of the ears should sit just below the future hat brim.
Sew the full four-stitch base of each ear to the head and reinforce both ends of the seam. Add one small stitch behind each ear to help it hold the outward angle. Don't stuff the ears.
Part 3: Crochet the Long Curled Elf Hat
The tall green hat is the most recognizable feature of this doll. Crochet the crown from its narrow tip downward, then add the thick brick-red band at the bottom.
Using forest-green yarn:
Rnd 1: Work 6 sc in a MR. (6)
Rnd 2: (Sc in next st, inc) 3 times. (9)
Rnd 3: Sc around. (9)
Rnd 4: (Sc in next 2 sts, inc) 3 times. (12)
Rnd 5: Sc around. (12)
Rnd 6: (Sc in next 3 sts, inc) 3 times. (15)
Rnd 7: Sc around. (15)
Rnd 8: (Sc in next 4 sts, inc) 3 times. (18)
Rnd 9: Sc around. (18)
Rnd 10: (Sc in next 5 sts, inc) 3 times. (21)
Rnd 11: Sc around. (21)
Rnd 12: (Sc in next 6 sts, inc) 3 times. (24)
Rnd 13: Sc around. (24)
Rnd 14: (Sc in next 7 sts, inc) 3 times. (27)
Rnd 15: Sc around. (27)
Rnd 16: (Sc in next 8 sts, inc) 3 times. (30)
Rnd 17: Sc around. (30)
Rnd 18: (Sc in next 9 sts, inc) 3 times. (33)
Rnd 19: Sc around. (33)
Rnd 20: (Sc in next 10 sts, inc) 3 times. (36)
Rnd 21: Sc around. (36)
Rnd 22: (Sc in next 11 sts, inc) 3 times. (39)
Rnd 23: Sc around. (39)
Rnd 24: (Sc in next 12 sts, inc) 3 times. (42)
Rnd 25: Sc around. (42)
Rnd 26: (Sc in next 13 sts, inc) 3 times. (45)
Rnd 27: Sc around. (45)
Rnd 28: (Sc in next 14 sts, inc) 3 times. (48)
Rnd 29: Sc around. (48)
Rnd 30: (Sc in next 15 sts, inc) 3 times. (51)
Rnd 31: Sc around. (51)
Rnd 32: (Sc in next 16 sts, inc) 3 times. (54)
Change to brick-red yarn.
Rnds 33 through 36: Sc in each stitch around. (54 each round)
FO, leaving a long red tail to sew the hat to the head.
Hat fitting checkpoint: Before shaping the curl or sewing the hat in place, try the red brim over the stuffed head. It should sit just above the embroidered eyes without stretching the stitches widely or squeezing the head out of shape. Both pointed ears must remain visible.
If the brim is too tight, check that the hat and head were made with matching yarn weight and tension. A larger hook may be needed for the hat, but remember that changing the hat gauge also changes its length and curl. Check the fit again before fastening the hat permanently.
Make the Little Ivory Hat Tip
Using ivory yarn:
Rnd 1: Work 6 sc in a MR. (6)
Rnd 2: Inc around. (12)
Rnd 3: Sc around. (12)
Rnd 4: Dec around. (6)
Add a tiny pinch of filling, close the opening and leave a sewing tail. Attach the rounded tip to the narrow beginning of the green hat.
Shape the Hat's Big Curl
Before sewing the hat onto the head, gently bend the upper green section toward one side. To match the example image, the hat should curl toward the viewer's right when the elf faces forward.
Fold the narrow upper portion into a broad hook shape, not a sharp crease. Bring the underside of approximately Round 7 toward the outside of Round 20 and pin it in place. Make two or three discreet green stitches between those areas, catching only the inner portions of the crochet stitches.
Next, position the underside of approximately Round 12 toward Round 26 and add another small securing stitch if needed. Adjust the two anchor points until the hat makes a rounded downward curl with the ivory tip at its end.
Keep the lower section full and rounded. The top should have a pronounced curve, but it shouldn't be pulled into a tight knot.
Shaping note: These hidden attachment points are an engineered method for holding the illustrated curl. The exact finished curvature will need verification on a crocheted sample. If either attachment produces a sharp fold instead of a smooth hook, release it and reposition the stitch before securing the thread.
Place the hat over the top of the head, keeping the red brim just above the embroidered eyes and leaving both pointed ears visible. Pin all around first, then sew the brim securely to the head with the long red tail.
Catch the lower inside edge of the brim rather than making large stitches across its front. Secure the yarn end inside the head or beneath the hat.
Part 4: Crochet the Soft Green Elf Tunic
Now for the floppy part of the snuggler. The tunic is crocheted from the neckline downward in one widening tube. Leave it completely unstuffed. Its softness is what lets the skirt fold naturally when the elf is sitting.
The raised puffs give the green body the nubby texture visible in the finished design. Don't substitute a solid shell-stitch fabric. That would make a much heavier, less flexible skirt.
Using forest-green yarn, ch 24. Without twisting the chain, join with a sl st into the first chain to form a ring.
Rnd 1: Sc in each of the 24 chains. (24)
Rnd 2: Hdc in each stitch around. (24)
Rnd 3: (Hdc in next 3 sts, hdc inc in next st) 6 times. (30)
Rnd 4: Hdc around. (30)
Rnd 5: (Hdc in next 5 sts, raised puff in next st) 5 times. (30)
Rnd 6: (Hdc in next 4 sts, hdc inc) 6 times. (36)
Rnd 7: Hdc around. (36)
Rnd 8: (Hdc in next 5 sts, raised puff in next st) 6 times. (36)
Rnd 9: (Hdc in next 5 sts, hdc inc) 6 times. (42)
Rnd 10: Hdc around. (42)
Rnd 11: (Hdc in next 5 sts, raised puff in next st) 7 times. (42)
Rnd 12: (Hdc in next 6 sts, hdc inc) 6 times. (48)
Rnd 13: Hdc around. (48)
Rnd 14: (Hdc in next 5 sts, raised puff in next st) 8 times. (48)
Rnd 15: (Hdc in next 7 sts, hdc inc) 6 times. (54)
Rnd 16: Hdc around. (54)
Rnd 17: (Hdc in next 5 sts, raised puff in next st) 9 times. (54)
Rnd 18: (Hdc in next 8 sts, hdc inc) 6 times. (60)
Rnd 19: Hdc around. (60)
Rnd 20: (Hdc in next 5 sts, raised puff in next st) 10 times. (60)
Rnd 21: (Hdc in next 9 sts, hdc inc) 6 times. (66)
Rnd 22: Hdc around. (66)
Rnd 23: (Hdc in next 5 sts, raised puff in next st) 11 times. (66)
Rnd 24: (Hdc in next 10 sts, hdc inc) 6 times. (72)
Rnd 25: Hdc around. (72)
Rnd 26: (Hdc in next 5 sts, raised puff in next st) 12 times. (72)
Rnd 27: (Hdc in next 11 sts, hdc inc) 6 times. (78)
Rnd 28: Hdc around. (78)
Rnd 29: (Hdc in next 5 sts, raised puff in next st) 13 times. (78)
Rnd 30: (Hdc in next 12 sts, hdc inc) 6 times. (84)
Rnd 31: Hdc around. (84)
Rnd 32: (Hdc in next 5 sts, raised puff in next st) 14 times. (84)
Rnd 33: Hdc around. (84)
Keep the last round relaxed rather than pulling it tight. You want the bottom of the tunic to spread gently into a skirt, not draw inward like the top of a bag.
Add the Ivory Scalloped Hem
Change to ivory yarn. Work the edging into the 84 stitches of Round 33.
Rnd 34: (Sc in next st, skip next st, work 4 dc in next st, skip next st) 21 times. Join with a sl st to the first sc.
Each repeat uses exactly 4 stitches from the previous round, producing 21 small scallops around the hem.
FO and weave in the ivory tail on the inside.
Lay the tunic flat and gently straighten the scallops with your fingers. There should be a continuous ivory edging all around the flared lower edge.
The skirt is meant to stay soft. Don't stuff it, and don't sew its front and back together. The open lower edge is part of the construction and gives the snuggler its floppy shape.
Part 5: Crochet the Elf's Arms and Hands
Make two matching arms, beginning with the ivory hands and working upward toward the shoulders. The little red cuffs separate the hands from the green sleeves, just as they do in the finished design.
Begin with ivory yarn.
Rnd 1: Work 6 sc in a MR. (6)
Rnd 2: Inc in each stitch around. (12)
Rnds 3 through 5: Sc around. (12 each round)
Add a small pinch of fiberfill to round the hand, keeping the filling away from the open cuff.
Change to brick-red yarn.
Rnds 6 and 7: Sc around. (12 each round)
Change to forest-green yarn.
Rnds 8 through 22: Sc around. (12 each round)
Rnd 23: (Sc in next st, dec) 4 times. (8)
Rnd 24: Sc around. (8)
FO, leaving a long green sewing tail. Leave the green sleeve unstuffed so the arm can hang naturally beside the tunic.
Flatten the eight-stitch opening at the shoulder. You'll sew through both layers of this flattened edge when attaching the arm.
Make the second arm exactly the same way. Both hands should be ivory, with matching brick-red cuffs and green sleeves.
Part 6: Crochet the Long Striped Elf Legs
These dangling striped legs help separate our Christmas elf from an ordinary round-bodied amigurumi doll. Keep them narrow and flexible. There's no stuffing inside the legs, and you won't need any shaping increases.
Make two identical legs. Begin each leg by leaving a 12-inch yarn tail for attachment, then ch 12 in ivory. Join with a sl st to the first chain, taking care not to twist the chain ring.
Rnd 1: Sc in each chain around using ivory. (12)
Rnds 2 and 3: Sc around in ivory. (12 each round)
Changing stripe colors: On the last stitch before each new color band, work the final pull-through with the next yarn color. Cut the previous color, leaving enough yarn to weave securely into the inside stitches of the leg. Weave each end back and forth through several stitches, keeping the inside of the tube smooth and flexible. Don't leave long loose strands running between color bands. Repeat this at every color change.
Change to brick red.
Rnds 4 through 6: Sc around. (12 each round)
Change to forest green.
Rnds 7 through 9: Sc around. (12 each round)
Change to ivory.
Rnds 10 through 12: Sc around. (12 each round)
Change to brick red.
Rnds 13 through 15: Sc around. (12 each round)
Change to forest green.
Rnds 16 through 18: Sc around. (12 each round)
Change to ivory.
Rnds 19 through 21: Sc around. (12 each round)
Change to brick red.
Rnds 22 through 24: Sc around. (12 each round)
Change to forest green.
Rnds 25 through 27: Sc around. (12 each round)
Change to ivory.
Rnds 28 through 30: Sc around. (12 each round)
FO, leaving a short tail at the ankle end. Weave that tail inside the tube. Keep the long beginning tail available for attaching the upper end beneath the tunic.
Each leg has 30 rounds of 12 stitches, arranged into ten equal three-round color bands. The order is ivory, red, green, repeated, with ivory at the ankle.
Both legs must have the same number of rounds. If one winds up longer, count the stripes before taking anything apart. A missed or extra three-round band is easy to spot.
Part 7: Crochet the Oversized Curled Elf Shoes
Those enormous green shoes are worth the extra effort. Their rounded fronts and sharply curled toes make the elf look as though he could march right into Santa's workshop, even if his sleepy little face suggests he'd rather have a nap.
Make two shoes in forest green, working from the narrow tip of each toe toward the ankle. Finish with a brick-red cuff.
Rnd 1: Work 6 sc in a MR. (6)
Rnd 2: Inc in each stitch around. (12)
Rnd 3: (Sc in next st, inc) 6 times. (18)
Rnd 4: Sc around. (18)
Rnd 5: (Sc in next 2 sts, inc) 6 times. (24)
Rnds 6 through 10: Sc around. (24 each round)
Rnd 11: (Sc in next 2 sts, dec) 6 times. (18)
Rnds 12 through 15: Sc around. (18 each round)
Rnd 16: (Sc in next st, dec) 6 times. (12)
Rnds 17 through 19: Sc around. (12 each round)
Add a little fiberfill into the broadest section, approximately Rnds 5 through 15. Keep the narrow beginning tip and the upper ankle section flexible. Too much filling will make the shoes look like stiff boots instead of the exaggerated curling elf shoes in the example image.
Change to brick red.
Rnd 20: (Sc in next st, inc in next st) 6 times. (18)
Rnd 21: Sc around. (18)
Rnd 22: (Sc in next st, dec) 6 times. (12)
FO, leaving a long red tail for attaching the shoe to the striped leg.
Gently roll the fuller middle of the red cuff outward to create a soft, raised band around the ankle. Keep the final 12-stitch opening clear for attaching the striped leg. Do not stuff the cuff.
Give Each Shoe Its Curled Toe
Before attaching the shoes to the legs, use your fingers to bend the narrow beginning of each shoe upward. The broader part of the shoe should remain rounded, while the tip bends back into a pronounced hook.
Thread a yarn needle with forest-green yarn. With the tip held in its curved position, bring the beginning of Round 1 toward the upper outside surface near Rounds 8 through 10. Secure it with a few small stitches through the inner loops, keeping the stitching hidden on the underside of the curve.
Add a second discreet stitch between approximately Round 3 and the upper surface near Round 11 if the curve needs more support.
Look at the shoe from the side before weaving in the end. You want a visible upturned point, not a round ball with its tip pulled against the ankle. If the toe looks pinched, loosen the attachment and try a wider bend.
Construction note: The shaped cone and hidden anchoring stitches are designed to approximate the distinctive curled shoes shown in the example image. Their exact curvature and the angle between foot and ankle need checking on a completed crochet sample.
Shape the Bend Between Each Shoe and Leg
Before attaching the striped leg, hold the shoe sideways with the rounded green forefoot extending outward and the red ankle cuff pointing upward. The foot and cuff should form an L-shaped profile rather than one straight tube.
Leave the ankle section unstuffed. Bend the green fabric gently between Rounds 16 and 19 to form the inside of the heel. With a separate length of forest-green yarn, bring one stitch on the inside of Round 14 toward the corresponding inside stitch of Round 19. Sew through the inner loops twice, drawing the fabric together just enough to hold the bend.
Check the shoe from the side. The red cuff should point upward while the rounded forefoot extends sideways. If the bend needs more support, add one hidden shaping stitch on either side of the first. Don't pull so tightly that the shoe becomes pinched or the cuff opening closes.
Shape the second shoe as a mirror image of the first, so both curled toes point away from the center when the elf faces forward.
The heel angle is an engineered shaping method and will need checking on a completed sample. Keep the 12-stitch cuff opening intact for attaching each striped leg.
Attach the Shoes to the Legs
Slide the lower ivory end of one striped leg against the open red cuff of a shoe. Both openings contain 12 stitches.
Using the long red sewing tail, sew the 12 stitches around the leg opening to the 12 stitches of the shoe cuff, one stitch to one stitch. Make a second reinforcing pass through the seam, then bury the yarn end securely inside the shoe.
Repeat for the other leg and shoe.
Position the shoes so their curled toes point outward, away from one another, when the finished elf faces forward. The viewer's left shoe curls toward the left, and the viewer's right shoe curls toward the right.
Set both finished legs aside until you're ready to attach them inside the tunic.
Assemble Your Crochet Christmas Elf Doll
You've made all the pieces, and now the elf can finally come together. Lay everything out before you start sewing. Put the head above the tunic, the arms beside the shoulders and the striped legs underneath, with those curled shoes pointing outward.
It's worth spending a few minutes getting the placement right. A lovely crocheted head can look completely out of proportion if it's attached too far forward, and uneven legs can make the tunic hang crooked.
Step 1: Mark the Front of the Tunic
Lay the green tunic flat, letting its natural folds determine the front and back. Choose the smoother-looking side as the front if the puff stitches appear slightly different on the two sides.
Place a removable marker at the center front of Round 2, just beneath the neckline. Place another marker at the center front near Round 30.
These markers establish the front centerline for the head, striped legs and diagonal red crossover.
Step 2: Attach the Arms
Place the arms at opposite sides of the tunic, approximately level with Rounds 5 through 7. The green sleeves should angle downward naturally, with the ivory hands hanging beside the lower portion of the flared tunic, above the scalloped hem. Check that both hands hang at matching heights before sewing the shoulders securely.
Flatten the eight-stitch shoulder opening of each arm so that four pairs of stitches form a closed edge.
Sew each closed shoulder edge to approximately four adjacent stitches at the side of the tunic, catching both layers of the flattened arm opening. Add reinforcing stitches at the front and back ends of each attachment, extending into the neighboring body rounds.
Repeat on the other side. The arms should hang at the same height.
Give each arm a gentle pull to check the seam. If the shoulder starts to separate from the tunic, reinforce it before continuing.
Step 3: Attach the Striped Legs Inside the Tunic
Turn the tunic inside out so the wrong side of the crochet fabric faces outward. The upper leg openings will be sewn to this exposed wrong-side surface of the front of the tunic, several rounds above the scalloped hem. When the tunic is turned right side out again, the attachment seams will be hidden inside the skirt.
Use the center-front markers to locate the middle of the tunic. On the exposed wrong-side surface, mark one leg attachment area approximately eight stitches to the left of center and another approximately eight stitches to the right, measured around Round 28.
For each leg, mark a small rectangular attachment area spanning four neighboring stitch positions horizontally and Rounds 26 through 29 vertically. Keep both attachment areas the same size and clearly separated.
Each attachment area uses twelve anchor points: four along Round 26, two along one side in Rounds 27 and 28, four along Round 29, and two along the opposite side in Rounds 28 and 27.
Position the beginning chain ring of one striped leg over its marked attachment area. Using the long ivory tail, sew the twelve loops around the leg opening to the twelve marked attachment points, one to one, following the perimeter. Don't sew the opening shut before attaching it.
Repeat for the second leg. Use small stitches that catch the body fabric securely without pulling its outside surface into deep puckers.
Turn the tunic right side out again, guiding both legs downward through the open lower edge as you turn. The twelve-point attachment seams should now be concealed against the inside of the green skirt, with both striped legs hanging freely beneath the ivory scalloped hem.
Check their spacing from the front. Both shoes should hang at similar heights, and neither leg should pull the ivory scalloped hem upward.
Step 4: Join the Head to the Tunic
Set the head above the 24-stitch neckline opening. Line up the embroidered face with the center-front marker so that the elf looks directly forward.
The head's final round has 24 stitches, and the tunic neckline has 24 stitches. The internal neck lining should already be secured inside the head, leaving the front loops of its final round available.
Using the long ivory tail from the head, whipstitch the 24 free front loops of the head's final round to the 24 foundation-chain positions along the upper edge of the green tunic. Work into a secure strand at each original chain position, matching one head loop to one foundation-chain position. Keep the seam along this same upper edge all the way around rather than alternating between the foundation chain and Round 1. Avoid catching or bunching the internal neck lining.
Make one complete pass around the neckline, checking that the head remains centered. Then reinforce the attachment with a second pass, working through the neighboring stitches of the head and tunic. Keep the tension even so the neck doesn't pull to one side.
The larger head should sit directly over the narrower shoulders. Don't insert stuffing into the tunic to prop it up. The reinforced neckline and the head's own stuffing should provide the structure.
Step 5: Crochet the Brick-Red Collar
The little red collar sits just below the head and gives the top of the green tunic a finished look.
With the head attached, find Round 2 of the green tunic immediately below the neck seam. It contains 24 half double crochet stitches. Join brick-red yarn at the back, working into the visible green fabric below the seam rather than into the stuffed head.
Collar Rnd 1: Work one surface single crochet over each of the 24 stitch columns around Round 2. Insert the hook from the outside through the green fabric at the corresponding stitch column, draw up the red yarn and complete the single crochet. Keep the stitches evenly spaced and close to the neckline. Join to the first sc. (24)
Collar Rnd 2: (Sl st in next st, work 3 hdc in next st, sl st in next st) 8 times around.
FO and weave the tail into the underside of the collar. You should have eight small red scallops around the neckline.
Keep the collar close to the shoulders. It should look like part of the outfit, not a separate dangling necklace.
Step 6: Crochet the Diagonal Red Crossover
The diagonal red strip is one of the features that gives our Christmas elf his own distinctive look. It starts near the viewer's left shoulder and runs across the green tunic toward the viewer's right side of the scalloped hem.
Make it as one narrow strip in brick-red yarn, working in turned single crochet rows.
Before beginning, leave a 12-inch brick-red starting tail for securing the upper end beneath the collar.
Row 1: Ch 5. Sc in the second chain from the hook and in each remaining chain. (4)
Rows 2 through 39: Ch 1, turn, sc in each stitch across. (4 each row)
Check the length before tapering: Lay the tunic flat with the front facing up. Pin the starting end of the unfinished strip just below the collar at the elf's right shoulder, which appears on the viewer's left. Bring it diagonally across the front toward the viewer's right lower edge. The finished pointed end should reach just above the ivory scallops.
Allow enough length for the final two tapering rows. If the strip is too short, continue working four single crochet stitches per row, chaining 1 and turning after each row. If it's too long, undo complete four-stitch rows until the length fits. Keep the strip relaxed during fitting rather than stretching it.
Once the length is correct, work the pointed end.
Next row: Ch 1, turn, dec twice. (2)
Following row: Ch 1, turn, dec. (1)
FO, leaving a long brick-red sewing tail. Allow approximately 48 inches for sewing the tapered end and both long edges to the tunic. If the strip is unusually long, use an additional length of matching yarn rather than pulling the sewing stitches tight.
Pin the completed crossover back into position. The wide starting end should sit beneath the collar near the viewer's left shoulder, and the narrow pointed end should finish near the viewer's right lower hem. Check that the green fabric isn't being pulled sideways.
The strip remains four stitches wide through its straight section, then tapers from four stitches to two and finally one. Its exact number of straight rows depends on the finished tunic and your single crochet row gauge.
Use the 12-inch starting tail to sew the wide upper end securely beneath the collar. Fasten off and weave in that tail.
Thread the 48-inch tail from the pointed lower end onto a yarn needle. Beginning at the point, sew up one long edge of the crossover toward the collar, catching the green tunic every few rows. Sew across the upper end, then continue down the opposite long edge until you return to the pointed tip.
Keep the stitches evenly spaced and the red strip relaxed against the green fabric. Secure the pointed end with several small stitches, fasten off and weave in the remaining yarn. The entire crossover should be attached without pulling the tunic sideways or leaving a loose end.
The strip should appear slightly raised, like a narrow crossover on the tunic, without being loose enough to catch on fingers.
Step 7: Check the Hat, Ears and Shoes
Set the finished elf upright against a firm surface and look at the complete shape from the front.
- The pointed ears should remain visible beneath the red hat brim.
- The sleeping eyes and little smile should sit centered below the hat.
- The curled hat should bend toward the viewer's right with the ivory tip visible.
- The red crossover should travel diagonally across the green tunic.
- The ivory scallops should hang evenly around the lower edge.
- The striped legs should hang separately and remain flexible.
- The oversized green shoe toes should curl upward and outward.
Check the hidden stitches holding the hat and shoe curls. If a stitch has pulled the yarn into a sharp corner, adjust it before weaving in the final end.
Finish by checking every sewn piece, particularly the neck, ears, arms, legs, shoes and hat tip. Secure and bury all remaining yarn ends inside the crochet fabric. Remove every pin and removable stitch marker, and check that no needles or temporary construction tools remain inside the finished elf.
Now you've got the complete Christmas elf, from that enormous curling hat right down to his ridiculous little shoes.
Crochet Elf Tips and Troubleshooting
A few details are worth checking before you call your elf finished. Most of them are small adjustments, but they make a real difference to the overall shape.
What if the head tips forward?
Check the 24-stitch neck seam first. A large stuffed head needs a firm connection to the narrower, unstuffed body. If the head leans forward, add a few reinforcing stitches across the front and back of the neckline, catching the lower head stitches and upper green body stitches together.
Don't solve the problem by filling the tunic with stuffing. That would change the lovey's floppy shape and turn it into a more conventional doll.
What if the green tunic feels too stiff?
First, make sure you're working the correct stitches. The raised puffs appear on only ten specified rounds, with ordinary half double crochet between them. Filling every round with puffs will make a heavier fabric that doesn't drape like the intended snuggler.
If the fabric is still too firm, compare your half double crochet gauge with the target before changing hook sizes. Remember that a looser hook size may also change the width and length of the skirt.
Why doesn't the hat curl like the picture?
The long narrow section needs to curve gradually. If you anchor the tip too close to the brim, you'll get a sharp fold instead of that big rounded hook.
Try repositioning the hidden shaping stitches, bringing the upper section toward the middle of the crown rather than all the way to the hat's lower edge. Pin the curl first and look at it from the front and side before sewing.
How can I keep the legs the same length?
Count the color bands. Each leg has ten bands of three rounds, for a total of 30 rounds. If one leg looks longer than the other, check the round counts and compare the tension in the two pieces.
Don't pull one leg to make it match. Correct the missing rounds or tension difference instead.
What if the curled shoe toes collapse?
Use a little filling in the wider front section, but leave the narrow tip flexible. Then check the hidden green shaping stitches that hold the curl.
The curled point should be visible from the front and the side. If it disappears against the rest of the shoe, loosen the attachment and reshape the bend before securing the yarn.
There's no need to add wire or another rigid insert. Keep the shoes soft and use yarn stitching to hold the shape.
Christmas Elf Customization Ideas
I'd keep the first elf as close to the original design as possible, especially if you're following this pattern for the first time. That green hat, brick-red crossover and exaggerated shoes belong together. Change too many things at once and you'll lose the character that makes him special.
Once you're comfortable with the construction, you could experiment with darker evergreen yarn, a softer cranberry red or a slightly different ivory. Just keep the yarn weights consistent so the head, tunic and limbs retain their proportions.
The embroidered expression is another place to make a small change. You can give the closed eyes a gentler curve or adjust the pink cheeks without changing the head's stitch counts. Keep the features embroidered rather than adding buttons or plastic eyes.
More Christmas Crochet Projects to Make
If you're putting together a handmade Christmas gift, you might enjoy my crochet elf baby hat pattern. It's a separate wearable project, with a long pointed tail that makes a fun holiday photo accessory.
For another soft-bodied character, browse the free crochet baby snuggler patterns. You'll find other floppy handmade characters there, each with its own construction and personality.
And if you're still in the mood for Christmas yarn projects, my free Christmas crochet patterns collection brings together more holiday gifts, keepsakes and festive accessories.
You don't need to crochet an entire Christmas collection in one weekend. This little elf brings plenty of holiday cheer all by himself.
Care and Safety Notes for Your Crochet Elf Lovey
Before giving this elf as a gift, check every attachment. Pay particular attention to the ears, the ivory hat tip, the curled shoes, the neck seam and the places where the long legs join the tunic.
All facial features should be embroidered. Don't substitute safety eyes, buttons, beads or bells for the stitched details.
Follow the care instructions for the yarn you've chosen. If it permits machine washing, place the finished elf inside a mesh laundry bag and use the yarn manufacturer's washing recommendations. Reshape the hat and curled shoes afterward and let the entire doll dry thoroughly before storing it.
For baby gifts: This handmade elf is intended for supervised awake use or as a keepsake. Keep it out of cribs, bassinets and other infant sleep spaces. The American Academy of Pediatrics' safe sleep guidance explains why soft toys and loose objects should not be placed in a baby's sleeping area.
Check the seams and embroidered details regularly, especially if the elf is handled frequently. Repair loose stitching before the project is used again.
Pattern development note: The stitch counts and construction have been reviewed mathematically for internal consistency. The finished dimensions and yarn quantities are estimates, and the pattern has not been physically test-crocheted. The example image is a design visualization rather than a photograph of a completed sample. The hat curl, shoe shaping, neck stability, finished proportions and final drape require verification with a completed sample.
When you click on links to various merchants on this site and make a purchase, this may result in this site earning a commission. This does not affect the price you pay.

UBGI Gold Standard 2026
Reviewed under the site's
editorial checklist.
Photos, decorating ideas, party setups and reader submissions are shared for inspiration unless a page is specifically presented as a pattern, tutorial, reference guide or step-by-step project. Follow the instructions, measurements, safety guidance and manufacturer directions provided for the particular project or product.
About Jan | Contact | Baby Nursery Ideas (Blog) | Site Map | Privacy Policy | Disclosure Policy | Disclaimer | Affiliate Disclosure | Earnings Disclosure | Facebook | Pinterest
I am a participant in the Amazon Services LLC Associates Program, an affiliate advertising program designed to provide a means for us to earn fees by linking to Amazon. As an Amazon Associate I earn from qualifying purchases.
Copyright © 2006-2026. All Rights Reserved.