Free Crochet Flying Angel Ornament Pattern with Flowing Lace Gown
By Jan Bay
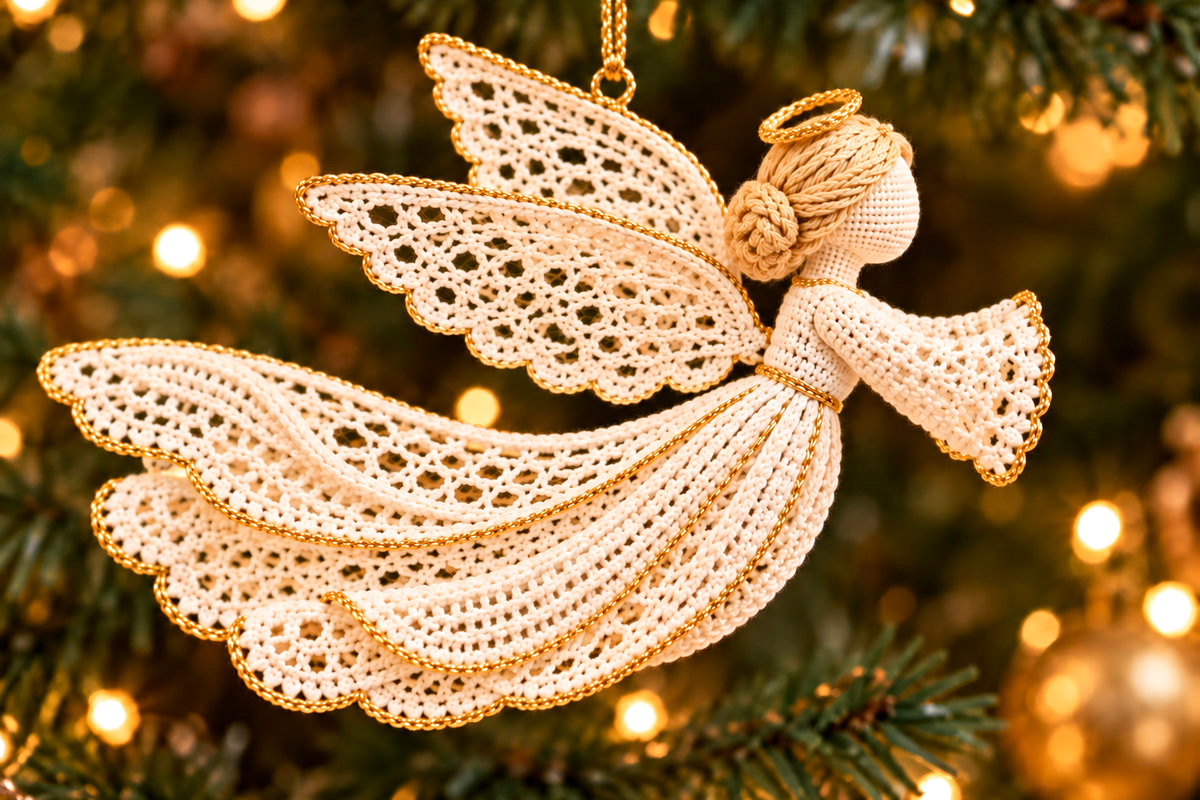
This free crochet flying angel ornament pattern creates a delicate ivory-and-gold Christmas angel that looks as though she's gliding through the air on gossamer wings. I especially love her long, flowing lace gown and swept-back wings. Her tidy little chignon, delicate crocheted halo, and gently flared sleeves give her a graceful, old-fashioned charm without a lot of fussy details. The pattern uses fine cotton thread, with blocking and fabric stiffener to help the flowing lace hold its shape. She's designed to become a lovely handmade Christmas keepsake.
Explore More Free Crochet Angel & Christmas Patterns
Classic Crochet Angel Ornament
Free Crochet Angel Wings Pattern
See Supplies for This Project Here.
Materials and Supplies for the Flying Angel
I'd choose smooth mercerized cotton for this angel. It shows the lace stitches clearly, gives the wings a lovely little bit of definition, and accepts fabric stiffener better than a fuzzy yarn. You don't need to make the entire angel rigid. The gown and wings should hold their shape, while her head and hair can stay softer.
- Size 3 mercerized cotton crochet thread in ivory, approximately 150–200 yards to allow for gauge differences and practice pieces
- Size 3 cotton crochet thread in golden blonde or light honey, approximately 20 yards for the hair and chignon
- Fine metallic-gold crochet thread, approximately 10–15 yards for the halo, edging, waist and hanging details
- 2.0 mm crochet hook, or the size needed to obtain the specified gauge
- 1.5–1.75 mm hook for the fine gold halo, if needed
- A small amount of polyester fiberfill for the head and bodice
- Yarn needle and smaller embroidery needle
- Stitch markers, scissors and measuring tape
- Commercial fabric stiffener suitable for cotton lace
- Foam blocking board, rustproof pins and plastic wrap
- Fine gold hanging cord and a small closed suspension ring
- Optional 24–26 gauge craft wire for concealed gown or wing support
Skill level: Intermediate. You'll need to know how to work single crochet, double crochet, increases, decreases, slip stitches, lace repeats and basic seaming.
Expected finished size: Approximately 7–8 inches from the back of the flowing gown to the forward sleeve cuffs. This is a calculated target rather than a measurement from a completed sample. The exact length will depend on your crochet gauge, blocking, lace shaping and final assembly.
Safety note: This is a decorative Christmas ornament, not a toy or a baby mobile. Keep it out of children's reach. If you use reinforcement wire, turn its ends into closed loops and cover them completely before assembling the ornament. Don't hang this decoration over a crib or sleeping area.
Free Crochet Flying Angel Ornament Pattern: Notes and Stitch Key
This angel is made in separate pieces, but the pieces aren't all worked alike. The wings use a tapered feather-lace pattern, while the gown combines firmer double-crochet rows with openwork and a more substantial band of stitches along one side. Those differences are what help give the finished angel her shape.
I'd make a small gauge sample before starting the gown. Fine cotton thread can vary quite a bit, and a small difference in stitch size becomes noticeable over twenty rows of lace.
Stitch Abbreviations (U.S. Terms)
- ch: Chain
- sc: Single crochet
- dc: Double crochet
- sl st: Slip stitch
- inc: Work 2 sc into the same stitch (single-crochet increase).
- dec: Single crochet the next 2 stitches together (sc2tog).
- dc2tog: Double crochet two stitches together
- MR: Magic ring
- sp: Space
- RS: Right side
- WS: Wrong side
How to Work the Shaped Lace
The following instructions use the word position to mean either an actual stitch or a chain-1 space from the preceding row. Count each chain-1 space as one position, but don't count the stitch skipped underneath it.
Turning-chain rule: Follow the Ch 2 and turn instruction at the beginning of each numbered row only once. The stitch instructions below describe what to crochet after turning. Do not add another turning chain when a numbered row refers to them.
Plain double-crochet row: Work 1 dc into every available position across. The turning chain does not count as a stitch.
Two-stitch increase row: Work 2 dc into the first position, 1 dc into each intermediate position and 2 dc into the final position. The new row contains two more stitches than the previous row.
Two-stitch decrease row: Work dc2tog across the first two positions, 1 dc in every intermediate position and dc2tog across the final two positions. The new row contains two fewer stitches.
Four-stitch decrease row: Work dc2tog twice across the first four positions. Work 1 dc in each position until only four positions remain. Work dc2tog twice across those final four positions. The new row contains four fewer stitches.
When a decrease covers a chain-1 space, insert the hook into that space for the corresponding part of dc2tog. Keep the resulting stitch snug so it doesn't leave a loose gap.
Wing Eyelet-Lace Row
After the numbered row's Ch 2 and turn, work 1 dc into each of the first two stitches. Across the middle section, repeat [ch 1, skip the next stitch, 1 dc in the following stitch] the specified number of times. Finish with 1 dc in each of the final two stitches. Do not add another turning chain.
These chain-1 spaces form the open lace holes. The two solid dc stitches at either edge keep the wing from becoming a loose piece of netting.
Gown Eyelet-Lace Row
After the numbered row's Ch 2 and turn, work 1 dc into each of the first two stitches. Repeat [ch 1, skip the next stitch, 1 dc in the following stitch] the specified number of times. Finish with 1 dc into each of the last six stitches. Do not add another turning chain.
Those final six double crochets create a more substantial lengthwise band along one side of the panel. Together with the plain double-crochet rows, they give the gown visible ribs and a place to follow with the fine gold accent thread.
For the gown, each eyelet row follows a solid double-crochet row. In the wings, some eyelet rows follow other eyelet rows, creating a more continuous lace pattern. Whenever the instructions say "position," work into an actual stitch or into a chain-1 space as directed. Count each chain-1 space as one position. Do not crochet into the skipped stitch beneath that space, and do not count the turning chain as a stitch.
Working Gauge
- Firm crochet: Aim for approximately 8 sc across 1 inch and 9 rounds in 1 inch.
- Double-crochet lace: Aim for approximately 8 stitch positions across 1 inch.
- Row gauge: Aim for approximately 4–4.5 lace rows in 1 inch after gentle blocking.
These measurements are calculated starting targets, not measurements from a test-crocheted ornament. The shape and finished length will depend on the actual thread and blocking.
Gauge Sample
Ch 9. Work 8 sc beginning in the second chain from the hook. Ch 2 and turn, then work 1 dc in each stitch across. Continue working eight dc per row until you have ten dc rows.
Measure the piece without stretching it, then block it lightly. You want approximately 1 inch across the eight stitches, with the dc portion measuring about 2.25–2.5 inches long.
If your sample is much larger, use a smaller hook. If it's much smaller, try a larger hook.
Don't worry about a tiny difference. What's important is that the gown doesn't become so short or wide that it loses the long, floating shape of the finished example.
Construction Order
- Crochet the head, hair, chignon and small halo.
- Make the fitted bodice and both open bell sleeves.
- Crochet two matching shaped lace wings.
- Make three graduated lace gown panels.
- Add the scalloped borders and check the dimensions.
- Block and selectively stiffen the lace.
- Attach the gown, wings and decorative gold trim.
- Balance the ornament using the adjustable hanging cords.
Count Your Finished Crochet Pieces
Before assembly, you should have 15 crocheted pieces:
- 1 smooth crochet head
- 1 golden-blonde hair cap
- 3 swept-back hair sections
- 1 crocheted chignon
- 1 small gold halo
- 1 fitted bodice
- 2 bell sleeves
- 2 shaped lace wings
- 3 separate gown panels: 20, 18 and 16 rows
That's 15 pieces altogether. The decorative gold trim, support cords and suspension ring are added during finishing and aren't included in the crochet-piece count.
Use a stitch marker at the beginning of the head and bodice rounds. The wings and gown are worked in rows, not spirals.
Keep the face completely plain. Don't add eyes, a nose, a mouth or separate hands. The chignon, halo, wings and open sleeves are the details that give this angel her character.
Crochet the Head, Hair, Chignon and Small Gold Halo
We're keeping her face completely plain. The hairstyle and the little halo will give the head all the detail it needs. The chignon is worked separately, so you won't have to arrange dozens of loose strands and hope they'll stay in place.
Part A: Smooth Crochet Head
Thread: Ivory cotton. Use the 2.0 mm hook, or a smaller hook if necessary to keep the stuffing from showing. Work continuously in spirals and mark the beginning of each round.
- Round 1: Make an MR and work 6 sc into it. Pull closed. (6 sc)
- Round 2: Inc in each stitch around. (12 sc)
- Round 3: [1 sc, inc] 6 times. (18 sc)
- Round 4: [2 sc, inc] 6 times. (24 sc)
- Round 5: Sc in every stitch. (24 sc)
- Round 6: Sc in every stitch. (24 sc)
- Round 7: Sc in every stitch. (24 sc)
- Round 8: Sc in every stitch. (24 sc)
- Round 9: Sc in every stitch. (24 sc)
- Round 10: [2 sc, dec] 6 times. (18 sc)
- Round 11: [1 sc, dec] 6 times. (12 sc)
Lightly stuff the head now. Use just enough filling to keep it round without stretching the stitches.
- Round 12: Dec 6 times. (6 sc)
Fasten off, leaving a 12-inch sewing tail. Keep the six-stitch closing edge available for attaching the head to the narrow upper end of the bodice.
Size checkpoint: The head should be approximately 1 inch wide, give or take a little depending on your gauge. Avoid pulling the front into a pointed shape. We want a gently rounded, featureless profile.
Part B: Golden-Blonde Hair Cap
Switch to the golden-blonde cotton thread. Work in continuous rounds.
- Round 1: 6 sc in MR. (6 sc)
- Round 2: Inc around. (12 sc)
- Round 3: [1 sc, inc] 6 times. (18 sc)
- Round 4: [2 sc, inc] 6 times. (24 sc)
- Round 5: Sc around. (24 sc)
- Round 6: Sc around. (24 sc)
Sl st into the next stitch and fasten off, leaving a long sewing tail. Position the cap over the crown and upper back of the head, with the front edge stopping above the blank face area. Sew it down neatly around its lower edge.
Don't pull the cap all the way forward. The smooth ivory face needs to remain visible in profile.
Part C: Three Simple Swept-Back Hair Sections
Make three matching narrow crocheted strands with the golden-blonde thread.
- Leave an 8-inch starting tail, then ch 12.
- Sl st in the second ch from the hook and in each remaining ch. (11 sl st)
- Fasten off, leaving an 8-inch finishing tail. You should now have one sewing tail at each end of the strand.
- Repeat twice more for a total of three matching strands.
Lay these strands diagonally across the outside of the hair cap, starting near the upper front hairline and sweeping them backward toward the chignon. Arrange them side by side rather than stacking them into one thick rope.
Secure each strand at the front, middle and back with small sewing stitches. Their ends should disappear beneath the bun. The three smooth lines give the impression of neatly combed-back hair without complicated individual curls.
Part D: Little Crochet Chignon
Still using golden-blonde cotton:
- Ch 17.
- Work 2 sc into the second ch from the hook and 2 sc into each of the remaining 15 chains. (32 sc)
- Fasten off, leaving an 18-inch sewing tail.
- Roll the curled strip into a compact spiral, beginning with one end at the center.
- Stitch through the layers on the underside to hold the spiral together.
- Position the bun at the lower back of the hair cap, just behind the neck.
- Sew it firmly to the cap and head, hiding the ends of the three swept-back strands beneath it.
Size checkpoint: Aim for a bun approximately 1/2–3/4 inch across. If your strip makes a larger bun, coil it more tightly or shorten the foundation chain and work two sc into each chain as before.
Keep the chignon tidy and close to the head. A large loose bun would change the proportions of this little angel.
Part E: Small Crocheted Gold Halo
Use the metallic-gold thread and the smaller hook.
- Ch 16.
- Without twisting the chain, join to the first chain with a sl st to form a ring.
- Ch 1. Work 1 sc into each of the 16 original chains around the ring. (16 sc)
- Join with a sl st to the first sc.
- Fasten off, leaving a sewing tail.
Shape the ring into a neat circle or slightly oval shape. Its expected diameter is approximately 1/2–3/4 inch, depending on the metallic thread.
Position the halo directly against the top of the hair, slightly toward the back of the crown. Tack its rear edge to the hair cap at three points. If the front lifts slightly, add another discreet stitch.
Important: The halo should look like a small crocheted ring resting on her head, not a large separate circle floating high above it.
Crochet the Bodice and Two Flowing Bell Sleeves
I prefer a fairly neat bodice for this design. The gown is going to be full of movement, and the wings have plenty of lace, so the upper body doesn't need more decoration. We'll let the sleeves flare gently toward the open cuffs.
Part F: Fitted Ivory Bodice
Use ivory cotton thread and the main hook. Work continuously in rounds from the neck toward the waist.
- Round 1: 6 sc in MR. (6 sc)
- Round 2: Inc in each stitch. (12 sc)
- Round 3: [1 sc, inc] 6 times. (18 sc)
- Round 4: Sc around. (18 sc)
- Round 5: Sc around. (18 sc)
- Round 6: Sc around. (18 sc)
- Round 7: Sc around. (18 sc)
- Round 8: Sc around. (18 sc)
- Round 9: Sc around. (18 sc)
- Round 10: Sc around. (18 sc)
- Round 11: Sc around. (18 sc)
- Round 12: [1 sc, dec] 6 times. (12 sc)
- Round 13: Sc around. (12 sc)
Lightly stuff the bodice before fastening off. Leave the twelve-stitch waist opening unclosed for now. It will be concealed beneath the attached gown panels and gold waist trim.
Use the head's sewing tail to attach its six-stitch closing edge to the six-stitch beginning of the bodice. Pass the needle through corresponding stitches all the way around. Make several additional hidden passes through the join to keep the head secure.
Size checkpoint: The finished bodice should be approximately 1.2–1.5 inches long, measured from the neck to the waist. Its widest section should remain noticeably narrower than the spread of the bell sleeves.
Part G: Bell Sleeves (Make Two)
Begin with ivory cotton. Each sleeve is worked from the narrow shoulder end toward the open cuff. The starting ring is closed; the cuff remains open.
- Round 1: Leave a 12-inch starting tail, then work 6 sc into an MR. Pull the ring closed securely. Keep the starting tail available for sewing the shoulder to the bodice. (6 sc)
- Round 2: Sc around. (6 sc)
- Round 3: [2 sc, inc] twice. (8 sc)
- Round 4: Sc around. (8 sc)
- Round 5: [3 sc, inc] twice. (10 sc)
- Round 6: Work 1 sc in the first stitch. Repeat [ch 1, skip the next sc, work 1 sc in the following sc] four times. Work 1 sc in the final sc. (6 sc and 4 ch-1 spaces; 10 positions)
- Round 7: Treat each sc and ch-1 space from Round 6 as one position. Repeat [1 sc in each of the next 4 positions, 2 sc in the following position] twice. (12 sc)
- Round 8: Repeat [1 sc in the next sc, ch 1, skip the following sc] six times around. (6 sc and 6 ch-1 spaces; 12 positions)
- Round 9: Ch 2, which does not count as a stitch. Repeat [1 dc in the next sc, 2 dc into the following ch-1 space] six times. Join with a sl st into the first dc. (18 dc)
- Round 10: Beginning at the first dc of Round 9, repeat [1 sl st in the next unworked dc, 3 dc in the following dc, 1 sl st in the following dc] six times around. Work into the 18 dc stitches only; do not count the joining sl st as a base stitch. (6 scalloped shells, each containing 3 dc)
Fasten off at the cuff and weave in that end. Keep the 12-inch starting tail at the closed shoulder end for sewing the sleeve to the bodice. Make the second sleeve the same way.
Bell Sleeve Finishing
Gently spread the six scallops around each cuff. The lace openings should remain visible through the widening sleeve, with the final scallops forming a broad, softly flared bell rather than a closed mitten shape.
Use a little metallic-gold thread to stitch around the outside curves of the cuff scallops. Follow the existing ivory stitches rather than adding another thick row of crochet. Secure the gold thread on the inside of the sleeve.
Don't add crocheted fingers, palms or separate hands. The bell sleeves are supposed to finish the arms by themselves.
Sleeve placement: The closed shoulder ends will attach to opposite sides of the upper bodice, approximately across Rounds 3–5. Position both sleeves so their cuffs point forward in the direction of flight. One sleeve can sit slightly behind the other when viewed from the side.
Set both finished sleeves aside until assembly. You'll sew them on in Step 2 of the assembly instructions, keeping the cuffs slightly forward and downward rather than straight out to the sides.
Crochet the Swept-Back Lace Angel Wings
These wings have a slightly different construction from the gown. They're narrow where they attach to the shoulders, wider through the middle and tapered at the tips. The openwork lets a little light through, while the solid stitches and small scallops give them a more defined feather shape.
Make two matching wings. You can turn one over during assembly so the feathered edges are positioned correctly on opposite sides.
Part H: Shaped Lace Wing (Make Two)
Thread: Ivory cotton. Use the main crochet hook. The turning ch 2 never counts as a stitch.
- Row 1: Ch 5. Work 1 sc into the second chain from the hook and into each remaining chain. (4 sc)
- Row 2: Ch 2, turn. Work a two-stitch dc increase row. (6 dc)
- Row 3: Ch 2, turn. Work a two-stitch dc increase row. (8 dc)
- Row 4: Ch 2, turn. Work a two-stitch dc increase row. (10 dc)
- Row 5: Ch 2, turn. Work 2 dc, then [ch 1, skip 1 dc, 1 dc in next dc] 3 times. Work 1 dc in each of the last 2 stitches. (7 dc and 3 ch-1 spaces; 10 positions)
- Row 6: Ch 2, turn. Work 2 dc into the first position, then 1 dc into the next position. Repeat [ch 1, skip the next position, 1 dc into the following position] 3 times. Work 1 dc into the next position and 2 dc into the final position. Work into chain-1 spaces wherever they occur. (9 dc and 3 ch-1 spaces; 12 positions)
- Row 7: Ch 2, turn. Work 1 dc into each of the first 2 positions. Repeat [ch 1, skip the next position, 1 dc into the following position] 4 times. Work 1 dc into each of the final 2 positions. (8 dc and 4 ch-1 spaces; 12 positions)
- Row 8: Ch 2, turn. Work 2 dc into the first position and 1 dc into the next position. Repeat [ch 1, skip the next position, 1 dc into the following position] 4 times. Work 1 dc into the next position and 2 dc into the final position. (10 dc and 4 ch-1 spaces; 14 positions)
- Row 9: Ch 2, turn. Work 1 dc into each of the first 2 positions. Repeat [ch 1, skip the next position, 1 dc into the following position] 5 times. Work 1 dc into each of the final 2 positions. (9 dc and 5 ch-1 spaces; 14 positions)
- Row 10: Ch 2, turn. Work 2 dc into the first position and 1 dc into the next position. Repeat [ch 1, skip the next position, 1 dc into the following position] 5 times. Work 1 dc into the next position and 2 dc into the final position. (11 dc and 5 ch-1 spaces; 16 positions)
- Row 11: Ch 2, turn. Work 1 dc into each of the first 2 positions. Repeat [ch 1, skip the next position, 1 dc into the following position] 6 times. Work 1 dc into each of the final 2 positions. (10 dc and 6 ch-1 spaces; 16 positions)
- Row 12: Ch 2, turn. Work a four-stitch decrease row. Work into every previous dc or chain-1 space as a position. (12 dc)
- Row 13: Ch 2, turn. Work 2 dc, then [ch 1, skip 1 dc, 1 dc in next dc] 4 times. Work 2 dc. (8 dc and 4 ch-1 spaces; 12 positions)
- Row 14: Ch 2, turn. Work a four-stitch decrease row. (8 dc)
- Row 15: Ch 2, turn. Work a four-stitch decrease row. (4 dc)
- Row 16: Ch 2, turn. Work dc2tog over the first 2 stitches, then dc2tog over the final 2 stitches. (2 dc)
Fasten off and weave in the thread end at the narrow outer tip. Leave the four-stitch beginning edge available for sewing to the back of the bodice.
Part I: Feather-Scalloped Lower Wing Edge
Choose one long side of the wing as the lower feather edge. Begin at the narrow four-stitch shoulder end and work toward the outer tip.
- Join ivory thread at the beginning of Row 1.
- Work 1 sc into the end of Row 1.
- Work 2 sc into the end of each dc row from Rows 2–16. (31 edging sc total)
- Ch 1 and turn.
- Sl st into the first edging sc.
- Repeat [skip the next edging sc, work 3 dc into the following edging sc, skip the next edging sc, sl st into the following edging sc] 7 times.
- Sl st into each of the final 2 edging sc.
- Fasten off and weave in the end.
You should have seven small rounded feather scallops along the lower edge.
The upper long edge remains comparatively smooth. That contrast is intentional. The wing should have a clean sweeping outline on top and a softer feathered edge underneath.
Part J: Gold Wing Outline
After blocking, use a fine needle and metallic-gold thread to follow the upper edge of each wing with small couching stitches. Continue around the exposed outer tip and along the scalloped lower edge.
Don't pull the gold thread tight. It should follow the lace you've already made, not change the shape of the wing.
Wing Size and Shape Check
At the working gauge, each wing should be approximately 3–3.5 inches long after shaping, with its widest openwork section around 1.75–2 inches across before curving.
The width is greatest near Row 10 or 11, then narrows toward Row 16. That gives you a tapered wing rather than a plain triangular piece of lace.
Block both wings with the tips pointing backward. Curve the upper edge gently and spread the seven small scallops along the underside.
If the wings look too wide when you place them against the bodice, don't cut back the openwork. A gentle curve and partial overlap at the roots will make them appear narrower in profile while keeping the lace intact.
Attachment reminder: The four-stitch starting edge is the shoulder root. The two-stitch end is the outer tip. Don't reverse those ends during assembly.
Crochet the Three Flowing Lace Gown Panels
Now we're going to make the part that gives this angel her lovely flying shape. The gown has three separate layers, with the longest one sweeping upward behind her, a middle layer flowing straight back and a shorter layer curving downward.
Each panel begins with a narrow, fairly solid section at the waist. As you crochet, the panel widens and develops a combination of solid stitches and small lace openings. I've kept a broader band of double crochet along one side so the gown has some definition instead of looking like three pieces of loose mesh.
All three panels use the same basic row sequence, but they stop at different lengths. Keep them separate until you're ready to assemble the angel.
Part K: Shared Gown-Panel Instructions
Use ivory size 3 cotton thread and the main hook. Work back and forth in rows. Each numbered row tells you when to ch 2 and turn. Follow that instruction only once per row. The turning chain never counts as a stitch.
Make three separate pieces from the following instructions.
- Row 1: Ch 7. Work 1 sc into the second chain from the hook and each remaining chain. (6 sc)
- Row 2: Ch 2, turn. Work 2 dc into the first stitch, 1 dc into each of the next 4 stitches and 2 dc into the last stitch. (8 dc)
- Row 3: Ch 2, turn. Work 1 dc in every stitch across. (8 dc)
- Row 4: Ch 2, turn. Work a two-stitch dc increase row. (10 dc)
- Row 5: Ch 2, turn. Work 1 dc in every stitch across. (10 dc)
- Row 6: Ch 2, turn. Work a two-stitch dc increase row. (12 dc)
- Row 7: Ch 2, turn. Work 2 dc, then [ch 1, skip 1 dc, 1 dc in next dc] twice. Work 1 dc into each of the final 6 stitches. (10 dc and 2 ch-1 spaces; 12 positions)
- Row 8: Ch 2, turn. Work a two-stitch dc increase row, working into the previous chain-1 spaces where necessary. (14 dc)
- Row 9: Ch 2, turn. Work 2 dc, then [ch 1, skip 1 dc, 1 dc in next dc] 3 times. Work 6 dc. (11 dc and 3 ch-1 spaces; 14 positions)
- Row 10: Ch 2, turn. Work a two-stitch dc increase row. (16 dc)
- Row 11: Ch 2, turn. Work 2 dc, then [ch 1, skip 1 dc, 1 dc in next dc] 4 times. Work 6 dc. (12 dc and 4 ch-1 spaces; 16 positions)
- Row 12: Ch 2, turn. Work a two-stitch dc increase row. (18 dc)
- Row 13: Ch 2, turn. Work 2 dc, then [ch 1, skip 1 dc, 1 dc in next dc] 5 times. Work 6 dc. (13 dc and 5 ch-1 spaces; 18 positions)
- Row 14: Ch 2, turn. Work a two-stitch dc increase row. (20 dc)
- Row 15: Ch 2, turn. Work 2 dc, then [ch 1, skip 1 dc, 1 dc in next dc] 6 times. Work 6 dc. (14 dc and 6 ch-1 spaces; 20 positions)
- Row 16: Ch 2, turn. Work a two-stitch dc increase row. (22 dc)
- Row 17: Ch 2, turn. Work 2 dc, then [ch 1, skip 1 dc, 1 dc in next dc] 7 times. Work 6 dc. (15 dc and 7 ch-1 spaces; 22 positions)
- Row 18: Ch 2, turn. Work a two-stitch dc increase row. (24 dc)
- Row 19: Ch 2, turn. Work 2 dc, then [ch 1, skip 1 dc, 1 dc in next dc] 8 times. Work 6 dc. (16 dc and 8 ch-1 spaces; 24 positions)
- Row 20: Ch 2, turn. Work a two-stitch dc increase row. (26 dc)
Notice that every even-numbered increase row adds two stitches. The eyelet rows that follow keep the same number of effective positions, including their chain spaces. The six solid stitches along one edge form the denser lengthwise rib.
Part L: Long Upper Gown Panel
Work Rows 1–20 of the shared gown pattern.
The final row contains exactly 26 dc. Continue with the upper panel's scalloped hem below.
Expected length before the hem: Approximately 4.5–5 inches at the working gauge.
This will be the longest panel. During blocking, curve it slightly upward and backward so the scalloped end appears to float behind the angel's wings.
Part M: Middle Gown Panel
Begin a new piece and work Rows 1–18 only.
The final row contains exactly 24 dc. Continue with the middle panel's scalloped hem below.
Expected length before the hem: Approximately 4–4.5 inches.
This panel will sit partly beneath the upper layer, with its widest end extending backward.
Part N: Lower Gown Panel
Begin a third piece and work Rows 1–16 only.
The final row contains exactly 22 dc. Continue with the lower panel's scalloped hem below.
Expected length before the hem: Approximately 3.5–4 inches.
The shorter panel will sit below the other two and curve gently downward from the waist.
Scalloped Hem for the Long Upper Panel
Begin immediately after Row 20, with 26 dc across.
- Ch 1 and turn.
- Work 1 sc in the first dc.
- Repeat [skip the next dc, work 4 dc into the following dc, skip the next dc, work 1 sc into the following dc] 6 times.
- Work 1 sc into the final remaining dc.
- Fasten off and weave in the end.
Hem count: Six scalloped shells, each containing four dc.
Scalloped Hem for the Middle Panel
Begin immediately after Row 18, with 24 dc across.
- Ch 1 and turn.
- Work 1 sc into each of the first 2 dc.
- Repeat [skip the next dc, work 4 dc into the following dc, skip the next dc, work 1 sc into the following dc] 5 times.
- Work 1 sc into each of the final 2 remaining dc.
- Fasten off and weave in the end.
Hem count: Five scalloped shells, each containing four dc.
Scalloped Hem for the Lower Panel
Begin immediately after Row 16, with 22 dc across.
- Ch 1 and turn.
- Work 1 sc into the first dc.
- Repeat [skip the next dc, work 4 dc into the following dc, skip the next dc, work 1 sc into the following dc] 5 times.
- Work 1 sc into the final remaining dc.
- Fasten off and weave in the end.
Hem count: Five scalloped shells, each containing four dc.
Check the Three Gown Panels
Before blocking, spread the pieces on a flat surface with their six-stitch starting edges together.
- The upper panel should have 20 rows, 26 dc across the last row and 6 scallops.
- The middle panel should have 18 rows, 24 dc across the last row and 5 scallops.
- The lower panel should have 16 rows, 22 dc across the last row and 5 scallops.
All three pieces should taper toward the waist and become wider toward the hem. Their denser six-stitch bands should be positioned so they can be seen as gently curving ribs once the panels are arranged.
If the long panel doesn't look noticeably longer than the short one, check your row gauge and make sure you haven't accidentally repeated or skipped a row.
Fine Gold Gown Edging
I'd keep the gold edging delicate. It's meant to trace the curves of the gown rather than cover the lacework.
- After blocking and stiffening, thread a fine embroidery needle with metallic-gold crochet thread.
- Follow the outside edge of each scalloped hem with small couching stitches.
- Secure the gold thread every two or three crochet stitches, without pulling the lace inward.
- Run a separate fine gold strand from the waist along the boundary of the denser six-dc band on each panel.
- Follow the panel's natural curve toward the hem.
- Fasten off on the wrong side, hiding each end beneath nearby stitches.
At the waist, the three gold strands should appear to flow out from beneath the narrow gold waistband. That's a lovely way to emphasize the layered gown without making the decoration too elaborate.
Shape the Gown Before Assembly
Pin the three panels individually while damp or while applying the chosen fabric stiffener. Spread the scalloped hems and give each panel a slightly different curve.
Upper panel: Curve gently backward and upward.
Middle panel: Let the lace sweep almost horizontally backward.
Lower panel: Curve backward and downward, spreading the scallops so the lower edge remains visible.
Don't block all three panels into matching triangles. The different curves and overlapping positions are what give the gown the impression of movement.
Let each panel dry fully while supported in its intended shape before completing the assembly.
Assemble the Crochet Flying Angel and Add the Hanging Loop
Before sewing the lace in place, lay all the pieces out beside the finished example image. The head and sleeves point forward, while the wings and three gown panels sweep backward.
I'd arrange everything with pins first. You'll have much better control over the final shape if you can see how the layers fit together before making the permanent stitches.
Important assembly order: Finish crocheting every piece first. Before permanently attaching the wings or gown panels, follow Steps 1–5 in the stiffening and shaping instructions below. Allow the lace to dry completely and remove the blocking pins. Then return here to sew the pieces to the bodice, add the gold accents and balance the hanging cords. Step 6 in the stiffening section explains the optional halo treatment, and Step 7 is the final inspection, not a second assembly.
Step 1: Finish the Head and Upper Body
- Check that the smooth crochet head is securely sewn to the narrow six-stitch neck end of the bodice.
- Position the smooth face forward, in the same direction the sleeves will extend.
- Make sure the blonde hair cap, three swept-back sections and little chignon are firmly attached.
- Check that the small crocheted gold halo rests against the top of the hair.
- Lightly adjust the fiberfill if the body needs more definition.
- Leave the twelve-stitch waist opening available for attaching the gown panels.
Don't add any features to the face. The hairstyle and halo are all the decoration it needs.
Step 2: Position the Bell Sleeves
- Place one sleeve against the upper side of the bodice, approximately across Rounds 3–5.
- Secure its closed six-stitch shoulder end with several small stitches.
- Angle the sleeve forward and slightly downward.
- Attach the second sleeve on the opposite side at the same height.
- Make sure both scalloped cuffs are open and the sleeves remain gently flared.
From the side, the nearer sleeve should be easy to see, with the other sleeve partly behind it.
Step 3: Arrange the Three Gown Panels
Set the angel on a padded work surface, with her head pointing to the right and the waist toward the left. The blocked gown pieces should be dry enough to hold their individual curves before permanent attachment.
- Place the 20-row panel at the upper back of the waist, directing its long end backward and slightly upward.
- Position the 18-row panel behind and below the first, sweeping almost horizontally backward.
- Arrange the 16-row panel along the lower waist, curving backward and gently downward.
- Overlap the narrow starting edges slightly, but fan the wide scalloped ends apart.
- Pin all three pieces in place and compare the complete silhouette with the finished example.
The longer upper panel should not completely hide the middle one. You want all three layers to show, especially their differently curved scalloped hems.
Step 4: Sew the Gown Panels to the Waist
Each panel begins with six single crochet stitches. The bodice has twelve stitches around the waist opening. We'll gather the panel beginnings slightly so all three can fit neatly around the waist.
- Before attaching any gown panel, secure the waist opening so the fiberfill cannot escape. Thread a needle with approximately 18 inches of ivory cotton thread and anchor it securely at the waist edge. Make six small crosswise retaining stitches over the center of the opening, taking the needle through opposite waist stitches: first stitches 1 and 7, then 2 and 8, continuing through stitches 6 and 12. Weave the remaining thread back and forth through these crossing strands to form a small, firm covering over the stuffing. Anchor the thread securely at the inside edge. Keep the tension gentle so the twelve waist stitches remain in their original circular positions. Do not gather or close the perimeter itself.
- Lay the angel on her side with her head pointing right and the gown extending left. Identify the top, far side and underside of the twelve-stitch waist edge. Assign four consecutive waist stitches along the upper portion to the long upper gown panel, the next four around the far side to the middle panel, and the remaining four around the lower portion to the short panel. Mark the three groups temporarily so their positions remain clear while sewing. All twelve stitches must be assigned once, with no overlap between groups.
- Position the flexible six-stitch beginning edge of the long upper gown panel against its assigned four waist stitches. Its long end should extend backward and slightly upward, as established during blocking.
- Using ivory sewing thread, catch the first two panel stitches together and secure them to the first waist stitch.
- Sew the third panel stitch to the second waist stitch and the fourth panel stitch to the third waist stitch.
- Catch the fifth and sixth panel stitches together and secure them to the fourth waist stitch.
- Repeat the same six-to-four gathering attachment for the middle and lower gown panels, using their assigned groups of four waist stitches.
- Make several small reinforcing stitches through the panel bases and the body.
- Check that the waist opening is securely covered by the retaining stitches made before attachment and that no fiberfill can protrude. Reinforce any loose stitches that remain accessible, without tightening or distorting the gathered gown roots. Remove the temporary waist-position markers once all three panels are securely sewn in place.
The three gathered attachment edges should form a compact, slightly overlapping arrangement around the waist. The skirt panels themselves should extend backward, not hang straight down.
Check that the curves remain visible before fastening off all the sewing threads.
Step 5: Attach the Two Lace Wings
Remember that each revised wing begins with four single crochet stitches at the shoulder end. Its outer tip is the final two-stitch end.
- Place the first wing at the upper back, close to the shoulder and just behind the chignon.
- Position the four-stitch root against the bodice around Rounds 4–6.
- Sew the root firmly to the body, catching the first two or three rows of the wing so the attachment spreads across a small area rather than one point.
- Angle the outer tip backward and upward.
- Place the second wing slightly lower and partly behind the first.
- Secure its root in the same manner, spreading the attachment stitches across the back of the bodice.
- Check that the scalloped feather edges face outward and remain visible.
Don't sew the broad middle of either wing flat against the bodice. Only the root needs to be firmly attached. The open lace should fan outward and keep its shaped curve.
When you lift the angel, the wing tips should not twist around their attachment points. Add another small stitch at the root if needed.
Step 6: Add the Gold Waistband and Flowing Accents
- Thread a fine needle with metallic-gold crochet thread.
- Anchor the thread behind the bodice at the waist.
- Wrap the gold thread once or twice around the narrow waist, covering the gown-panel attachment stitches.
- Secure it at the back with several small stitches.
- Check that the gold edging on the gown and wings follows the existing crochet without pulling it out of shape.
- Secure any loose gold accent strands at their ends.
Keep the waistband fairly narrow. The lace is the feature here, and too much gold around the waist would make the little bodice look heavy.
Step 7: Prepare the Hanging Cords
The ornament uses two concealed support cords meeting at one small ring. You can add a third support if the flowing gown needs extra balance.
- Cut two lengths of fine gold hanging cord, approximately 5 inches each.
- Pass the first cord through several firm stitches at the upper back of the bodice near Round 4 and the wing roots.
- Pass the second cord through several stitches near Rounds 11–12 of the bodice, above the waist.
- Secure each cord to its attachment point with a knot and several discreet anchoring stitches.
- Pass their free ends through a small closed suspension ring.
- Tie temporary adjustable knots rather than cutting away the extra cord.
- Make one separate visible hanging loop from approximately 7–8 inches of gold cord and secure it to the ring.
The two support cords should be positioned behind the wings and upper gown, where they are less noticeable. The final ornament should appear to hang from one neat gold loop.
Step 8: Balance the Horizontal Flying Position
Lift the ornament gently by its hanging loop. Keep a padded surface beneath it while the knots are temporary.
- Check whether the head and bodice remain approximately horizontal.
- If the head drops, shift the suspension ring's effective position toward the head by adjusting the support cord lengths.
- If the waist and gown drop, shift the effective support position toward the waist.
- Check that the wing tips still sweep backward and the gown panels retain their individual curves.
- If the gown pulls the ornament backward or downward, add a third fine support cord from the suspension ring to the upper gown panel around Rows 8–10. Pass the cord through several adjacent stitches along the denser crochet band rather than anchoring it to one open lace space. Reinforce the attachment with small ivory stitches so the tension is spread across the fabric. Shorten or lengthen this optional cord until the gown is supported and its flowing curves remain natural.
- Secure the final knots and hide the ends beneath nearby crochet stitches.
If the gown panels sag despite correct balance, don't keep pulling harder on the hanging cords. Reblock or reinforce the affected lace. The cords control the angle of the complete ornament, while the stiffening holds the shape of the separate pieces.
Final Appearance Check
Hang the angel against a plain background and view her from the side.
- The head should remain smooth, softly rounded and free of stitched facial details.
- The chignon should be small and tidy, with the gold halo resting on the hair.
- The two lace wings should show their shaped tips and scalloped feather edges.
- The bell sleeves should flare forward without separate hands.
- The gown should have three visible overlapping layers, not one flat triangular shape.
- The solid crochet ribs, lace openings, scalloped hems and gold accents should all be visible.
- The entire ornament should suggest forward movement through the air.
Those are the details worth checking carefully. Individual stitches and draping will vary from one crocheter to another, but the angel should still have the same recognizable flying design.
How to Stiffen and Shape the Crochet Flying Angel
I'd use a commercial fabric stiffener rather than the old-fashioned sugar-water method for this angel. Sugar water can attract insects and may become sticky in humid conditions. A fabric stiffener intended for cotton lace is a more practical choice for an ornament you want to put away and bring out again at Christmas.
The trick is to stiffen the right pieces. The wings and gown need enough support to hold their curves, but the head, hair and bodice don't need to feel like hard plastic.
Step 1: Prepare the Blocking Surface
- Cover a foam blocking board with plastic wrap.
- Have rustproof pins ready.
- Arrange small rolls of plastic-wrapped fabric or foam to support the raised curves of the gown.
- Place the wings and gown panels on the board separately before applying any stiffener.
Make a note of the original panel positions, especially which end belongs at the waist. The narrow ends should stay narrow, and the scalloped hems should remain spread apart.
Step 2: Test the Stiffener
Use a leftover piece of ivory crochet cotton or the small lace gauge sample to test the product first. Check that it dries clear and doesn't leave an unwanted sheen or discoloration.
For example, Aleene's Fabric Stiffener & Draping Liquid instructions explain how to saturate fabric, remove excess liquid and shape it over a protected form. That product may also be diluted for a softer hold. Follow the directions for whichever product you actually choose.
Don't dilute a stiffener automatically. These long lace panels need more support than a flat snowflake or small decorative edging.
Step 3: Stiffen the Shaped Lace Wings
- Apply fabric stiffener to the first wing, following the product directions and removing excess from the openwork.
- Keep the four-stitch root and its first two rows relatively flexible so the wing can be sewn securely to the bodice.
- Position the four-stitch root at one end of the blocking area and the narrow two-stitch outer tip at the other.
- Pin the smooth upper edge into a gentle backward-sweeping curve.
- Spread the seven feather scallops along the lower edge, pinning them individually without stretching them unevenly.
- Support the broad middle section with a small plastic-wrapped form so the wing dries with a shallow curve rather than completely flat.
- Repeat with the second wing, shaping it to complement the first.
- Allow both wings to dry fully before removing the pins.
Lift each dry wing by its attachment root. The tapered tip and scalloped edge should retain their intended positions without folding over. If the lace is still too flexible, apply another light stiffening treatment and block again.
Step 4: Stiffen the Gown Panels
Work with one panel at a time.
- Apply fabric stiffener to the long upper panel beginning at Row 4 and continuing toward the scalloped hem. Remove excess liquid from the open stitches. Keep the six single crochet stitches of Row 1 and the double-crochet stitches of Rows 2–3 free of stiffener so this narrow waist end remains flexible for gathering and sewing. Treat the middle and lower panels the same way when stiffening them.
- Pin the narrow waist end firmly in place.
- Guide the panel backward in a broad, sweeping curve.
- Spread the scalloped hem and pin each scallop without stretching it unevenly.
- Use protected supports beneath the panel to create a gentle raised curve.
- Repeat with the middle and lower panels.
- Let all three pieces dry completely while supported in their intended shapes.
The longest 20-row panel should curve slightly upward. The 18-row panel should sweep backward, while the shorter 16-row panel curves gently downward. Spread the six scallops on the upper panel and the five scallops on each remaining panel. Keep the solid crochet ribs visible and avoid flattening the panels into identical shapes.
Remove the pins carefully after drying. Hold each panel at its narrow end and see whether the lace supports its own weight. A little flexibility is fine, but a panel that immediately folds in half needs more stiffening or additional support.
Step 5: Optional Hidden Reinforcement
For an ornament that needs extra help maintaining the horizontal silhouette, you can add a very fine, flexible support wire along the wrong side of the upper edge of a gown panel.
- Cut a length of fine craft wire slightly shorter than the edge being reinforced.
- Bend both ends inward into small, fully closed loops.
- Wrap or cover the ends with cotton thread so no sharp metal remains exposed.
- Lay the wire along the wrong side of the panel.
- Sew it in place with ivory thread, catching the crochet at regular intervals.
- Gently bend the reinforced lace into the intended curve and check that the wire is completely concealed.
- Reapply stiffener and block again if the added support disturbed the shape.
You don't have to use wire if the stiffened cotton holds the shape satisfactorily. I'd make that decision after testing the actual panels rather than adding wire automatically.
Step 6: Finish the Halo and Hair
The little gold halo may need only a small amount of stiffener applied with a fine brush. Shape it into a tidy ring and allow it to dry against the hair without soaking the stuffed head.
Keep the chignon and swept-back hair sections comparatively soft. They should retain their crocheted texture rather than becoming shiny or rigid.
Step 7: Final Hanging and Safety Check
Once you've completed the assembly instructions, give the finished angel one last inspection.
- Remove every blocking pin, temporary positioning pin and stitch marker.
- Confirm that all permanent stitching is secure and that the chignon, halo, sleeves, wings and gown panels are firmly attached.
- If you used reinforcement wire, check that both ends are enclosed and that no sharp metal is exposed.
- Check that every temporary adjustable knot in the hanging cords has been securely finished.
- Hang the angel from her completed suspension loop.
- Check that the head and bodice remain approximately horizontal.
- Leave the ornament hanging for several minutes and examine the gown and wings for drooping or twisting.
- Remove any remaining temporary threads or construction supports and weave in all loose ends.
If the gown starts drooping, don't try to fix everything by shortening the hanging loop. Reblock or reinforce the panel that is losing its shape. The loop controls the angle of the ornament; the stiffening controls the curves of the lace.
Before You Put the Angel Away
Make sure every treated piece is completely dry. Store the ornament with enough room that the wings and gown won't be crushed. A shallow box with soft, dry tissue supporting the lace is better than folding the gown flat.
Keep it away from moisture and prolonged humidity. If the lace softens during storage, you may need to reshape and restiffen an affected section before hanging the ornament again.
Flying Angel Crochet Pattern FAQs
Can I make this angel with size 10 crochet thread?
Yes, but she'll be smaller if you keep the same stitch counts. You would also need a hook suited to the finer thread. The gown and wings may become particularly delicate, so make a lace gauge sample before starting. If you're trying to match the proportions and expected size in this pattern, I'd stay with size 3 cotton.
Does the finished angel have to be stiffened?
For the flowing horizontal gown, I recommend it. Without stiffening or some other structural support, the lace is likely to hang downward rather than hold those backward-sweeping curves. The head and hair can stay soft, but the wings and gown need shaping.
Can I use white craft glue mixed with water?
Some crocheters use diluted craft glue for decorative projects. I prefer a fabric stiffener specifically intended for textiles. Whatever you choose, test it on the same cotton thread first and make sure it dries clear without discoloring the ivory lace or gold accents.
Why doesn't the angel have a face or hands?
That's part of the finished design. The smooth face gives her a simple, traditional look, and the open bell sleeves eliminate the need for tiny fingers or hands. You can leave those details off entirely. There's nothing missing from the pattern.
What if my gown panels don't match the expected measurements?
Check the lace gauge before changing the pattern. If your rows are much shorter or narrower than the stated gauge, try a slightly larger hook. If they're too large, try a smaller hook.
If the panels are shorter than expected, check the double-crochet row gauge and the amount of stretch created during blocking. Keep the three panels at 20, 18 and 16 rows for this version. Adding extra rows changes both their width and the counted scalloped hems, so I'd correct the hook size or blocking measurements before changing the stitch counts.
If the panels are longer than expected, first check the row gauge and try a smaller hook if necessary. Keep the stated 20-, 18- and 16-row construction for the finished design. Removing rows would also change the final stitch counts, so don't shorten the panels without recalculating their scalloped borders. Check the proportions against the head and bodice before stiffening anything.
How do I keep the angel flying horizontally?
Start with the two adjustable suspension cords attached to the back of the bodice. Move their common ring until the finished ornament hangs at the right angle. If the gown's weight pulls it downward, use the additional concealed support thread described in the assembly instructions.
The correct balance depends on the weight of your thread, the amount of stiffener and how the gown panels are arranged. Give yourself a little extra hanging cord so you can adjust everything before tying the final knots.
Could I use this as a baby's nursery mobile?
No. This particular design is intended as a decorative Christmas ornament. The stiffened lace, hanging cords, metallic thread and possible reinforcement wire make it unsuitable as a baby toy or accessible crib mobile.
Keep it out of reach and away from sleeping areas. It's better displayed on a Christmas tree or in another secure location where the delicate crochet won't be handled.
Can I make several angels in different colors?
Of course. Ivory with gold is the combination shown here, but white with silver or soft cream with champagne-colored trim would be lovely too. Keep the same head, chignon, wings, sleeves and layered gown construction if you want the finished angels to share this particular flying silhouette.
If you're looking for another angel style, my free crochet angel patterns collection is a good place to compare designs. You can also browse my Christmas crochet patterns for more handmade ornaments and holiday keepsakes.
I think the nicest part of this angel is the way the small, simple details let the lace do the work. A tidy chignon, a little halo and those three floating gown layers are enough to give her a personality of her own.
When you click on links to various merchants on this site and make a purchase, this may result in this site earning a commission. This does not affect the price you pay.

UBGI Gold Standard 2026
Reviewed under the site's
editorial checklist.
Photos, decorating ideas, party setups and reader submissions are shared for inspiration unless a page is specifically presented as a pattern, tutorial, reference guide or step-by-step project. Follow the instructions, measurements, safety guidance and manufacturer directions provided for the particular project or product.
About Jan | Contact | Baby Nursery Ideas (Blog) | Site Map | Privacy Policy | Disclosure Policy | Disclaimer | Affiliate Disclosure | Earnings Disclosure | Facebook | Pinterest
I am a participant in the Amazon Services LLC Associates Program, an affiliate advertising program designed to provide a means for us to earn fees by linking to Amazon. As an Amazon Associate I earn from qualifying purchases.
Copyright © 2006-2026. All Rights Reserved.