Free Crochet Angel Applique Pattern for Baby Blankets and Keepsakes
By Jan Bay
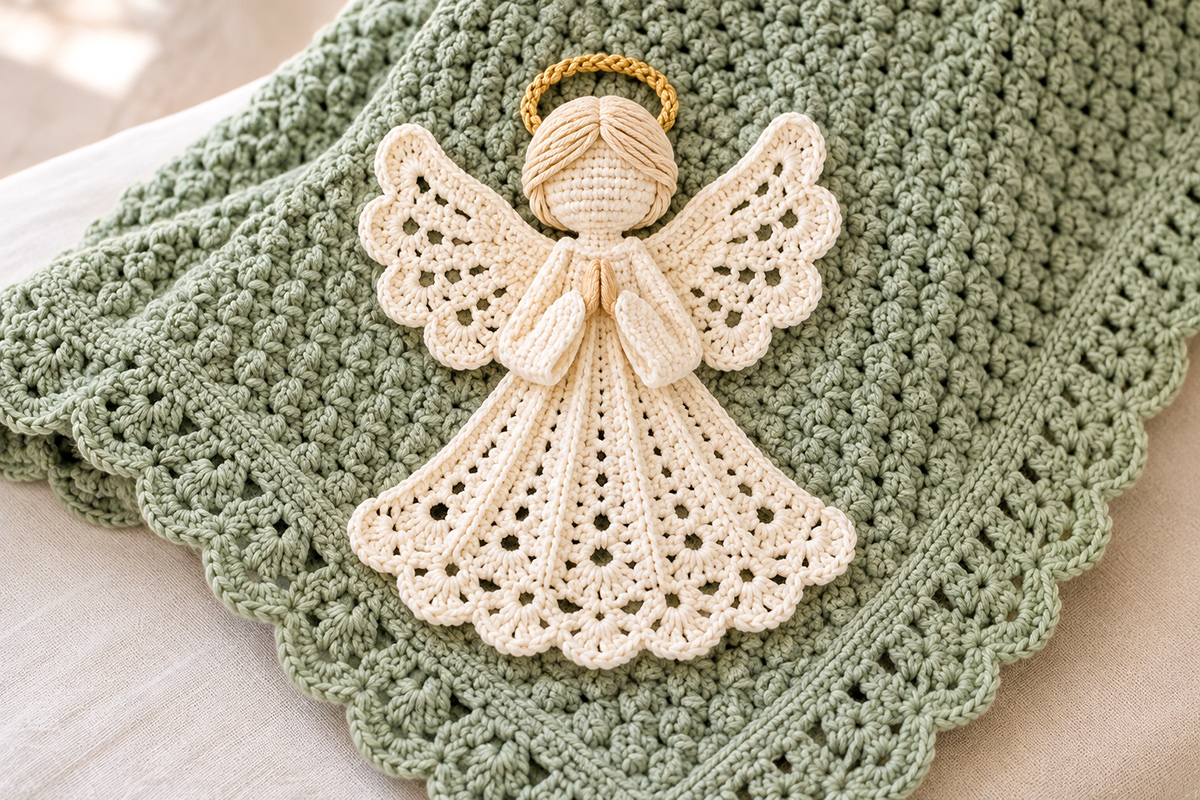
This free crochet angel appliqué pattern makes a graceful little angel with scalloped lace wings, folded praying hands, a delicate gold halo and a flowing ivory gown. I love the idea of adding one to the corner of a handmade baby blanket, where it becomes a lovely little detail making the blanket even more special. The traditional design also works beautifully for a christening keepsake, a Christmas stocking or another handmade gift made with love.
Explore More Free Crochet Baby Patterns
Jump to a Section
Free Crochet Angel Appliqué Pattern
Attaching the Angel to a Baby Blanket
Finished Size and Gauge
The angel is designed to finish at approximately 7 1/2 inches tall, including the halo. The gown has a wide scalloped hem, and its finished width will depend on the yarn, gauge and blocking. The measurements are design targets rather than measurements taken from a completed crochet sample. The final width still needs to be confirmed against the finished lacework.
I'd use smooth fingering-weight cotton for this project. The fine yarn gives you room to make the openwork wings, braided-looking hair and pretty scalloped hem without making the angel too bulky for a baby blanket.
Target gauge: Approximately 32 single crochet stitches and 17 double crochet rows per 4 inches, measured in separate practice swatches after blocking.
Suggested hook: 2.5 mm, or the size that gives you the closest match to the target gauge.
Skill level: Advanced. Best suited to crocheters comfortable with raised post stitches, decorative lace clusters, shaped pieces, blocking and assembling small crochet components.
It's worth making a small practice swatch before starting. The finished angel depends on several pieces fitting together, especially the wings behind the shoulders and the two sides of the hairstyle.
If you're using a larger hook or thicker yarn, expect a larger appliqué. That isn't necessarily a problem for a full-size blanket, but it could make the sleeves and hands look too large for the head.
The appliqué is intended to be lightly dimensional at the head, hands and sleeves while remaining fairly flat against the blanket. There's no need to turn it into a stuffed doll.
Materials and Supplies for the Free Crochet Angel Applique Pattern
Most of the angel is worked in one shade of warm ivory. A tiny bit of color variation makes the hands and halo stand out without taking away from the traditional appearance.
- Smooth fingering-weight cotton yarn in warm ivory for the gown, wings, head and sleeves
- A small amount of slightly warmer ivory or pale almond yarn for the hair and hands
- A small amount of muted gold cotton yarn for the halo
- 2.5 mm crochet hook, adjusted if needed to meet gauge
- Yarn needle with a blunt tip
- Small scissors
- Removable stitch markers
- Rustproof blocking pins and a blocking mat
- Measuring tape
- A small amount of polyester fiberfill for the head
- Matching sewing thread or additional yarn for attaching the appliqué to its finished fabric background
Yarn allowance: Have a full small skein of the main ivory yarn available, plus scraps of the two accent colors. Exact yardage has not been physically verified. I wouldn't buy several large skeins just for this little angel.
Skip beads, plastic eyes, wire and loose embellishments. This design doesn't need any of them.
You'll also need a finished blanket or another fabric item if you plan to sew the angel onto something. The sage-green blanket shown in the example photograph is a separate project and isn't included in the angel instructions.
If you'd like to make the blanket yourself, you can choose a suitable design from my crochet baby blanket patterns collection. A fairly even background will let the ivory lace show clearly.
Stitches and Abbreviations
This pattern uses US crochet terms. You'll be working ordinary stitches along with a few raised stitches for the gown, tapered rows for the sleeves and small oval shapes for the praying hands.
- ch: Chain
- sl st: Slip stitch
- sc: Single crochet
- hdc: Half double crochet
- dc: Double crochet
- FPdc: Front post double crochet
- BPdc: Back post double crochet
- inc: Work 2 single crochet stitches into the same stitch
- sc2tog: Single crochet two stitches together. Insert the hook into the next stitch and pull up a loop, insert it into the following stitch and pull up another loop, then yarn over and pull through all three loops.
- MR: Magic ring
- RS: Right side, the front of the finished work
- WS: Wrong side, the back of the finished work
- sp: Space
- st/sts: Stitch or stitches
- rnd: Round
- BLO: Back loop only
Special Stitches
Front post double crochet: Yarn over, insert the hook from front to back and then to front around the post of the indicated stitch, and complete a double crochet. This raises the stitch on the front of the fabric.
Back post double crochet: Yarn over, insert the hook from back to front and then to back around the indicated stitch, and complete a double crochet. Alternating front post stitches on right-side rows with back post stitches on wrong-side rows keeps the raised ribs on the front of the gown.
Five-double-crochet fan: Work 5 dc into the same stitch. The stitches spread outward into one rounded scallop.
Working around a foundation chain: The small praying hands are made by crocheting along one side of the foundation chain, working around its end, and continuing along the unused loops on the opposite side. The sleeves are made separately in ordinary turned rows.
Turning chains: The beginning ch-3 counts as the first dc post in the gown and wing lace rows, replacing the first stitch at the base of the turning chain. Do not work another dc into that same first stitch. On the return row, work the final dc into the top of the previous row's ch-3 to maintain the stated number of posts. The turning chain does not count as an additional decorative chain space.
Stitch-count note: In the lace sections, count the upright double crochet posts separately from the chains between them. The number of posts stays the same while the chain spaces widen. This distinction matters when checking the gown's stitch counts.
Free Crochet Angel Appliqué Pattern
We'll make the gown first because it establishes the angel's shape. The wings, head, sleeves and hands are separate pieces, so you can arrange them carefully before sewing everything together.
Piece count: You'll crochet 19 separate pieces altogether: one gown, two wings, two head circles, one hair cap, eight hair strands, two sleeves, two praying hands and one halo. The two head circles are joined to make one softly rounded head before the final assembly.
Don't rush the blocking or underestimate the importance of it. The openwork needs to spread evenly, and it's much easier to adjust individual pieces before they're attached.
Part 1: Crochet the Angel's Gown
Use the main ivory yarn. The gown begins with a narrow neckline and widens into a flowing lace skirt. Eleven upright stitch columns run from top to bottom, with three prominent raised ribs. The lower section includes three tiers of small floral-style lace motifs before the scalloped hem.
Work in turned rows using US crochet terms. The beginning ch-3 counts as the first dc post. Keep eleven structural posts throughout the lace section, with ten spaces between them.
On RS rows, use FPdc for structural posts 3, 6 and 9. On WS rows, use BPdc at those same positions. Work ordinary dc in the other post positions. The three raised stitches replace ordinary dc; they are not additional stitches. When working back toward a previous turning chain, place the final dc into the top of that chain.
Special Gown Stitch: Three-Double-Crochet Cluster (3-dc cluster)
Yarn over, insert the hook into the indicated chain space, yarn over and pull up a loop, then yarn over and pull through two loops. Repeat this partial double crochet twice more into the same chain space. You will have four loops on the hook. Yarn over and pull through all four loops to complete one raised cluster.
Two clusters separated by a ch-2 opening form one small petal-pair motif. Each motif is worked between two structural gown posts. The following row arches over it, leaving the raised petals visible.
Upper Gown and Raised Pleats
Row 1 (RS): Ch 12. Sc in the second ch from the hook and in each remaining ch. (11 sc)
Row 2 (WS): Ch 3 and turn. *Ch 1, dc in the next sc.* Repeat from * to * 10 times. (11 dc posts and 10 ch-1 spaces)
Rows 3 and 4: Ch 3 and turn at the beginning of each row. *Ch 1, work the next structural post above or around the corresponding post of the previous row.* Repeat from * to * 10 times, using FPdc or BPdc at posts 3, 6 and 9 as appropriate. (11 posts and 10 ch-1 spaces per row)
Rows 5 through 7: Ch 3 and turn at the beginning of each row. *Ch 2, work the next structural post above or around the corresponding post of the previous row.* Repeat from * to * 10 times, maintaining the raised columns at positions 3, 6 and 9. (11 posts and 10 ch-2 spaces per row)
Rows 8 through 10: Ch 3 and turn at the beginning of each row. *Ch 3, work the next structural post above or around the corresponding post of the previous row.* Repeat from * to * 10 times. Maintain the same raised columns. (11 posts and 10 ch-3 spaces per row)
Rows 11 and 12: Ch 3 and turn at the beginning of each row. *Ch 4, work the next structural post above or around the corresponding post of the previous row.* Repeat from * to * 10 times. Maintain the three raised columns. (11 posts and 10 ch-4 spaces per row)
Check the work before starting the decorative lace. You should have eleven upright structural posts, ten open ch-4 spaces, and three raised ribs running vertically down the gown.
First Tier of Floral Lace
Row 13 (RS): Ch 3 and turn. *Ch 1, work a 3-dc cluster into the next ch-4 space, ch 2, work a second 3-dc cluster into the same ch-4 space, ch 1, work the next structural post.* Repeat from * to * 10 times, maintaining FPdc at structural posts 3, 6 and 9.
(11 structural posts, 20 raised clusters arranged in 10 pairs, and 10 ch-2 motif openings)
Row 14 (WS): Ch 3 and turn. *Ch 5, pass over the next pair of raised clusters and its center opening, then work the next structural post.* Repeat from * to * 10 times, maintaining BPdc at structural posts 3, 6 and 9. (11 posts and 10 ch-5 arches)
Each arch spans one petal-pair motif. Do not work additional stitches into the clusters on this row.
Row 15 (RS): Ch 3 and turn. *Ch 4, pass over the next ch-5 arch, and work the next structural post.* Repeat from * to * 10 times, maintaining FPdc at posts 3, 6 and 9. (11 posts and 10 ch-4 spaces)
Second Tier of Floral Lace
Row 16 (WS): Ch 3 and turn. *Ch 1, work a 3-dc cluster into the next ch-4 space, ch 2, work a second 3-dc cluster into that same space, ch 1, work the next structural post.* Repeat from * to * 10 times, maintaining BPdc at structural posts 3, 6 and 9.
(11 structural posts, 20 raised clusters arranged in 10 pairs, and 10 ch-2 motif openings)
Row 17 (RS): Ch 3 and turn. *Ch 5, pass over the next pair of raised clusters and its center opening, then work the next structural post.* Repeat from * to * 10 times, maintaining FPdc at structural posts 3, 6 and 9. (11 posts and 10 ch-5 arches)
Row 18 (WS): Ch 3 and turn. *Ch 4, pass over the next ch-5 arch, then work the next structural post.* Repeat from * to * 10 times, maintaining BPdc at structural posts 3, 6 and 9. (11 posts and 10 ch-4 spaces)
Third Tier of Floral Lace
Row 19 (RS): Ch 3 and turn. *Ch 1, work a 3-dc cluster into the next ch-4 space, ch 2, work a second 3-dc cluster into that same space, ch 1, work the next structural post.* Repeat from * to * 10 times, maintaining FPdc at structural posts 3, 6 and 9.
(11 structural posts, 20 raised clusters arranged in 10 pairs, and 10 ch-2 motif openings)
Row 20 (WS): Ch 3 and turn. *Ch 4, pass over the next pair of raised clusters and its center opening, then work the next structural post.* Repeat from * to * 10 times, maintaining BPdc at structural posts 3, 6 and 9. (11 posts and 10 ch-4 spaces)
At the end of Row 20, check that you have eleven structural posts and ten ch-4 spaces. The three raised ribs should remain visible between the openwork motifs.
Part 2: Make the Scalloped Hem
The three decorative lace tiers lead into eleven rounded hem fans. First, turn the final row of openwork into a counted single-crochet foundation.
Row 21 (RS): Ch 1 and turn. Sc in the first structural post. Work the following number of sc into each ch-4 space, followed by 1 sc into the next structural post after every space:
Space 1: 4 sc
Space 2: 3 sc
Space 3: 3 sc
Space 4: 4 sc
Space 5: 3 sc
Space 6: 3 sc
Space 7: 4 sc
Space 8: 3 sc
Space 9: 3 sc
Space 10: 4 sc
You should have 45 sc across Row 21: eleven sc worked into the structural posts and 34 sc worked into the ten chain spaces.
Row 22 (WS): Ch 1 and turn. Sc in the first sc. *Skip the next sc, work 5 dc into the next sc, skip the next sc, sc in the next sc.* Repeat from * to * 11 times. (11 five-dc fans and 12 separating sc)
The finished hem has eleven decorative scallops. The spaces between the fans should sit beneath the floral-style openwork rather than forming a straight, tight band.
Fasten off, leaving enough yarn to weave the end securely into the back of the gown.
Part 3: Finish the Gown's Sloping Edges
With the right side facing you, join the main ivory yarn at the lower corner just above the first scalloped fan.
Work 1 sc into the exposed end of Row 21. Continue toward the neckline, working 2 sc into the exposed end of each row from Rows 20 through 2, placing those stitches around the row-end post or turning-chain edge without catching the decorative clusters. Finish with 1 sc into the side of Row 1. (40 sc along this edge)
Repeat on the opposite side, using the same stitch placement for another 40 sc.
Fasten off and weave in the ends. Lay the gown on a blocking mat with the raised ribs facing upward.
Spread the lower gown into a broad, symmetrical flare. Arrange the three tiers of petal-pair motifs so their small centers remain open, and pin the eleven hem scallops into even rounded sections.
Keep the neckline narrow and the three raised ribs aligned. Gently shape the outer edges without stretching the openwork into oversized holes.
Allow the gown to dry completely before removing the blocking pins. Don't press the raised ribs or floral-style clusters flat. Their texture is part of the finished design.
Part 4: Crochet the Lace Wings
Make two wings in the main ivory yarn. Each wing begins with a narrow edge that attaches behind the shoulder and widens into decorative openwork. Two rows of small raised petal clusters give the lace more texture, while three graduated scallops finish the outside edge.
Work in turned rows. The beginning ch-3 counts as the first dc post. The five main posts remain aligned throughout the lace sections.
Special Wing Stitch: Two-Double-Crochet Cluster (2-dc cluster)
Yarn over, insert the hook into the indicated chain space, yarn over and pull up a loop, then yarn over and pull through two loops. Yarn over, insert the hook into the same space, yarn over and pull up a loop, then yarn over and pull through two loops. Yarn over and pull through all three remaining loops. The two partial double crochets become one raised cluster.
Wing Foundation and First Openwork Rows
Wing Row 1 (RS): Ch 10. Sc in the second ch from the hook and in each remaining ch. (9 sc)
Wing Row 2 (WS): Ch 3 and turn. *Ch 1, skip the next sc, dc in the next sc.* Repeat from * to * 4 times. (5 dc posts and 4 ch-1 spaces)
Wing Row 3 (RS): Ch 3 and turn. *Ch 2, dc in the next dc post.* Repeat from * to * 4 times. Work the final dc into the top of the previous turning chain. (5 posts and 4 ch-2 spaces)
Wing Row 4 (WS): Ch 3 and turn. *Ch 3, dc in the next dc post.* Repeat from * to * 4 times, working the final dc into the top of the previous turning chain. (5 posts and 4 ch-3 spaces)
First Row of Raised Lace Petals
Wing Row 5 (RS): Ch 3 and turn. *Ch 1, work one 2-dc cluster into the next ch-3 space, ch 2, work a second 2-dc cluster into the same space, ch 1, dc in the next upright dc post.* Repeat from * to * 4 times.
You now have five structural dc posts, eight raised petal clusters arranged in four pairs, and four small ch-2 openings between the cluster pairs. Keep the clusters slightly raised rather than pulling them flat.
Wing Row 6 (WS): Ch 3 and turn. *Ch 5, pass over the two petal clusters and their center opening, dc in the next structural dc post.* Repeat from * to * 4 times. (5 structural posts and 4 ch-5 spaces)
Each ch-5 arch spans one pair of petal clusters. Do not work into the clusters themselves on this row. This leaves the raised petals visible beneath the openwork arches.
Second Row of Raised Lace Petals
Wing Row 7 (RS): Ch 3 and turn. *Ch 1, work one 2-dc cluster into the next ch-5 space, ch 2, work a second 2-dc cluster into that same space, ch 1, dc in the next structural dc post.* Repeat from * to * 4 times.
You should again have five structural posts, eight raised clusters arranged in four pairs, and four ch-2 openings between those pairs.
The two rows of petal clusters create the layered openwork effect. They are connected by the five structural posts, so you do not need to crochet or sew on separate flower motifs.
Wing Row 8 (WS): Ch 3 and turn. *Ch 5, pass over the two petal clusters and their center opening, dc in the next structural dc post.* Repeat from * to * 4 times. (5 posts and 4 ch-5 spaces)
Wing Row 9 (RS): Ch 3 and turn. *Ch 4, dc in the next structural dc post.* Repeat from * to * 4 times. (5 posts and 4 ch-4 spaces)
The wing now has a narrow foundation, two decorative rows of raised lace petals, and a wider outside edge ready for its three scallops.
Part 5: Shape the Wing Scallops
The outside edge is finished with three graduated fans. They give the wing its rounded feather-like outline without requiring a separate edging piece.
Wing Row 10 (WS): Ch 1 and turn. Sc in the first dc post. Work 3 sc into the first ch-4 space, sc in the next dc post, 4 sc into the second ch-4 space, sc in the next dc post, 4 sc into the third ch-4 space, sc in the next dc post, 3 sc into the fourth ch-4 space, and sc in the final dc post. (19 sc)
Count the stitches before continuing. There must be exactly 19 sc across this foundation row.
Wing Row 11 (RS): Ch 1 and turn. Sc in the first sc. Skip the next 2 sc, work 5 dc into the next sc, skip the next 2 sc, sc in the next sc. Skip the next 2 sc, work 6 dc into the next sc, skip the next 2 sc, sc in the next sc. Skip the next 2 sc, work 7 dc into the next sc, skip the next 2 sc, sc in the final sc. (3 graduated fans and 4 separating sc)
Fasten off, leaving a long sewing tail at the outer edge. Make a second wing using the same foundation and openwork instructions.
Mirror the Second Wing
For the second wing, reverse only the fan sizes in Row 11. Begin with the 7-dc fan, follow with the 6-dc fan, and finish with the 5-dc fan. Keep the same skipped stitches and separating sc positions.
Both completed wings have eleven rows, two rows of raised petal clusters, and three graduated outer scallops.
Blocking and Positioning the Wings
Lay both wings right side up, with their narrow foundation edges facing inward toward the angel's shoulders and their scalloped edges facing outward.
Position the 7-dc scallop toward the upper outside corner of each wing. The 6-dc scallop forms the middle rounded section, and the 5-dc scallop sits below it.
Dampen the wings and pin them into matching outward-spreading shapes. Gently lift the upper scallops to create the slightly raised tips shown in the example, while allowing the lower scallops to curve back toward the gown.
Arrange the raised petal clusters so the small open centers remain visible. Avoid stretching the decorative stitches until the clusters lose their shape.
Allow the wings to dry completely before removing the blocking pins. Their narrow foundation edges will be sewn behind the upper gown during assembly.
Part 6: Crochet the Rounded Head
Use the main ivory yarn. Make two matching circles in continuous rounds. Place a removable marker in the first stitch of each round and move it up as you work.
Round 1: Make a magic ring with 6 sc. (6)
Round 2: Inc in every stitch. (12)
Round 3: *Sc 1, inc.* Repeat 6 times. (18)
Round 4: *Sc 2, inc.* Repeat 6 times. (24)
Round 5: *Sc 3, inc.* Repeat 6 times. (30)
Round 6: *Sc 4, inc.* Repeat 6 times. (36)
Round 7: Sc in every stitch around. (36)
Fasten off the first circle. Make the second circle through Round 7, but do not fasten off. Leave the working yarn attached.
Place the two circles together with their wrong sides facing inward and their right sides facing outward. With the working yarn still attached to the second circle, work 1 sc through each corresponding pair of edge stitches to join the circles. Leave the last few pairs unworked temporarily for stuffing, as described below. (36 joining sc when complete)
Before completing the join, add a very small amount of fiberfill. The head should be softly rounded rather than firmly stuffed.
Finish joining the edges, fasten off and weave in the remaining end securely. Remove the stitch marker.
Part 7: Make the Hair Cap
Use the slightly warmer ivory yarn. This shallow circle forms the base for the sweeping strands.
Round 1: Make a magic ring with 6 sc. (6)
Round 2: Inc in every stitch. (12)
Round 3: *Sc 1, inc.* Repeat 6 times. (18)
Round 4: *Sc 2, inc.* Repeat 6 times. (24)
Round 5: *Sc 3, inc.* Repeat 6 times. (30)
Fasten off with a long sewing tail.
Place the cap over the upper head, letting its lower edge sit just above the area that will remain the plain faceless front. Sew it down around its outer edge.
Part 8: Crochet the Sweeping Hair Strands
Make four strands for each side of the head, eight altogether. These are narrow raised strips rather than plain slip-stitch cords.
Short strand: Ch 13. Hdc in the third ch from the hook and in each remaining ch. (11 hdc)
Second strand: Ch 15. Hdc in the third ch from the hook and in each remaining ch. (13 hdc)
Third strand: Ch 17. Hdc in the third ch from the hook and in each remaining ch. (15 hdc)
Long strand: Ch 19. Hdc in the third ch from the hook and in each remaining ch. (17 hdc)
Make a second set of all four lengths. Leave a sewing tail on every strand.
Arrange four strands on each side of a central part at the crown. Overlap the strips slightly so they sweep diagonally across the hair cap and toward the sides of the face.
Place the longer strands around the outer edges and the shorter strands nearer the center. Curve each strand gently rather than pulling it straight.
Secure the strips along their lengths with small stitches through the hair cap and upper head. Tuck their ends beneath the neighboring strands or behind the head.
Keep the lower front of the face uncovered. The angel has no embroidered facial features.
Part 9: Crochet the Long Sleeves
Make two sleeves in the main ivory yarn. Each sleeve begins at its wider shoulder end and narrows toward the praying hands.
Row 1 (RS): Ch 8. Sc in the second ch from the hook and in each remaining ch. (7 sc)
Rows 2 and 3: Ch 1 and turn. Sc in every stitch across. (7 sc per row)
Row 4: Ch 1 and turn. Sc2tog, sc in the next 3 stitches, sc2tog. (5 sc)
Rows 5 through 8: Ch 1 and turn. Sc in each stitch across. (5 sc per row)
Row 9: Ch 1 and turn. Sc2tog, sc in the next stitch, sc2tog. (3 sc)
Rows 10 and 11: Ch 1 and turn. Sc in each stitch across. (3 sc per row)
Fasten off, leaving a long sewing tail.
Make the second sleeve the same way. Position the two sleeves as mirror images, with their wider ends at the shoulders and narrower ends pointing toward the hands.
To give each sleeve a raised central detail, use matching yarn to work a short line of surface slip stitches along its length. Keep the surface stitches loose enough that the sleeve doesn't draw inward.
Don't stuff the sleeves. They should remain flexible enough to lie against the upper gown while retaining their gently raised stitch texture.
Part 10: Crochet the Praying Hands
Use the slightly warmer ivory yarn. Make two small ovals.
Round 1: Ch 7. Sc in the second ch from the hook, sc in the next 4 ch, and work 3 sc in the final ch. Rotate the work to crochet along the opposite side of the foundation chain. Sc in the next 4 unused loops, then work 2 sc into the same chain where you made the very first sc of this round. (14 sc)
Join with a sl st and fasten off, leaving a sewing tail.
Make a second matching hand.
These little pieces should sit vertically together, with their long edges touching and their rounded tips pointing upward.
They should resemble two palms held in prayer. There's no need to embroider individual fingers at this scale.
Part 11: Crochet the Gold Halo
Use the muted gold yarn.
Round 1: Ch 36 and join with a sl st to the first ch, taking care not to twist the chain.
Round 2: Ch 1, work one sc in each foundation chain around, and join with a sl st to the first sc. (36 sc)
Fasten off, leaving a long sewing tail.
Flatten the ring and gently shape it into an oval. It should sit behind the upper head, with only the top and sides visible.
The halo isn't meant to stand unsupported. It will be stitched to the finished blanket or keepsake backing to hold its shape without wire.
Assembling the Crochet Angel
Now we can bring the pieces together. I'd lay everything out on a towel or blocking mat before making the first permanent stitch. You want to see the whole angel, not just one piece at a time.
Step 1: Arrange the Gown and Wings
Place the blocked gown right side up, with the narrow neckline at the top and the scalloped hem spread evenly below.
Slide one wing behind each upper side of the gown. Position the openwork panels so they extend outward beyond the sleeves, with the largest scallops near the upper outside corners.
Angle the upper tips slightly upward. The wings should frame the head and shoulders without disappearing behind the arms.
Pin the wings in place and compare the two sides. Adjust their angles until the visible portions are as symmetrical as possible.
Sew the inner portions of both wings to the back of the upper gown with matching ivory yarn, leaving the decorative outside edges free for blocking and final positioning.
Step 2: Position the Head
Center the head above the gown's neckline. Let its lower edge overlap the neckline enough to hide the upper ends of the gown stitches.
Sew the lower back of the head securely to the upper gown. Keep the stitching on the back so the rounded front stays smooth.
The head should sit directly above the three prominent gown ribs, not off to either side.
Step 3: Attach the Hair
Place the hair cap across the upper part of the head and secure it with small stitches.
Arrange the eight textured strands into two sweeping groups, beginning near the center part and curving toward the sides of the face.
Try to keep the two sides balanced, but they don't need to look mechanically identical. A little difference in the curves gives the hair a softer appearance.
Stitch the strands down along their lengths, not merely at their ends. This keeps the hairstyle from developing loose loops.
Step 4: Add the Sleeves
Place one sleeve along each upper side of the gown. Angle both sleeves inward so their lower ends approach one another near the middle of the chest.
The fuller ends should sit close to the shoulders. The narrower ends should be tucked beneath the praying hands.
Pin the sleeves and compare their positions before sewing. Keep the central raised gown rib visible below them.
Stitch each sleeve firmly to the gown along its inner attachment area and several points around its outer edge.
Step 5: Attach the Praying Hands
Place the two hand ovals together at the center of the upper gown, just below the head. Their long edges should touch, with the rounded ends pointing upward.
Sew the hands together along their meeting edges. Then attach the joined hands to the upper gown, covering the inner ends of the sleeves.
The hands should look like one small, centered detail rather than two separate decorations.
Step 6: Add the Halo
Center the gold halo behind the upper part of the head. Adjust it into a gentle arch, leaving the lower section behind the hair and head.
Stitch the hidden portion securely to the back of the head. When the angel is attached to its final fabric backing, stitch the exposed arch down as well.
Check that the halo looks centered from the front and that no part is left hanging loosely.
Step 7: Final Blocking and Inspection
Arrange the gown into a broad, flowing shape. Check that the hem has eleven visible fans, the three raised gown ribs are aligned, and the wings extend evenly behind the shoulders.
Use gentle blocking to settle the lace. Don't flatten the padded head or crush the raised sleeve texture.
Weave in the remaining yarn ends securely and trim them close to the work. Remove every blocking pin and stitch marker. Check the wings, hair strands, sleeves and hands for loose ends, and make sure nothing has been left inside the lacework.
That's the finished assembly. The last job is attaching the angel to its blanket or keepsake backing.
Attaching the Angel to a Baby Blanket
I prefer placing a single angel near one corner of a handmade baby blanket rather than centering it in the middle. It's a pretty detail that leaves the blanket's own stitches and border visible.
Lay the finished blanket flat and position the angel several inches inside the border. Check that the gown and wing edges sit comfortably on the blanket without folding over its outer edging.
Choose a place where the fabric underneath has enough structure to support the appliqué. Very open lace backgrounds may need additional reinforcement.
Sewing the Angel in Place
- Pin the completed angel in its chosen position, keeping the gown spread evenly.
- Thread a blunt yarn needle with matching ivory yarn or suitable matching thread.
- Begin by securing the center of the gown, working small stitches through the back of the appliqué and the underlying blanket fabric.
- Sew along the three raised gown ribs and several additional interior points so the skirt cannot lift away from the blanket.
- Attach the gown's side edges and each scallop at enough points to keep them from curling loose.
- Sew around the structural edges and interior portions of both wings, preserving their openwork shape.
- Secure the head, sleeves and praying hands through their backing layers.
- Stitch the exposed gold halo firmly to the blanket so it forms a flat arch.
- Finish on the back of the blanket and weave in all sewing ends securely. Remove every positioning pin, then check that the gown, wings, head, hair, hands and halo are firmly attached, with no loose yarn ends or unsecured loops.
Don't depend on a few stitches at the neckline to hold the whole angel. The wings, sleeves, gown and halo all need their own secure attachment points.
Baby blanket note: The photograph shows a decorative handmade keepsake. An appliquéd blanket is not intended for use as loose bedding in an infant sleep space. The U.S. Consumer Product Safety Commission's safe sleep guidance explains why blankets and other loose items should be kept out of infant sleep spaces.
If you're making the angel for a family keepsake or nursery display, the textured lace and dimensional details can be appreciated without placing it in a baby's sleeping area.
More Ways to Use Your Crochet Angel
A baby blanket is my favorite setting for this particular angel, but it doesn't have to be a Christmas-only project. The soft ivory yarn and traditional faceless design make it suitable for several kinds of handmade gifts.
Christening or Baptism Keepsake
Sew the angel onto a decorative keepsake blanket or a fabric panel that can be framed. A small stitched name or date could make the finished piece more personal, but I'd keep any lettering separate from the angel so the lace doesn't look crowded.
Baby's First Christmas Stocking
The angel could be attached to the front of a large Christmas stocking, especially one made from plain fabric. Position it below the cuff and away from the stocking opening.
If you're already making a stocking, take a look at my crochet Christmas tree appliqué pattern for another small holiday decoration.
Decorative Baby Cardigan
A smaller version could decorate a cardigan intended as a keepsake or for a supervised portrait. For clothing, I would reduce the yarn weight and simplify the thickness before attempting to scale the complete design down.
The photographed angel has a raised head, sleeves and hair. Those details make it better suited to a decorative textile than an everyday garment that will be washed and worn frequently.
Framed Handmade Angel
You can also sew the finished angel onto a fabric backing and display it in a frame with enough depth to accommodate the raised details. That makes a lovely alternative if you want the angel to remain a keepsake rather than become part of a larger blanket project.
I wouldn't crowd this design with extra stars, ribbons or flowers. Its lace wings and flowing gown already give it plenty of detail.
Frequently Asked Questions
Can I make the angel smaller?
Yes, but I'd change the yarn and hook size rather than remove stitches from the pattern. The wings, gown and hair all depend on their stitch counts to maintain their shapes.
Use a finer cotton thread and a suitably smaller hook if you want to experiment with a miniature version. Just remember that the smaller the angel gets, the harder it will be to preserve all those delicate details.
Do the wings need starch?
Not necessarily. Cotton yarn responds well to damp blocking, and the wings will receive additional support once they're sewn onto the blanket or fabric backing.
I would skip starch if the angel is going onto something that needs regular washing. For a framed decorative keepsake, a little extra shaping may be useful, but test it on a separate swatch first.
Can I sew the angel onto fabric instead of crochet?
Yes. A firmly woven fabric backing can make the lace details stand out beautifully. Use matching thread and small attachment stitches, especially around the wings, gown and halo.
If the backing fabric is lightweight, add suitable stabilizing fabric behind the appliqué so the raised pieces don't pull it out of shape.
How should I wash a finished keepsake?
Follow the care directions for the yarn and backing fabric, and test a sample before washing the finished project. Smooth cotton is often washable, but the layered hair, raised sleeves and blocked lace may need reshaping afterward.
For a framed angel or another decorative keepsake, gentle spot cleaning may be preferable to washing the entire piece.
This little angel has enough detail to be special without adding anything else. I particularly like it against sage green, but dusty rose, muted lavender or soft gray would make lovely backgrounds, too.
If you'd like another handmade gift to go with it, browse my free baby crochet patterns for more ideas.
Pattern development note: The stitch counts have been reviewed for internal consistency. Finished dimensions and yarn quantities are estimates, and the pattern has not been physically test-crocheted.
When you click on links to various merchants on this site and make a purchase, this may result in this site earning a commission. This does not affect the price you pay.

UBGI Gold Standard 2026
Reviewed under the site's
editorial checklist.
Photos, decorating ideas, party setups and reader submissions are shared for inspiration unless a page is specifically presented as a pattern, tutorial, reference guide or step-by-step project. Follow the instructions, measurements, safety guidance and manufacturer directions provided for the particular project or product.
About Jan | Contact | Baby Nursery Ideas (Blog) | Site Map | Privacy Policy | Disclosure Policy | Disclaimer | Affiliate Disclosure | Earnings Disclosure | Facebook | Pinterest
I am a participant in the Amazon Services LLC Associates Program, an affiliate advertising program designed to provide a means for us to earn fees by linking to Amazon. As an Amazon Associate I earn from qualifying purchases.
Copyright © 2006-2026. All Rights Reserved.