Free Crochet Angel Wings Pattern for Christmas Ornaments and Appliqués
By Jan Bay
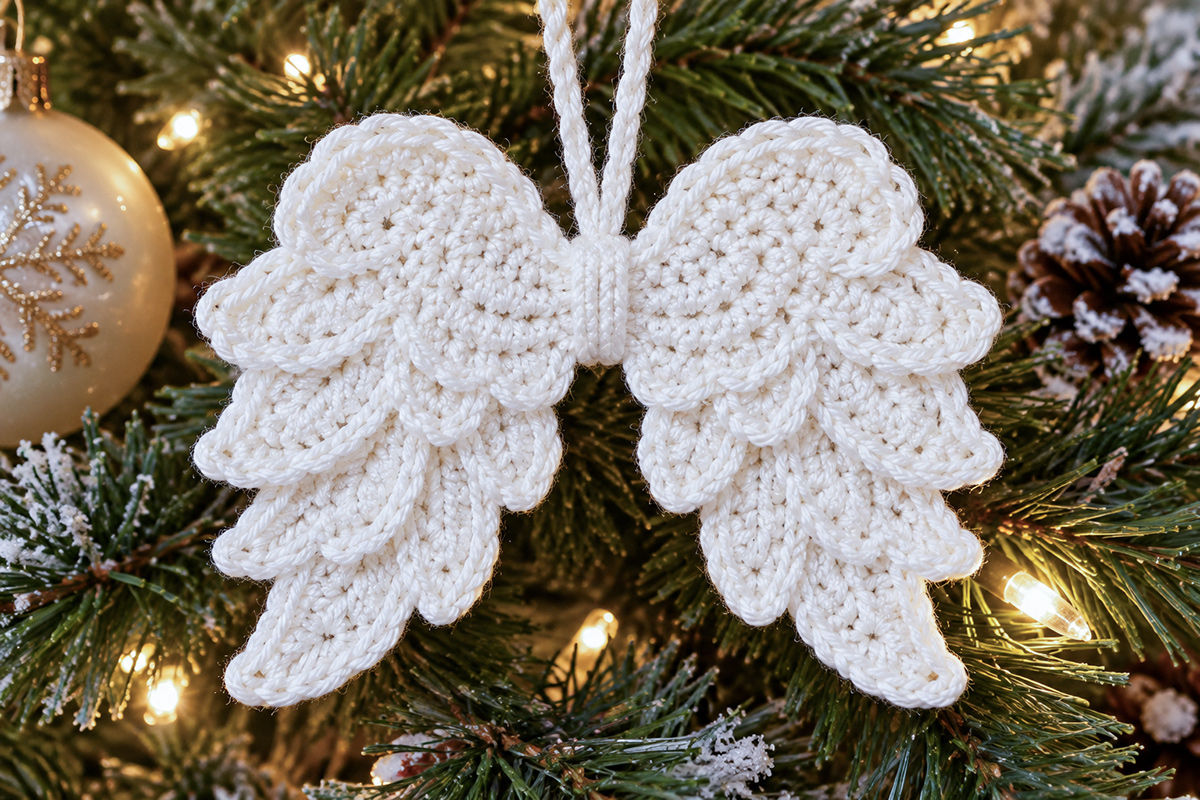
This free crochet angel wings pattern makes an elegant pair of ivory wings with softly layered feathers and a graceful, symmetrical shape. Add a simple hanging loop to make a Christmas tree ornament, or leave the loop off and use the wings as an appliqué on a handmade stocking, blanket, gift bag or other Christmas project. Both versions use the same basic pattern, so you can make several without learning a different design.
More Free Christmas Crochet Patterns and Ornaments
Baby Christmas Ornaments and Keepsakes
Free Christmas Crochet Patterns
See Supplies for This Project Here.
On This Page
Free Crochet Angel Wings Pattern: Before You Start
These wings get their shape from two rounded crocheted foundations with separate feathers layered over the front. The longer feathers point downward, while the shorter ones spread outward along the upper edges. That combination gives the wings their open, graceful shape instead of making them look like two flat leaves.
The feather arrangement matters just as much as the stitches. If you sew every feather flat against its neighbor, you'll lose those pretty overlapping edges. Leave the pointed ends free and let each layer show.
You'll make two matching foundations, crochet five feathers for each wing, and join everything with a narrow center binding. Add the hanging loop for a Christmas ornament, or leave it off when you're making an appliqué.
I'd keep the wings ivory and skip beads, bells and other decorations. The feather details are enough.
Supplies and Crochet Abbreviations
Materials
- Ivory size 3 crochet cotton thread, with one 100-yard ball allowed for the project and a practice sample
- 2.25 mm crochet hook, or the size needed to obtain gauge
- 3 mm crochet hook for the optional hanging loop
- Optional Baby's First Christmas version: a small amount of ivory DK or light worsted weight yarn (category 3) and a 3.25 mm crochet hook for the miniature booties and their decorations
- Yarn needle for sewing the feathers and joining the wings
- Stitch markers
- Small scissors
- Rustproof pins and a blocking mat
- Measuring tape or ruler
Choose a smooth cotton thread that shows the stitch outlines clearly. Very fuzzy yarn can hide the feather edges, and bulky yarn will change the size and proportions. You don't need a contrasting color.
Finished Size and Gauge
The proposed finished ornament measures approximately 5 inches across and 3 to 3 1/2 inches from the rounded upper edges to the lowest feather tips, excluding the hanging loop. These are target dimensions rather than measurements from a completed sample.
Target gauge: 26 single crochet stitches and 30 rows over 4 inches, measured on a flat single crochet swatch after blocking.
Skill level: Intermediate. You'll work around both sides of foundation chains, make shaped feathers, and sew the layers together in a mirrored arrangement.
Make a small gauge swatch before starting the wings. If your stitches are considerably larger or smaller, change hook size and check again. Getting close to the proposed gauge will help keep the foundations and feathers in proportion.
Crochet Abbreviations
- ch: Chain
- sc: Single crochet
- hdc: Half double crochet
- dc: Double crochet
- sl st: Slip stitch
- sc2tog: Single crochet two stitches together
- st(s): Stitch or stitches
- RS: Right side
- WS: Wrong side
This pattern uses US crochet terminology. If you're more familiar with British terms, the Craft Yarn Council's crochet abbreviation guide explains the differences.
Before you begin: Turning chains do not count as stitches unless an instruction specifically says otherwise. Keep your tension even, especially on the feather edging. Tight slip stitches can make those pointed ends curl.
Crochet the Wing Foundations
Start with the two rounded pieces that sit behind the feathers. Each foundation widens toward the outer wing, then narrows slightly to give the upper section a gently shaped edge.
Make two foundations using the same instructions. You'll turn one around during assembly so that the finished wings mirror each other.
Foundation Pattern: Make 2
Starting chain: Leave an 8-inch beginning yarn tail for sewing the center seam, then ch 4.
Row 1: Sc in the second ch from the hook and in each remaining ch. (3 sc)
Row 2: Ch 1, turn. Work 2 sc in the first st, sc in the next st, and 2 sc in the last st. (5 sc)
Row 3: Ch 1, turn. Work 2 sc in the first st, sc in the next 3 sts, and 2 sc in the last st. (7 sc)
Row 4: Ch 1, turn. Work 2 sc in the first st, sc in the next 5 sts, and 2 sc in the last st. (9 sc)
Row 5: Ch 1, turn. Work 2 sc in the first st, sc in the next 7 sts, and 2 sc in the last st. (11 sc)
Row 6: Ch 1, turn. Work 2 sc in the first st, sc in the next 9 sts, and 2 sc in the last st. (13 sc)
Row 7: Ch 1, turn. Sc in each st across. (13 sc)
Row 8: Ch 1, turn. Sc2tog, sc in the next 9 sts, sc2tog. (11 sc)
Row 9: Ch 1, turn. Sc2tog, sc in the next 7 sts, sc2tog. (9 sc)
Row 10: Ch 1, turn. Sc2tog, sc in the next 5 sts, sc2tog. (7 sc)
Fasten off and weave in the end, leaving the starting tail available for joining at the center.
Stitch-count check: The ten rows contain 3, 5, 7, 9, 11, 13, 13, 11, 9 and 7 stitches, for a total of 88 stitches per foundation.
Position the Two Foundations
Lay the pieces next to each other with their narrow Row 1 ends facing inward and their Row 10 ends pointing outward. The wider sections should form the upper portions of the wings.
Keep the same fabric face upward on both foundations. Rotate one piece 180 degrees on your work surface, without flipping it to the wrong side, so the narrow Row 1 ends meet at the center and the Row 10 ends extend to opposite sides. Use the upward-facing sides as the fronts for both wings when attaching the feathers.
The foundations don't need to look like finished angel wings yet. The feathers will cover much of their lower surface and create the final silhouette.
Add the Raised Upper Edging
With the chosen front side facing you, join the ivory thread at the upper inner corner of one foundation, beside Row 1.
Work one loose sl st into each of the ten row ends along the exposed upper edge. Continue with one loose sl st into each of the seven stitches across Row 10. Fasten off and weave in the ends.
Repeat on the opposite foundation, following its upper edge in the mirrored direction.
These slip stitches make a subtle corded border around the upper section. Keep them loose enough that the crocheted fabric stays flat.
Set both foundations aside while you make the feathers.
Make the Layered Feathers
Now for the feathers. You'll make five for each wing, with slightly different lengths so the finished edges don't all end in the same place.
Each feather is crocheted around both sides of a foundation chain. The stitches start small, grow taller along the middle, and taper again near the pointed end. A second pass of loose slip stitches adds the raised border.
You'll need ten feathers altogether. Make two of each size listed below.
Feather Sizes
- Feather A, outer flight feather: Ch 11, with 5 dc along each side. (20 stitches)
- Feather B, upper middle feather: Ch 10, with 4 dc along each side. (18 stitches)
- Feather C, middle feather: Ch 10, with 4 dc along each side. (18 stitches)
- Feather D, lower feather: Ch 11, with 5 dc along each side. (20 stitches)
- Feather E, long trailing feather: Ch 14, with 8 dc along each side. (26 stitches)
Feathers B and C use the same stitch counts, but you'll position them at different angles during assembly. That's intentional. Their overlap gives the finished wings an extra layer without requiring another stitch pattern.
Basic Pointed Feather Pattern
Use the starting chain and the number of double crochet stitches listed for your chosen feather size.
First side of the foundation chain:
Step 1: Work 1 sl st in the second ch from the hook.
Step 2: Sc in the next ch.
Step 3: Hdc in the next ch.
Step 4: Work 1 dc in each of the next 4, 5 or 8 chains, according to the feather size you're making.
Step 5: Hdc in the next ch.
Step 6: In the final ch, work (sc, ch 1, sc). The ch-1 space forms the pointed tip. Do not count that chain as a stitch.
Second side of the foundation chain:
Don't turn the work as you would at the end of an ordinary row. Instead, rotate the feather around the pointed end so you can crochet into the unused loops along the opposite side of the original foundation chain.
Step 7: Work 1 hdc into the unused loop of the chain immediately before the tip.
Step 8: Work 1 dc into each of the next 4, 5 or 8 unused chain loops, matching the number used on the first side.
Step 9: Hdc in the next unused chain loop.
Step 10: Sc in the next unused chain loop.
Step 11: Sl st into the final unused chain loop at the rounded base.
Fasten off, leaving a sewing tail about 10 inches long. You'll use this to attach the feather to its foundation.
Count check: Each feather has twice its double crochet count plus ten additional stitches. That gives 18, 20 or 26 stitches depending on the size. The ch-1 point isn't included in those totals.
Add the Raised Feather Border
Lay the feather flat with its chosen front side facing up. Join a new strand of ivory thread at the rounded base.
Work one loose sl st into each stitch around the outside edge of the feather. At the pointed end, work one sl st into the ch-1 tip space. Continue around the second side until you return to the base.
Fasten off and weave in the edging ends, keeping the longer attachment tail available.
The edging should sit slightly above the main feather fabric, giving it a corded outline. If your slip stitches pull the sides inward, go up one hook size for this edging pass.
Make the remaining feathers in the same way.
Check the Feather Shape
Before sewing anything together, lay all ten feathers flat and arrange them in two matching groups.
Each group should have one long trailing feather, one lower feather, two middle-length feathers and one outer flight feather. The longest feathers will sit toward the bottom of the finished wings.
Don't stretch the tips into sharp needles. They should taper naturally and keep a little fullness through the middle.
If a feather twists, dampen it lightly and smooth it into shape. Leave it flat until dry before attaching it.
Assemble the Angel Wings
Take your time arranging the feathers before you sew. The wings should spread outward from the center, with the upper feathers extending toward the sides and the longer feathers dropping below them.
Work on one wing at a time. Keep the narrow Row 1 end of each foundation pointing toward the center of the finished ornament.
Step 1: Position the Longest Feather
Start with Feather E, the long trailing feather.
On the front of the foundation, locate Row 8. Pin the rounded feather base over the three center stitches of that row. Angle its pointed tip diagonally downward and outward toward the lower outside corner of the wing. This should be the longest visible feather, extending below the other layers without hanging directly beneath the center binding.
Sew the feather base securely through the foundation. Keep the raised edge facing forward and leave the lower pointed section free.
Step 2: Add the Lower Feather
Position Feather D over the three center stitches of foundation Row 7, just inward from the attachment of Feather E.
Angle its pointed end diagonally downward and outward. It should overlap the upper portion of Feather E while ending a little higher.
Sew the rounded base in place. Keep both feather tips visible.
Step 3: Add the Middle Feather
Position Feather C over the three center stitches of Row 6.
Point this feather diagonally outward and downward, making its angle shallower than Feather D. Its lower edge should overlap part of the feather beneath it without covering that feather's pointed tip.
Secure the base with several small stitches.
Step 4: Add the Upper Middle Feather
Position Feather B over the three center stitches of Row 5.
Angle this feather mostly outward, with a slight downward tilt. Let its lower border overlap Feather C and leave the pointed end extending beyond the layers below.
Secure the base without pulling the stitches tight enough to bunch the foundation.
Step 5: Attach the Outer Flight Feather
Position Feather A over the three center stitches of Row 9, close to the outer end of the foundation.
Point it almost horizontally toward the outer edge of the wing. The tip should reach farther outward than the other feather tips.
Sew the base securely. Keep the rounded upper foundation visible behind the feather so the wing retains its broad upper shape.
Step 6: Secure the Overlapping Layers
Look over the whole wing before removing the pins. You should see five feather layers descending from the rounded upper section.
Where a feather needs more support, add a small hidden tack through its inner edge and the foundation beneath it. If that section extends beyond the foundation, catch the underlying feather instead.
Leave the outer half of each pointed feather free enough to retain its layered appearance. Don't sew continuously around every feather edge. Doing that would flatten the design.
Step 7: Make the Opposite Wing
Repeat the same assembly with the second foundation and the remaining five feathers.
Mirror the arrangement carefully. The outer flight feather should extend outward on each side, while the longest trailing feather should angle toward the outer lower corner of each wing. Both lower feather tips should sit well away from the center binding, giving the finished wings their wide, open silhouette.
Lay both completed wings next to each other. Check their spread, upper curves and lower feather lengths before joining them.
Step 8: Join the Wings at the Center
Place the narrow Row 1 ends of the two foundations side by side, with the fronts facing up and the three stitches of each Row 1 edge aligned.
Use the starting yarn tail and a yarn needle to sew the three corresponding stitches together with a neat, firm seam. Don't overlap the foundations. Their inner edges should meet without creating a bulky lump.
Check that the two wings open outward evenly.
Step 9: Crochet the Center Binding
Ch 4.
Row 1: Sc in the second ch from the hook and in each remaining ch. (3 sc)
Rows 2–6: Ch 1, turn, sc in each st across. (3 sc per row)
Fasten off, leaving a sewing tail.
Place the binding vertically over the center seam, with the three-stitch width running across the seam and the six-row length running from top to bottom.
Fold the narrow sides slightly around the joined wing edges toward the back. Sew the binding in place, keeping the front smooth.
This center section should look like a small wrapped band. It shouldn't become a large square that covers the inner feathers.
Weave in the remaining ends on the back of the ornament.
Take one last look at the wing arrangement. The two upper sections should balance each other, and the lower pointed feathers should hang at matching angles.
Christmas Tree Ornament Finishing
If you're making the Christmas tree ornament, you'll need a small hanging loop at the upper center of the wings.
Keep the loop ivory so it blends with the crocheted design. There's no need to add a bead or metal ornament cap.
Crochet the Hanging Loop
Hold two strands of ivory crochet cotton together and use a 3 mm crochet hook.
Ch 25, leaving a sewing tail at each end. Fasten off and fold the chain into a loop, bringing its two ends together.
Position both ends behind the upper center binding. Sew them securely through the back of the binding and the joined foundation edges.
Make several reinforcing stitches, then weave the tails into the back of the wings.
Hold the ornament by its loop to check that the wings hang evenly. If one side tilts lower, adjust the loop attachment before fastening off completely.
Optional Baby's First Christmas Angel Wings Ornament
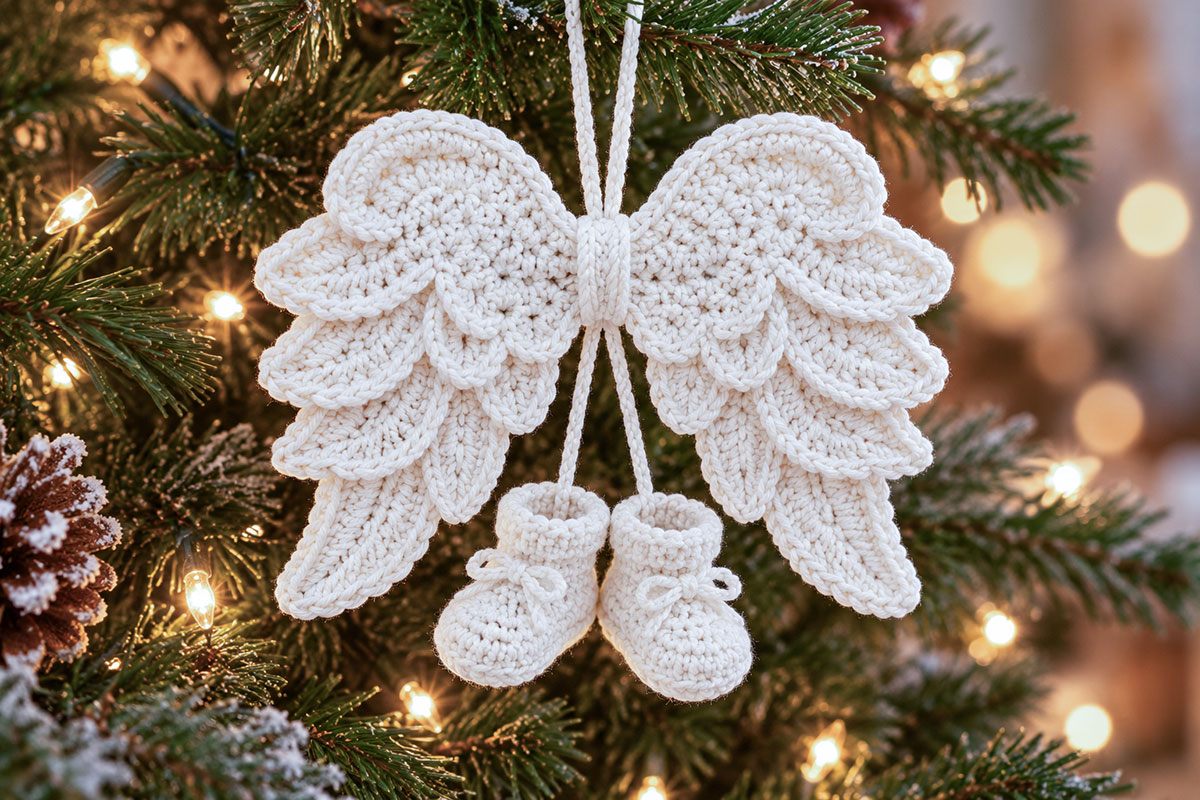
If you're making these angel wings to celebrate a baby's first Christmas, you can add a tiny pair of crocheted baby booties beneath the center of the wings. It's a sweet little keepsake, and you don't need to change the original wing pattern at all.
I've already included the complete miniature bootie instructions in my free crochet wreath ornament pattern. Use the section called "Crochet the Miniature Baby Booties" and make two matching booties.
For this version, I'd crochet both the booties and their cuffs in ivory instead of using cranberry for the cuffs. The wreath pattern calls for DK or light worsted yarn and a 3.25 mm hook. Use those supplies for the booties rather than automatically switching to the finer crochet cotton used for the angel wings.
The miniature booties are designed to measure approximately 1 to 1 1/4 inches long, although the finished size will depend on your yarn and tension.
To match the finished Baby's First Christmas ornament, add a small ivory yarn bow to the front of each miniature bootie. Cut two 8-inch lengths of the same ivory yarn used for the booties, one for each bow.
For each bootie, pass the yarn beneath two adjacent stitches at the front of the cuff, leaving the ends approximately equal in length. Tie a small bow with loops about 1/4 to 3/8 inch long. Use a separate strand of matching yarn and a yarn needle to secure the center knot to the cuff with two small stitches. Weave the securing ends into the inside of the cuff and trim the decorative bow tails neatly.
Keep the bows small enough that the rounded toes remain visible. They're decorative details for the keepsake ornament, not attachments for wearable baby shoes.
Attach the Miniature Booties to the Angel Wings
Make two short suspension cords using ivory yarn. For each cord, leave an 8-inch beginning tail, ch 6, then work a sl st in the second chain from the hook and in each remaining chain. (5 sl sts) Fasten off, leaving an 8-inch ending tail.
Because you've worked back along the foundation chain, both yarn tails are now at the same end of the cord. You'll use those tails to attach the cord to the wings.
Cut a separate 8-inch length of matching ivory yarn for each bootie. Use it to sew the tail-free end of one cord securely to the back of a bootie cuff, passing through several cuff stitches rather than just one. Weave the sewing ends securely into the cuff. Repeat for the second bootie.
Position the booties side by side with their rounded toes pointing slightly outward.
Bring the two-tail end of each cord behind the lower portion of the angel wings' center binding. Pin both cords temporarily in place, then hold the ornament upright to check their positions.
The booties should hang beneath the center of the wings without hiding the pointed feathers. To shorten the visible cord length, tuck a little more of the cord behind the binding. If a longer cord is needed, remake it with additional starting chains and work one slip stitch into each chain after the first.
Once both booties hang evenly, use the beginning and ending yarn tails of each cord to sew it securely through the back of the center binding and the joined wing foundations. Make several reinforcing stitches through the attachment area, then weave the tails securely into the back of the wings.
Remove the temporary pins and hold the ornament by its upper hanging loop. Check that both booties hang freely, that their suspension cords remain secure, and that neither bootie pulls the center binding out of shape.
Keep the original hanging loop at the top. That way, you can make the classic angel wings ornament or the baby's first Christmas version using the same wing pattern.
Safety note: These miniature booties are decorative keepsakes, not wearable baby shoes or toys. Keep the finished ornament and its hanging cords out of a baby's reach and away from cribs and infant sleep spaces.
Shape the Finished Ornament
Lay the completed wings on a blocking mat with the front facing up.
Lightly dampen the cotton, then arrange the two upper sections into smooth, rounded curves. Spread the outer feathers toward the sides and point the longer lower feathers downward.
Pin the feather tips into position without stretching them out of shape. Leave the raised feather borders visible rather than pressing all the layers flat.
Let the ornament dry completely before removing the pins.
If you want a little more firmness, you can lightly stiffen a display-only ornament with a product suitable for your cotton thread. Test it on a spare feather first. I'd skip heavy stiffening because it can flatten the overlapping texture that gives these wings their character.
The finished ornament belongs on a Christmas tree, wreath, decorative package or other display where its delicate feather details can be seen.
Flat Appliqué Finishing
You can use the same wing pattern as an appliqué. Just leave off the hanging loop and attach the wings directly to your chosen fabric or crochet project.
For a flat appliqué, I'd secure more of the feather layers than I would on a hanging ornament. You still want the raised edges to show, but the pointed sections shouldn't catch easily on clothing or other objects.
Attaching the Wings to Fabric
Place the finished wings on the fabric with the center binding aligned where you want the design.
Pin the center first, then arrange the upper outer edges and the lower feather tips.
Thread a yarn needle with matching ivory yarn or strong coordinating sewing thread.
Sew through the center binding and both wing foundations, then make small securing stitches around the foundations and underneath the individual feathers.
Keep your attachment stitches hidden beneath the raised edging whenever possible.
If the appliqué will be washed, use enough attachment stitches to prevent the feather tips from lifting during laundering. Skip fabric stiffener and check that the finished piece lies flat.
These wings would be pretty on a decorative Christmas stocking, fabric gift bag or handmade holiday wall hanging.
For a project intended for a baby, avoid detachable ornaments, hanging loops, beads and loosely attached decorative pieces. Keep ornaments and decorative hanging items away from cribs and other infant sleep spaces.
Getting the Feather Layers to Look Right
If your wings don't look quite like the finished example at first, check the feather arrangement before changing the stitches.
If the wings look too narrow: Check that Feather A points outward on both sides rather than downward. The upper feathers are what give this design its wide, open appearance.
If the bottom looks too crowded: Spread Feathers D and E apart slightly. Their tips should be visible as separate layers instead of gathering into one thick point.
If the feathers curl: Check the slip-stitch edging. Work it more loosely or use a slightly larger hook, then block the feather into shape.
If the center looks bulky: Check that the foundation ends meet edge to edge rather than overlapping. Keep the center binding smooth and avoid adding unnecessary layers of sewing thread.
If the ornament droops: Add small, hidden securing stitches where the feathers overlap the foundations. Be careful not to flatten the outer edges.
Don't pull the wings wider just to reach a particular measurement. Keeping both sides balanced matters more than stretching the cotton.
A Few More Ways to Use Your Crocheted Angel Wings
Once you've made a pair, you can use the same design for several Christmas projects. The ornament version makes a pretty decoration for a tree or a wrapped gift, while the appliqué works nicely on flat fabric projects.
You can also pair these wings with the free crochet angel appliqué pattern if you'd like a complete angel motif for another handmade Christmas decoration.
I wouldn't add a separate halo, head or dress to this particular pair of wings. Their open shape and overlapping feathers are the whole point of the design.
Keep the finishing simple and let the crochet work show.
Before hanging or gifting your finished ornament, check that all temporary pins and stitch markers have been removed. Check the center seam, hanging loop, feather attachments and, if included, both bootie suspension cords and bows. Every attachment should be securely sewn, and the wings should hang evenly without twisting.
Pattern verification note: This crochet pattern has been reviewed for stitch-count consistency and mathematical construction, but it has not been physically made or tested from these instructions. Finished measurements and exact appearance may vary with yarn, tension and assembly.
When you click on links to various merchants on this site and make a purchase, this may result in this site earning a commission. This does not affect the price you pay.

UBGI Gold Standard 2026
Reviewed under the site's
editorial checklist.
Photos, decorating ideas, party setups and reader submissions are shared for inspiration unless a page is specifically presented as a pattern, tutorial, reference guide or step-by-step project. Follow the instructions, measurements, safety guidance and manufacturer directions provided for the particular project or product.
About Jan | Contact | Baby Nursery Ideas (Blog) | Site Map | Privacy Policy | Disclosure Policy | Disclaimer | Affiliate Disclosure | Earnings Disclosure | Facebook | Pinterest
I am a participant in the Amazon Services LLC Associates Program, an affiliate advertising program designed to provide a means for us to earn fees by linking to Amazon. As an Amazon Associate I earn from qualifying purchases.
Copyright © 2006-2026. All Rights Reserved.