Free Christmas Crochet Baby Mobile Pattern with Gingerbread Man and Baubles
By Jan Bay
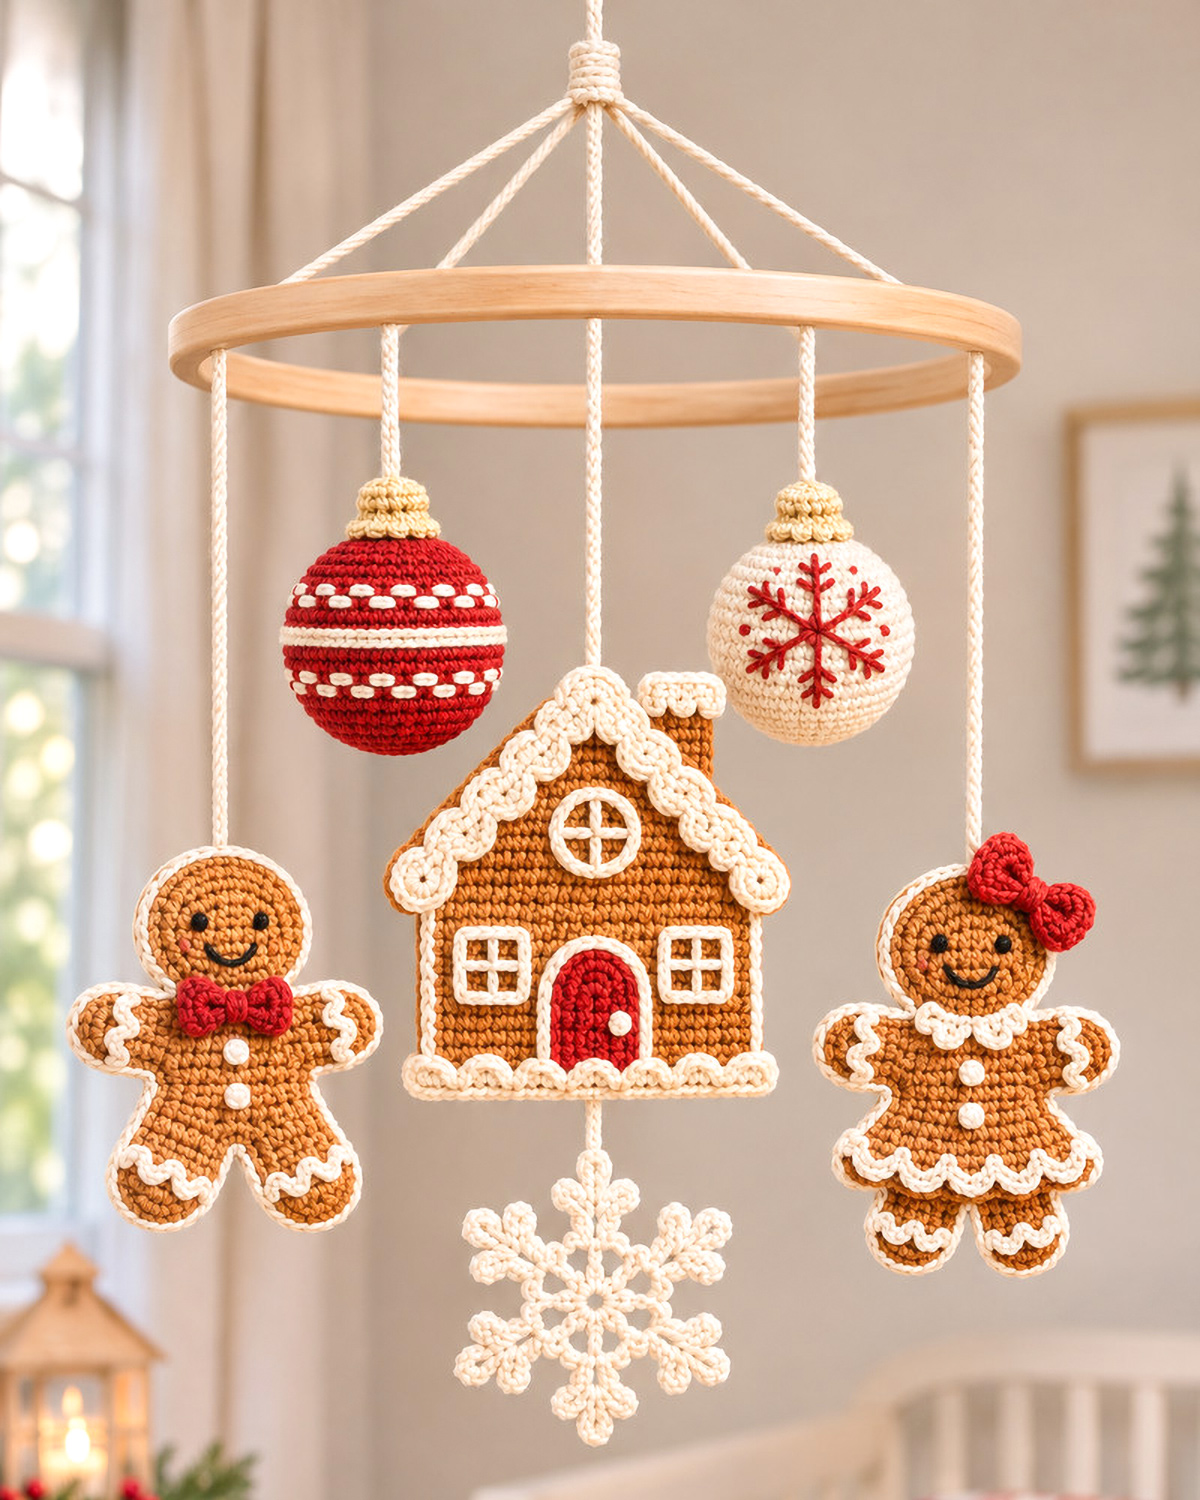
This free Christmas crochet baby mobile pattern brings a gingerbread house, a gingerbread man and woman, two colorful Christmas baubles and a pretty snowflake together in one handmade holiday decoration for baby's first Christmas and beyond. You'll find each individual crochet pattern right here, ready to be displayed on a simple wooden hoop for a charming nursery decoration.
Explore More Free Christmas Crochet Patterns
Gingerbread House, Man and Woman Patterns
Free Crochet Christmas Bauble Patterns
Free Crochet Snowflake Ornament Pattern
More Free Crochet Baby Mobile Patterns
See Supplies for This Project Here.
Important: This handmade Christmas mobile is a decorative craft project, not a tested or certified infant mobile. Keep the hanging decorations and cords completely out of a baby's reach. Do not attach the handmade mobile to crib rails or place any of its parts inside the crib. See the display information below for additional guidance on age limits and placement.
Jump to a Section
About This Free Christmas Crochet Baby Mobile Pattern
We're going to bring six little Christmas decorations together on one wooden hoop. The gingerbread house hangs in the middle, with the gingerbread man and woman on opposite sides. Two Christmas baubles fill the spaces above them, and a pretty ivory snowflake hangs beneath the house.
That's plenty. I wouldn't add more hanging pieces. The gingerbread figures are already quite detailed, and the red and ivory baubles give us just enough Christmas color without making everything look crowded.
There are two different kinds of crochet in this project. The gingerbread decorations are flat appliqués, while the baubles are small stuffed balls. The snowflake is an openwork ornament, so its delicate branches make a nice contrast with the other pieces.
We'll make the individual decorations first, finish the embroidery and icing, and then arrange everything on the hoop. Keeping the hanging cords until last makes it much easier to adjust the finished arrangement.
The Six Decorations
- One gingerbread house with cream roof icing, embroidered windows and a red door.
- One gingerbread man with a red bow tie and cream icing details.
- One gingerbread woman with a red hair bow and scalloped cream icing.
- One cranberry Peppermint Keepsake bauble with ivory embroidered bands.
- One ivory Winterberry Snowflake bauble with red embroidery.
- One openwork ivory crochet snowflake.
The gingerbread house, man and woman are based on my three gingerbread crochet appliqué patterns. The two ornament designs also appear in my free crochet Christmas bauble patterns collection.
We'll leave off the gingerbread house's little holly cluster for this particular mobile. The separate hanging holly leaves have also been removed from the design. The house, couple, baubles and snowflake already give us everything we want.
Expected Finished Measurements
- Wooden hoop: 12 inches in diameter.
- Gingerbread house: Approximately 6 1/2 inches tall and 5 1/2 inches wide.
- Gingerbread man: Approximately 5 1/2 inches tall.
- Gingerbread woman: Approximately 5 1/4 inches tall.
- Christmas baubles: Approximately 2 1/2 inches in diameter, excluding their crocheted caps.
- Snowflake: Approximately 5 to 6 inches across when made with the original ornament pattern materials.
- Overall hanging arrangement: An initial design target of approximately 17 to 20 inches below the hoop, depending on the finished snowflake size and cord adjustments.
These measurements are calculated or estimated from the individual designs. The exact assembled height and balance haven't been confirmed by making a finished mobile.
Materials for the Christmas Crochet Baby Mobile
You'll be working with three different yarn or thread sizes. That's intentional. The gingerbread pieces are larger flat decorations, the baubles need a tighter fabric to hold their stuffing, and the snowflake is made with finer cotton thread so its openwork branches show clearly.
For the Gingerbread Decorations
- Medium-weight category 4 cotton or cotton-blend yarn in gingerbread brown, approximately 75 yards.
- Warm cream yarn, approximately 25 yards.
- Christmas red yarn, approximately 15 yards.
- A small amount of fine black yarn or embroidery floss.
- 3.5 mm crochet hook.
Gingerbread gauge: 18 single crochet stitches and 20 rows = 4 inches before blocking, using medium-weight category 4 yarn and a 3.5 mm hook. This is the target gauge from the original gingerbread appliqué patterns.
Bauble gauge: 24 single crochet stitches = approximately 4 inches using DK-weight yarn. At the widest point, 48 stitches give an expected circumference of approximately 8 inches and a diameter close to 2 1/2 inches.
These are pattern targets, not measurements taken from a physically completed mobile. Match the appropriate gauge before making the complete set.
For the Two Christmas Baubles
- DK-weight category 3 cotton or cotton-blend yarn.
- Cranberry red, approximately 40 yards.
- Warm ivory, approximately 40 yards.
- Cream-gold, approximately 15 yards for the two caps.
- 2.75 mm crochet hook.
- Polyester fiberfill, approximately 10 to 14 grams total as an initial allowance.
For the Snowflake
- Size 3 ivory cotton crochet thread, approximately 25 to 35 yards.
- 2.25 mm crochet hook.
- Blocking mat and rustproof blocking pins.
The original snowflake design is expected to finish around 5 to 6 inches across. A smaller snowflake would require a finer thread and corresponding hook adjustment, but an exact reduced measurement hasn't been verified. I would keep the original stitch structure rather than removing any branches.
Mobile Frame and Assembly Supplies
- One plain, rigid 12-inch wooden craft hoop without detachable tightening hardware.
- Nonstretch ivory cotton hanging cord, approximately 2 mm thick.
- Sharp scissors.
- Yarn needle and tapestry needle.
- Removable stitch markers.
- Measuring tape.
- Four temporary markers or pieces of removable tape for identifying the hoop attachment positions during layout.
- A suitable manufacturer-rated hanging system for the intended display location.
I would skip decorative wooden beads, bells and plastic decorations. They aren't needed for the finished design, and they would introduce additional small parts.
US Crochet Abbreviations
- ch: Chain.
- sc: Single crochet.
- hdc: Half double crochet.
- dc: Double crochet.
- tr: Treble crochet.
- sl st: Slip stitch.
- inc: Work 2 single crochet stitches into the same stitch.
- dec: Single crochet 2 stitches together.
- inv dec: Invisible single crochet decrease.
- sc3tog: Single crochet 3 stitches together.
- MR: Magic ring.
- BLO: Back loop only.
- st/sts: Stitch or stitches.
- rnd: Round.
- FO: Fasten off.
Beginning chains don't count as stitches unless a step specifically says otherwise. The gingerbread pieces are worked mainly in rows, while the baubles are made in continuous rounds.
Crochet the Gingerbread Man for Your Christmas Mobile
Our little gingerbread man has a round head, a narrow body, two separate legs and short arms. His bow tie and icing are added afterward, so there's no need to change colors while making his brown pieces.
Make the Head
With gingerbread brown, make a magic ring. Work in continuous rounds until the final join.
- Round 1: Work 6 sc into the ring. (6 sts)
- Round 2: Inc in each stitch. (12 sts)
- Round 3: Repeat [sc in next st, inc] 6 times. (18 sts)
- Round 4: Repeat [sc in next 2 sts, inc] 6 times. (24 sts)
- Round 5: Repeat [sc in next 3 sts, inc] 6 times. (30 sts)
Join with a slip stitch and fasten off, leaving a sewing tail. Keep the head flat rather than stuffing it.
Make the Body and Legs
With gingerbread brown, ch 8.
- Row 1: Sc in the second chain from the hook and in each remaining chain. (7 sts)
- Row 2: Ch 1, turn. Inc in the first stitch, sc in the next 5 stitches, inc in the last stitch. (9 sts)
- Rows 3–11: Ch 1, turn. Sc in each stitch across. (9 sts per row)
Keep the yarn attached. The first leg grows from one side of the lower body edge.
First leg:
- Leg Row 1: Ch 1, turn. Sc in the first 3 stitches. Leave the remaining 6 body stitches unworked. (3 sts)
- Leg Rows 2–4: Ch 1, turn. Sc across. (3 sts)
- Leg Row 5: Ch 1, turn. Inc, sc in the next stitch, inc. (5 sts)
- Leg Rows 6–7: Ch 1, turn. Sc across. (5 sts)
Fasten off.
Second leg: Return to the six unworked stitches along the lower edge of the body. Leave the middle three unworked, and join brown yarn in the next stitch at the opposite side.
- Leg Row 1: Ch 1, sc in the joining stitch and the following 2 stitches. (3 sts)
- Leg Rows 2–4: Ch 1, turn. Sc across. (3 sts)
- Leg Row 5: Ch 1, turn. Inc, sc in next stitch, inc. (5 sts)
- Leg Rows 6–7: Ch 1, turn. Sc across. (5 sts)
Fasten off. There should be three unused stitches between the legs, with both feet widening to five stitches.
Make Both Arms
Make two matching arms with gingerbread brown. Ch 4 for each arm.
- Row 1: Sc in second chain from hook and across. (3 sts)
- Rows 2–5: Ch 1, turn. Sc across. (3 sts)
- Row 6: Ch 1, turn. Inc, sc in next stitch, inc. (5 sts)
- Row 7: Ch 1, turn. Sc across. (5 sts)
Fasten off, leaving enough brown yarn to sew the arms to the body.
Crochet the Little Red Bow Tie
With Christmas red, make a magic ring.
Work [ch 2, 2 dc, ch 2, sl st into the ring] twice.
Pull the ring closed. Fasten off with a sewing tail, then wrap the tail around the center two or three times to pinch the bow into shape.
Assemble and Decorate the Gingerbread Man
- Place the body flat with the feet pointing downward.
- Overlap the lower part of the head over the upper body by approximately 1/4 inch. Sew the overlap firmly with brown yarn.
- Place one arm on each side of the upper torso. Hide approximately two rows of each arm behind the body.
- Angle both arms slightly downward. Sew the narrow ends securely to the body.
- Attach the red bow tie just below the head.
- With black embroidery floss, stitch two small eyes onto the head. Keep them evenly positioned with approximately four crochet stitches between them.
- Work a shallow curved smile beneath the eyes using two or three small backstitches.
- With cream yarn, embroider three short zigzag stitches across each wrist.
- Repeat the icing decoration across both ankles, just above the wider feet.
- Add two short cream vertical stitches down the center of the torso, spaced about two rows apart.
- Weave all remaining ends into the back of the completed figure.
Checkpoint: The expected finished gingerbread man is approximately 5 1/2 inches tall with an arm span close to 4 1/4 inches. Both arms should match, and the legs should have the same length and width.
Don't add a Christmas ornament hanging loop yet. The mobile assembly uses its own supporting cord.
Crochet the Gingerbread Woman with Her Red Bow
The gingerbread woman uses the same round head as the man, but her body widens into a little skirt. That's the main difference between the two characters. Her red hair bow and scalloped cream icing give her the rest of her personality.
Head
With gingerbread brown, make a magic ring.
- Round 1: Work 6 sc into the ring. (6 sts)
- Round 2: Inc in every stitch. (12 sts)
- Round 3: [Sc 1, inc] 6 times. (18 sts)
- Round 4: [Sc 2, inc] 6 times. (24 sts)
- Round 5: [Sc 3, inc] 6 times. (30 sts)
Join with a slip stitch. Fasten off with a long sewing tail.
Flared Gingerbread Body
With brown yarn, ch 8.
- Row 1: Sc in second chain from hook and across. (7 sts)
- Row 2: Ch 1, turn. Inc, sc in next 5 stitches, inc. (9 sts)
- Rows 3–5: Ch 1, turn. Sc across. (9 sts)
- Row 6: Ch 1, turn. Inc, sc in next 7 stitches, inc. (11 sts)
- Row 7: Ch 1, turn. Sc across. (11 sts)
- Row 8: Ch 1, turn. Inc, sc in next 9 stitches, inc. (13 sts)
- Rows 9–10: Ch 1, turn. Sc across. (13 sts)
Fasten off. Your skirt should be wider at its lower edge than at its neckline.
Two Legs
Work two identical pieces in brown. Ch 4 for each leg.
- Row 1: Sc in second chain from hook and across. (3 sts)
- Rows 2–4: Ch 1, turn. Sc across. (3 sts)
- Row 5: Ch 1, turn. Inc, sc in next stitch, inc. (5 sts)
- Rows 6–7: Ch 1, turn. Sc across. (5 sts)
Fasten off each leg with a sewing tail.
Two Arms
Make two arms exactly alike. Ch 4 with brown yarn.
- Row 1: Sc in second chain and across. (3 sts)
- Rows 2–5: Ch 1, turn. Sc across. (3 sts)
- Row 6: Ch 1, turn. Inc, sc 1, inc. (5 sts)
- Row 7: Ch 1, turn. Sc across. (5 sts)
Fasten off with sewing tails.
Red Hair Bow
With red, make a magic ring. Work [ch 2, 2 dc, ch 2, sl st into ring] twice.
Close the ring and secure the center with two wraps of the remaining red yarn.
Assemble the Gingerbread Woman
- Center the head above the narrow upper edge of the flared body. Overlap the two pieces by about 1/4 inch and sew them together.
- Turn the body over. Position the narrow ends of the legs behind the lower skirt edge.
- Attach the first leg beneath skirt stitches 3–5 and the second beneath stitches 9–11, counting across the 13-stitch lower edge.
- There should be three skirt stitches between the legs and two outside each leg.
- Sew the narrow ends of the arms behind the upper body, with the wider hands pointing outward.
- Angle the arms downward slightly and secure both attachment areas.
- Place the red bow near the upper right edge of the head as viewed from the front. Sew it flat.
- Embroider two black satin-stitch eyes with approximately five to six stitches between them.
- Add a shallow smile using two or three small black backstitches.
- Embroider three small cream V-shaped stitches across the neckline.
- Add short cream zigzag icing at both wrists and ankles.
- Make two vertical cream icing marks down the middle of the dress.
Crochet the Scalloped Skirt Icing
With the front of the dress facing you, attach cream yarn with a slip stitch in the first stitch of the 13-stitch lower skirt edge.
Repeat [sl st in next stitch, work 3 hdc in next stitch, sl st in next stitch] four times.
Fasten off and weave the ends through the back of the dress.
Stitch checkpoint: The skirt has four cream scallops across its lower edge. Its 13-stitch width remains unchanged beneath the edging.
Lay the gingerbread woman beside the man. At the stated yarn and hook sizes, she's expected to measure approximately 5 1/4 inches tall, just a little shorter than her partner.
Crochet the Gingerbread House for the Center of the Mobile
Here's our centerpiece! The gingerbread house is made from a rectangular body, a separate triangular roof, a little chimney and a red door. The windows are mostly embroidered, so we won't have a collection of tiny window pieces to sew on.
We're keeping the cream roof icing, the red door and the three windows. For this mobile, we're leaving off the small holly cluster that appears on the individual house appliqué pattern.
House Body
With gingerbread brown, ch 20.
- Row 1: Sc in the second chain from the hook and across. (19 sts)
- Rows 2–18: Ch 1, turn. Sc in every stitch. (19 sts per row)
Fasten off and weave in the yarn end.
Set the rectangle flat with Row 1 at the bottom and Row 18 at the top. Count the stitch columns from left to right when placing the windows and door.
Triangular Roof
With brown yarn, ch 26.
- Row 1: Sc in second chain from hook and across. (25 sts)
- Row 2: Ch 1, turn. Dec, sc across until 2 stitches remain, dec. (23 sts)
- Row 3: Repeat the decrease at both ends. (21 sts)
- Row 4: Decrease at both ends. (19 sts)
- Row 5: Sc across. (19 sts)
- Row 6: Decrease at both ends. (17 sts)
- Row 7: Decrease at both ends. (15 sts)
- Row 8: Decrease at both ends. (13 sts)
- Row 9: Decrease at both ends. (11 sts)
- Row 10: Sc across. (11 sts)
- Row 11: Decrease at both ends. (9 sts)
- Row 12: Decrease at both ends. (7 sts)
- Row 13: Decrease at both ends. (5 sts)
- Row 14: Ch 1, turn. Dec, sc in next stitch, dec. (3 sts)
- Row 15: Ch 1, turn. Sc3tog. (1 st)
Fasten off. The lower edge of the roof should be wider than the house body, leaving a small overhang at each side.
Cream Roof Icing
Join cream yarn at the lower left corner of the roof, working upward along the 15 row ends of the left slope.
After the joining slip stitch, repeat [sl st in next row end, 3 dc in following row end, sl st in next row end] four times. Sl st in each of the final two row ends and then into the single stitch at the peak.
Along the right slope, work sl st into the first two row ends. Repeat [sl st in next row end, 3 dc in following row end, sl st in next row end] four times. Sl st in the remaining row end.
Fasten off. This creates four scalloped icing groups on each roof slope. Leave the straight bottom edge of the roof without icing.
Chimney
With brown, ch 4.
- Row 1: Sc in second chain and across. (3 sts)
- Rows 2–5: Ch 1, turn. Sc across. (3 sts)
Fasten off with a sewing tail.
Add three little cream icing stitches across the chimney top. Place the chimney behind the right roof slope, hiding its lower two rows. Sew it securely to the back of the roof.
Red Gingerbread House Door
With Christmas red, ch 6.
- Row 1: Sc in second chain and across. (5 sts)
- Rows 2–6: Ch 1, turn. Sc across. (5 sts)
- Row 7: Ch 1, turn. Sl st in first stitch, hdc in next, 3 dc in middle stitch, hdc in next and sl st in final stitch.
Fasten off, leaving yarn for sewing.
Center the door over house body columns 8 through 12. Keep the lower edge even with the bottom of the house and sew all around the door.
With cream yarn, embroider a narrow icing line up each side and around the rounded top. Make one little cream satin stitch near the right side for a doorknob.
Two Square Windows
Thread cream yarn into a tapestry needle.
- Outline the left window over house body columns 2–5 and Rows 7–10.
- Outline the right window over columns 15–18 and Rows 7–10.
- Work one vertical dividing stitch through each square.
- Add one horizontal dividing stitch through each square, creating four panes per window.
Both windows should be approximately four crochet columns wide and four rows tall.
Round Upper Window
With cream, ch 10 and join with a slip stitch to form a ring.
Round 1: Ch 1. Work 12 sc evenly into the ring. Join to the first sc with a slip stitch. Fasten off with a sewing tail.
Center the ring on the roof, with its lower edge near Roof Row 5 and upper edge near Roof Row 8. Sew it in place.
Make one vertical and one horizontal cream backstitch across the opening to create four windowpanes.
Join the House and Roof
- Place the completed roof over the house body with both decorated fronts facing you.
- Center the roof so its lower edge extends equally beyond the left and right house walls.
- Overlap the roof and body by approximately one row.
- Sew the overlapping section securely with brown yarn, working through both layers.
- With cream yarn, embroider three small U-shaped icing scallops along the bottom left of the house, stopping before the red door.
- Repeat three matching scallops along the bottom right.
- Weave all ends into the back.
House checkpoint: The finished house is expected to be approximately 6 1/2 inches tall and 5 1/2 inches across the roof. The chimney rises above the right roof slope, the round window sits centered above the door, and the two square windows match.
Leave the house flat and unstuffed. The main mobile supporting cord will run behind it during assembly.
Make the Two Crochet Christmas Baubles
Now we get to add a little Christmas color! We'll make two matching-size balls, one cranberry red with ivory peppermint-style bands and one ivory with a red embroidered snowflake.
Both ornaments begin with exactly the same 24-round crochet ball. Only the colors and embroidery change.
Basic Crochet Bauble Body, Make Two
Use DK-weight yarn and a 2.75 mm crochet hook. Make one ball in cranberry red and one in ivory.
Work in continuous rounds. Place a removable stitch marker in the first stitch of each round.
- Round 1: MR, 6 sc. (6)
- Round 2: Inc in each stitch. (12)
- Round 3: [Sc 1, inc] 6 times. (18)
- Round 4: [Sc 2, inc] 6 times. (24)
- Round 5: [Sc 3, inc] 6 times. (30)
- Round 6: [Sc 4, inc] 6 times. (36)
- Round 7: [Sc 5, inc] 6 times. (42)
- Round 8: [Sc 6, inc] 6 times. (48)
- Rounds 9–17: Sc in every stitch of each round. (48 per round)
- Round 18: [Sc 6, inv dec] 6 times. (42)
- Round 19: [Sc 5, inv dec] 6 times. (36)
- Round 20: [Sc 4, inv dec] 6 times. (30)
- Round 21: [Sc 3, inv dec] 6 times. (24)
- Round 22: [Sc 2, inv dec] 6 times. (18)
- Round 23: [Sc 1, inv dec] 6 times. (12)
Add small amounts of polyester fiberfill before the final round. Fill the ball evenly so it stays round without stretching the stitches apart.
Round 24: Inv dec 6 times. (6)
Fasten off, leaving a 10-inch tail. Draw the tail through the front loops of the last six stitches, pull the opening closed, and bury the yarn end.
Stitch count checkpoint: Each ball has 48 stitches from Rounds 8 through 17. The complete 24-round sphere contains 816 single crochet stitches, including increases and decreases.
The target circumference is approximately 8 inches at the widest part, giving an estimated diameter close to 2 1/2 inches. Shape both balls to the same size before adding their decorative details.
Peppermint Keepsake Bauble: Red with Ivory Bands
Take the cranberry bauble and place its beginning-of-round line toward the back. The ivory dashes are embroidered over the red surface, rather than made by changing yarn colors during the crochet rounds.
Four rows of staggered dashes:
- On Round 10, embroider an ivory running-stitch dash across stitch columns 1–2. Leave columns 3–4 red. Repeat around the 48-stitch round for 12 dashes.
- On Round 11, offset the dashes by two columns. Make the first dash across columns 3–4, leave two stitches uncovered, and repeat around for 12 dashes.
- Repeat the Round 10 arrangement on Round 15 for another 12 ivory dashes.
- Repeat the offset arrangement on Round 16 for the final 12 dashes.
You should now have 48 ivory dashes altogether. Keep them short and fairly even so the red spaces remain visible between each one.
Two raised ivory center lines:
- Join ivory yarn at a stitch post on Round 13, keeping the joining end inside the ball where possible.
- Work one loose surface slip stitch around each of the 48 stitch posts in Round 13.
- Join the final surface slip stitch to the first and secure the yarn.
- Repeat the same method around Round 14, making another 48 surface slip stitches.
- Hide the yarn ends through the stuffed body.
The two raised lines sit between the upper and lower rows of dashes. Don't pull them tight enough to pinch the middle of the ball.
Winterberry Snowflake Bauble: Ivory with Red Embroidery
Use the completed ivory ball. Find the center of its front and mark a point on Round 13. We'll embroider the snowflake across the middle of the sphere, using the crochet stitch columns and rounds as a placement grid.
For the following placement measurements, the center mark is coordinate (0,0). Negative vertical values move toward the top of the ball; positive values move downward. Horizontal values count stitch columns to the left or right.
- With doubled cranberry yarn, backstitch a small diamond around the center mark. Connect (0,-2), (+2,0), (0,+2), (-2,0), then return to (0,-2).
- Embroider the top snowflake arm from the diamond's upper point (0,-2) to (0,-5).
- Make the lower arm from (0,+2) to (0,+6).
- Make the upper-left arm from (-2,0) through (-4,-1) and (-6,-3) to (-8,-4).
- Mirror that arm on the upper-right side using positive horizontal values.
- Make the lower-left arm from (-2,0) through (-4,+1) and (-6,+3) to (-8,+4).
- Mirror the lower-left arm on the lower-right side.
- Switch to one strand of red yarn for the shorter branches.
- On the top arm, embroider two twigs from (0,-3) to (-2,-4) and (+2,-4).
- On the bottom arm, work matching twigs from (0,+4) to (-2,+5) and (+2,+5).
- For each diagonal arm, add two little outer branches at the point approximately six columns from the center and three rounds above or below it. One branch extends two columns outward at the same height; the other extends two rounds toward the nearest end of the ball.
- Add six little red French-knot dots around the snowflake at (-9,-5), (+9,-5), (-11,0), (+11,0), (-9,+5) and (+9,+5). Use three wraps for each knot.
- On Round 20, embroider a tiny red dash over every other stitch around the 30-stitch round. (15 dashes)
Checkpoint: The embroidered snowflake has six long arms, a small diamond center, short side branches and six red dots. The lower decorative border has 15 dashes.
Keep the snowflake centered on the front of the ornament. This is the side that will face outward on the finished mobile.
Crochet Two Matching Cream-Gold Bauble Caps
Make one cap for each bauble using cream-gold DK-weight yarn and the 2.75 mm hook.
- Round 1: MR, 6 sc. (6)
- Round 2: Inc in each stitch. (12)
- Round 3: [Sc 1, inc] 6 times. (18)
- Round 4: Working through the back loops only, sc around. (18)
- Round 5: Repeat [sl st in next stitch, ch 2, skip next stitch] nine times. Join after the final chain-2 arch to the first slip-stitch anchor. (9 scallops)
Fasten off, leaving about 12 inches of yarn for sewing.
With a separate length of cream-gold yarn, work 18 loose surface slip stitches through the unused front loops from Round 3. Join the decorative ridge and hide its yarn ends.
Place each cap over the starting magic-ring end of its bauble. Center it carefully and sew the cap beneath its scalloped edge to the ball.
Check that each cap sits evenly before securing the final yarn tail. Both caps should have nine matching scallops and a narrow raised decorative ridge.
Prepare the Baubles for the Mobile Cords
The standalone bauble ornaments have their own twisted hanging loops. For this mobile, we'll attach the vertical support cords directly through the centers of the crocheted caps, avoiding an additional loop above each ornament.
- Prepare an ivory support cord for each bauble, leaving extra length for the hoop attachment.
- Thread the lower end of the cord through the center of the gold cap and into several firm stitches at the top of the stuffed ball.
- Secure the cord to the ball's crochet structure with multiple small attachment stitches using matching yarn. Do not rely only on the scalloped edge of the cap.
- Check that the ball hangs from its top center and does not pull sideways.
- Leave the upper cord ends unsecured until the final hanging positions have been measured.
Now we have two coordinating Christmas baubles. The cranberry ornament adds the brighter color, while the ivory snowflake ornament keeps the arrangement from looking too red.
Crochet the Ivory Snowflake for the Bottom of the Mobile
The snowflake hangs beneath the gingerbread house, giving the center of the mobile one last pretty detail. We'll use the six-arm design from my free crochet snowflake ornament pattern.
It has an open circular center, long narrow arms, smaller side loops and delicate connecting arches. The repeating shape is already decorative enough without adding anything else.
Make the Snowflake Center
With ivory size 3 cotton thread and a 2.25 mm hook, ch 10. Join with a slip stitch to form a ring.
Round 1: Ch 3, counting as the first dc. Work 23 dc into the center ring. Join to the top of the starting ch-3. (24 dc)
Round 2: Ch 1. Sc in the same stitch as the join, tr in the next dc, ch 2, tr in the next dc, sc in the next dc. Repeat [sc in next dc, tr in next dc, ch 2, tr in next dc, sc in next dc] five more times. Join to the first sc.
Center checkpoint: There are 12 sc, 12 tr and six ch-2 spaces. Each ch-2 space will support one snowflake arm.
Fasten off and weave the starting ends into the back of the center.
Crochet the First Snowflake Arm
Join ivory thread with a slip stitch into one of the six ch-2 spaces. Ch 20 to form the arm's main stem.
Number the foundation chains from the center outward. Chain 1 is nearest the center and Chain 20 is at the outer tip.
- At Chain 20, ch 9 and slip stitch back into Chain 20 to form the long oval tip loop.
- Work 10 sc around the ch-9 loop, inserting the hook through the center of the loop rather than into the individual chain stitches.
- Sl st into the original Chain 20 again. The completed outer loop has 10 sc and remains open in the middle.
- Work backward toward the center with slip stitches into foundation Chains 19, 18 and 17.
- At Chain 17, ch 7 and sl st into the same foundation chain to form a side loop.
- Work 8 sc around the ch-7 loop. Sl st into Chain 17 again.
- Continue toward the center, making 1 sc into an available loop of each foundation chain from Chain 16 through Chain 1. (16 sc)
- Sl st into the original ch-2 space at the center.
- Pivot the work to reach the unused loops along the opposite side of the foundation chain.
- Sc into each free loop from Chain 1 through Chain 16. (16 sc)
- Sl st into the opposite side of Chain 17.
- Ch 7, sl st into Chain 17, work 8 sc around the new loop, and sl st into Chain 17 again. This forms the matching side loop.
- Slip stitch into the remaining free loops of Chains 18, 19 and 20, moving toward the tip.
Fasten off and weave the end securely along the back of the stem.
Each completed arm has 16 sc along each side of the lower stem, 10 sc around the outer loop, and 8 sc around each side loop. That's 58 sc per arm, excluding the slip stitches used to form and anchor the loops.
Make the Remaining Five Arms
Repeat the complete first-arm construction in each of the other five ch-2 spaces around the center.
Keep every foundation chain at 20 stitches, both side loops at seven chains, and each outer loop at nine chains.
After completing all six arms, count the decorative loops. There should be 18 altogether: one large outer loop and two smaller side loops on every arm.
Connect the Arms with Six Openwork Arches
The little arches sit near the center and give the snowflake its delicate openwork appearance. Make six, one between each pair of neighboring arms.
- On each arm, count outward from the center along the same chosen edge of its crocheted stem. Mark the sixth sc from the center.
- Keep all six markers the same distance from the center.
- With the right side facing, join ivory thread with a sl st into the marked sc of any arm.
- Ch 10 loosely and sl st into the marked sc on the next arm, moving clockwise around the snowflake.
- Repeat the same ch-10 connection between each neighboring pair of arms.
- Make the sixth ch-10 arch between the last arm and the marked stitch on the first arm.
- Fasten off and weave in the ends.
Arch checkpoint: Six chain-10 arches, with 60 chain stitches altogether. Do not add a single-crochet edging to these arches. Leave the spaces open so the finished snowflake matches the original ornament design.
Block and Finish the Snowflake
- Weave every remaining thread end securely into the back of the snowflake.
- Lightly dampen the cotton thread using a blocking method appropriate for the fiber.
- Place the snowflake on a blocking mat with its front facing upward.
- Arrange all six arms evenly around the center.
- Pin the outermost tip of each arm, keeping the opposite tips equally spaced from the center.
- Open the two smaller side loops on each arm into matching diagonal branches.
- Shape the six connecting arches without pulling the center out of round.
- Allow the snowflake to dry completely before removing every blocking pin.
Choose one arm to point straight upward when the snowflake hangs. We'll attach this point to the separate center support cord during assembly, rather than adding the long double hanging loop used for the standalone Christmas ornament.
Final snowflake checkpoint: Six matching arms, 18 decorative loops and six openwork chain-10 arches. Each arm contains 58 single crochet stitches, excluding attachment slip stitches. Both sides of every arm should match.
Arrange the Christmas Crochet Decorations on the Wooden Mobile Hoop
All six Christmas decorations are finished, and now we can see how they belong together. This is the part that gives the project its own personality, rather than making it look like six unrelated ornaments hanging from the same ring.
The gingerbread couple belongs at the outer sides. Their similar shapes make a natural pair. The two baubles fill the upper spaces, and the house stays in the center, with the ivory snowflake underneath.
Mark the Four Outer Hanging Positions
Lay the 12-inch wooden hoop flat on a table. Mark four equally spaced attachment positions, 90 degrees apart around its circumference.
For the intended front view, arrange the pieces as follows:
- Front left: Gingerbread man.
- Front right: Gingerbread woman.
- Rear left: Cranberry Peppermint Keepsake bauble.
- Rear right: Ivory Winterberry Snowflake bauble.
The actual attachment points are spaced around the hoop, not along one straight wooden bar. When viewed from the front, the gingerbread characters appear lower and farther apart, while the baubles sit a little higher behind them.
Prepare the Four Upper Suspension Cords
Cut four equal 28-inch lengths of nonstretch ivory cotton cord as starting allowances. The extra length gives room for attachment and adjustment.
- Mark four suspension points at equal quarter-turn intervals around the wooden hoop.
- Attach one cord securely to each marked position using the hanging system's specified attachment method.
- Bring all four cords upward to a common central suspension point.
- Adjust them until the hoop is approximately level while empty.
- Secure the upper gathering point with the hardware and fastening arrangement specified for the selected suspension system.
- Keep the central gathering point directly over the middle of the wooden ring.
The 28-inch lengths are cutting allowances, not the final exposed suspension lengths. For a 12-inch hoop with an approximately 9-inch vertical rise to the upper gathering point, each upper cord follows a diagonal of roughly 10.8 inches before accounting for knots and attachments.
A hanging system has to carry the full weight of the completed project. The example image doesn't establish a suitable ceiling anchor, load rating or fastening method, so those details depend on the actual hardware and display location. Don't substitute an unverified hook or tie the mobile to the crib rail.
Attach the Gingerbread Couple
Prepare a separate ivory hanging cord for each gingerbread figure, leaving at least 15 inches as a cutting allowance for each one.
- Lay the gingerbread man front-side down.
- Center the lower end of his hanging cord behind the upper half of the head.
- With matching brown yarn, work several firm attachment stitches through the back of the head's crochet fabric and around the cord.
- Catch more than one crochet round so the pull isn't concentrated on a single stitch.
- Secure and weave the sewing yarn into the back of the head.
- Repeat for the gingerbread woman, keeping the cord behind the top center of her head and clear of the red bow.
- Hang each figure temporarily from its assigned front position on the hoop.
- Adjust the cords until the tops of the heads hang approximately 7 to 8 inches below the hoop.
The figures should face outward from the intended front of the mobile. Because they are flat appliqués, the backs are not decorated in the same way as the fronts.
Position the Two Christmas Baubles
Place the red bauble at the rear-left attachment position and the ivory snowflake bauble at the rear-right position.
- Attach the upper end of the red bauble's prepared support cord to its assigned hoop position.
- Adjust the cord so the top of the cream-gold cap hangs approximately 2 1/2 to 3 inches beneath the hoop.
- Repeat with the ivory bauble at the opposite rear position.
- Turn the ivory bauble so its embroidered red snowflake faces the intended front view.
- Keep both baubles at approximately the same height.
- Secure the attachments only after comparing their positions with the gingerbread couple.
The baubles shouldn't be pressed against the gingerbread heads or the house. They are separate hanging pieces, and each one needs space to move without catching the next decoration.
Prepare the Independent Center Cord
Cut a separate 40-inch length of nonstretch ivory cord as a starting allowance for the center hanging line.
This line passes down through the empty center of the hoop. It attaches to the approved upper suspension hardware independently of the crocheted decorations and carries both the gingerbread house and the snowflake.
- Route the central cord from the rated upper suspension point through the center of the wooden hoop, following the hanging hardware's attachment instructions.
- Keep the line vertical and separate from the four perimeter support cords.
- Hold the gingerbread house against the line, with its roof peak approximately 3 1/2 to 4 inches below the hoop.
- Secure the house to the center cord at the back of the roof peak and at a second point lower on the house. Use matching yarn stitches that catch multiple crochet stitches.
- Keep the support cord behind the flat appliqué so it doesn't cross the embroidered windows or door.
- Continue the same supporting line below the gingerbread house, leaving approximately 1 to 1 1/2 inches of visible space before the snowflake's upper tip.
- Attach the snowflake's uppermost arm directly to that independent support line with secure thread stitching. Do not suspend its weight from the lower edge of the gingerbread house.
- Finish the lower end of the support cord behind the snowflake's upper arm. Secure the snowflake to the cord with several firm attachment stitches through the crochet fabric, then fasten off and weave in the sewing thread ends. Trim any unused cord below the attachment so no loose tail hangs beneath the snowflake.
From the front, the snowflake should look as though it's hanging beneath the house. In the construction, though, the continuous supporting cord carries the snowflake separately.
Keeping those two pieces independently supported also makes it possible to adjust the distance between them without pulling the bottom of the crocheted house out of shape.
Balance and Finish the Christmas Crochet Mobile
Before treating the mobile as finished, look at it from the front, both sides and underneath. The individual pieces can be lovely on their own, but the entire arrangement needs to hang without the wooden hoop leaning or the ornaments getting tangled together.
Check the Hanging Arrangement
- Check that the wooden hoop is level when the completed decorations are attached.
- Compare the two gingerbread figures. Their heads should hang at approximately the same height.
- Check that both baubles hang above the figures, with their caps at similar heights.
- Look at the gingerbread house from the front. Its roof peak and red door should fall along the central vertical line.
- Check that the snowflake hangs beneath the house with one arm pointing upward and its opposite arm pointing down.
- Look for overlapping decorations, twisted cords or any part that catches another piece during gentle movement.
- If the hoop leans, return the hanging arrangement to a supported work surface. Compare the actual decoration weights and suspension geometry before adjusting attachment positions. Don't add loose balancing weights.
- Once the final hanging arrangement is established, secure every permanent attachment according to the selected suspension system's instructions.
Balance checkpoint: The house and snowflake form one central vertical group. The two gingerbread figures create the lower outer pair, and the two baubles provide the upper outer pair. The hoop should remain level under the full decorative load.
A visual layout check does not establish structural strength. The finished assembly and its mounting hardware have not been load-tested.
Final Crochet and Cord Inspection
- All gingerbread arms, legs, bows and house components are attached securely.
- Every embroidered eye, smile, window and icing detail is finished.
- The bauble caps are sewn through the underlying crochet fabric.
- The baubles are fully closed, with no visible loose stuffing.
- All six snowflake arms and connecting arches are complete.
- No removable stitch markers or blocking pins remain.
- No unused lengths of yarn dangle from the completed decorations.
- No hard decorative beads, loose bells, plastic eyes or detachable ornaments have been added.
- Every hanging connection has been inspected for looseness or damage.
I'd stop decorating right here. The gingerbread house, matching couple, two Christmas baubles and snowflake give us the complete design.
Displaying the Finished Christmas Crochet Baby Mobile
This little collection would make a sweet addition to a Christmas nursery, especially if you're planning a handmade decoration for baby's first Christmas. The red and ivory baubles give the mobile its festive colors, while the gingerbread characters bring in the playful details.
There is one important distinction, though. This is a handmade decorative pattern, not a manufactured, tested or certified infant mobile. It isn't a baby toy, and none of its hanging pieces are intended to be handled, pulled or mouthed by an infant.
If displayed near a baby's sleeping area, the mobile and all hanging cords must remain completely out of reach. Never place loose decorations inside the crib or attach this handmade assembly to the crib rails. The mounting system must be appropriate for the complete assembled weight and its intended location.
The American Academy of Pediatrics states that hanging crib toys, including mobiles, must be removed when a baby begins pushing up on hands and knees or reaches five months of age, whichever comes first. You can read the American Academy of Pediatrics guidance on hanging crib toys for the age and developmental limits.
After that stage, the handmade Christmas decorations can be kept as a seasonal display in a location where children cannot reach the cords or hanging pieces.
A Handmade Christmas Keepsake
Another nice thing about this particular mobile is that the individual decorations have their own patterns. The gingerbread house, man and woman can become Christmas ornaments, the baubles can decorate a tree, and the snowflake can be used on its own after the mobile is no longer displayed.
If you want more ideas for combining small crochet projects, browse my crochet baby mobile pattern collection. You'll find other themed designs with their own arrangements and decorative details.
And if you're putting together a collection of handmade Christmas decorations, there's plenty more to explore in my free Christmas crochet patterns.
Six handmade Christmas decorations, one simple wooden hoop, and a little gingerbread house in the middle. That's our Christmas mobile.
When you click on links to various merchants on this site and make a purchase, this may result in this site earning a commission. This does not affect the price you pay.

UBGI Gold Standard 2026
Reviewed under the site's
editorial checklist.
Photos, decorating ideas, party setups and reader submissions are shared for inspiration unless a page is specifically presented as a pattern, tutorial, reference guide or step-by-step project. Follow the instructions, measurements, safety guidance and manufacturer directions provided for the particular project or product.
About Jan | Contact | Baby Nursery Ideas (Blog) | Site Map | Privacy Policy | Disclosure Policy | Disclaimer | Affiliate Disclosure | Earnings Disclosure | Facebook | Pinterest
I am a participant in the Amazon Services LLC Associates Program, an affiliate advertising program designed to provide a means for us to earn fees by linking to Amazon. As an Amazon Associate I earn from qualifying purchases.
Copyright © 2006-2026. All Rights Reserved.