Free Crochet Christmas Bauble Patterns – 3 Handmade Ornaments
By Jan Bay
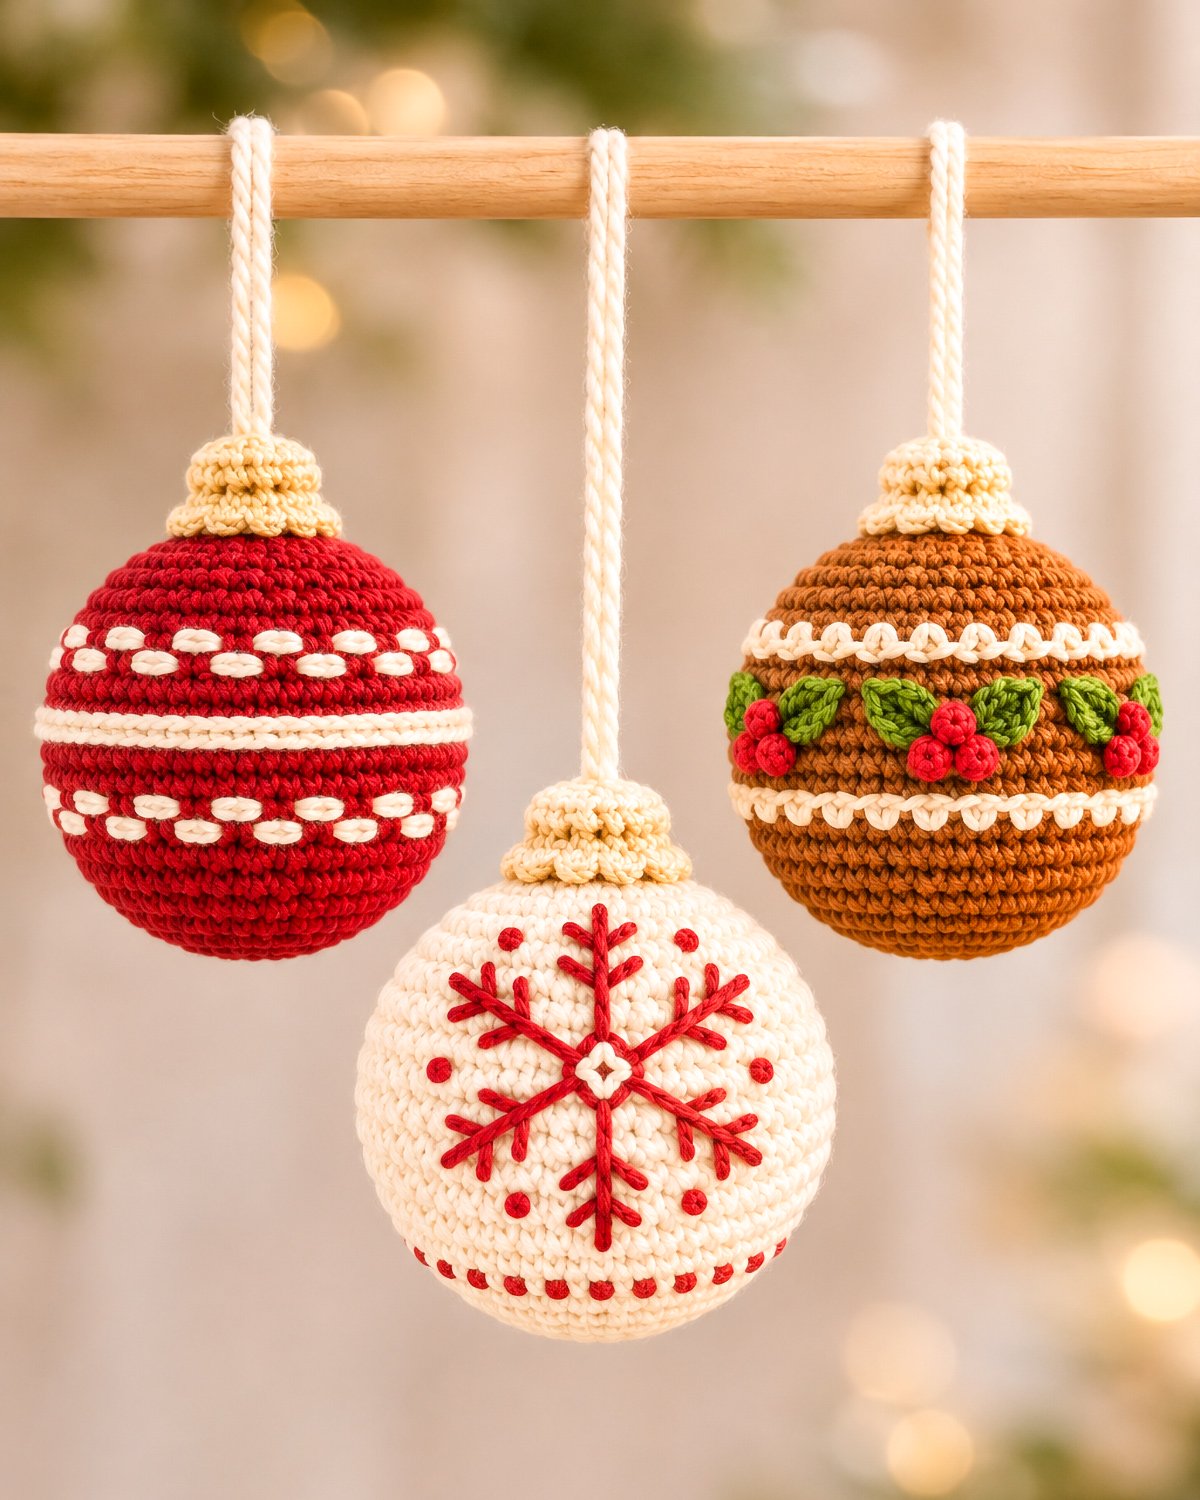
These free crochet Christmas bauble patterns feature three festive ornaments that will look beautiful hanging together on your baby's first Christmas tree. There's a cranberry-red peppermint bauble with little ivory stripes, a snowy white bauble with a red embroidered snowflake, and a gingerbread-brown bauble decorated with holly leaves and berries. Each has a matching crocheted cap and hanging loop. They're lovely Christmas tree decorations, but I especially like the idea of making all three for a handmade Christmas mobile. The colors work together without making the ornaments look exactly alike.
Explore More Free Christmas Crochet Patterns
Free Crochet Christmas Ornament Patterns
Our Decorative Christmas Bauble Pattern
See Supplies for This Project Here.
Jump to a Section
- Materials and Supplies
- Finished Size, Gauge and Abbreviations
- Basic Crochet Bauble Pattern
- 1. Peppermint Keepsake Bauble
- 2. Winterberry Snowflake Bauble
- 3. Hollyberry Gingerbread Bauble
- Crocheted Caps and Hanging Loops
- Stuffing, Shaping and Finishing
- Using the Baubles on a Christmas Mobile
- Frequently Asked Questions
Materials for All Three Crochet Christmas Baubles
You won't need three completely different sets of supplies for these ornaments. The balls are all crocheted the same way. It's the colors, little embroidered details, and holly decorations that give each one its own personality.
I'd keep the yarn weight the same for all three. That way, your finished baubles will be close in size when they're hanging together.
Yarn and Tools
- Yarn: DK-weight cotton or cotton-blend yarn, weight category 3, in cranberry red, warm ivory, cinnamon brown, olive green, berry red, and cream-gold.
- Main yarn allowance: Approximately 35–45 yards each of cranberry, ivory, and cinnamon for the three ornament bodies, with additional yarn in those colors for decoration.
- Accent yarn: Small amounts of olive green and berry red for holly leaves, berries, and embroidery.
- Cap yarn: Approximately 15–20 yards total of cream-gold yarn for three caps, with additional ivory yarn for hanging cords.
- Crochet hook: 2.75 mm (US C/2) or the hook size required to obtain a firm fabric.
- Stuffing: Polyester fiberfill, approximately 5–7 grams per ornament as an initial estimate.
- Yarn needle: A blunt tapestry needle for embroidery, joining, and finishing.
- Stitch markers: One removable marker for the beginning of each round, plus a few spare markers for decoration placement.
- Scissors and measuring tape.
These are working yarn allowances, not measured consumption figures. Keep a little extra of each color available, particularly if your gauge is looser.
Colors for Each Ornament
- Peppermint Keepsake: Cranberry body, ivory bands, cream-gold cap, ivory cord.
- Winterberry Snowflake: Ivory body, cranberry embroidery, cream-gold cap, ivory cord.
- Hollyberry Gingerbread: Cinnamon body, olive-green leaves, berry-red berries, ivory trim, cream-gold cap and ivory cord.
There are no plastic eyes, beads, buttons, bells, or metal ornament caps in these patterns. All the visible decorations are made with yarn.
Size and Gauge for These Free Crochet Christmas Bauble Patterns
Each finished ornament is designed to measure approximately 2½ inches across its widest point. The crocheted cap adds a little height, and the hanging loop can be adjusted separately.
The pattern uses a firm single-crochet fabric with small spaces between stitches. If your stitches are loose enough for the stuffing to show through, go down a hook size before making all three.
Target Gauge
- 24 single-crochet stitches: Approximately 4 inches across.
- Round gauge: Aim for approximately 24 single-crochet rounds over 4 inches of crocheted fabric, measured without stretching. This is a target gauge, not the finished vertical height of the stuffed ball.
- Maximum sphere circumference: Approximately 8 inches at 48 stitches.
- Estimated body diameter: Approximately 2½ inches.
- Expected body height: Approximately 2½ inches, depending on stuffing and shaping.
- Cap width: Approximately 1 inch across its lower edge.
These are calculated target measurements. Your yarn, hook, and stuffing will determine the actual finished size.
US Crochet Abbreviations
- ch: Chain
- sc: Single crochet
- hdc: Half double crochet
- dc: Double crochet
- sl st: Slip stitch
- inc: Work 2 sc in the same stitch
- inv dec: Invisible decrease, working the front loops of the next 2 stitches together
- BLO: Back loop only
- MR: Magic ring
- st/sts: Stitch/stitches
- rnd/rnds: Round/rounds
- rep: Repeat
- FO: Fasten off
All stitch instructions use US terminology. The main balls are made in continuous spiral rounds, without joining at the end of each round. Move your stitch marker up as you work.
A number in parentheses at the end of a round gives the total number of stitches after that round is complete. Chains used for decorative scallops aren't included in the main stitch count.
Basic Crochet Bauble Pattern: The Shared Round Ball
Make this ball three times, once in cranberry red, once in ivory, and once in cinnamon brown. Don't change colors while making the spheres. All the stripes, snowflake details, and holly decorations are added afterward, which keeps the shape consistent.
Every ball begins at the top, widens through the middle, and closes at the bottom. The cream-gold cap will cover the starting rounds when the ornament is finished.
Top and Upper Curve
- Rnd 1: Make a MR. Work 6 sc into the ring. Pull the ring closed. (6)
- Rnd 2: Inc in each st around. (12)
- Rnd 3: [Sc in next st, inc in next st] 6 times. (18)
- Rnd 4: [Sc in next 2 sts, inc in next st] 6 times. (24)
- Rnd 5: [Sc in next 3 sts, inc in next st] 6 times. (30)
- Rnd 6: [Sc in next 4 sts, inc in next st] 6 times. (36)
- Rnd 7: [Sc in next 5 sts, inc in next st] 6 times. (42)
- Rnd 8: [Sc in next 6 sts, inc in next st] 6 times. (48)
Checkpoint: Count 48 stitches at the end of Round 8. Your work may look like a nearly flat circle or a shallow cup at this stage. Either is fine. Rounds 9–17 will begin forming the rounded sides. If the outer edge is visibly rippling, count your stitches now and check that you made exactly six increases in each round. If the circle is pulling into a tight bowl, check that you haven't missed an increase. Correct any counting mistake before moving to Round 9. At the target gauge, the finished middle circumference will be approximately 8 inches.
Fullest Part of the Ball
- Rnd 9: Sc in each st around. (48)
- Rnd 10: Sc in each st around. (48)
- Rnd 11: Sc in each st around. (48)
- Rnd 12: Sc in each st around. (48)
- Rnd 13: Sc in each st around. (48)
- Rnd 14: Sc in each st around. (48)
- Rnd 15: Sc in each st around. (48)
- Rnd 16: Sc in each st around. (48)
- Rnd 17: Sc in each st around. (48)
Those nine straight rounds give the ornament its full middle section. Don't add extra plain rounds unless you're deliberately changing the size and proportions of the approved design.
Lower Curve and Closing Rounds
- Rnd 18: [Sc in next 6 sts, inv dec] 6 times. (42)
- Rnd 19: [Sc in next 5 sts, inv dec] 6 times. (36)
- Rnd 20: [Sc in next 4 sts, inv dec] 6 times. (30)
- Rnd 21: [Sc in next 3 sts, inv dec] 6 times. (24)
- Rnd 22: [Sc in next 2 sts, inv dec] 6 times. (18)
- Rnd 23: [Sc in next st, inv dec] 6 times. (12)
Stuffing checkpoint: Add small amounts of fiberfill before the opening becomes too narrow. Fill the upper half first, then the sides and lower curve. The ball should feel rounded and springy rather than tightly stretched. Before working Round 24 and closing the opening, check for visible stuffing, distorted stitches, or an overly firm shape. Remove a little filling now if necessary.
- Rnd 24: Inv dec 6 times. (6)
FO, leaving a 10-inch tail. Thread the tail through the front loop of each of the remaining 6 stitches. Pull the opening closed, secure the yarn, and bury the tail inside the ball.
Roll the ornament gently between your palms to even out the stuffing. Check for a flattened top, a pointed bottom, or obvious gaps between stitches.
Shape checkpoint: The finished body should be a nearly round sphere approximately 2½ inches across. Gently smooth its shape with your hands. If the ball is much taller than it is wide, compare your actual round gauge with the target before making the next ornament. The stuffing adjustment must be completed before the final opening is closed.
Repeat this complete 24-round pattern in the other two colors. You'll have three plain spheres ready for their individual decorations.
1. Peppermint Keepsake Crochet Bauble
The peppermint bauble is the simplest of the three to decorate. Its cranberry body stays completely red while you add four rows of little ivory dashes and two raised lines around the middle.
Those staggered dashes are worth keeping. Ordinary red-and-white stripes would give you a different ornament, and the interrupted pattern is part of what makes this one recognizable.
Embroider the Four Rows of Ivory Dashes
You'll work two rows above the middle ridge and two below it. Use a tapestry needle and ivory yarn. Keep the stitches on the surface rather than pulling them down into the stuffing.
- Set the beginning-of-round line at the back of your bauble. Count the stitch columns around each of the 48-stitch middle rounds from that point.
- Upper dash row, Round 10: Make one short horizontal ivory running stitch across stitch columns 1–2. Leave columns 3–4 red. Repeat this four-column pattern around the ornament, making 12 evenly spaced dashes.
- Second upper row, Round 11: Offset the pattern by two stitch columns. Make the first dash across columns 3–4, leave the next two columns red, and repeat every four columns. The final dash spans columns 47–48. Make 12 dashes.
- First lower row, Round 15: Repeat the placement used for Round 10, beginning across columns 1–2. Make 12 ivory dashes.
- Second lower row, Round 16: Repeat the offset placement used for Round 11, beginning across columns 3–4. Make 12 ivory dashes.
Checkpoint: You should have 48 short dashes altogether, with 24 above the center and 24 below. Each pair of rows has a staggered pattern, with every dash separated by two uncovered cranberry stitches.
Crochet the Raised Ivory Center Ridge
The narrow raised center band separates the two sets of dashes. You'll make it with surface slip stitches, so there's no need to undo any part of the red ball.
- Hold the stuffed ball with Round 13 facing you. Insert the hook beneath the surface of the first stitch post, keeping the hook outside the stuffing.
- Pull an ivory loop through the fabric. Insert the hook under the next stitch post, draw up another loop, and pull it through the loop already on your hook. That's one surface slip stitch.
- Continue across all 48 stitch posts in Round 13. Join the last surface slip stitch to the first, keeping the line loose enough that it doesn't squeeze the ball.
- Fasten off and bury both yarn ends inside the ornament.
- Repeat the same surface-slip-stitch method around Round 14, making a second parallel line of 48 surface slip stitches.
Keep the two ivory lines close together. They form the raised middle ridge shown in the finished ornament without covering the red stitches above and below.
Final check: Look at the front of the bauble. The top dashes, center ridge, and lower dashes should be level and balanced. If one ivory line is pulling the red body inward, remove that line and work it again with slightly looser surface stitches.
That's your peppermint bauble finished, apart from its cream-gold cap and hanging loop.
2. Winterberry Snowflake Crochet Bauble
This one has a little more personality than a plain white Christmas ball. The red snowflake is large enough to stand out, but the ivory background still shows around its branches. Six little red dots and a broken red border near the bottom finish it without making it too busy.
The snowflake is embroidered onto the completed ivory sphere. You won't need to crochet a separate snowflake and sew it on.
Mark the Snowflake Placement
Place a removable marker at the center of the front of the ivory bauble, approximately at Round 13. This will be the middle of your snowflake.
For the placement directions below, imagine a small grid drawn over the front of the ball. Each horizontal unit is one stitch column. Each vertical unit is one crochet round. Count left and right from the center marker, and up or down from Round 13.
The first number in each coordinate means stitch columns left or right. The second number means rounds above or below the center. For example, (-2, -1) means two stitch columns left and one round above the center. Keep this grid visually upright on the sphere, since the beginning of spiral rounds may lean slightly.
Embroider the Diamond-Shaped Center
- Thread the tapestry needle with two strands of cranberry yarn held together for a raised line. Secure the starting end inside the stuffed sphere.
- Mark four points around the center: top (0, -2), right (+2, 0), bottom (0, +2), and left (-2, 0).
- Use short backstitches to connect the top point to the right point.
- Continue from right to bottom, bottom to left, and left back to top.
- Keep the middle of the diamond open so a small ivory diamond remains visible.
The four sides should form a neat little diamond rather than a solid red knot. This is the center detail shown in the example image.
For the little raised ivory detail visible inside the red diamond, thread a tapestry needle with one strand of ivory yarn. Make four short stitches forming a smaller diamond inside the red outline: from (0, -1) to (+1, 0), from (+1, 0) to (0, +1), from (0, +1) to (-1, 0), and from (-1, 0) back to (0, -1). Leave the tiny center opening visible. Keep these ivory stitches slightly raised without pulling the red outline inward. Secure and bury the yarn ends.
Embroider the Six Snowflake Arms
- Top arm: From the top diamond point at (0, -2), work a straight red line upward to (0, -5).
- Bottom arm: From the bottom diamond point at (0, +2), work a straight line downward to (0, +6).
- Upper-left arm: From (-2, 0), stitch through (-4, -1), then (-6, -3), and finish at (-8, -4).
- Upper-right arm: Mirror the upper-left arm, beginning at (+2, 0), passing through (+4, -1) and (+6, -3), and finishing at (+8, -4).
- Lower-left arm: From (-2, 0), stitch through (-4, +1), then (-6, +3), and finish at (-8, +4).
- Lower-right arm: Mirror the lower-left arm, beginning at (+2, 0), passing through (+4, +1) and (+6, +3), and finishing at (+8, +4).
Use backstitches no longer than about two stitch columns or two rounds at a time. Several small stitches make a controlled raised line and are less likely to catch than one long strand stretched across the surface.
Add the Forked Snowflake Branches
Change to a single strand of cranberry yarn for the little branches. These smaller stitches give the snowflake its delicate shape.
- Top arm: Make the first pair of twigs from (0, -3) to (-2, -4) and (+2, -4). Make a second, smaller pair from (0, -4) to (-1, -5) and (+1, -5).
- Bottom arm: Make the first pair from (0, +4) to (-2, +5) and (+2, +5). Make the second pair from (0, +5) to (-1, +6) and (+1, +6).
- Upper-left arm: Add two inner twigs from (-4, -1) to (-4, -3) and (-6, -1). Add two outer twigs from (-6, -3) to (-6, -5) and (-8, -3).
- Upper-right arm: Mirror the upper-left branches. Work from (+4, -1) to (+4, -3) and (+6, -1). Then work from (+6, -3) to (+6, -5) and (+8, -3).
- Lower-left arm: Work from (-4, +1) to (-4, +3) and (-6, +1). Then work from (-6, +3) to (-6, +5) and (-8, +3).
- Lower-right arm: Mirror the lower-left branches. Work from (+4, +1) to (+4, +3) and (+6, +1). Then work from (+6, +3) to (+6, +5) and (+8, +3).
Keep the branch stitches small. They should look like little forks growing from the snowflake arms, not separate decorations scattered around the ball.
Add Six Red Accent Dots
Use a single strand of cranberry yarn to embroider six small French knots around the snowflake.
- Make the upper-left dot at approximately (-4, -5).
- Make the upper-right dot at approximately (+4, -5).
- Make the middle-left dot at (-11, 0).
- Make the middle-right dot at (+11, 0).
- Make the lower-left dot at approximately (-4, +5).
- Make the lower-right dot at approximately (+4, +5).
For each dot, bring the needle up through the crochet fabric, wrap the yarn around the needle three times, and return the needle close to where it emerged. Hold the wraps gently against the fabric while pulling the needle through.
French knot checkpoint: Make the first dot and check that it sits on top of the ivory stitches. If the knot pulls through, don't make the other five yet. Bring the needle up through the yarn of a crochet stitch rather than an open gap, then take it back down through the fabric a tiny distance away from the starting point. The knot should stay rounded and visible without pulling the ivory fabric inward.
Six little knots are plenty. The snowflake is still the main decoration.
Embroider the Lower Red Border
- Locate Round 20 near the lower curve of the ivory sphere. This round has 30 stitches.
- Using cranberry yarn, make one short horizontal running stitch over the first stitch.
- Leave the next stitch uncovered.
- Continue alternating one red dash and one uncovered ivory stitch around the entire round.
- After 30 stitch positions, you will have 15 small red dashes. Secure and bury the yarn ends.
Final check: The snowflake should have exactly six main arms, a visible diamond at its center, smaller forked branches, and six red dots. The lower red border stays separate from the snowflake.
If the embroidery appears crooked, check the center diamond before adjusting individual branches. A centered diamond gives the entire motif its balance.
3. Hollyberry Gingerbread Crochet Bauble
The cinnamon-colored bauble brings something different to the collection. Instead of another stripe or snowflake, it has a circle of tiny green holly leaves and red berries between two ivory decorative borders.
I'd keep the holly decorations small. The cinnamon yarn is meant to show, and six tidy clusters around the middle give the bauble a festive look without hiding the crochet underneath.
Crochet the Two Ivory Scalloped Borders
These are raised surface borders, not separate strips that have to be sewn on later. Work one around Round 10 and the other around Round 17 of the cinnamon sphere.
- Hold the ball with the beginning-of-round area facing the back. Join ivory yarn at the surface of the first stitch post in Round 10 with a surface slip stitch.
- Ch 2 and skip the next body stitch post.
- Insert the hook beneath the following stitch post and work another surface slip stitch.
- Repeat the pattern of ch 2, skip one post, and surface slip stitch into the next post around Round 10.
- After anchoring into 24 alternating stitch posts, make the final ch 2 and join to the first surface slip stitch. There will be 24 small ivory arches.
- Fasten off and bury the ends inside the sphere.
- Repeat the same instructions around Round 17, making a second border of 24 ivory arches.
Keep the arches loose enough to sit gently on the brown fabric. They should look like little ivory scallops around the ornament rather than tight bands squeezing the stuffing.
Crochet the Green Holly Leaves
Make 12 small leaves. Each holly cluster uses two leaves, so six clusters will require twelve altogether.
The leaves are crocheted around a short foundation chain. A few tiny picots give their edges the pointed holly shape visible in the finished design.
- With olive-green yarn, ch 7.
- Beginning in the second ch from the hook, sl st in the first ch.
- Sc in the next ch.
- Hdc in the next ch. Immediately ch 2 and sl st into the first of those two new chains to form a small picot.
- Dc in the next foundation ch.
- Hdc in the next foundation ch. Make another ch-2 picot in the same way.
- Sc in the final foundation ch. You have now worked across all six available foundation chains.
- Ch 1 and rotate the work to reach the unused loops on the opposite side of the foundation chain.
- Sc in the first unused loop.
- Hdc in the next unused loop, followed immediately by a ch-2 picot.
- Dc in the next unused loop.
- Hdc in the next unused loop, followed by another ch-2 picot.
- Sc in the next unused loop.
- Sl st in the final unused loop near the pointed starting tip.
- FO, leaving a 10-inch tail. Pass the finishing tail through stitches on the underside of the leaf to bring it back toward the base for sewing.
Leaf checkpoint: Each leaf has six stitches worked along each side of its foundation chain, plus four small decorative picots. There are no skipped foundation chains between the leaf stitches.
Flatten the leaf gently, keeping the pointed edge details visible. Make the remaining eleven leaves the same way.
Crochet the Tiny Red Holly Berries
Make 18 berries. Each cluster will have three, and they are small enough to make from yarn without plastic beads or other added pieces.
- Rnd 1: With berry-red yarn, make a MR and work 4 sc into the ring. Pull the ring closed. (4)
- Rnd 2: Sc in each of the 4 stitches. (4)
- FO, leaving a 10-inch tail. Thread the tail through the front loops of the four stitches in Round 2 and draw the opening closed.
- Keep the little berry rounded between your fingers. Its yarn bulk forms the center, so it doesn't require additional stuffing.
- Save the finishing tail for sewing the berry onto the ornament.
Repeat until you have 18 berries. They don't need to be perfectly identical, but keep their size consistent so one cluster doesn't look much larger than another.
Position and Sew the Six Holly Clusters
The cinnamon sphere has 48 stitches around its middle. That means you can divide the ornament into six equal spaces, with eight stitches between the center of each holly cluster.
- On Round 13, mark stitch positions 1, 9, 17, 25, 33, and 41. These will be the six cluster centers.
- At the first marked position, lay two green leaves in a shallow V. Their bases meet near Round 14, and their pointed tips angle outward and upward toward Round 11.
- Position the left leaf tip about three stitch columns left of the marked center and the right leaf tip about three columns right. Allow the two leaves to overlap slightly at their bases.
- With the green yarn tails, sew each leaf at its base and through several points along its centerline. Leave the pointed edges slightly raised rather than stitching them completely flat.
- Place the first red berry over the joined leaf bases, approximately at the marked center on Round 13.
- Position the other two berries immediately below it on Round 14, one slightly left and one slightly right.
- Use the remaining red yarn tails to stitch each berry securely through its crocheted body and into the cinnamon ball several times. Bury the tails inside the stuffed sphere.
- Repeat the same arrangement at the other five marked positions.
When all six clusters are attached, you'll have twelve green leaves and eighteen red berries spaced around the ornament.
Holly checkpoint: Every cluster contains two leaves and three berries. The berries sit over the joined leaf bases, and the two ivory borders remain visible above and below the holly band.
Look at the bauble from the side and then turn it around. The holly decoration should continue around the entire middle, not stop at the edges of the section visible in the photograph.
This is the most detailed ornament of the three, but the repeated clusters keep the construction straightforward. Once you've made one, the next five are exactly the same.
Crochet the Matching Caps and Hanging Loops
Now for the little cream-gold caps that bring the whole collection together. All three ornaments get the same cap, complete with a raised ridge, a scalloped lower edge, and a soft ivory hanging loop.
I'd keep these identical. The decorations on the balls are different enough already, and matching caps make the three ornaments look like a set.
Crochet the Cream-Gold Ornament Cap
Make 3 caps. Work in continuous rounds until the scalloped edging.
- Rnd 1: With cream-gold yarn, make a MR and work 6 sc into the ring. Pull closed. (6)
- Rnd 2: Inc in each stitch around. (12)
- Rnd 3: [Sc in next st, inc in next st] 6 times. (18)
- Rnd 4: Working in BLO, sc in each stitch around. (18)
- Rnd 5, scalloped edge: [Sl st in next stitch, ch 2, skip next stitch] 9 times. After the ninth ch 2, join to the first slip-stitch anchor. (9 scallops)
FO, leaving a 12-inch tail for sewing the cap onto the ornament.
Add the Raised Detail to the Cap
- Find the unused front loops of Round 3. These loops were left available when Round 4 was crocheted in the back loops only.
- Join a fresh strand of cream-gold yarn in one of those unused front loops.
- Work one loose surface slip stitch into each of the 18 exposed front loops.
- Join the final surface stitch to the first. Fasten off and hide the ends inside the cap.
You'll have a little raised ring above the scalloped edge. The top of the cap stays rounded, and the scallops flare gently around its base.
Attach the Cap to the Bauble
- Place the cap over the top of the finished sphere, centering it over the starting magic ring.
- Position the cap so its 18-stitch Round 4 edge rests against Round 3 of the sphere, which also contains 18 stitches. The nine scallops should extend loosely toward Round 4 of the sphere.
- Using the 12-inch cream-gold sewing tail, sew the base of the first cap Round 4 stitch to the first corresponding stitch of sphere Round 3.
- Continue around the cap, matching each of its remaining 17 Round 4 stitches to one corresponding stitch of sphere Round 3. Make 18 evenly spaced attachment stitches altogether.
- Keep the attachment stitches firm but not tight. Do not sew down or stretch the nine scallops. They should rest freely over the sphere's upper curve.
- Secure the sewing yarn and bury the remaining tail inside the sphere. Check that the cap is centered and that the sphere has not gathered beneath it.
Cap checkpoint: Each cap has 18 stitches around its lower body, nine scallops, and one raised decorative ring. The cap should stay centered without flattening the top of the ornament.
Make the Twisted Ivory Hanging Cord
The example image has soft ivory twisted cords rather than metal ornament hooks. You can make the same style from your leftover ivory yarn.
Make 3 cords.
- For the peppermint and hollyberry baubles, cut two 14-inch lengths of ivory yarn for each cord. If you're recreating the staggered hanging arrangement in the main page image, cut two 22-inch lengths for the center snowflake cord instead. For three equal-height loops, use the 14-inch lengths for all three ornaments.
- Hold the two strands together. Keep one end steady and twist the other end clockwise until the strands are evenly twisted.
- Fold the twisted length in half. Allow the two halves to twist around one another, forming a thicker cord.
- Temporarily secure the loose yarn ends so the new cord doesn't unravel.
- Bend the finished twisted cord into an upside-down U. Bring its folded end and four loose yarn tails down to opposite sides of the cap's top center. The middle of the cord forms the highest point of the hanging loop.
- Using a blunt tapestry needle, pass the four loose tails through stitches on one side of the cap crown and into the top of the sphere. Secure the tails through several different top stitches and bury them inside the ball.
- With a separate strand of ivory yarn, sew the cord's folded end firmly to the opposite side of the cap crown. Pass the attachment stitches through both the cap and the crocheted sphere several times. Secure and bury the sewing yarn.
- Check that both ends of the U-shaped cord are firmly attached to the ornament, leaving an open hanging loop between them.
With the standard 14-inch yarn lengths, the finished hanging loop is expected to stand approximately 3 inches high. The longer snowflake cord may form a loop around 5 inches high, allowing the center ornament to hang about 2 inches lower, as shown in the main page image. Twisting shortens the yarn, so these measurements are approximate. For equal-height Christmas tree ornaments, make all three loops the same length.
If you're making the baubles for a hanging Christmas mobile, the finished cord lengths can be adjusted to suit that particular display. Keep all cords and decorative pieces completely beyond a baby's reach.
Hanging-loop checkpoint: Gently pull on the loop while holding the ornament. It should remain attached to the cap and ball without shifting the cap or pulling open the center stitches. Check every attachment stitch before hanging the decoration.
Stuffing, Shaping and Finishing Your Christmas Baubles
Before you hang your three ornaments, set them together on a table and take a look at their shapes. They don't have to be identical down to the last millimeter, but they should be close enough in size to look like a matching collection.
Check the red ball for a smooth middle ridge, the ivory ball for a balanced six-armed snowflake, and the cinnamon ball for evenly spaced holly clusters.
Final Construction Check
- Check the stuffing. The balls should be rounded without being stretched so tightly that the filling shows through the stitches.
- Check the lower closures. Each six-stitch opening should be completely drawn closed, with its yarn tail secured and buried.
- Check the decorative embroidery. Loose strands or long floating stitches can catch when the ornaments are handled or stored.
- Check each holly leaf and berry. Sew down any loose attachment points before hanging the ornament.
- Check the cream-gold caps. All three should be centered with their scalloped edges visible.
- Check the twisted ivory cords. The finished loops must be firmly secured to the caps and the crocheted balls.
- Remove all temporary stitch markers and placement threads. Check that none remain inside or attached to the finished decorations.
If a bauble looks slightly lopsided, gently reshape it with your hands. An overstuffed ball may develop a stretched middle or a pointed bottom. A little less stuffing can improve the shape if the closing rounds haven't yet been secured.
Don't add extra rows or increases just to correct the appearance. That would change the proportions of the design.

What Your Finished Set Should Include
- One cranberry Peppermint Keepsake Bauble with 48 ivory dashes and two raised center lines.
- One ivory Winterberry Snowflake Bauble with six embroidered arms, six red dots, a diamond center, and a lower dashed border.
- One cinnamon Hollyberry Gingerbread Bauble with six clusters containing 12 leaves and 18 berries altogether.
- Three matching cream-gold caps with scalloped edges.
- Three soft ivory hanging loops.
The finished ornaments can hang together from a Christmas tree, decorate a wreath, or become part of a seasonal hanging display.
For storage, keep the baubles clean and completely dry. Lay them in a box without heavy objects pressing against the raised leaves, berries, or embroidered snowflake.
Using These Crochet Baubles on a Christmas Mobile
These three ornaments were designed to look pretty hanging together, which makes them a nice addition to a gingerbread-themed Christmas mobile.
The peppermint bauble adds a bright red accent, the ivory snowflake lightens the arrangement, and the little hollyberry ornament brings in green and cinnamon brown. They coordinate with gingerbread houses and other Christmas crochet decorations without looking like three copies of the same design.
You can also look at my free crochet Christmas baby mobile pattern featuring Santa, reindeer, and other holiday decorations for another seasonal hanging project.
Keeping the Three Baubles Balanced
For a decorative hanging arrangement, I'd place the ivory snowflake near the middle, with the peppermint bauble on one side and the hollyberry bauble on the other. Their similar finished sizes help keep the collection visually balanced.
The completed ornaments will not necessarily weigh exactly the same. The hollyberry bauble contains additional leaves and berries, so check the actual weight and balance of the finished display rather than assuming all three weigh alike.
These are handmade hanging decorations, not toys for a baby to hold, mouth, or pull. The pattern has not been tested or certified as an infant mobile.
If these ornaments are included in a nursery hanging display, attach the supporting frame or hanger securely to a stable mounting point. Keep the entire handmade display away from, rather than directly above, a crib or other infant sleep space. Check the mounting, hanging loops, and attached decorations before display.
The American Academy of Pediatrics' guidance on crib mobiles states that mobiles must remain out of a baby's reach and be removed when the baby can get onto hands and knees or reaches five months of age, whichever comes first.
Never place the baubles, loose yarn, hanging cords, or detached decorations inside a crib or another infant sleep space.
For a Christmas tree or an adult decorative display, you can enjoy all three ornaments together without changing their individual patterns.
Frequently Asked Questions About Crochet Christmas Baubles
Can I use worsted-weight yarn instead of DK yarn?
Yes, but the baubles will probably finish larger if you use a larger hook to suit the yarn. The stitch counts stay the same, but the finished measurements won't match the estimated 2½-inch diameter. If you're making all three as a set, keep the yarn weight and hook size consistent.
Why does the snowflake look off-center on my bauble?
The first thing to check is the little diamond in the middle. If it isn't centered on the front of the stuffed ball, the six arms can look uneven even when you've followed the embroidery directions. Also remember that continuous crochet rounds can lean slightly. Use the visually straight center-front column as your reference, rather than assuming the starting stitch of every round makes a perfectly vertical line.
What if my holly leaves curl?
A little lift at the pointed edges is part of their shape, but the middle of each leaf should lie against the cinnamon ball. Check the stitches along the centerline and the attachment at the base. If those are loose, add a few small stitches with matching green yarn. Keep the picot points free so the leaf still looks like holly.
Can I make the baubles larger for a Christmas tree?
You can make a larger version by using thicker yarn and a suitable larger hook. Keep the same round counts for the spheres and caps, then adjust the embroidery placement and hanging cords to fit the new dimensions. The larger result is a variation rather than an exact-size reproduction of the example.
Do I need a separate crochet pattern for each bauble?
No. All three use the same 24-round ball and matching cap. The only differences are the colors and decorative instructions. Make one plain sphere in each color, then work through its individual decoration section.
And that's your set of three Christmas crochet baubles. The peppermint stripes, snowy red snowflake, and little hollyberries each have their own look, but those matching cream-gold caps bring them together beautifully.
If you're making more handmade decorations, visit my free crochet Christmas ornament patterns collection for other small projects to go with them.
When you click on links to various merchants on this site and make a purchase, this may result in this site earning a commission. This does not affect the price you pay.

UBGI Gold Standard 2026
Reviewed under the site's
editorial checklist.
Photos, decorating ideas, party setups and reader submissions are shared for inspiration unless a page is specifically presented as a pattern, tutorial, reference guide or step-by-step project. Follow the instructions, measurements, safety guidance and manufacturer directions provided for the particular project or product.
About Jan | Contact | Baby Nursery Ideas (Blog) | Site Map | Privacy Policy | Disclosure Policy | Disclaimer | Affiliate Disclosure | Earnings Disclosure | Facebook | Pinterest
I am a participant in the Amazon Services LLC Associates Program, an affiliate advertising program designed to provide a means for us to earn fees by linking to Amazon. As an Amazon Associate I earn from qualifying purchases.
Copyright © 2006-2026. All Rights Reserved.