Free Crochet Santa Doll Pattern
By Jan Bay
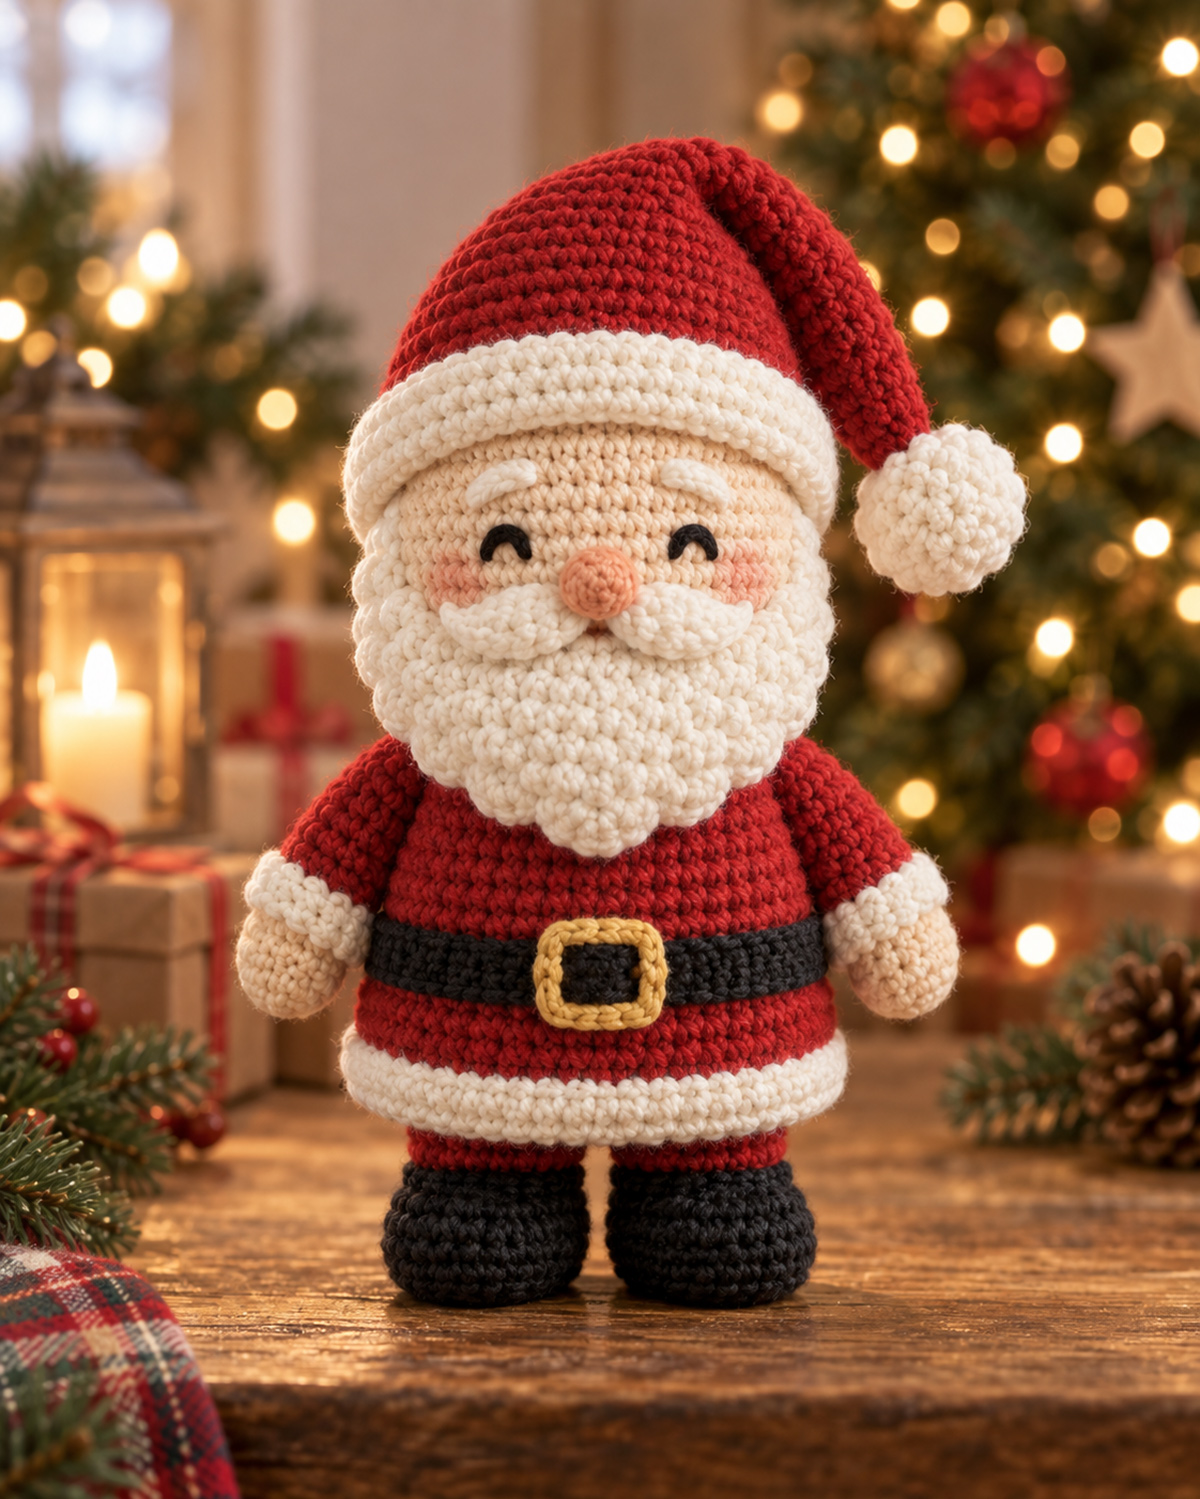
This free crochet Santa doll pattern makes a cheerful Christmas Santa with a rounded head, full white beard, long red Santa hat, classic Christmas red suit, black belt and short black boots. Santa Claus' face is easy to create with simple embroidered features and black satin stitch eyes while the simple shape keeps the Jolly Old Elf cute but not too complicated.
Explore More Free Christmas Crochet Patterns
Worsted Weight Yarn for This Project
Jump to the Crochet Santa Pattern
Pattern Notes and Abbreviations
Free Crochet Santa Doll Pattern
Materials and Supplies
I would use a smooth worsted weight yarn for this Santa rather than chenille or a fuzzy yarn. You want the shaping in his face, beard, belt and hat to stay easy to see, and a regular worsted yarn gives you much better control over those little pieces.
Yarn: Worsted weight #4 yarn in the following approximate amounts:
- Christmas red: about 100 yards
- Soft white or ivory: about 70 yards
- Warm peach or light skin tone: about 35 yards
- Black or very dark charcoal: about 30 yards
- Mustard or warm gold: about 5 yards for the buckle
- Small amount of soft pink for the cheeks
Yardage note: The yarn amounts above are planning estimates based on the stitch counts and typical worsted weight yarn use. They are not measured yarn consumption from a physically test-crocheted sample. Keep a little extra yarn available, especially if your tension is loose or you change the hook size.
Hook: 3.5 mm (E/4) crochet hook, or the hook size needed to get a firm fabric without gaps.
You'll also need:
- Polyester fiberfill, about 3 to 4 ounces
- Black embroidery floss for the eyes
- Yarn needle
- Stitch marker
- Scissors
- Straight pins for positioning the face and beard before sewing
You won't need plastic safety eyes, buttons or a separate hard belt buckle for this Santa. His eyes are embroidered with black floss and the buckle is made from yarn.
If you're making the Santa as a toy for a young child rather than as Christmas decor, sew every separate piece on very securely and check the doll regularly for loose seams or exposed stuffing. Keep the finished Santa out of an infant's crib, bassinet, play yard or other sleep space. The U.S. Consumer Product Safety Commission recommends keeping infant sleep spaces bare except for a fitted sheet. You can review the CPSC Safe Sleep guidance.
Finished Size and Gauge
The measurements below are planning targets rather than measurements taken from a physically test-crocheted sample.
With worsted weight yarn and a 3.5 mm hook, this Santa is intended to finish roughly 9 to 11 inches from the bottom of his boots to the top of his crocheted head. Treat that as an expected range rather than an exact finished size. The slouched Santa hat can add some height depending on how it falls.
The widest 54-stitch round of the lower body has a calculated circumference of about 12 inches at the reference stitch gauge below, which works out to about 3.8 inches across before differences in stuffing are taken into account.
Reference stitch gauge: About 18 single crochet stitches = 4 inches in a firm fabric. I am not using a round gauge to predict the finished height because the curved increases, decreases and stuffing in an amigurumi doll change the vertical measurement.
For an amigurumi doll, I care more about a firm fabric than a perfect gauge square. If stuffing is showing between the stitches, go down a hook size. If the fabric is so tight that you're struggling to insert the hook, go up slightly.
Pattern Notes and Abbreviations
This pattern uses U.S. crochet terms.
MR: magic ring
ch: chain
sl st: slip stitch
sc: single crochet
hdc: half double crochet
dc: double crochet
inc: work 2 sc in the same stitch
dec: single crochet decrease over the next 2 stitches
sc2tog: single crochet the next 2 stitches together
sc3tog: single crochet the next 3 stitches together
BLO: back loop only
The head, body, arms, boots, nose and pompom are worked in continuous rounds unless the instructions say otherwise. Place a stitch marker in the first stitch and move it up after every round.
Treat the round-start line on the head and body as the center back. That gives you a dependable reference when it's time to place the face, arms and belt buckle. A little natural drift in that line is fine.
The beard is worked flat in rows. The hat is worked in joined rounds so its wide white band stays even. On the hat, the beginning chain does not count as a stitch. At the end of every hat round, join with a sl st to the first stitch before beginning the next round.
Pattern status: The stitch counts, shaping and expected dimensions in this pattern have been checked mathematically against the finished design. The pattern is not presented as physically test-crocheted.
Piece count: Before everything is assembled, you should have 12 crocheted components: 1 head and body piece, 2 arms, 2 boot and leg pieces, 1 belt buckle, 1 beard, 1 nose, 2 moustache pieces, 1 Santa hat and 1 pompom.
Skill level: Confident beginner to intermediate. The stitches themselves are basic, but you'll also be shaping several pieces, embroidering the face and positioning the beard, hat, arms and boots.
For a cleaner color change, begin the final stitch in the old color and complete the last yarn-over with the new color.
Stuff firmly enough for Santa to hold his rounded shape, but stop before the stitches spread apart. Pay particular attention to the head. Overstuffing it can stretch the face and make the beard look too small.
There are four placements that really affect whether your finished doll looks like the example: keep the head round, let the beard cover most of the lower face, position the boots slightly toward the front of the body and let the long hat fall to one side. Those details are worth taking a minute to pin in place before you sew.
Free Crochet Santa Doll Pattern
Santa's Head and Body
The head and body are crocheted as one continuous piece. Start at the top of the head with the skin-tone yarn.
Round 1: Work 6 sc in a MR. (6)
Round 2: Inc in each stitch around. (12)
Round 3: (Sc in next stitch, inc in next stitch) 6 times. (18)
Round 4: (Sc in next 2 stitches, inc in next stitch) 6 times. (24)
Round 5: (Sc in next 3 stitches, inc in next stitch) 6 times. (30)
Round 6: (Sc in next 4 stitches, inc in next stitch) 6 times. (36)
Round 7: (Sc in next 5 stitches, inc in next stitch) 6 times. (42)
Round 8: (Sc in next 6 stitches, inc in next stitch) 6 times. (48)
Rounds 9 through 15: Sc in each stitch around. (48)
Round 16: (Sc in next 6 stitches, dec) 6 times. (42)
Round 17: (Sc in next 5 stitches, dec) 6 times. (36)
Round 18: (Sc in next 4 stitches, dec) 6 times. (30)
Stuff the head firmly now, paying attention to the sides so it stays round rather than becoming tall and narrow. Change to Christmas red on the final stitch of Round 18.
Round 19: (Sc in next 4 stitches, inc in next stitch) 6 times. (36)
Round 20: Sc in each stitch around. (36)
Round 21: (Sc in next 5 stitches, inc in next stitch) 6 times. (42)
Round 22: Sc in each stitch around. (42)
Round 23: (Sc in next 6 stitches, inc in next stitch) 6 times. (48)
Rounds 24 through 26: Sc in each stitch around. (48)
Change to black.
Rounds 27 through 29: Sc in each stitch around. (48)
These three black rounds form Santa's belt. Change back to red.
Round 30: Sc in each stitch around. (48)
Round 31: (Sc in next 7 stitches, inc in next stitch) 6 times. (54)
Rounds 32 through 34: Sc in each stitch around. (54)
Change to white.
Rounds 35 through 37: Sc in each stitch around. (54)
This white section makes the wide trim along the bottom of Santa's coat. Change back to red for the underside.
Round 38: (Sc in next 7 stitches, dec) 6 times. (48)
Round 39: (Sc in next 6 stitches, dec) 6 times. (42)
Round 40: (Sc in next 5 stitches, dec) 6 times. (36)
Round 41: (Sc in next 4 stitches, dec) 6 times. (30)
Round 42: (Sc in next 3 stitches, dec) 6 times. (24)
Finish stuffing the body. Keep the lower body rounded but don't pack so much stuffing into the bottom that it pushes the white coat trim outward.
Round 43: (Sc in next 2 stitches, dec) 6 times. (18)
Round 44: (Sc in next stitch, dec) 6 times. (12)
Round 45: Dec around. (6)
Fasten off. Thread the tail through the remaining 6 stitches, pull the opening closed and secure the yarn inside the body.
Arms, Make 2
Start with skin-tone yarn at the hand.
Round 1: Work 6 sc in a MR. (6)
Round 2: Inc in each stitch around. (12)
Rounds 3 and 4: Sc in each stitch around. (12)
Round 5: (Sc in next 2 stitches, dec) 3 times. (9)
Change to white for the cuff.
Round 6: (Sc in next 2 stitches, inc in next stitch) 3 times. (12)
Round 7: Sc in each stitch around. (12)
Change to red.
Rounds 8 through 11: Sc in each stitch around. (12)
Round 12: (Sc in next 2 stitches, dec) 3 times. (9)
Stuff the hand and cuff firmly. Add only a little stuffing to the red sleeve so the arm stays short and slightly soft rather than sticking straight out from the body.
Fasten off, leaving a long tail for sewing. Leave the upper opening unclosed.
Boots and Short Red Legs, Make 2
Start with black yarn. These are deliberately chunky boots because they help give Santa the short, sturdy proportions shown in the example.
Round 1: Work 6 sc in a MR. (6)
Round 2: Inc in each stitch around. (12)
Round 3: (Sc in next stitch, inc in next stitch) 6 times. (18)
Rounds 4 through 6: Sc in each stitch around. (18)
Round 7: (Sc in next 4 stitches, dec) 3 times. (15)
Change to red.
Rounds 8 and 9: Sc in each stitch around. (15)
Fasten off, leaving a long sewing tail. Stuff the black portion firmly and the red leg portion a little more lightly. Leave the top open.
Crocheted Belt Buckle
With mustard or warm gold yarn, ch 19.
Starting in the second chain from the hook, sl st in each chain across. (18 sl sts)
Fasten off, leaving a long tail. This gives you a narrow crocheted cord. Shape it into a rectangle about 1 1/8 inches wide and 3/4 inch tall. Stitch the two ends of the cord together, then center the rectangle over the black belt. Using the remaining tail, sew around all four sides of the crocheted buckle, catching the buckle cord and the black belt as you go. Return to the starting point, secure the yarn and weave in the tail. Leave the black belt showing through the middle of the rectangle.
Santa's Beard and Face
The beard is one shaped piece with five lower sections worked directly from its bottom edge. That gives Santa the full scalloped beard in the example without asking you to make and sew on a pile of separate little beard curls.
Beard
With white yarn, ch 24.
Row 1: Sc in the second chain from the hook and in each chain across. (23)
Row 2: Ch 1, turn. Sc across. (23)
Row 3: Ch 1, turn. Sc2tog, sc in next 19 stitches, sc2tog. (21)
Row 4: Ch 1, turn. Sc across. (21)
Row 5: Ch 1, turn. Sc2tog, sc in next 17 stitches, sc2tog. (19)
Row 6: Ch 1, turn. Sc across. (19)
Row 7: Ch 1, turn. Sc2tog, sc in next 15 stitches, sc2tog. (17)
Row 8: Ch 1, turn. Sc across. (17)
Fasten off. Along the bottom edge of Row 8, divide the 17 stitches from left to right into five groups: 3 stitches, 3 stitches, 5 stitches, 3 stitches and 3 stitches. Place a marker between the groups if that makes them easier to see.
Outer Beard Sections
Lay the beard flat with the 23-stitch top edge at the top. The first 3-stitch group is the left outer section and the last 3-stitch group is the right outer section. The decreases are mirrored so the two points angle away from the center evenly.
Left outer section, Row 1: Join white yarn in the first stitch of the first 3-stitch group. Ch 1 and sc in all 3 stitches. (3)
Row 2: Ch 1, turn. Sc across. (3)
Row 3: Ch 1, turn. Sc in next stitch, sc2tog. (2)
Row 4: Ch 1, turn. Sc2tog. (1)
Fasten off.
Right outer section, Row 1: Join white yarn in the first stitch of the last 3-stitch group. Ch 1 and sc in all 3 stitches. (3)
Row 2: Ch 1, turn. Sc across. (3)
Row 3: Ch 1, turn. Sc2tog, sc in last stitch. (2)
Row 4: Ch 1, turn. Sc2tog. (1)
Fasten off.
Inner Beard Sections
The second 3-stitch group is the left inner section and the fourth 3-stitch group is the right inner section. Mirror these decreases the same way.
Left inner section, Row 1: Join white yarn in the first stitch of the second 3-stitch group. Ch 1 and sc in all 3 stitches. (3)
Rows 2 and 3: For each row, ch 1, turn and sc across. (3)
Row 4: Ch 1, turn. Sc in next stitch, sc2tog. (2)
Row 5: Ch 1, turn. Sc2tog. (1)
Fasten off.
Right inner section, Row 1: Join white yarn in the first stitch of the fourth 3-stitch group. Ch 1 and sc in all 3 stitches. (3)
Rows 2 and 3: For each row, ch 1, turn and sc across. (3)
Row 4: Ch 1, turn. Sc2tog, sc in last stitch. (2)
Row 5: Ch 1, turn. Sc2tog. (1)
Fasten off.
Center Beard Section
Join white yarn to the first stitch of the center 5-stitch group.
Row 1: Ch 1 and sc in all 5 stitches. (5)
Row 2: Ch 1, turn. Sc across. (5)
Row 3: Ch 1, turn. Sc2tog, sc in next stitch, sc2tog. (3)
Rows 4 and 5: For each row, ch 1, turn and sc across. (3)
Row 6: Ch 1, turn. Sc3tog. (1)
Fasten off and weave the short ends into the back of the beard.
Don't sew the beard on yet. Finish the eyes, cheeks and nose first so you can see the whole face while you're placing them.
Embroidered Eyes
Find the center front of the head opposite the round-start line. Place the eyes around Rounds 11 and 12. Each eye should cover about 2 stitches, with roughly 5 stitches between the inside edges of the eyes.
Use several close satin stitches of black embroidery floss to make each eye. Curve the outer ends very slightly upward to get the cheerful closed-eye expression shown in the finished Santa.
White Eyebrows and Pink Cheeks
With white yarn, make a short slightly curved eyebrow about one round above each eye. Two or three small stitches are enough. Keep them thin so they don't compete with the wide white hat band.
With soft pink yarn, make 3 short horizontal stitches on each cheek just below and slightly outside the eyes. Keep the blush small and flat.
Crocheted Nose
With the skin-tone yarn, work 6 sc in a MR. (6)
Round 2: Inc in each stitch around. (12)
Round 3: Sc in each stitch around. (12)
Round 4: Dec around. (6)
Add a tiny amount of stuffing. Fasten off with a long tail but leave the 6-stitch opening unclosed. Center the opening against the face around Rounds 12 and 13. Sew all 6 opening stitches securely to the head, working completely around the base of the nose. Return to the starting point, secure the yarn and bury the tail inside the head.
Moustache, Make 2
With white yarn, ch 5.
Starting in the second chain from the hook, work 1 sc in the next chain, 1 hdc in the next chain, 1 dc in the next chain and 5 dc in the final chain.
Continue around the opposite side of the foundation chain. Work 1 dc in the next chain, 1 hdc in the next chain and 1 sc in the final chain. Join with a sl st to the first sc.
Fasten off, leaving a sewing tail.
Putting the Beard and Moustache on the Face
Center the beard over the lower half of the face. The top edge should sit just below the nose, with the two upper corners curving slightly upward toward the cheeks. The long center section should hang lowest and can overlap the top of the red body a little. That's what gives this Santa his big white beard instead of a small chin beard.
Pin it before you sew. Sew the 23-stitch top edge of the beard securely across the lower front of the head. Then sew down each side edge, catching the beard at each row end and anchoring it to the head. Leave all five lower beard sections free rather than sewing them flat. They need a little movement to keep the beard from looking like a flat bib.
Place the two moustache pieces directly below the nose. Put the narrow ends together at the center and angle the fuller rounded ends slightly upward and outward. Sew the foundation-chain edge of each moustache piece to the upper edge of the beard, working from the center toward the outer end and back again. Leave the rounded double-crochet edge free so the moustache keeps the raised shape shown in the example.
Crochet Santa Hat for the Doll
This is the doll-size Santa hat used for this project. It is not a wearable infant, child or adult Santa hat.
The long hat is a big part of this Santa's look, so I wouldn't shorten it into a little pointed cap. The wide white band should fit around the head and the red section should have enough length to bend naturally to one side.
With white yarn, ch 48. Without twisting the chain, join with a sl st to the first chain to form a ring.
Round 1: Ch 1. Hdc in each chain around. Join with a sl st to the first hdc. (48)
Rounds 2 through 4: Ch 1. Hdc BLO in each stitch around. Join with a sl st. (48)
Fit check: Before changing to red, slip the white band over Santa's head. It should fit snugly without stretching the face or buckling away from the head. If the band is noticeably too tight or too loose, correct your tension or hook size before continuing with the red part of the hat. Keep the 48-stitch count unchanged.
Change to red. Continue in joined rounds. Ch 1 at the beginning of each round. The ch 1 does not count as a stitch.
Rounds 5 and 6: Sc in each stitch around. (48)
Round 7: (Sc in next 6 stitches, dec) 6 times. (42)
Rounds 8 and 9: Sc in each stitch around. (42)
Round 10: (Sc in next 5 stitches, dec) 6 times. (36)
Rounds 11 and 12: Sc in each stitch around. (36)
Round 13: (Sc in next 4 stitches, dec) 6 times. (30)
Rounds 14 and 15: Sc in each stitch around. (30)
Round 16: (Sc in next 3 stitches, dec) 6 times. (24)
Rounds 17 and 18: Sc in each stitch around. (24)
Round 19: (Sc in next 2 stitches, dec) 6 times. (18)
Rounds 20 and 21: Sc in each stitch around. (18)
Round 22: (Sc in next stitch, dec) 6 times. (12)
Rounds 23 and 24: Sc in each stitch around. (12)
Round 25: Dec around. (6)
Rounds 26 through 28: Sc in each stitch around. (6)
Fasten off and close the tip.
Crocheted White Pompom
With white yarn, work 6 sc in a MR. (6)
Round 2: Inc in each stitch around. (12)
Round 3: (Sc in next stitch, inc in next stitch) 6 times. (18)
Round 4: Sc in each stitch around. (18)
Round 5: (Sc in next stitch, dec) 6 times. (12)
Add stuffing.
Round 6: Dec around. (6)
Fasten off with a long tail and close the 6-stitch opening. Place the closed opening against the narrow red tip of the hat. Sew through the base of the pompom and the hat tip several times around the entire base of the pompom, return to the starting point and secure the yarn inside the hat.
Put the hat on Santa with the joined-round seam at the center back and the white band sitting low enough to frame the forehead but not cover the eyebrows. Let the red section bend toward one side. Once you like the position, use white yarn to sew the lower edge of the brim securely to the head all the way around. Keep the stitches small and hidden inside the white band, return to the starting point and secure the yarn inside the head.
Assembly and Finishing
By this point Santa should already have his face, beard, belt and hat. The last job is getting the arms and boots in the right places. Pin them first. Moving a boot even 1/4 inch can change whether the doll looks balanced.
Attach the Boots
Place the two boots under the body with the red leg sections against the red underside below the white coat trim. Leave a small gap between the boots, about 1/2 inch at the front.
Move the boots slightly toward the front rather than centering them directly under the middle of the body. This matches the short-footed stance in the example and gives the round body a better base.
Pin both boots. Set Santa upright on a flat surface and look at him from the front and side. If he leans backward, move the boots a little farther forward. If he pitches forward, move them back slightly.
Once you're happy with the position, use the long sewing tail to attach all 15 stitches around the open red top of each leg to solid stitches in the underside of the body. Work completely around the opening, then make a second pass through the attachment if needed before securing and weaving in the tail.
Attach the Arms
Place one arm on each side of the upper red body around Rounds 22 through 25. Keep the white cuff and skin-tone hand completely visible.
The arms should angle slightly downward. Don't set them straight out from the shoulders.
Use the long sewing tail to attach all 9 stitches around the open upper edge of each arm to the body. Work completely around the opening and secure the tail. Add a few small stitches along the upper inside edge of each sleeve if you want the arms to stay close to Santa's sides.
Check the Belt and Coat Trim
Center the gold buckle on the front of the three black belt rounds. Make sure it sits level before finishing the last sewing stitches.
Run your fingers around the white coat trim and gently shape it into an even band around the widest part of the lower body. It should sit smoothly without curling or flaring like a skirt.
Final Shaping
Roll the head gently between your hands if the stuffing has made one side flatter than the other. Shape the beard so the center section hangs lowest and the two moustache pieces sit evenly under the nose.
Then bend the red hat gently to one side and let the crocheted pompom hang beside the head. You don't need wire inside it. The narrow tip should be soft enough to fall over on its own.
That's enough. The full beard, wide white hat band, black belt and chunky boots already give him plenty of Christmas personality without adding buttons or more little pieces.
Final Check
Remove every straight pin and stitch marker before the Santa is finished. Weave in all remaining yarn tails and trim them only after they are secure.
Give each arm, boot, the beard, both moustache pieces, the nose, hat, pompom and belt buckle a gentle tug. Reinforce anything that shifts. Check the seams for visible stuffing and make sure no loose yarn end or temporary marker remains inside or outside the doll.
If you're putting together a little group of handmade Christmas characters, the free crochet snowman pattern and free crochet reindeer pattern give you two more recognizable Christmas figures without changing the whole style of the display.
When you click on links to various merchants on this site and make a purchase, this may result in this site earning a commission. This does not affect the price you pay.

UBGI Gold Standard 2026
Reviewed under the site's
editorial checklist.
Photos, decorating ideas, party setups and reader submissions are shared for inspiration unless a page is specifically presented as a pattern, tutorial, reference guide or step-by-step project. Follow the instructions, measurements, safety guidance and manufacturer directions provided for the particular project or product.
About Jan | Contact | Baby Nursery Ideas (Blog) | Site Map | Privacy Policy | Disclosure Policy | Disclaimer | Affiliate Disclosure | Earnings Disclosure | Facebook | Pinterest
I am a participant in the Amazon Services LLC Associates Program, an affiliate advertising program designed to provide a means for us to earn fees by linking to Amazon. As an Amazon Associate I earn from qualifying purchases.
Copyright © 2006-2026. All Rights Reserved.