Free Crochet Wall Organizer Pattern for a Woodland Nursery
By Jan Bay
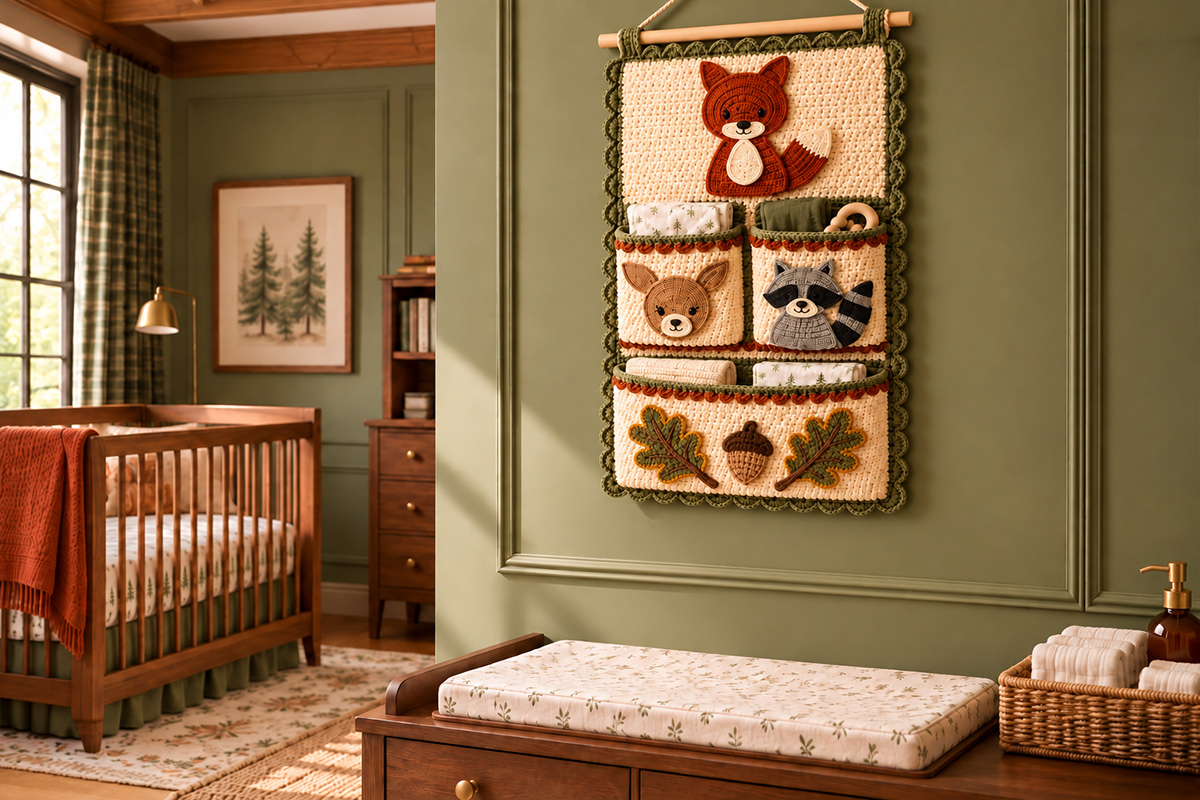
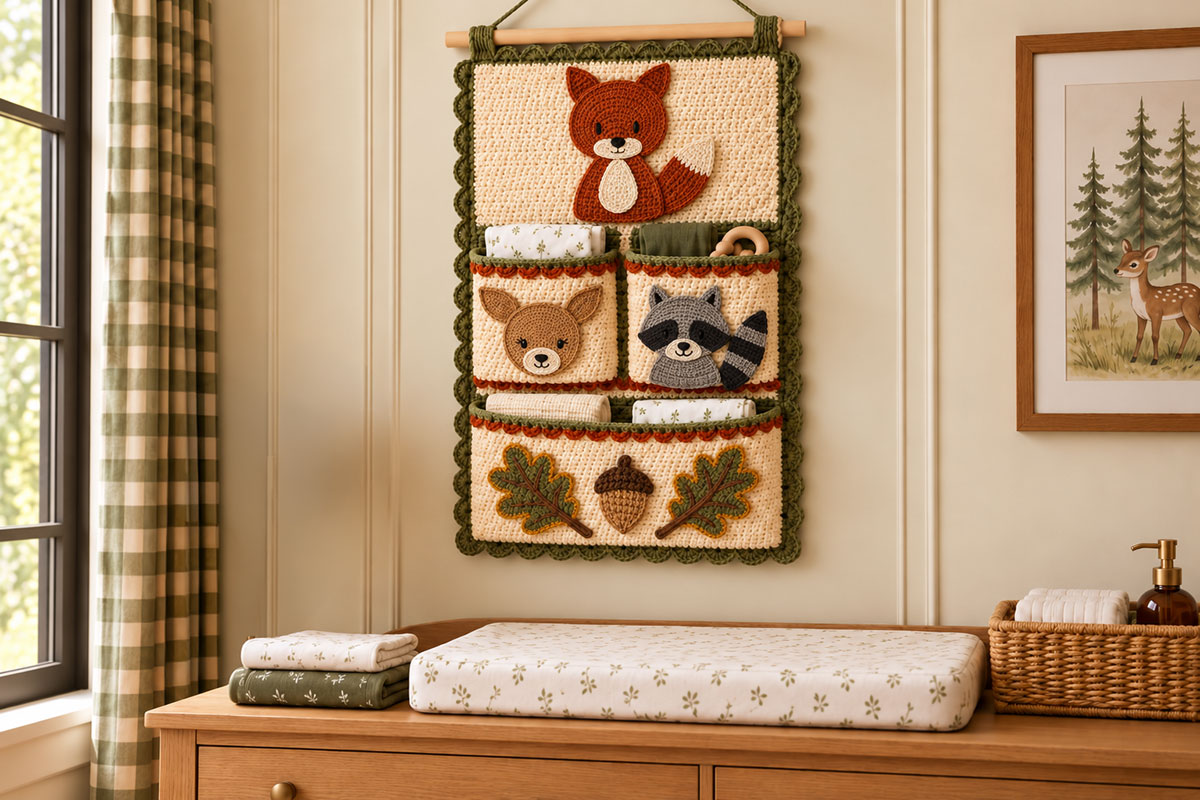
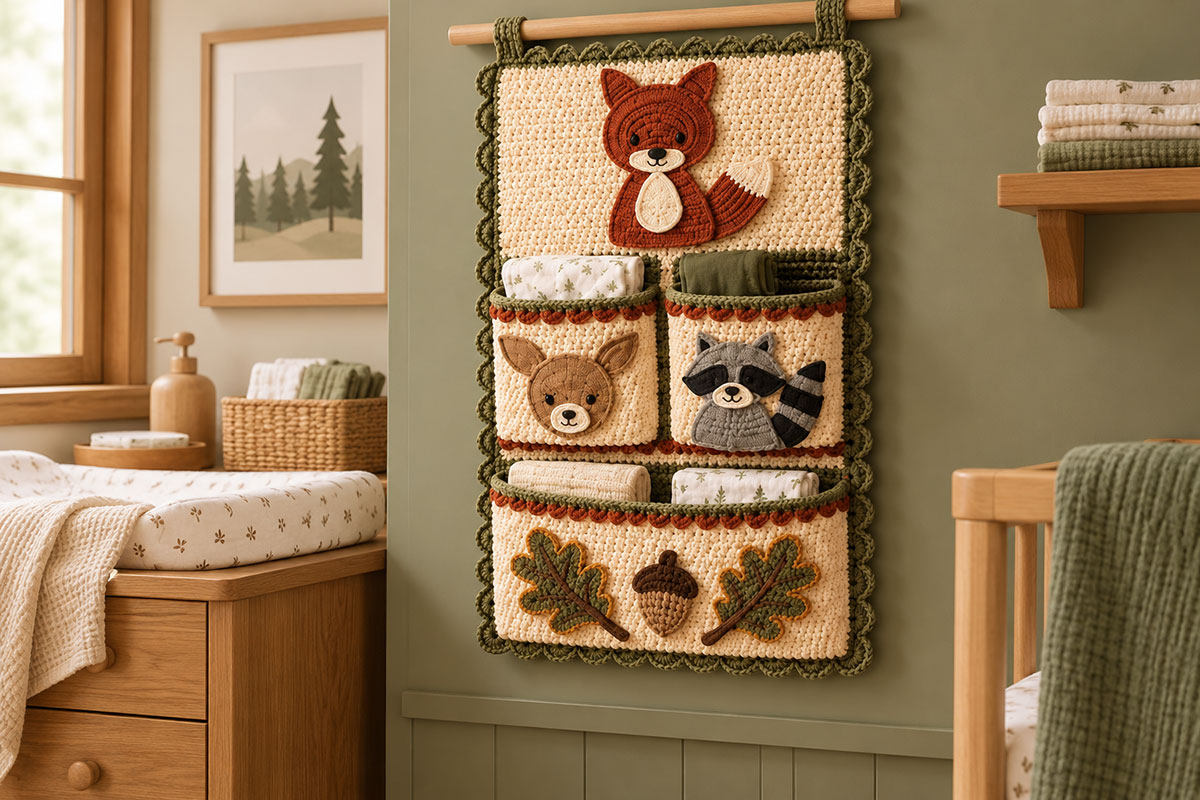
This free crochet wall organizer pattern makes a roomy woodland nursery organizer with both large and small pockets, perfect for tucking away those hard-to-corral toys and everyday items like diapering supplies, an extra pacifier or a teether. You can also decorate your wall hanging with crocheted forest animal appliqués and other motifs using my patterns. My example features a fox, deer, raccoon, oak leaves and an acorn, but you can mix and match the appliqués to suit your nursery. What a delightful way to turn practical wall storage into handmade nursery décor.
Explore More Nursery Storage & Crochet Patterns
See My Preferred Wooden Dowel Rods for Crochet Wall Hangings
Jump to:
Crochet Wall Organizer Pattern Materials
I’d use a smooth worsted weight cotton or cotton-rich yarn for the organizer itself. The pockets need enough body to hold their shape, so I wouldn’t choose a very soft, stretchy yarn here. Save those drapier yarns for blankets and loveys.
The amounts below are calculated estimates rather than amounts measured from a physically test-crocheted sample. Yarn brand, tension and the amount used for finishing can change what you need.
- Worsted weight #4 yarn in warm cream or ivory, approximately 750 to 850 yards
- Worsted weight #4 yarn in muted sage or olive green, approximately 120 to 150 yards
- Worsted weight #4 yarn in muted rust, approximately 40 to 60 yards
- 4 mm (G/6) crochet hook for the organizer
- Wooden dowel approximately 24 inches long and 5/8 to 3/4 inch in diameter
- Strong cotton cord for hanging
- Yarn needle
- Scissors
- Stitch markers
- Rustproof pins for appliqué placement
- Measuring tape
You’ll also need the yarn and hook sizes called for in the individual woodland appliqué patterns. I would make those at their established sizes instead of trying to shrink everything to fit a small organizer. The pockets on this one were sized around the appliqués.
For the animal motifs, use my crochet fox appliqué pattern, crochet deer appliqué pattern and crochet raccoon appliqué pattern. Each of those pages includes the complete pattern for the animal shown on this organizer.
The lower pocket uses two of the larger oak leaf appliqués and one acorn. Make them using my oak leaf and acorn crochet appliqué pattern, and keep them at their original pattern sizes.
Abbreviations
- ch = chain
- sc = single crochet
- hdc = half double crochet
- dc = double crochet
- sl st = slip stitch
- st = stitch
- sts = stitches
All crochet terms are standard U.S. terms. A turning chain does not count as a stitch unless the instructions specifically say otherwise.
Finished Size and Gauge
The finished wall organizer is expected to measure approximately 22 inches wide by 30 inches tall after the outer edging is added. The hanging cord above the wooden dowel is not included in that measurement.
The main cream panel before edging is expected to measure approximately 20 1/2 inches wide by 28 1/2 inches tall.
Organizer gauge: approximately 14 single crochet stitches and 16 rows = 4 inches with the 4 mm hook.
Check this gauge before making the full panel. A 72-stitch row should measure about 20 1/2 inches without stretching. If yours is several inches wider or narrower, change hook size now. The appliqués and pockets were planned around this finished width.
The finished measurements are calculated from the stated gauge. This organizer has not been physically test-crocheted from beginning to end, so treat the measurements and yarn amounts as expected values and check your work against the measurement points as you go.
Expected Piece Sizes
- Main back panel before edging: about 20 1/2 × 28 1/2 inches
- Each middle pocket: about 9 1/2 × 8 1/2 inches
- Lower pocket: about 19 1/2 × 9 1/2 inches
- Finished organizer after edging: about 22 × 30 inches
That extra width matters. The fox appliqué can reach roughly 6 to 7 inches across, while the raccoon appliqué has a head about 4 inches across with its striped tail positioned beside the body. A skimpy little pocket would look crowded. These won’t.
Crochet the Main Organizer Panel
Use cream yarn and the 4 mm hook.
Foundation: Ch 73.
Row 1: Sc in the second ch from the hook and in each ch across. Turn. (72 sts)
Rows 2 through 114: Ch 1. Sc in each st across. Turn. (72 sts)
Fasten off after Row 114.
Lay the panel flat without stretching it. At the stated gauge it should measure approximately 20 1/2 inches wide by 28 1/2 inches tall.
Keep the panel rectangular. If one side is beginning to creep outward, count the stitches before going any farther. There should be 72 stitches in every row.
Lightly block the panel now if needed. I’d do that before adding pockets because it’s much easier to square one flat rectangle than a finished organizer with three pockets attached to it.
For placement, think of the panel from bottom to top like this:
- Rows 1 through 38: lower pocket zone
- Rows 39 through 42: open cream separation
- Rows 43 through 76: middle pocket zone
- Rows 77 through 114: open upper panel for the fox
That upper section stays plain. No stripes, no little flower sprays and no extra filler motifs. The fox has enough color and detail by itself.
Make the Two Middle Pockets
Make two matching pocket fronts.
Use cream yarn.
Foundation: Ch 34.
Row 1: Sc in the second ch from the hook and in each ch across. Turn. (33 sts)
Rows 2 through 33: Ch 1. Sc in each st across. Turn. (33 sts)
Change to sage or olive green.
Row 34 - Sage top edge: Ch 1. Working in the back loops only of Row 33, sc in each st across. (33 sts)
Fasten off the sage yarn.
Rust scallop trim: With the right side of the pocket facing you and the sage top edge at the top, join rust yarn in the unused front loop of the first stitch of Row 33. Working in the unused front loops only, repeat [sl st in next st, 3 hdc in next st, sl st in next st] across. (11 small rust scallops)
Fasten off the rust yarn and weave in the ends that will not be used for sewing.
Make the second pocket exactly the same way.
At the stated gauge, each pocket should finish at approximately 9 1/2 inches wide and about 8 1/2 inches high including the top trim.
The scallops belong only along the pocket opening. Keep them small. We want a little color and texture, not a ruffle that catches every time you reach into the pocket.
Check the Middle Pocket Layout
Lay the main panel flat with Row 1 at the bottom.
Place the first pocket over Rows 43 through 76. Leave approximately two back-panel stitches showing at the left edge.
Place the second pocket beside it with approximately two back-panel stitches showing between the pockets and another two stitches showing at the right edge.
The stitch-column layout is:
- 2-stitch left margin
- 33-stitch left pocket
- 2-stitch center gap
- 33-stitch right pocket
- 2-stitch right margin
Don’t sew the pockets down yet. Add the animal appliqués while you can still turn each pocket freely in your hands.
Make the Large Bottom Pocket
Use cream yarn.
Foundation: Ch 69.
Row 1: Sc in the second ch from the hook and in each ch across. Turn. (68 sts)
Rows 2 through 37: Ch 1. Sc in each st across. Turn. (68 sts)
Change to sage or olive green.
Row 38 - Sage top edge: Ch 1. Working in the back loops only of Row 37, sc in each st across. (68 sts)
Fasten off the sage yarn.
Rust scallop trim: With the right side of the pocket facing you and the sage top edge at the top, join rust yarn in the unused front loop of the first stitch of Row 37. Working in the unused front loops only, sc in the first st. Repeat [sl st in next st, 3 hdc in next st, sl st in next st] 22 times. Sc in the final st.
Fasten off the rust yarn.
The finished pocket should measure approximately 19 1/2 inches wide and about 9 1/2 inches high.
Center it over Rows 1 through 38 of the back panel. That leaves approximately two back-panel stitches showing along each side.
This pocket is deliberately broader than the two above it. Besides giving you more useful storage, that wide front gives the oak leaves enough room to angle toward the acorn instead of standing stiffly in a row.
Add the Woodland Appliqués
This is where several of the woodland patterns finally get to live together instead of being separate little projects.
Make the crochet fox appliqué, crochet deer appliqué and crochet raccoon appliqué from their individual patterns.
Use two oak leaf appliqués and one acorn for the lower pocket.
Keep the appliqués at their established sizes. You do not need to reduce any of them for this organizer.
Fox Placement
Center the fox on the plain upper cream field between Rows 77 and 114. Depending on your finished fox size, its upper and lower edges should each have roughly 3/4 to 1 inch of open cream space around them.
Pin the fox first and stand the panel upright before sewing. It should read as the main woodland motif without looking as though it is sitting on top of the middle pockets.
Sew securely around the stable outer edges using matching yarn. Keep the tail and ears positioned exactly as they are in the finished fox pattern.
Deer Placement
Center the deer appliqué on the left middle pocket.
The deer is approximately 5 inches tall and 3 1/2 inches wide, so there should be plenty of cream pocket showing around it. I prefer that to making the animal fill every inch.
Keep the top of the ears below the scalloped pocket opening so they don’t interfere when something is tucked inside.
Sew the deer securely to the pocket before attaching the pocket to the organizer.
Raccoon Placement
Center the raccoon appliqué on the right middle pocket.
The finished raccoon is expected to measure about 5 3/4 to 6 1/4 inches tall, with the head reaching about 4 inches across at its widest point. The 9 1/2-inch pocket also gives the striped tail room to show beside the body.
Keep the raccoon body near the middle of the pocket and let the tail sweep naturally toward one side. Don’t crowd it against the center gap between the pockets.
Sew around the body, head and the securely attached portion of the tail. Follow the individual raccoon pattern for its complete assembly and embroidered facial details.
Oak Leaf and Acorn Placement
Place one oak leaf toward the left side of the lower pocket and the second toward the right.
Angle the leaves inward so their stems point toward the acorn. They should frame it rather than sit upright like three separate motifs.
Center the acorn between the two stems.
With the larger oak leaves measuring approximately 7 to 8 inches long and 3 1/2 to 4 inches across, the 19 1/2-inch pocket gives you enough room to angle both leaves without forcing them underneath the acorn.
Pin all three pieces before sewing anything. Look at the whole organizer, not just the pocket. Move a leaf a little if one side feels heavier than the other.
Sew the acorn and the stable outer edges of both leaves securely to the pocket.
Assemble and Finish the Crochet Wall Organizer
Once all of the appliqués are attached, put the three pockets back onto the main panel.
Attach the Lower Pocket
Center the 68-stitch lower pocket across Rows 1 through 38 of the back panel.
Leave approximately two back-panel stitches showing along each side.
Pin the lower edge and both side edges in place. Make sure the pocket opening stays perfectly free.
Using cream yarn and small whipstitches, sew down the left side, across the bottom and up the right side.
Do not stretch either layer while sewing. If you pull the pocket front tighter than the back panel, the bottom of the organizer will cup forward before you put anything inside it.
Attach the Two Middle Pockets
Position both middle pockets over Rows 43 through 76.
Use the 2 + 33 + 2 + 33 + 2 stitch layout described earlier. Check the center gap before sewing. The two pocket tops should sit at the same height.
Sew the left side, bottom and right side of each pocket to the back panel with matching cream yarn.
Leave both top edges completely open.
Run your hand inside every pocket after sewing. If you accidentally caught the back of an appliqué or stitched through the pocket opening, it’s much easier to fix it now.
Add the center divider: With the organizer front facing you, join sage or olive green yarn at the bottom of the two-stitch gap between the middle pockets. Work a relaxed line of surface slip stitches straight up the center of that gap, stopping just below the pocket-opening trim. Fasten off and weave in the ends. Keep these stitches loose enough that the center of the organizer stays flat.
Work the Sage Outer Border
The outer border adds the soft scalloped frame shown on the finished organizer and brings the final size closer to 22 × 30 inches.
Join sage or olive yarn at the upper-left corner of the main panel.
Border Round 1: Work 3 sc in the upper-left corner stitch. Work 1 sc in each of the 70 stitches between the two top corner stitches. Work 3 sc in the upper-right corner.
Down the first side, work 7 sc evenly across every group of 8 row ends. There are 112 interior row ends between the corner rows, giving 98 sc along that side.
Work 3 sc in the bottom-right corner. Work 1 sc in each of the 70 stitches between the two bottom corner stitches. Work 3 sc in the bottom-left corner.
Work 7 sc evenly across every group of 8 row ends up the remaining side. (98 sc)
Join with a sl st to the first sc. (348 sts)
Lay the organizer flat before continuing. The border should lie flat without ruffling. That check matters more than tugging the edge into shape later.
Border Round 2: Before beginning, identify the center sc of each 3-sc corner group from Border Round 1 and place a removable marker in each one. Work 5 dc in the marked upper-left corner st. Across the top edge, repeat [sl st in next st, skip next st, 5 dc in next st, skip next st] 18 times. Work 5 dc in the marked upper-right corner st. Down the first side, repeat [sl st in next st, skip next st, 5 dc in next st, skip next st] 25 times. Work 5 dc in the marked bottom-right corner st. Across the bottom, repeat [sl st in next st, skip next st, 5 dc in next st, skip next st] 18 times. Work 5 dc in the marked bottom-left corner st. Up the remaining side, repeat [sl st in next st, skip next st, 5 dc in next st, skip next st] 25 times. Join with a sl st to the first dc of the beginning corner shell. Remove all four corner markers. (90 scallops total: 4 corner scallops, 36 across the top and bottom, and 50 along the two sides)
Fasten off and weave in the yarn securely.
Make Two Dowel Loops
Use sage or olive yarn.
Foundation: Ch 7.
Row 1: Sc in the second ch from the hook and across. Turn. (6 sts)
Rows 2 through 14: Ch 1. Sc across. Turn. (6 sts)
Fasten off, leaving a long tail for sewing.
Make a second loop the same way.
At the stated gauge each strip should be approximately 1 1/2 to 1 3/4 inches wide and about 3 1/2 inches long.
Fold each strip around the wooden dowel before sewing it to the organizer. The loop should fit around the dowel without gripping it so tightly that the wood pulls against the crochet.
Position one loop near each upper corner as shown on the finished organizer, keeping the two loops the same distance in from the side edges.
Sew both ends of each loop securely to the back of the organizer along the upper edge. Reinforce each attachment with a second pass of stitches.
Before adding the dowel, secure and weave in all remaining sewing tails on the back of the organizer. Lay the organizer flat one more time and check that the pockets open freely, the center divider is not pulling the fabric, the outer border lies flat and both dowel loops are firmly attached.
Add the Wooden Dowel and Hanging Cord
Slide the approximately 24-inch wooden dowel through both crocheted loops.
The dowel should extend roughly an inch beyond the finished organizer at each side.
Cut a length of strong cotton hanging cord. Tie one end securely near each end of the dowel, leaving enough cord above the organizer to form the hanging triangle shown in the example.
Pull firmly on both knots before hanging the organizer. The cord, loops and wall attachment are carrying the weight of the organizer and everything placed inside it.
Use wall hardware appropriate for the wall construction and keep the organizer and its hanging cord completely beyond a baby's reach. I would not hang it directly over a crib, bassinet or other infant sleep space. The U.S. Consumer Product Safety Commission safe sleep guidance recommends keeping an infant sleep space bare.
This organizer is meant for lightweight nursery storage. Diapers, folded cloths, a spare pacifier, a teether or a small board book make sense. Heavy bottles, large containers or anything that could hurt someone if it fell do not.
Customize Your Wall Organizer
You don’t have to make another organizer every time you want another nursery theme. That’s one reason I like keeping the basic pocket design fairly simple.
Leave the cream panel and pocket construction alone and change the appliqués instead.
For this woodland version, I’d keep the fox, deer and raccoon together because their finished sizes work well with the three decorative areas.
If you want to change the animal combination, browse my free crochet animal appliqué patterns. Measure the appliqué before sewing it to a pocket. A motif around 4 to 7 inches generally has plenty of room here, but a very wide animal may belong on the large lower pocket instead of one of the middle pockets.
You could also keep the organizer completely plain. The pockets still work without a single appliqué.
If you’re building a room around the forest theme, my woodland nursery patterns bring the same animals and colors into other handmade projects without making every piece identical.
And because this really is nursery storage, not just something pretty to hang on the wall, you can use it alongside the ideas on my nursery storage ideas and baby room organization pages.
Keep the organizer useful. You don’t need to fill every pocket just because it’s there.
Crochet Wall Organizer FAQ
How big is the finished crochet wall organizer?
At the stated gauge, expect the finished organizer to measure approximately 22 inches wide by 30 inches tall after the outer edging is added. The hanging cord above the dowel is not included in that measurement.
Will the woodland appliqués fit without changing their patterns?
Yes. That was built into the organizer dimensions. The fox fits the open upper panel, the deer and raccoon fit the two 9 1/2-inch middle pockets, and two large oak leaves plus the acorn fit across the approximately 19 1/2-inch lower pocket.
I would not resize the fox, deer or raccoon just to make them fit. Use the established pattern sizes.
Can I make the wall organizer without the woodland animals?
Yes. The organizer and pockets are complete on their own. Leave them plain or substitute other flat appliqués that fit the available space.
What yarn is best for a crochet wall organizer?
I prefer a smooth worsted weight cotton or cotton-rich yarn for the main organizer because the fabric needs some firmness. Very soft, stretchy yarn can let the pockets sag once you put something inside them.
Can I make the organizer wider or narrower?
You can, but changing the width changes more than the back panel. The two middle pockets, lower pocket, dowel length and appliqué spacing all work together in this version.
If what you want is the organizer shown here, I’d make it at the written size first.
What can I store in the crochet pockets?
Use them for lightweight nursery items such as diapers, folded cloths, an extra pacifier, a teether or a small board book. I wouldn’t use a crocheted wall organizer for heavy bottles, large containers or anything that could be dangerous if the organizer or its contents fell.
Where should I hang a nursery wall organizer?
Choose a securely anchored wall location that stays completely out of the baby's reach. Do not hang the organizer or its cord directly over a crib, bassinet or another infant sleep space.
Can I use different animal appliqués?
Absolutely. That’s one of the useful things about this design. Browse the crochet animal appliqué collection and choose motifs that suit your nursery. Check the finished measurements first, especially for animals with wide tails, long bodies or large ears.
If you’d rather start another handmade nursery project from scratch, my free baby crochet patterns page brings the larger crochet collection together in one place.
When you click on links to various merchants on this site and make a purchase, this may result in this site earning a commission. This does not affect the price you pay.

UBGI Gold Standard 2026
Reviewed under the site's
editorial checklist.
Photos, decorating ideas, party setups and reader submissions are shared for inspiration unless a page is specifically presented as a pattern, tutorial, reference guide or step-by-step project. Follow the instructions, measurements, safety guidance and manufacturer directions provided for the particular project or product.
About Jan | Contact | Baby Nursery Ideas (Blog) | Site Map | Privacy Policy | Disclosure Policy | Disclaimer | Affiliate Disclosure | Earnings Disclosure | Facebook | Pinterest
I am a participant in the Amazon Services LLC Associates Program, an affiliate advertising program designed to provide a means for us to earn fees by linking to Amazon. As an Amazon Associate I earn from qualifying purchases.
Copyright © 2006-2026. All Rights Reserved.