Free Crochet Fox Applique Pattern for Woodland Baby Projects
By Jan Bay
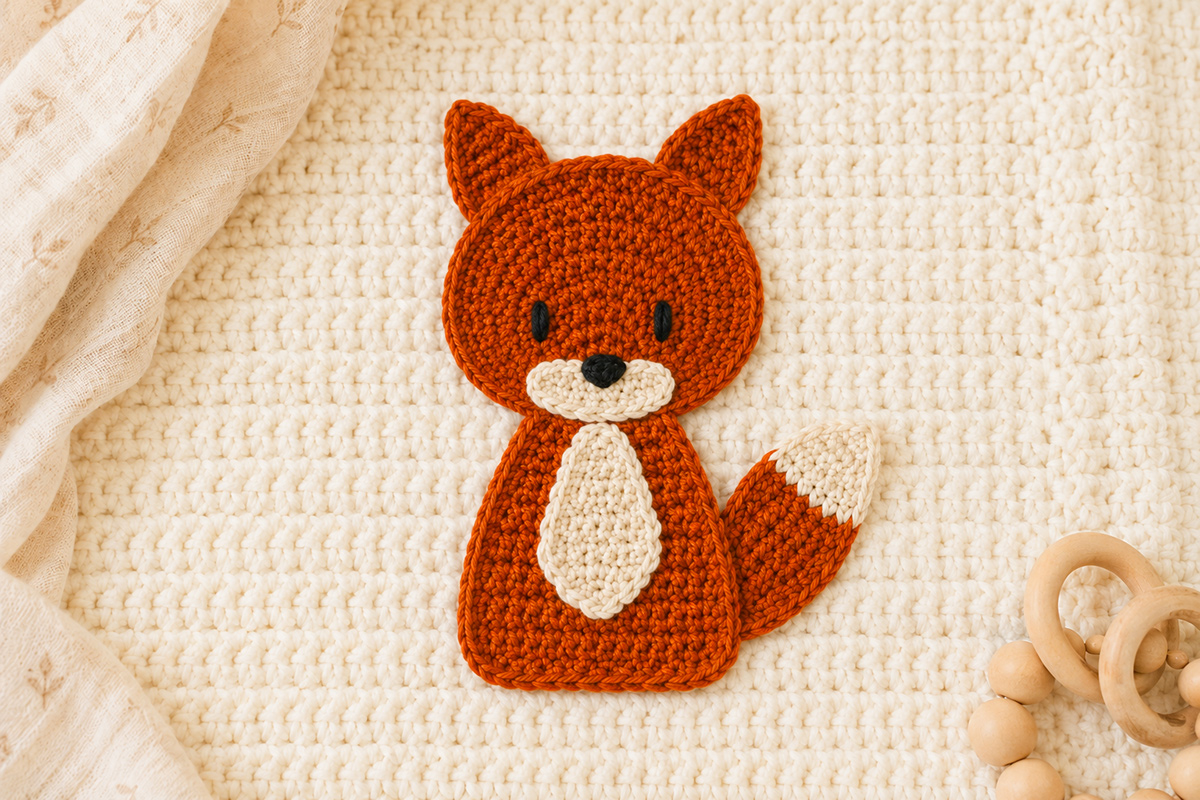
This free crochet fox applique pattern makes a flat woodland fox with pointed ears, a cream muzzle, rust-orange body and bushy tail. The crocheted fox can be used to decorate crocheted baby blankets, nursery banners, wall hangings and other handmade woodland baby projects.
Explore More Free Crochet Baby Patterns
Crochet supplies for this project:
Jump To
Supplies for the Free Crochet Fox Applique Pattern
This fox applique is designed as a flat, layered piece rather than a stuffed animal. The finished fox has a rust-orange head and body, pointed ears, a cream muzzle and chest, and a curved bushy tail with a cream tip. Keeping the pieces fairly simple makes the applique easier to sew onto a baby blanket, nursery banner or wall hanging without adding too much bulk.
I recommend smooth worsted-weight cotton or a cotton-blend yarn for this pattern. The stitches stay easy to see, the pointed ears hold their shape well, and the finished applique lies flatter than it may with a very fuzzy yarn. Acrylic worsted-weight yarn can also be used if you prefer it.
- Worsted-weight yarn in rust orange or another fox color
- Small amount of cream or ivory worsted-weight yarn for the muzzle, chest and tail tip
- Small amount of black embroidery floss for the eyes and nose
- 3.5 mm crochet hook
- Yarn needle
- Embroidery needle
- Stitch marker
- Scissors
- Straight pins or locking stitch markers for temporary placement during assembly
Expected finished size: approximately 7 to 8 inches tall from the tips of the ears to the bottom of the body and approximately 6 to 7 inches across at the widest point when the tail is attached. These are expected measurements with the listed yarn weight and hook size rather than measurements from a fixed gauge. Your finished size may vary with yarn choice and tension.
Gauge: Exact gauge is not critical for this applique. Crochet firmly enough that the pieces keep their shape, but do not work so tightly that the fabric curls or becomes difficult to sew through.
Skill level: Confident beginner to easy intermediate. You should be comfortable working in rounds and rows, increasing, decreasing and sewing separate crochet pieces together.
Abbreviations:
- ch = chain
- sc = single crochet
- hdc = half double crochet
- dc = double crochet
- inc = work 2 sc in the same stitch
- dec = single crochet decrease
- sl st = slip stitch
- st or sts = stitch or stitches
- MR = magic ring
The head and muzzle are worked in continuous rounds unless stated otherwise. Place a stitch marker in the first stitch of each round and move it up as you work. The body, ears, chest and tail are worked separately and joined during assembly.
Before you begin, choose which side of each finished piece looks best and use that as the front. Keeping all yarn tails and joins toward the back will give the finished fox a cleaner surface when it is sewn onto another project.
If you are making several animals for one blanket or nursery project, keep the same yarn weight and hook size for each applique. That helps the animals look like they belong together even when their shapes are different. You can find more coordinating designs on the crochet animal applique patterns page.
Free Crochet Fox Applique Pattern Instructions
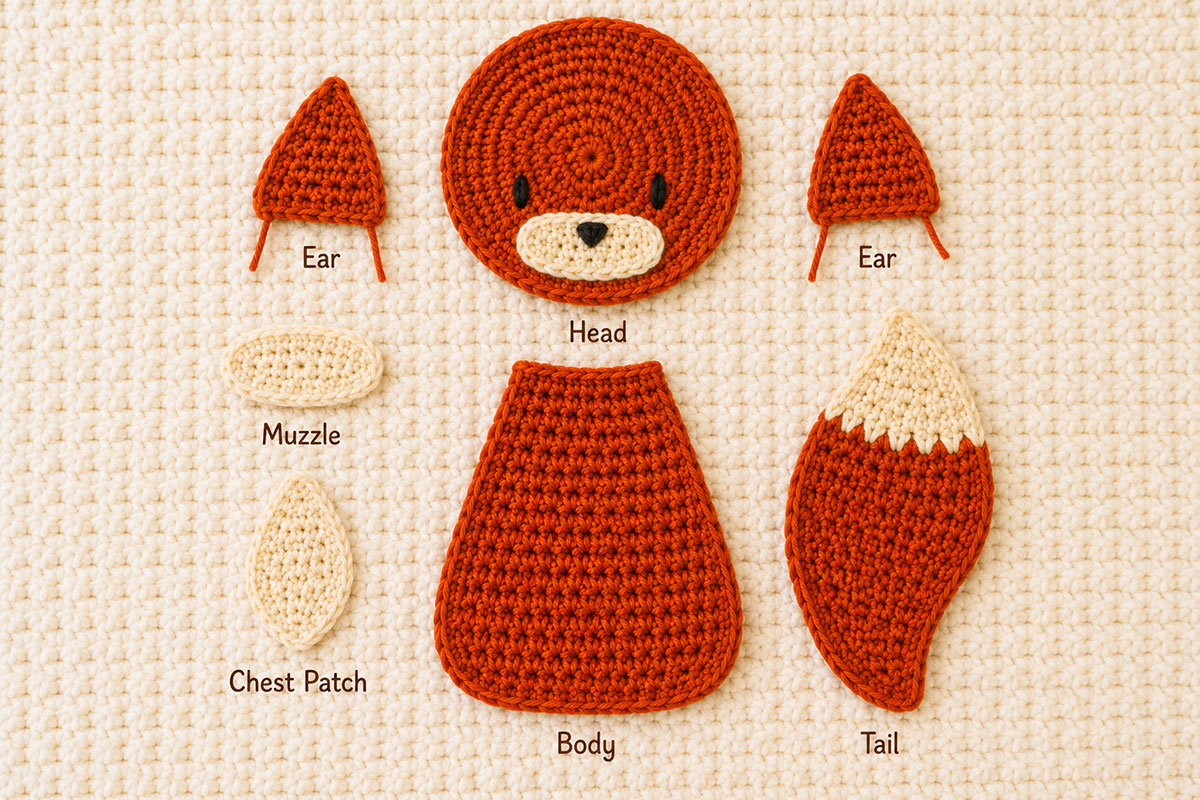
The fox is made from seven flat crochet pieces: one head, two ears, one muzzle, one body, one chest patch and one tail. The pieces are sewn together at the end, so you can adjust the angle of the ears and tail before making anything permanent.
Use rust-orange yarn unless another color is stated. Leave a long sewing tail when instructed because those yarn ends can be used during assembly.
Fox Head
Work in continuous rounds.
Round 1: Make 6 sc in a MR. (6 sts)
Round 2: Inc in each st around. (12 sts)
Round 3: (Sc in next st, inc in next st) 6 times. (18 sts)
Round 4: (Sc in next 2 sts, inc in next st) 6 times. (24 sts)
Round 5: (Sc in next 3 sts, inc in next st) 6 times. (30 sts)
Round 6: (Sc in next 4 sts, inc in next st) 6 times. (36 sts)
Round 7: (Sc in next 5 sts, inc in next st) 6 times. (42 sts)
Round 8: (Sc in next 6 sts, inc in next st) 6 times. (48 sts)
Sl st in the next st. Fasten off, leaving a long tail for sewing.
Lay the head flat and gently shape it with your fingers. With the listed yarn weight and hook size, expect it to measure approximately 4 to 4 1/2 inches across. A slightly oval shape is fine and can make the fox face look a little less round once the ears and muzzle are added.
Pointed Fox Ears
Make 2.
Leave a long starting tail for sewing the ear to the head, then ch 11.
Row 1: Sc in the second ch from the hook and in each ch across. Ch 1 and turn. (10 sts)
Row 2: Dec, sc in next 6 sts, dec. Ch 1 and turn. (8 sts)
Row 3: Dec, sc in next 4 sts, dec. Ch 1 and turn. (6 sts)
Row 4: Dec, sc in next 2 sts, dec. Ch 1 and turn. (4 sts)
Row 5: Dec twice. Ch 1 and turn. (2 sts)
Row 6: Dec. (1 st)
Fasten off and weave the yarn end into the back of the ear. Keep the long starting tail at the wider base for sewing.
Each ear should form a simple narrow triangle. Do not pull the final stitch tightly enough to bend the tip. If the ear curls slightly, smooth it between your fingers before assembly.
For a little more definition, you can embroider a narrow cream line inside each ear after the ears are attached to the head. Keep the embroidery flat rather than adding a separate raised piece.
Cream Fox Muzzle
With cream yarn, ch 7.
Round 1: Sc in the second ch from the hook and in the next 4 ch. Work 3 sc in the last ch. Continue along the unused loops on the opposite side of the foundation chain. Sc in the next 4 ch, then work 2 sc in the final ch. (14 sts)
Round 2: Inc in the first st, sc in the next 4 sts, inc in each of the next 3 sts, sc in the next 4 sts, inc in each of the final 2 sts. (20 sts)
Sl st in the next st. Fasten off, leaving a long tail for sewing.
The finished muzzle should be a small horizontal oval. Flatten it before placing it on the face. The wider ends should sit from side to side rather than from top to bottom.
Fox Body
The body is worked back and forth in rows. Ch 1 at the beginning of a row does not count as a stitch.
Ch 15.
Row 1: Sc in the second ch from the hook and in each ch across. Ch 1 and turn. (14 sts)
Row 2: Inc in the first st, sc in the next 12 sts, inc in the last st. Ch 1 and turn. (16 sts)
Row 3: Sc across. Ch 1 and turn. (16 sts)
Row 4: Inc in the first st, sc in the next 14 sts, inc in the last st. Ch 1 and turn. (18 sts)
Rows 5 through 8: Sc across. Ch 1 and turn. (18 sts)
Row 9: Dec, sc in the next 14 sts, dec. Ch 1 and turn. (16 sts)
Row 10: Sc across. Ch 1 and turn. (16 sts)
Row 11: Dec, sc in the next 12 sts, dec. Ch 1 and turn. (14 sts)
Row 12: Sc across. Ch 1 and turn. (14 sts)
Row 13: Dec, sc in the next 10 sts, dec. Ch 1 and turn. (12 sts)
Row 14: Sc across. (12 sts)
Fasten off, leaving a long tail for sewing.
The wider end of the body is the bottom. The 12-stitch final row is the top and will be partly covered by the head during assembly.
Cream Chest Patch
With cream yarn, ch 9.
Row 1: Sc in the second ch from the hook and across. Ch 1 and turn. (8 sts)
Row 2: Inc in the first st, sc in the next 6 sts, inc in the final st. Ch 1 and turn. (10 sts)
Rows 3 and 4: Sc across. Ch 1 and turn. (10 sts)
Row 5: Dec, sc in the next 6 sts, dec. Ch 1 and turn. (8 sts)
Row 6: Dec, sc in the next 4 sts, dec. Ch 1 and turn. (6 sts)
Row 7: Dec, sc in the next 2 sts, dec. (4 sts)
Fasten off, leaving a long tail for sewing.
The 8-stitch starting edge is the bottom of the chest patch. The narrow 4-stitch edge points toward the fox's neck.
Bushy Fox Tail
The tail is worked from the cream tip toward the narrower base. Ch 1 at the beginning of a row does not count as a stitch.
With cream yarn, ch 5.
Row 1: Sc in the second ch from the hook and across. Ch 1 and turn. (4 sts)
Row 2: Inc in the first st, sc in the next 2 sts, inc in the last st. Ch 1 and turn. (6 sts)
Row 3: Inc in the first st, sc in the next 4 sts, then begin the final increase. On the last sc of that increase, use rust-orange yarn for the final yarn-over and pull-through. (8 sts)
Cut the cream yarn, leaving a tail long enough to weave securely into the back. The rust-orange yarn is now active.
Row 4: Ch 1 and turn. Inc in the first st, sc in the next 6 sts, inc in the last st. Ch 1 and turn. (10 sts)
Rows 5 and 6: Sc across. Ch 1 and turn. (10 sts)
Row 7: Inc in the first st, sc in the next 8 sts, inc in the last st. Ch 1 and turn. (12 sts)
Rows 8 through 11: Sc across. Ch 1 and turn. (12 sts)
Row 12: Dec, sc in the next 8 sts, dec. Ch 1 and turn. (10 sts)
Row 13: Sc across. Ch 1 and turn. (10 sts)
Row 14: Dec, sc in the next 6 sts, dec. Ch 1 and turn. (8 sts)
Row 15: Dec, sc in the next 4 sts, dec. Ch 1 and turn. (6 sts)
Row 16: Dec, sc in the next 2 sts, dec. (4 sts)
Fasten off, leaving a long tail for sewing.
The 4-stitch final row is the base of the tail. The cream end is the outer tip. The tail may look fairly straight when it comes off the hook. Give it a gentle curve during assembly instead of trying to crochet the bend into the piece.
Piece-count checkpoint: Before you begin assembly, you should have 1 head, 2 ears, 1 cream muzzle, 1 body, 1 cream chest patch and 1 tail. That is 7 crochet pieces in total.
How to Assemble and Finish the Fox Applique
Arrange every piece before you sew. Small placement changes can give the fox a noticeably different expression, especially around the ears and muzzle, so it is worth pinning the pieces first.
1. Flatten and Shape the Pieces
Smooth each crochet piece with your fingers. If a piece still curls, lightly dampen it and pin it flat until dry. Keep direct heat away from acrylic yarn because high heat can damage the fibers.
Check the tail color change and weave the cream yarn end securely into the back of the tail before continuing.
2. Position the Ears
Place the head right side up. Slide the wider base of one ear behind the upper left edge of the head and the second ear behind the upper right edge.
Angle both ear tips slightly outward. Keep the lower edge of each ear hidden behind the head by approximately 1/2 inch.
Check the spacing before sewing. The ears should sit far enough apart that the upper edge of the head remains visible between them.
Turn the head over. Use the long starting tail at the base of each ear to sew the ear securely to the back of the head. Weave the remaining yarn ends into the back.
3. Add the Cream Muzzle
Turn the head right side up again. Place the cream oval across the lower half of the face.
Center the muzzle from side to side. Its lower edge should sit close to the lower edge of the head without extending beyond it.
Pin the muzzle in place and sew around the entire outer edge with cream yarn. Keep the stitches small so the seam does not pull the oval out of shape.
4. Embroider the Face
Use black embroidery floss for the eyes and nose. Do not use plastic safety eyes, buttons or beads on an applique intended for a baby project.
Place the eyes approximately 1 to 1 1/4 inches apart and slightly above the top edge of the cream muzzle. Make each eye with several short satin stitches or a small vertical embroidered oval.
Center the nose near the upper middle of the cream muzzle. Use several short satin stitches to form a small black triangle or rounded oval.
If you want a simple mouth, bring one strand of floss down from the bottom of the nose and make two short diagonal stitches, one toward each side. Keep the mouth small so the face stays clean and easy to read from a distance.
Secure every embroidery end on the back of the head. Trim only after the ends are firmly woven in.
For optional inner-ear detail, use cream yarn or embroidery floss to make two or three straight stitches inside each ear. Keep these stitches well inside the orange edge.
5. Sew on the Chest Patch
Place the body with the wider edge at the bottom and the 12-stitch edge at the top.
Center the cream chest patch on the upper half of the body. The narrow 4-stitch end should point toward the top of the body.
Leave approximately 1/2 inch of orange showing along each side of the patch. Pin it in place and sew completely around the edge with cream yarn.
6. Position the Tail
Place the tail on either side of the body. There is no required left or right side, so choose the direction that works best for the project where you plan to use the applique.
The narrow 4-stitch orange end is the tail base. Place that end behind the lower side of the body.
Curve the wide portion of the tail upward so the cream tip points away from the body. Avoid a sharp bend. A broad curve gives the tail a fuller fox shape.
Sew the tail base securely to the back of the body. You can also make a few small stitches along the inside edge of the orange portion if you want the curve to stay fixed.
7. Join the Head and Body
Place the head over the upper edge of the body. Overlap the two pieces by approximately 1/2 to 3/4 inch.
Center the head so equal amounts of the body remain visible on both sides.
Pin the overlap in place. Turn the applique over and sew the head to the body through the overlapping area with orange yarn.
Turn the fox right side up and check that the head sits level. The finished applique should now hold together as one piece.
8. Final Finishing
Weave every remaining yarn end into the back of the applique. Trim the ends only after they are secure.
Lay the finished fox flat and check the ears, muzzle, chest and tail. None of the outer corners should lift excessively.
When you attach the fox to a baby blanket or another fabric project, sew around the full outer perimeter of the applique. Add a few discreet anchoring stitches through larger interior areas if needed so the fox cannot pull away from the background fabric.
For a baby item, inspect the finished applique carefully before use. Remove every straight pin, locking stitch marker and working stitch marker. Make sure all crochet pieces and embroidered details are firmly attached, with no loose yarn ends, beads, buttons or other detachable decorations. If the applique is used on a baby blanket, remember that blankets and other soft items should be kept out of an infant's sleep space. See the U.S. Consumer Product Safety Commission safe sleep guidance for current recommendations.
Ways to Use a Crochet Fox Applique in Woodland Baby Projects
A fox applique is useful because it can add a woodland theme without requiring the entire project to be shaped like an animal. The rust, cream and brown color family also works easily with many fall nursery palettes.
Add the Fox to a Baby Blanket
Sew one fox near a lower corner for a simple accent, or repeat several foxes across the lower edge of a larger blanket. If you combine the fox with other animals, leave enough open space between the appliques that each silhouette remains easy to recognize.
The fox can also be paired with designs from the crochet animal applique pattern collection. Keeping the same yarn weight and hook size across the collection makes it easier to build a coordinated set.
For a blanket that will be used by a baby, sew every edge securely to the blanket and avoid loose three-dimensional decorations.
Make a Woodland Nursery Banner
A row of fox, bunny, bear and other woodland appliques can be sewn to individual crochet pennants or to a fabric banner. Leave enough space around each animal so pointed ears and tails do not overlap the neighboring design.
If the banner is used in a nursery, hang it securely and keep it out of a baby's reach.
Use the Fox on a Wall Hanging
The applique can be sewn to a crocheted rectangle, a quilted fabric panel or another flat handmade background. A wall hanging gives you more freedom to add woodland details because the finished piece is decorative rather than something the baby will handle.
If you are choosing colors for a larger room theme, the fox woodland nursery ideas page has additional ways to work foxes and other forest animals into the room without making every surface match.
Create a Coordinated Handmade Gift
Use the same rust-orange and cream yarn for several small projects so they look related without being identical. A blanket with the fox applique can be paired with another pattern from the free baby crochet patterns collection.
The applique can also be used on the front of a handmade keepsake bag, a nursery storage pocket or a decorative fabric basket that will be kept away from the baby's sleeping space.
Change the Fox Colors
Rust orange gives the clearest traditional fox look, but the construction does not depend on that color. Soft brown, cinnamon, muted terracotta or pale gray can all work with the same pattern.
Keep the muzzle and tail tip noticeably lighter than the main fox color. That contrast is what makes the face and bushy tail easy to identify after the applique is sewn onto another project.
For a fall woodland palette, combine the fox with cream, oatmeal, warm brown, muted green or deep rust. For a lighter nursery version, pair the same fox with ivory, soft gray and pale natural wood tones.
Frequently Asked Questions About the Crochet Fox Applique Pattern
Can I make the fox applique larger?
Yes. The simplest method is to use a heavier yarn and a hook that matches that yarn. Keep all seven pieces in the same yarn weight so the proportions stay consistent. You can also add another increase round to the head, but changing only one piece may require adjustments to the muzzle, ears and body.
Can I make a smaller fox applique?
Yes. Use DK or sport-weight yarn with an appropriate smaller hook. Follow the same stitch counts. The finished fox will be smaller without changing the construction.
Why does my fox head look round instead of fox-shaped?
The crocheted head begins as a round piece on purpose. The pointed ears, horizontal muzzle and placement of the facial features create the fox shape during assembly. You can also gently shape the sides of the head with your fingers before sewing it down.
Can I leave off the tail?
Yes. The face and pointed ears are enough to identify the animal as a fox, especially if you use traditional rust-orange and cream colors. The tail adds more character and makes the silhouette easier to recognize when the applique is used by itself.
Can I put the tail on the opposite side?
Yes. The tail can be attached to either side of the body. Turn it over or change the angle before sewing until the curve fits the project where you plan to place the fox.
Can I use safety eyes instead of embroidery?
For a baby blanket, nursery textile or other project that a baby may handle, embroidered facial features are the better choice. This pattern is written for black embroidery floss rather than plastic eyes, buttons or beads.
How do I keep the applique from curling after I sew it on?
Make sure the individual pieces lie flat before assembly and do not pull the sewing yarn too tightly. When attaching the completed fox to the final project, work small, evenly spaced stitches around the perimeter. If you tighten those stitches excessively, the background fabric can pucker and the applique may curl at the edges.
Can I sew this crochet fox onto fabric instead of crochet?
Yes. The applique can be sewn to woven fabric, quilted fabric, felt or another stable textile. Use a yarn needle if it passes through the fabric easily. For tightly woven fabric, use a sturdy sewing needle and matching thread instead.
Can I make several foxes for one blanket?
Yes. Make one complete fox first and measure it before starting the others. Use the same yarn, hook and tension for the full set. This gives you a reference piece and makes it easier to keep the finished appliques close to the same size.
What other animals work well with the fox?
Bunnies, bears, owls, deer and other woodland animals pair naturally with a fox. You can mix woodland designs with the other free crochet animal applique patterns as the collection grows, or use one fox alone when you want a simpler project.
When you click on links to various merchants on this site and make a purchase, this may result in this site earning a commission. This does not affect the price you pay.

UBGI Gold Standard 2026
Reviewed under the site's
editorial checklist.
Photos, decorating ideas, party setups and reader submissions are shared for inspiration unless a page is specifically presented as a pattern, tutorial, reference guide or step-by-step project. Follow the instructions, measurements, safety guidance and manufacturer directions provided for the particular project or product.
About Jan | Contact | Baby Nursery Ideas (Blog) | Site Map | Privacy Policy | Disclosure Policy | Disclaimer | Affiliate Disclosure | Earnings Disclosure | Facebook | Pinterest
I am a participant in the Amazon Services LLC Associates Program, an affiliate advertising program designed to provide a means for us to earn fees by linking to Amazon. As an Amazon Associate I earn from qualifying purchases.
Copyright © 2006-2026. All Rights Reserved.