Free Crochet Pumpkin Goose Snuggler Lovey Pattern
By Jan Bay
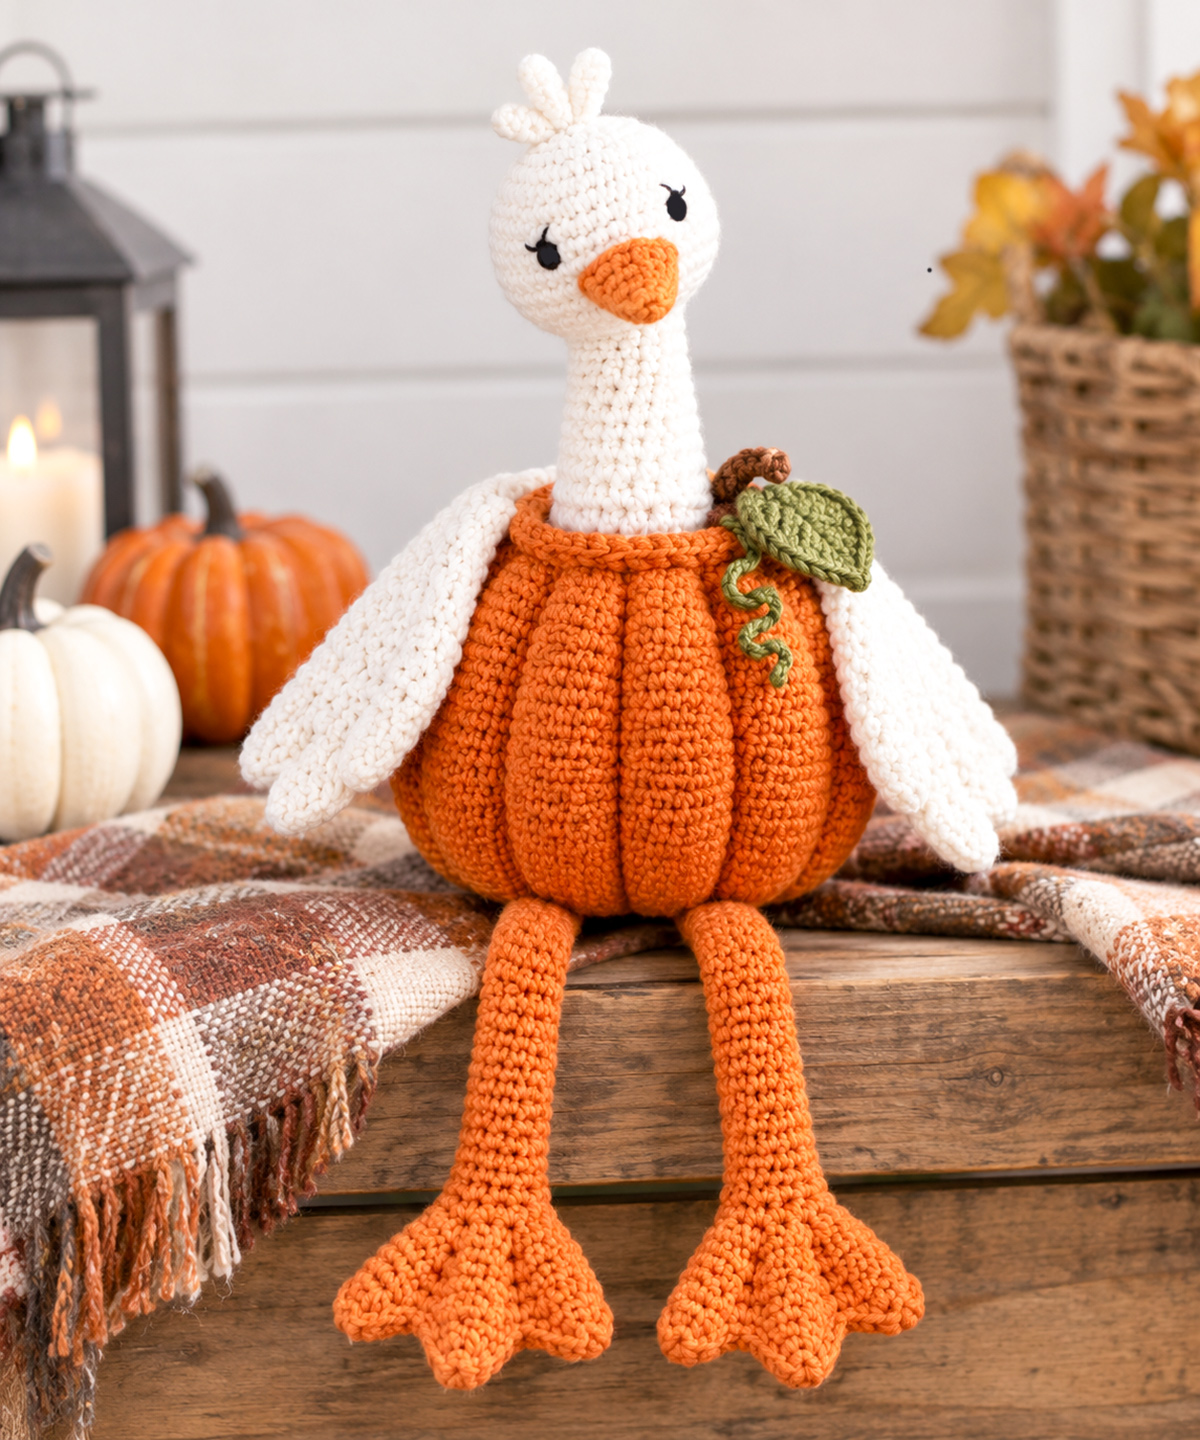
Meet Pumpkin Duck Duck Goose, the funny fall character you can make with my free crochet pumpkin goose snuggler lovey pattern. She is a white goose with soft floppy wings sitting, for some odd reason, inside an orange pumpkin with her extra long legs and funny webbed feet dangling below. This sweet character has black satin stitch eyes, a small orange bill and a snuggly shape made for supervised cuddling, handmade gifts or as a shelf sitter.
Explore More Free Crochet Baby Patterns
Crochet Baby Snuggler Patterns
See Soft Yarn for This Crochet Project
Jump to the Pumpkin Duck Duck Goose Pattern
Pattern Notes and Abbreviations
Add the Bill, Eyes and Eyelashes
Crochet the Ribbed Pumpkin Body
Crochet the Pumpkin Leaf and Vine
Materials for the Free Crochet Pumpkin Goose Snuggler Lovey Pattern
I would use a soft bulky chenille or plush yarn for Pumpkin Duck Duck Goose. You want enough body to hold the pumpkin shape, but the wings and those wonderfully long legs still need to flop instead of standing stiffly.
Yarn: CYC weight 5 bulky chenille or plush yarn.
Orange: About 220 yards for the pumpkin, legs, feet and bill. This is an estimated amount at the stated gauge, so allow a little extra if your stitches work up larger.
White: About 120 yards for the head, neck, wings and little feather tuft.
Muted olive green: About 15 yards for the leaf and curly vine.
Brown: About 5 yards for the small pumpkin stem.
Black embroidery floss: A small amount for the satin stitch eyes and eyelashes.
Hook: 6.5 mm crochet hook, or the hook needed to get a firm fabric with your yarn.
Other supplies: Polyester fiberfill, yarn needle, locking stitch markers, scissors, straight pins and a ruler or tape measure.
You do not need safety eyes, buttons or a hard piece for the face. Everything on her face is soft yarn or embroidery.
Finished Size and Gauge
At the gauge below, Pumpkin Duck Duck Goose is expected to measure about 24 to 25 inches from the top of her feather tuft to the tips of her feet while she is sitting with her legs hanging straight down.
The shaped pumpkin is expected to finish about 7 to 7 1/2 inches across. The head should be close to 4 inches across, the exposed neck about 4 1/2 to 5 inches long, each wing about 5 1/2 inches long, and each leg about 7 inches before the foot is attached. Each finished webbed foot should be about 3 1/2 inches across at its widest point.
Gauge: About 10 single crochet stitches and 10 rounds = 4 inches.
Gauge doesn't have to be exact for a stuffed project, but it matters here because the long neck, pumpkin and legs need to stay in proportion. If your stitches are noticeably larger, the whole goose will be larger and you'll need more yarn and stuffing.
Pattern Notes and Abbreviations
Skill level: Confident beginner to intermediate.
Construction: The head and neck are worked as one continuous white piece. The pumpkin is made separately with an open top and exactly six shaped grooves. The goose neck is secured inside that opening so she really does look as though she is sitting inside a pumpkin instead of simply having an orange pumpkin shaped torso.
The wings, legs, feet, bill, leaf, stem and vine are made separately and attached. The three little white crown feathers are worked directly onto the head, so they do not add another piece to sew on.
There are 12 crocheted pieces in the finished project: 1 head and neck, 1 pumpkin, 1 bill, 2 wings, 2 legs, 2 feet, 1 leaf, 1 stem and 1 vine.
Turning chains: The ch 1 used at the end of a flat row does not count as a stitch. Turn and work the first stitch of the next row into the first actual stitch.
Rounds: Work in continuous rounds unless the instructions specifically tell you to turn. Place a stitch marker in the first stitch of each round and move it up as you work.
Turning chains: The ch 1 used at the end of a flat row does not count as a stitch. Turn and work the first stitch of the next row into the first actual stitch.
Stuffing: Stuff the head and pumpkin enough to hold their shapes. Keep the neck fairly light and the lower part of the legs mostly unstuffed. That's what gives her the soft, dangly look in the example image.
mr = magic ring
ch = chain
sc = single crochet
hdc = half double crochet
dc = double crochet
sl st = slip stitch
inc = 2 single crochet stitches in the same stitch
dec = single crochet decrease over the next 2 stitches
BLO = back loop only
st/sts = stitch/stitches
rnd/rnds = round/rounds
The stitch count at the end of a round is shown in parentheses. Count it. Chenille yarn is forgiving visually, but it can also hide a missed stitch surprisingly well.
Crochet the Goose Head
Use white yarn.
Rnd 1: Make 6 sc in a magic ring. (6)
Rnd 2: Inc in each st around. (12)
Rnd 3: [Sc in next st, inc in next st] 6 times. (18)
Rnd 4: [Sc in next 2 sts, inc in next st] 6 times. (24)
Rnd 5: [Sc in next 3 sts, inc in next st] 6 times. (30)
Rnds 6 through 9: Sc in each st around. (30)
Rnd 10: [Sc in next 3 sts, dec] 6 times. (24)
Rnd 11: [Sc in next 2 sts, dec] 6 times. (18)
Rnd 12: [Sc in next st, dec] 6 times. (12)
Stuff the head firmly enough to keep it round, but don't stretch the stitches apart. Leave the 12 stitches of Rnd 12 open. Put a locking marker in the working loop while you add the face and feather tuft.
Add the Bill, Eyes and Eyelashes
Make the bill with orange yarn.
Rnd 1: Make 6 sc in a magic ring. (6)
Rnd 2: [Sc in next st, inc in next st] 3 times. (9)
Rnd 3: Sc in each st around. (9)
Rnd 4: [Sc in next 2 sts, inc in next st] 3 times. (12)
Fasten off, leaving about 18 inches for sewing. Add only a tiny pinch of stuffing to the bill. Flatten the open edge slightly so it sits neatly against the face.
Choose the front of the head before attaching anything. Center the bill below the eyes with its upper edge around Rnd 8 and its lower edge close to Rnd 10. Pin it first, then sew all the way around the open edge.
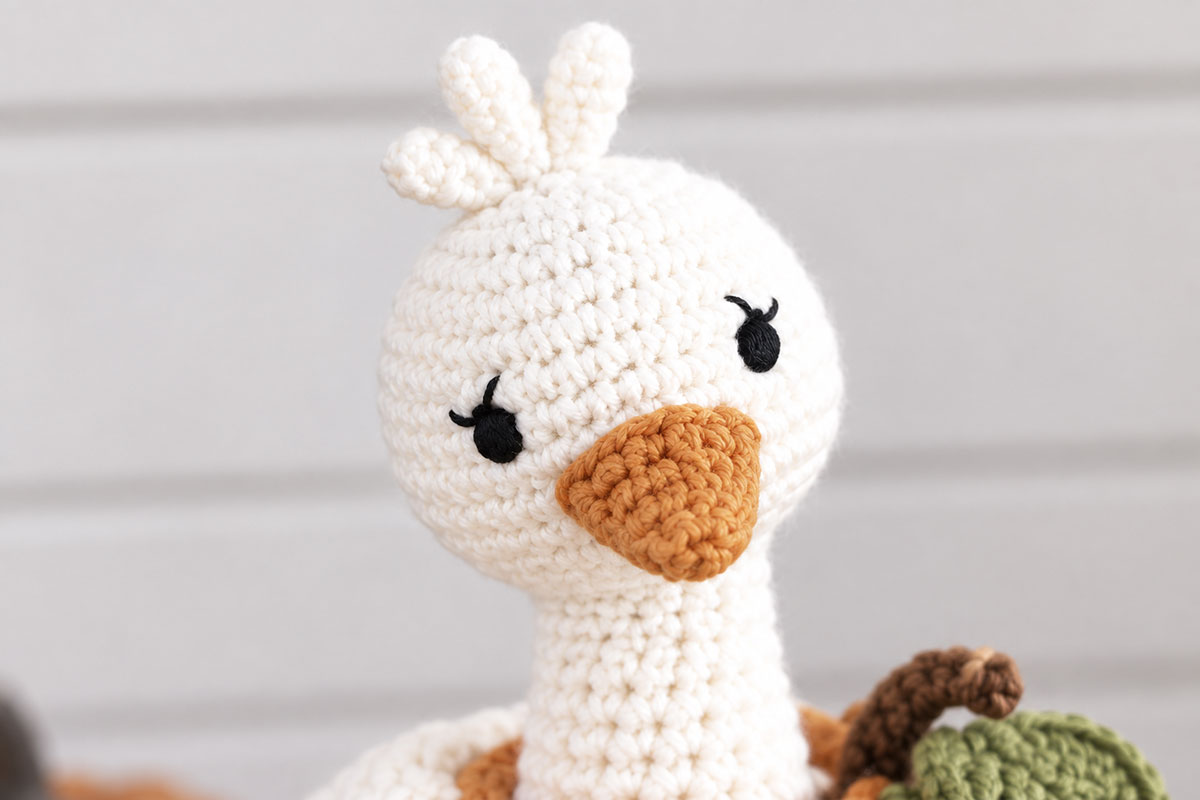
For each eye, use black embroidery floss to make a small vertical satin stitch oval spanning roughly Rnds 7 and 8. Place the eye centers about 3 stitches to either side of the center front so there are about 6 stitches between the two eye centers.
Add two tiny straight stitches at the upper outside corner of each eye for eyelashes. Keep them short. We want the sweet little eyelash expression in the example image without turning them into large cartoon lashes.
Push all embroidery ends into the stuffed head and trim them where they won't show.
Crochet the Three Feather Tuft
The three little feathers keep the top of her head from looking bare, and they are much easier than making a separate hat or headpiece.
Join white yarn at the crown close to the center of the original magic ring.
First feather: Ch 5. Starting in the second ch from the hook, sl st in the next ch, sc in the next ch and hdc in each of the last 2 ch. Sl st into the crown beside your starting point.
Center feather: Ch 6. Starting in the second ch from the hook, sl st in the next ch, sc in the next ch and hdc in each of the last 3 ch. Sl st into the next crown stitch.
Third feather: Ch 5. Starting in the second ch from the hook, sl st in the next ch, sc in the next ch and hdc in each of the last 2 ch. Sl st into the next crown stitch.
Fasten off and hide the ends inside the head. Let the center feather stand a little taller and gently angle the two shorter feathers outward.
Crochet the Long Goose Neck
Return to the white working loop left at the end of Rnd 12.
Rnds 13 through 24: Sc in each st around. (12)
Add small amounts of stuffing as you go. The neck needs enough fill to support the head without collapsing, but don't pack it hard. A little flexibility is part of her goofy goose look.
After Rnd 24, fasten off and leave a tail about 24 inches long. Leave the bottom of the neck open. That long tail will be used to secure the goose inside the pumpkin.
Crochet the Ribbed Pumpkin Body
Use orange yarn. The pumpkin is worked from the bottom up. It needs to be noticeably wider than the goose's head, just as it is in the example image. Three long shaping strands will make exactly six deep grooves around the finished pumpkin.
Rnd 1: Make 6 sc in a magic ring. (6)
Rnd 2: Inc in each st around. (12)
Rnd 3: [Sc in next st, inc in next st] 6 times. (18)
Rnd 4: [Sc in next 2 sts, inc in next st] 6 times. (24)
Rnd 5: [Sc in next 3 sts, inc in next st] 6 times. (30)
Rnd 6: [Sc in next 4 sts, inc in next st] 6 times. (36)
Rnd 7: [Sc in next 5 sts, inc in next st] 6 times. (42)
Rnd 8: [Sc in next 6 sts, inc in next st] 6 times. (48)
Rnd 9: [Sc in next 7 sts, inc in next st] 6 times. (54)
Rnd 10: [Sc in next 8 sts, inc in next st] 6 times. (60)
Rnds 11 through 14: Sc in each st around. (60)
Rnd 15: [Sc in next 8 sts, dec] 6 times. (54)
Rnd 16: [Sc in next 7 sts, dec] 6 times. (48)
Rnd 17: [Sc in next 6 sts, dec] 6 times. (42)
Rnd 18: [Sc in next 5 sts, dec] 6 times. (36)
Rnd 19: [Sc in next 4 sts, dec] 6 times. (30)
Rnd 20: [Sc in next 3 sts, dec] 6 times. (24)
Rnd 21: [Sc in next 2 sts, dec] 6 times. (18)
Stuff the pumpkin now. Fill the lower half first, then work the stuffing evenly toward the sides. Keep the top opening clear. The pumpkin should be full and rounded but still soft enough for the shaping strands to pull six visible grooves into it.
Rnd 22: Working in BLO, sc in each st around. (18)
Rnd 23: Sc in each st around. (18)
Fasten off with a long tail. Fold Rnds 22 and 23 outward. Whipstitch the edge of Rnd 23 to the unused front loops left from Rnd 21. This makes the raised orange rim around the goose's neck.
Make the six pumpkin grooves: Use the 18 stitches of Rnd 22 at the inner fold of the neck opening. Number those stitches from 1 through 18. Place markers in stitches 1, 4, 7, 10, 13 and 16. You now have six evenly spaced shaping points around the opening.
Cut 3 orange strands about 48 inches long.
Anchor the first strand securely underneath the raised rim at marker 1. Bring it straight down the outside of the pumpkin to the bottom center. Take one small stitch through the center of Rnd 1 so the shaping strand cannot slide sideways, then continue up the opposite side to marker 4.
Pull both sides of the strand evenly until those two grooves are clearly visible, then secure both ends underneath the raised rim.
Repeat from marker 2 to marker 5 with the second strand. Repeat from marker 3 to marker 6 with the third strand.
You should now have exactly 6 grooves and 6 rounded pumpkin lobes. Adjust each strand a little at a time until the lobes are similar in size. Stop when the grooves are obvious but the lobes still look plump. Leave the 6 markers around the pumpkin opening in place because you will use them to align the neck during assembly.
Crochet the Soft Floppy Wings
Make 2 with white yarn. These are worked flat in rows and are not stuffed.
Ch 4.
Row 1: Sc in second ch from hook and across. Ch 1, turn. (3)
Row 2: 2 sc in first st, sc in next st, 2 sc in last st. Ch 1, turn. (5)
Row 3: 2 sc in first st, sc in next 3 sts, 2 sc in last st. Ch 1, turn. (7)
Rows 4 through 8: Sc across. Ch 1, turn. (7)
Row 9: Dec, sc in next 3 sts, dec. Ch 1, turn. (5)
Rows 10 and 11: Sc across. Ch 1, turn. (5)
Row 12: Dec, sc in next st, dec. Ch 1, turn. (3)
Row 13: Sc across. Ch 1, turn. (3)
Row 14: Sc across. (3)
Fasten off, leaving about 18 inches for sewing. Don't stuff or stiffen the wings. Row 14 is the upper attachment end and Row 1 is the lower tip.
Crochet the Extra Long Legs
Make 2 with orange yarn. Rnd 1 forms the closed upper end that will eventually be sewn to the pumpkin. You will work downward toward the foot.
Rnd 1: Make 8 sc in a magic ring. Pull the ring firmly closed. (8)
Rnds 2 through 18: Sc in each st around. (8)
Before attaching the foot, push a very small amount of stuffing through the open lower end and all the way up into the first 4 or 5 rounds nearest the magic ring. Leave the rest of the leg unstuffed so it hangs loosely.
Fasten off and leave the lower end open.
Crochet the Funny Webbed Feet
Make 2 with orange yarn. Leave an 18 inch beginning tail before making the starting chain. That tail will close the bottom of the leg and attach the foot in one seam.
Ch 5.
Row 1: Sc in second ch from hook and across. Ch 1, turn. (4)
Row 2: 2 sc in first st, sc in next 2 sts, 2 sc in last st. Ch 1, turn. (6)
Row 3: 2 sc in first st, sc in next 4 sts, 2 sc in last st. Ch 1, turn. (8)
Row 4: Sc in next 4 sts, 2 sc in next st, sc in next 3 sts. Ch 1, turn. (9)
Rows 5 and 6: Sc across. Ch 1, turn. (9)
Row 7, make the three toes: Sl st in next st, 5 hdc in next st, sl st in next st; sl st in next st, work hdc, 3 dc and hdc in next st, sl st in next st; sl st in next st, 5 hdc in next st, sl st in last st.
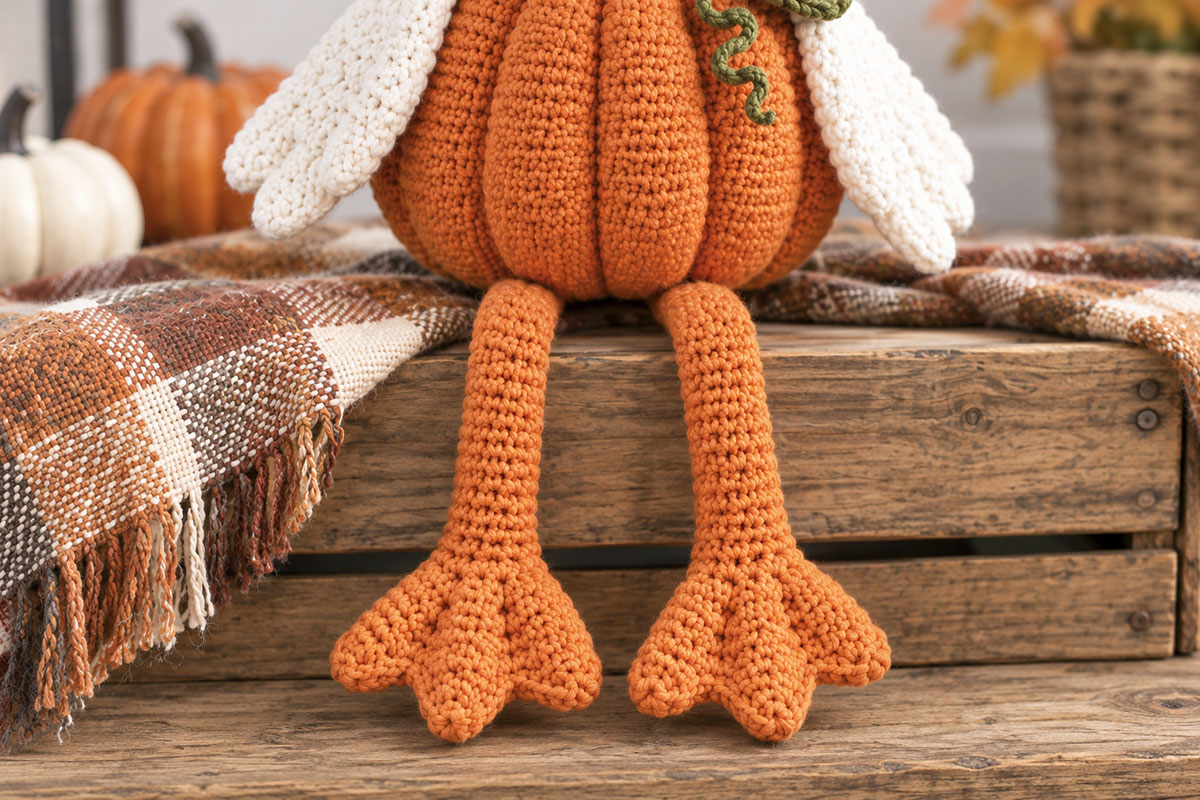
Fasten off and weave in the working end. The two half double crochet shells form the shorter side toes, while the taller stitches in the middle shell make the center toe extend a little farther, as shown in the finished goose.
Flatten the open lower end of one leg so 4 stitches lie across the front and 4 lie directly behind them. This gives you 4 paired positions across the opening.
Place the 4 stitches along the Row 1 heel edge of the foot against those 4 paired positions. Thread the 18 inch beginning tail from the foot onto your yarn needle. At each of the 4 positions, sew through the corresponding heel stitch and through both layers of the flattened leg. Work across all 4 positions. This closes the leg opening and attaches the foot at the same time.
Repeat for the second foot. Lay both legs beside each other before securing the final ends and make sure all three toes on each foot point forward.
Crochet the Pumpkin Leaf and Vine
Leaf: Use muted olive green yarn and ch 7.
Sc in second ch from hook, hdc in next ch, dc in next 2 ch, hdc in next ch, then work 3 sc in the last ch.
Continue along the unused loops on the opposite side of the foundation chain. Hdc in next ch, dc in next 2 ch, hdc in next ch and sc in the final ch. Sl st to the first sc. (13 sts)
Fasten off with a long tail for sewing.
Stem: With brown yarn, make 5 sc in a magic ring. (5)
Rnds 2 and 3: Sc in each st around. (5)
Fasten off with a tail for sewing. Do not stuff the stem. Rnd 1 is the closed tip and the open edge of Rnd 3 is the base. Use the yarn tail to sew all 5 stitches of the Rnd 3 edge to the pumpkin rim, curving the stem gently as you attach it so it leans slightly instead of standing straight up.
Curly vine: With olive green yarn, ch 12. Starting in the second ch from the hook, work 2 sc in each ch across. (22 sc)
The extra stitches make the chain curl on its own. Fasten off with a tail for sewing.
Assemble Pumpkin Duck Duck Goose
Take a minute to pin everything before sewing. The unusual proportions are what make her funny, so don't shorten the legs or push the wings too high just because they look exaggerated while she's lying flat.
1. Attach the neck inside the pumpkin. Insert about 1/2 inch of the open neck end into the center of the 18 stitch Rnd 22 opening.
Leave the 6 markers in Rnd 22 from the groove shaping step in place. Place 6 markers around the 12 stitch neck opening, one every 2 stitches, then match the six marked neck sections to the six marked pumpkin sections.
Before sewing, look straight at the goose. The bill and eyes should face directly over the center front of one pumpkin lobe rather than lining up over a deep groove. Rotate the neck inside the opening now if needed.
Use the long white neck tail to whipstitch the neck to the inside edge of the pumpkin opening underneath the raised orange rim. Work one marked section at a time. Sew the first neck stitch to the first pumpkin stitch. Sew the second neck stitch to the second pumpkin stitch, then take one additional securing stitch from that same neck stitch into the third pumpkin stitch. Repeat this 2 neck stitch to 3 pumpkin stitch sequence in each of the 6 sections. All 12 neck stitches and all 18 pumpkin opening stitches will then be secured. Remove all 12 alignment markers when the join is complete.
2. Attach the wings. Position one white wing on each upper side of the pumpkin just below the raised rim, with Rows 12 through 14 lying flat against the pumpkin and Row 1 pointing down.
Using the long sewing tail, stitch across the 3 stitches of Row 14, down one side edge through Rows 13 and 12, across the 3 stitches of Row 12, then back up the opposite side edge through Rows 12 and 13 to Row 14. Secure the yarn and hide the end inside the pumpkin. Repeat for the second wing. Leave everything below Row 12 loose so the wings hang naturally.
3. Attach the legs. Sit the pumpkin on a flat surface with the face pointing forward. Position the closed magic ring end of each leg on the lower front underside of the pumpkin about 2 1/2 inches apart from center to center.
Pin both legs in place and let them hang over the edge of the table or shelf. Turn each leg until its foot faces forward before you sew anything.
Thread about 18 inches of orange yarn onto your yarn needle for the first leg. Sew around the 8 stitches of Rnd 1, taking each stitch securely into the pumpkin body. Repeat with a fresh strand for the second leg. Hide both sewing ends inside the pumpkin. Leave the long lower portions of the legs completely free so they can dangle.
4. Check the feet. Set her upright with both legs dangling. Turn each foot so the broad three toe edge faces forward and slightly outward. If needed, add one small anchoring stitch between the back of each heel and its leg to keep the foot from spinning.
5. Add the pumpkin details. Sew the small brown stem at the rim on the goose's left side, which will appear on the right side when you're looking directly at her.
Place the olive leaf beside the stem and sew along the center and base of the leaf, leaving the outer edge free.
Attach one end of the curly green vine beside the stem. Let the rest curl naturally down the front or side of the pumpkin.
Step back and look at the whole character before weaving in those last tails. You want a round white goose head, long narrow neck, three little crown feathers, floppy white wings, six pumpkin lobes, two ridiculously long orange legs and a pair of broad funny feet. That's Pumpkin Duck Duck Goose.
Finishing and Safety Check
Weave every yarn end deeply into the stuffed pieces and trim it only after you're sure it won't pull back out.
Check the bill, feather tuft, wings, legs, feet, leaf, stem and vine one more time. Give each part a gentle tug. Repair any loose stitching before the finished goose is handled.
Check the black embroidery too. The eyes and little eyelashes should be made entirely with thread. There are no plastic safety eyes, buttons or other hard facial pieces in this pattern.
Remove every straight pin and temporary stitch marker used during shaping and assembly. Run your hands over the whole finished goose once more before calling her done.
For a baby, use Pumpkin Duck Duck Goose only during supervised play or cuddling. She's also perfectly happy sitting on a shelf or dresser. Keep her out of a crib, bassinet or other infant sleep space. The American Academy of Pediatrics safe sleep recommendations say to keep stuffed toys and other soft objects out of an infant's sleep space.
If the pumpkin is the part you fell for, my crochet pumpkin snuggler lovey pattern gives you another fall character with a very different shape. If you're here because of the bird, take a look at my free crochet duck pattern too.
When you click on links to various merchants on this site and make a purchase, this may result in this site earning a commission. This does not affect the price you pay.

UBGI Gold Standard 2026
Reviewed under the site's
editorial checklist.
Photos, decorating ideas, party setups and reader submissions are shared for inspiration unless a page is specifically presented as a pattern, tutorial, reference guide or step-by-step project. Follow the instructions, measurements, safety guidance and manufacturer directions provided for the particular project or product.
About Jan | Contact | Baby Nursery Ideas (Blog) | Site Map | Privacy Policy | Disclosure Policy | Disclaimer | Affiliate Disclosure | Earnings Disclosure | Facebook | Pinterest
I am a participant in the Amazon Services LLC Associates Program, an affiliate advertising program designed to provide a means for us to earn fees by linking to Amazon. As an Amazon Associate I earn from qualifying purchases.
Copyright © 2006-2026. All Rights Reserved.