Free Silly Goose Crochet Lovey Pattern with Bonnet
By Jan Bay
Sissy the Prissy Goose™ Crochet Pattern Series
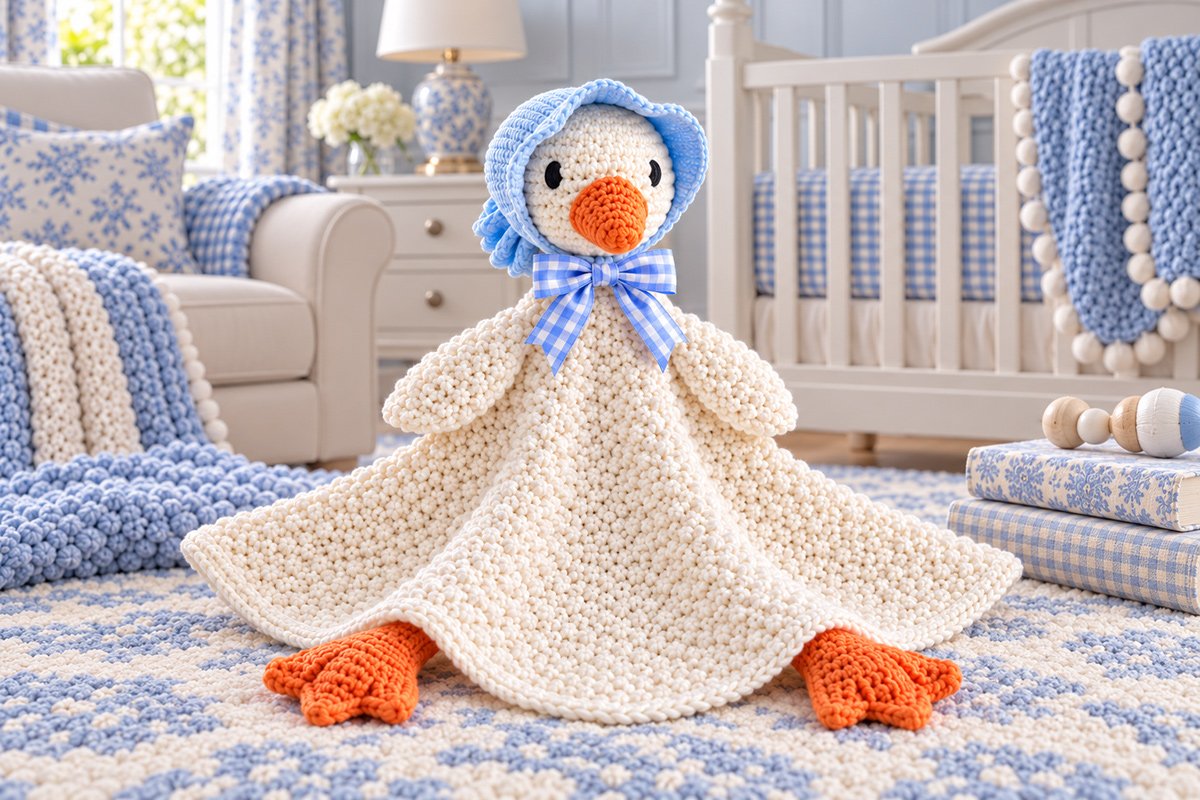
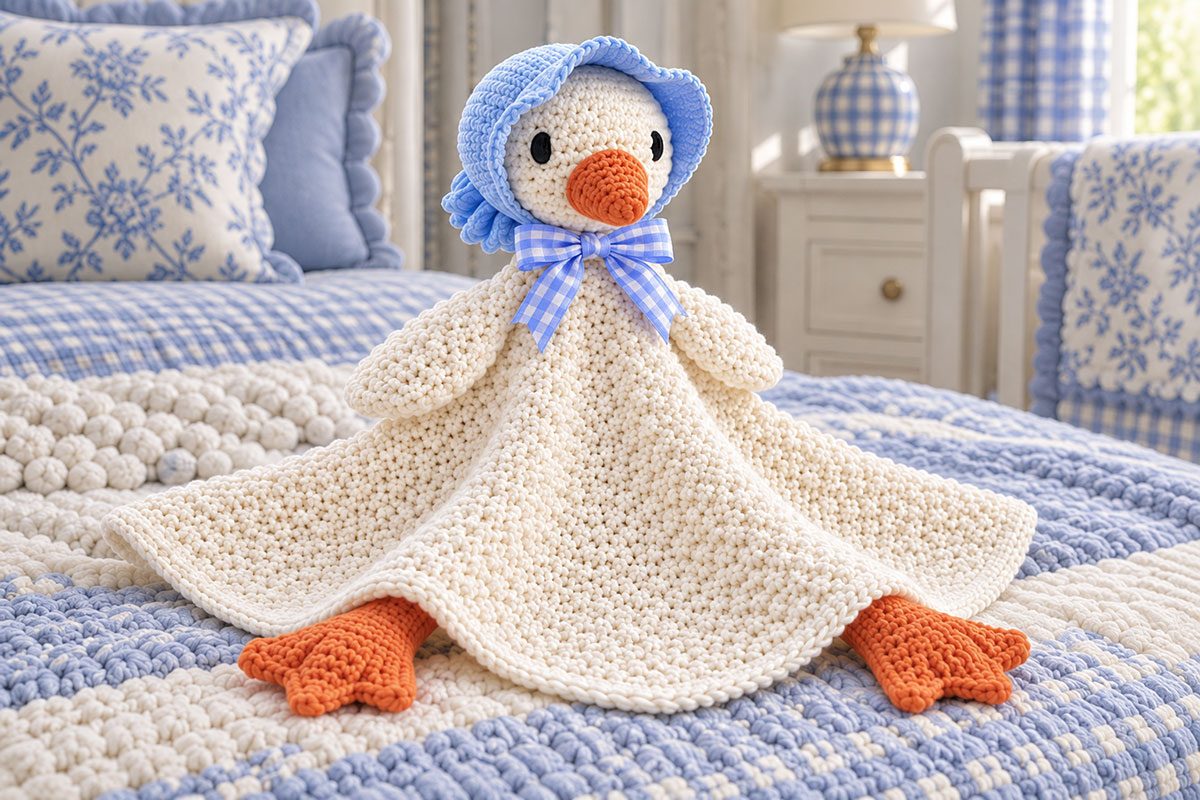
This free Silly Goose crochet pattern turns a classic white French Country goose into a soft baby lovey with far more personality than your average farmyard bird. She has embroidered eyes, a sassy orange bill and webbed feet, a pale blue crochet bonnet designed especially for her, and a periwinkle gingham fabric bow fixed beneath her chin at the bonnet tie point. Those details give the white crochet goose lovey a distinctive handmade look with just a hint of French Country charm. Her name is Sissy the Prissy Goose™. She is a little “prissy” in her fancy bonnet, but that is part of her personality and makes her especially cute for baby gifts, baby showers, and both elegant and farm animal nursery themes.
Explore More Free Crochet Baby Patterns
Pumpkin Goose Snuggler Lovey Pattern
Winter Woodland Lovey Patterns
Need Yarn for Your Silly Goose Lovey?
Finished Size for the Goose Made With This Silly Goose Crochet Lovey Pattern
At the gauge given below, the ivory lemon-peel blanket is expected to finish at about 18 inches square, including the edging. That gives her enough blanket to feel like a real lovey instead of a goose head sitting on a washcloth. I don't want to skimp on that part.
The stuffed goose head is expected to measure about 4 1/4 to 4 1/2 inches across. The neck adds about 2 1/2 to 2 3/4 inches from the bottom of the head to the blanket, bringing the finished height from the blanket surface to the top of the bonnet to roughly 8 inches.
Each wing should finish at approximately 4 inches long by 2 to 2 1/4 inches at its widest point. The orange webbed feet are expected to measure about 3 inches from the attachment edge to the tips of the toes and about 3 1/4 inches across the widest part of the toe fan.
The bill should finish at about 1 1/2 to 1 3/4 inches from tip to attachment edge, with a base close to 2 to 2 1/4 inches wide. The pale blue bonnet is sized specifically for the finished goose head rather than as a separate baby bonnet. Its lifted brim should frame the face without dropping over either embroidered eye, and the little gathered section at the back should stay modest rather than turning into a full ruffle.
Measurement note: These are calculated, expected measurements based on the stated gauge and construction. The written pattern has been mathematically checked against the finished example image, but it has not been physically test-crocheted from these instructions. Check your gauge before you get very far into the blanket or stuffed pieces. A small difference in yarn or tension can add up quickly on an 18-inch square.
Materials for This Free Silly Goose Crochet Pattern
I would use a smooth medium-weight yarn for this one rather than chenille. The little pebbles in the lemon-peel blanket, the webbed feet and that bonnet brim all need enough stitch definition to show what they're doing.
The amounts below are working allowances for the complete project rather than measured yarn consumption from a physically test-crocheted sample. Don't buy right on the edge. I'd rather have a little ivory left than discover I'm six rows short on the blanket.
- Approximately 550 yards medium #4 yarn in warm ivory or soft white
- Approximately 90 yards medium #4 yarn in pale baby blue for the bonnet
- Approximately 60 yards medium #4 yarn in warm orange for the bill and feet
- Black embroidery floss for the satin-stitch eyes
- Approximately 14 inches total of 5/8-inch periwinkle blue gingham cotton ribbon for the optional fixed decorative bow
- Small amount of polyester fiberfill for the head, neck and bill
- 5.0 mm crochet hook for the lovey blanket
- 3.5 mm crochet hook for the head, neck, bill, wings and feet
- 4.0 mm crochet hook for the bonnet
- Yarn needle
- Embroidery needle
- Matching sewing thread and hand-sewing needle for the fixed gingham bonnet bow
- Removable stitch markers
- Scissors
- Flexible measuring tape
The white doesn't need to be glaring white. I prefer a soft ivory here because the pale blue and periwinkle look prettier against it and the orange bill doesn't shout quite so loudly.
Gauge and the Two Fabrics We're Making
There are three gauges in this project. The stuffed goose pieces need a firm fabric so the stuffing doesn't work its way through, the blanket needs more drape, and the bonnet uses its own hook and gauge so it fits the finished head properly.
Blanket gauge with 5.0 mm hook: 14 lemon-peel stitches and 12 rows = approximately 4 inches.
Stuffed-piece gauge with 3.5 mm hook: 17 single crochet stitches and 19 rounds = approximately 4 inches.
Bonnet gauge with 4.0 mm hook: approximately 16 single crochet stitches and 18 rows = 4 inches.
Make the blanket gauge swatch in the actual lemon-peel stitch, not plain single crochet. That's the number that controls whether your 60-stitch blanket ends up close to 18 inches or wanders into baby-blanket territory.
The exact round gauge on the stuffed pieces matters less than getting a dense fabric, but the finished head should stay near the expected 4 1/4 to 4 1/2-inch width. If your head is noticeably larger, fix that before making the bonnet. The bonnet is supposed to fit her, not the other way around.
Abbreviations and Special Stitch
This pattern uses standard U.S. crochet terminology.
ch: chain
sc: single crochet
hdc: half double crochet
dc: double crochet
sl st: slip stitch
st/sts: stitch/stitches
rnd/rnds: round/rounds
inc: work 2 stitches in the same stitch
dec: single crochet 2 stitches together
sc3tog: single crochet 3 stitches together
Lemon-peel stitch: alternate 1 sc and 1 dc across the row. On the following row, work the same sc, dc sequence so each sc falls into the dc below it and each dc falls into the sc below it. That little height change is what gives the blanket the dense pebbled texture shown in the example image.
Chains used for turning do not count as stitches unless I specifically say otherwise.
Crochet the Goose Head and Neck
Use ivory yarn and the 3.5 mm hook. Work in continuous rounds unless a row specifically says otherwise. Move your beginning-of-round marker up every round.
Rnd 1: Make a magic ring and work 6 sc into the ring. (6)
Rnd 2: Inc in each st around. (12)
Rnd 3: [Sc 1, inc] 6 times. (18)
Rnd 4: [Sc 2, inc] 6 times. (24)
Rnd 5: [Sc 3, inc] 6 times. (30)
Rnd 6: [Sc 4, inc] 6 times. (36)
Rnd 7: [Sc 5, inc] 6 times. (42)
Rnd 8: [Sc 6, inc] 6 times. (48)
Rnd 9: [Sc 7, inc] 6 times. (54)
Rnd 10: [Sc 8, inc] 6 times. (60)
Rnds 11 through 18: Sc in each st around. (60)
Stop here for the eyes while the inside of the head is still accessible.
Place the face so the beginning-of-round marker sits at the center back. On Rnd 14, count forward from that marker and place one eye-center marker at St 24 and the second at St 36. The two eye centers are 12 stitches apart across the front. Position the satin stitches between Rnds 14 and 15 at those two marked columns.
Using black embroidery floss, make each eye as a small vertical satin-stitch oval about 3/8 inch high. Build the oval with several closely packed stitches until no ivory yarn shows through the center. Keep both eyes open and simple, just like the example image. Knot the floss securely inside the head.
Do not substitute plastic safety eyes. The embroidered eyes are part of the locked design.
Continue shaping the head.
Rnd 19: [Sc 8, dec] 6 times. (54)
Rnd 20: [Sc 7, dec] 6 times. (48)
Rnd 21: [Sc 6, dec] 6 times. (42)
Rnd 22: [Sc 5, dec] 6 times. (36)
Rnd 23: [Sc 4, dec] 6 times. (30)
Begin stuffing the head firmly enough to hold its round shape. Keep the front smooth around the eyes.
Rnd 24: [Sc 3, dec] 6 times. (24)
Do not fasten off. The remaining 24 stitches become the neck.
Rnds 25 through 36: Sc in each st around. (24)
Add small amounts of stuffing as you go. The neck needs support, but don't pack it so tightly that it looks like a post. It should still have a little softness.
After Rnd 36, leave the bottom open and fasten off, leaving a 24-inch sewing tail. The neck should measure approximately 2 1/2 inches from the base of the head to its open lower edge.
Crochet the Orange Goose Bill
Use orange yarn and the 3.5 mm hook. Work in continuous rounds, moving your beginning-of-round marker up after each round.
Rnd 1: Make a magic ring and work 6 sc. (6)
Rnd 2: Inc around. (12)
Rnd 3: [Sc 1, inc] 6 times. (18)
Rnd 4: [Sc 2, inc] 6 times. (24)
Rnd 5: [Sc 3, inc] 6 times. (30)
Rnds 6 through 8: Sc around. (30)
Fasten off, leaving a 24-inch sewing tail. Add only enough stuffing to keep the bill from collapsing. I want it softly rounded, not packed into a hard cone. Set the bill aside until assembly.
Crochet Two White Goose Wings
Make two with ivory yarn and the 3.5 mm hook. These stay unstuffed so they flop softly against the blanket.
Row 1: Leaving a 24-inch starting tail for assembly, ch 3. Sc in second ch from hook and in next ch. Turn. (2)
Row 2: Ch 1. Inc in each st. Turn. (4)
Row 3: Ch 1. Inc, sc 2, inc. Turn. (6)
Row 4: Ch 1. Inc, sc 4, inc. Turn. (8)
Row 5: Ch 1. Inc, sc 6, inc. Turn. (10)
Rows 6 through 14: Ch 1. Sc across. Turn. (10)
Row 15: Ch 1. Dec, sc 6, dec. Turn. (8)
Row 16: Ch 1. Sc across. Turn. (8)
Row 17: Ch 1. Dec, sc 4, dec. Turn. (6)
Row 18: Ch 1. Dec, sc 2, dec. Turn. (4)
Row 19: Ch 1. Dec twice. (2)
Fasten off and weave in the Row 19 yarn end. Keep the 24-inch starting tail at Row 1 for assembly. Each wing should be about 4 inches long and a little over 2 inches across its widest section.
The narrow Row 1 end is the shoulder end. Don't stuff the wings and don't sew all the way around them later. Attaching only the upper portion is what gives them the soft hanging look in the example image.
Crochet the Webbed Orange Feet
Make two with orange yarn and the 3.5 mm hook. Work these flat.
Row 1: Leaving a 20-inch starting tail for assembly, ch 9. Sc in second ch from hook and across. Turn. (8)
Rows 2 through 7: Ch 1. Sc across. Turn. (8)
Row 8: Ch 1. Inc, sc 6, inc. Turn. (10)
Row 9: Ch 1. Inc, sc 8, inc. Turn. (12)
Row 10: Ch 1. Inc, sc 10, inc. Turn. (14)
From here, work the three webbed toes separately. After turning Row 10, keep this side facing you whenever you rejoin yarn. Beginning at the edge where the first toe will be worked, divide the 14 stitches into 4 stitches for the first toe, the next 6 stitches for the center toe and the final 4 stitches for the third toe.
First toe, Row 11: Ch 1. Sc in the first 4 sts. Turn. Leave the remaining 10 stitches unworked. (4)
First toe, Row 12: Ch 1. Dec twice. Turn. (2)
First toe, Row 13: Ch 1. Dec. Fasten off.
With the same side of Row 10 facing you, insert the hook in the first unworked stitch immediately beside the first toe, pull up a loop of orange yarn and ch 1.
Center toe, Row 11: Sc in that stitch and in the next 5 unworked stitches. Turn. Leave the final 4 stitches of Row 10 unworked. (6)
Center toe, Row 12: Ch 1. Dec, sc 2, dec. Turn. (4)
Center toe, Row 13: Ch 1. Dec twice. Turn. (2)
Center toe, Row 14: Ch 1. Dec. Fasten off.
With the same side of Row 10 facing you, insert the hook in the first of the 4 remaining unworked stitches, pull up a loop of orange yarn and ch 1.
Third toe, Row 11: Sc across all 4 remaining stitches. Turn. (4)
Third toe, Row 12: Ch 1. Dec twice. Turn. (2)
Third toe, Row 13: Ch 1. Dec. Fasten off.
Weave in the toe ends but leave the original starting tail at Row 1 for assembly. At the stated gauge, the finished foot should be close to 3 inches long and about 3 1/4 inches across the widest part of the toe fan. The extra row on the center toe makes it slightly longer than the two outside toes.
Crochet the Lemon-Peel Stitch Lovey Blanket
Use ivory yarn and the 5.0 mm hook. This is the stitch we're locking to the example image: dense, pebbled lemon peel with no granny-style openings, shells or lacy holes.
Foundation: Ch 61.
Row 1: Sc in second ch from hook, dc in next ch. Repeat [sc in next ch, dc in next ch] across. Turn. (60)
Rows 2 through 50: Ch 1. Sc in first st, dc in next st. Repeat [sc, dc] across. Turn. (60)
Row 51: Ch 1. Sc in first st, dc in next st. Repeat [sc, dc] across. Do not turn. (60)
Because the row contains an even 60 stitches, the sc stitches automatically fall into the dc stitches from the previous row and the dc stitches fall into the sc stitches. That's what you want.
After Row 51, the unbordered square should be close to 17 inches at the stated gauge.
Border Rnd 1: After Row 51, ch 1. Do not turn. Work (sc, ch 1, sc) in the same stitch as the final dc of Row 51. Down the first side edge, work 1 sc in each of the 49 row ends from Row 50 through Row 2, adding a second sc in row ends 3, 9, 14, 20, 25, 30, 36, 41 and 47 when counted from the top. This gives 58 sc along the straight section of the side. Work (sc, ch 1, sc) in the last stitch of Row 1 at the bottom corner. Work 1 sc in each of the next 58 stitches across the foundation-chain edge. Work (sc, ch 1, sc) in the first stitch of Row 1 at the next corner. Up the second side edge, work 1 sc in each of the 49 row ends from Row 2 through Row 50, adding a second sc in row ends 3, 9, 14, 20, 25, 30, 36, 41 and 47 when counted from the bottom. Work (sc, ch 1, sc) in the first stitch of Row 51 at the final corner. Work 1 sc in each of the remaining 58 interior stitches across Row 51. Join with a sl st to the first sc of the beginning corner. You will have 240 sc plus four ch-1 corner spaces, with 60 sc between each pair of corner spaces.
Border Rnd 2: Ch 1. Work 1 reverse single crochet, also called crab stitch, in each sc around. Work 2 reverse single crochet stitches into each ch-1 corner space. Join and fasten off. (248 reverse sc)
That outer round gives the edge a little body without adding a decorative border that competes with the goose.
Expected finished size after edging is approximately 18 inches square.
Crochet the Pale Blue Goose Bonnet
Now for her fancy hat. Use pale blue yarn and the 4.0 mm hook. Work Rnds 1 through 9 in continuous rounds, moving your beginning-of-round marker up after each round.
The bonnet is built from the back of the head forward. That gives us a true bonnet shape instead of a cap with a floppy visor stuck onto it.
Rnd 1: Make a magic ring and work 6 sc. (6)
Rnd 2: Inc around. (12)
Rnd 3: [Sc 1, inc] 6 times. (18)
Rnd 4: [Sc 2, inc] 6 times. (24)
Rnd 5: [Sc 3, inc] 6 times. (30)
Rnd 6: [Sc 4, inc] 6 times. (36)
Rnd 7: [Sc 5, inc] 6 times. (42)
Rnd 8: [Sc 6, inc] 6 times. (48)
Rnd 9: [Sc 7, inc] 6 times. (54)
Fasten off. The beginning-of-round point will become the lower center back of the bonnet.
Count 3 stitches to the left of that point and 3 stitches to the right. Those 6 stitches remain unworked to form the little opening at the back neckline.
Join yarn in the first stitch immediately after the 6-stitch gap.
Rows 10 through 15: Ch 1. Sc across the remaining 48 sts. Turn after every row. (48)
Before adding the brim, try the bonnet on the finished goose head. The edge should reach forward enough to frame the face but should stop behind the embroidered eyes. If your gauge has carried it over the eyes, remove a body row now. Don't solve that by folding a too-deep bonnet backward later.
Brim Row 16: Ch 2. [Hdc in next 5 sts, 2 hdc in next st] 8 times. Turn. (56)
Brim Row 17: Ch 2. [Hdc in next 6 sts, 2 hdc in next st] 8 times. Turn. (64)
Brim Row 18: Ch 1. Sc across. (64)
Fasten off.
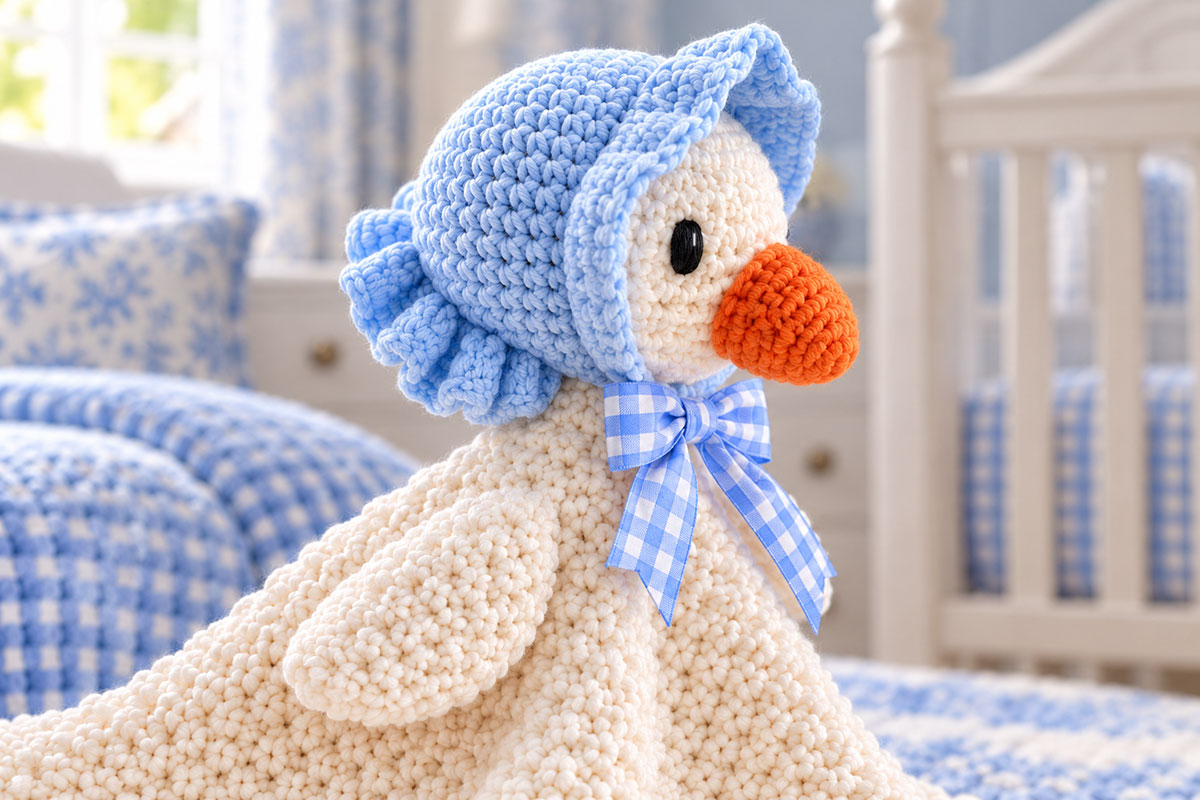
Those evenly spaced increases are deliberate. They let the brim flare away from the face so both sides sit high enough to expose the embroidered eyes, which is one of the details we're matching from the example image.
Back bonnet skirt: With the outside of the bonnet facing you, join the pale blue yarn at one lower back corner. Work 1 sc in each of the 6 row ends down the first side, 1 sc in each of the 6 unworked stitches across the center back, and 1 sc in each of the 6 row ends up the other side. Turn. (18)
Skirt Row 2: Ch 1. [Sc in next st, 2 dc in next st] 9 times. Turn. (27)
Skirt Row 3: Ch 1. Sc across. (27)
Fasten off, leaving an 18-inch pale blue sewing tail at the back of the bonnet. Weave in the other bonnet yarn ends. The remaining tail will be used to secure the bonnet during final assembly.
That's enough ruffle. I wouldn't add another row. The little skirt at the back gives her the French Country look without turning the bonnet into a costume.
Add the Optional Fixed Periwinkle Gingham Bonnet Bow
The gingham bow shown in the example image is a decorative detail. It is fixed securely beneath the chin to the crocheted neck and lower bonnet corners rather than made from long ribbon ties that circle the goose's neck.
For the decorative version, cut one 7-inch piece of 5/8-inch gingham ribbon for the bow loops, two 2 1/2-inch pieces for the tails and one 2-inch piece for the center wrap.
Turn the exposed raw end of each tail under about 1/8 inch twice and hand stitch the fold. Fold the 7-inch piece into a loop with the two ends overlapping by about 1/2 inch at the center back and stitch the overlap together. Place the two tails behind the loop, pinch the middle into a bow shape and wrap the 2-inch center piece around the middle. Stitch the center wrap closed at the back.
Set the finished bow aside until the bonnet has been attached in Step 6 of assembly. After the bonnet position is secured, center the bow on the front of the crocheted neck directly beneath the goose's chin, between the two lower front corners of the bonnet. Sew through the center wrap and the crocheted neck several times with matching thread. Add one small securing stitch through the back of each bow loop into the nearest lower bonnet corner. Tack the upper end of each short tail to the crocheted neck behind the bow so the tail bases cannot lift. The finished bow should look like the gingham bonnet tie in the example image without leaving two long free ribbons around the neck.
The crochet bonnet is complete without the gingham bow. For an infant or young child, I would omit the ribbon detail rather than treat it as a required part of the lovey. The U.S. Consumer Product Safety Commission warns that strings and straps on toys can present a strangulation hazard to young children. See the CPSC toy string and strap safety guidance.
Assemble the Silly Goose Lovey
Before you start sewing, count your crocheted pieces. You should have 8: one head-and-neck piece, one bill, two wings, two feet, one lemon-peel blanket and one bonnet. If you're adding the optional fixed gingham bow, its four ribbon pieces are assembled separately.
If something isn't on that list, don't start assembly yet.
1. Attach the bill. Center the lightly stuffed bill below the eyes. Pin its upper edge around Rnd 16 and its lower edge around Rnd 21, forming an attachment oval approximately 10 face stitches wide and 5 rounds high. Using the 24-inch orange tail, sew all 30 bill stitches to the face, distributing approximately 10 attachment stitches across the top, 5 down each side and 10 across the bottom. Before closing the last inch, add or remove a little stuffing if needed. Check the bill from the front, then finish sewing, knot securely and bury the tail inside the head.
2. Mark the front and find the exact blanket center. Choose one blanket corner to be the front and place a removable marker in that corner. On the 60-stitch blanket, the horizontal center lies between Sts 30 and 31. With 51 rows, Row 26 is the vertical center. The point where those meet is the center of the blanket.
3. Mark the neck attachment circle. Center a circle approximately 1 3/4 inches in diameter over that point. Place 8 removable markers evenly around the circle.
Before matching the neck to the markers, rotate the head so the center of the bill points directly toward the front corner you marked in Step 2. Keep that orientation while you sew. The neck has 24 stitches. Match every third neck stitch to one of the 8 markers. That divides the neck into 8 equal three-stitch sections and keeps it centered without asking you to eyeball a circle while you sew.
Using the long ivory tail, whipstitch the 24 neck stitches to the blanket, distributing three neck stitches evenly between each pair of markers. Go around once, check the head from all four sides, then go around a second time if the attachment needs reinforcing.
Remove all 8 markers.
4. Attach the wings. Place one wing on each side of the neck with the narrow Row 1 end pointing toward the head. Position the wings like the 3 o'clock and 9 o'clock points around the neck base. On each wing, use the side edge closest to the neck as the attachment edge. Using the 24-inch starting tail, sew through one edge stitch from each of the first 5 wing rows and into the blanket immediately beside the neck attachment circle. Attach only that upper inner edge. Leave the rest of each wing loose so it hangs naturally.
5. Attach the feet. Use the front corner marked in Step 2. On each of the two adjoining front edges, locate the ch-1 corner space from Border Rnd 1. Starting with the first sc immediately beside that corner space, count 15 sc along Border Rnd 1.
On each side, align the 8-stitch Row 1 edge of one orange foot with the next 8 sc of Border Rnd 1. Sew those 8 foot stitches securely to the underside of the blanket through Border Rnd 1, staying just inside the reverse-single-crochet edging. The webbed toes should extend beyond the blanket edge and point slightly outward.
Repeat on the other side. Before knotting the second foot permanently, lay the lovey flat and make sure the feet are the same distance from the front corner.
6. Attach the bonnet. Set the rounded crown over the back of the head, pull the little skirt down at the nape and arrange the brim so neither side covers an embroidered eye. Check the bonnet from the front before sewing.
Thread the 18-inch pale blue tail onto your yarn needle and run it invisibly through the lower back edge of the bonnet until it reaches the center back. Tack the center back securely to the head at the nape. With a separate length of pale blue yarn, add one secure attachment point at each lower side of the bonnet behind the eye area. Make several passes at each attachment point, knot securely and bury the yarn ends inside the crocheted fabric. The bonnet should stay in its intended position rather than being left as a loose removable piece.
If you're using the optional fixed gingham bow, make and attach it as described above after the bonnet position is correct.
7. Final inspection. Check every seam by gently tugging the head, bill, wings, feet and bonnet. If you added the optional fixed gingham bow, check its stitching as well. Weave in or bury every remaining yarn tail. Remove every pin and removable marker. Check again for loose thread ends before the lovey is given to a child.
Finishing and Baby-Use Safety Notes
The face on this Silly Goose uses embroidered black satin-stitch eyes. There are no plastic safety eyes and no buttons on the finished design.
That doesn't mean the finishing gets a free pass. Check the embroidery, bill, feet, wings and bonnet regularly for loosened stitches, pulled threads or damage. If you included the optional fixed bow, check its stitching too. If something starts coming loose, repair it before giving the lovey back to a child.
The gingham bow shown in the example image is an optional decorative fabric detail rather than a required part of the crochet pattern. For an infant or young child, omit the ribbon bow. If you make the decorative version for display, photography or gift presentation, use the short fixed bow described above rather than long functioning ribbon ties.
This lovey is for cuddling and supervised awake use. Do not leave it in an infant's crib, bassinet or other sleep space. For current infant sleep guidance, see the U.S. Consumer Product Safety Commission Safe Sleep guidance.
For washing, follow the care instructions for the yarn and ribbon you choose. If all materials are washable, use a gentle cold-water wash and reshape the bonnet, bill, wings and feet before drying. Check every sewn attachment again after washing.
And that's her. There's my little goose in all her glory with her orange feet, lemon-peel stitch blanket, fancy little blue bonnet and just enough gingham to make her a little bit sassy, a little bit silly and yes, very prissy.
If one goose isn't enough, the Pumpkin Goose Snuggler Lovey Pattern takes the goose idea in a completely different direction with a fun fall snuggler. It's not as elegant as Sissy but still cute and fun to make.
When you click on links to various merchants on this site and make a purchase, this may result in this site earning a commission. This does not affect the price you pay.

UBGI Gold Standard 2026
Reviewed under the site's
editorial checklist.
Photos, decorating ideas, party setups and reader submissions are shared for inspiration unless a page is specifically presented as a pattern, tutorial, reference guide or step-by-step project. Follow the instructions, measurements, safety guidance and manufacturer directions provided for the particular project or product.
About Jan | Contact | Baby Nursery Ideas (Blog) | Site Map | Privacy Policy | Disclosure Policy | Disclaimer | Affiliate Disclosure | Earnings Disclosure | Facebook | Pinterest
I am a participant in the Amazon Services LLC Associates Program, an affiliate advertising program designed to provide a means for us to earn fees by linking to Amazon. As an Amazon Associate I earn from qualifying purchases.
Copyright © 2006-2026. All Rights Reserved.