Free Crochet Christmas Garland Pattern with Bows and Snowflakes
By Jan Bay
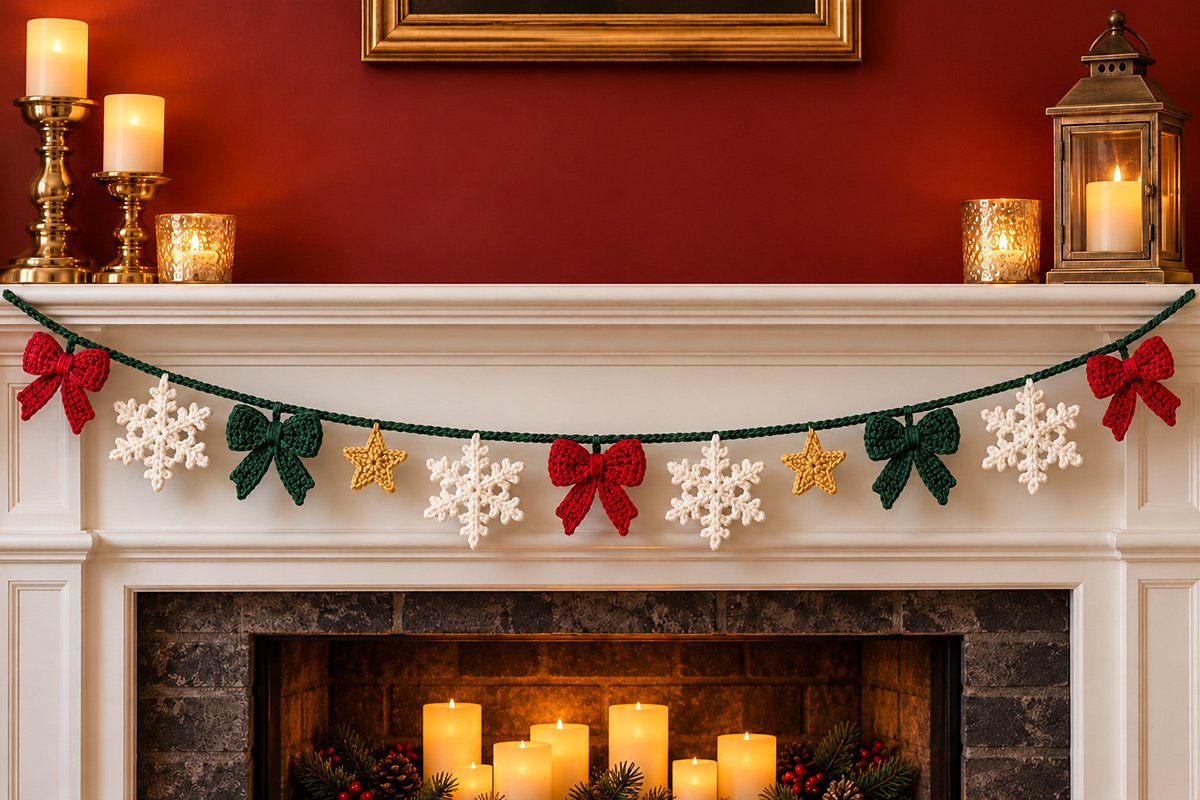
This free crochet Christmas garland pattern brings together pretty little red and evergreen crocheted bows, ivory snowflakes and antique-gold stars for a handmade holiday decoration. We're using familiar crochet motifs in a fresh arrangement that looks lovely across a Christmas mantel, window, wall or on your Christmas tree. You can make the complete garland as long or as short as you want to fit the space that needs decorations.
Explore More Free Christmas Crochet Patterns
Crochet Snowflake Appliqué Pattern
See Supplies for This Project Here.
Jump to a Section
Supplies for the Crochet Christmas Garland Pattern
Before you start, gather your yarn and take a look at the space where you'd like to hang the garland. The version pictured uses five bows, four snowflakes and two little gold stars. That's eleven separate pieces, all attached to an evergreen cord.
I'd choose smooth yarn with good stitch definition. The bows need enough body to hold their loops and pointed tails, while the snowflakes look prettier when you can see their individual branches.
Yarn colors:
- Cranberry red for three small bows.
- Deep evergreen for two small bows and the hanging cord.
- Ivory for four crochet snowflakes.
- Antique gold for two five-point stars.
For planning your yarn purchase, allow approximately 60 to 75 yards of cranberry worsted-weight yarn, 65 to 80 yards of evergreen worsted-weight yarn, 100 to 140 yards of ivory size 3 cotton crochet thread and 15 to 20 yards of antique-gold worsted-weight yarn. The ivory allowance covers four snowflakes at approximately 25 to 35 yards each. These are estimated working amounts, not quantities measured from a completed garland. Actual use depends on your tension and the individual motif patterns.
Other supplies:
- Smooth #4 worsted-weight yarn for the existing small bows and stars.
- 4 mm (G-6) crochet hook for the bows, stars and evergreen cord.
- 2.25 mm crochet hook for the ivory snowflake ornaments made with size 3 cotton thread.
- Yarn needle with an eye large enough for the yarn.
- Scissors.
- Flexible measuring tape or yardstick.
- Eleven removable stitch markers or short temporary yarn ties.
- Blocking mat and rustproof pins if your snowflakes need shaping.
- Two secure hanging hooks suitable for your display surface.
You won't need stuffing, beads, bells, wire or a glue gun. Everything on the garland can be crocheted and sewn together.
Use the same yarn and hook combination for all five bows, and make all four snowflakes alike. That will help the finished pieces hang at reasonably consistent sizes without having to keep adjusting the spacing.
Finished Garland Size and Gauge
The sample layout is designed around a 60-inch decorated span, measured along the cord from the first bow attachment to the last bow attachment. The original cord measures 68 inches before its ends are folded into hanging loops.
Expected finished measurements:
- Decorated section: approximately 60 inches along the cord.
- Finished hanging loops: approximately 2 inches long at each end.
- Small crochet bows: approximately 4 inches wide and 3 to 3 1/4 inches tall.
- Gold stars: approximately 2 1/2 inches across.
- Ivory snowflakes: approximately 5 to 6 inches across from tip to tip, excluding a hanging loop, when worked with size 3 cotton thread and a 2.25 mm hook.
- Attachment spacing: 6 inches from the center of one motif to the center of the next, measured along the cord.
These dimensions are targets for making the pictured arrangement. The amount the garland hangs below its supports will depend on the distance between your hooks, the weight of your yarn and how much slack you leave in the cord.
Gauge: Use the gauge supplied with the existing small bow pattern for the bows. The star pattern uses a 4 mm hook with worsted-weight yarn and produces a star expected to measure about 2 1/2 inches across. The cord is worked to a measured length rather than a fixed number of chain stitches.
Make one bow, one snowflake and one star first. Put them side by side. The snowflake should be larger than the bow, with an expected diameter of approximately 5 to 6 inches. Check that its six arms spread evenly and that neighboring motifs will have room to hang at the planned 6-inch attachment spacing. Correct any unusually loose or uneven stitches before making the other three snowflakes.
I'd rather adjust that first snowflake than discover after making four that they crowd the bows.
Stitches and Abbreviations
This pattern uses US crochet terminology. The individual bow, snowflake and star patterns have their own stitch instructions. You'll use the following abbreviations for the hanging cord and any finishing work.
- ch = chain
- sc = single crochet
- hdc = half double crochet
- sl st = slip stitch
- st = stitch
- sts = stitches
- RS = right side
- WS = wrong side
Skill level: Confident beginner for the cord and assembly. The snowflake pattern may require more experience with chains, decorative points and working into chain spaces.
The sewing matters just as much as the crochet here. Each motif needs to hang facing forward without spinning around the cord or pulling its neighboring pieces out of position.
Crochet Bows, Snowflakes and Stars
Make the eleven decorations before starting the hanging cord. You'll use my three existing crochet patterns for the bows, snowflakes and stars, with links to each one below. Then come back here for the evergreen cord, exact spacing and assembly instructions. It's much easier to arrange everything on a table before you begin attaching the pieces.
Make Five Small Crochet Bows
Use the small size from my free crochet bow pattern. This is the approximately 4-inch bow with two shaped loops, a gathered center and short pointed tails.
Make three cranberry bows and two evergreen bows. Follow the existing pattern's small-bow instructions, including its separate tail pieces and center wrap. There's no need to change the bow's stitch counts or make it larger for this garland.
Finish all five bows with their tails pointing downward and the right sides facing forward. Weave in any ends that won't be needed for attaching the bows to the cord.
Keep the center wraps neat and the loops evenly shaped. Don't sew the bows onto the cord yet.
Make Four Ivory Crochet Snowflakes
For the snowflakes, use the six-point design from my free crochet snowflake ornament pattern. Make four matching ivory snowflakes, omitting separate ornament hanging loops if the original pattern includes them. The snowflakes will attach directly to the garland cord.
If you'd rather use worsted-weight yarn for all the decorations, my crochet snowflake appliqué pattern is an alternative. That version uses a 4 mm hook and approximately 15 to 20 yards of worsted-weight yarn per snowflake, or 60 to 80 yards for four. Its expected diameter is approximately 5 to 5 1/4 inches. This changes the snowflake design from the featured ornament version, so treat it as an optional variation rather than substituting it into the main materials list.
Keep the six main points and their decorative branches intact. Those little details are what make the snowflakes stand out between the fuller bows.
After crocheting each snowflake, weave in the ends securely. If the points curl, lightly block the snowflake according to the yarn manufacturer's care instructions. Pin the six points into position without stretching the center out of shape.
Let the snowflakes dry completely before removing the pins. Don't attach damp pieces to the garland.
Make Two Antique-Gold Crochet Stars
Use my free crochet star pattern to make two matching five-point stars in antique-gold yarn.
The star is worked in two rounds. The first makes a center of ten single crochet stitches, and the second forms five points. Follow the complete instructions on the star pattern page, using the listed 4 mm hook and medium-weight yarn.
Make each star with one point facing straight up. The top point will become the attachment point for the garland.
Finish and weave in the ends. You can gently shape the points with your fingers or block them if needed.
Check Your Eleven Finished Pieces
Before moving on, you should have:
- Three cranberry bows.
- Two evergreen bows.
- Four ivory snowflakes.
- Two antique-gold stars.
That's eleven. Count them now, because the hanging cord instructions use eleven attachment positions.
Lay everything on a table with the red bow intended for the center in the middle. Place the other bows, snowflakes and stars around it in the order given below. Make sure every snowflake has one point facing upward and every star has one point at the top.
I'd keep the stars smaller than the bows. They're meant to be little flashes of gold, not the main attraction.
Crochet Garland Cord
Now we're ready to make the evergreen cord that holds everything together. The finished cord needs to be narrow enough that it doesn't compete with the bows, but firm enough to carry the eleven decorations without sagging unevenly between attachment points.
Use deep evergreen worsted-weight yarn and a 4 mm crochet hook. This cord uses one foundation chain and one reinforcing row of slip stitches.
Crochet the Cord
Starting tail: Leave approximately 12 inches of yarn before making your slip knot. This tail will be used to secure one of the hanging loops.
Step 1: Chain loosely until the chain measures approximately 72 to 74 inches when laid flat without stretching. This initial length is deliberately longer than the desired finished cord because the reinforcing row can shorten it.
Step 2: Working back along the chain, make 1 sl st in the back bump of the second chain from the hook. Continue with 1 sl st in the back bump of every remaining chain.
Keep the slip stitches relaxed. If you pull them tightly, the cord may curl or become noticeably shorter.
Step 3: Lay the completed cord flat and measure it without stretching. The target is 68 inches before making the hanging loops.
If your reinforced cord is too short or too long, undo the slip-stitch row, add or remove foundation chains, and work the reinforcing row again. The number of chains will depend on your actual gauge, so the measured 68-inch length is the checkpoint rather than an invented fixed chain count.
Step 4: Once the completed cord measures 68 inches, fasten off and leave another approximately 12-inch yarn tail for securing the opposite end loop.
Make the Hanging Loops
Measure 4 inches inward from each finished end of the cord and place a temporary marker at each point.
First loop: Fold the first 4 inches of cord back toward the center so the end meets its marker. Use the beginning yarn tail and a yarn needle to sew the cord end securely to the cord at that marker. Make several small stitches through both layers, taking care not to cut or split the yarn. The folded section forms a hanging loop approximately 2 inches long when flattened.
Second loop: Repeat at the opposite end, folding the last 4 inches of cord back and sewing the end securely at its marker.
Weave the remaining sewing tails through the reinforced cord, change direction and weave through again before trimming.
You now have approximately 60 inches of straight decorated cord between the two loop junctions, with a hanging loop at each end.
Mark the Eleven Attachment Positions
Keep the finished cord flat on the table. The two loop junctions will be the positions for the first and last cranberry bows.
Starting at the first loop junction, place a temporary marker every 6 inches along the cord until you reach the opposite loop junction.
Measured from the original first end of the 68-inch cord, the eleven attachment centers are:
4, 10, 16, 22, 28, 34, 40, 46, 52, 58 and 64 inches.
There are ten intervals of 6 inches, giving a decorated span of exactly 60 inches before hanging. The folded end loops account for the remaining 8 inches of original cord.
Check that the center marker is at 34 inches. That's where the middle cranberry bow goes.
Don't remove the other markers yet. They'll save you a good deal of measuring when you begin sewing.
Garland Assembly Instructions
Here's where the separate crochet pieces finally become a Christmas garland. Start with everything laid out in its final order, right sides facing up and bow tails pointing downward.
Arrange the Motifs
Beginning at the left hanging loop, use this exact order:
- Cranberry bow at 4 inches.
- Ivory snowflake at 10 inches.
- Evergreen bow at 16 inches.
- Antique-gold star at 22 inches.
- Ivory snowflake at 28 inches.
- Cranberry bow at 34 inches.
- Ivory snowflake at 40 inches.
- Antique-gold star at 46 inches.
- Evergreen bow at 52 inches.
- Ivory snowflake at 58 inches.
- Cranberry bow at 64 inches.
The center red bow is the focal point. The two green bows balance each other on either side, and the four snowflakes give the arrangement its lighter, more delicate sections.
Don't switch the center bow for a snowflake or star if you want the arrangement shown in the finished example. The bow is what gives the design its identity.
Attach the Five Crochet Bows
I'd attach the center cranberry bow first, followed by the two end bows and then the two evergreen bows. That gives you the main color arrangement before you start adding smaller decorations.
Thread a yarn needle with yarn matching the bow you're attaching.
Position the bow with its center wrap directly beneath its marked point on the evergreen cord. Keep both loops facing outward and both tails hanging downward.
Sew through the back of the center wrap and around the cord with several small stitches. Catch the back of each bow loop close to the center wrap with another securing stitch so the bow cannot rotate easily around the cord.
Keep the sewing stitches on the back whenever possible. Don't pull them so tightly that the center wrap becomes distorted.
Fasten the sewing yarn securely, weave the ends into the back of the bow and trim them. Repeat for the remaining four bows at their marked positions.
Before continuing, lift the cord gently. All five bows should face forward without twisting sideways.
Attach the Four Crochet Snowflakes
Position each ivory snowflake beneath its marker, with one of the six main points facing straight upward.
Using matching ivory yarn, sew the upper spoke to the evergreen cord with several small stitches. Catch a sturdy section of the upper spoke rather than fastening the entire snowflake through a single loose chain loop or delicate picot.
Pass the sewing yarn through the back of the upper spoke, around the cord and back through the spoke. Repeat until the attachment feels secure, keeping the lower five points free to hang naturally.
Fasten off and weave the sewing ends into the back of the snowflake. Repeat at the other three snowflake positions.
Keep the snowflake centers facing forward. If a snowflake twists, add a small stabilizing stitch at the upper spoke attachment rather than pulling harder on the first stitches.
Attach the Two Gold Stars
Place the two antique-gold stars at the 22-inch and 46-inch markers, with one point of each star facing upward.
Use matching gold yarn to sew the top point of each star securely to the cord. Catch more than one stitch in the upper point so the star isn't hanging by a single chain loop.
Make several small attachment stitches, fasten off and weave the ends into the back of the star.
Let the other four points hang free. Don't sew the center of the star against the cord because that would pull the star upward and change the shape of the finished display.
Check the Garland Before Hanging
Once all eleven motifs are attached, lay the entire garland flat and check the arrangement from end to end.
The two green bows should sit opposite one another, the gold stars should balance the center section, and every snowflake should point downward from a secure upper attachment.
Make sure the attachments haven't caused the cord to bunch up. If a piece has shifted, correct its position before hanging the garland.
Now lift the cord by both hanging loops. The motifs will settle differently when they're suspended, so this is the time to check that the bows still face forward and the stars aren't twisting.
Remove all eleven temporary attachment markers and check that no blocking pins or temporary yarn ties remain. Inspect both hanging loops, the backs of the bows and every snowflake and star attachment. All sewing ends should be securely woven in, with no loose strands hanging from the finished garland.
Finishing and Display Tips for Your Christmas Garland
Once you've checked the attachments, all that's left is finding a good place to hang your garland. The mantel arrangement shown in the example is one possibility, but the same cord and motifs can work across a holiday shelf or along a wall.
Hanging the Garland
Start with your two hanging hooks approximately 54 to 56 inches apart for the 60-inch decorated section. This is a suggested starting distance, not a fixed requirement. The extra cord length will let the center fall into a gentle curve.
Slip the two crocheted hanging loops over the hooks. Check that the hooks are securely installed and suitable for the surface and weight of the decoration.
Step back and look at the center bow. If the garland hangs too low, move the hooks farther apart within the available cord length. If you'd like a deeper curve, move them a little closer together.
The finished appearance will depend on your yarn's stretch and the size of the motifs, so make small changes and check the arrangement again.
Don't stretch the cord tightly to force it across a space wider than it was made to fit. A little drape is part of the design.
Keeping the Snowflakes and Bows Looking Neat
If a snowflake curls after hanging, take it down and lightly block it again using the care method appropriate for its yarn. Let it dry before returning it to the cord.
For a bow that seems a little lopsided, adjust the loops and tails with your fingers first. If it continues to turn sideways, check the attachment stitches on the back.
You shouldn't need wire or stiff plastic inside the bows. The original bow pattern already has a gathered center and shaped loops, and those are the features we're keeping.
Christmas Mantel and Nursery Safety
The example shows the garland hanging over an unlit fireplace with battery-operated LED pillar candles. That's the arrangement I'd use for a holiday display.
Never operate a fireplace while this garland or other combustible hanging decorations are positioned nearby. Remove the decorations before using the fireplace, and keep yarn away from open flames, hot surfaces, heaters and real candles.
The National Fire Protection Association's winter holiday safety guidance explains why decorations need to be kept away from candles and other heat sources.
If you're using this as a nursery or children's room decoration, hang it securely on a wall well beyond a child's reach. Never attach it to a crib, bassinet or other sleep space. A hanging cord is a decoration, not a toy.
Check the hanging loops and motif attachments before putting the garland up each Christmas. Replace any weakened yarn or loose stitching before displaying it.
Making a Shorter Garland
You can shorten the arrangement without changing the individual crochet patterns. Decide how many motifs you'd like, then allow 6 inches between neighboring attachment centers. Multiply the number of spaces by 6 inches and add 8 inches for the two folded hanging loops. For example, seven motifs create six spaces measuring 36 inches altogether, so you'd make a 44-inch reinforced cord before folding the ends. Keep a bow in the center and arrange the remaining decorations to balance the colors on either side.
For the full version shown here, though, I'd keep all eleven. Five bows are enough to make the design feel like a bow garland, while the snowflakes and little gold stars give it just the right amount of Christmas detail.
And if you have leftover cranberry or evergreen yarn, the small crochet bow pattern makes a matching decoration for gift wrapping or a Christmas stocking. No need to invent another bow.
You can also use the five-point crochet stars as separate ornaments. Both projects use motifs you've already made, which is a nice way to get more Christmas decorating out of the same yarn.
Keep the colors together, hang the bows straight and let those little snowflakes show. That's plenty of Christmas charm for one garland.
When you click on links to various merchants on this site and make a purchase, this may result in this site earning a commission. This does not affect the price you pay.

UBGI Gold Standard 2026
Reviewed under the site's
editorial checklist.
Photos, decorating ideas, party setups and reader submissions are shared for inspiration unless a page is specifically presented as a pattern, tutorial, reference guide or step-by-step project. Follow the instructions, measurements, safety guidance and manufacturer directions provided for the particular project or product.
About Jan | Contact | Baby Nursery Ideas (Blog) | Site Map | Privacy Policy | Disclosure Policy | Disclaimer | Affiliate Disclosure | Earnings Disclosure | Facebook | Pinterest
I am a participant in the Amazon Services LLC Associates Program, an affiliate advertising program designed to provide a means for us to earn fees by linking to Amazon. As an Amazon Associate I earn from qualifying purchases.
Copyright © 2006-2026. All Rights Reserved.