Lion Baby Quilt Pattern for a Jungle Nursery
By Jan Bay
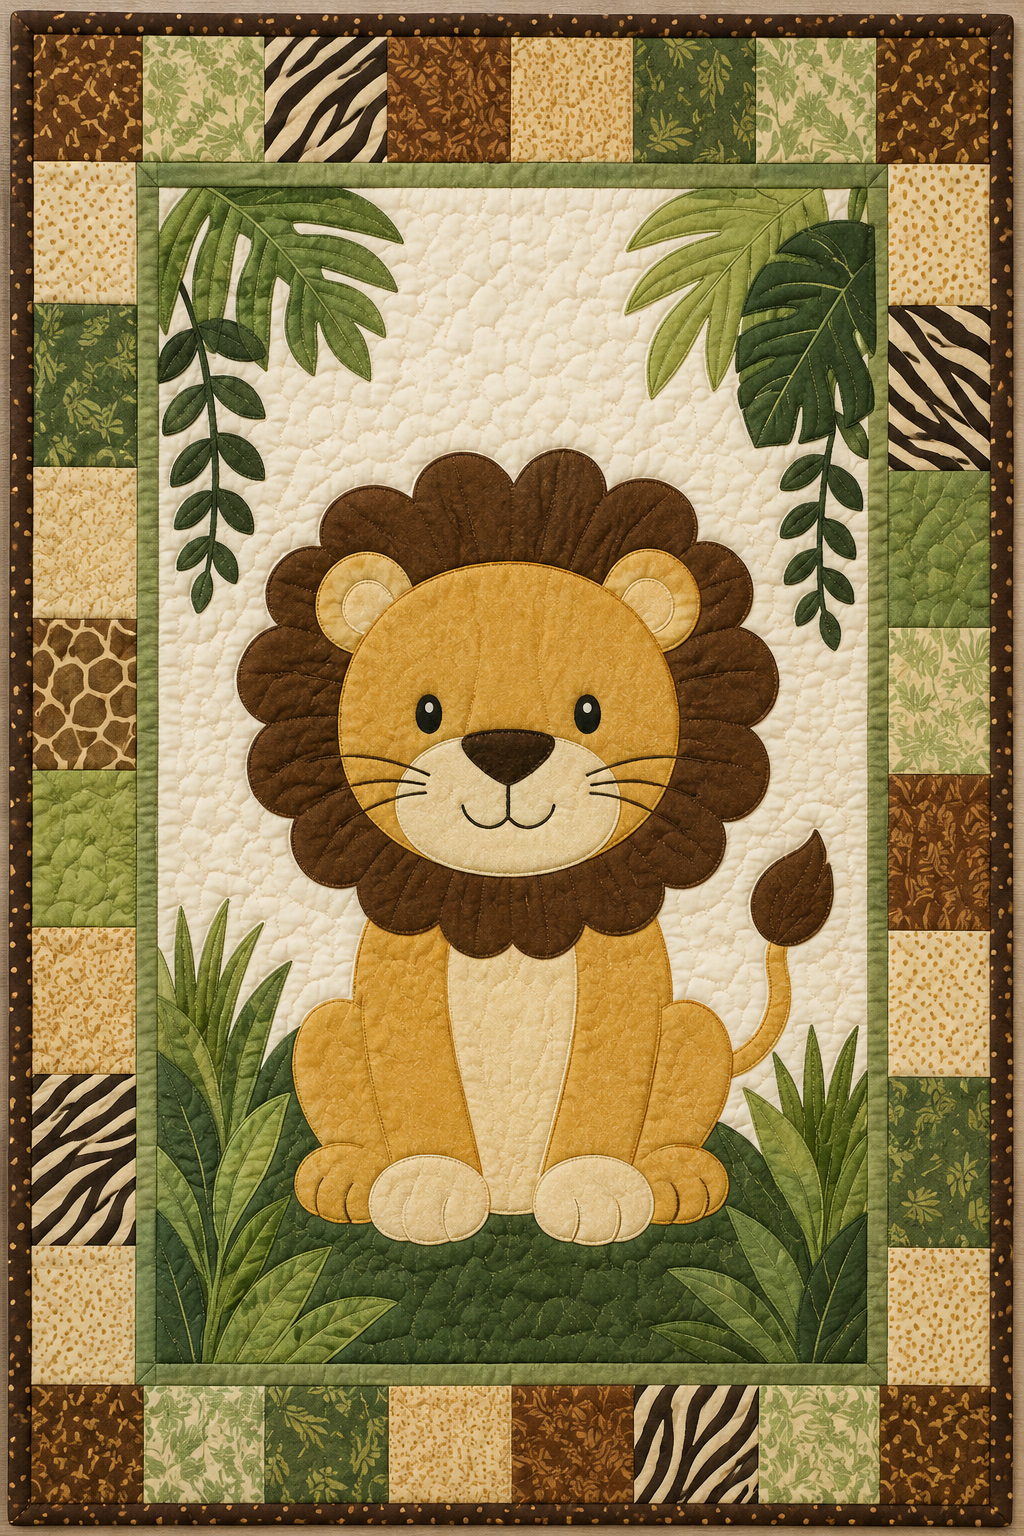
Make a lion baby quilt pattern with a simple appliqué lion, crib-size layout ideas, jungle nursery colors, and easy finishing details for a handmade baby quilt that works as nursery decor or a baby shower gift.
Explore More Baby Quilt Ideas
Helpful Quilting Supplies For This Baby Quilt
Jump to a Section
Lion Baby Quilt Pattern Specifications
This lion baby quilt pattern is designed to finish at approximately 36 inches by 48 inches, making it an ideal crib quilt, nursery wall hanging, tummy-time quilt, or handmade baby shower gift. The quilt features a large seated lion surrounded by tropical leaves, grassy accents, and jungle-inspired borders. Oversized appliqué pieces with smooth curves make the pattern easy to trace, cut, and stitch while creating a bold focal point for a jungle or safari nursery.
Finished Quilt Specifications
- Designed Finished Size: Approximately 36" × 48"
- Finished Center Panel: Approximately 28" × 40" before borders
- Skill Level: Intermediate
- Seam Allowance: ¼ inch throughout
- Construction Method: Fusible raw-edge appliqué with machine quilting
- Center Design: Large lion appliqué scene
- Border Style: Pieced jungle-inspired border
- Binding: Double-fold binding
Pattern Includes
- Full-size printable appliqué templates
- Master layout reference sheet
- Master appliqué inventory
- Step-by-step assembly instructions
- Quilt construction guide
- Border assembly instructions
- Binding instructions
Color Guide
| Quilt Element | Suggested Fabric |
|---|---|
| Background | Ivory or Cream |
| Lion Body | Golden Tan |
| Lion Mane | Dark Brown |
| Muzzle, Belly & Paw Pads | Cream |
| Leaves | Medium Green |
| Grass | Dark Green |
| Border | Mixed Jungle Prints |
| Binding | Dark Brown |
Materials & Supplies
Gather all fabrics before printing the templates. Quilting cottons in warm golds, browns, creams, and leafy greens create the classic jungle look, although any coordinating palette may be substituted to match your nursery.
- Cream or ivory quilting cotton for the background panel
- Golden tan quilting cotton for the lion
- Dark brown quilting cotton for the mane and tail tuft
- Cream quilting cotton for the muzzle, belly, inner ears, and paw pads
- Several green quilting cottons for leaves and grasses
- Assorted quilting fabrics for the pieced border
- Crib-size cotton batting
- Backing fabric
- Lightweight paper-backed fusible web
- 50-weight cotton quilting thread
- Rotary cutter, acrylic ruler, and cutting mat
- Fabric scissors and appliqué scissors
- Fabric marking pencil
- Steam iron and pressing surface
- Temporary fabric adhesive (optional)
- Appliqué pressing sheet (recommended)
- Walking foot or free-motion quilting foot
- Safety pins or quilting spray for basting
Thread Recommendation
A quality 50-weight cotton quilting thread works well for both piecing and appliqué. Match the thread color to each appliqué fabric for nearly invisible stitching, or use a fine monofilament thread if you prefer the stitching to disappear against the fabric.
Master Appliqué Inventory
Print every template page at 100% scale. Do not use "Fit to Page," "Shrink to Fit," or any other printer scaling option. Before tracing onto fusible web, compare every template with the Master Layout Diagram so you understand where each appliqué piece belongs before cutting fabric.
| Template | Appliqué Piece | Quantity |
|---|---|---|
| Reference | Finished Appliqué Placement Guide | 1 |
| A | Lion Body | 1 |
| B | Lion Head | 1 |
| C | Mane Segment | See Master Layout Diagram |
| D | Outer Ear | 2 |
| E | Inner Ear | 2 |
| F | Muzzle | 1 |
| G | Nose | 1 |
| H | Belly | 1 |
| I | Front Paw | 2 |
| J | Rear Paw | 2 |
| K | Tail | 1 |
| L | Tail Tuft | 1 |
| M | Large Tropical Leaf | 4 |
| N | Small Tropical Leaf | See Master Layout Diagram |
| O | Left Grass Cluster | 1 |
| P | Right Grass Cluster | 1 |
| Q | Grass Ground Base | 1 |
Before You Begin
Print every template at full size, verify the printer scale if a test square is provided on the template pages, cut all appliqué pieces, organize them alphabetically, and dry-arrange the complete lion on the background fabric before permanently fusing any pieces into place. Compare your layout with the Master Layout Diagram one final time before stitching.
© Jan Bay, Unique Baby Gear Ideas. You may sell finished quilts made from this pattern, but the pattern, templates, photographs, illustrations, and written instructions may not be copied, redistributed, republished, or sold in any form.
Master Layout and Placement Guide
Use the master template reference and the finished appliqué placement guide before fusing any fabric. The master reference shows the full quilt design, while the placement guide shows the order for arranging the appliqué pieces on the background panel.

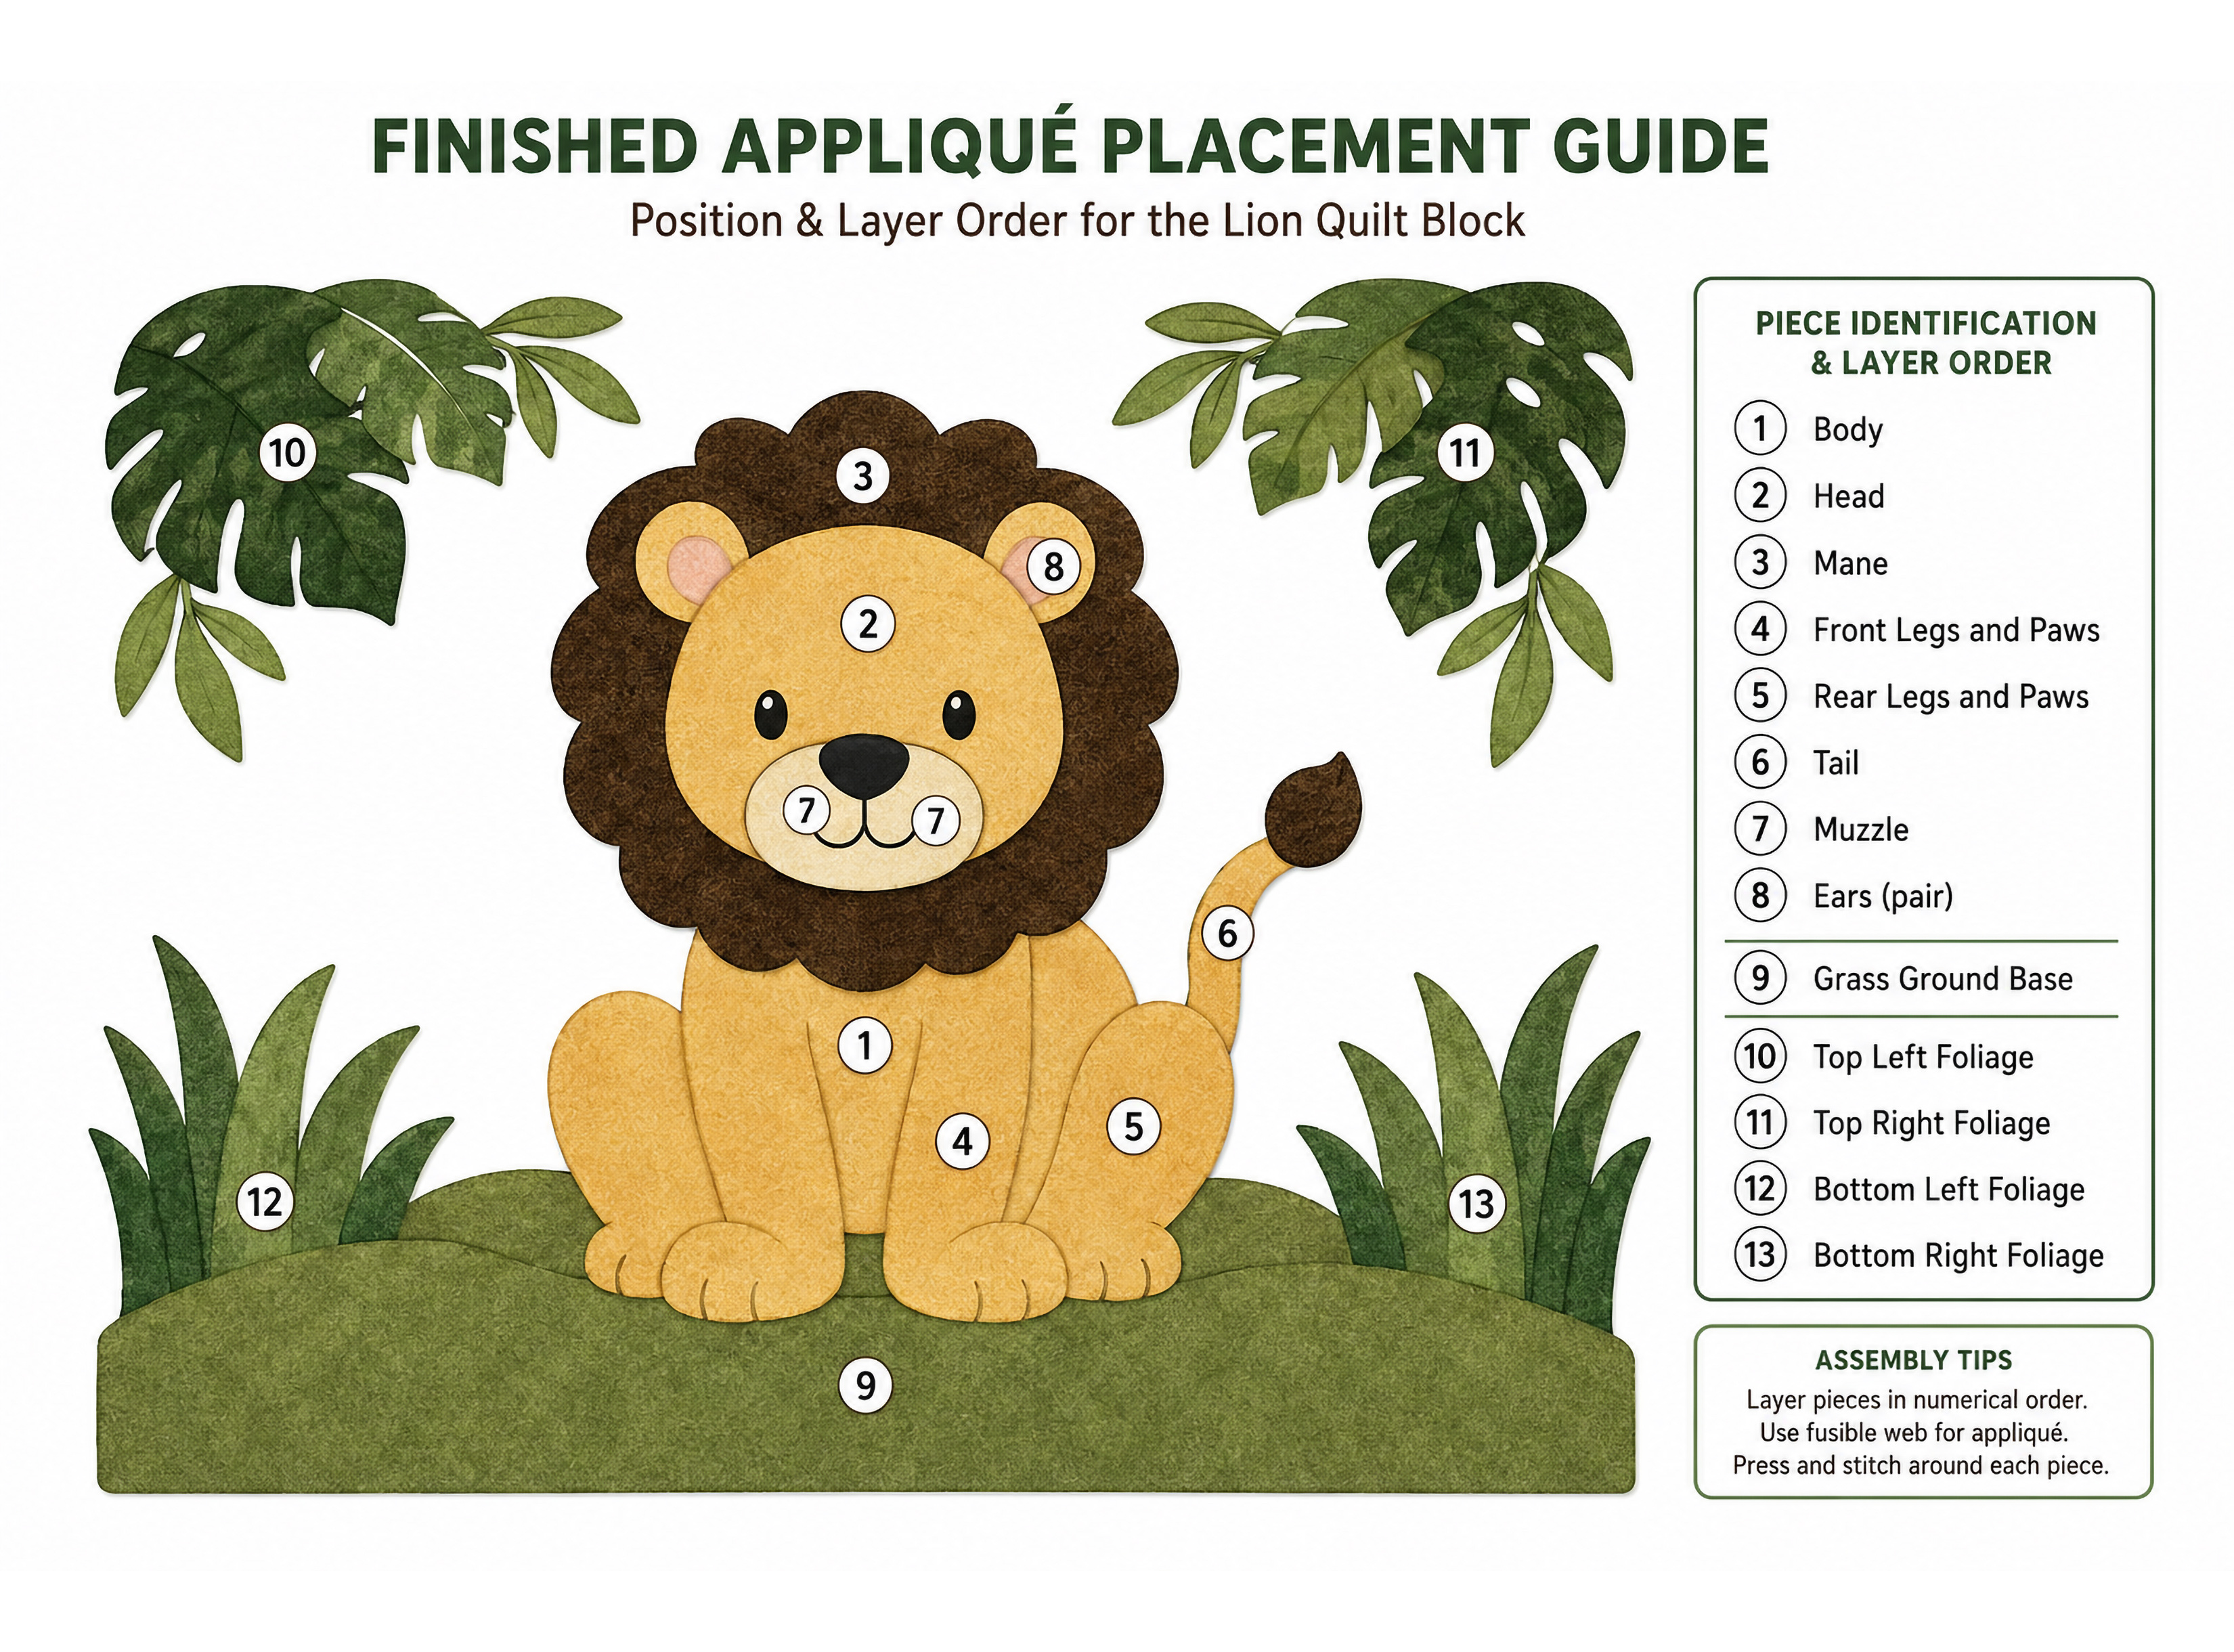
Placement Order
- Place the grass ground base across the lower background panel.
- Add the lion body over the grass base.
- Place the rear legs and paws on both sides of the body.
- Add the front legs and front paws over the lower body.
- Position the tail on the right side of the lion with the tail tuft added on the tip.
- Place the mane above the body.
- Add the head over the center of the mane.
- Tuck the ears behind the head and inside the mane area.
- Add the muzzle and nose to the face.
- Arrange the top left and top right foliage.
- Arrange the bottom left and bottom right foliage.
Printable Template Downloads
Print the template pages at 100% scale. Do not use "Fit to Page" or "Scale to Fit." The grass ground base is split into left and right halves so it can be printed, matched, taped, and traced as one full-width appliqué piece.
- Master Template Reference Sheet
- Finished Appliqué Placement Guide
- Lion Body Template
- Lion Head Template
- Lion Mane Template
- Front Legs and Paws Template
- Rear Legs and Paws Template
- Ears, Muzzle and Tail Template
- Top Left Jungle Foliage Template
- Top Right Jungle Foliage Template
- Bottom Left Jungle Foliage Template
- Bottom Right Jungle Foliage Template
- Grass Ground Base Left Half
- Grass Ground Base Right Half


Lion Appliqué Assembly Order
Assemble the pieces included in this lion baby quilt pattern from the background forward, following the natural layering of the appliqué pieces. Keep the Master Template Reference Sheet and the Finished Appliqué Placement Guide beside your work throughout the assembly process. Arrange every piece first without fusing so adjustments can be made before anything is permanently attached.
Preparation Checklist
- Print every template page at 100% scale.
- Trim and tape the Grass Ground Base Left Half and Right Half together.
- Trace every template onto the paper side of lightweight fusible web.
- Fuse the web to the wrong side of each fabric according to the manufacturer's directions.
- Cut every appliqué piece directly on the traced outline.
- Organize the pieces before beginning assembly.
- Lay out the complete quilt before permanently fusing anything.
Step 1 — Position the Grass Ground Base
Place the full-width Grass Ground Base across the lower portion of the background panel. This piece forms the foundation of the jungle scene and should remain behind the lion and surrounding greenery.
Step 2 — Position the Tail
Place the tail on the right side of the lion. The base of the tail should extend behind the body so only the visible portion appears after the body is added.
Step 3 — Position the Lion Body
Center the lion body over the Grass Ground Base and partially over the tail. Compare its location with the Finished Appliqué Placement Guide before continuing.
Step 4 — Add the Rear Leg Assembly
Position the rear leg assembly so it overlaps the lower body and rests naturally on the Grass Ground Base.
Step 5 — Add the Belly
Center the belly appliqué on the lower portion of the body. Check that equal spacing remains around the edges before pressing.
Step 6 — Add the Front Leg Assembly
Position the front leg assembly over the lower front of the body. Verify that both paws rest evenly on the Grass Ground Base.
Step 7 — Position the Mane
Center the mane above the body. Align the lower edge of the mane with the upper body so the face opening remains centered.
Step 8 — Add the Outer Ears
Slide the outer ears behind the mane so only the visible ear portions extend above the mane.
Step 9 — Add the Inner Ears
Center the inner ears inside the outer ears before continuing.
Step 10 — Position the Head
Center the head inside the mane opening. Compare its position with the Finished Appliqué Placement Guide before proceeding.
Step 11 — Add the Muzzle and Nose
Center the muzzle on the lower portion of the head and position the nose directly above it. Compare the completed face with the Finished Appliqué Placement Guide before fusing.
Step 12 — Arrange the Jungle Foliage
Position the Top Left, Top Right, Bottom Left, and Bottom Right Jungle Foliage around the lion. Begin with the largest foliage pieces before filling the remaining spaces with the smaller leaves shown on the placement guide.
Step 13 — Position the Grass Clusters
Add the Left Grass Cluster and Right Grass Cluster over the Grass Ground Base so they partially overlap the lower edges of the lion and blend naturally into the surrounding foliage.
Step 14 — Final Dry Layout Inspection
Step back and compare your complete arrangement with both reference sheets. Check the balance of the lion, foliage, and ground before fusing. Make any final adjustments while every piece can still be moved.
Fusing the Appliqué
Fuse the appliqué beginning with the lowest background pieces and working upward through the overlapping layers. Allow the fused pieces to cool completely before moving the quilt top.
Appliqué Stitching
- Blanket Stitch for a traditional hand-appliqué appearance.
- Narrow Satin Stitch approximately 2–3 mm wide for a bold decorative edge.
- Narrow Zigzag Stitch approximately 2.5 mm wide with a stitch length of 0.5–0.7 mm.
- Straight Stitch close to the edge for a clean, modern finish.
After completing the appliqué stitching, lightly press the quilt top from the back using a pressing cloth if desired. The quilt top is now ready for border construction.
Border Construction
The appliqué portion of this lion baby quilt pattern is now complete. The remaining steps finish the quilt by adding borders, quilting, and binding. Unless otherwise noted, sew all seams using a ¼-inch seam allowance.
Before Adding Borders
- Trim all loose appliqué threads.
- Press the quilt top from the back.
- Confirm the finished center panel measurements.
- Cut border strips only after confirming the completed center panel size.
- Square the quilt top if necessary before attaching the borders.
Step 1 — Measure the Center Panel
Measure the quilt vertically through the center and again horizontally through the center. Avoid measuring along the outer edges, as slight stretching during appliqué can produce inaccurate border lengths.
Step 2 — Cut the Side Borders
Cut two side border strips using the measured center length. If additional length is needed, join strips using diagonal seams and press the seams open to reduce bulk.
Step 3 — Attach the Side Borders
Fold each border strip and the quilt top in half to locate their centers. Match the centers first, then the ends, distributing any remaining fullness evenly before stitching.
Press the seam allowances toward the borders.
Step 4 — Measure for the Top and Bottom Borders
After attaching the side borders, measure across the center of the quilt again. Use this measurement when cutting the top and bottom borders so the finished quilt remains square.
Step 5 — Attach the Top and Bottom Borders
Match the centers and corners before stitching. Press the seam allowances toward the borders and verify that the quilt lies flat without ripples or fullness.
Preparing the Quilt Sandwich
Lay the backing fabric wrong side up on a clean, flat surface. Center the batting over the backing, then place the finished quilt top right side up. Smooth each layer from the center outward before securing the quilt sandwich.
Recommended Layer Order
- Backing fabric (wrong side up)
- Low-loft cotton or cotton-blend batting
- Finished quilt top (right side up)
Low-loft cotton or cotton-blend batting provides excellent stitch definition while keeping the appliqué smooth and reducing unnecessary bulk.
Choose a backing fabric at least 4 inches larger than the finished quilt on all four sides to provide room for quilting and final trimming.
Secure the Quilt Sandwich
Secure the three layers using curved safety pins, thread basting, quilting clips, or temporary quilting spray. Begin in the center and work outward to eliminate wrinkles before quilting.
Machine Quilting
The quilting should enhance the lion without competing with the appliqué. Simple quilting designs add texture while allowing the lion and jungle scene to remain the focal point.
Recommended Quilting Designs
- Echo quilting around the lion.
- Straight-line quilting in the borders.
- Gentle curved background quilting.
- Leaf-inspired quilting around the jungle foliage.
- Horizontal curved quilting that follows the contour of the Grass Ground Base.
Increase the stitch length slightly when quilting through multiple appliqué layers if your machine feeds heavily fused areas more slowly.
Walking Foot Tip
A walking foot helps feed all three quilt layers evenly and reduces shifting during straight-line quilting.
Quilting Tips
- Begin quilting near the center of the quilt.
- Work outward toward the borders.
- Support the quilt to prevent stretching.
- Remove basting pins as quilting progresses.
- Check the backing periodically for puckers.
Binding the Quilt
Trim the excess batting and backing even with the quilt top before preparing the binding.
Attach the Binding
- Prepare double-fold binding strips.
- Sew the binding to the front of the quilt using a ¼-inch seam allowance.
- Miter each corner as you sew.
- Join the binding ends with a diagonal seam before completing the final side.
- Fold the binding to the back of the quilt.
- Secure the binding by hand or machine stitching.
Final Inspection
- Inspect every appliqué edge.
- Check the quilting for missed areas.
- Verify that the binding is securely stitched around the entire quilt.
- Trim all remaining loose threads.
- Confirm that the finished quilt lies flat.
Give the finished quilt a final light press from the back using a pressing cloth if desired. Your lion baby quilt is now complete.
Care Instructions
For additional quilting techniques, fabric care information, and educational resources, visit the Quilt Alliance.
This lion baby quilt pattern creates a special item designed to become a well-loved keepsake. Proper care helps preserve the appliqué, quilting, and fabric colors through years of regular use.
Recommended Quilt Care
- Machine wash using cold water on a gentle cycle.
- Wash with similar colors.
- Use a mild detergent.
- Avoid bleach and harsh stain removers.
- Tumble dry on low heat or air dry.
- Remove promptly to minimize wrinkles.
Pressing the Quilt
If pressing is needed after washing, press from the back using a pressing cloth. Avoid prolonged direct heat on heavily fused appliqué pieces.
Storage
Store the quilt in a cool, dry location away from prolonged direct sunlight. Avoid storing quilts in plastic containers for long periods, as natural fibers benefit from air circulation.
Printing the Templates
All template pages are designed to print at full size. Always print using your PDF or printer's Actual Size or 100% setting.
Printing Checklist
- Print at 100% scale.
- Do not use "Fit to Page" or "Shrink to Fit."
- Use standard US Letter paper unless noted otherwise.
- Trim and tape multi-page templates together before tracing.
- Trace templates onto fusible web rather than cutting the printed originals.
Reusing the Templates
For repeated use, transfer the printed templates onto template plastic, cardstock, or other durable material before tracing onto fusible web.
Copyright and Personal Use
This lion baby quilt pattern is provided for personal use. You may print the templates and create finished quilts for yourself or as handmade gifts.
You may not reproduce, redistribute, republish, upload, or sell the written instructions, photographs, diagrams, templates, or downloadable files without written permission.
Finished quilts made from this pattern may be sold in small quantities as handmade items, provided they are individually crafted and not mass produced.
Lion Baby Quilt Pattern FAQs
Can I resize the lion baby quilt pattern?
Yes. The appliqué templates can be enlarged or reduced together using the same percentage so every piece remains in proportion.
Can I use hand appliqué instead of fusible appliqué?
Yes. The templates work equally well for needle-turn, freezer-paper, or traditional hand appliqué techniques.
Can I change the fabric colors?
Absolutely. Traditional golden lion fabrics, neutral nursery colors, safari prints, or modern solids all work well with this design.
What batting works best?
Low-loft cotton or cotton-blend batting provides excellent stitch definition while allowing the appliqué to remain smooth.
Is this pattern suitable for beginners?
This pattern is best for quilters with basic piecing and appliqué experience. A confident beginner may be able to complete it, but the number of appliqué pieces makes it closer to an intermediate project.
Finished Lion Baby Quilt Pattern
This free lion baby quilt pattern includes printable templates, a master layout diagram, appliqué placement guide, complete assembly instructions, border construction, quilting suggestions, binding directions, and care information to help you create a nursery quilt that can be enjoyed for years.
When you click on links to various merchants on this site and make a purchase, this may result in this site earning a commission. This does not affect the price you pay.

UBGI Gold Standard 2026
Reviewed under the site's
editorial checklist.
Photos, decorating ideas, party setups and reader submissions are shared for inspiration unless a page is specifically presented as a pattern, tutorial, reference guide or step-by-step project. Follow the instructions, measurements, safety guidance and manufacturer directions provided for the particular project or product.
About Jan | Contact | Baby Nursery Ideas (Blog) | Site Map | Privacy Policy | Disclosure Policy | Disclaimer | Affiliate Disclosure | Earnings Disclosure | Facebook | Pinterest
I am a participant in the Amazon Services LLC Associates Program, an affiliate advertising program designed to provide a means for us to earn fees by linking to Amazon. As an Amazon Associate I earn from qualifying purchases.
Copyright © 2006-2026. All Rights Reserved.