Free Crochet Baby Bib Pattern to Personalize With Appliqués
By Jan Bay
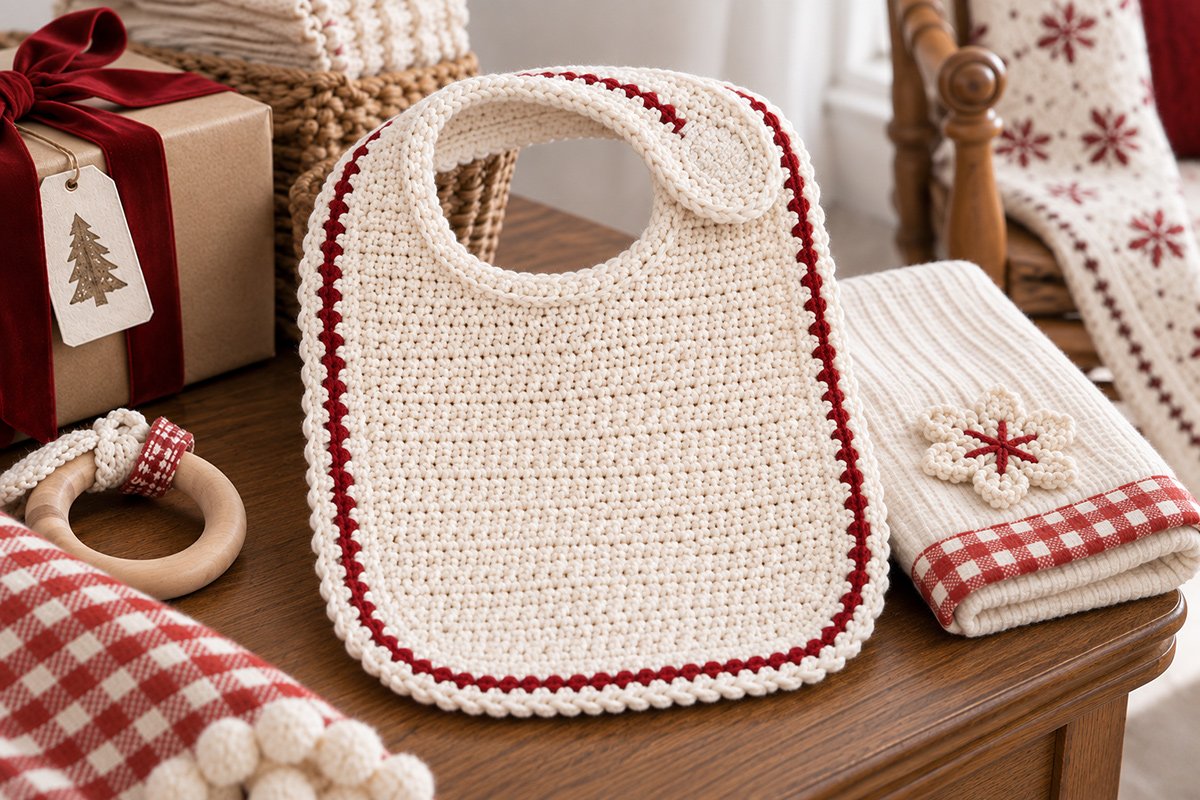
I designed this free crochet baby bib pattern to make a practical cotton bib with a broad, flat front that is perfect for adding one of my crochet appliqués. The shape is very simple, with a narrow strip of contrasting edging that leaves plenty of room to personalize it with one of my crocheted snowman, animal, holiday or other themed designs. It is so simple yet so cute that you may want to keep a small pile of them in your stash, ready for the next baby gift basket.
Explore More Free Crochet Baby Patterns
Supplies for This Crochet Baby Bib
Jump to:
Free Crochet Baby Bib Pattern
I kept the actual bib simple on purpose. The broad front is worked in a dense, fairly smooth stitch so you have a good background for a crochet appliqué without a lot of texture competing with it. The narrow cranberry stripe gives the plain bib just enough color on its own, and you can change that one little row to match whatever appliqué you plan to add.
The bib is worked from the lower edge upward in rows. A few increases shape the rounded lower corners before you continue straight up the body. The upper section is divided to form the neck opening and two matching shoulders. A separate crocheted closure strap crosses the top of the neckline and overlaps one shoulder to make the rounded tab you see in the example image. The edging is added before the strap is attached.
Pattern note: This pattern was drafted to reproduce the finished bib shown in the example image and the stitch counts and measurements have been mathematically checked at the stated gauge. It has not been physically test-crocheted from these instructions, so check your gauge and the measurement checkpoints as you go.
Finished Size
At the stated gauge, the 34-stitch bib body is calculated to measure approximately 8 1/2 inches wide before the outer edging is added. With the three narrow outer edging passes in place, expect the finished bib to measure approximately 9 to 9 1/2 inches wide and about 10 to 10 1/2 inches long, depending on your single crochet gauge.
The broad center section gives you an appliqué area of about 5 1/2 inches wide by 5 inches high. I would keep most appliqués in the 3 1/2 to 4 1/2 inch range so there is still plenty of cream showing around the design.
Before the neckline edging is added, the shaped opening is calculated to measure approximately 4 1/2 inches across at its widest point. After the two cream edging passes are complete, expect the clear opening to be closer to 4 inches across while the bib is lying flat, depending on your single crochet gauge. Because this pattern has not been physically test-crocheted, treat these as checkpoints rather than claimed measured sample dimensions.
Materials
Yarn: Medium weight #4 washable cotton yarn. Allow approximately 150 yards of cream for the bib and outer edging and about 20 yards of cranberry for the narrow contrast stripe.
I would use cotton here rather than a fuzzy yarn. It gives the front enough body to support an appliqué, shows the stitch pattern clearly and keeps the bib washable. If you substitute another yarn, match the gauge rather than relying only on the weight number. The Craft Yarn Council yarn weight system lists worsted and aran yarns in the medium #4 category.
Hook: 4.0 mm crochet hook, or the size needed to match gauge.
You will also need:
- Yarn needle
- Scissors
- Stitch markers
- Measuring tape
- Small piece of sew-on hook-and-loop tape for the hidden shoulder closure
- Matching sewing thread and hand-sewing needle for the closure
If you plan to add an appliqué, have that finished before you sew it onto the bib. It is much easier to judge the placement when you can move the completed piece around on the flat front first.
Gauge
16 half double crochet stitches and 12 rows = 4 inches in half double crochet.
Gauge matters on this one because the neck opening and the width of the front are tied directly to the stitch count. If your 16 stitches measure more than 4 inches, try a smaller hook. If they measure less than 4 inches, try a larger one.
Make the swatch in the same cotton yarn you plan to use for the bib. Don't measure it while it is stretched.
Stitches and Abbreviations
US crochet terms are used throughout.
- ch = chain
- st/sts = stitch/stitches
- sl st = slip stitch
- sc = single crochet
- hdc = half double crochet
- hdc2tog = half double crochet 2 stitches together
- RS = right side
- WS = wrong side
Half double crochet increase: Work 2 hdc in the same stitch.
Half double crochet decrease: Yarn over, insert hook in the next stitch and pull up a loop. Yarn over, insert hook in the following stitch and pull up a loop. Yarn over and pull through all 5 loops on the hook.
Unless a row says otherwise, the turning chain does not count as a stitch.
Right side: For this pattern, treat the side facing you as you work Row 1 of the bib body as the RS. Keep that designation throughout the edging and finishing instructions.
Crochet the Bib Body
With cream yarn, ch 31.
Row 1: Hdc in the 2nd ch from the hook and in each ch across. Turn. 30 sts.
Row 2: Ch 1. Work 2 hdc in the first st, hdc across to the last st, work 2 hdc in the last st. Turn. 32 sts.
Row 3: Ch 1. Work 2 hdc in the first st, hdc across to the last st, work 2 hdc in the last st. Turn. 34 sts.
These first three rows give the lower corners a gentle outward curve without making the bottom much narrower than the rest of the bib. At the stated gauge, Row 1 is calculated to measure about 7 1/2 inches across, widening to about 8 1/2 inches across by Row 3.
Rows 4–20: Ch 1, hdc in each st across. Turn. 34 sts.
After Row 20, the body should measure approximately 6 1/2 to 6 3/4 inches from the lower edge. Check that measurement before starting the neckline. If your bib is much longer or shorter here, go back and check your row gauge rather than adding or removing several rows. The neck shaping depends on the proportions staying close to the example image.
Do not fasten off yet.
Shape the Neck and Shoulder Tab
The lower neckline is made by working two matching shoulder sections and leaving the center stitches unworked. The opening widens over the next two rows to make the rounded U shape. A separate closure strap is added across the top after the bib edging is complete.
First Shoulder
Row 21: Ch 1. Hdc in the first 10 sts. Turn. Leave the remaining stitches unworked for now. 10 sts.
Row 22: Ch 1. Hdc2tog over the first 2 sts, hdc in each remaining st across. Turn. 9 sts.
Row 23: Ch 1. Hdc in each st across to the last 2 sts, hdc2tog over the last 2 sts. Turn. 8 sts.
Rows 24–29: Ch 1, hdc in each st across. Turn. 8 sts.
Fasten off.
The first shoulder should measure approximately 2 inches wide and about 3 inches from the beginning of the neck opening to the top edge.
Second Shoulder
Return to Row 20. Count 14 unworked center stitches after the first shoulder. Join cream yarn in the next stitch. The remaining 10 stitches form the second shoulder.
Row 21: Ch 1. Hdc in each of the remaining 10 sts. Turn.
Row 22: Ch 1. Hdc across to the last 2 sts, hdc2tog. Turn. 9 sts.
Row 23: Ch 1. Hdc2tog over the first 2 sts, hdc in each remaining st across. Turn. 8 sts.
Rows 24–29: Ch 1, hdc in each st across. Turn. 8 sts.
Fasten off.
Both shoulders should now be the same height and approximately 2 inches wide by 3 inches high. Before edging, the neck opening should measure approximately 4 1/2 inches across at its widest point.
Crochet the Closure Strap
With cream yarn, ch 7.
Row 1: Hdc in the 2nd ch from the hook and in each ch across. Turn. 6 sts.
Rows 2–12: Ch 1, hdc in each st across. Turn. 6 sts.
Row 13: Ch 1. Hdc2tog, hdc in the next 2 sts, hdc2tog. Turn. 4 sts.
Row 14: Ch 1. Hdc2tog twice. 2 sts.
Fasten off.
At the stated row gauge, the strap should measure approximately 4 2/3 inches long before its edging is added. The cream edging will add a little more length and soften the tapered end. Set the strap aside until the bib edging is complete.
Add the Contrast Border
The cranberry stripe is deliberately narrow. I wouldn't make it any wider because the front of the bib is supposed to stay simple enough to work with lots of different appliqué colors.
Cream Foundation Pass Around the Outer Edge
With the RS facing you, join cream yarn at the inner top corner of the first shoulder.
Ch 1 and work sc across the top of that shoulder, down its outside edge, around the lower edge of the bib, up the opposite outside edge and across the top of the second shoulder, ending at its inner top corner.
Along straight hdc row ends, begin with about 4 sc for every 3 hdc row ends. Work 1 sc in each available stitch or foundation chain along horizontal edges. Around the lower corners, add an extra sc only where needed so the edging lies flat.
Do not join. Fasten off cream and turn.
Because single crochet gauge can vary from half double crochet gauge, check the fabric after several inches. If the edging pulls inward, add a stitch in that section. If it begins to wave, remove one.
Cranberry Contrast Pass
Join cranberry yarn in the first cream sc at the inner top corner of the second shoulder. Ch 1 and sc in each cream sc back along the same outer edge. At the lower curves, work 2 sc in a stitch only where the fabric needs the extra room to stay flat. Fasten off cranberry and turn.
Cream Outer Pass
Join cream yarn in the first cranberry sc at the inner top corner of the first shoulder. Ch 1 and sc in each cranberry sc back along the outer edge, again adding an extra sc at the lower curves only where needed. Fasten off.
You should now have the thin cranberry line framed by cream around the outside of the bib.
Neckline Edging
With the RS facing you, join cream yarn at the inner top corner of either shoulder.
Ch 1 and work sc evenly down the inside edge of that shoulder, across the exposed neckline edge at the top of Row 20 and up the inside edge of the opposite shoulder. Along hdc row ends, begin with about 4 sc for every 3 row ends. Work 1 sc in each exposed stitch across the lower part of the neckline. Do not join. Turn.
Ch 1 and sc in each st back across the neckline. Fasten off.
The neckline should lie flat without pulling inward or ruffling. The clear opening is expected to be close to 4 inches across after these two cream edging passes.
Edge the Closure Strap
With cream yarn, work 1 round of sc around the separate closure strap. Along its long row-end edges, begin with about 4 sc for every 3 hdc row ends. Work evenly around the tapered end so it becomes softly rounded. Join with a sl st in the first sc and fasten off.
Add the Hidden Closure
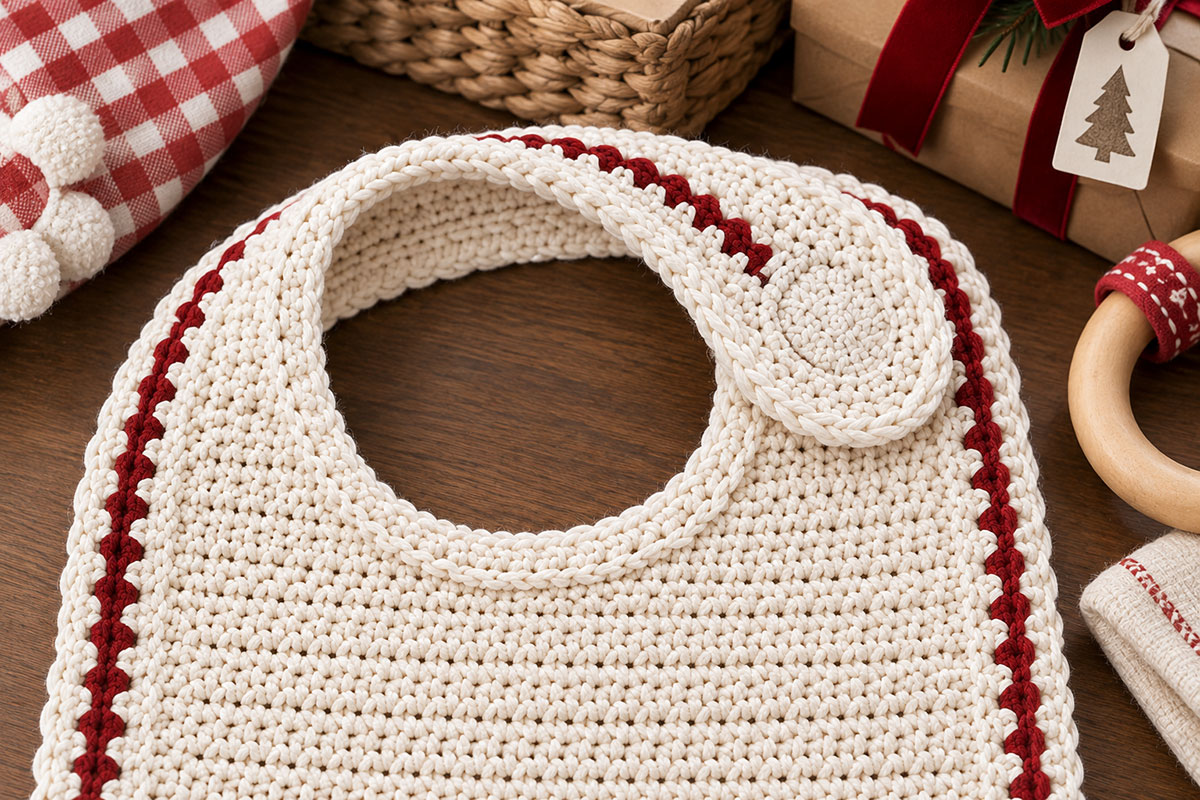
Position the straight short end of the finished closure strap against the upper inside edge of the first shoulder, with the strap extending naturally across the open top of the neckline toward the second shoulder. Center the 6-stitch width of the strap along the upper portion of that inside shoulder edge. Using cream yarn and a yarn needle, sew the entire short end securely through the neckline edging and shoulder fabric.
Lay the bib flat without twisting the strap. Bring the strap straight across the open top of the neckline. The rounded end should lie flat over the second shoulder with approximately 3/4 to 1 inch of overlap.
The example bib has a rounded crocheted tab rather than a visible button. I prefer a hidden closure underneath it so the simple shape stays intact and there isn't a decorative button on the bib.
Cut two small pieces of sew-on hook-and-loop tape approximately 1/2 inch square. Round the corners with scissors so there are no sharp points.
Position the soft loop side of the hook-and-loop tape on the underside of the rounded end of the closure strap, about 1/2 inch in from the tip. This is the side that will face the second shoulder when the bib is fastened. Hand-sew securely around all four sides using matching thread.
Let the strap lie naturally across the neckline and mark where the loop piece touches the top of the second shoulder. Sew the matching hook piece securely at that point.
Fasten the closure and check that the strap lies flat without pulling either shoulder inward, twisting the neckline or lifting away from the bib. The hook-and-loop pieces should be completely covered when the bib is fastened.
Before using the bib, tug gently on the sewn strap and both closure pieces to make sure everything is secure. Use the bib only while the baby is awake and supervised, and remove it after feeding and before putting the baby down to sleep.
Add a Crochet Appliqué
This is the part that makes the bib useful beyond one single look. The front is intentionally plain so you can change the whole personality of it just by changing the appliqué.
I would keep most appliqués between 3 1/2 and 4 1/2 inches tall for this bib. That leaves enough cream showing around the design and keeps the appliqué from crowding the neckline or border.
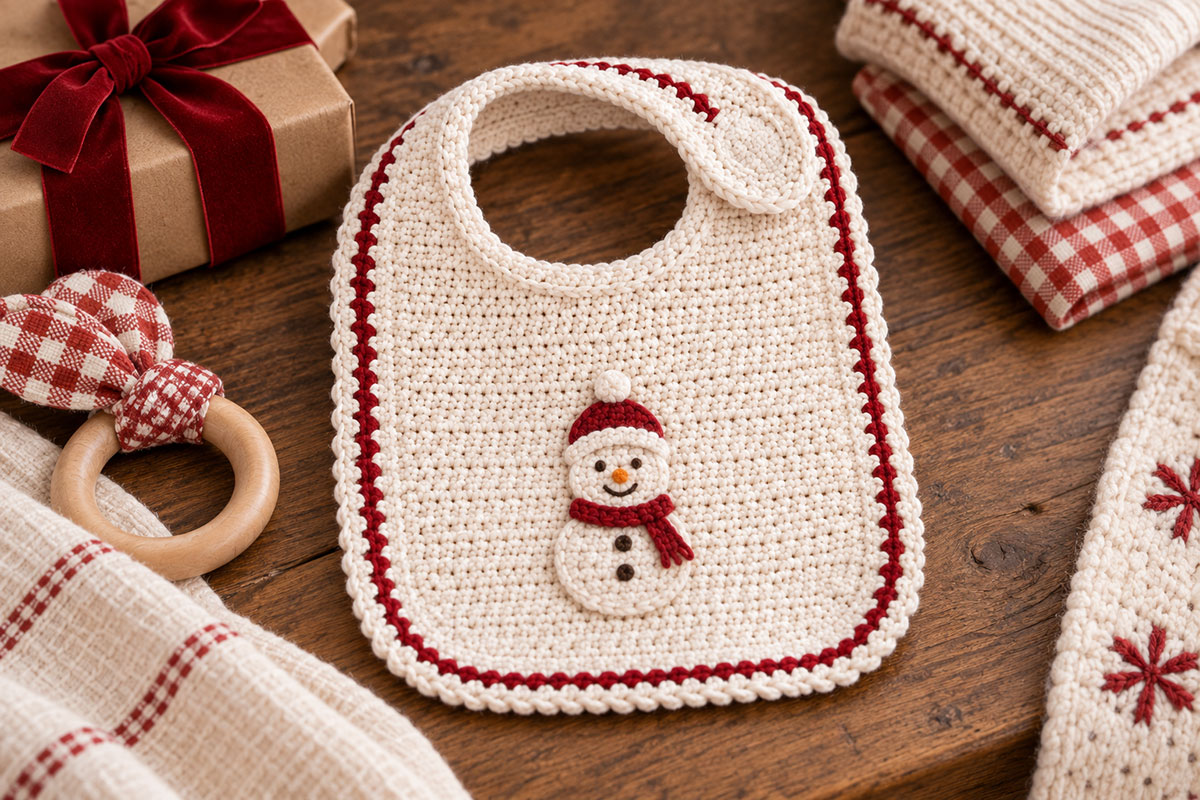
Lay the finished appliqué on the bib before you sew anything down. Start with it centered from side to side and position it slightly below the vertical center of the bib. That usually gives you the best balance because the neckline already takes up visual space at the top.
Once you like the placement, pin or clip the appliqué in place. Sew it down with matching yarn or strong sewing thread, working around the outer edge and securing any narrow points, arms, ears, leaves, scarf ends or other small extensions so they cannot curl away from the bib.
Remove every pin or clip after the appliqué is securely attached. Keep the back of the work as flat as you can, knot securely and weave or bury the ends so there are no loose strands on the back of the bib.
If the appliqué has embroidered facial details, finish those before attaching it to the bib. I would skip buttons, plastic safety eyes or other hard decorative pieces on a baby bib and use embroidery instead.
For animal ideas, you can browse my crochet animal appliqué patterns. For holiday versions, the same bib works well with Christmas trees, reindeer, gingerbread designs or a small snowman.
Finishing and Care
Weave in every yarn end securely, then lay the bib flat and check the edges before washing. If the border pulls inward, you may need to relax it gently with blocking. If it ruffles, the edging probably has too many stitches in the curved areas.
Wash according to the care instructions for the cotton yarn you used. A mesh laundry bag can help protect the appliqué and closure during washing.
Reshape the bib while damp and let it dry flat so the rounded lower edge and neckline keep their shape.
Before each use, check the appliqué and closure for loose stitching. If anything starts to come away from the bib, repair it before using the bib again.
Choosing Colors for the Bib and Appliqué
You do not need a complicated palette here. The plain cream body is useful because almost any appliqué color will show against it.
I like the narrow contrast row because you can tie the bib to the appliqué without changing the whole pattern. Use cranberry with a Christmas design, soft green with a woodland animal, dusty rose with a flower or bunny, or a warm rust with a fox or pumpkin.
If your appliqué already has several colors, keep the border quiet. One accent color is enough.
How to Adjust the Bib Size
If you want to adjust this bib, I would change the length rather than trying to scale the entire pattern with a different hook size. The neckline, shoulders and overlap are all tied to the stated gauge.
For a little more length, add 1 or 2 plain hdc rows before beginning the neck shaping. For less length, remove 1 or 2 plain rows.
I would leave the 34-stitch body width and the neck-shaping counts unchanged unless you are prepared to recalculate the neckline and shoulder proportions. Changing the hook size enough to alter the finished size can also change the density and feel of the bib fabric.
Frequently Asked Questions
Can I use acrylic yarn instead of cotton?
You can, but I would still choose cotton for this project. It gives the bib a flatter, firmer surface for attaching an appliqué and is a natural fit for something that will need regular washing.
Can I leave the appliqué off?
Yes. The bib is complete on its own. The narrow contrast edging gives it enough detail to use as a plain crochet baby bib.
Can I add the appliqué before making the border?
You can, but I prefer to finish the bib first. Once the border and closure are complete, you can see the true center of the finished bib and place the appliqué more accurately.
Can I use a larger appliqué?
You can, but I would stay under about 5 inches tall unless the shape is especially narrow. Larger pieces start to crowd the neckline and border and can make the bib feel visually heavy.
Can I use a button instead of the hidden closure?
I would not use a decorative button on this baby bib. The hidden sew-on closure keeps the front cleaner and avoids adding a separate hard decorative piece.
More Free Crochet Baby Patterns
If you like the idea of making a small handmade gift and then changing the theme with color or appliqué, you may also like my free baby crochet patterns.
You can also use the appliqué collection to coordinate the bib with another handmade gift. A fox, bear or deer bib would pair nicely with one of my crochet animal lovey patterns, while a holiday bib can coordinate with one of the designs on my Christmas crochet patterns page.
Keep the bib itself simple and let the appliqué do the fun part.
When you click on links to various merchants on this site and make a purchase, this may result in this site earning a commission. This does not affect the price you pay.

UBGI Gold Standard 2026
Reviewed under the site's
editorial checklist.
Photos, decorating ideas, party setups and reader submissions are shared for inspiration unless a page is specifically presented as a pattern, tutorial, reference guide or step-by-step project. Follow the instructions, measurements, safety guidance and manufacturer directions provided for the particular project or product.
About Jan | Contact | Baby Nursery Ideas (Blog) | Site Map | Privacy Policy | Disclosure Policy | Disclaimer | Affiliate Disclosure | Earnings Disclosure | Facebook | Pinterest
I am a participant in the Amazon Services LLC Associates Program, an affiliate advertising program designed to provide a means for us to earn fees by linking to Amazon. As an Amazon Associate I earn from qualifying purchases.
Copyright © 2006-2026. All Rights Reserved.