Free Crochet Candy Cane Pattern + Peppermint Appliqué Pattern
By Jan Bay
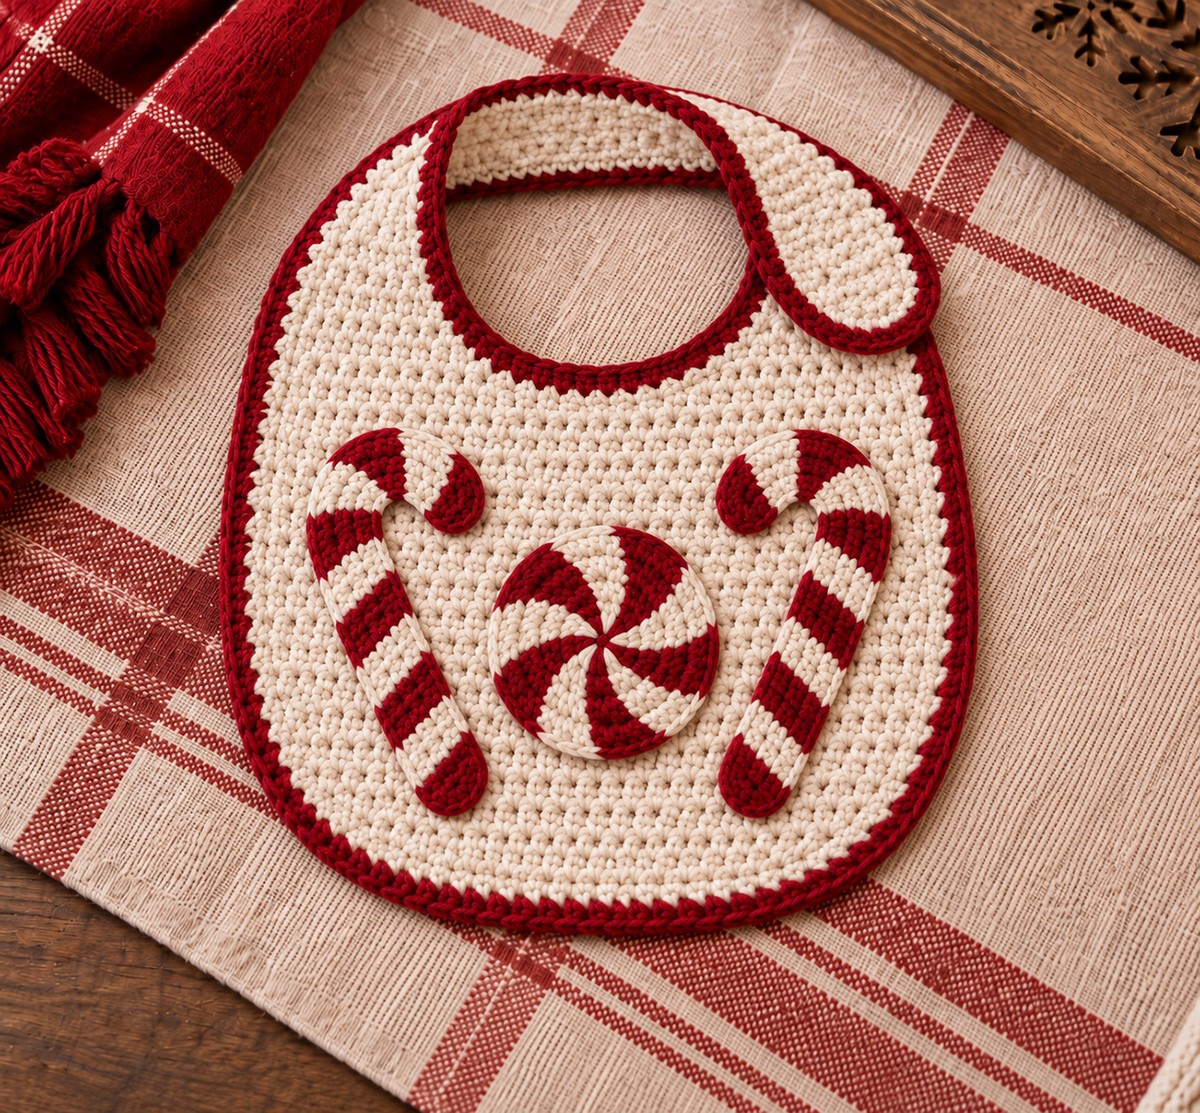
I designed this free crochet candy cane pattern and added the peppermint appliqué pattern as a bonus so you can use them to make crocheted baby bibs, blankets, gift bags, stockings, ornaments and other holiday crafts even sweeter.
Explore More Free Christmas Crochet Patterns
Snowman Family Crochet Appliqués
Christmas Tree Crochet Appliqué
Yarn for the Candy Cane and Peppermint Appliqués
Supplies
Keep the yarn fairly smooth for these appliqués. The little color changes show much better when the stitches are crisp, and the finished pieces need to stay flat enough to sew neatly to the bib.
You will need:
- Worsted weight cotton or cotton-blend yarn, Category 4, in warm cream and cranberry red
- Approximately 20 yards cream yarn
- Approximately 25 yards cranberry yarn
- 4 mm (G-6) crochet hook
- Yarn needle
- Scissors
- Straight pins or locking stitch markers for positioning the appliqués before sewing
The yarn amounts above include enough for two candy canes and one peppermint candy with a little extra for joining and sewing. If your yarn is especially thick or loosely spun, you may need slightly more.
Gauge
Target gauge: approximately 18 sc and 20 rows = 4 inches in single crochet with a 4 mm hook.
Gauge matters more for size than fit on this project. Check the width of your first candy cane after a few rows. Five single crochet stitches should measure about 1 to 1 1/4 inches across. If yours is much wider, use a smaller hook before making both appliqués.
You can use acrylic yarn, but I'd choose cotton or a cotton blend for this project. It gives the candy canes a cleaner edge and helps the peppermint stay flat instead of looking puffy.
Finished Size
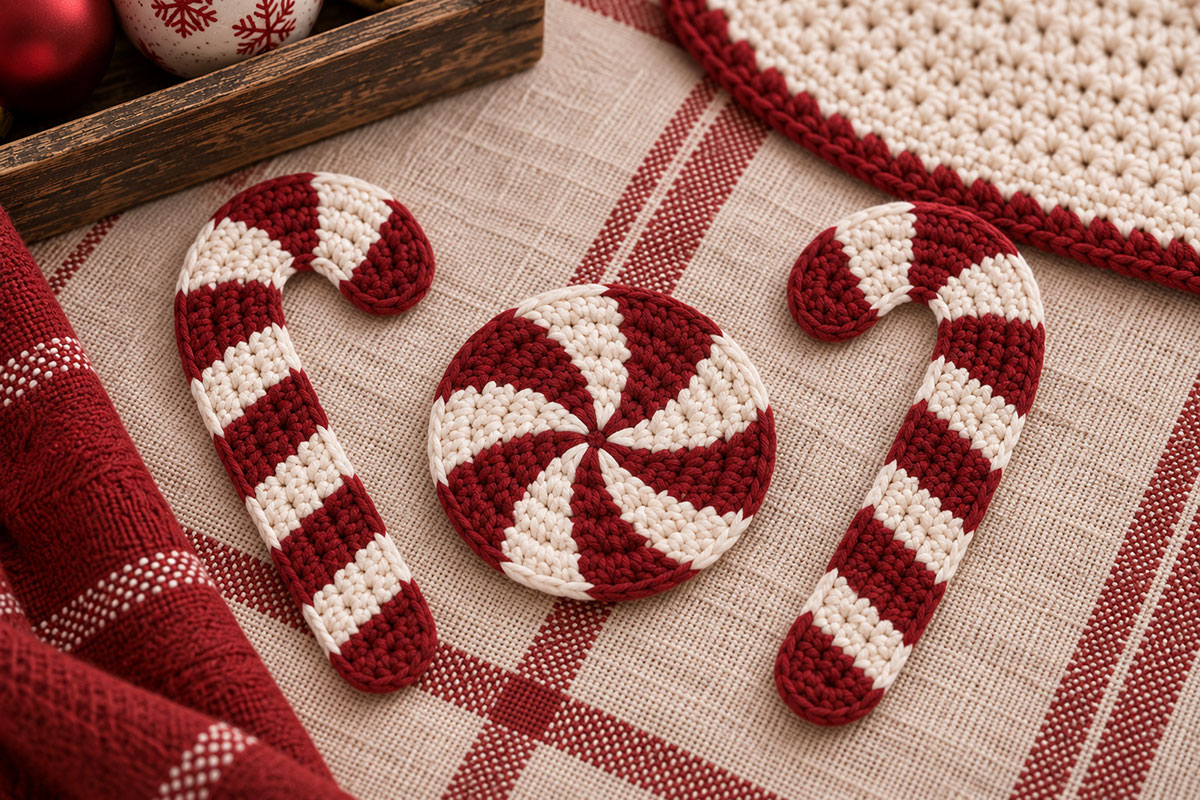
With worsted weight yarn and a 4 mm hook, the straight striped stem of each candy cane should measure approximately 3 1/2 inches long and about 1 to 1 1/4 inches wide before the crook is shaped. The four short-row sections then form the rounded hook, so the final overall height and crook width will vary slightly with your tension and how deeply the finished crook curves.
The peppermint candy should finish at approximately 3 1/2 inches across after the 12 wedges are joined and the final cream slip-stitch edging is added.
These are calculated target measurements rather than measurements from a physically test-made sample. After finishing the first candy cane, lay it flat and make sure the stem is close to the measurements above, the crook forms a smooth deep hook, and the piece lies flat. Then use the same yarn, hook and tension for the second cane so the pair matches.
Abbreviations
US crochet terms are used throughout this pattern.
- ch = chain
- sc = single crochet
- sl st = slip stitch
- st = stitch
- sts = stitches
- sc2tog = single crochet 2 stitches together
- RS = right side
- WS = wrong side
If you need a refresher on standard crochet terminology, the Craft Yarn Council crochet abbreviations are a useful reference.
Pattern Notes Before You Start
The finished bib uses two matching candy canes with their crooks turned toward the center and one peppermint candy between them. That placement is part of the design, so don't make one large candy cane and one small one. Make the first cane, check its finished size, and then use the same yarn, hook and tension for the second.
The candy canes are worked back and forth in rows. The straight stem stays 5 stitches wide. The crook is shaped with graduated short rows worked along the outside edge, adding more crochet to the outer curve than the inner curve. That lets the strip turn into the deep rounded hook shown in the example without stuffing or wiring it.
The peppermint is made from 12 narrow wedges, six cream and six cranberry. Every wedge is increased along the same side before the pieces are joined in alternating colors. That slight lean gives the finished candy the pinwheel look shown on the bib instead of a plain red-and-white pie chart.
Keep your turning chains loose, but don't count them as stitches unless the instructions specifically say to do so.
Free Crochet Candy Cane Pattern
Make 2. The two canes are shaped in opposite directions so both can be placed right-side-up on the bib with their crooks facing inward.
Stripe sequence: For the straight stem, work 3 rows cranberry, then 3 rows cream, repeating through Row 18. The crook is worked in four short-row shaping sections that alternate cranberry, cream, cranberry and cream. The rounded caps at both ends are cranberry. Fasten off at each color change instead of carrying yarn along the edge so the appliqué stays flat.
Left Candy Cane
This cane will sit on the left side of the bib. Its crook will curve toward the peppermint candy in the center.
With cranberry, ch 6.
Row 1: Sc in second ch from hook and in each ch across. Turn. 5 sc.
Rows 2 to 3: Ch 1, sc in each st across. Turn. 5 sc.
Change to cream.
Rows 4 to 6: Ch 1, sc in each st across. Turn. 5 sc.
Change to cranberry.
Rows 7 to 9: Ch 1, sc in each st across. Turn. 5 sc.
Change to cream.
Rows 10 to 12: Ch 1, sc in each st across. Turn. 5 sc.
Change to cranberry.
Rows 13 to 15: Ch 1, sc in each st across. Turn. 5 sc.
Change to cream.
Rows 16 to 18: Ch 1, sc in each st across. Turn. 5 sc.
You should now have a straight striped section approximately 3 1/2 inches long. Don't worry if yours is a little longer or shorter. The more important checkpoint is that the strip stays close to 1 inch wide and lies flat.
Fasten off the cream yarn after Row 18.
Shape the Left Crook
Lay the candy-cane stem vertically in front of you with Row 1 at the bottom and Row 18 at the top. The right side of the appliqué should face you.
For the left candy cane, the finished crook needs to turn inward toward the right. That means the left edge of the stem is the outside edge of the curve. Begin every short-row shaping section from that left outside edge.
Crook Section 1 — Cranberry
Join cranberry yarn in the leftmost stitch of Row 18.
Short Row 1: Ch 1, sc in first 3 sts. Turn. 3 sc.
Short Row 2: Ch 1, sc in each of the 3 sts. Turn. 3 sc.
Short Row 3: Ch 1, sc in the 3 sts just worked, then sc in the next previously unworked stitch of Row 18. Turn. 4 sc.
Short Row 4: Ch 1, sc in each of the 4 sts. Turn. 4 sc.
Full Row 1: Ch 1, sc in the 4 sts just worked, then sc in the final previously unworked stitch of Row 18. Turn. 5 sc.
Full Row 2: Ch 1, sc in each of the 5 sts across. Turn. 5 sc.
Fasten off cranberry.
Crook Section 2 — Cream
The newest completed 5-stitch row is now your base row. Join cream yarn at its left outside edge.
Short Row 1: Ch 1, sc in first 3 sts. Turn. 3 sc.
Short Row 2: Ch 1, sc in each of the 3 sts. Turn. 3 sc.
Short Row 3: Ch 1, sc in the 3 sts just worked, then sc in the next previously unworked stitch of the current base row. Turn. 4 sc.
Short Row 4: Ch 1, sc in each of the 4 sts. Turn. 4 sc.
Full Row 1: Ch 1, sc in the 4 sts just worked, then sc in the final previously unworked stitch of the current base row. Turn. 5 sc.
Full Row 2: Ch 1, sc in each of the 5 sts across. Turn. 5 sc.
Fasten off cream.
Crook Section 3 — Cranberry
Use the newest completed 5-stitch row as the new base row. Join cranberry yarn at its left outside edge and repeat the same shaping sequence: 3, 3, 4, 4, 5, 5 sts. Fasten off cranberry.
Crook Section 4 — Cream
Use the newest completed 5-stitch row as the new base row. Join cream yarn at its left outside edge and repeat the same shaping sequence: 3, 3, 4, 4, 5, 5 sts. Fasten off cream.
Lay the cane flat. The short rows add extra length along the outside edge while keeping the inside edge shorter, so the top should now curve into a deep rounded hook instead of leaning sideways. Gently smooth the crook into shape with your fingers without stretching the outside edge.
Right Candy Cane
Work Rows 1 through 18 exactly as written for the left candy cane, following the same cranberry-and-cream stripe sequence.
Fasten off the cream yarn after Row 18.
Lay the stem vertically with Row 1 at the bottom and Row 18 at the top, with the side you want facing outward on the finished bib facing you.
For the right candy cane, the crook turns toward the left. The right edge of the stem is the outside edge of the crook. Work all short rows from this outside edge.
Crook Section 1 — Cranberry: Join cranberry in the rightmost stitch of Row 18. Work the same shaping sequence used for the left cane: 3, 3, 4, 4, 5, 5 sts. Fasten off.
Crook Section 2 — Cream: The newest completed 5-stitch row is now your base row. Join cream at its right outside edge and work the same shaping sequence: 3, 3, 4, 4, 5, 5 sts. When extending from 3 to 4 stitches and from 4 to 5 stitches, work into the next previously unworked stitch of this current base row. Fasten off.
Crook Section 3 — Cranberry: Use the newest completed 5-stitch row as the new base row. Join cranberry at its right outside edge and repeat the shaping sequence: 3, 3, 4, 4, 5, 5 sts. Fasten off.
Crook Section 4 — Cream: Use the newest completed 5-stitch row as the new base row. Join cream at its right outside edge and repeat the shaping sequence: 3, 3, 4, 4, 5, 5 sts. Fasten off.
The right cane should now mirror the left, with its deep rounded crook turning toward the center.
Crook checkpoint: Before adding the rounded caps, the newest row at the tip of each candy cane should have 5 stitches. Both canes should lie flat, and the crooks should be similar in depth and width while curving in opposite directions. If one crook is noticeably tighter or looser, check that each of its four shaping sections followed the same 3, 3, 4, 4, 5, 5 stitch sequence.
Round the Candy Cane Ends
The example candy canes have softly rounded cranberry tips rather than flat row ends. Add the following cap to the bottom and top of each candy cane.
Bottom cap: With cranberry, join at one corner of the foundation edge. Working across the 5 stitch bases, sl st in the first stitch, sc in the second stitch, work 3 sc in the center stitch, sc in the fourth stitch, and sl st in the fifth stitch. Fasten off.
Crook-tip cap: With cranberry, join at one corner of the final 5-stitch edge at the end of the crook. Sl st in the first stitch, sc in the second stitch, work 3 sc in the center stitch, sc in the fourth stitch, and sl st in the fifth stitch. Fasten off.
Gently shape each cap into a smooth half-round with your fingers. The bottom and crook tip should both read as rounded cranberry ends, matching the finished candy canes shown in the example.
Place the two candy canes side by side before moving on. They should be approximately the same height and width, with the crooks curving toward one another. If one is noticeably longer, correct it now rather than trying to hide the difference when you sew them to the bib.
Crochet Peppermint Candy Pattern
Make 1. The peppermint is assembled from 12 narrow wedges, six cranberry and six cream. Each wedge is worked from the center point toward the outer edge. The increases are kept along the same side of every wedge so the alternating sections lean slightly when they are joined, giving the finished candy the pinwheel look shown in the example.
Make 6 Cranberry Wedges and 6 Cream Wedges
Use the same 4 mm hook and worsted weight yarn.
Ch 2.
Row 1: Sc in second ch from hook. Turn. 1 sc.
Row 2: Ch 1, work 2 sc in the only st. Turn. 2 sc.
Row 3: Ch 1, sc in each st across. Turn. 2 sc.
Row 4: Ch 1, work 2 sc in first st, sc in remaining st. Turn. 3 sc.
Row 5: Ch 1, sc in each st across. Turn. 3 sc.
Row 6: Ch 1, work 2 sc in first st, sc in each remaining st across. Turn. 4 sc.
Rows 7 to 9: Ch 1, sc in each st across. Turn after Rows 7 and 8 only. 4 sc.
Fasten off, leaving a 12-inch tail for joining.
At the target gauge, each wedge should measure approximately 1 3/4 to 1 7/8 inches from the narrow center point to the outer edge. The final row should measure about 7/8 to 1 inch across.
Make all 12 wedges the same way. Keep every wedge oriented with the increase edge on the same side. Do not flip alternate wedges.
Join the Peppermint
Arrange the wedges in a circle, alternating cranberry and cream, with all 12 narrow Row 1 points meeting at the center. Keep the increase edge of every wedge facing the same direction around the circle.
Using the long tails and a yarn needle, whipstitch the side edge of each wedge to the neighboring wedge. Work from the outer edge toward the center and keep the seam firm but not tight. Join all 12 wedges in the same way.
Before closing the final seam, spread the peppermint flat. The outer edge should measure approximately 10 1/2 to 11 inches around, which gives a finished diameter close to 3 1/2 inches.
Close the final seam. Thread a remaining yarn tail through the 12 narrow center points, pull only until the center closes, and secure the yarn on the wrong side. Do not cinch tightly enough to make the peppermint cup.
Flatness checkpoint: Lay the peppermint on a flat surface before adding the edging. The center should stay closed, all 12 wedges should lie flat, and the outer edge should form a smooth circle without ruffling or pulling upward. Adjust the center closure or joining seams now if needed.
Outer Peppermint Edge
Join cream yarn at any outer seam.
Edging Round: Ch 1. Work 1 sl st in each stitch around the outer edge. Each wedge contributes 4 stitches, for 48 sl sts total. Join with a sl st to the first stitch and fasten off.
The finished peppermint should measure approximately 3 1/2 inches across and lie flat. If it cups before the edging is added, loosen the center join or the wedge seams. If it ruffles, check that every wedge ended with 4 stitches and that no extra stitches were added around the outer edge.
Candy Cane and Peppermint Appliqué Placement on the Baby Bib
The layout matters here. The two candy canes aren't simply scattered around the bib. They mirror one another and frame the peppermint in the center.
Put the bib flat with the right side facing up before you pin anything.
Center the peppermint horizontally on the lower half of the bib. Leave roughly 1 1/2 to 2 inches between the lower edge of the peppermint and the cranberry border at the bottom of the bib.
Place one candy cane to the left of the peppermint. Turn its crook inward so the hook points toward the candy.
Place the second candy cane to the right and mirror the first one. Its crook also points inward toward the peppermint.
Position the straight lower ends of the candy canes at approximately the same height. The crooks should sit a little higher than the top half of the peppermint, just as they do in the example image.
Leave approximately 1/2 to 3/4 inch between each candy cane and the peppermint. You want three clearly separate shapes. Don't crowd them together.
Step back and look at the whole bib before you sew. The peppermint should be centered, the two cane bottoms should look level, and the crooks should turn toward each other.
Pin or clip all three pieces in place once you're happy with the arrangement.
Finishing and Sewing the Appliqués in Place
Weave in every yarn end on the wrong side of each appliqué before sewing it to the bib. Trim the ends close only after they are secure.
If an appliqué wants to curl, lightly dampen it and pin it flat to dry. Don't stretch the candy canes while they're drying or you'll lose the rounded crook.
Use matching sewing yarn or matching crochet yarn threaded onto a yarn needle.
Start with the peppermint because it establishes the center of the whole arrangement.
Sew around its outer edge with small stitches, catching the bib fabric beneath without pulling tightly enough to pucker it. If the center lifts away from the bib, add two or three small hidden stitches near the middle of the peppermint.
Sew the left candy cane next. Work around the full outside edge and around the inside of the crook. Add two or three extra anchoring stitches along the middle of the long straight section so it can't twist away from the bib during washing.
Repeat for the right candy cane.
Check the wrong side of the bib when you're finished. Knotting isn't necessary if the yarn is woven securely through several stitches in different directions. Trim the remaining tails.
Because this is a baby item, don't add beads, buttons, bells or other small detachable decorations to the candy pieces. Keep the design simple as shown, with the crochet itself providing the decoration.
Use a baby bib only while the baby is awake and supervised, and remove it before sleep. Keep bibs, blankets and other loose items out of an infant sleep space. See the U.S. Consumer Product Safety Commission safe sleep guidance.
Hand washing or a gentle machine cycle in cool water will be easier on the appliqués than rough agitation. Reshape the bib and appliqués while damp and dry flat.
How to Adjust the Size
If you're decorating a smaller bib, don't squeeze this exact three-piece arrangement into a space that isn't big enough. Make the appliqués smaller instead.
For smaller candy canes, use DK weight yarn and a hook suited to that yarn while keeping the same row counts. Make both canes with the same yarn and hook so they remain matched.
You can reduce the peppermint the same way. I would change the yarn weight and hook size rather than removing wedges because the 12 alternating color sections are part of the look shown here.
For a larger project such as a blanket, stocking or gift bag, use a heavier yarn and larger hook. Watch the finished proportions rather than assuming the same hook change will enlarge every piece by an exact percentage.
More Ways to Use the Candy Cane and Peppermint Appliqués
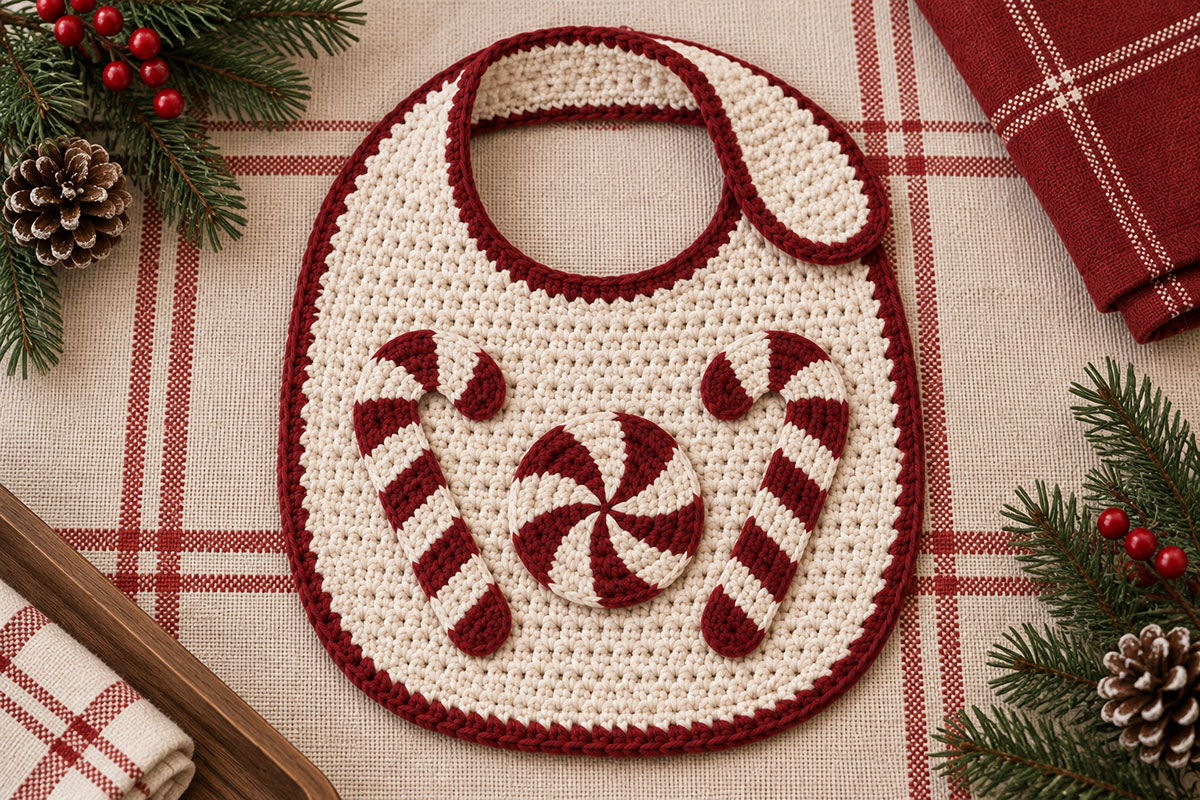
The bib in the main image shows my favorite arrangement for this set. The mirrored candy canes frame the peppermint without covering too much of the cream crochet. That's the layout I'd use for the bib, but the three motifs don't have to stay together on every project. Skip the canes, change the peppermint colors or use several smaller peppermint candies if that suits what you're making better.
A single candy cane can be sewn to the corner of a baby blanket, while the peppermint works nicely on a small Christmas gift bag or stocking. You can also attach a hanging loop to the top of a candy cane and use it as a flat ornament, although I'd leave off the loop when you're sewing it to a baby item.
For a larger Christmas project, repeat the three-piece grouping across the lower edge of a blanket or alternate candy canes and peppermint candies along a garland.
If you're putting together several Christmas appliqué projects, you can also mix these pieces with my Christmas tree crochet appliqué or Christmas reindeer crochet appliqué. I would keep each finished project fairly simple rather than covering every inch with motifs.
For more small crochet motifs you can sew onto baby projects, see the crochet animal appliqué patterns.
Candy Cane and Peppermint Pattern Checkpoints
Before you call the project finished, compare your pieces with these checkpoints:
- There are exactly two candy canes.
- The candy canes are approximately the same size.
- Both candy canes have alternating cranberry and cream stripes.
- The left crook points toward the center.
- The right crook points toward the center.
- The peppermint shows 12 alternating color sections, six cranberry and six cream.
- The peppermint lies flat rather than forming a cup.
- The peppermint is centered between the candy canes.
- The three appliqués do not overlap.
- All yarn tails are secured on the wrong side.
- All straight pins or locking stitch markers have been removed.
If those points match, you've kept the arrangement shown in the example instead of ending up with three separate Christmas motifs that don't quite work together.
Frequently Asked Questions
Can I make just one candy cane?
Yes. The two-cane arrangement is what matches the baby bib shown here, but each candy cane is a complete flat appliqué on its own. A single one works nicely on a stocking, gift bag, blanket corner or Christmas ornament.
Why are the two candy canes written separately?
The shaping is mirrored. The left candy cane curves toward the center from one direction, while the right candy cane curves toward the center from the opposite direction. Making them as mirror images is what gives the bib its balanced layout.
Can I use red and bright white instead of cranberry and cream?
Absolutely. The cranberry and warm cream reproduce the softer colors in the example, but traditional Christmas red and white will work with the same instructions.
Why does my crochet candy cane twist?
Check the crook sections first. Each shaping section should follow the same stitch sequence: 3, 3, 4, 4, 5 and 5 stitches, with every short row beginning from the outside edge of the curve. If one section was started from the inside edge, the crook can twist instead of lying flat.
If the stitch counts are correct, gently dampen the cane and smooth the crook flat without stretching the outside edge.
Why is my peppermint candy cupping?
Check that every wedge has 9 rows and ends with 4 stitches. Then check the joining seams and the center. If either was pulled too tightly, loosen those stitches until the peppermint lies flat before adding the cream slip-stitch edging.
Why is the peppermint made from separate wedges?
The separate wedges keep the cranberry and cream sections crisp while allowing each section to widen from the center toward the outer edge. Keeping every wedge oriented the same way gives the joined candy its pinwheel movement.
Do I need to add the cream border around the peppermint?
Yes if you want it to match the example. The final cream slip-stitch round gives the peppermint its narrow finished outline without adding enough height to make the appliqué look bulky.
Can I attach these appliqués to a different crochet baby bib?
Yes. Pin all three pieces in place before sewing and make sure there is enough room for the mirrored arrangement. If the bib is substantially smaller, reduce the appliqués with lighter yarn and a smaller hook rather than crowding the pieces together.
Can I use these as Christmas ornaments?
Yes. Leave the appliqués flat and add a securely crocheted hanging loop at the top. For the peppermint, attach the loop at the outer edge. For a candy cane, place it at the top of the crook.
Pattern Use
You may use this pattern to make finished items for yourself, gifts or small-scale handmade sales. Please do not copy, republish, distribute or sell the written pattern, photographs or charts as your own.
If you'd like to share the pattern, please link to this page instead of reproducing the instructions.
For more Christmas projects, visit my free Christmas crochet patterns.
When you click on links to various merchants on this site and make a purchase, this may result in this site earning a commission. This does not affect the price you pay.

UBGI Gold Standard 2026
Reviewed under the site's
editorial checklist.
Photos, decorating ideas, party setups and reader submissions are shared for inspiration unless a page is specifically presented as a pattern, tutorial, reference guide or step-by-step project. Follow the instructions, measurements, safety guidance and manufacturer directions provided for the particular project or product.
About Jan | Contact | Baby Nursery Ideas (Blog) | Site Map | Privacy Policy | Disclosure Policy | Disclaimer | Affiliate Disclosure | Earnings Disclosure | Facebook | Pinterest
I am a participant in the Amazon Services LLC Associates Program, an affiliate advertising program designed to provide a means for us to earn fees by linking to Amazon. As an Amazon Associate I earn from qualifying purchases.
Copyright © 2006-2026. All Rights Reserved.