Free Black Cat Crochet Lovey Pattern
By Jan Bay
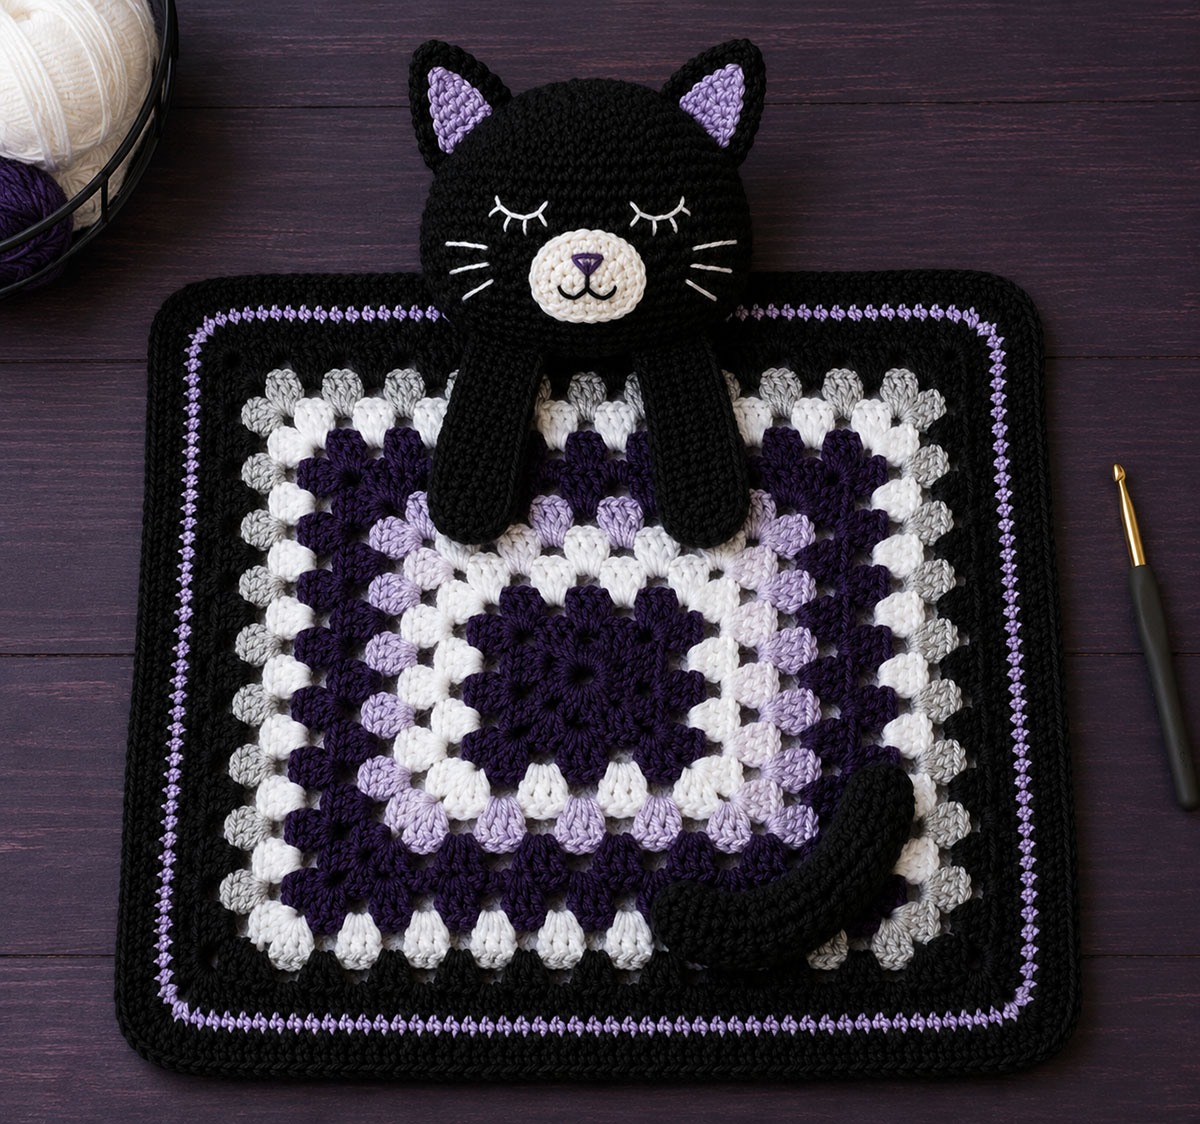
This free black cat crochet pattern creates a soft kitten lovey with a rounded cat head, tiny paws, a curved tail, and an attached granny-style blanket. The complete pattern includes clear stitch counts, embroidered facial features, careful assembly guidance, and color ideas for making a Halloween black cat or a year-round handmade baby gift.
Explore More Free Crochet Baby Patterns
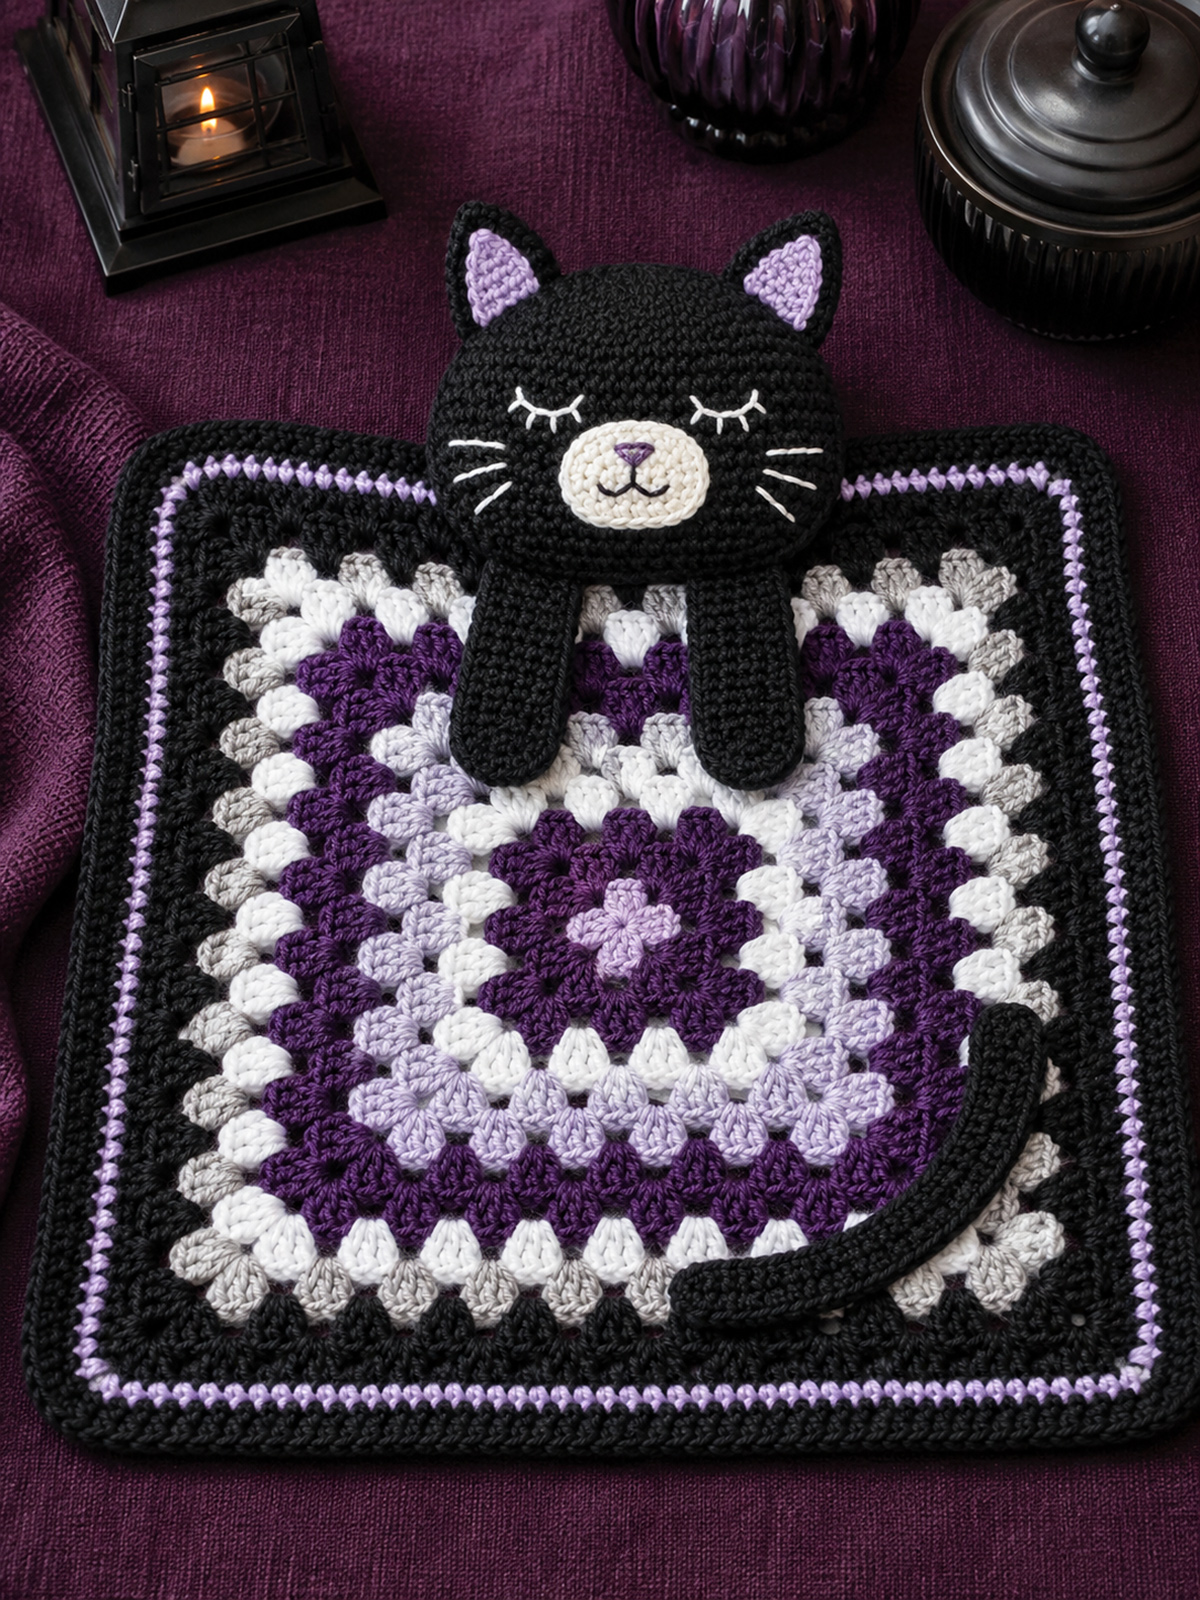
Black Worsted weight yarn for this lovey pattern
Jump to the Black Cat Lovey Pattern Sections
Black Cat Crochet Lovey Pattern Quick Answer
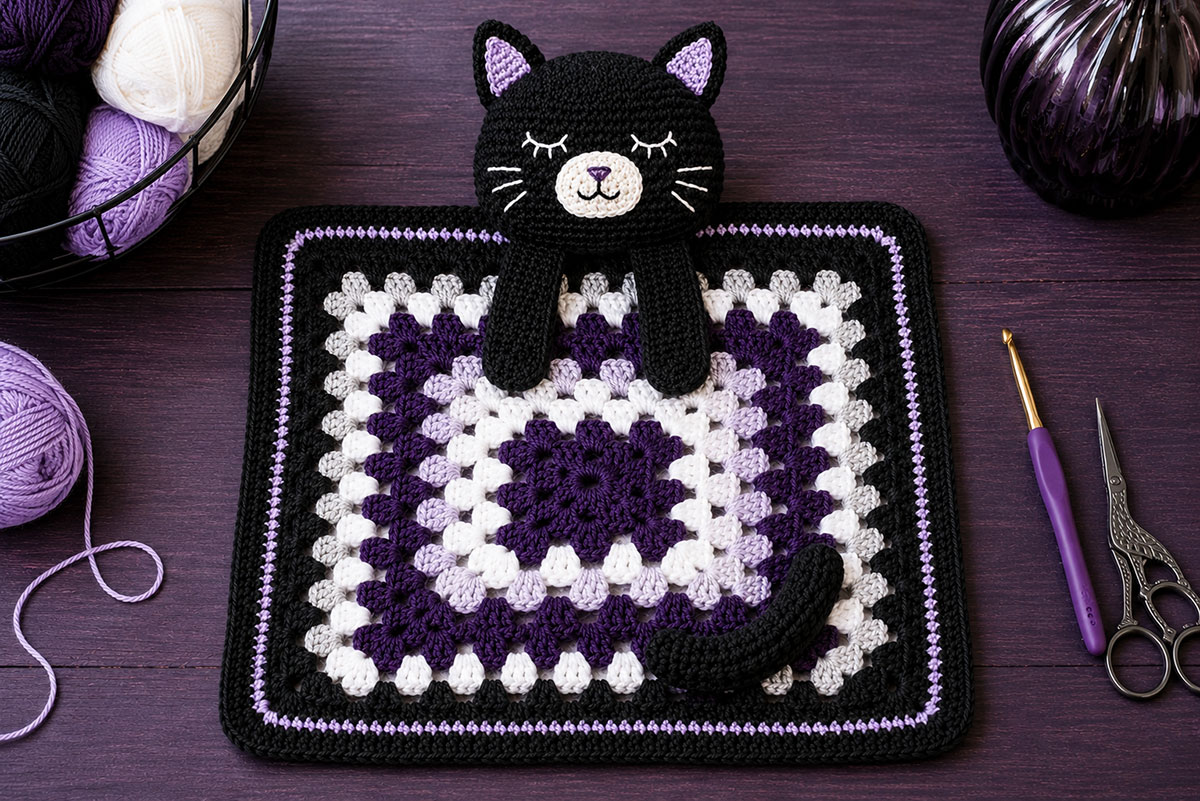
This free black cat crochet pattern makes a kitten lovey with an approximately 14-inch granny-style blanket, a rounded stuffed head, pointed ears, a flat contrast muzzle, two unstuffed paws, and a curved tail. The face is embroidered rather than made with plastic eyes, and the pieces are sewn securely to the blocked blanket for supervised use while a baby is awake. This is not a sleep-space item.
This pattern is written for the crocheter who wants one complete, gift-ready black cat lovey without having to combine separate blanket, amigurumi, and assembly instructions.
The written measurements and placement instructions define the finished project. The page images are visual references, and the purple, gray, white, and black colors are an example palette unless you record and follow an exact round-by-round color order.
The little black kitten is easy to recognize, but the project does not depend on Halloween colors. Pair the cat with orange and purple for an October baby gift, or choose soft blue, mint, rose, lavender, or gray for a lovey that suits a cat-themed nursery throughout the year.
This design follows the same measurements and construction as my original crochet cat lovey pattern. The blanket size, shaped head, paws, tail, and attachment method remain the same, while the color planning, facial embroidery, photography, and black-yarn guidance are tailored to this version.
Black yarn needs a little more attention than pale yarn because the loops can blend together while you work. A beginning-of-round marker, accurate stitch counts, and a light-colored work surface make a noticeable difference. I also recommend checking each increase and decrease round before moving ahead. Correcting one missed stitch is much easier than finding it after the head has already begun to close.
The finished lovey has enough detail to look like a kitten without adding buttons, beads, ribbons, or other loose decorations. Short embroidered whiskers and a light muzzle keep the face visible against the dark yarn while preserving the soft, simple appearance that works well for a handmade baby gift.
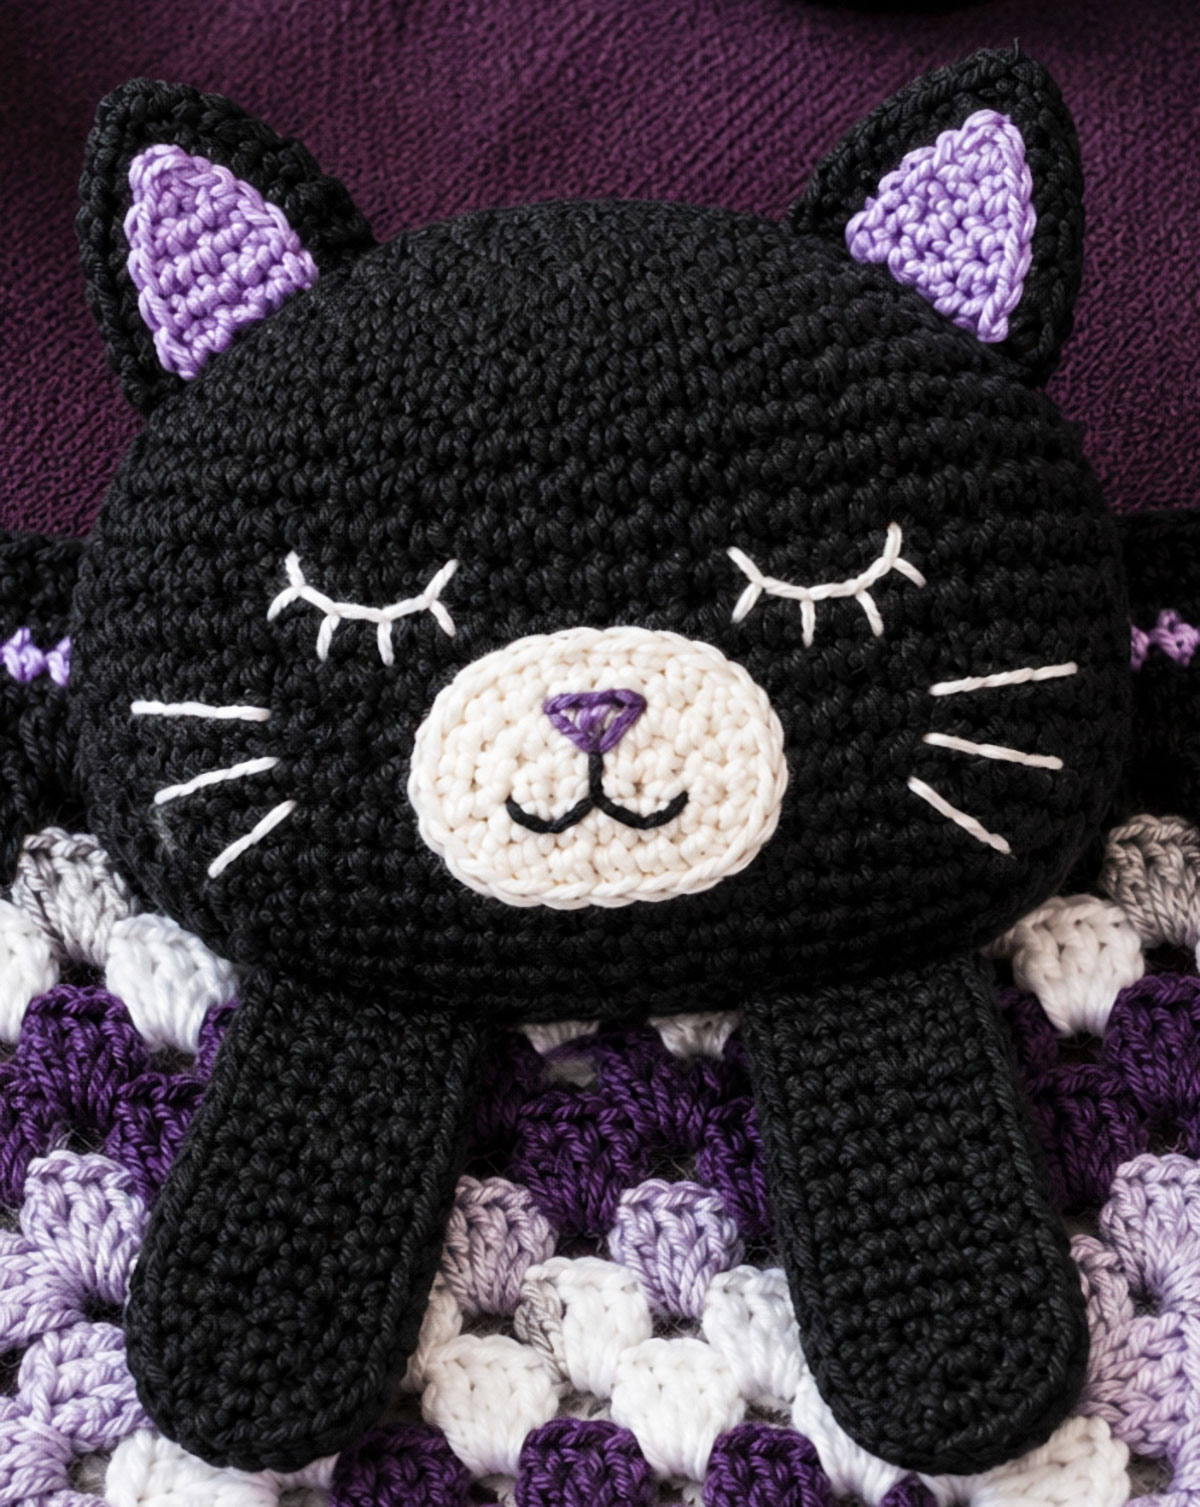
Materials for the Black Cat Crochet Lovey
Use smooth, machine-washable #4 worsted weight yarn with clear stitch definition. Very fuzzy black yarn can hide the loops and make the increase rounds harder to count, so save eyelash yarn, chenille, and heavily textured fibers for another project.
The blanket and cat pieces use the same yarn weight, but they are worked with different hook sizes. The larger hook keeps the blanket flexible. The smaller hook creates a firmer fabric for the head so the fiberfill does not show through the stitches.
- Approximately 250 yards #4 worsted weight yarn for the granny-style blanket
- Approximately 110 yards black #4 worsted weight yarn for the head, outer ears, paws, and tail
- Approximately 20 yards white, light gray, pale lavender, or another contrast yarn for the muzzle and optional inner ears
- Less than 3 yards light gray, white, gold, lavender, or pale green embroidery floss for the eyes
- Less than 2 yards pink, gray, or lavender embroidery floss for the nose and mouth
- Size H (5.0 mm) crochet hook for the blanket
- Size G (4.0 mm) crochet hook for the black cat pieces
- Approximately 1½ ounces washable polyester fiberfill
- Yarn needle with an eye large enough for worsted weight yarn
- Embroidery needle
- Locking stitch markers
- Scissors
- Flexible measuring tape
- Light-colored towel, pillowcase, or work mat to place beneath the black yarn
- Rustproof pins for checking placement before sewing
| Material | Recommended Amount or Size |
|---|---|
| Blanket Yarn | Approximately 250 yards |
| Black Cat Yarn | Approximately 110 yards |
| Muzzle and Inner Ear Yarn | Approximately 20 yards |
| Facial Embroidery Floss | Less than 5 yards total |
| Fiberfill | Approximately 1½ ounces |
| Blanket Hook | H (5.0 mm) |
| Cat-Piece Hook | G (4.0 mm) |
Buying yarn by the skein: Check the yardage printed on each yarn label. Divide the required pattern yardage by the number of yards in one skein, then round up to the next whole skein. Buy enough yarn from the same dye lot for each large color section so the blanket does not change shade unexpectedly halfway through a round.
Choose the eye color before you begin the face. Black embroidery will disappear against the head, while pure white can create a sharper expression than you intended. Light gray, muted gold, pale lavender, and soft green are easier to see without making the kitten look harsh.
Check the care labels on every yarn and embroidery thread you plan to use. The finished lovey should be washed according to the most restrictive care instructions among the yarn, floss, and fiberfill.
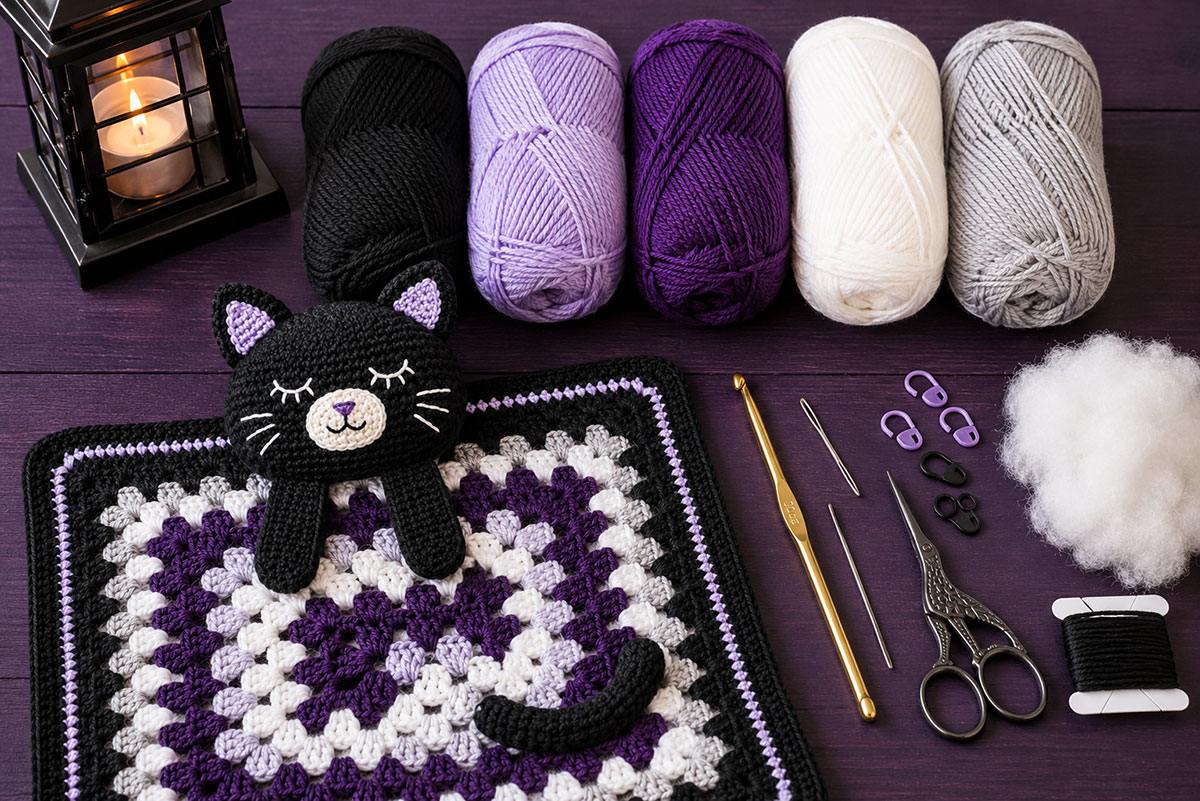
Choosing Black Yarn and Keeping the Stitches Easy to See
A smooth yarn makes this black cat crochet pattern much easier to follow. Look for a #4 worsted weight yarn with an even twist and a surface that lets you separate one loop from the next. Black yarn with a fuzzy halo may look appealing in the skein, but it can hide stitch openings, decrease points, and sewing paths.
I recommend making a small single crochet sample before beginning the head. Work at least 18 stitches across and 20 rows tall with the 4.0 mm hook. Hold the sample near a window or beneath your usual craft light. If you cannot see where one stitch ends and the next begins, choose a smoother yarn or a slightly softer shade such as charcoal.
Keep the following habits in place while working with dark yarn:
- Place a locking marker in the first stitch of every continuous round.
- Move the marker as soon as the first stitch of the new round is completed.
- Count every increase and decrease round before beginning the next round.
- Spread the stitches gently with your fingers when locating the front loops for an invisible decrease.
- Work over a white towel, pale pillowcase, or other light surface.
- Use a bright lamp that shines across the stitches rather than directly toward your eyes.
- Pause after several rounds and turn the piece inside out briefly to check for skipped stitches or visible gaps.
- Keep a row counter or written note beside the project so the dark yarn does not make you lose your place.
A phone camera can also help when a stitch is difficult to identify. Place the piece on the light work surface, take a close photograph, and enlarge the image. The stitch openings are often easier to separate on the screen than they are while the yarn is moving in your hands.
Do not loosen the head stitches simply to make them easier to see. The finished fabric must remain firm enough to contain the fiberfill. Better lighting and careful counting are safer solutions than creating large spaces between the stitches.
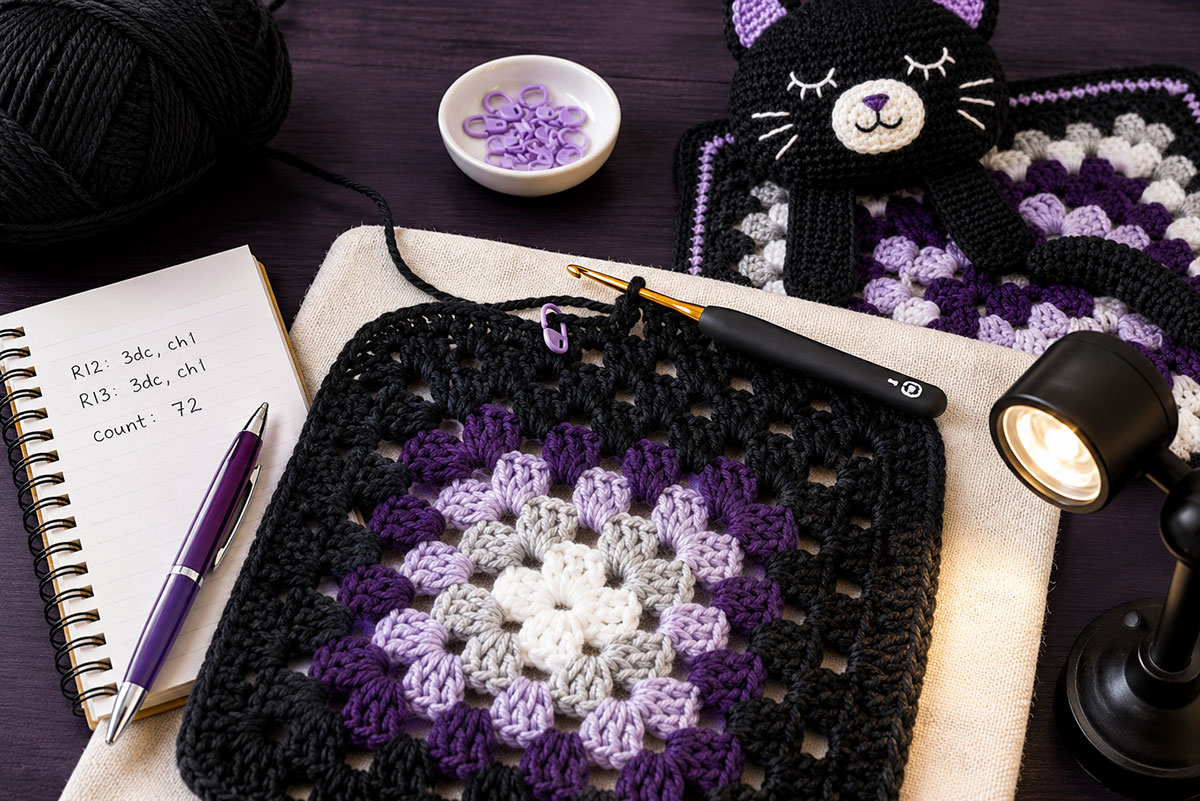
Recommended Yarn Qualities
- Weight: #4 worsted weight
- Fiber: A washable acrylic, cotton blend, or other baby-appropriate yarn that meets gauge
- Texture: Smooth with visible stitch definition
- Color: Black, near-black, or charcoal for the cat pieces
- Care: Machine washable when possible
- Finish: Low fuzz and no loose decorative fibers
Use the same yarn weight for the blanket and cat pieces, even when the colors or fiber blends differ. A thinner black yarn can create a head and paws that look too small beside the blanket. A thicker substitute may produce a large head that pulls heavily on the top edge.
Make sure every chosen color behaves similarly after washing. A soft black acrylic paired with a firm cotton blanket yarn may shrink, stretch, or dry at a different rate. When the fibers differ, wash the gauge samples together before committing to the full project.
Stitches and Abbreviations Used in the Pattern
The black cat pieces use basic single crochet shaping, while the blanket is built with double crochet groups and two simple border rounds. Confident beginners should be comfortable counting stitches, making increases and invisible decreases, and sewing finished pieces together.
Stitches Used
- Magic ring
- Chain
- Slip stitch
- Single crochet
- Half double crochet
- Double crochet
- Single crochet increase
- Invisible single crochet decrease
Abbreviations
- ch: chain
- sl st: slip stitch
- sc: single crochet
- hdc: half double crochet
- dc: double crochet
- inc: work 2 single crochet stitches in the same stitch
- invisible dec: invisible single crochet decrease over the next 2 stitches
- st: stitch
- sts: stitches
Gauge for the Blanket and Black Cat Pieces
The blanket and cat pieces have separate gauge checkpoints because they use different hook sizes. Check both before completing the project. A blanket that is too small cannot be corrected by making a larger head, and a loose head may allow the fiberfill to show through.
Blanket Gauge with the 5.0 mm Hook
- After Blanket Round 4, the square should measure approximately 4¼ to 4½ inches across.
- After Blanket Round 8, the square should measure approximately 8½ to 9 inches across.
- After Blanket Round 12, the square should measure approximately 13 inches across before the border rounds are added.
Black Cat Piece Gauge with the 4.0 mm Hook
For the flat gauge swatch, chain 19. Single crochet in the second chain from the hook and in each remaining chain across for 18 stitches. Chain 1 and turn. The turning chain does not count as a stitch. Work 1 single crochet in each stitch across until 20 rows are complete.
- 18 single crochet stitches should measure approximately 4 inches.
- 20 rows of single crochet in a flat gauge swatch should measure approximately 4 inches.
- The fabric should be firm and closely worked, with no fiberfill visible between the stitches.
Change hook size if your measurements are substantially different. Dark yarn can make tight stitches feel slower at first, but do not move to a larger hook unless the gauge confirms that you need one.
Finished Black Cat Lovey Measurements
| Piece | Approximate Finished Size |
|---|---|
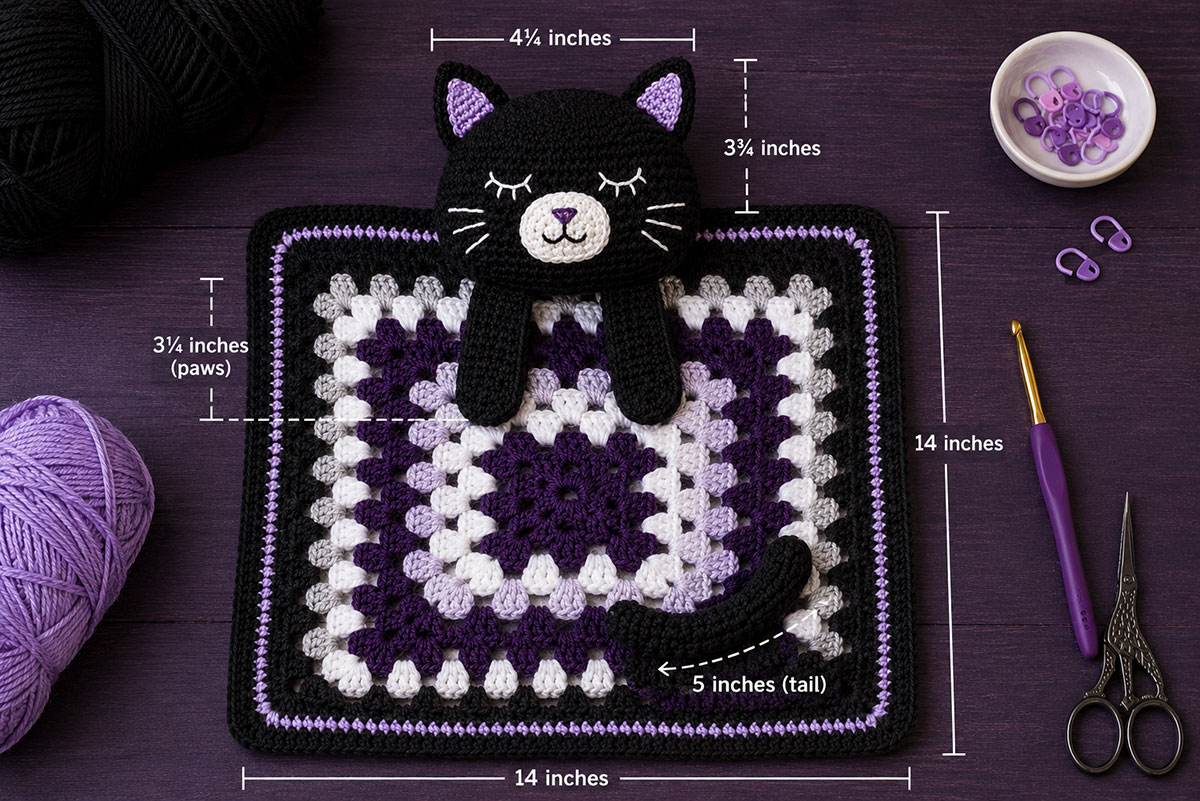
| Blocked Blanket | 14 × 14 inches |
| Stuffed Cat Head | 4¼ inches across and 3¼ to 3¾ inches tall |
| Each Outer Ear | 1¾ inches tall |
| Contrast Muzzle | Approximately 1¾ inches across |
| Each Front Paw | Approximately 3¼ inches long and 1¼ inches wide when flattened |
| Curved Tail | Approximately 5 inches long |
| Finished Weight | Approximately 7 to 9 ounces |
| Estimated Total Yardage | Approximately 380 yards |
The finished lovey will be slightly taller than the blanket once the head is attached along the upper edge. Small differences are acceptable, but the proportions should remain close enough that the head does not overpower the blanket or pull the border out of shape.
Before You Begin the Black Cat Lovey
Project Checklist
- Gather the yarn, hooks, fiberfill, embroidery supplies, markers, and sewing tools.
- Read the full pattern before beginning the blanket.
- Check the blanket and cat-piece gauge separately.
- Choose the muzzle, inner ear, eye, nose, and blanket colors before crocheting.
- Place a marker in the first stitch of every continuous round.
- Keep a written record of the completed head rounds.
- Prepare a light-colored surface for working with the black yarn.
Black Cat Lovey Pattern Notes
- The granny-style blanket rounds are joined with a slip stitch.
- The head, muzzle, paws, and tail are worked in continuous rounds unless the instructions state otherwise.
- Do not join or turn continuous rounds.
- Move the beginning-of-round marker after completing the first stitch of every new round.
- Beginning chains count as stitches only where the instructions specifically say they do.
- The chain 1 at the start of a single crochet or half double crochet border does not count as a stitch.
- The chain 1 used when turning an ear row does not count as a stitch.
- Use the 5.0 mm hook for the blanket and the 4.0 mm hook for every cat piece.
- Count each black head round before beginning the next one.
- Weave in ordinary yarn ends as the work progresses, but keep every instructed sewing tail.
- For every magic ring, leave a starting tail at least 6 inches long. After pulling the ring closed, weave the starting tail through the base stitches in two directions before trimming it.
- Stuff only the head. The paws, muzzle, ears, and tail remain unstuffed.
- Block the completed blanket before attaching the head, paws, or tail.
- Lay the blanket flat after every two granny rounds and check that the corners remain square.
- Complete the ears, muzzle, and embroidered face before sewing the head to the blanket.
Black Cat Color Combinations
A black kitten can look playful, seasonal, or quietly classic depending on the blanket and facial colors. The cat pieces remain black in each version, so only a few supporting colors are needed.
- Halloween black cat: Black cat pieces with orange, deep purple, charcoal, and cream blanket rounds.
- Soft nursery black cat: Black cat pieces with mint, pale gray, white, and muted blue blanket rounds.
- Black and white tuxedo cat: Add a white muzzle, white inner ears, and white lower paw sections.
- Lavender black cat: Use pale lavender for the muzzle and inner ears with gray-lavender eyes.
- Autumn black cat: Pair black with rust, muted gold, warm gray, and ivory.
- Simple monochrome cat: Use black, charcoal, silver gray, and white for a year-round design.
Keep the face colors soft enough to suit the blanket. Bright white eyes against solid black yarn can look more startled than sleepy, while pale gray or muted gold creates a gentler expression.
Black Cat Crochet Lovey Project Summary
- Skill Level: Advanced Beginner
- Estimated Time: Approximately 8 to 12 hours
- Finished Blanket Size: Approximately 14 inches square
- Finished Weight: Approximately 7 to 9 ounces
- Estimated Yarn: Approximately 380 yards total
- Yarn Weight: #4 Worsted
- Blanket Hook: H (5.0 mm)
- Cat-Piece Hook: G (4.0 mm)
- Construction Order: Blanket first, cat pieces second, face embroidery third, and assembly last
- Stuffed Pieces: Head only
- Facial Features: Embroidered only
- Intended Use: Supervised use while a baby is awake and decorative gifting
Crochet the Black Cat Lovey Blanket
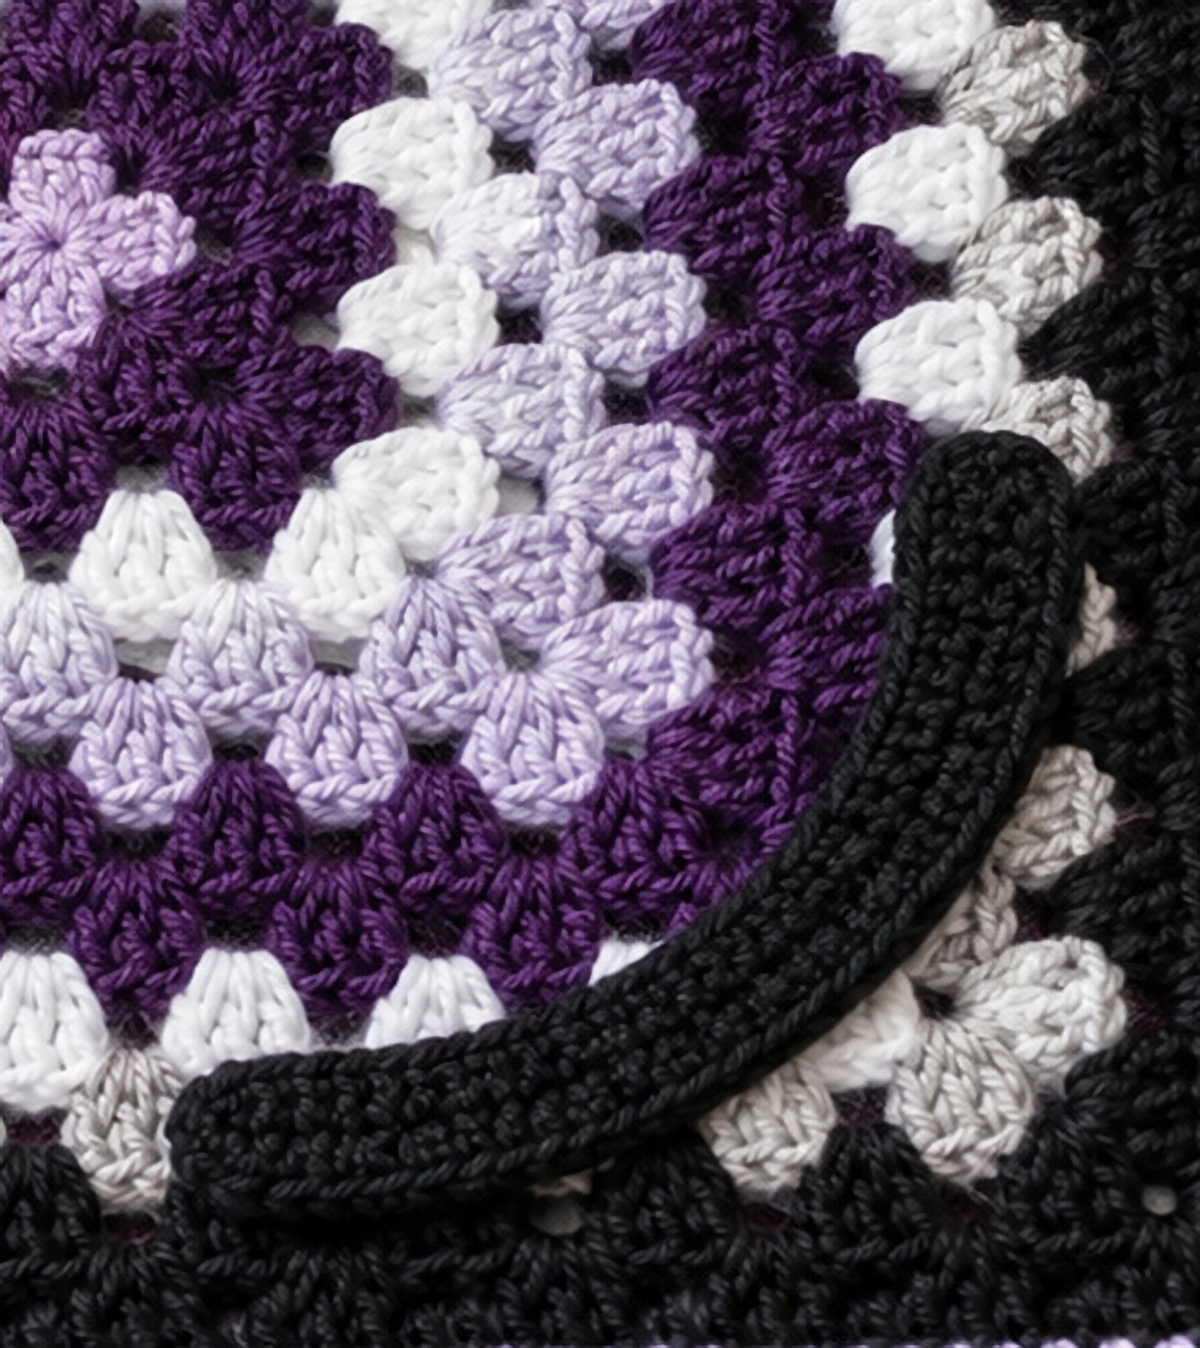
Begin with the blanket so it can be blocked and allowed to dry while you crochet the kitten pieces. The granny-style center gives little hands plenty of texture to grasp, while the two border rounds create a smoother edge for attaching the head, paws, and curved tail.
You may work the blanket in one color or change colors between rounds. For a Halloween version, try alternating charcoal, orange, purple, and soft cream. A quieter nursery version can use gray, white, muted blue, lavender, or mint. Fasten off and weave in each color-change end securely rather than carrying long strands across the back.
How to Begin a New Blanket Color
After joining the completed round, fasten off the old color. Join the new color with a slip stitch in any chain-2 corner space. Chain 3, which counts as the first double crochet, then work 2 double crochet, chain 2, and 3 double crochet in the same corner space. Continue the written instructions after that first corner. Do not work the slip-stitch-to-the-corner setup on a round begun with a new color.
Blanket Foundation Ring
Using the 5.0 mm hook and the first blanket color, chain 4.
Join with a slip stitch to the first chain to form a ring.
Optional tighter center: Make a magic ring instead. Work Blanket Round 1 into the ring, pull the center closed, and join as instructed.
Blanket Round 1
Chain 3. The beginning chain 3 counts as the first double crochet.
Work 2 double crochet into the ring. Chain 2.
*Work 3 double crochet into the ring. Chain 2.*
Repeat from * to * two more times.
Join with a slip stitch to the top of the beginning chain 3.
Stitch Count: Four 3-double-crochet groups and four chain-2 corner spaces.
Blanket Round 2
Slip stitch into the next 2 stitches and into the first corner space.
Chain 3. Work 2 double crochet, chain 2, and 3 double crochet in the same corner space.
In each of the remaining 3 corner spaces, work 3 double crochet, chain 2, and 3 double crochet.
Join with a slip stitch to the top of the beginning chain 3.
Stitch Count: Eight 3-double-crochet groups and four chain-2 corner spaces.
Blanket Round 3
Slip stitch into the next 2 stitches and into the first corner space.
Chain 3. Work 2 double crochet, chain 2, and 3 double crochet in the same corner space.
Work 3 double crochet in the next side space.
*In the next corner space, work 3 double crochet, chain 2, and 3 double crochet. Work 3 double crochet in the next side space.*
Repeat from * to * around.
Join with a slip stitch to the top of the beginning chain 3.
Stitch Count: Twelve 3-double-crochet groups and four chain-2 corner spaces.
Blanket Rounds 4 Through 12
At the beginning of each round, slip stitch into the next 2 double crochet stitches and into the first corner space.
Chain 3. The chain counts as the first double crochet. Work 2 double crochet, chain 2, and 3 double crochet in the same corner space.
Work 3 double crochet in every side space until you reach the next corner.
In each corner space, work 3 double crochet, chain 2, and 3 double crochet. Continue working 3 double crochet in every side space between the corners.
Do not add chain stitches between the side groups.
Join each round with a slip stitch to the top of the beginning chain 3.
Lay the blanket flat after each round. The center should remain smooth, the sides should lie comfortably, and the four corners should stay easy to identify. If the edges begin to ripple, tighten your tension slightly. If the corners pull inward, loosen the chain-2 corner spaces a little.
Round 4 Stitch Count: Sixteen 3-double-crochet groups and four chain-2 corner spaces.
Round 5 Stitch Count: Twenty 3-double-crochet groups and four chain-2 corner spaces.
Round 6 Stitch Count: Twenty-four 3-double-crochet groups and four chain-2 corner spaces.
Round 7 Stitch Count: Twenty-eight 3-double-crochet groups and four chain-2 corner spaces.
Round 8 Stitch Count: Thirty-two 3-double-crochet groups and four chain-2 corner spaces.
Round 9 Stitch Count: Thirty-six 3-double-crochet groups and four chain-2 corner spaces.
Round 10 Stitch Count: Forty 3-double-crochet groups and four chain-2 corner spaces.
Round 11 Stitch Count: Forty-four 3-double-crochet groups and four chain-2 corner spaces.
Round 12 Stitch Count: Forty-eight 3-double-crochet groups and four chain-2 corner spaces.
Blanket Gauge Checkpoints
- After Round 4, the square should measure approximately 4¼ to 4½ inches across.
- After Round 8, the square should measure approximately 8½ to 9 inches across.
- After Round 12, the square should measure approximately 13 inches across before the borders are added.
Blanket Border Round 13
If you are continuing with the same yarn, chain 1. If you are changing colors, fasten off after joining Round 12, join the new color with a slip stitch in the top of the beginning chain 3 from Round 12, and chain 1. The chain does not count as a stitch.
Work 1 single crochet in the same stitch as the join.
Work 1 single crochet in each remaining double crochet stitch and 1 single crochet in each gap between adjacent 3-double-crochet groups along the sides.
Work 3 single crochet in each chain-2 corner space.
Do not work into the joining slip stitch.
Join with a slip stitch to the first single crochet.
Stitch Count: 200 single crochet stitches.
Blanket Border Round 14
If you are continuing with the same yarn, chain 1. If you are changing colors, fasten off after joining Round 13, join the new color with a slip stitch in the first single crochet from Round 13, and chain 1. The chain does not count as a stitch.
Work 1 half double crochet in the same stitch as the join.
Work 1 half double crochet in each remaining stitch around, except at the corners. In the center stitch of each 3-stitch corner from the previous round, work 3 half double crochet instead of 1.
Do not work into the joining slip stitch.
Join with a slip stitch to the first half double crochet.
Fasten off and weave the yarn end through the back of the border in two directions before trimming it.
Stitch Count: 208 half double crochet stitches.
Check and Block the Finished Blanket
Finished Blanket Checkpoint: After blocking, the square should measure approximately 14 inches across each side. A difference of about ½ inch is acceptable. If the blanket is much smaller or larger, remake it with an adjusted hook size before crocheting the cat pieces.
Lightly dampen the blanket with clean water. Lay it on a dry towel and smooth the center without stretching it. Shape each corner into a right angle and pat the edges into an even square.
Allow the blanket to dry completely before assembly. Blocking now gives you a flatter surface for measuring the head and paw placement, and it helps prevent the upper edge from gathering when the kitten is sewn in place.
A freshly finished granny square may have a little movement along the sides. Give the stitches time to settle before deciding that the shape is wrong. The final measurement should be taken only after the blanket is dry.
Crochet the Black Cat Head
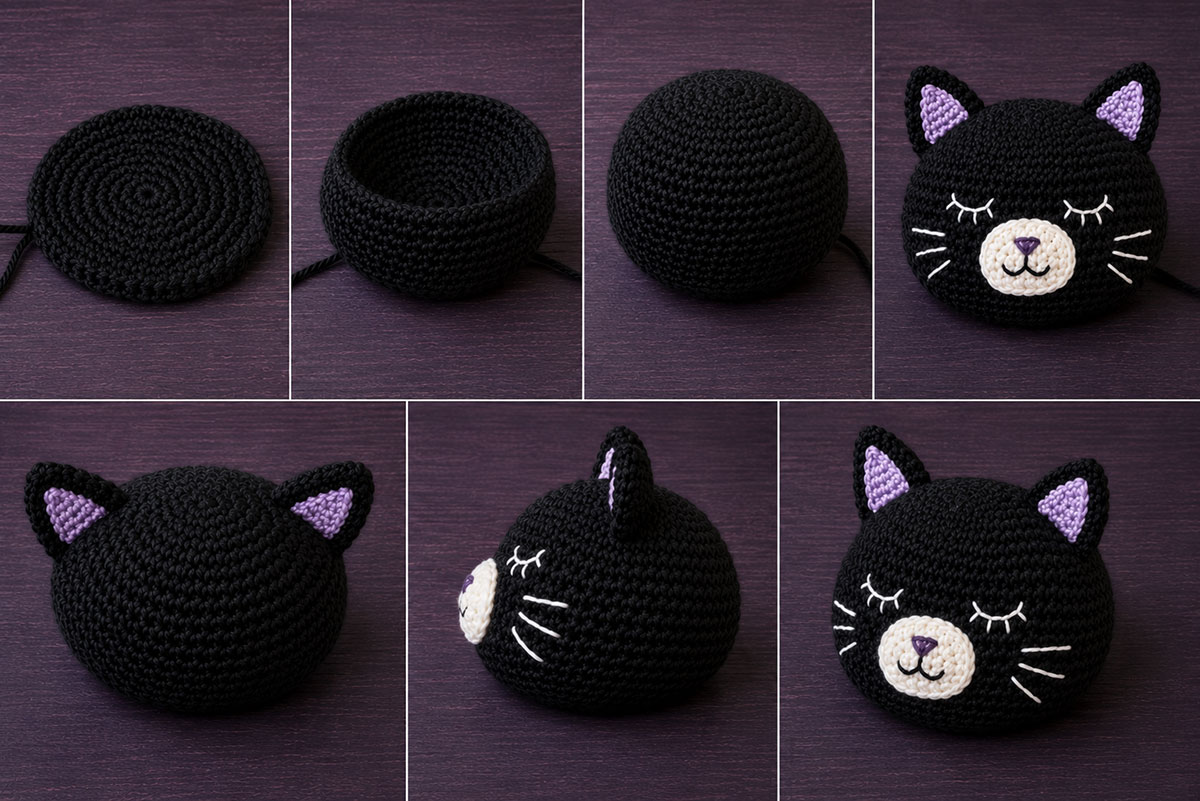
Use the 4.0 mm hook and black yarn for the head. Work in continuous rounds without joining or turning. Place a locking marker in the first stitch of every round and move it as you work.
The finished head is wider than it is tall, which helps the face read as a kitten rather than a round bear. Keep the stitches firm, but do not pull them so tightly that the hook becomes difficult to insert.
Black Cat Head Round 1
Make a magic ring and work 6 single crochet into the ring.
Pull the center closed firmly.
Stitch Count: 6 stitches.
Black Cat Head Round 2
Increase in every stitch around.
Stitch Count: 12 stitches.
Black Cat Head Round 3
*(Single crochet in the next stitch, increase in the next stitch.)*
Repeat from * to * around.
Stitch Count: 18 stitches.
Black Cat Head Round 4
*(Single crochet in the next 2 stitches, increase in the next stitch.)*
Repeat from * to * around.
Stitch Count: 24 stitches.
Black Cat Head Round 5
*(Single crochet in the next 3 stitches, increase in the next stitch.)*
Repeat from * to * around.
Stitch Count: 30 stitches.
Black Cat Head Round 6
*(Single crochet in the next 4 stitches, increase in the next stitch.)*
Repeat from * to * around.
Stitch Count: 36 stitches.
Black Cat Head Round 7
*(Single crochet in the next 5 stitches, increase in the next stitch.)*
Repeat from * to * around.
Stitch Count: 42 stitches.
Black Cat Head Round 8
*(Single crochet in the next 6 stitches, increase in the next stitch.)*
Repeat from * to * around.
Stitch Count: 48 stitches.
Black Cat Head Round 9
*(Single crochet in the next 7 stitches, increase in the next stitch.)*
Repeat from * to * around.
Stitch Count: 54 stitches.
Black Cat Head Round 10
*(Single crochet in the next 8 stitches, increase in the next stitch.)*
Repeat from * to * around.
Stitch Count: 60 stitches.
Counting Check: Stop here and count all 60 stitches before continuing. Black yarn can make a missed increase difficult to spot later, especially after the straight rounds have been added.
Black Cat Head Rounds 11 Through 20
Single crochet in every stitch around.
Stitch Count: 60 stitches in each round.
As the sides grow, the piece should begin to form a shallow bowl. Keep the beginning-of-round line toward the back of the head so it will be less noticeable after the ears and face are added.
Black Cat Head Round 21
*(Single crochet in the next 8 stitches, invisible decrease over the next 2 stitches.)*
Repeat from * to * around.
Stitch Count: 54 stitches.
Black Cat Head Round 22
*(Single crochet in the next 7 stitches, invisible decrease over the next 2 stitches.)*
Repeat from * to * around.
Stitch Count: 48 stitches.
Black Cat Head Round 23
*(Single crochet in the next 6 stitches, invisible decrease over the next 2 stitches.)*
Repeat from * to * around.
Stitch Count: 42 stitches.
Black Cat Head Round 24
*(Single crochet in the next 5 stitches, invisible decrease over the next 2 stitches.)*
Repeat from * to * around.
Stitch Count: 36 stitches.
Black Cat Head Round 25
*(Single crochet in the next 4 stitches, invisible decrease over the next 2 stitches.)*
Repeat from * to * around.
Stitch Count: 30 stitches.
Begin adding polyester fiberfill in small pieces. Press the stuffing into the crown and sides before filling the center. Small amounts are easier to shape than one large handful, and they are less likely to create firm lumps beneath the black stitches.
Shape the sides evenly while keeping a little extra width through the cheek area. The head should not become a hard ball.
Black Cat Head Round 26
*(Single crochet in the next 3 stitches, invisible decrease over the next 2 stitches.)*
Repeat from * to * around.
Stitch Count: 24 stitches.
Black Cat Head Round 27
*(Single crochet in the next 2 stitches, invisible decrease over the next 2 stitches.)*
Repeat from * to * around.
Stitch Count: 18 stitches.
Black Cat Head Round 28
*(Single crochet in the next stitch, invisible decrease over the next 2 stitches.)*
Repeat from * to * around.
Stitch Count: 12 stitches.
Add the final small pieces of fiberfill. Smooth the crown and cheeks with your fingertips and check the head from the front and side. It should be softly rounded with slightly more width than height.
Black Cat Head Round 29
Work an invisible decrease around.
Stitch Count: 6 stitches.
Fasten off, leaving a 36-inch yarn tail.
Thread the tail onto the yarn needle. Pass the needle through the front loop of each remaining stitch, pull the opening closed, and secure it firmly. Do not cut the remaining tail. It will be used later to attach the head to the blanket.
Finished Head Checkpoint
- The head should measure approximately 4¼ inches across.
- It should measure approximately 3¼ to 3¾ inches from the crown to the closed lower end.
- The cheeks should appear rounded and slightly wider than the height.
- No fiberfill should be visible between the stitches.
- The remaining yarn tail should be long enough to make two passes across the 2½- to 3-inch head attachment seam and weave in securely afterward.
Set the head on the blocked blanket before making the smaller pieces. The size should feel balanced against the 14-inch square. A head that is noticeably larger or smaller should be corrected before the ears, muzzle, and embroidered features are positioned.
Crochet the Black Cat Ears and Muzzle
The pointed ears give the kitten its unmistakable black cat shape. Work both outer ears before making the smaller inner pieces so you can compare their height and width side by side.
Use the 4.0 mm hook. The ears are worked back and forth in rows. The turning chain does not count as a stitch.
Black Cat Outer Ears
Make 2.
Ear Row 1
Chain 2.
Work 2 single crochet in the second chain from the hook. Chain 1 and turn.
Stitch Count: 2 stitches.
Ear Row 2
Increase in each stitch across. Chain 1 and turn.
Stitch Count: 4 stitches.
Ear Row 3
Single crochet in each stitch across. Chain 1 and turn.
Stitch Count: 4 stitches.
Ear Row 4
Single crochet in the first stitch, increase in each of the next 2 stitches, and single crochet in the final stitch. Chain 1 and turn.
Stitch Count: 6 stitches.
Ear Row 5
Single crochet in each stitch across. Chain 1 and turn.
Stitch Count: 6 stitches.
Ear Row 6
Single crochet in the next 2 stitches, increase in each of the next 2 stitches, and single crochet in the final 2 stitches. Chain 1 and turn.
Stitch Count: 8 stitches.
Ear Rows 7 Through 9
Single crochet in each stitch across.
Chain 1 and turn after Rows 7 and 8 only.
Stitch Count: 8 stitches in each row.
Fasten off each ear, leaving an 18-inch sewing tail.
Each finished outer ear should measure approximately 1¾ inches from the tip to the lower edge. Lay the two pieces together and check that the tips, sides, and lower edges match before continuing.
Optional Contrast Inner Ears
The smaller inner triangles help the ears remain visible against the black head. Pale gray, muted lavender, dusty pink, or soft cream all provide enough contrast without becoming too bright.
Make 2.
Using the 4.0 mm hook and the contrast yarn, repeat Outer Ear Rows 1 through 5. At the end of Row 5, do not chain 1 or turn.
Fasten off each inner ear, leaving a 12-inch sewing tail.
Place one smaller triangle on the side of each black outer ear that you want to face forward. This becomes the right side of the finished ear. Center the triangle so an even black border remains visible along the two sloping sides and the lower edge.
Sew around the inner triangle with small stitches. Pass the needle only through the outer ear fabric rather than wrapping the yarn around the edge. Secure and bury the ends on the back of the ear.
Ear Check: The two completed ears should be the same height, and the inner triangles should sit at matching angles. A small difference becomes much more noticeable after the ears are attached to the head.
Crochet the Contrast Muzzle
The light muzzle separates the nose and mouth from the black head. It is worked as one flat circle and is not stuffed.
Use the 4.0 mm hook and the same contrast yarn used for the inner ears, or choose a second light color.
Muzzle Round 1
Make a magic ring and work 6 single crochet into the ring.
Stitch Count: 6 stitches.
Muzzle Round 2
Increase in every stitch around.
Stitch Count: 12 stitches.
Muzzle Round 3
*(Single crochet in the next stitch, increase in the next stitch.)*
Repeat from * to * around.
Stitch Count: 18 stitches.
Muzzle Round 4
*(Single crochet in the next 2 stitches, increase in the next stitch.)*
Repeat from * to * around.
Stitch Count: 24 stitches.
Fasten off, leaving an 18-inch sewing tail.
Flatten the muzzle gently without stretching it. The finished piece should measure approximately 1¾ inches across.
Attach the Ears and Complete the Black Cat Face
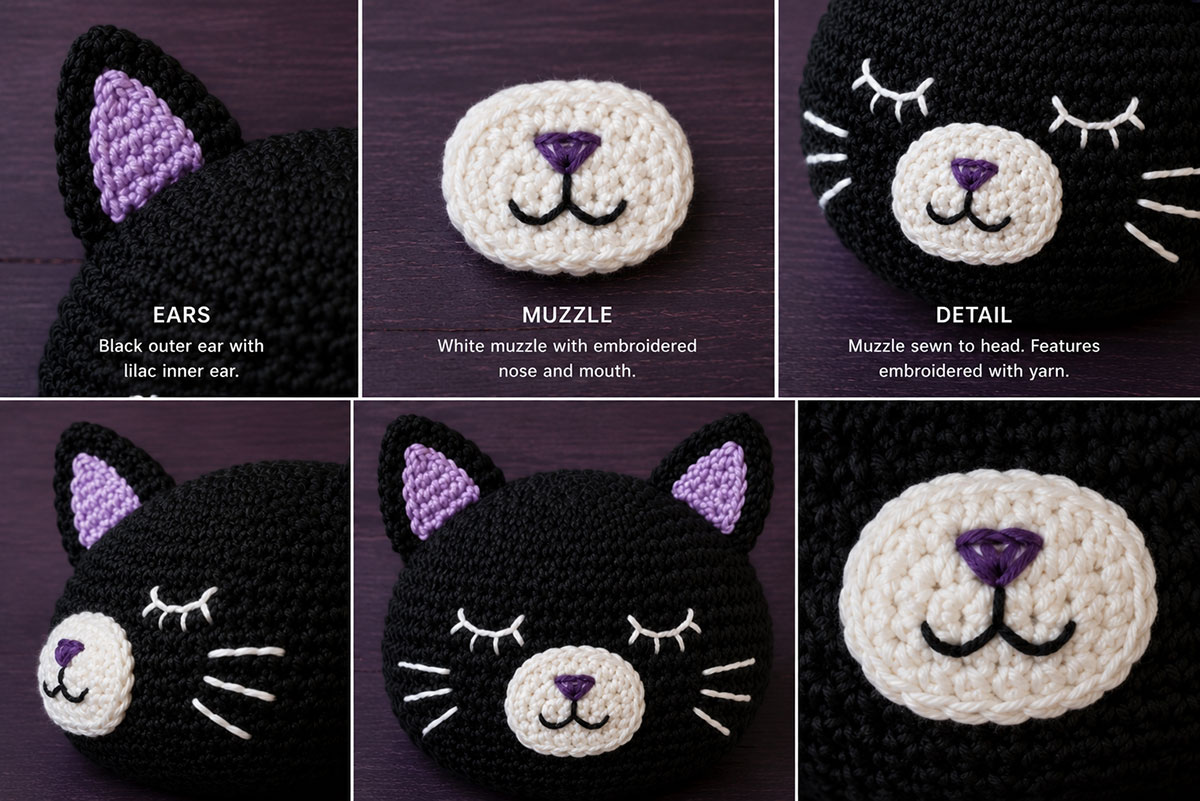
Finish the entire face before sewing the head to the blanket. It is much easier to adjust an ear, center the muzzle, or bury an embroidery end while the head is still separate.
- Turn the head so the beginning-of-round line rests at the back.
- Pin the lower inside corner of each ear between Head Rounds 9 and 10.
- Leave approximately 10 stitches between the two inside ear corners.
- When contrast inner ears are used, keep them facing forward. Angle the tips slightly outward and check the head from the front before sewing.
- Sew completely across the lower edge of each ear and reinforce both corners.
- Center the muzzle on the front of the head. Place its upper edge near Head Round 15 and its lower edge near Head Round 23.
- Pin the muzzle at four evenly spaced points, then sew completely around its outer edge.
Do not place the ears too low. Lower ears soften the triangular outline and can make the finished face resemble a bear. Keeping the inside corners near Rounds 9 and 10 preserves the kitten shape.
Embroider the Eyes, Nose, Mouth, and Whiskers
Use embroidery thread that can be seen clearly against the black yarn. Muted gold, light gray, pale green, or lavender works well for the eyes. Choose pink, gray, or lavender for the nose and mouth.
- Embroider the sleepy eye curves between Head Rounds 14 and 15.
- Leave approximately 8 stitches between the inside ends of the eyes.
- Add 3 short downward lash stitches along each eye curve, spacing them evenly and keeping them flat against the head.
- Keep both eye curves and lash placement similar in length, spacing, and angle.
- Embroider a small triangular or softly rounded nose in the upper center of the muzzle.
- Add a short vertical stitch beneath the nose.
- Work two small curved mouth lines extending from the lower end of the vertical stitch.
- Add 3 short whiskers on each side of the muzzle.
- Keep every whisker under ¾ inch long.
Check the expression from several feet away before securing the final embroidery ends. A face that looks evenly spaced from close range can appear slightly tilted when viewed as a complete kitten.
To bury an embroidery or sewing end, pass the needle through the stuffed head and bring it out through a hidden area near the lower back. Pull gently, trim the thread close to the surface, and allow the cut end to settle inside the head.
Completed Face Check
- Both ears are firmly attached and sit at matching heights.
- The muzzle is centered and sewn completely around its edge.
- The eye color remains visible against the black yarn.
- The eyes have approximately 8 stitches between their inside ends.
- Each eye has 3 short, flat lash stitches with matching spacing and angles.
- The nose and mouth are centered on the muzzle.
- There are 3 short whiskers on each side of the muzzle, and all are securely embroidered.
- All thread and yarn ends are buried inside the head.
Crochet the Black Cat Paws
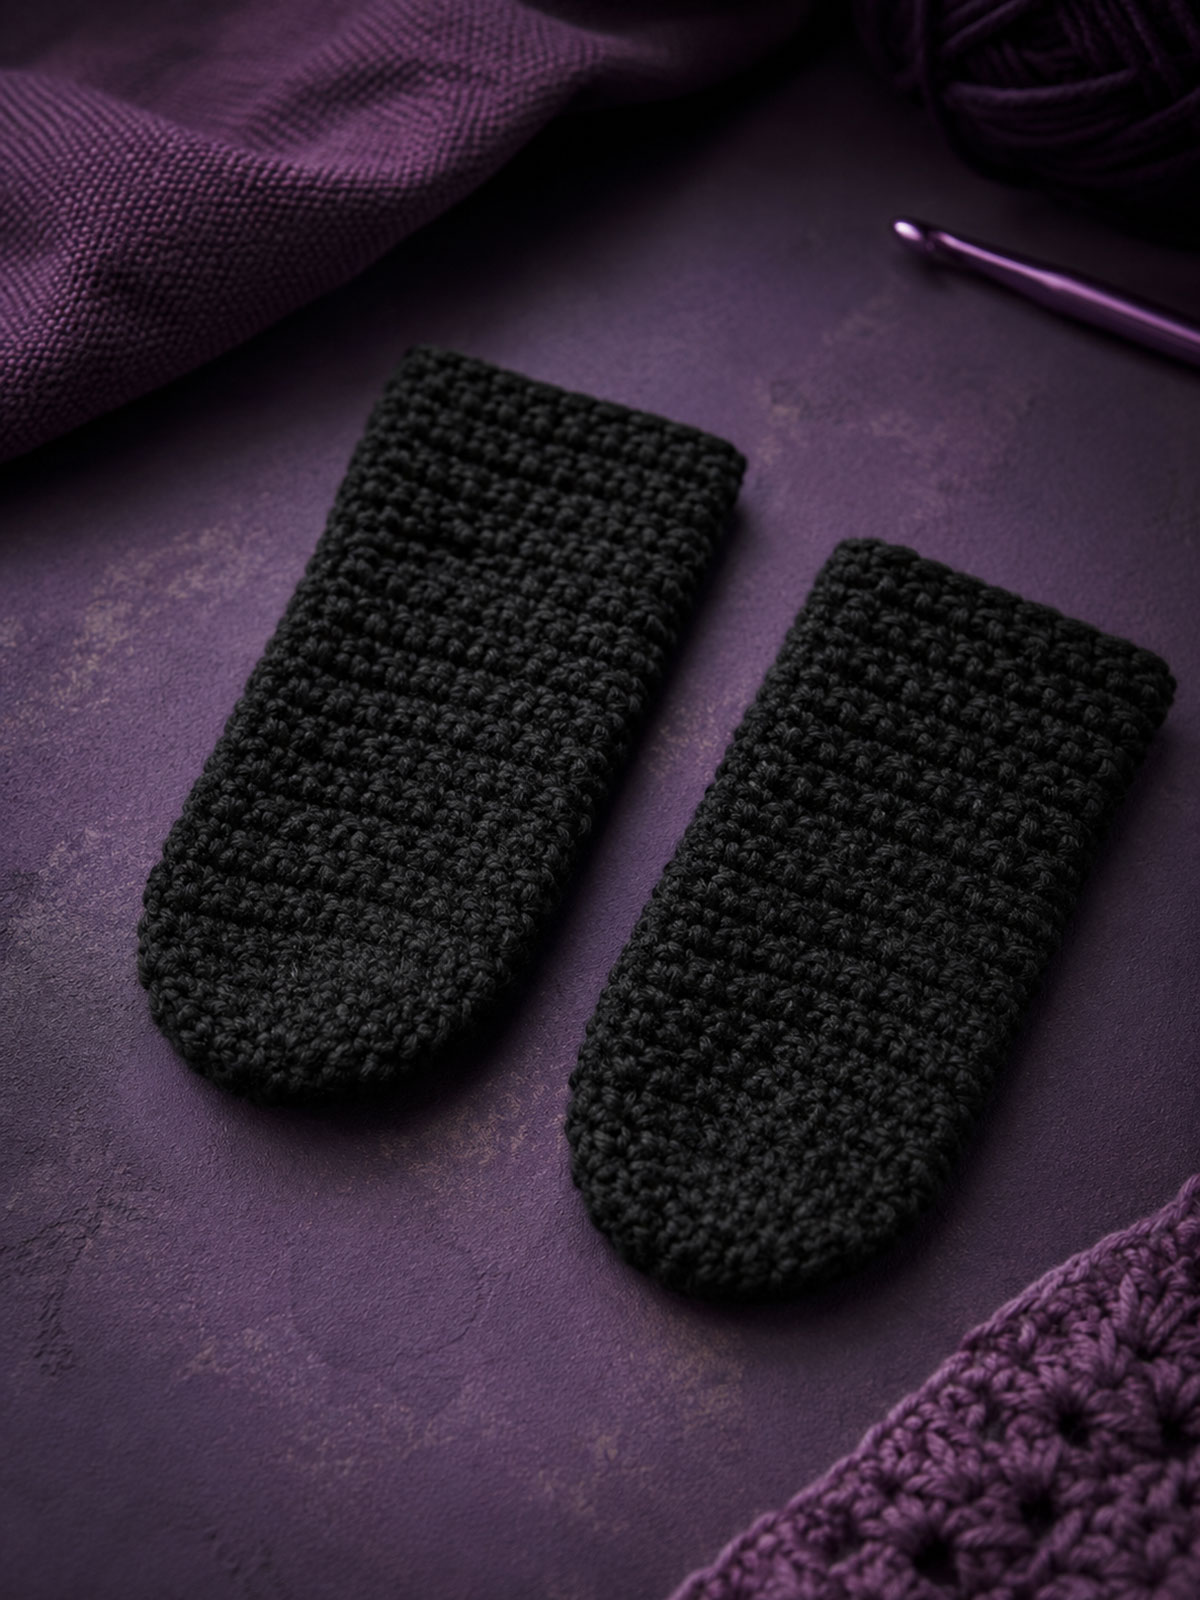
The two front paws are worked as narrow tubes and left unstuffed so they rest neatly against the blanket. Their simple shape keeps the kitten recognizable without adding bulky limbs that might twist or pull on the granny-style square.
Use the 4.0 mm hook and black yarn. Work in continuous rounds without joining or turning. Place a locking marker in the first stitch of each round.
Make 2 paws.
Paw Round 1
Make a magic ring and work 6 single crochet into the ring.
Pull the center closed firmly.
Stitch Count: 6 stitches.
Paw Round 2
Increase in every stitch around.
Stitch Count: 12 stitches.
Paw Rounds 3 Through 16
Single crochet in every stitch around.
Stitch Count: 12 stitches in each round.
Count the stitches after every few rounds. The narrow black tube can turn slightly in your hands, which may make the beginning-of-round line harder to follow.
Do not stuff the paw.
Rotate the tube so the beginning-of-round line rests along one side. Flatten the open end with 6 stitches on the front and 6 stitches on the back.
Single crochet through both layers using 6 stitches to close the opening.
Fasten off, leaving an 18-inch sewing tail.
Finished Paw Size: Approximately 3¼ inches long and 1¼ inches wide when flattened.
Make the second paw in the same manner. Lay both pieces together before fastening off the second one. Their closed upper edges and rounded lower ends should line up closely.
Paw Check
- Each paw contains 12 stitches through Round 16.
- Neither paw contains fiberfill.
- The open end of each paw is closed through 6 stitches.
- Both pieces measure approximately 3¼ inches long.
- The 18-inch sewing tails remain attached.
Changing Color in a Paw: Begin the final single crochet of the old color normally. Complete the final yarn-over and pull-through with the new color. Continue directly into the next round without joining or turning, and move the round marker to the first stitch worked in the new color. Cut the old color with a tail at least 6 inches long. After several more rounds are complete, secure and weave both color-change ends into the inside of the paw.
The paws can remain completely black, or you can create a tuxedo-cat variation by working the lower paw tips in white or pale gray. Work Rounds 1 through 5 in the light color, then change to black at the beginning of Round 6 and complete the paws as written. Make the color change at the same round on both paws so the markings match.
Crochet the Curved Black Cat Tail
The tail is worked as a longer unstuffed tube. Leaving it flat allows the piece to bend into a gentle curve without becoming heavy or forming a large raised loop on the blanket.
Use the 4.0 mm hook and black yarn. Work in continuous rounds without joining or turning.
Tail Round 1
Make a magic ring and work 6 single crochet into the ring.
Pull the center closed securely.
Stitch Count: 6 stitches.
Tail Round 2
Increase in every stitch around.
Stitch Count: 12 stitches.
Tail Rounds 3 Through 25
Single crochet in every stitch around.
Stitch Count: 12 stitches in each round.
Do not stuff the tail. Smooth the tube between your fingers every few rounds so it remains even from the base to the tip.
After Round 25, flatten the open end with 6 stitches on the front and 6 stitches on the back.
Single crochet through both layers using 6 stitches to close the opening.
Fasten off, leaving a 24-inch sewing tail.
Finished Tail Size: Approximately 5 inches long.
Lay the tail along one lower side of the blocked blanket and test the curve before assembly. The entire tail should remain inside the blanket border. A wide open loop is not needed. A gentle bend secured at three points gives the black cat its shape while keeping the piece close to the blanket.
Tail Check
- The tail contains 12 stitches through Round 25.
- The tube is unstuffed and lies flat when pressed gently.
- The open end is closed through 6 stitches.
- The finished length is approximately 5 inches.
- The 24-inch sewing tail remains attached for assembly.
A few inches of plain black crochet can look surprisingly featureless while it is still separate from the project. Once the tail is curved beside the blanket and paired with the pointed ears, the kitten silhouette becomes much clearer.
Assemble the Black Cat Crochet Lovey
Wait until the blanket is completely dry before arranging the kitten pieces. A damp or loosely shaped square can shift while you measure, which makes it harder to center the head and keep the paws even.
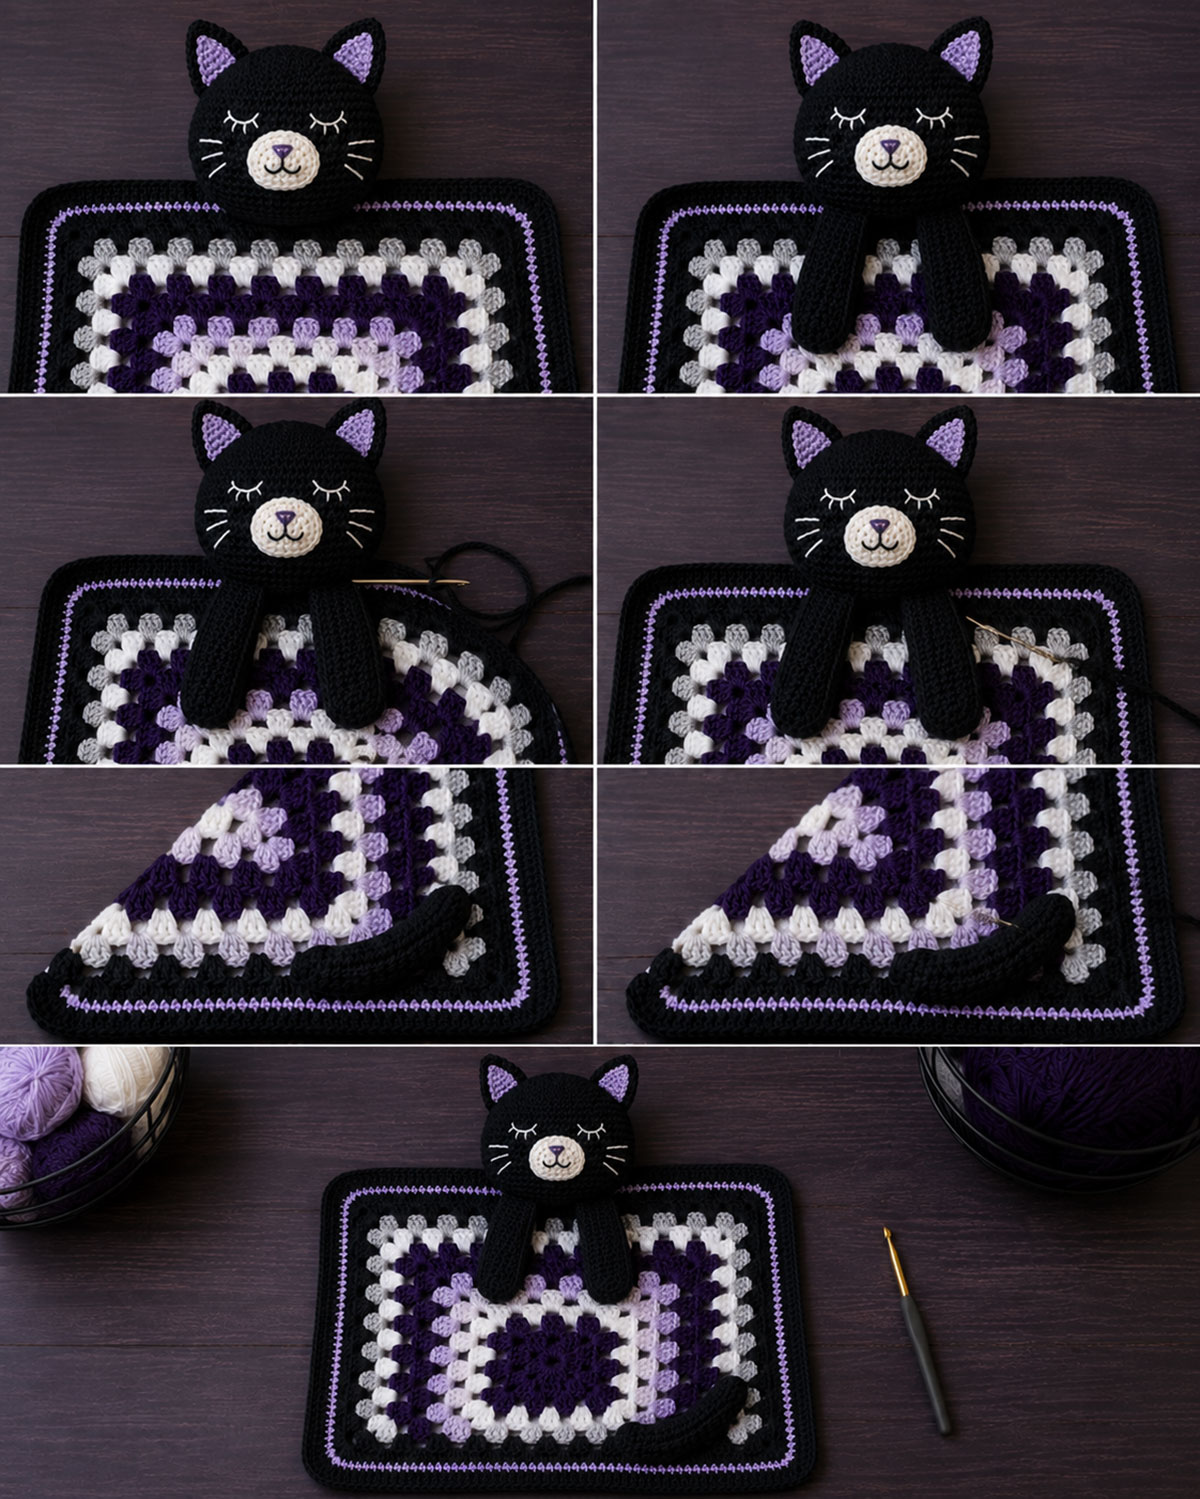
Lay the blanket flat with the side you selected as the right side facing up. This side becomes the front of the finished lovey. Choose one edge as the top, then place the head, paws, and tail without sewing anything yet. Step back and look at the entire lovey rather than judging one piece at a time. The black yarn creates a clear silhouette, so even a small placement difference may be easy to see.
Check Every Piece Before Sewing
Measure the completed pieces one more time. Remake any piece that is substantially outside the recommended size before attaching it permanently.
- The blocked blanket should measure approximately 14 inches square.
- The head should measure approximately 4¼ inches across and 3¼ to 3¾ inches tall.
- Each ear should measure approximately 1¾ inches tall.
- Each paw should measure approximately 3¼ inches long.
- The tail should measure approximately 5 inches long.
- The muzzle should measure approximately 1¾ inches across.
Check the face before continuing. The ears should sit at matching heights, the muzzle should be centered, and the eyes should remain visible against the black yarn. Make any corrections while the head is still separate from the blanket.
Position and Attach the Black Cat Head
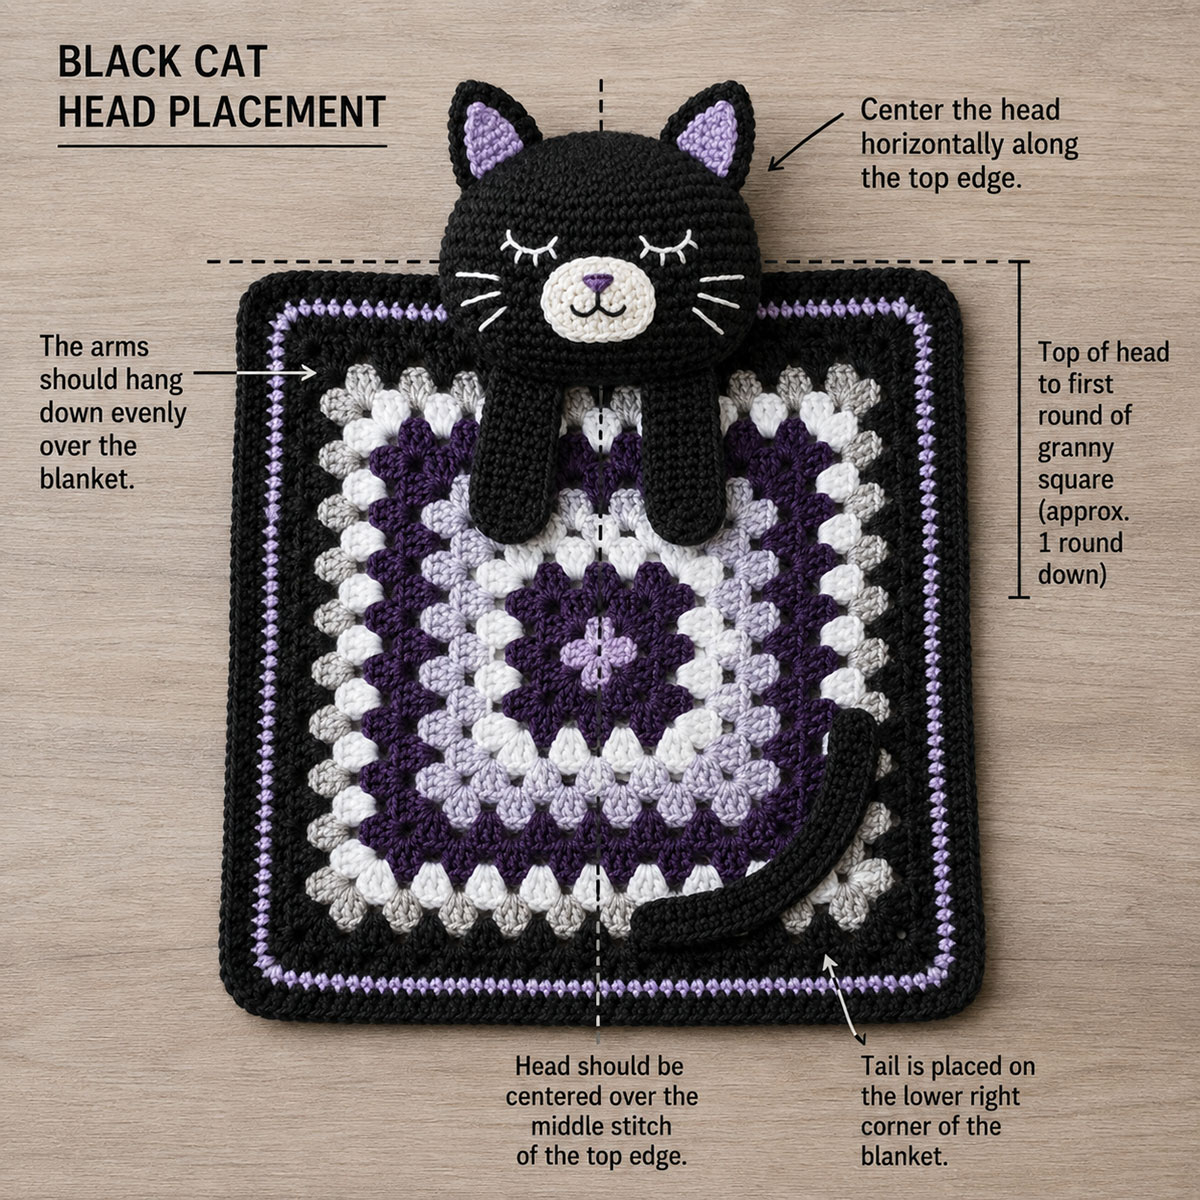
- Center the completed head along the top edge of the blanket.
- Keep the face pointing forward and the beginning-of-round line toward the back.
- Allow the lower back of the head to overlap the blanket by approximately 1 inch.
- Pin the head in place at the center and at both ends of the planned attachment area.
- Measure from each side of the head to the nearest blanket corner. Adjust the position until the measurements are nearly equal.
- Thread the remaining yarn tail from the head onto the yarn needle.
- Pass the needle through the stuffed head and bring it out at one end of the planned seam.
- Sew through the lower back of the head and the blanket across a curved attachment area approximately 2½ to 3 inches wide.
- Do not carry the stitches through the front of the face.
- Return across the same attachment area in the opposite direction for a second reinforcing pass.
Keep the blanket flat while sewing. Pull each stitch firmly enough to hold the head, but not so tightly that the top blanket edge gathers.
Head Check: Lift the lovey gently by the head while supporting the blanket with your other hand. The head should stay centered without shifting away from the seam, and the blanket edge should lie flat without puckering.
Position and Attach the Front Paws
- Tuck the closed upper edge of each paw just beneath the lower front edge of the attached head so the head hides most of the paw attachment seam.
- Leave approximately 1 inch between the inside edges of the two paws.
- Point both paws toward the lower blanket edge.
- Check that the rounded lower ends finish at approximately the same height.
- Pin each paw through its closed upper edge.
- Use the attached 18-inch yarn tail to sew through all 6 closing stitches and through the blanket.
- Return across the same edge for a second reinforcing pass.
- Leave the remainder of each paw unattached so it rests flat over the blanket.
Do not sew down the full length of the paws. Attaching only the closed upper edge gives them a soft draped appearance while avoiding long loose loops.
Curve and Attach the Black Cat Tail
- Choose either the lower left or lower right side of the blanket.
- Place the closed base of the tail approximately 2½ inches above the nearest lower corner.
- Curve the tail gently toward the corner.
- Keep the full length of the tail inside the blanket border.
- Pin the base, center of the curve, and tip.
- Use the 24-inch sewing tail to secure the closed base firmly to the blanket.
- Weave the sewing yarn through the back of the blanket to the center of the curve.
- Add one small hidden tack through the tail and blanket.
- Continue to the tip and add a final hidden tack.
- Before weaving in the remaining yarn, slide a fingertip beneath each section of the tail. Add another small hidden tack anywhere the tail lifts noticeably, and keep the entire tail inside the finished border.
- Weave the remaining yarn through the back of the blanket in two directions before trimming it.
The attached tail should rest close to the blanket without forming a loose loop.
Black Cat Lovey Placement Guide
| Piece | Recommended Placement |
|---|---|
| Head | Centered along the top edge with the lower back overlapping the blanket by approximately 1 inch. Sew across a curved area approximately 2½ to 3 inches wide. |
| Ears | Inside lower corners positioned between Head Rounds 9 and 10, with approximately 10 stitches between them. |
| Eyes | Embroidered between Head Rounds 14 and 15, with approximately 8 stitches between the inside ends. |
| Muzzle | Centered below the eyes, with the upper edge near Head Round 15 and the lower edge near Head Round 23. |
| Paws | Closed upper edges placed beneath the head with approximately 1 inch between their inside edges. |
| Tail | Base approximately 2½ inches above a lower corner. Secure at the base, middle of the curve, and tip. |
Secure the Remaining Yarn Ends
Weave every assembly tail through the back of the blanket in two different directions before trimming it. Change direction at least once so ordinary movement and washing are less likely to loosen the end.
Run your fingertips across the front and back of every attachment point. There should be no long strands, exposed knots, or loose loops. The head, paws, and tail should feel firmly connected without pulling the blanket out of shape.
Final Assembly and Safety Inspection
Before calling the black cat lovey finished, inspect it from the front, back, and sides. Small sewing tails and loose embroidery ends can be difficult to see against black yarn, so work beneath bright light and run your fingers over every seam.
- The head is centered and attached with two passes across the curved seam.
- The top blanket edge lies flat without gathering beneath the head.
- Both ears are sewn securely across their lower edges and reinforced at the corners.
- The muzzle is attached completely around its outer edge.
- All facial features are embroidered securely.
- Every embroidery end is buried inside the stuffed head.
- Both paws are attached through all 6 closing stitches.
- The tail is secured at the base, center of the curve, and tip, with an additional hidden tack wherever any section lifts noticeably from the blanket.
- No part of the tail extends beyond the blanket border.
- Every yarn end is woven in two different directions.
- The blanket lies flat without puckering around the attachment points.
- No stuffing is visible through the head stitches or lower closure.
- Every rustproof pin and locking stitch marker has been removed and accounted for.
- No buttons, beads, plastic eyes, bells, ribbons, snaps, or loose decorations have been added.
Gently tug each ear, paw, and tail attachment while supporting the surrounding fabric. Nothing should shift away from the blanket or expose a sewing strand. Press the embroidered eyes, nose, and mouth lightly with your fingertips and check that the stitches remain flat against the head.
Look closely at the magic rings in the head, paws, muzzle, and tail. Each center should be pulled closed and secured. A loose center can widen during washing, so correct it before the lovey is given as a gift.
Finished Lovey Checkpoint
- The blanket measures approximately 14 inches square.
- The kitten head stays centered and does not shift away from the attachment seam when the blanket is lifted carefully.
- The paws hang evenly beneath the head.
- The tail keeps its gentle curve without forming a loose loop.
- The completed lovey weighs approximately 7 to 9 ounces.
- All pieces remain soft, secure, and easy to inspect.
Turn the finished piece over and examine the back before trimming any final yarn ends. The reverse side does not need to look identical to the front, but it should be tidy, flat, and free from long carried strands.
Baby Safety Notes for the Black Cat Crochet Lovey
This handmade lovey is intended for supervised use while a baby is awake. It should not be placed in a crib, bassinet, play yard, or other infant sleep space with a sleeping baby.
Use embroidered facial features only. Do not add plastic safety eyes, buttons, beads, bells, ribbons, bows, snaps, charms, or loose decorative trim. Even pieces sold as safety eyes can loosen through repeated handling, washing, or wear.
Keep the embroidered whiskers short and flat against the muzzle. Long yarn whiskers can form loops or become easier to pull. Each whisker in this pattern should remain under ¾ inch long, with both ends secured inside the stuffed head.
Inspect the lovey before it is given to a baby and again after every washing. Stop using it until repairs are complete if you find any of the following:
- A loose ear, paw, muzzle, head, or tail seam
- An opening in a magic ring or closing round
- Exposed fiberfill
- A pulled or broken embroidery stitch
- A loose yarn end or long loop
- Fraying, thinning, or damaged yarn
- A tail attachment that has separated from the blanket
- A blanket edge that has begun to unravel
Repairs should restore the affected area completely. Do not simply trim a loose strand or tie a visible knot on the surface. Secure the yarn through the surrounding stitches, weave it in through two directions, and inspect the area again before returning the lovey to supervised use.
For current U.S. safe-sleep guidance, visit the U.S. Consumer Product Safety Commission Safe Sleep page. CPSC advises keeping infant sleep spaces bare except for a fitted sheet, so this lovey should remain outside the crib, bassinet, or play yard during sleep. You can also review the site's crib safety standards guide.
Washing and Reshaping the Finished Lovey
Follow the most restrictive care instructions listed for the yarn, embroidery floss, and fiberfill. Even when the main yarn is machine washable, a contrast yarn or embroidery thread may require gentler treatment.
If every material permits machine washing, place the lovey inside a mesh laundry bag and use a gentle cycle with cool or lukewarm water. Avoid bleach and harsh stain treatments that may weaken the black yarn or change the contrast colors.
After washing, inspect every attachment before reshaping the project.
- Lay the damp lovey flat on a clean towel.
- Smooth the blanket into an even square without stretching the center.
- Shape each corner into a right angle.
- Pat the head gently to restore the rounded cheeks and crown.
- Straighten the ears and paws.
- Arrange the tail in its original curve.
- Allow the lovey to dry completely before using or storing it.
Dark yarn may show lint after washing. A clean lint roller can be used lightly on the dry blanket, but avoid pulling it firmly across the embroidery, ear edges, or sewing seams.
Store the Black Cat Lovey Without Flattening the Head
Fold the blanket loosely and leave the head resting above the folded layers. Do not compress the lovey beneath heavy blankets, books, or storage bins. Long periods of pressure can flatten the stuffing and bend the ears.
Store the project only when it is completely dry. A breathable cotton bag or clean drawer is preferable to a tightly sealed container when the lovey will be stored for an extended period.
Troubleshooting the Black Cat Crochet Pattern
Dark yarn can make small mistakes harder to spot, but nearly every problem is easier to correct before the pieces are sewn together. Check the stitch counts, measurements, and placement as each section is completed rather than waiting until final assembly.
The black stitches are difficult to see.
Place the work on a white towel or pale pillowcase and use a lamp that shines across the yarn from the side. Spread the next stitch gently with your fingertips before inserting the hook. A locking marker in the first stitch of every round will also keep the round beginning from disappearing into the fabric.
The head is smaller than the pattern measurement.
Check the 4.0 mm hook gauge and confirm that the head reached 60 stitches after Round 10. Tight tension can reduce the finished size even when the stitch count is correct. Remake the head with the next larger hook only when a gauge sample confirms that the change is needed.
The head is too loose or the fiberfill shows.
The hook may be too large for the chosen yarn. Try a smaller hook and make another gauge sample. Do not add less stuffing to hide open stitches because an underfilled head will lose its rounded shape.
The head looks like a bear instead of a cat.
Check the ear placement first. The lower inside corners should sit between Head Rounds 9 and 10, with approximately 10 stitches between them. Move the ears slightly higher and angle their tips outward before sewing them permanently.
The eyes disappear against the black yarn.
Replace very dark embroidery thread with light gray, muted gold, pale green, or lavender. The color should be visible from several feet away without creating a sharp contrast that changes the sleepy expression.
The face looks uneven.
Remove the pins and measure again before sewing. The muzzle should be centered between the sides of the head, and the inside ends of the eyes should have approximately 8 stitches between them. Check the face from the front rather than judging it from above.
The muzzle will not lie flat.
The muzzle may have been stretched during sewing or worked at a looser gauge than the head. Flatten it gently before pinning and place four pins at equal points around the edge. Sew between those points without pulling the thread tightly enough to gather the circle.
The blanket is rippling.
Loose tension around the corners can add too much fabric. Tighten the chain-2 corner spaces slightly on the following round and lay the square flat after each round. Mild waviness may settle during blocking, but a heavily rippled square should be corrected before the border is added.
The blanket corners are pulling inward.
The corner chains may be too tight. Loosen the chain-2 spaces or move to a slightly larger blanket hook after checking the gauge. Do not stretch the corners aggressively during blocking to compensate for a square that is substantially too tight.
The paws are different lengths.
Count the completed rounds and compare the beginning-of-round lines. Each paw should include Rounds 1 through 16 and finish with 12 stitches before flattening. Remake the shorter or longer paw before assembly so the pair hangs evenly.
The tail forms a loose loop.
Reduce the curve and keep the entire tail inside the blanket border. Secure it at the base, middle, and tip. The tail should suggest a curved cat silhouette while remaining close to the blanket surface.
The head leans to one side.
Measure from each side of the head to the nearest upper blanket corner. If the measurements differ, remove the attachment seam and center the head again. Sew across a curved area approximately 2½ to 3 inches wide, then make a second reinforcing pass while keeping the blanket flat.
The blanket gathers beneath the head.
The sewing yarn has been pulled too tightly. Remove the latest attachment stitches and sew them again with less tension. The seam should hold the head securely without shortening the upper edge of the blanket.
Black fibers or lint show on the contrast muzzle.
Remove loose fibers with clean fingertips or a lint roller used very lightly after the project is dry. Avoid scraping the muzzle or pulling across the embroidered features, which may disturb the stitches.
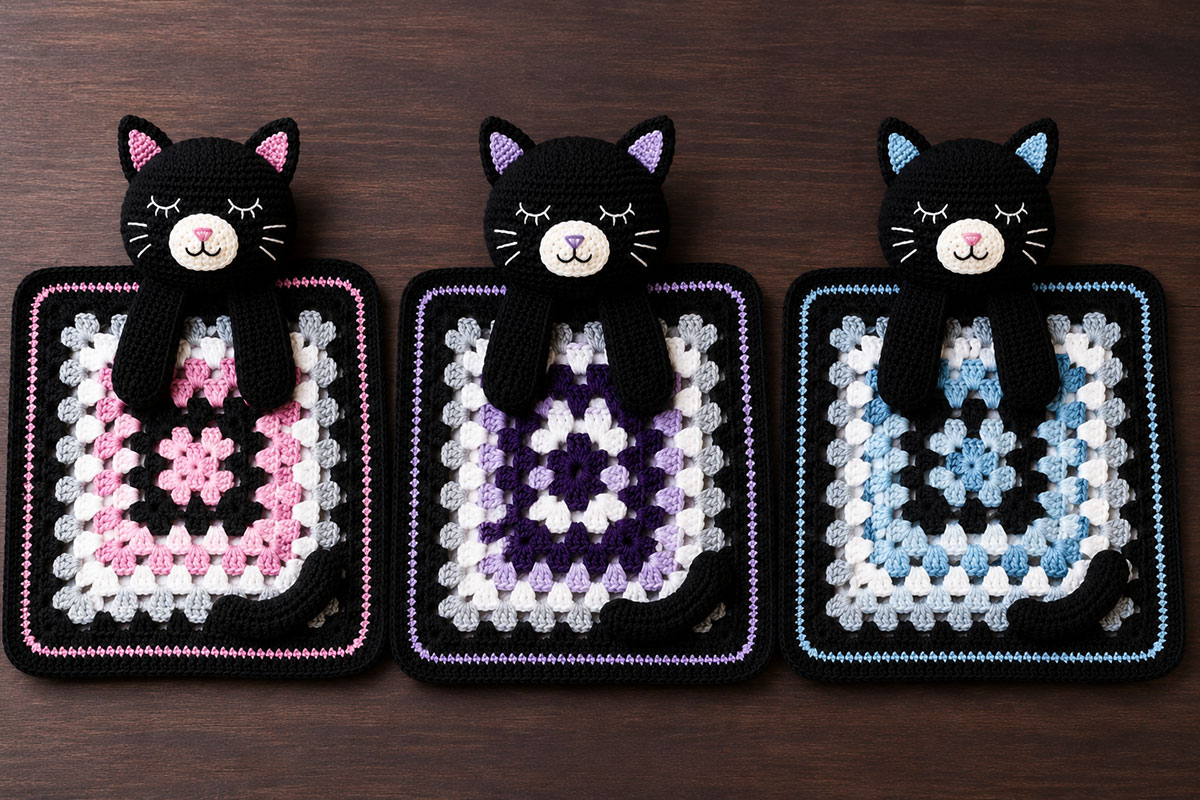
Black Cat and Tuxedo Cat Color Variations
The same pattern can make several noticeably different kittens without changing the head shaping, blanket size, or assembly measurements. Plan the colors before beginning so both paws, ears, and blanket rounds remain balanced.
Solid Black Cat Lovey
Use black yarn for the head, outer ears, paws, and tail. Add a light muzzle and optional contrast inner ears so the facial details do not disappear into the dark stitches.
For a year-round version, pair the kitten with gray, white, muted blue, mint, lavender, or soft rose blanket rounds. Keeping the blanket lighter than the cat also makes the black silhouette easier to see.
Halloween Black Cat Lovey
Combine black cat pieces with orange, deep purple, charcoal, and cream blanket yarn. The seasonal colors can be distributed throughout the granny square rather than placed only in the border.
A simple arrangement is:
- Rounds 1 through 3 in deep purple
- Rounds 4 through 6 in charcoal
- Rounds 7 through 9 in orange
- Rounds 10 through 12 in soft cream
- Border Round 13 in black
- Border Round 14 in deep purple or orange
Keep the face gentle by using pale gray, muted lavender, or warm cream for the muzzle and inner ears. The kitten will still look seasonal without relying on extra decorations.
This project pairs naturally with the crochet bat lovey pattern, the crochet pumpkin lovey pattern, and the crochet ghost pattern when you are planning a group of handmade fall gifts.
Black and White Tuxedo Cat Lovey
For a tuxedo cat, keep the head, ears, tail, and upper paws black. Use white or pale gray for the muzzle, inner ears, and lower paw sections.
To add white tips to the paws:
- Work Paw Rounds 1 through 5 with white or pale gray yarn.
- Change to black yarn at the beginning of Round 6.
- Complete Rounds 6 through 16 in black.
- Close and finish both paws as written.
- Make the color change at the same round on each paw.
For longer white socks, work Rounds 1 through 7 in the light color and change to black for Round 8. Compare both paws before fastening off to confirm that the color sections match.
Charcoal Black Cat Lovey
Near-black charcoal yarn is a useful alternative when pure black stitches are difficult to see. It still reads as a black cat beside a light blanket, but the softer shade may reveal the stitch structure more clearly while you crochet.
Pair charcoal with ivory, dusty blue, muted gold, pale green, or lavender. Use a muzzle that is at least two shades lighter than the head so the nose and mouth remain visible.
Change the Blanket Without Changing the Cat
The kitten pieces can remain identical while the blanket colors are adjusted for a nursery, season, or gift theme. Keep the total number of rounds unchanged and use #4 worsted weight yarn that meets the same blanket gauge.
- Autumn: Rust, muted gold, charcoal, and ivory
- Winter: Silver gray, white, muted blue, and black
- Soft nursery: Mint, pale gray, white, and dusty blue
- Lavender nursery: Lavender, gray, cream, and black
- Monochrome: Black, charcoal, silver gray, and white
Photograph or write down the color order before beginning. Once several similar shades are in use, it is easy to forget which color was intended for the next round.
Black Cat Crochet Pattern FAQ
Is this black cat crochet pattern suitable for beginners?
It is best for confident beginners who already know how to make basic crochet stitches, work in continuous rounds, increase, decrease, count stitches, and sew separate pieces together. The blanket uses repeating granny-style groups, while the head requires careful counting through the shaping rounds.
Is the black cat an amigurumi pattern?
The stuffed head uses amigurumi-style construction, but the full project is a lovey rather than a complete stuffed animal. The paws and tail are left unstuffed and attached to a flat granny-style blanket.
Can I use safety eyes on the black cat?
No. Use embroidered eyes for a baby lovey. Plastic eyes can loosen with washing, repeated handling, or wear, even when they are sold as safety eyes.
Why are my black crochet stitches so difficult to see?
Black yarn absorbs light and makes the stitch openings blend together. Work over a pale surface, use bright side lighting, place a marker in the first stitch of every round, and count each shaped round before moving ahead.
Can I use charcoal yarn instead of black?
Yes. Charcoal keeps the dark cat appearance while making individual stitches easier to see. Check the gauge because yarns labeled with the same weight can still vary in thickness and texture.
How large is the finished black cat lovey?
The blocked blanket measures approximately 14 inches square. The completed lovey is slightly taller after the stuffed head is attached along the upper edge.
Can I make a black and white cat crochet pattern from these instructions?
Yes. Use white or pale gray for the muzzle, inner ears, and lower paw sections to create a tuxedo cat. Keep the stitch counts, measurements, and assembly instructions unchanged.
Can I change the size of the blanket?
You may add or remove granny rounds, but changing the blanket size also changes the balance between the square and the cat pieces. I recommend making the original 14-inch version first before adjusting the proportions.
Can I use a different yarn weight?
A different yarn weight will change the size of every piece and may require new hook sizes, yardage estimates, placement measurements, and attachment spacing. Use #4 worsted weight yarn for the most dependable match to the written pattern.
Why does the finished head look more like a bear?
The ears may be positioned too low or too far apart. Place their lower inside corners between Head Rounds 9 and 10, leave approximately 10 stitches between them, and angle the tips slightly outward.
Should the paws and tail be stuffed?
No. Only the head is stuffed. The flat paws and unstuffed tail lie closer to the blanket and are easier to secure without creating bulky raised sections.
Can the black cat lovey be placed in a crib?
No. This lovey is intended for supervised use while the baby is awake. It should not be placed in an infant sleep space with a sleeping baby.
The black yarn gives this little cat a clear silhouette, but the careful details are what bring the face to life. Pointed ears, a softly rounded head, a visible contrast muzzle, and short embroidered whiskers create a kitten without adding hard or loose decorations.
Choose Halloween colors when you want a seasonal gift, or pair the black cat with quieter nursery shades for a project that can be enjoyed throughout the year.
When you are making the seasonal version, browse the free crochet patterns for Halloween to compare this kitten with the ghost, bat, pumpkin, spider and candy corn loveys.
For more handmade animal blankets made with the same practical approach, continue to the crochet animal lovey patterns collection. You can also browse the full free baby crochet patterns collection for coordinating nursery gifts and baby projects.
A handmade kitten does not need complicated embellishments to feel special. Careful shaping, neat embroidery, and secure assembly do the work beautifully.
When you click on links to various merchants on this site and make a purchase, this may result in this site earning a commission. This does not affect the price you pay.

UBGI Gold Standard 2026
Reviewed under the site's
editorial checklist.
Photos, decorating ideas, party setups and reader submissions are shared for inspiration unless a page is specifically presented as a pattern, tutorial, reference guide or step-by-step project. Follow the instructions, measurements, safety guidance and manufacturer directions provided for the particular project or product.
About Jan | Contact | Baby Nursery Ideas (Blog) | Site Map | Privacy Policy | Disclosure Policy | Disclaimer | Affiliate Disclosure | Earnings Disclosure | Facebook | Pinterest
I am a participant in the Amazon Services LLC Associates Program, an affiliate advertising program designed to provide a means for us to earn fees by linking to Amazon. As an Amazon Associate I earn from qualifying purchases.
Copyright © 2006-2026. All Rights Reserved.